
Hello, everybody! It’s a weekend but I’m working from home. I have been doing it for years now, I do this as a habit to prepare myself for the coming week. Preparation is important, not only are you ensuring a good job but it will also save you some time so you can do more things. Every professional is familiar with this, if I have the choice I wouldn’t want to do this but I am overloaded at the moment, I only have my sidekick to help me. This strains me mentally, physically and emotionally but that’s the nature of my job. It’s something that I will have to live with so long as I work in this industry and in this country in particular. Today, I will show you just how important it is to prepare your work so all you do is see how things fall-into-place nicely. It is something that every camera repairer should do, too.
Introduction:
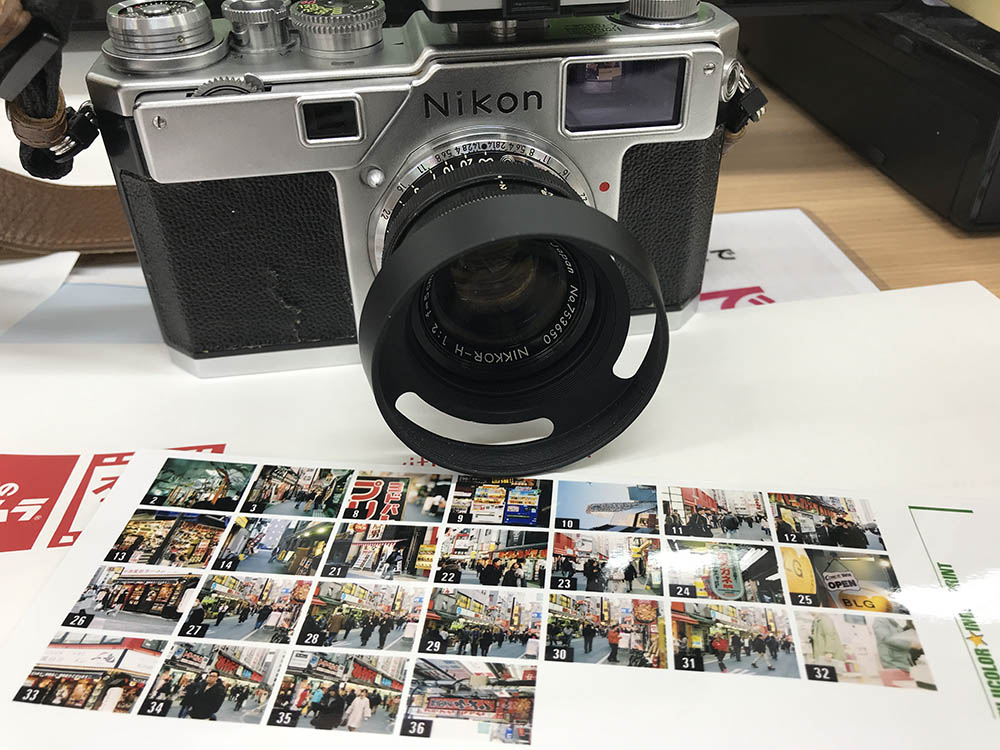
The Nikon S3/S4 is a fine camera, if maintained properly it will keep taking photos as long as film is available. This means that this camera will outlive most of us. An all-mechanical camera is a wonderful thing, much like how a mechanical watch is compared to the quartz ones. There is a certain charm to mechanical gadgets, something that only an aficionado will understand. I would like to show you how much work in involved servicing a mechanical camera in this article so you’ll appreciate the work involved in maintaining it. If you found a reliable repairer, give him a bottle of wine since he’s doing a fine job, a trade that we may not see anymore in the coming years. If you found an honest repairer, send him 2 bottles instead, integrity has no price.
Once your camera has been serviced properly it should take perfect photos for more years to come. If properly cared for the next time you send it to a repairer should be around 5-10 years or more and the repair should be less since all the repairer has to do is clean, lubricate and adjust. You shouldn’t give the camera to another repairer for maintenance, stick to one person. I said that because only he can service it properly since he knows it the best. If you want to change repairers because the last one made a terrible job it’s okay but do everybody a favor and share your experience.
We’re done dismantling the camera, it’s now time to adjust and put all of its parts back. We have spent all of that time dismantling the camera, it is now the moment truth. This will be the true test of how well you have cleaned it. If you did a poor job cleaning the camera your resulting job won’t be good. I always spend extra time cleaning everything, this will be the basis of a good and successful job. Like I always say, never treat this as a repair manual, it’s only for your education and entertainment. Experienced repairers will find this useful if they’re not familiar with this type of camera, novices shouldn’t even touch this at all. Sit back and enjoy the last writeup for the Nikon S3/S4 repair series.
Before We Begin:
If this is your first attempt at repairing a lens then I suggest that you check my previous posts regarding screws & drivers, grease and other things. Also read what I wrote about the tools that you’ll need to fix your Nikkors.
I suggest that you read these primers before you begin (for beginners):
Reading these primers should lessen the chance of ruining your lens if you are a novice. Before opening up any lens, always look for other people who have done so in Youtube or the internet. Information is scarce, vague and scattered (that is why I started this) but you can still find some information if you search carefully.
I highly recommend that you read my working with helicoids post because this is very important and getting it wrong can ruin your day. If I can force you to read this, I would. It is that important!
For more advanced topics, you can read my fungus removal post as a start. This post has a lot of useful information and it will be beneficial for you to read this.
Calibration (Shutter Mechanism):
The shutter mechanism is the most delicate part of any camera apart from the rangefinder mechanism, that is. It has to be well-tuned in order for it to perform properly. It will fire inaccurately if something is wrong that is why it’s best-left to the professionals to tinker with. Remember, this is not a real repair manual, this is just me documenting how I worked on my camera, it is the reason why I left-out any details regarding its reassembly. If you don’t know how to fix cameras, avoid working on it, specially vintage ones since they’re so precious (except for Canons). I don’t want to be responsible for a rise in botched jobs being sold online. Have some decency and work on old, cheap Soviet cameras or Canons first before touching Nikons, Leicas or any vintage Zeiss classics. If you don’t have the proper tools such as a tester for shutter-speeds and other things like a micro-meter then don’t even attempt to repair anything related to shutters.
After cleaning everything it’s now time to put things back together. I made a lot of effort cleaning everything, making sure that everything turns smooth. I then began the difficult task of reassembling each assembly. I oiled every part that needs to be oiled, I used the best ones made specially for cameras. I only applied oil in small amounts and only at the required pivots. Some of the parts had to be greased, any metal-to-metal contact points were greased with Tamiya’s molybdenum grease. Silicon grease is perfect as well but I do not have any at the moment and I don’t want to use the grease that I use for lenses with cameras as they’re exclusively used for clean helicoids.
During reassembly you will have to be careful about how you put anything back together. You will have to make sure that everything fits perfectly and there’s no play. If you put things back incorrectly you will end-up damaging the shutter mechanism. If something doesn’t fit properly then something is wrong. This is where your notes come in handy and photos help a lot in this process.

When putting the speed-selector mechanism back to the chassis, be careful not to brute-force it. This pin at the kidney-shaped part should fit inside the hole in the curtain’s pawl. Failure to do so will result in a warping the pawl or the kidney-shaped thing. You must also press the change-over lever just like you did when you removed the speed-selector mechanism so its tongue won’t get bent. Many cameras have been damaged by inexperienced people and this is the cause. This is why you should only send your cameras to the real repairers who are familiar with Nikon cameras. Some people claim that they’re experts in this or that camera but you should ask your friends first. I have heard many horror stories about camera repairers so be aware.

The retarder has been cleaned, maybe a bit overly-done. I used citric acid to clean the corrosion. Citric acid is very potent, you will have to clean it really well in order to prevent residual acid from eating-away at the brass. This is important because you won’t know what’s happening until it’s too-late. This is best done by flushing it in running water for some time. After that, I soak it in oil to further remove any water or whatever is there. Once I’m satisfied I dry everything and wipe-away what’s left, there none usually. I only oil the pivots, not all pivots need to be oiled and I only apply a tiny drop where the oil is needed. I use a small needle with its eye filed-off to form a U-shape. It’s a mini applicator that we use for repairing watches. Supply some oil, move the parts to make the oil coat the parts evenly and then test the mechanism. It should move smoothly and the sound that it makes should be “clean”.

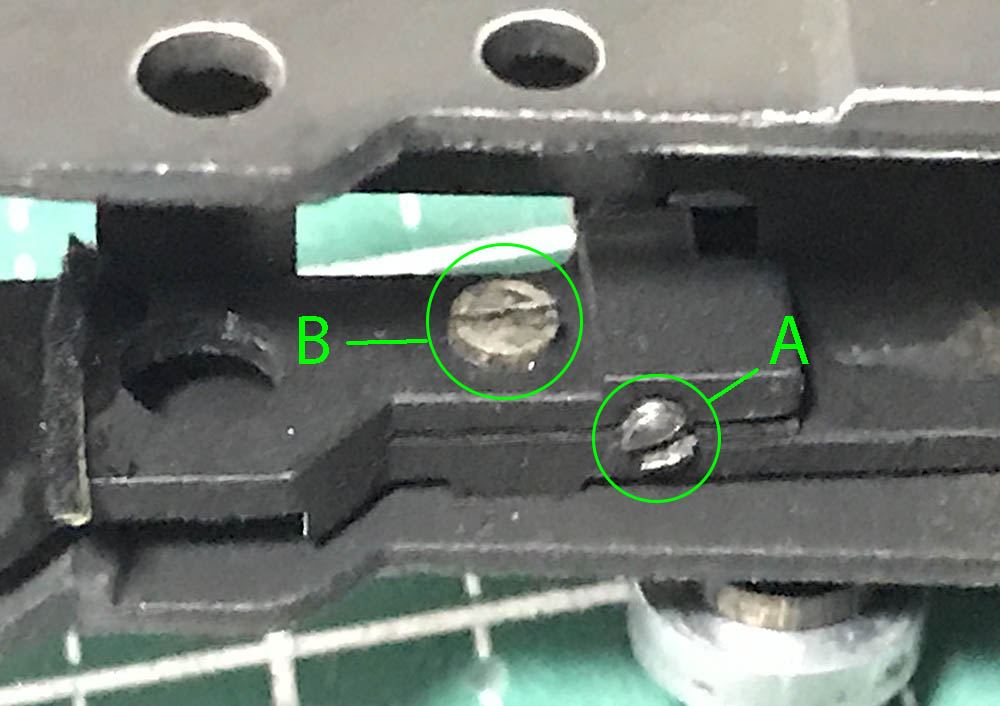
You adjust part A for 1/60s. This is a very important speed, you should get it as accurately as possible because the other neighboring speeds rely on it. It also affects the faster speeds to some extent, too. You shouldn’t have to mess with part B if your camera hasn’t been tampered-with, you adjust this to get 1/500s accurately. Adjusting both parts A and B will affect 1/250s but I think part B has more to do with that if I remember it correctly. If you can’t get an accurate 1/125s after adjusting part B then you have screwed something up. Getting 1/125s and 1/250s is the result of tuning both parts A and B. Correct me if I am wrong since I haven’t repaired anything for months. By the way, in case it’s not obvious, you can adjust part B only after loosening its collar. You will damage it if you didn’t do that.
Adjusting 1/1000s is the trickiest, it involves bending a hard part of the high-speed cam which is situated somewhere near the kidney-shaped part. I will not show you how to do this since it’s a very delicate adjustment. If you get it wrong it’s very difficult to get it back. There’s another way to adjust for it, it’s safer but I won’t show you how to do it here since it’s a hack. It’s placed somewhere unexpected and I only found out about it through a lot of trial-and-error.

You turn this to adjust the slower speeds from 1/4s down to 1s. Carefully use a wooden wedge to turn this eccentric shaft. Remember I told you to shoot a photo of this in part 4? That photo will come in handy now. The main speed to adjust for is 1s and the rest should correct themselves. If that didn’t make it then adjust the eccentric screw on the previous slide until you get it done. It’s difficult to get all of the speeds super-accurate, the best you can do is get them as close to their labeled speeds as possible.
It’s important to mention that adjusting this eccentric shaft will also affect T and B. You adjust T the official way by adjusting its resting post which I will not show here. You normally shouldn’t bother with it, if you repaired this in the proper manner then all of these speeds should fall-into place properly.

This little eccentric is used to adjust for 1/4s. It’s very delicate, you can bend the slow lever’s arm easily if you applied too much pressure on this. Adjust this slightly and make sure that you don’t strip its head. This is easy to reach unlike the one found in the Nikon F. Before I forget, adjusting this eccentric may also affect 1/8s or the slower ones to some extent.
In case you’re having trouble getting an accurate 1/8s, nudge the retarder a bit towards the front after loosening its screws. Its position is important, it’s a precise adjustment and every fraction of a millimeter counts. You’ll have to experiment with it until you get it perfectly.
Here’s a video that I made discussing some points about the slower speeds.
Here’s another one. I also discussed some pointers on general shutter repair and calibration.
There will be times when you’ll never get accurate 1/15s or 1/30s despite all the efforts you’ve put into adjusting the eccentrics and the retarder. This is an issue with the change-over cam lever’s position or maybe the position of the latch. The cause of this is people could’ve bent these when they remove the shutter-speed selector assembly without being mindful of these. It’s also true when reattaching the shutter-speed selector assembly. This is annoying to adjust but it’s something that you can get used to once you become more familiar with these mechanisms.

When you have relax the shutters to clean, replace or adjust them, take lots of photos first. Note how they look like in the cocked and release positions. I always take several photos of the shutter mechanism so I will know how to tension them and how far they should go at each state. This is how the rear curtain should look like when the curtains are at the released position.

Equally important is how they look like when they travel. Move the drums a bit and note how much overlap there is between the ribs of the curtains. It’s important to note this or else you won’t get accurate speeds specially at the faster ones. You may also end-up tensioning the shutters just to get accurate speeds which is something that you should never do. The release of these is timed to each other that’s why how they overlap is important to document. I have to point out one thing, the overlap doesn’t occur evenly. This means it’s different at each stage of the shutter’s travel while the curtains are closed. It can overlap by a little bit at 85% of the travel distance and around 50% half-way and more as it reaches the start. Don’t rely on my vague numbers. Get a micrometer and measure the overlap yourself. Observation is the key here.
I usually relax the tension of the shutter’s springs when I flush and clean, it is pointless to keep the tension because they will change once you cleaned it and oil and it after. Flushing helps remove any dirt and old oil, I flush using naphtha or alcohol depending on which one I think is useful. I use the bulb blowers for flushing everything and canned air for the insides of the drums but you should be really careful because the pressure may be too high. The pressure may set something loose so only do it in small, controlled bursts. I then tension the shutters again and check the speeds. There’s one thing that I need to tell you about tensioning the shutters, the rear curtain needs to be tensioned accurately to factory standards. I don’t know what that is but the rear curtain’s spring should have enough power to drive the pawl or else it won’t have enough “kick” to it and it won’t start the retarder properly. You’ll also notice that the timings of the front and rear curtains’ pawls will not be accurate and they will miss certain latches’ timings as they spin. This is very important and everything should sync perfectly. This is the joy of repairing mechanical cameras.
I usually leave the camera alone for a few days after I lubricate it. This gives me time-off from the camera so I won’t burn myself out. This also allows the oil to properly set and coat whatever is needed. A day is usually enough, it’s important to note that this is just my personal preference and some people think that this is merely wasting time. I’ve heard of somebody even doing it for a whole week with the camera stored upright. It makes a lot of sense, it’s simulating the camera being stored in a cabinet for a period of time and the oil should flow naturally via gravity and capillary action.

The tension of the shutters can be adjusted by loosening their set screws. If you are happy with the tension you can seal them with nail polish. This will prevent them from accidentally moving and causing a change in accuracy. I usually do this at the very end of adjusting the camera, just before I close its panels and covers.
This is probably the most time-consuming part of the whole repair. You will spend an hour to a whole night messing-around with the shutter depending on the mechanism’s state and the quality of your repair. It’s difficult when it has been tinkered by somebody else before it got to you, you won’t have the important point-of-references set by the factory, all you can do is adjust and make your best effort. While I can say that I’m usually successful, there are instances when I cannot get the shutters to be super-accurate, missing by a bit. Around 1/3 of a stop at most is forgivable but any more than that isn’t a good sign. Figuring out why that’s happening at certain speeds is difficult, it takes a lot of time and effort but it can be done.
Once you’re done with the shutter mechanism it’s now time to reassemble everything but leave the rangefinder mechanism for last, I’ll show you how I serviced mine in the next section.
Calibration (Rangefinder Mechanism):
Apart from the shutter mechanism the rangefinder mechanism is the most delicate assembly in any rangefinder camera. While positioning and timing are the most important things to consider in the shutter mechanism, you’re only mostly concerned with alignment here in the rangefinder mechanism. If you got the alignment off by just a small bit you won’t get an accurate and clear representation of the view. The parts here are delicate, too. Scratching or deforming something here can be devastating and will leave you a really painful lesson. Maybe I should’ve listened to Richard when he told me that I should send this to a professional is what you’re going to ask yourself on the way to sleep, that is if you could even take a nap.
The rangefinder mechanism is nowhere-near the complexity of the big one found in the Nikon SP. This one feels bare, it only has the most basic parts. It only shows you a view and a rangefinder patch, nothing more. You will not get automatic parallax-correction and selectable frame-lines with this, that’s the Nikon SP’s specialty, it even goes a bit further by giving you a small port for wider lenses beside the main viewfinder.
Despite being a simpler design, you’ll have to be careful when you handle it. Don’t flush anything here, the prisms were glued to their housings but some of them have screws to help secure them better. Avoid using canned air, the pressure is too strong, you may blow some dirt into places where you won’t ever reach without a total dismantling of the assembly. Don’t dismantle the rangefinder mechanism further than what’s necessary. You don’t have to do it and most of the things can be cleaned easily since they’re exposed. Never oil anything here except for the moving pivots, things that move when your pushes-on the rangefinder-coupling arm. Do not apply too much oil or it can migrate to the optics. You’ll be surprised by how much oil travels, just give it a few years and it will coat everything inside the camera with a thin film. It is important to use the right solvents, things that evaporate really quick like naphtha will be beneficial. Alcohol is fine but it tends to leave drying-marks if you’re not careful. Some stains will only respond to alcohol and some can only be dissolved by a non-polar solvent like naphtha. I prefer naphtha but I also use alcohol as a pre-wipe. Finally, never blow air into it after you have oiled the pivots. You will make a mess if you did and you’ll have to start all-over again if that happens.
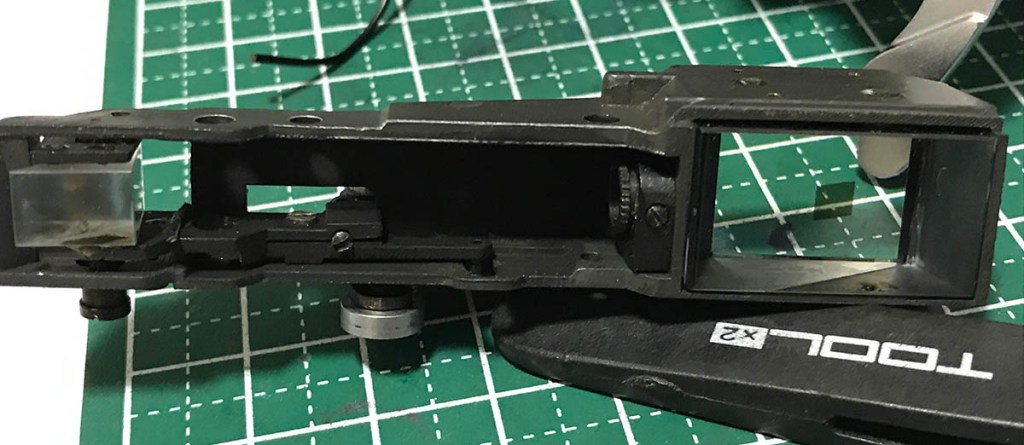
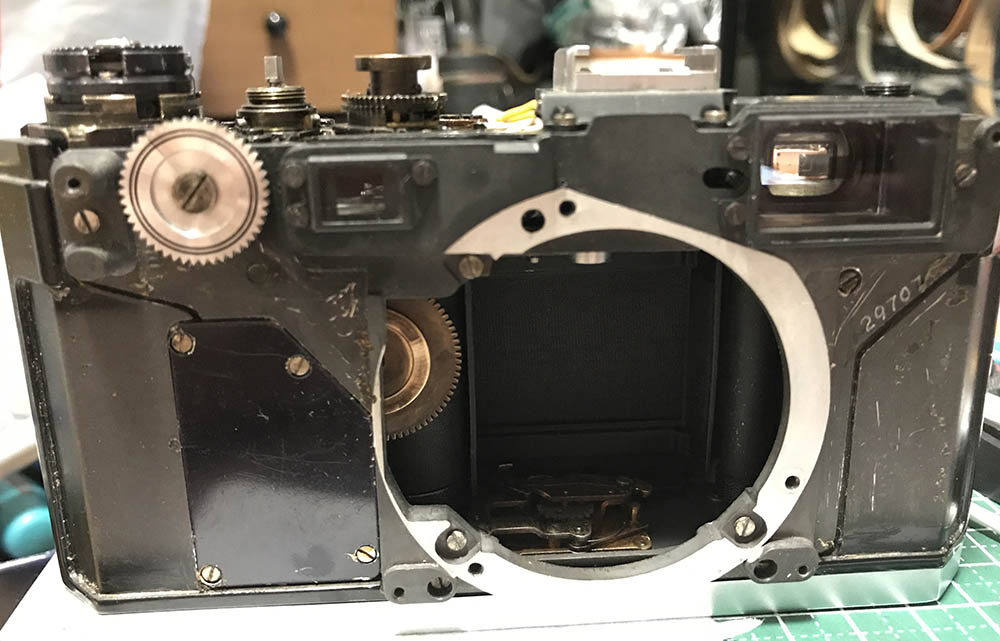
The part between the viewfinder prism and the vertical adjustment prism is impossible to clean unless you remove the vertical adjustment prism and its housing. This is a very risky thing to do and should never be done unless it’s absolutely needed. I would refuse removing it for customers’ cameras since it’s such a delicate part and its position has to be precise.

This is tough to remove, apply a drop of MEK to each screw. The solvent will help soften the cement. Just make sure not to apply too much.
With the housing of the vertical adjustment prism off you can clean what is between it and the viewfinder prism. Dirt and fungus can accumulate there and make the rangefinder patch look dull. Cleaning this won’t give you the guarantee of a clear patch but it does help specially if that part is filthy or it has fungus growth in it.
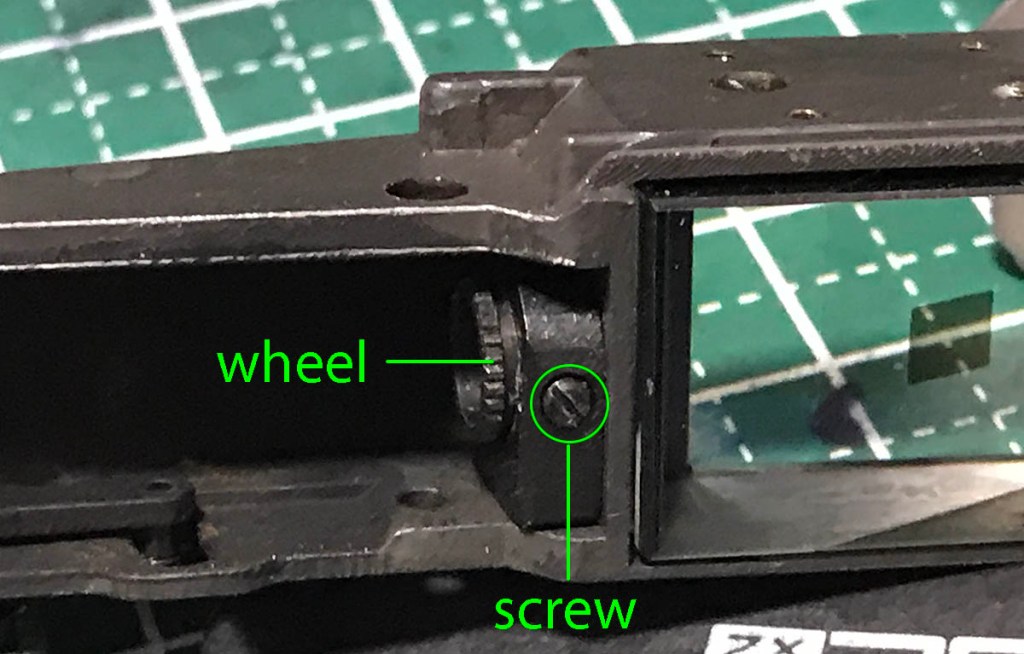
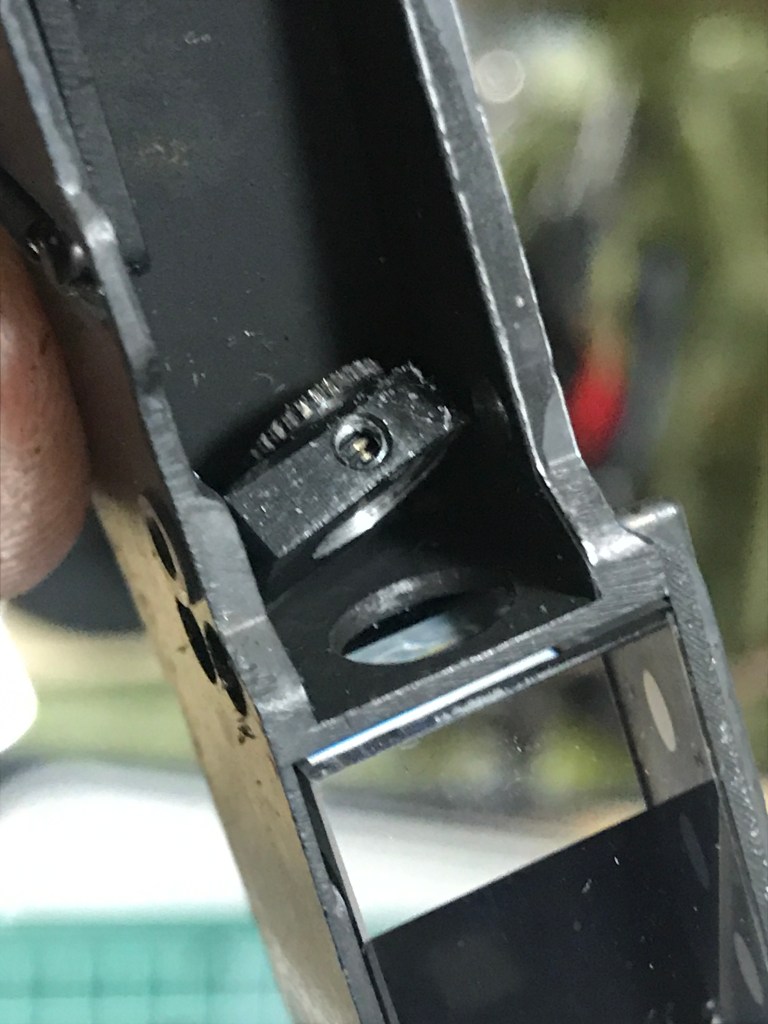
Here’s a closer view of the vertical adjustment prism’s mechanism. The set screw secures the wheel, loosen this screw a bit and you can turn the wheel up-or-down to adjust the vertical alignment of the rangefinder patch. Don’t turn the wheel too much and never over-tighten its set screw.

You turn this to adjust the horizontal alignment of the rangefinder patch. It is a delicate part that’s easy to strip so be careful handling it.
Screw A was discussed in the previous panel while screw B is for adjusting the near-far alignment of the rangefinder patch if I am not mistaken. Don’t mess-around with screw B, it’s best left alone.
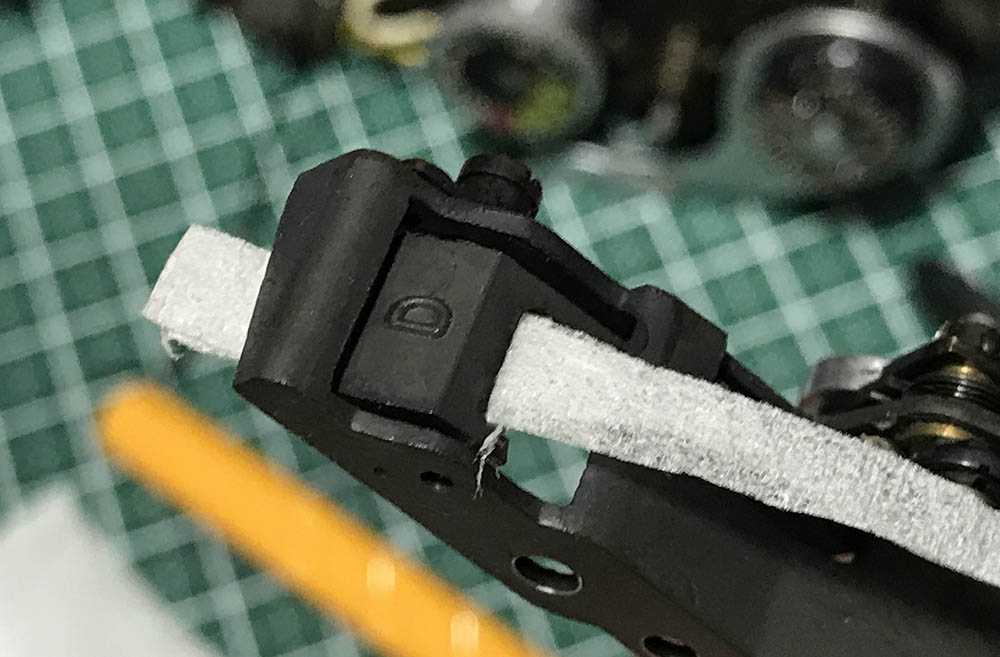
The only way to clean the rangefinder prism or beam-splitter is to use a lens tissue to wipe it. I cut a strip of tissue and slip it behind the prism block. The tissue should be moist with alcohol and you run the tissue in-and-out so you can clean the silvered part of the prism. Do not do it vigorously or the prism will get even dimmer as you rub what’s left of the silver off.

The rangefinder assembly is now clean, it’s ready to be reinstalled. Clean all of the parts accessible to you carefully. Remember, this is a delicate piece of precision optics and should be treated like a newborn baby.
Look at it now, it’s so clean you could kiss it without the fear of getting STD.

Reassemble the helicoid very well after cleaning it. Paint the black part with the darkest India ink you can find. Cleaning this thinned the original paint I had to repaint it to make it look presentable again.
Once you’re done cleaning everything it’s now time to reassemble all of the major assemblies but leave the panels and covers out for now. You’ll have to adjust some other things first which won’t be easily accessed once all of the panels have been reinstalled.

This port will allow you to access the vertical-adjustment wheel. Loosen the set screw a bit and nudge the wheel up-or-down until the resulting image in the rangefinder patch aligns.
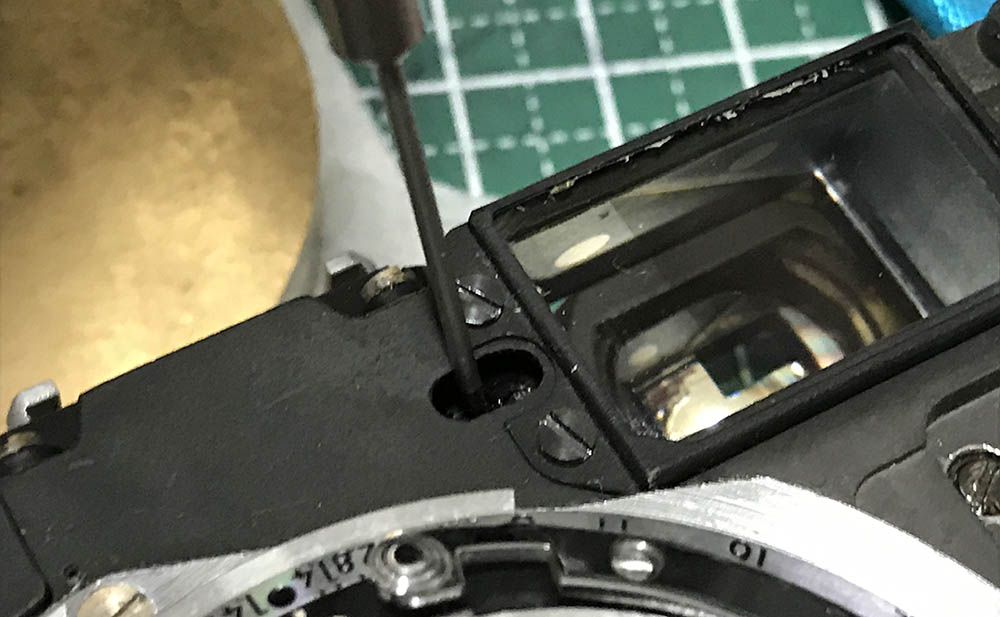
You’ll only need to adjust it by a little bit, it should not be off by much.

Adjust the horizontal alignment screw. It’s easily-accessible, use a precision screwdriver and turn the screw until the horizontal axis aligns. Once you’re satisfied with the alignment you can now reinstall the panels and covers.
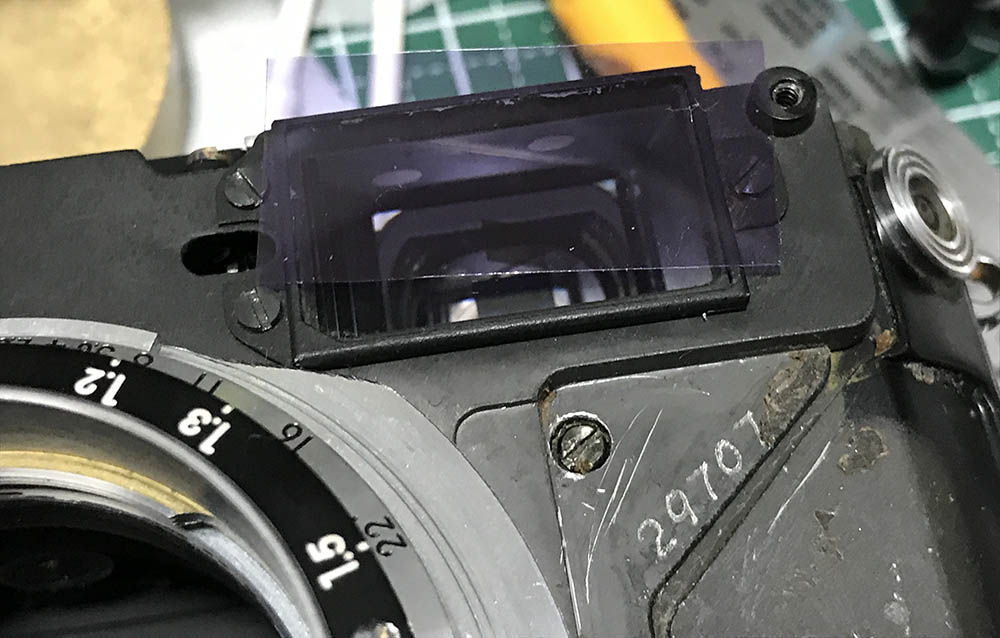
One nice touch is to add a film over the viewfinder window. This will make the viewfinder a bit dimmer, making it easier to see the rangefinder patch. I learned this trick from my friend Jon Mitchell, I was supposed to cut a piece of colored filter to replace the original window protector of my Nikon S2 but I learned about this trick from him and that saved me a lot of time. It works, I can now see the patch better. Some people use colored-glass strips, I saw a person who did this and that made me curious but this trick is much better.
Do some final tests just to make sure that all the speeds are firing accurately and the rangefinder patch is accurate both near-and-far. Fix or adjust what is needed before you put the everything back. It’s a waste of time to open it again just to adjust something. Any last-minute adjustments should be done now.
Conclusion:
This is the most time-consuming part of the whole repair. I usually spend a whole day on this depending on the camera and its condition. You may find yourself spending a few nights just adjusting the shutter, that isn’t unusual. If you’re a professional, you will have to do it under a time constraint or it’s not worth repairing at all since you are losing money. You may charge extra for it but that’s your call. Customers usually don’t know what repairers have to deal with so I hope that this article will help you appreciate how much is being done in a proper camera overhaul. While this article does not show a total overhaul it’s close to it. A total overhaul involves bringing the springs out and the bottom mechanisms stripped and cleaned. That’s too much, for most cameras, this is as far as many repairers should go. All-in-all, it should take about 3-4 days of work at most and extra days added to this when your facing a difficult job such as a butchered camera. A butchered camera isn’t something that you should deal with as a professional, you can deny it and it’s also fair to ask for more and not promise anything much in return. This is reasonable since it’s impossible to repair something without replacement parts if the camera came to you in a bad state. If it’s merely faulty but looks to be in good shape then the quality of repair should be higher.
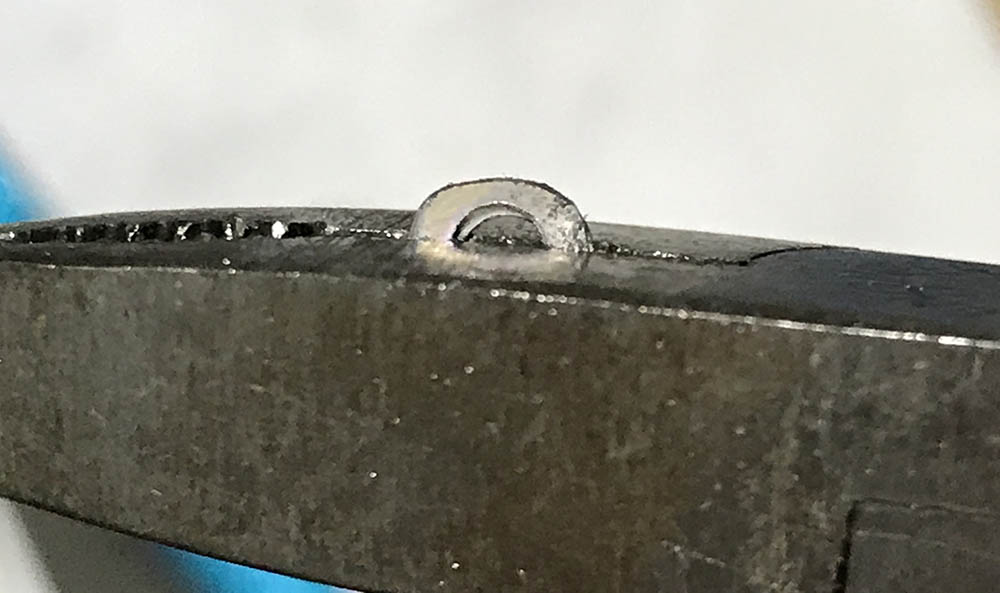
I had to replace some washers, some of them have clipped edges. I got some washers and filed one side flat. I have a few washers in my spares box just in case when I need them.
For easy navigation, here are the links to the other parts:
I advise that you read them all in-order so you’ll follow everything better.
This article completes our series on the Nikon S3/S4. It’s a long, 5-part series because I can’t condense everything. That will burn me out, I’m tired doing by day job and I won’t have the stamina to write long articles. This is just a way for me to unwind and take my mind off work. My day job is stressful, I have to deal with difficult people and politics at work, this is how I escape it and you help me keep my sanity.
If you enjoyed this article, be sure to share it with your friends. I would like to thank the people who help support this blog because you’re helping me a lot in terms of offsetting the cost of maintenance. It also helps me buy film, I intend to make this the best the best place for everybody who loves film so I take plenty of photos with it. Purchasing, developing and scanning cost a bit but your help makes it easier on my pocket. This helps ensures that this site is kept running and help more people in the future. Thank you very much, I would like to see you again in the next article, Ric.
Help Support this Blog:
Maintaining this blog requires money to operate. If you think that this site has helped you or you want to show your support by helping with the site’s upkeep, you can make a small donation to my paypal.com (richardHaw888@gmail.com). Money is not my prime motivation for this blog and I believe that I have enough to run this but you can help me make this site (and the companion facebook page) grow.
Leave me some tip?
Thank you very much for your continued support!
$2.00
Helping support this site will ensure that this will be kept going as long as I have the time and energy for this. I would appreciate it if you just leave out your name or details like your country’s name or other information so that the donations will totally be anonymous. This is a labor of love and I intend to keep it that way for as long as I can. Ric.

5 Comments (+add yours?)