
Hello, everybody! I was hungry for some Taiwanese food so I went looking but I found that most of them were ran by the mainland Chinese people and there was nothing Taiwanese about them apart from what’s written in the sign. This is unacceptable, I hope that this practice ends because it’s unfair to the peaceful Taiwanese people. If you do not know any better then you’ll get the wrong impression about the Taiwanese because the people running these shops are mainland Chinese. Speaking of being confused, we will talk about a confusing subject today in Nikkor land but this time, you will get an excellent lens whichever one you end up and unlike the example that I just gave, it is not some shoddy knock-off trying to deceive people but it is just Nikon being lazy and will show you why I said that and how you will know which version you’re looking at.
Introduction:
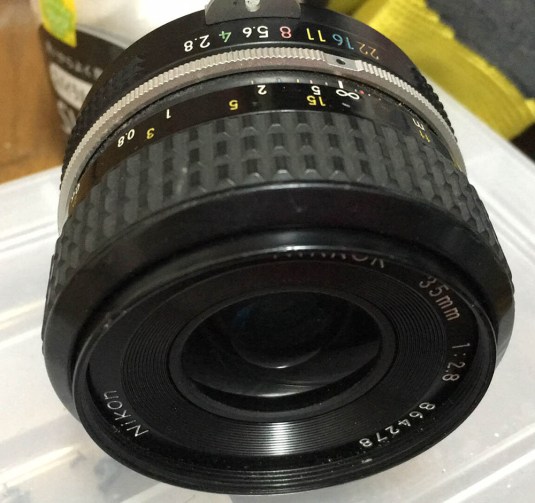
We are going to showcase the New-Nikkor 35mm f/2.8 lens today, a lens that is usually mistaken for its successor, the Nikkor 35mm f/2.8 Ai since they’re almost identical apart from some insignificant details. This lens replaced the beloved Nikkor-S 35mm f/2.8 Auto in 1974 and it’s a total re-design from the optics to the barrel. From the old 7-element design it now sports a new 6-elements-in-6-groups design and a new barrel that’s more in-line with the New-Nikkor line of lenses. The successor to this lens (Nikkor 35mm f/2.8 Ai) is essentially the same lens with an Ai-ring and a slightly-different rubber grip pattern. To the untrained eye, they look identical specially if the New-Nikkor 35mm f/2.8 sports a factory Ai-ring upgrade. The parts can mostly be interchangeable as far as I remember so I lumped the two lenses into one. Why did Nikon do this? To save money, because in just a few more years the later Nikkor 35mm f/2.8 Ai was sold and that’s what I believe is what Nikon really wanted to sell as the Ai version but it probably didn’t make it in time, that’s just my theory but it’s very likely to be the case.
 It’s a wonderful little lens that not a lot of people know about but the few who do know it for a special reason which I’ll mention several times in this article so pay attention. Some people poo-poo this lens but it’s a great little lens if you know how to use it.
A little history on the 35/2.8 Nikkors for the F-mount, the first version is the venerable Nikkor-S 3.5cm f/2.8 Auto which came out around the same time as the Nikon F in 1959. It has the original 7-elements formula which was soon tweaked on the later ones with a different formula while still using the same 7-elements count. The New-Nikkor 35mm f/2.8 is the 3rd version when it comes to optics design, it has a 6-elements count which was used until the first version of the Nikkor 35mm f/2.8 Ai. Finally, we have the Nikkor 35mm f/2.8 Ai which is the last time this lens type was given a new optical formula of just 5-elements and it lasted until the final version of this lens was made in the form of the Nikkor 35mm f/2.8 Ai-S which was made until 1989. This lens family was one of Nikon’s most popular lens lines because of their price and utility. Not everybody wanted the Nikkor 35mm f/2 Ai so this sold very well amongst enthusiasts. Together with the 50/2, 105/2.5 and 135/3.5 line of lenses, this is considered to be one of the 4 pillars of F-mount Nikkors in the old times before the 50/1.4, 85/2 and other lens families became common.
 The lens feels dense despite being small. It’s just a bit larger than the usual 50/2 lens and the construction is good if you compare it to the later Ai-S one. This lens will take plenty of punishment and was certainly made for abuse in mind. The focus throw is adequate, if not perfect. The later lenses have shorter focus throws which annoys me. The useful focusing scale is great and informative. Most manufacturers don’t color-code their depth-of-field scales and I find it annoying at times so I went all-Nikkor a couple of years ago.
 It’s the perfect partner for a Nikon FM! This combo is great for travel as it’s compact and light. The setup balances perfectly in your hands and it’s a joy to use this combo. If there is such a thing as a match-made-in-heaven then this is it. People (including me) buy better and more expensive setups but this is all you need to enjoy photography and take great pictures.
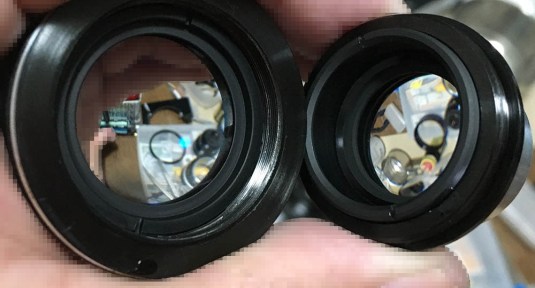
 You are looking at 2 different lenses here, the left one is New-Nikkor 35mm f/2.8 with an Ai-ring and the other one is the early Nikkor 35mm f/2.8 Ai with a non-Ai ring. I swapped the rings and it seems that they’re identical. I don’t know why they share the same barrel design but the only reason I can see here is Nikon’s trying to save money.
 The easiest way to determine which one is what model apart from the serial numbers and the Ai-ring (or the lack of it) is by looking at the rubber grip. The older one sports a New-Nikkor style pattern while the later one looks more modern.
 It’s easy to tell the difference from the front. The later Nikkor 35mm f/2.8 Ai (left) has a slightly bigger front element. You can always refer to the serial numbers using Roland’s amazing site but this is the easiest visual way to determine the version if you only have a reference picture of the front of the lens.
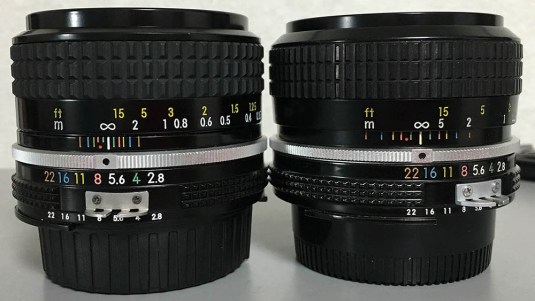 The easiest way to determine which version of the lens you have is to look at its top where the differences is more obvious. It’s easy to tell because the later Nikkor 35mm f/2.8 Ai has a narrower depth-of-field scale along with a pathetic focus throw. You’ll also notice that the later version Nikkor 35mm f/2.8 Ai has a more straight-walled profile compared to the earlier lens.
Let’s now see some sample photos that I took with this lens. It’s important to know how a lens performs in order to know its merits and how to exploit them. This will help you make the most out of your gear so you will know when to use a lens and how. These pictures were taken from f/2.8, f/4 and f/5.6 (in that order) so we can compare how the different f-stops look. These apertures also show the most differences in terms of characteristics and any changes beyond these look subtle.


(Click to enlarge)
The distortion is quite low for a 35mm lens but you can notice it if you look carefully. This won’t be obvious in your pictures so do not worry about it. Vignetting is awful until you stop it down by 1-stop and goes away by f/5.6 so you won’t see it much even when looking at the corners. The good thing is it improves drastically by f/4 unlike some lenses where it only gets better after 2 stops. Stop the lens down to f/5.6 and everything improves by several levels. The resolution is now better, sharpness is great, the vignetting is now gone and the corners look much sharper. This aperture is what you should be using if your shutter speed is fast enough. I don’t have pictures for f/8 but it looks amazing at that aperture and it should or else this lens is rubbish.


(Click to enlarge)
My sample of the lens isn’t all that sharp wide-open, it’s just a bit un-sharp compared to the 2nd Nikkor 35mm f/2.8 Ai but it’s not a bad lens at all. Since people are reporting otherwise, I will just resign it to sample variation. The cause is a lack of resolution so this is easy to fix by stopping the lens down a bit. Spherical aberration also contributes to it somewhat but the good news is it doesn’t seem to have any terrible signs of chromatic aberration. Stop the lens down to f/4 and the resolving power of this lens improves a lot and spherical aberration is now unnoticeable in your focused areas. Sharpness is decent but the corners are still bad but still much better than it was wide-open.


(Click to enlarge)
The lens is resistant to flares and ghosts as you can see in the pictures above and the worst that I could get is a tiny green blob when you have the sun in the corner of the frame. This is good as far as I’m concerned but vignetting on the other hand can be a big problem if you’re shooting at the sky or any even-colored backdrop so stop it down a bit to avoid this.
 Geometric distortion is pretty low with this lens but it’s present if you take pictures like this. It’s hard to see and you can even say that it’s absent and nobody will fault you for it but it’s visible if you measure it. Having said that, you can say it’s as-good-as-none and this is a negligible amount that you’re seeing here.


(Click to enlarge)
One of the more helpful tricks of this lens is the ability to focus close. Most wider lenses should do this well and this lens is not an exception. It’s useful for taking detail shots of things such as the wedding rings or the cake if you shoot weddings. I don’t know how good this lens is when used as a reverse-lens but it should be reasonably well I assume.


(Click to enlarge)
Here are more sample pictures. It is not the best lens for pictures like these because of its limited f/2.8 speed but that will do for most cases if you are using a digital camera and you can dial-up your ISO settings. If you’re using film then you will want to use a faster film for indoor shots.
Let’s now see some results that were taken with film. This was designed for film so it’s good to see how it works using it. Film renders differently from digital and it’s difficult to simulate its look using a digital camera because of grain. I am not a purist but it’s nice to see this lens render with its intended media, this way we can see how its designer envisioned this lens. Seeing the results from both film and digital will also give us a better understanding of how a lens performs and this is why I always take pictures with both media for our samples here in the blog. I took these pictures using a Nikon FM3A and I loaded it with Fujifilm Industrial 100.
 This was taken at about f/8 so I can get more depth-of-field. I like the natural look that I get with this lens specially when used with film. It’s sharp at this aperture and the slight blurriness you see here is the result of motion blur. If you have a keen pair of eyes you will also notice the nice sunstar in the scene, can you find where it is?
 This is great for shooting architecture because of its low distortion. Stop the lens down to avoid dark corners. It is not a problem unless you have the sky in the scene or an even-colored background.
 The big golden tadpole you see here is called the “golden poop” by locals for obvious reasons and the tallest tower is the Skytree. Lines remain straight as you can see in the bridge at the lower part of the frame.
 Colors look neutral with this lens despite the slight magenta cast of this film stock.


(Click to enlarge)
Here are some more pictures that I took with this combo. It’s a great lens for a leisurely afternoon stroll around the city. If you need a 35mm lens that’s compact and cheap for travel then this is the lens for you.
Can I recommend this lens? Yes, but only if you wanted a 35mm lens with minimal distortion. You shoot this lens for that and you are better off using the Nikkor 35mm f/2.8 Ai instead if you want sharpness at wider apertures at the cost of more distortion. It really is tough choosing between the 2 but if you know what you want then it’s going to be easier. If you choose this lens then it’s important to buy one that has an Ai-ring or else you won’t be able to use it with later Nikons that can’t be used with pre-Ai lenses. They cost a bit more but it’s worth it. This is a tough lens and I will definitely recommend it for travel and other types of photography. It will take more abuse compared to the plastic lenses that are the standard these days and they are not expensive so you won’t be crying as much when you lose it. If you love taking pictures of art and architecture then this lens will be really useful for that because of its low geometric distortion. I have used many 35mm lenses and this is exceptional when it comes to this. Sure, it’s not perfect but it’s still much better than many 35mm lenses. I will leave the introduction here and let’s begin with the repair article.
Before We Begin:
If this is the first attempt at opening a lens then I suggest that you read my previous posts regarding screws & drivers, grease and other things. Please also read what I wrote about the tools that you will need in order to fix your Nikkors.
I highly suggest that you read these primers before you begin (for beginners):
- Essential tools
- Best practices 1
- Best practices 2
- Best practices 3
- Ai conversion
- Working with Helicoids
Reading these primers should lessen the chance of ruining your lens if you are a novice. Before opening up any lens, always look for other people who have done so in Youtube or the internet. Information is scarce, vague and scattered (that is why I started this) but you can still find some information if you search carefully.
I highly recommend that you also read my working with helicoids post because this is very important and getting it wrong can ruin your day. If I can force you to read this, I would. It is that important!
For more advanced topics, you can read my fungus removal post as a start. This post has a lot of useful information here and there and it will be beneficial for you to read this.
Disassembly (Lens Barrel):
As usual, we need to remove the objective from the lens barrel so we can work on barrel without about it. The lens barrel itself is easy to work on but you will require plenty of patience because New-Nikkors are known to be sealed at multiple points using lacquer and even epoxy on some cases. If you encounter a part that won’t unscrew easily just apply a drop of alcohol and let it work on the seams to help soften the seal. Heat will be required when you encounter epoxy. Make sure that you have the right tools such as a set of JIS screwdrivers so you won’t strip the heads of your screws. Take as many notes as you can while you work on the lens specially before you remove something so you will have plenty of references to help you later.
 Carefully remove the rubber grip by running a thin toothpick underneath its circumference to lift it from the glue. You then carefully pick it out using your nails. Be careful not to tear the rubber because it can be brittle due to its age.
 Once the rubber grip is gone you can now remove the tape or whatever is securing the bezel of the focusing ring and turn the bezel until it unscrews. Applying a small drop of solvent to its seams helps if it’s stuck.
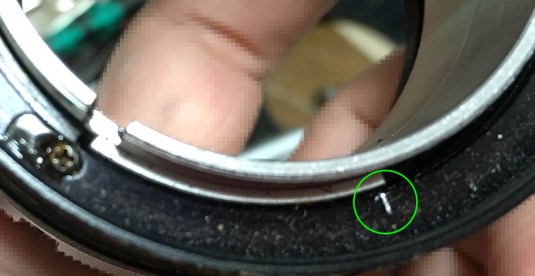
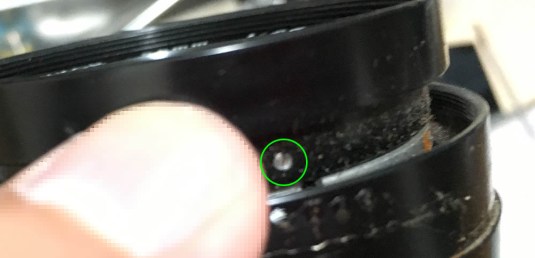 Removing the front ring requires that you remove this small set screw that’s securing it.
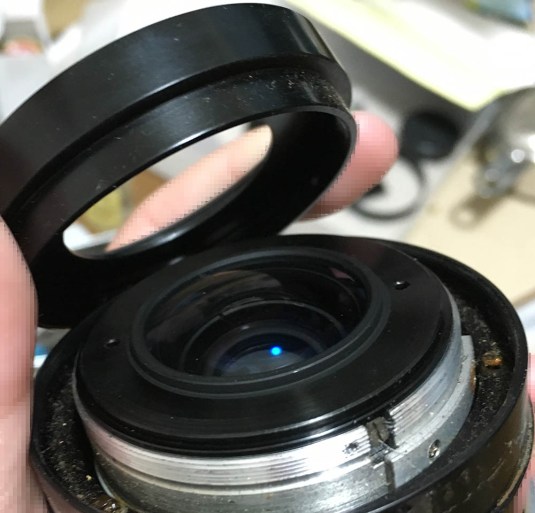 The front ring easily screws-off once the set screw is gone. You will want to be careful with the objective at this point because it’s only being secured by the front ring.
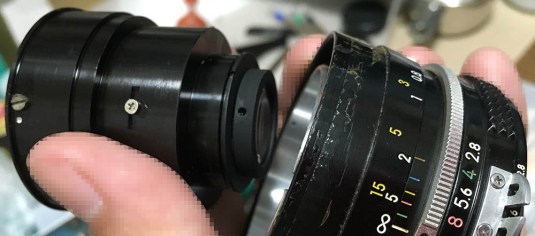 Extract the objective from the barrel and keep it in a safe place while you work on the barrel.
 The bayonet is secured by these screws. If you’re new to lens repair please read my article on how to remove bayonet screws. Many people get stuck in this step because they stripped the heads of their screws so read my article to avoid this problem.
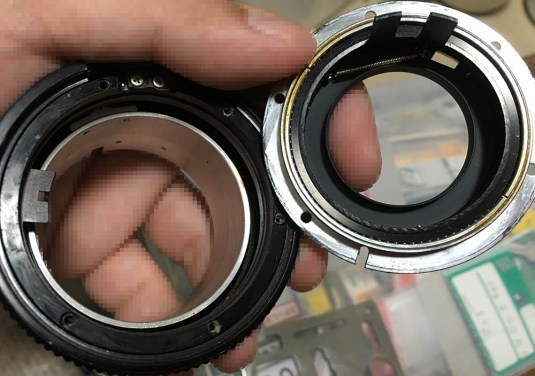 The bayonet is easy to remove once the screws are gone.
 The aperture ring can now be removed but before proceeding set your lens barrel to infinity and work with the lens like this from now as much as you can. This will help a lot later when taking notes because you have a reference point.
 The focusing ring is being secured by these 3 screws and you loosen these to adjust the focusing ring so take notes so you’ll know how to put them back together again to help you make your adjustments easier. They are usually sealed like what you see in this picture, this will prevent them from getting loose. Dissolve the seal with alcohol before you remove them.
 I made a small mark against the helicoid stop and that will help me guess my starting point when it’s time to put things back.
 The focusing ring can be easily removed once the screws are gone.
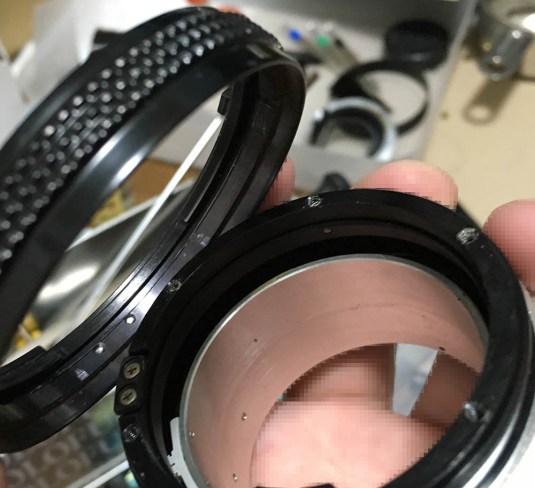
 Remove these screws to remove the chrome grip but there are more things that has to be unscrewed before you remove it.
 Carefully remove this tall screw because it’s in the way.
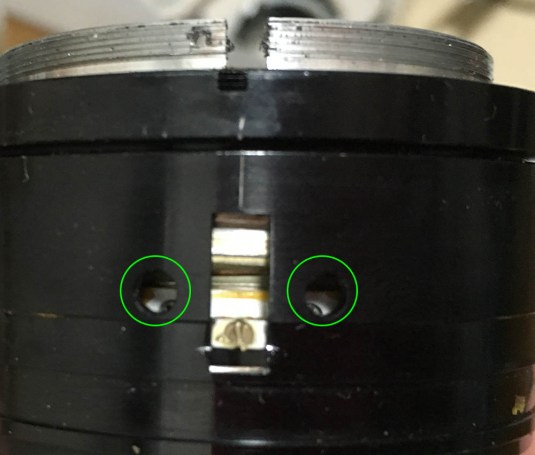
 Carefully these screws to remove the detent spring. These can be easily misplaced.
 The grip can now be removed along with the sleeve. These can be stuck at times and you’ll have to use solvents to dissolve its seals or any hardened grease to make this easier for you.
 Separating the helicoids require that you remove these screws to remove the helicoid key. The helicoid key holds things together and it also syncs the the helicoids so turning the central one will allow the barrel to extend or retract.
 You will want to turn the barrel a bit so the screws are easier to access like in this picture.
 You can now remove it once the screws are gone.
 Begin by separating the central helicoid from the outer one and don’t forget to mark where they separated. Many forget to mark this and they end up getting stuck because they don’t know how to put it back. This is important and if you don’t know how to work with these please read my article on how to work with helicoids.
 Separating the inner one will require you to remove this helicoid stop. It’s there to constrain the turning range of the helicoids so they’re not going to turn beyond their range. Remove these screws to remove the helicoid stop.
 Don’t forget to note which side of the helicoid key should be facing up.
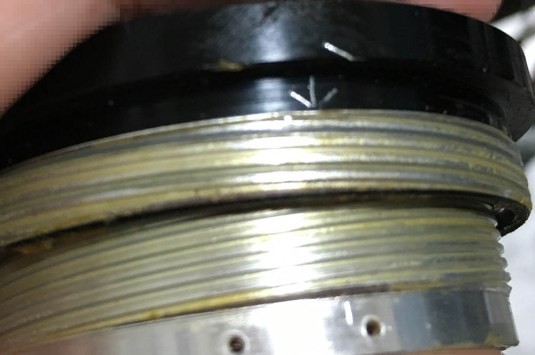 Separate the inner helicoid like this and don’t forget to mark where they separate.
 The central helicoid can be disassembled further. Loosen the tiny set screws found on the upper rim and then apply solvents to the seams to dissolve the seal. You will have to do this repeatedly before you can unscrew this easily. It may even take days to do this depending on the solvent. The quicker way is to heat it with a torch but you will have to be careful. This ring adjusts the lens’ focus so I mad 3 marks to serve as keys later so I will know how to align this properly later.
 The aperture fork and its rail is secured by this brass retainer.
 The easiest way to remove it is to position one of the open ends near the slot of the helicoid key.
 Carefully pick on it with a small tool and be careful not to scratch the slot.
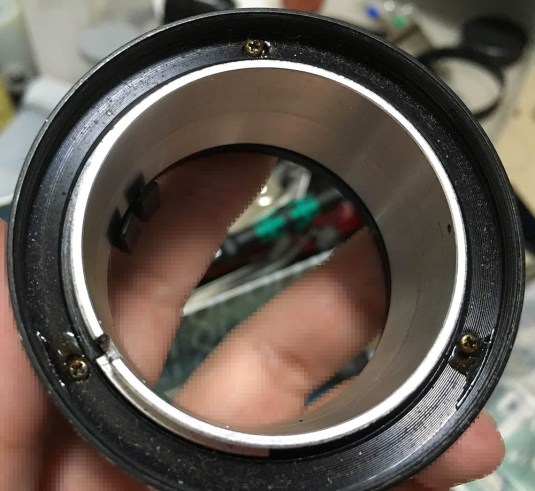
 Clean this very well because it tends to accumulate gunk over the years.
Clean everything very well and make sure that you don’t leave any residue before you apply a fresh coat of grease. I then brush the helicoids using a pig-bristle brush on my Dremel to remove any hardened gunk. Pickling these in an alcohol bath helps, too. It’s going to soften any stubborn dirt so you can pick them up using a toothpick. I applied a slightly-thick type of grease for it, the focus throw is short and that will help me with focusing this lens precisely.
Disassembly (Objective):
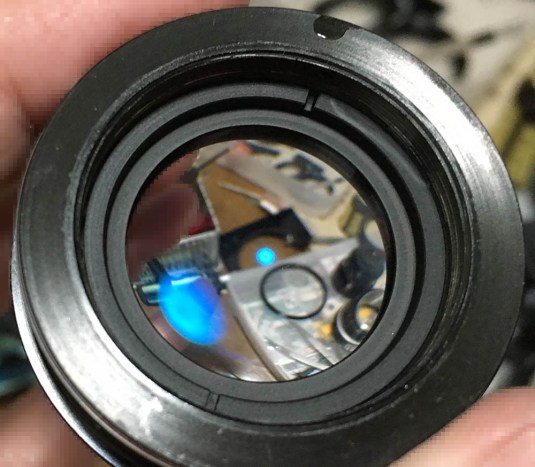
The objective is simple to service because the glass elements aren’t big on this lens its the construction is simple, it is similar to most Nikkor primes of the same era and you should easily understand how things were assembled. One important tip is to mark which side of the element should be facing the front so you won’t put one back facing the wrong way. I do this by making a small mark using a permanent marker on the leading edge of the element. The mark should not be big and should only be situated on the wall of the element. You can also make several smaller marks denoting an element’s order and that will help a lot later so you’ll know which order the elements are when putting them back to their casing. Just like the lens barrel, Nikon likes to seal the parts here using lacquer and you should do the solvent trick again if anything is stuck. You’ll need a good lens spanner to work on this and don’t even bother if you don’t have one.
 The front optics assembly can be unscrewed from the housing like this.
 Be really careful not to damage the bulbous rear.
 To remove the retention collar you’ll have to apply a small drop of alcohol into this hole to soften the seal. Be careful so you won’t damage the glass while you remove it.
 You can further dismantle the front assembly like this.
 Removing this retention ring will give you access to the front elements. Use a lens spanner to open it and apply some solvents to help soften the seal in case it was sealed at the factory which is usually the case for these things.
 The central one can be opened the same way.
 The rear element can be easily removed once its collar is gone.
 Remove the rear assembly by unscrewing it.
 This part can be difficult to remove so be careful not to slip and damage the glass.
That’s all for the objective. I didn’t have to clean the iris so I didn’t include it in this article. If you need to clean your iris then read my other lens repair articles and search for a lens using a similar mechanism and use that as a guide.
Conclusion:
This lens took me about 2-3 hours to work on with most of that time spent on cleaning everything up. It’s an easy lens to work on for an experienced hobbyist like me and I found it boring to be honest but at least I now have a clean lens.
It’s now time to put things back together! Make sure that everything is clean and nothing is in contact or scratching anything. Before you go ahead and completely re-assemble everything you will have to adjust your lens’ focus first. Put everything back except for the front ring and the front bezel of the focusing ring.
 Adjust the focus of your lens by turning the central helicoid until your lens can focus perfectly at infinity. I wrote a post on infinity focus calibration and it shows you how to do it using simple DIY tools. It’s not factory-perfect but it’s still the best option available to any DIY repairer who do not have the money or space for the right tools. Also note that I scratched a line along the centerline of the lens. This will help me determine of I got the helicoids aligned perfectly after an overhaul.
It feels great writing a new article again after weeks of updating older ones. I have been too busy at work lately so I do not have the time for this blog lately. Writing requires a lot of time, energy and resources but your support helps me keep this blog alive. The support helps me with maintaining the hosting as well as offset the cost of film and its processing so I appreciate all of the support you’re sending this blog. With that said, I’ll continue to write quality original content when I have the time and that is all thanks to you. Some writers just re-blog what others made while some give you mediocre content just to get quick hits. You will not see any of that here because this blog is not a business and I put my heart into everything, most specially the sample pictures. See you guys again in the next article, Ric.
Help Support this Blog:
Maintaining this blog requires money to operate. If you think that this site has helped you or you want to show your support by helping with the site’s maintenance, you can make a small donation to my paypal.com account (richardHaw888@gmail.com). Money is not my prime motivation for this blog and I believe that I have enough to run this but you can help me make this site (and the companion facebook page) grow.
Leave me some tip?
Thank you very much for your continued support!
$2.00
Helping support this site will ensure that this will be kept going as long as I have the time and energy for this. I would appreciate it if you just leave out your name or details like your country and other information so that the donations will totally be anonymous it is at all possible. This is a labor of love and I intend to keep it that way for as long as I can. Ric.

Jun 02, 2019 @ 14:21:50
Great article, I’ve just discovered your site and you have so many interesting lenses, I’m digging into Nikon history and this helps so much!
One question: why do you pixellate out all your fingers and hands/palms in photos?
Apr 14, 2020 @ 16:43:22
I`m very interested to learn the specialities of languages, could you please explain to me the meaning of “poo poo the lens”?Cannot find a satisfying explain online.