
Hello, everybody! I am down with a cold and I had to work yesterday (Saturday) so I do not have much time to update this blog but this morning, I found that somebody donated to the upkeep of this blog and that gave me the will to write this down. Whoever you are, thank you very much for the encouragement! It will be a short one this time. The usual lens tear-downs require around 2-3 nights to write but this should be easier.
Introduction:
We are going to look into a common (and expensive) item for the Nikon F2 camera today – the Nikon DE-1 Eye level finder!
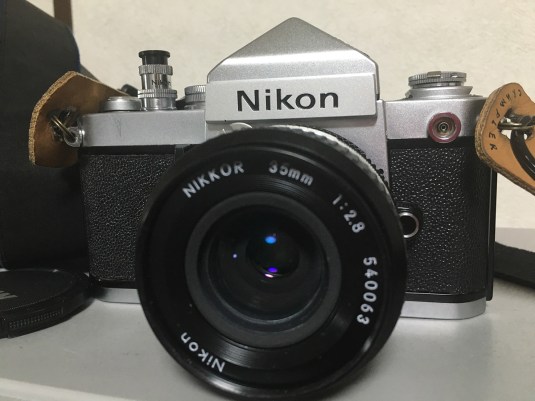 This is just a standard finder for the Nikon F2 camera. It is really the cheapest option that you could buy back in the days because it is unmetered but since people wanted the ones with the built-in meters for obvious reasons so this one was made is smaller quantities. As time goes by, these finders age and degrade and the prism don’t hold up very well so good ones end up being expensive. The ones that have bad prisms still fetch a nice sum, I think that the cause of this artificial price is collectors. I do not remember these being sold at the current prices 4-5 years ago.
It is a really lovely finder and it keeps the profile of the Nikon F2 small. Sure, it doesn’t do all the fancy stuff that a metered finder would but the uncluttered view you get from using a plain finder is sometimes more important than exposure readouts and information. This helps me concentrate on what is in the view rather than what the camera wants me to see. Carrying a light meter can be cumbersome but I am used to it and I am pretty confident at guessing the right exposure for 400 film in daylight conditions anyway.
This finder differs from it’s predecessor in the sense that it has a few electronic parts in it that lights up a small bulb in the viewfinder when the flash is ready to be fired. Other than that this finder will also work with later later models of the Nikon F so long as you remove the nameplate in front of it.
I would recommend that you buy one if you are an avid Nikon F2 shooter but be aware of a few things before placing a bid on any item online. First, you would want to have a clear view of the viewfinder and the prism. These should look clean and devoid of any form of cloudiness, dark spot/patterns or smudging. If you see anything like it, skip. This is a sign of the prism going bad. It can be repaired but it’s a lot of trouble finding somebody with an aluminium deposition machine that will accept such a small order from you. Second, look for signs of fungus in the glass parts as well as the rubber gaskets. If it looks mouldy, skip it or low-ball the seller. Finally, avoid finders that have dents in them. The pointy parts usually are bent and the face has dings here and there for the common ones.
Needless to say, I got this finder for a nice price considering that this has none of the signs that I told you to avoid. You get lucky sometimes when gambling online. Let’s begin with the tear down!
Before We Begin:
If this is the first attempt at opening a lens then I suggest that you read my previous posts regarding screws & drivers, grease and other things. Also read regarding the tools that you will need in order to fix your Nikkors.
I highly suggest that you read these primers before you begin (for beginners):
- Essential tools
- Best practices 1
- Best practices 2
- Best practices 3
- Ai conversion
- Working with Helicoids
Reading these primers should lessen the chance of ruining your lens if you are a beginner. Also before opening up any lens, always look for other people who have done so in Youtube and the internet. Information is scarce, vague and scattered (that is why I started this) but you can still find some information if you search carefully.
I highly recommend that you also read my working with helicoids post because this is very important and getting it wrong can ruin your day. If I can force you to read this, I would. It is that important!
For more advanced topics, you can read my fungus removal post as a start. This post has a lot of useful information here and there and it will be beneficial for you to read this.
Disassembly:
Taking this thing apart is pretty straight forward and shares a lot in common with the one used for the Nikon F except that this thing has electronic parts that you should be aware of and avoid damaging. I can consider this to be a short afternoon project for the experienced tinkerbug. Just make sure that you have the proper tools handy as well as the replacement foam needed. The foams come in different thicknesses and are called malt planes in some countries like Japan (where I live).
I would suggest that you send yours for repair to the people below. They are experienced repairmen and all are pretty well regarded. If you are unsure then it’s better to send it to the people who know what they are doing.
- Jools Abel (UK) contaxrepairs.com
- David Hilos (Singapore) davidhilos@yahoo.com
- Kenneth Olsen (Norway) mikeno62@gmail.com
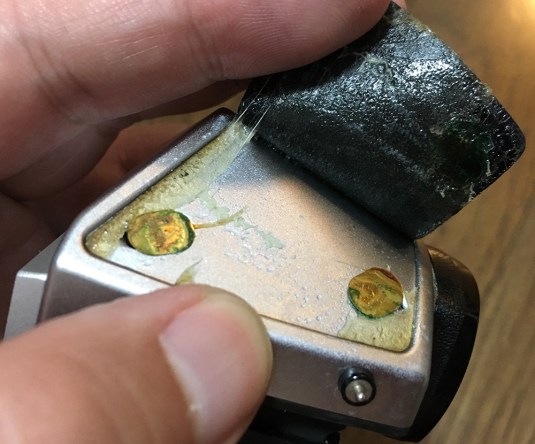
Begin by saturating the corners of the leatherette with alcohol and wait for it to do it’s job. Carefully peel one of the corners until you are able to lift it off. Remember, go at it slowly.
 With patience and a steady hand you will be able to peel it all off. The leatherette is old and it will tear if you are not careful. Carefully peel off these brass covers to reveal the screws underneath them.
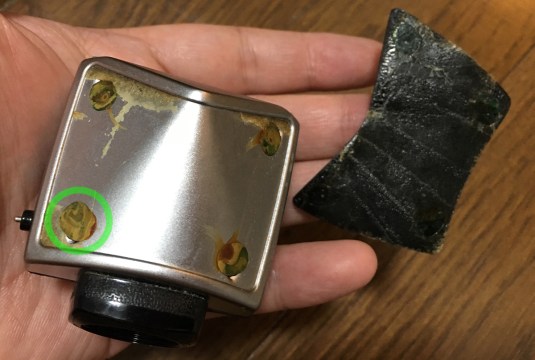
 I am not sure if these screws are original because these are usually slot (-) headed ones. Be careful not to strip the heads while removing these. These screws secure the top cover.
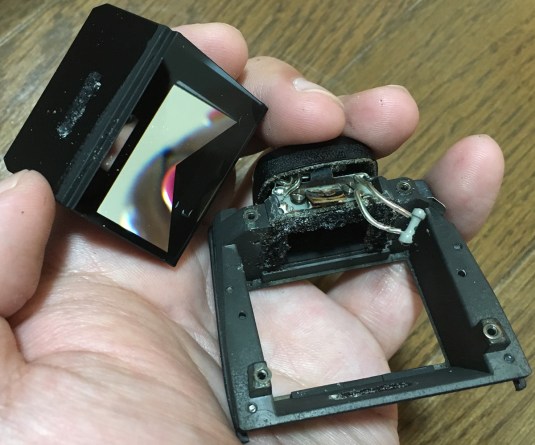
 Removing the top cover will reveal the delicate and important things underneath it. This is where all the fun parts are. This is much more complicated than the Nikon F’s Eye-level Finder so I will advise that you leave this job to a professional if you’re not up to the task or just not confident with tinkering about.

Here is a rough layout of what the important parts are:
Be careful not to lose the 4 washers on each corner of the frame as they are glued in place with a weak adhesive and if one fell off, be sure to keep that in a safe place so you won’t lose it.
There are electronic parts in the Nikon DE-1 so take a picture first before you go any further with the disassembly. This way, you have a reference handy when things go wrong. It is a potentiometer that regulates that tiny ready light in the viewfinder. I will not bother with this unless something is wrong with it. I am pretty bad with electronic stuff myself.
There is also a contact (yellow) on the left side of the frame. Be sure not to bend this out of shape! This one connects to a contact in the top cover which in turn connects to the flash outside to communicate with it. I believe that a more elegant solution can be engineered.
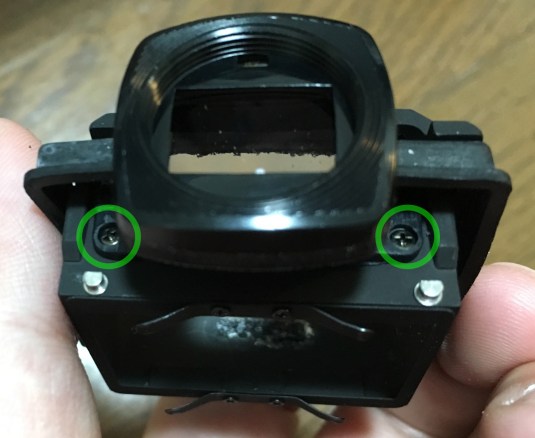
Just unscrew the 2 screws (red) securing the braces so you can work with the all-important prism.
 It is a good thing that the Nikon DE-1 comes this plastic liner, I had to fabricate one from a thin sheet of plastic for it’s predecessor. This liner protects the prism from the corrosive effects of the deteriorated foam. Many prisms of older cameras fell victim to this so a good finder usually fetch for a high price. Some people even go as far as use finders from other cameras because they are cheaper and just modify things to fit. My guess is that petroleum was used to manufacture the foam and as the foam age and break down it becomes a gooey mess made up of the harmful chemicals that it was made of. This is just me inventing stuff from my ass but it’s possible.
 And here is the prism! Damage this part and your prism is useless. Remove all of the junk you see by blowing it with air and then wiping the mess off with alcohol and Q-tips. You can find the old foam in the areas of the prism and the viewfinder.
 To separate the viewfinder assembly, unscrew these 4 screws found on each corner of the viewfinder assembly’s frame.
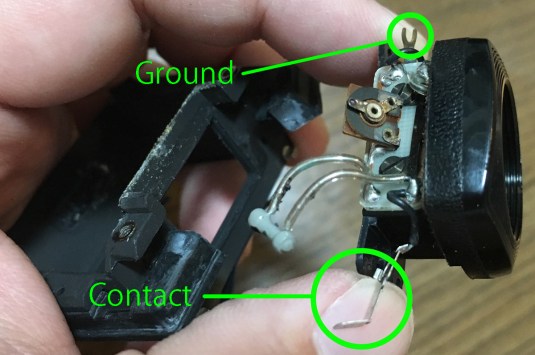 While remove the viewfinder assembly, be careful and note how the ground and the contact are originally secured into the whole thing.
Conclusion:
Putting things back together isn’t really difficult but you have to be very careful as to how things are put together and in what sequence. Be especially careful with the electronic bits so you won’t damage anything like accidentally bending a soldered part out of place. The resistor needs to be tucked in neatly to the side so it won’t get caught, be careful bending the wires in place when doing so.
The rubber seals were scrubbed and cleaned with dishwashing detergent and a soft brush. The main housing was dunked in an alcohol bath to kill the germs (it smelled funky).
Not all of the foam seals were replaced. For example, I don’t recall replacing the foam strip found on the front of the prism since I think it doesn’t really do a good job protecting the prism from scratches as it doesn’t wobble anyway.
The thin strip of foam found on top of the viewfinder has to be replaced since it prevents dusts from getting into the whole thing. It can be found in between the top cover and the viewfinder assembly.
The foam seals found covering the rear of the prism and viewfinder wasn’t replaced,too if I recall it properly. It does prevent dirt from getting into the viewfinder but if you cover the top part properly then it seems pretty secure enough. I would tolerate a few bits of dirt in the finder rather than de-silvering of the prism so it’s totally your call. I am sure purists will want that back and that is probably the right thing to do.
The one piece of foam that I cannot do without is the one found on top of the prism. This is the one that seals that gap from dirt. Check the next few images to see how I approached it and how I used an oversized cut to make sure that it will cover for the omission of the foam underneath it. Hope that it does the trick!
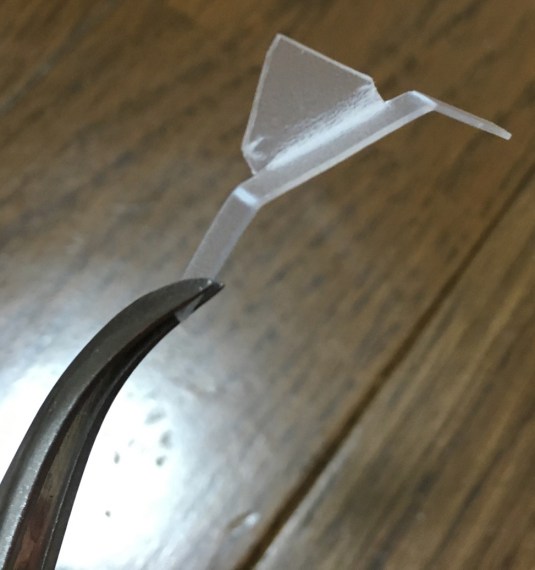 I fabricated a simple hood so that the foam that goes on top of the viewfinder and the rear end of the prism never comes in contact with the prism itself. Sure, the foam will corrode over time and bits of it will collect in the prism below but with this thing I feel a little bit more secure. Just cut a piece of thin plastic from a notebook and that will suffice.
 And this is how the little hood of mine protects the prism from that big bad foam. You can use alternative materials for this like electrical tape since it doesn’t corrode like this but it can become a sticky mess in humid climates.
 Removing the old rubber cement is something that I do if I am allowed. Just saturate this with alcohol and rub the old cement with your fingers until it comes off. I was lucky with this one because it came off neatly in one piece. It usually requires a considerable effort to do this but not this time. How I wish it was like this all the time.
 Now, time to pack things up. Put things back together again in sequence and then apply a generous amount of rubber cement and wait for it to cure a bit before you put the 2 pieces back together. Many people forget to do this and end up with a weak bond.
And that’s all for today. Remember, this is all for educational purposes and if you aren’t up for it, bring it to a real professional! Until next time, Ric.
Help Support this Blog:
Maintaining this blog requires money to operate. If you think that this site has helped you or you want to show your support by helping with the upkeep of this site, you can simple make a small donation to my paypal.com account (richardHaw888@gmail.com). Money is not my prime motivation for this blog and I believe that I have enough to run this but you can help me make this site (and the companion facebook page) grow.
Helping support this site will ensure that this will be kept going as long as I have the time and energy for this. I would appreciate it if you just leave out your name or details like your country and other information so that the donations will totally be anonymous it is at all possible. This is a labor of love and I intend to keep it that way for as long as I can. Ric.

Jul 10, 2020 @ 18:18:54
Thank you very much for this detailed guide! I have a nikon f2 with a few problems. When I received it, I saw fungus starting to build up on the focusing screen so I decided to clean it and to put it in direct sunlight for an hour or so a couple of times. Then I look around for information and I discovered that I could use hydrogen peroxide. So I unscrewed the four little screws and separated the screen from the frame, then I dipped the screen into hydrogen peroxyde and it came out very clean, however i found out that it is actually made of two layers and a few dropets dryed in between these two layers leaving a few spots. I was wondering if you had a more professional way of cleaning it since I saw that there seems to be a very thin tape around the sides of the screen that keeps the two parts together and I don’t want to go as far as cutting a new thin stripe of tape.
Feb 08, 2023 @ 19:41:32
Richard,
Just wondering if you are aware of two versions of the DE-1? One (perhaps the first) had metal-metal contact with the body, and some foam rubber inside. The other has a rubber inset gasket where it contacts the body, and no foam (not needed). Now I am wondering if there were two versions of DA-1?