
Hello, everybody! I am in the process of fixing the pipeline of our studio at the moment. I am spending many hours evaluating and creating new tools for our artists and throwing away what the previous guy did. He basically made everything too-complicated and now he can’t fix it himself and so he had to quit! Making something more complicated so that only you know how to fix it can backfire, too. Instead of giving him job security, it made things more difficult for him and everybody else so the company is losing millions of yen in wasted time and missed-schedules. Being a tinker, I am used to seeing what others did and how and where things can be improved or fixed. Today, I’m going to show you a little mod that you can do to save yourself some money.
Introduction:
Many useful photography gadgets like light meters, cameras, etc that were made several decades ago all share something in common that limits their use today – the use of an old battery type that has a different size, voltage and chemistry to mainstream batteries that you can buy today. These are the old mercury-type cells that went out-of-fashion around the late 1980s. It was a very good battery type because the power drop-off is steep so this will allow it to function near its nominal voltage for longer until it exhausts itself. Newer ones that use different chemistry has a smoother fall-off curve so they’ll emit lower and lower voltage gradually until they die. This leads to erratic operation like inaccurate and intermitent operation. The call for greener batteries resulted in the end for this because it has a scary-sounding name and so these batteries are now scarce. Sure, you can buy a few alternatives like the Wein cell but they’re not cheap at all and they usually die within a few months whether you use it or not. Hearing aid batteries share similar dimensions but the voltage is different and they can be hard-to-obtain in an emergency. The best way I know of is use the common and cheap 1.5v batteries and modify your gadget so they’ll work with them with as little fuss as possible. This is a popular mod that any people do, I am sure that you have seen or heard this done somewhere, I personally learned about it some time ago in the 1990s when these batteries are beginning to become scarce.
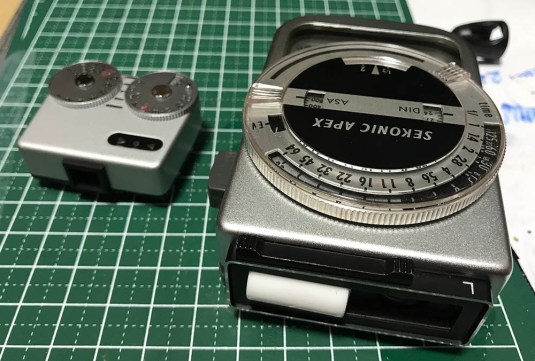
 You will have to open your gadget just like what you see in this picture. It looks scary but it’s one of the easiest things you can do if you’re an intermediate-level repairer. This is an old Sekonic Apex light meter, it’s one of my favorite meters because it’s easy-to-use and it is still reasonably-accurate in everything but poor lighting conditions where light ratios and other things may affect its performance. The only thing that I hate about it is it uses the older 625/MR-9 mercury-cells. Somebody stole my trusty Sekonic L-308 that I’ve been using for many years and so I had to bring this old meter back from retirement.
Doing this mod will allow your cameras and light meters to use the common button-cell batteries that you can buy just about anywhere. They’re cheap and relatively reliable but the problem with its power fall-off still remains but that’s something that you can ignore because they’re so cheap and all you need to do is carry several spares in your bag all the time. Just do a frequent battery check or see if the readings are still accurate and change the batteries if they fail these tests. This is a small price to pay if you ask me.
This just as a hack, the proper way to do this is to replace the resistors with a proper one with the right resistance or just install a potentiometer. That is too much for me to bother at the moment so I will just show this to you for educational purposes only.
I am not an electronics expert but a repairman told me that this mod will not work on all gadgets and some will just require you to adjust a variable-resister while some will need a new logic board. Luckily for us, most camera-related gadgets that uses these things are simple-enough and doing a simple mod like this won’t ruin their components. I am not a trained electrician and I hated electronics despite growing up in a generation where you are considered cool if you built your own transister radio. If you know more about these things and you’re sure about them then please chime-in. Let’s now begin!
Before We Begin:
If this is the first attempt at opening a lens then I suggest that you read my previous posts regarding screws & drivers, grease and other things. Please also read what I wrote about the tools that you will need in order to fix your Nikkors.
I highly suggest that you read these primers before you begin (for beginners):
- Essential tools
- Best practices 1
- Best practices 2
- Best practices 3
- Ai conversion
- Working with Helicoids
Reading these primers should lessen the chance of ruining your lens if you are a novice. Before opening up any lens, always look for other people who have done so in Youtube or the internet. Information is scarce, vague and scattered (that is why I started this) but you can still find some information if you search carefully.
I highly recommend that you also read my working with helicoids post because this is very important and getting it wrong can ruin your day. If I can force you to read this, I would. It is that important!
For more advanced topics, you can read my fungus removal post as a start. This post has a lot of useful information here and there and it will be beneficial for you to read this.
Modification:
You’re required to use a soldering bolt so this isn’t something that I will recommend to a complete novice. You’ll also need to open your gadget to access the negative wire so that you can modify it and this requires some special tools or skill depending on what you are going to modify. If I were you, I will just send your gadget to a repairman and have them do it for you. Just tell them what you want and I am sure that they will know what you’re talking about and if they don’t then stay well-away from them!
The first thing to do is the open your gadget and look for the negative wire. The negative wire is usually a cooler-shade like blue or green and is never red as far as I remember. It is also easy to determine which one it is simply by looking at which side of the battery it comes into contact with. It usually has an insulation around its terminal so it won’t touch the surrounding metal and cause a short.
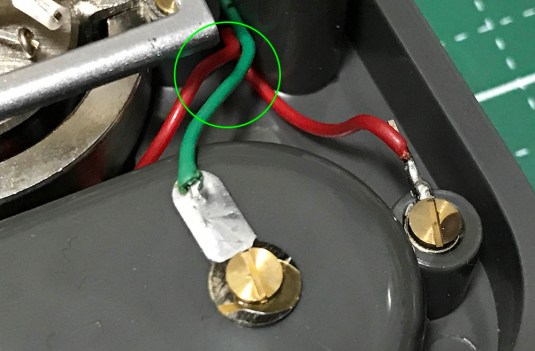 What you want to do is to install a diode between the negative terminal and its circuit so install it along the negative wire. Find a suitable part with adequate space to accomodate the new component and make sure that it won’t impede on anything’s movement.
 I have asked several people who are experts at this and they recommened the cheap and popular Schottky diodes (1N5711) because of their efficiency and other things that I don’t understand like conductivity properties, etc. They come in different sizes and I found the smallest one available to me. Trial-fit your diode and see if it fits the tiny space you want it to be in. These usually have a black band (or bare strip) on one side and that direction should lead to the battery. Just make sure that you get it right first, if you are unsure of it then use a voltmeter and do a simple test to see which side should go where. Once you’re satisfied, cut the negative wire and strip both ends of the open wire so you can solder the ends of the diode to them.
 Cut the extra length of wire from each end of the diode and twist the naked parts of your wire around the diode. Use a head sink at the base of the diode because they’re sensitive and can be easily-damaged. My soldering work isn’t the best in this picture but trust me, I cleaned this up a bit later so it’s not so messy.
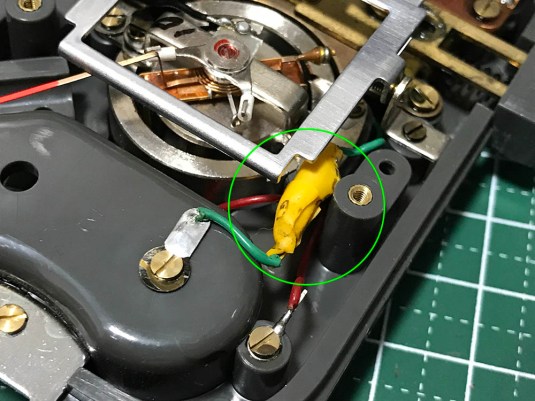 To protect the precious diode and to make sure that nothing conductive will contact both ends, use an insulator to cover the whole thing. Electrical tape is fine but they can get too messy over time when it breaks-down so I use an insulator. I bought the cheapest one at the shop and this is the result, an igly lump of rubberized material. Tuck everything and make sure that it’s safe and not impeding on anything’s movement and you’re all done!


(Click to enlarge)
The next step is to adapt the common button-cell batteries (LR-44/SR-44) so they’ll fit the larger battery well of your old gadget. The pictures above show their diameters and how much you will need to compensate. This is an easy fix and can be addressed by using an O-ring of the appropriate type and size. I sometimes use a small plastic tube for this but I ran out of material. Any material will do so long as it won’t conduct electricity.
 While the fit isn’t snug at least the little battery isn’t loose inside its new well and this will ensure that it keeps in-contact with both negative and positive terminals.
That’s all you need to do! Try and so some tests and see if you got it right. If the readings are off by a lot or going the wrong direction then you did something wrong. Check which direction should be facing where (cathode/anode), the cathode part should lead to where the negative terminal is. Check and see if the diode is working properly or replace it. This is the reason why you should test your equipment first before you do this mod so you’re going to be aware if something is way-off or not. Luckily for me, it was only off by a bit so I only had to tweak my light meter a bit.
Conclusion:
Do some final checks and see if everything is working properly. It’s rare that every thing will work perfectly off-the-bat so you will have to adjust your gadget a bit. Some gadgets will allow for easy adjustments by means of a potentiometer while some don’t and you’ll have to replaces resistors with ones with the proper resistance. It’s best not to adjust the 0 position of your needle when it comes to light meters but there are instances when this is the only way you can do it without causing too much trauma to your equipment. Use a light meter that you know to be accurate as a reference and try to match it to the best of your ability. Of course, the older one won’t be as accurate as the newer so don’t be upset if they won’t match exactly. In this case, close-enough is good-enough. These CDS cells are at least around 40 years old and many of them are on-the-way-out by now. If they show a tendency to be sensitive at the low range (like this one) then that’s a sign that it’s about to die in a few years or so. If it started to become too sensitive at the higher range then that is a sign that the deterioration is advanced and it’s time to replace it with a new one. You can buy newer cells, I bought a couple of them at Akihabara but I am still too lazy to do it and map-out the voltage ranges.
 I use my Voigtländer meter as reference because it’s a recent model that I bought new so it’s as accurate as it can get as far as small meters are concerned. I also used a spot meter just in case and I was satisfied with the results. To know more about these Voigtländer VC meters please click on this link to read my review.
That’s the basics of it. It took me about 30 minutes or so to do everything, It shouldn’t be a complicated operation so long as you have the right tools and know-how. I consider my electronic skills to be sub-par but I managed to do this without any problems.
Did you like this article? If you did then please share this with your friends and if you’re really motivated then please consider supporting my work. This will help me pay for the overhead of this blog as well as help with producing original content such as the cost of developing and scanning film. Thank you for staying with this blog and see you guys in the future again. Ric.
Help Support this Blog:
Maintaining this blog requires money to operate. If you think that this site has helped you or you want to show your support by helping with the upkeep of this site, you can simple make a small donation to my paypal.com account (richardHaw888@gmail.com). Money is not my prime motivation for this blog and I believe that I have enough to run this but you can help me make this site (and the companion facebook page) grow.
Leave me some tip?
Thank you very much for your continued support!
$2.00
Helping support this site will ensure that this will be kept going as long as I have the time and energy for this. I would appreciate it if you just leave out your name or details like your country and other information so that the donations will totally be anonymous it is at all possible. This is a labor of love and I intend to keep it that way for as long as I can. Ric.

Jan 28, 2019 @ 20:07:24
Thx for this tipp
Feb 02, 2019 @ 10:41:11
Thanks!