
Hello, everybody! I’m busy lately so I am writing a short blog post this time. Today, we’re going to talk about making a special tool to remove the lock/retainer for the A/R ring. It’s the ring or collar around the shutter button of the Nikon F, Nikon F2, Nikon SP, Nikon S3 and the Nikon S4. This ring is notorious for being difficult to remove as you will require a special tool to remove it and many beginners (and even “professionals”) botch this job by using the wrong set of tools to remove this. I will admit that I also botched my first try by using poorly-made tool that I DIY’ed but thankfully the damage wasn’t severe I ended up with some scratches instead of terrible scars on the surface of the A/R ring. I do not wish for that to happen to you and that is why I started this blog.
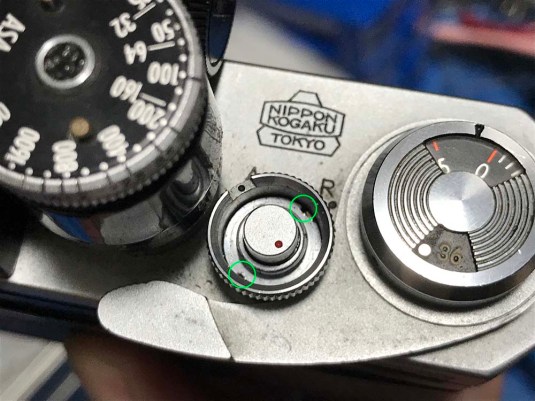 The A/R Ring has a retainer that has 2 slots milled on it. Many people botch this by using brute force to remove this with inappropriate tools such as a pair of screwdrivers,etc. It’s used for switching between “advance” and “rewind” that’s why it’s called the A/R ring. On the Nikon F2, this part is used to switch between T or L (locked).
IMPORTANT:
When using an opener to open anything, always remember to only use the tool to loosen the part that you need to remove! Once the part is loose enough to be turned by a driver or by a sharp pin, remove the opener and just use something else to turn the part until it is unscrewed. This way, you do not put both the part and the opener to stress and this’ll also prevent you from making any accidents!
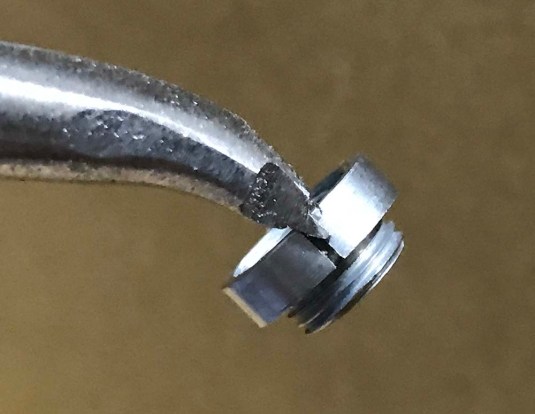
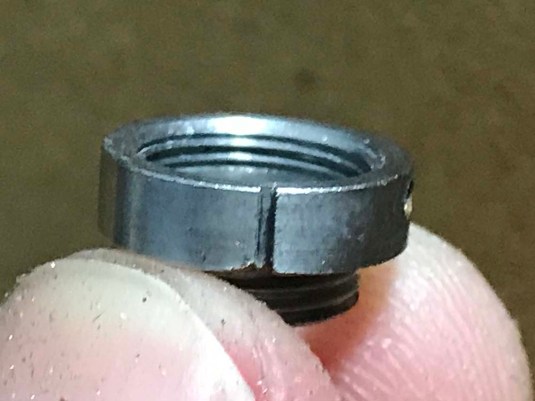 Here is a closeup of the retainer after it has been removed. See the slot? Ideally, you will want a tool that has prongs that are long enough to be inserted into the whole depth of it but tools that are hard enough can be difficult to obtain or expensive. The prongs will be thin and that means that they can easily break-off and leave the prongs inside the slot. It is going to be a bigger headache if that happens as you will have to find creative ways to remove the retainer without damaging it. Keep this issue in mind through out this post.
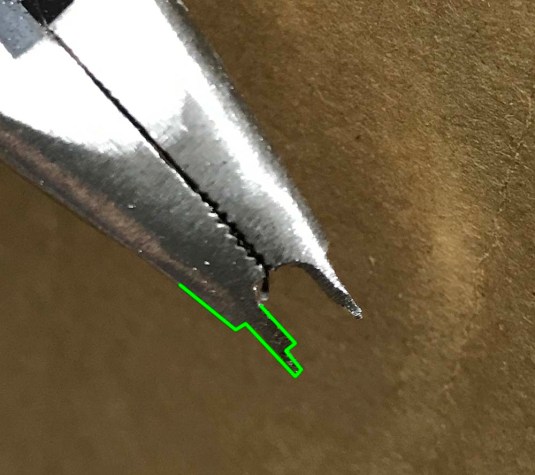
 Here’s one of the tools that I use to loosen-up the A/R ring’s retainer. It was milled from a piece of solid brass. Notice that the prongs’ tips aren’t long but end up in a sharp point. It was intentionally milled fashioned this so there is less chance of the tips’ ends breaking. I will have a bigger problem if the tips are left on the slot when I have thinner tips for this. The tapering gives the tips additional strength while still having a sharp tips that will be good enough to dig into the slots. Just make sure that the tips are sharp and you’ll be OK.
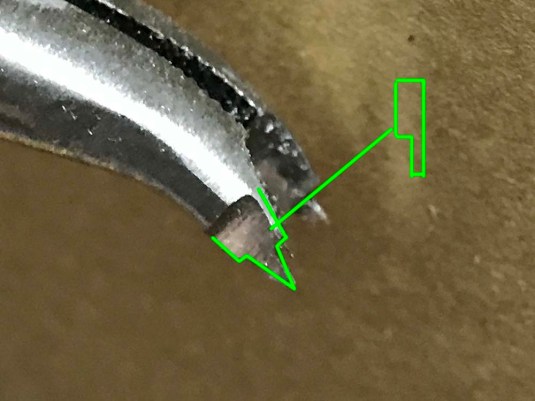
Notice that the tool has a deep center to give the shutter button some clearance or it will hit the tool and impede it’s function. Always remember this when making a custom tool to open your A/R ring. This is also the reason why many people use tubes instead but it’s difficult to look for scrap tubes with the correct diameter and milling one requires that you own a lathe or pay somebody to mill one for you and that will not be cheap.
 Here is another tool that I use. I made this from a pair of cheap alligator pliers. This tool allows me to open more things that requires a similar tool. This is more versatile but can be more difficult to use because you will have to be careful with your grip. A slip can be a very expensive lesson! The materials used on this is harder to mill than brass so you’ll need tools that will be capable of milling this like diamond-tipped cutters and file. I have the general shape of the tip outlined in green to make it easier for you to visualize.
 Here is a view from the side. Notice that the tips also end in a sharp point.
 Here is a picture of the tool gripping the slots. In real use, the tips will not reach this deep but it is deep enough to turn the ring in order for you to loosen it.
Conclusion:
That’s it for this post. I hope that you got something out of this and the lesson that I want you to learn here to use the correct tools for the job. If you don’t have one then you will have to be creative and make one yourself. If you are not sure how to open something, I will advise you to ask around first or search the net before attempting to open it. Thank you very much for patronizing my blog and if you enjoyed this, please share this to your friends on social media! See you guys again soon, Ric.
Help Support this Blog:
Maintaining this blog requires money to operate. If you think that this site has helped you or you want to show your support by helping with the upkeep of this site, you can simple make a small donation to my paypal.com account (richardHaw888@gmail.com). Money is not my prime motivation for this blog and I believe that I have enough to run this but you can help me make this site (and the companion facebook page) grow.
Helping support this site will ensure that this will be kept going as long as I have the time and energy for this. I would appreciate it if you just leave out your name or details like your country and other information so that the donations will totally be anonymous it is at all possible. This is a labor of love and I intend to keep it that way for as long as I can. Ric.

Oct 13, 2018 @ 13:07:28
Hi.. I am a “former” Nikon Professional Service tech (1978 -1980) I saw your post about the A/R tool and was wondering if you service Nikon F, F2 bodies and F2(AS)viewfinder? (or know of someone that does) I also have all the tools that were used to service the camera (except for the calibration tools) I also have a bunch of plates and various parts (all new) If you can help me find someone, that would be great! Thank you.
Jerry .. mj@mjadamo.com
Nov 03, 2018 @ 00:08:51
Hello, Jerry!
Let’s see what you want to sell. I may be interested. Ric.
Nov 06, 2018 @ 22:55:39
Hi Ric.. I have some of the tools needed to work on a Nikon F / F2. I also have many parts for them as well – Leathers – front plate (F) bottom plates – top plates I have MD-11 switch and also the drives/battery holder.. let me know I can also send a full inventory with images .. Thank you
Nov 09, 2018 @ 00:39:33
Hello, Jerry.
Sorry for the late reply. You can reach me at richardHaw888@gmail.com, please indicate “Nikon” on the subject or else it goes straight to the SPAM folder. I get tons of SPAM from India, China, Africa and who knows where. Ric.
Nov 06, 2018 @ 22:56:37
Can you service my F and F2AS?
Nov 09, 2018 @ 00:40:24
Hello, Jerry.
Depends if I have the time. I would like to but my schedule these days are kind of hectic. What’s the problem with them? Ric.
Nov 09, 2018 @ 00:47:59
Hi Ric.. The F needs calibration (speed) it been sitting in my dry cabinet for almost 40 years… The same for my F2 and it meter F2AS.. Thanks