
Hello, everybody! I’ll share with you my experience about bleaching thoriated glass and show you some results. This is a topic that has been discussed many times but I’d like to contribute my experience to my readers in case you want to hear what I have to say.
Introduction:
The use of radioactive glass is controversial for obvious reasons and I don’t need to explain why. But why did the use of radioactive material became an option for some manufacturers from the 1960s up until the 1970s? These exotic blends offer plenty of advantages since optical engineers could correct more aberrations with them, allowing them to achieve certain benchmarks or help design the “perfect lens”. Of course, public opinion put a stop on this practice which could have been influenced by the events at Long Island or some other things prior to that. I can’t say anything about any ill effects on us humans but it certainly will tint your lens with a yellowish or amber hue depending on how it was stored or how old it is. The “hot-element” can alter its own composition at the atomic-level and result in a dark-core. It affects the performance of your lens by filtering light, at times depriving it of as much as 2-3 stops of light. It also affects how sharp it could render, too. The drop in sharpness won’t be obvious but it’s definitely observable to a minor extent. That and also a drop in resale value is something that you should be aware of.

This is how it looks like before treatment. The Nikkor-N 35mm f/1.4 Auto is the most notorious example in Nikkor-land, I couldn’t think of another Nikkor that suffered from this despite knowing of others that have slight radioactivity in the glass. Do note that the center of the glass looks more discolored compared to the edges, hence the term “dark-core”. I personally didn’t mind this since it somewhat made this lens special and the discoloration is somewhat remedied when you’re using auto-white-balance but that will never be the case when shooting with film.
I mentioned that how a “hot-lens” was stored will affect how much it gets discolored, the reason for this is because the radioactive glass reacts to light, bombarding it with light will bleach it. If a lens was stored without any light reaching it and its glass then it just makes sense that it would develop more sever darkening compared to an identical lens stored with the glass exposed to some degree of light.
Which lenses uses these so-called “hot-glass”? That’s beyond the scope of this article, there are lists on the internet but how reliable they are is something that I cannot confirm for you. You need to remember that lenses that use rare-earth like lanthanum aren’t radioactive, they may look discolored at times but they should look neutral when you place them atop a white sheet of paper, or at least reasonably neutral with slight coloration. Look at the photo below to see what it looks like.

Here’s how one of mine looks like before treatment. This isn’t as bad but that’s still going to affect your photos. Notice how dark the center looks like compared to the edges.

You must not mistake any yellowish or amber hue to be a sign of discoloration, this Super-Takumar 50mm f/1.4 is from the earlier 8-elements batch so it’s not radioactive at all but it does show some degree of yellowing due to the color of its coating. If I placed it on top of a white sheet of paper I shouldn’t see a lot of change in the whiteness of the paper. I also check my lenses by mounting them to a camera and focusing on something white and see if it the color shifted.
Let’s now see how it affects your photos. This won’t be much of an issue if you’re shooting with a digital camera but it’s definitely going to affect your photos in a significant way when you’re shooting with film since there’s no way to adjust the white balance of your film. These were shot with my Nikkor-N 35mm f/1.4 Auto before I treated it.
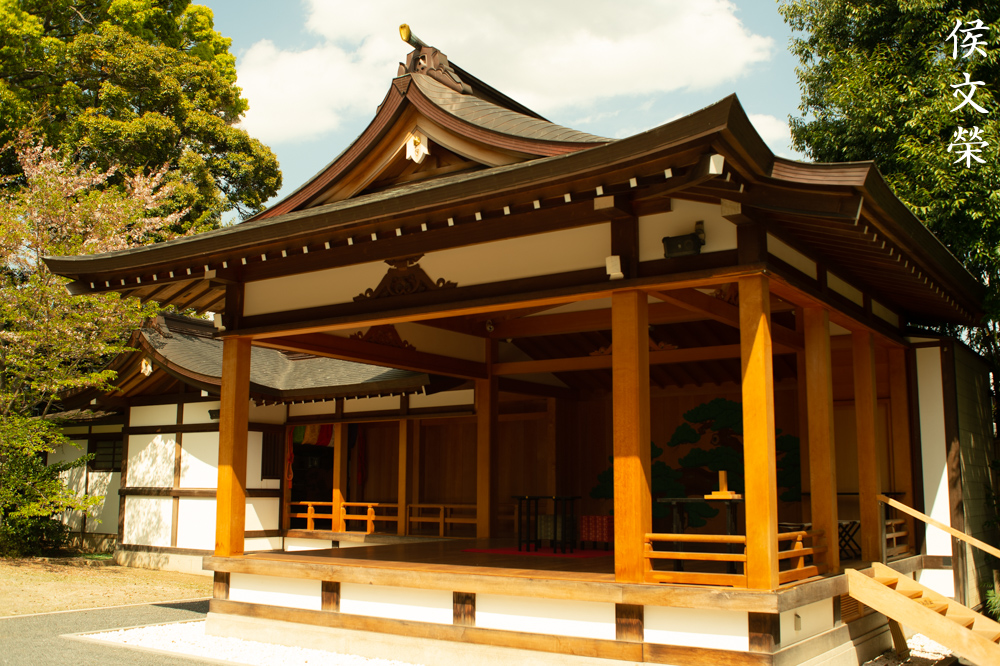
Notice how the white parts of the pavilion looks, everything is tinted with an amber-colored layer akin to shooting with colored-filters. While this may help create more contrast when shooting with monochrome film this is not something I would want in my photos.

It gets worse indoors specially under warm lighting, it looks unnatural to say the least. If you shoot people they’ll look like the characters from The Simpsons.
The discoloration can be treated somewhat with direct-light. It will take some time and the best way is to illuminate the radioactive elements when they are not inside of the barrel. In my experience, cooking them bare makes the process a lot faster, somewhere around 3x or so. It’s not unusual to cook the elements for long periods of time in this manner. It is normal to cook them for 24 to 72 hours and maybe even up to a week for severe cases. You’ll see the most results at the 36-hour mark and from there you’ll gradually see minimal improvements until you get to a point where it begins to appear pointless and just wasting valuable electricity. To illustrate my point I will show you how it looks like at different stages of the treatment. Since my workshop has consistent lighting conditions I could do my tests consistently merely by setting my camera’s white balance to a certain value and taking shots every 24 hours to monitor progress, that is if I didn’t dismantle the lens.

This is how it looks before I did anything, notice that the significant loss of light specially towards the edges. The white plastic sheet clearly looks brownish.
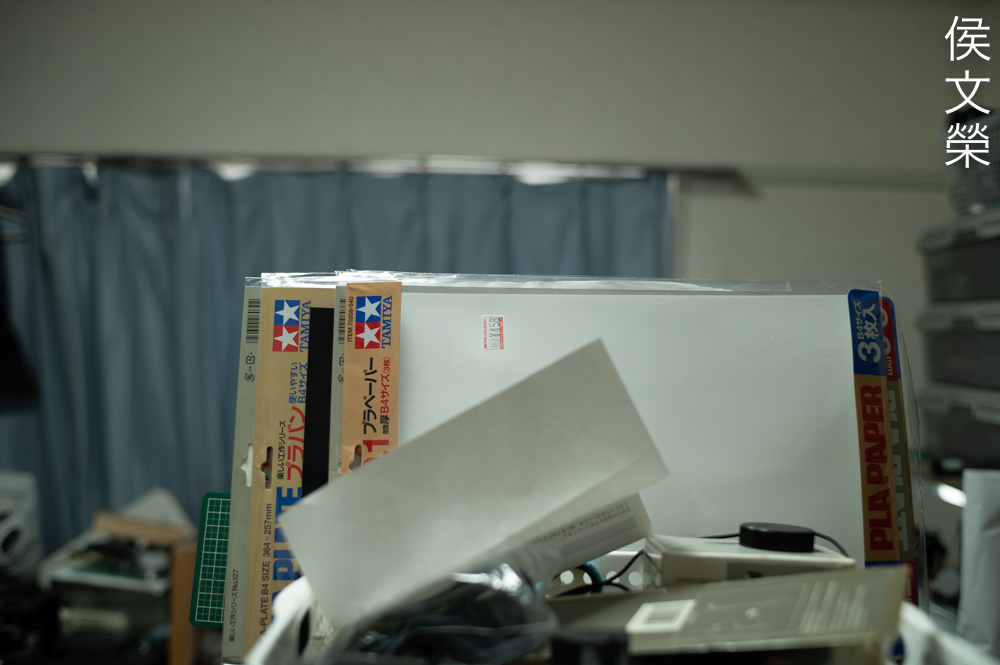
This is how it looks like after 50 something hours, there’s significant improvement in terms of brightness, clarity and it’s ability to portray a white object. It doesn’t look bad but it will get even better.
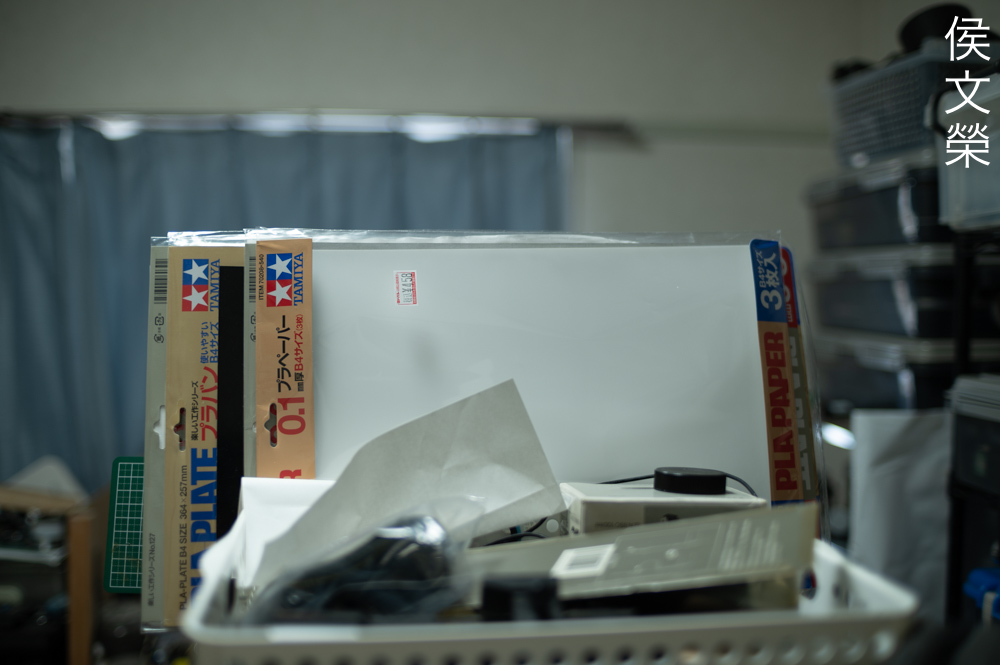
This is how it looks like after almost a week. There’s still traces of yellowing but this is certainly acceptable compared to what we originally have when we started.
Let’s see how the progression is when shooting with film, this is the best way to know if what we’re doing is working. If you remember our examples above with the Nikkor-N 35mm f/1.4 Auto where the whites appear yellowish then these will show you just how far we could reverse the effects of discoloration.

After about 72 hours this is what I got, the discoloration isn’t as obvious now but you’ll still see it. It’s not obvious when the objects in your scene aren’t pure-white where you could getaway with it. This will improve some more which you’ll see later.
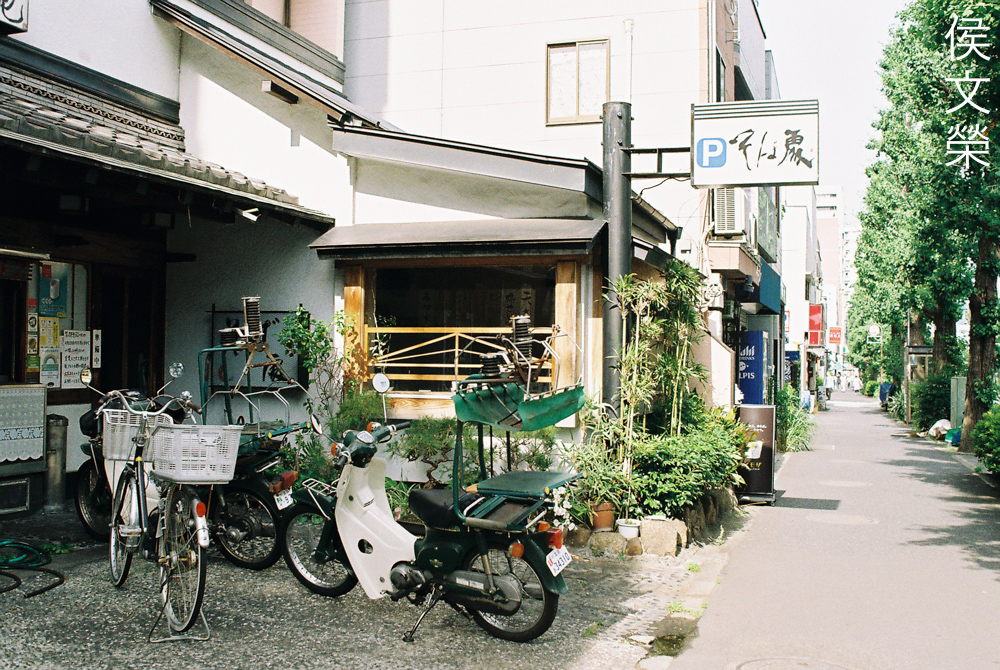
After bleaching it for more than a week to the point where I couldn’t squeeze anything from it anymore I tried to shoot more photos to see if it actually helped. The walls of the house are white, there’s still traces of discoloration which you will notice but then I was shooting with Kodak ColorPlus 200 which is known to have a yellowish tint.

Here’s another photo with white objects in the scene. Again, it’s still yellowish but not as bad compared to the photos I took above before I bleached this lens.

The yellowing is more obvious in the shade. I don’t think it will improve even more which is a shame because I like this lens a lot. I could tolerate this so I’ll just leave it be.
Read my article on the Nikkor-N 35mm f/1.4 Auto to see more examples of the before-and-after state of my lens. That will help give you more realistic expectations before you even start treating your yellowish lens.
You won’t need a fancy or expensive setup for this. In fact, you can use what’s available to you for this task. I will share my setup with you and also mention some other alternatives that other people used and also bust some myths.

There’s somewhat of a consensus that UV light will bleach the discoloration, that is not true. A popular lamp made by a furniture maker is also promoted as the ultimate solution for this but you won’t need any of them. Using the Sun’s rays will heat the glass and make the grease runny, potentially creating a bigger problem, it’s also inconsistent. The popular lamp mentioned everywhere is unnecessary expense. What you need is a bright LED lamp blasting directly at your lens. I just so happen to have UV lamps for killing germs and fungi so I used them instead. These are health hazards so they are difficult to acquire depending on where you live so the easiest sources are reptile-lamps. You’ll need an articulated stand, since I repair stuff I didn’t have to buy this. Just cover the whole thing with aluminum foil to prevent unnecessary light from reaching you. Since LED lamps do not emit excessive amounts of heat it’s safe to leave it running for longer periods of time without damaging your lens.

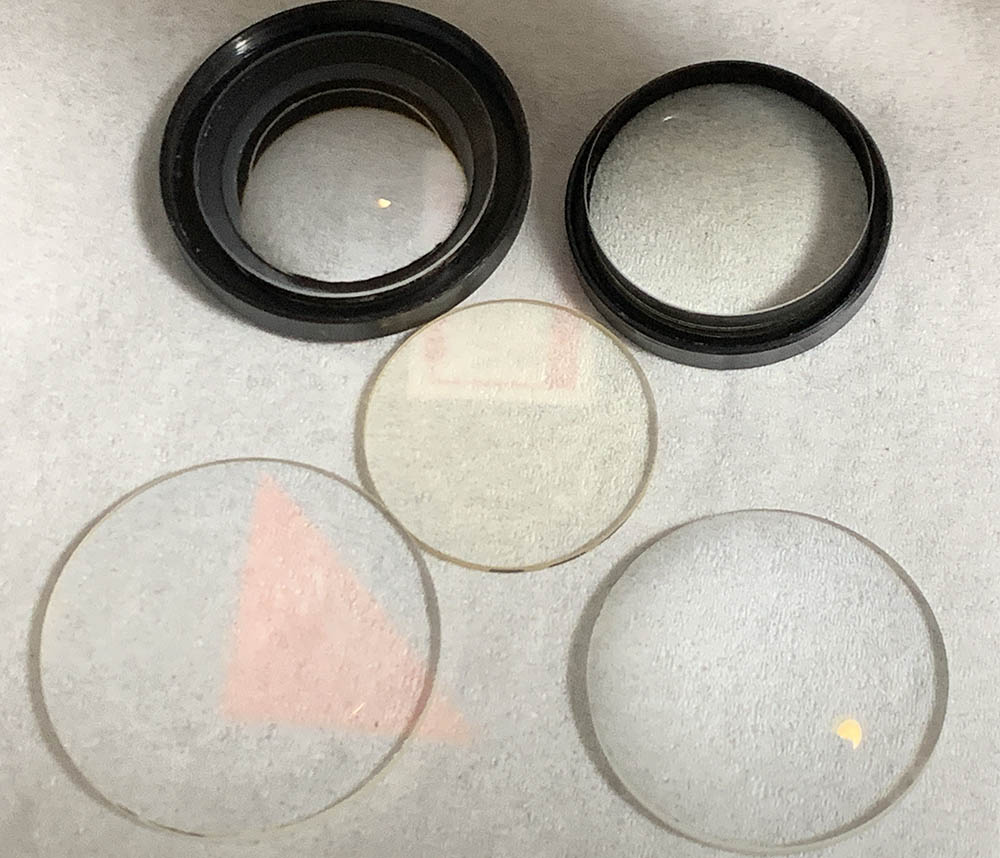
This is how they look like under the lamp. As far as my experience goes the UV lamps act faster compared to the usual white lamps by as much as 30% or so depending on the situation. The regular lamps will also help you get the desired results but you’ll have to cook your lens for just a bit longer which is not an issue unless you’re doing this for business.

The element at the center is certainly thoriated, just look at how discolored it is compared to the other ones. This is not bad but still this has to be corrected. Of course, the others won’t benefit much from this, I merely added them here just to kill germs and fungus.
After around 24 or so hours under the UV lamp this is what I saw. There’s significant improvement but there will come a point where you won’t be able to make it any clearer and that’s when you should stop. I have never treated anything that reverted back to its clear state as if it were new, you should be happy that you’ve at least bleached it to a certain extent where it won’t affect your photos much.
Dismantling the element and exposing it directly to light helps a lot. Some lenses have their “hot-glass” situated at the rear so you don’t have to dismantle them to get optimum results. The Super-Takumar 55mm f/1.8 is one example, it is possible to bleach properly as-is. The Nikkor-N 35mm f/1.4 Auto has to be dismantled to get best results because of its radioactive-glass being situated deep-inside the lens. If you didn’t dismantle it you won’t be able to bleach it to a state where you’ll get completely-neutral whites and the process will take more time because the other elements are going to filter the potent light reaching it.
I hope that you found this article informative. This is not by any means authoritative but all I shared with you are based on my actual experience and not internet hearsay passed-on by people who don’t actually repair lenses. This will help a lot if you want to understand how this issue affects your photos and how to correct them.
Here’s a recap:
- It makes your photos darker and marginally softer.
- Not all discolored lenses are radioactive.
- Never sunbath your lens, disregard what people tell you.
- It’s reversible up to a certain point.
- You’ll need to dismantle the lens for best results.
- If the “hot-glass” is exposed you don’t need to dismantle it.
- Proximity to the light source helps a lot, even by inches.
- You don’t need UV light or the Sun to make this work.
- Only use LED lamps for the task, even USB ones will work.
Try this trick for yourself and see if it works for you, if you know anything more please share it with us so we could all benefit from your input. Do not let all the hub-hub about radioactive lenses prevent you from using them, at the end of the day it’s still your choice and the happiness is yours.
Thanks for following my work, if you liked this article please share this with your friends so it will get more views. This site earns around $0.40 a day, we are totally reliant on views. You could also support this site, it helps me offset the cost of maintenance and hosting. You are also helping me purchase, process and scan film. This site promotes the use of film so we are all in this together. See you again in the next article, Ric.
Help Support this Blog:
Maintaining this requires resources and a lot of time. If you think that it has helped you or you want to show your support by helping with the site’s upkeep, you can make a small donation to my paypal.com at richardHaw888@gmail.com. Money isn’t my prime motivation for this blog and I believe that I have enough to run this but you can help me make this site (and the companion facebook page) grow.
Buy me a roll of film or a burger?
Thank you very much for your continued support!
$2.00
Helping support this site will ensure that this will be kept going as long as I have the time and energy for this. I would appreciate it if you just leave out your name or details like your country’s name or other information so that the donations will totally be anonymous. This is a labor of love and I intend to keep it that way for as long as I can. Ric.

Aug 30, 2022 @ 11:13:05
Great article. I left my yellow Takumar in a black soft pouch, in my camera bag for a few years, using it sparingly, and the yellow has gone. So if you keep the lens in a dark place over time it will lighten.
Sep 19, 2023 @ 02:43:24
If you don’t have a collimator and the skills to re-align the elements, it’s not worth it to dismantle the lens…
Nov 16, 2025 @ 13:37:34
Which is the best type of UV lamp to use for this purpose:
UV-A,UV-B or UV-C?