
Hello, everybody! I’m tired from work and it’s getting so damn cold now here in Tokyo! I was sick last week from fatigue and I’m recuperating. I have managed to muster enough strength to make a video on how to check Nikkormats (Nikomat here in Japan) for faults and some simple solutions that you can do on your own. Please pardon my speech in the video as I’m tired and it’s almost past my bedtime. And no, I’m not drunk this time like in the previous video from a couple of months ago. I am sober this time, I promise.
 Nikkormats are great cameras. They’re tougher than the Nikon F series in most cases and they’re a joy to use. The key to their toughness is their simplicity and the reliable Copal-S (Square) shutter used in them. They’re heavy and when properly cared for will last more than a lifetime. I would even say that they are tougher than the Pentax Spotmatics that’s known to be tough so that’s saying a lot about this humble camera. The Nikkormats are the predecessors of the great Nikon FM/FE family of reliable cameras made for amateurs and professionals alike. They share many similarities and you can see the pedigree.Nikkormats were made for the amateur market but their reliability and performance has earned it the respect of professionals and many pros used these as backup cameras. You can hear many stories about how tough this camera is from many photographers like the time when a Nikkormat fell from the edge of a cliff and lost its shutter plunger and it was replaced with a toothpick and it was left in that state for 2 decades and the camera kept on working as it did. I forgot who told me this so if you’re reading this, please raise your hand. They are easy to repair as well if you know what you’re doing and since they’re not expensive you can get one for little money and use it to swap parts when needed. I have rebuilt 2 Nikkormats in this manner and they’re both very reliable.
In this video, I will show you how to check any problems and some solutions for the lazy photographer. I will also show you some fundamental differences between the popular mechanical variants of the Nikkormats. The video is long so please bear with me.
The video isn’t enough to show what I usually do to service a Nikkormat for my personal use so I will be making a couple of companion articles after this when I have the time. It is also worth reading my article on how to replace foam seals and how to check cameras found on the junk shop for added information because much of what’s mentioned there are also relevant to this article. These are very important information for the potential Nikkormat owner so I hope that these will help you weed-out the bad ones from the ones that are worth saving. To make things short, make sure that the shutter is good and that the electronics are still working. If the viewfinder is dirty inside then you will need more time and skill just to clean that because there’s no other way around it but to open it up just to access the viewfinder assembly and it can get delicate once you get to that stage.
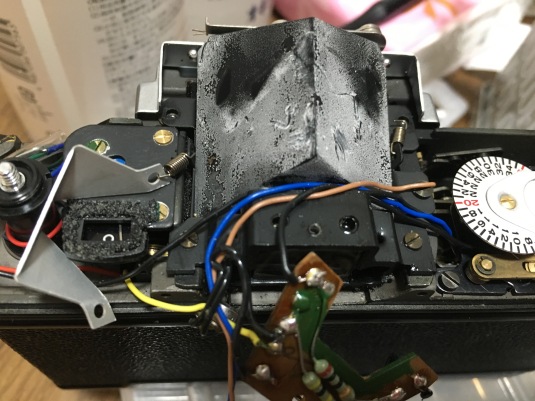 This is not even half of what you need to do just to remove the junk in the screen. If your Nikkormat has a dirty screen then just forget about it unless you want to pay a pro just to clean that up or do it yourself if you have the proper tools. This is not an easy task!
Thank you for supporting my blog and as always, if you enjoyed this post please share it with your friends! Our community is growing and it’s all thanks to you! We started small but we are getting bigger and bigger! I aim to make this the best Nikon-related repair and “infotainment” site and we are getting close to it month-after-month. See you guys again and I’m sorry for the poor video quality and the ads on my site. The ads help pay for the majority of the blog’s overhead like hosting and storage so I can’t do much about them. If you do get those annoying ones that automatically play or show inappropriate content or the ones that generate pop-ups then please get a screen shot and send it to me so I can do a formal complaint to WordPress. This is unacceptable and if this continues then we will have to look for another platform to host our blog. You are the reason why this blog and community is where it’s at now and that matters more to me. It’s going to be a pain just to migrate and we may have some downtime but if that’s what’s needed then we’ll have to go that route. Thank you guys again and see you in the next blog post, Ric,
Help Support this Blog:
Maintaining this blog requires money to operate. If you think that this site has helped you or you want to show your support by helping with the upkeep of this site, you can simple make a small donation to my paypal.com account (richardHaw888@gmail.com). Money is not my prime motivation for this blog and I believe that I have enough to run this but you can help me make this site (and the companion facebook page) grow.
Leave me some tip?
Thank you very much for your continued support!
$2.00
Helping support this site will ensure that this will be kept going as long as I have the time and energy for this. I would appreciate it if you just leave out your name or details like your country and other information so that the donations will totally be anonymous it is at all possible. This is a labor of love and I intend to keep it that way for as long as I can. Ric.

Feb 06, 2018 @ 18:13:04
Ric,
Without getting into the long story, my FTn (which I’ve had since new in ’74) suffered an injury to the matte black piece that connects the bayonet mount to the camera body. The casting cracked where the two bottom screws fasten the piece to the body – the upper two are OK. But there was enough distortion with this that I couldn’t get infinity focus. Bolstered by confidence inspired by your writing, I was able to use a high-quality epoxy to repair the piece, and have re-assembled the camera, and now it works fine.
But I’ve purchased a non-functioning FTn from which I plan to harvest the part to replace the broken/repaired part in my camera. To do this it looks like I will have to de-solder the green wire from the copper ring on that part, and re-solder it onto the new piece. Is this as straightforward as it appears?
thank you.
Feb 10, 2018 @ 00:59:10
if it’s the main chassis, i would just buy another Nikkormat and use that one instead. they are cheap anyway. the eletricals are simple so it shouldnt matter but you will need to calibrate it again.
Feb 12, 2018 @ 21:46:30
some followup – The casting is the piece that connects the bayonet to the main chassis. I bought a set of Vessel tools and took my time and got it all done. The biggest hurdle was figuring out how to reassemble so everything goes together and works correctly. The soldering was a fiddle but do-able. I checked the light meter against my F3 and a Gossen Luna Pro, and it’s all in agreement. thanks.
Mar 23, 2018 @ 20:36:01
Hello, I need to replace the focus screen of my nikkormat ft2, could you sell me a spare one and send it to Argentina? or in any case, would you tell me where I can get it? From already thank you very much!
Mar 25, 2018 @ 06:27:03
Hello. I have spares but they are for my own use only. You can get one from a junk. Ric.
May 15, 2018 @ 10:40:55
My FTn recently and suddenly developed a jammed winding mechanism, I’d appreciate your thoughts.
I’ve disassembled the top and bottom enough to learn that:
1. The winding mechanism operates smoothly up to the point at which a pawl engages a cam to drive the film advance gears, this happens in that stack of cams etc… on the top of the takeup shaft. The gears on the plate under that shaft are not jammed tight, but something prevents them from moving.
2. Pushing the rewind button changes nothing.
3. I can release the mechanism by pulling back the pawl near the top of the takeup shaft stack and the system returns to “unwound.”
4. On the underside of the camera, I disconnected the rack from the bottom of the takeup shaft and can cock and fire the shutter – I tested several speeds (not B) and they all seem to work as they’re supposed to.
5. I see nothing blocking full movement of the cam on the bottom of the takeup shaft that pulls the rack.
6. Lifting the film counter assembly, I see nothing obviously out of place/broken/stripped on the gears or the cam stack on the takeup shaft.
7. I have not actuated the self-timer, and am hesitant to do so.
Any thoughts on where the problem is and how to fix it?
May 15, 2018 @ 15:14:57
Hello,
Sorry I kind of forgot how the Nikkormats look inside but there is something there that prevents the shutter from cocking and I forgot what will actuate that but I do remember playing around with that. Maybe I should revisit the Nikkormat again and I will get back to you. Ric.
May 24, 2018 @ 10:23:50
A progress report:
With the top and bottom covers off, the counter mechanism lifted and to the side, and the above diagnostic tests, I’ve been studying this construction for the past several days. I’ve come to these conclusions:
1. frame counter, film advance, and shutter/mirror mechanisms are independent, linked only via “The Stack” on top of the film take-up spool (frame counter) and the connection of the rack to the cam on the bottom of the take-up spool (mirror/shutter).
2. Taking the covers off the “junk” Nikkormat (purchased to harvest the lens mount casting), I observe that shutter/mirror and film advance operate together, across the entire range of the winding lever. Only the shutter cock happens on my “good” Nikkormat; the film advance does not move, and appears to stop the takeup spool from further movement about 2/3 into the stroke. (I cannot see the definitive problem however)
3. There is no impedence to movement by the rack or the frame counter. The appears to be no binding in the idler gears A and B between the takeup gear and gear C on the sprocket shaft, and I find no other linkages. Therefore the problem must lie in the The Stack on top of the takeup spool assembly.
This looks like a complicated and tedious bit of disassembly. I’ve got the retaining pin backed out and over the next few days will slowly and carefully lift this apart.
My hypothesis at this point is that the Advancing Cam stop pin has stripped, or perhaps the spring on the stopper that looks like it has something to do with the lever pawl cam and/or stopper plate has broken (I cannot see it). I am going to get two fine forceps (e.g. Dumont 5) to aid with this disassembly.
phil
May 30, 2018 @ 11:35:18
An update:
The problem is not in the “stack,” as I have completely diassembled and no faults, other than the drive sprocket being misaligned, probably relating to the last time the camera was wound.
However, the sprocket spindle will not rotate. A degree or so of “rotational slop” but it is otherwise frozen in place. Here is a problem.
Now I don’t know where to go with this. Will be studying the diagrams some more, but I don’t see any interlocks so far on that shaft.
phil
Jul 07, 2018 @ 17:45:43
Sorry for the late reply, I am so busy with work and life at the moment. Weird, something is definitely jamming it. Are you sure that nothing is jamming the sprocket or the film counter? I have forgotten how to work on a Nikkormat so I have to work on one again to refresh my memory. Ric.
May 31, 2018 @ 20:26:08
On completing that disassembly it is evident that the hangup is the sprocket shaft cannot rotate. I see no interlocks in the diagrams. Since I hope to fix this camera, I’m now going to strip my “junk” FTn to find out what’s under that plate that carries the idler gears/mounts the top bearings for the takeup spool and sprocket. I’ve looked at the diagrams and all the online pix I can find, and I see nothing that should be hanging this up……obviously I’ve missed something. thanks.
Jul 10, 2018 @ 22:25:39
I too have been too busy. I have not disassembled further, other than small attempts to tease up that plate on which the idler gears ride. Something is keeping it from moving easily, it looks like it should lift straight up. Any clues appreciated, as I am trying to avoid peeling the leatherette from the front and lifting out the mirror box to get into that area above/behind the self-timer clockwork.
Jan 20, 2024 @ 16:24:36
Hi there
Fantastic page you have here. I just got an nikkormat ftn. The funny thing it is actually a nikkormat. It says on the sign. However, you have nikomat… how come the difference?