
Hello, everybody! Have you heard of the legendary “Barrel Man“? It is a wooden statuette carved by the talented Igorot people. He is basically a little wooden man with a big barrel covering his body. When you pull the barrel off from the statuette you will be surprised by his huge wooden spring-loaded penis. It’s a novelty gift and it has become somewhat of a folk culture icon after it was introduced to the rest of the world by travelers. I had one a long time ago at my office which I used as a paperweight and to entertain my guests with. I am reminded of that little naughty figurine by today’s subject. It has a spring-loaded gimmick, but it is not as vulgar as what the Barrel Man has nor is it as big. Anyway, it’s just as entertaining if you ask me.
Introduction:
The Seiki Kogaku S has a pop-up viewfinder instead of the Leica’s simpler window. It is one of its defining gimmicks to circumvent the original German parents. I find it pathetic and useless as you will soon know why later in this article when I talk about how it handles when shooting. Despite that, I find it charming as it gives this camera a special character and silhouette. The funny thing is, it costs a lot more to produce a tiny enclosed viewfinder compared to a simpler flip-type one and the latter would be much more useful. It’s just a waste of space and an unnecessary complexity to solve a simple problem. I guess the Japanese really did idolize the Germans too much, to the extent of learning the bad habit of over-engineering. It’s probably one of the first, if not the first Leica copycat and a primitive one, too.

It is now much cleaner compared to how you first saw it in part 1. Some parts of the plating are corroded and beyond conventional cleaning, there’s nothing much we can do about it. I have replaced some screws and a few small parts from a donor Canon S2 which fits perfectly. I’m lucky to have a few screws that I can repurpose for my spares box, some of them are cross-type screws and are placed in parts that you won’t see externally. Some of the small set screws were replaced with new stainless ones just in case.
Like what I said in my previous articles, the workmanship of this camera is better than the Soviet copycats but is nowhere near the level of the Nikon M and S series. The Nikon is a no-compromise product, you will see the quality of the parts once you have opened it, nearly everything was made from good quality brass and the craftsmanship is almost at the same level of what the Germans did. I have restored several Nikons that came to me and similar condition and I have successfully made them operate as close to the original specifications. This one was extremely challenging and some aspects will never work as they did before. It took me several nights just to try to make the 1/500s work but it was too damaged to make that possible.
I will focus on how the camera handles in this article just to give you an idea of how it is to shoot with the second-oldest production Canon. I will discuss all the quirks and annoying things that I will encounter. It’s not the best camera for a daily-shooter, that’s for sure.

The rangefinder’s patch is weak, perhaps due to it’s age. That makes it difficult to acquire precise focus for subjects that are really close, especially if you consider that the magnification isn’t adequate. The window is so small and the patch occupies a small area at the center.

I had to crop this photo drastically just because it is biased towards the left. That’s where the silly gimmick of using a pop-up viewfinder fails because it sits atop the camera instead of just beside the rangefinder as what you would get with most Leica-type cameras. There’s definitely no parallax correction of any sort, it’s so tiny that you can’t see the actual area properly even without wearing glasses. For those of you who are not familiar with using these types of cameras, the higher the viewfinder is, the worse of parallax will be at closer distances. It wouldn’t be that much of a problem if there are corrective frames to help you.

If you look carefully at the right edge of the frame you will see a dark strip. That is caused by the opening curtain bouncing back into the film aperture. This is a very primitive copy of a Leica so reliable brakes are absent.

There is also a light-leak coming from the same edge. This is problematic and I am unsure of the course, I suspect that the closing curtain bounces a little bit or is left open at slower speeds due to lack of tension.
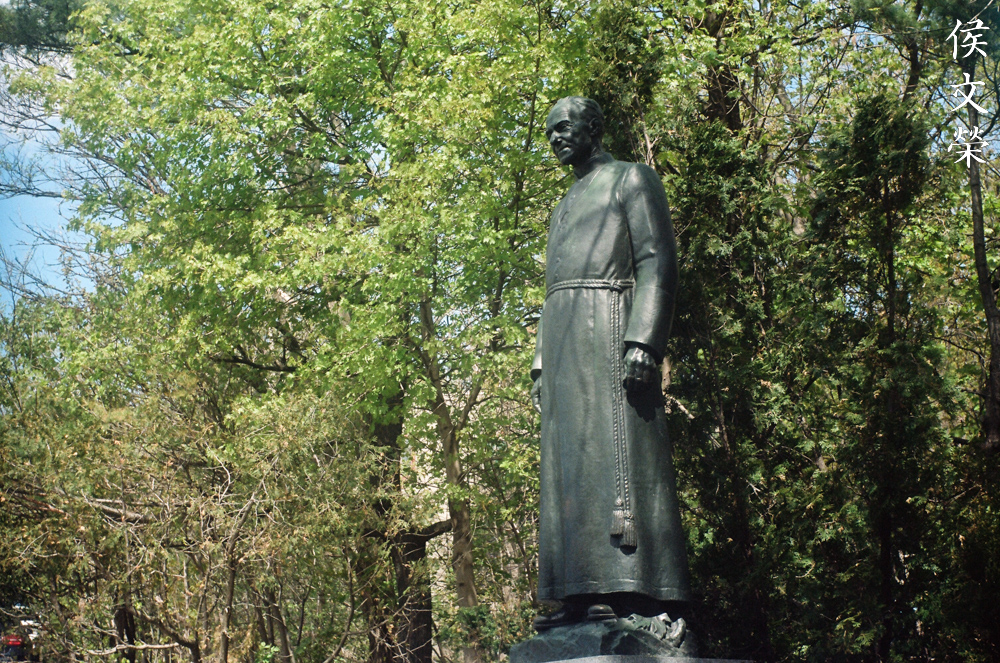
I have wasted about half of the roll to shutter malfunction, the good thing is I was able to salvage pictures that I really like, such as this of Brother Andre’s statue, it’s a miracle.

Despite the slow governor not functioning optimally, I was able to take decent photos in dark conditions.

I am surprised that this photo turned out to be acceptable because I shot this at 1/8s or so.

I got lucky with this one because the shutter cooperated with me and didn’t give me a black frame. You’re not going to get framing issues with the stupid viewfinder for subjects that are further in the frame.


(Click to enlarge)
Here’s the rest of the roll, I have never been so relieved to finish shooting with a camera I was testing. It’s so unpleasant to use as everything felt precarious. Not only because the shutter isn’t reliable but handling the camera wasn’t fun at all, the ergonomics are just terrible. I have wasted a valuable roll of Kodak Portra 160! I’m doing this just to give you guys feedback, that’s how much I value my readers.
Boy, am I glad this is all over. This is not what I would call a pleasant shooter, it’s worse than my Nicca 3S. I can imagine that only hardcore Canon lovers will find this pleasurable and put up with all the nonsense thinking that they are shooting something sacred, perhaps like me shooting with a Nikon I. This is just for collectors, a nice item in the cabinet. Of course, I will advise anyone who has a working copy of this to get it out and shoot with it sometimes to prevent any trouble. Now that we’re done with the commentaries, it is time for ending this series with the final steps that I did for bringing this camera back to life.
Before We Begin:
If this is your first attempt at repairing a lens, I suggest that you see my previous posts regarding screws & drivers, grease and other things. Also read what I wrote about the tools that you’ll need.
I suggest that you read these primers before you begin:
- Essential tools
- Best practices 1
- Best practices 2
- Best practices 3
- Ai conversion
- Working with Helicoids
Reading these should lessen the chance of ruining your lens. Before opening up anything, always look for other people who have done so on the internet. Information is vague and scattered but you can still find some information if you search carefully.
For more advanced topics, you can read my fungus removal article. It has a lot of useful information, it will be beneficial for you to read this. I also recommend that you read the working with helicoids article since it is very important!
Disassembly (Pullies and Curtains):
Just like what you would do with regular Leica clones, you’ll want to clean everything as much as possible before you even install your replacement shutters and ribbons. Even before that, you should measure all components including the attachment points in their respective drums and pulleys. I will not go too deep into the details because this topic has been discussed so many times not only in this blog but everywhere on the internet that talks about this subject. In fact, you should know what to do if you are reading this.
For a camera in such a poor state, the only way to clean this is to take everything apart. I usually avoid the spindle, which is the long shaft that spins and contains the take-up drum and pullies for the curtains. This part is very annoying to put back because it has to be aligned precisely or else the shutter won’t operate properly. Unfortunately, I had to take it apart just so that I could clean all the corrosion and shellac.
Once you have taken everything apart, dip all of the brass parts in alcohol to dissolve any shellac and glue that was there originally. Do note that anything that is not brass or stainless steel will rust in the alcohol, it is important to remove steel screws and shims in order to prevent this from happening.


(Click to enlarge)
You can open up the springs by unscrewing their caps off but you must be careful so you will not damage the delicate coils inside. Note how each spring is attached to their caps and shaft so you will know how to remove and reinstall them later. Clean the coils very well with lighter fluid and lubricate them using fresh grease, just brush the coils so they are coated with a very thin film of lubricant. The pivots at each end are lubricated with a little bit of grease, too.
Locate and extract this screw so you can dismantle the rear curtain’s drum and the front curtain’s pullies. I will advise you to carefully study how it works and make notes of each alignment. Getting anything wrong here will be a huge headache later.

This is how it looks like when everything is dismantle. Clean everything very well, especially the corroded parts of the shaft. You can polish it with a rubber wheel if you want.

The drum can be opened just like this. Push the cap from inside using a wooden stick and it should open without a lot of effort.

Extract this so you can remove the upper pulley. Please do not forget to note its original alignment.

Everything has been cleaned to the best of my ability. The springs are lubricated and all I need to do next is to reassemble each subassembly. Please note that there are shims here and you should put them back where they belong. Lubricate the pivots with grease so that they turn effortlessly.

I have fabricated new ribbons and curtains from the measurements that I took from the old ones. I did the best I could to stitch everything as neatly as possible. Notice that I am using a synthetic material for both of the curtains, they are not good as they easily fray at the edges. This is something that I will regret. I will never use this material again and stick to the traditional silk curtains from Japan.

Attach everything with tape first so you will get a feel of how everything works. Install the new shutters to test the alignment of the edges and be sure that the overlap between the front and rear curtains are both correct. The front curtain should be at the back, unlike what you see here. Cock the shutter halfway, your curtains should have an overlap of about no more than 3mm, mine is 1.5mm more but I don’t care. Look at the next photo and read the description on how to reinstall the shutter crate.
Once you are satisfied with the positions of the curtains and ribbons, use contact cement to finalize them. Remove the tapes and wait for an hour for the cement to partially cure. Reinstall the shutter just to see if everything’s still positioned correctly.

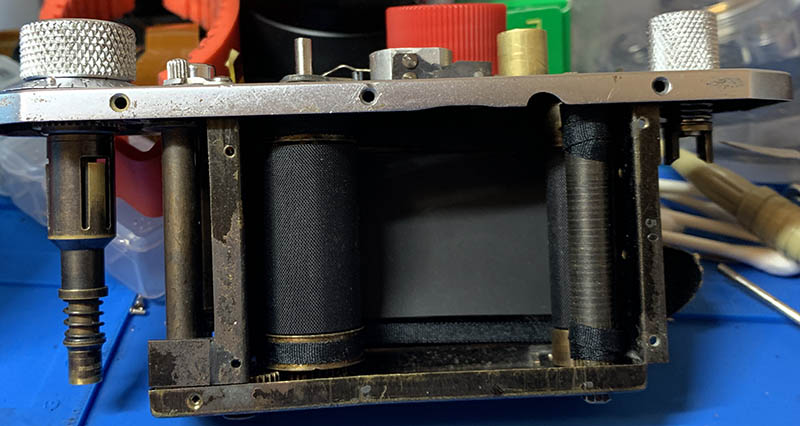
Before we proceed, please note that I did not have the floor of the shutter crate installed here since I want to show you a better angle of the spindle. Please install the floor before you proceed.
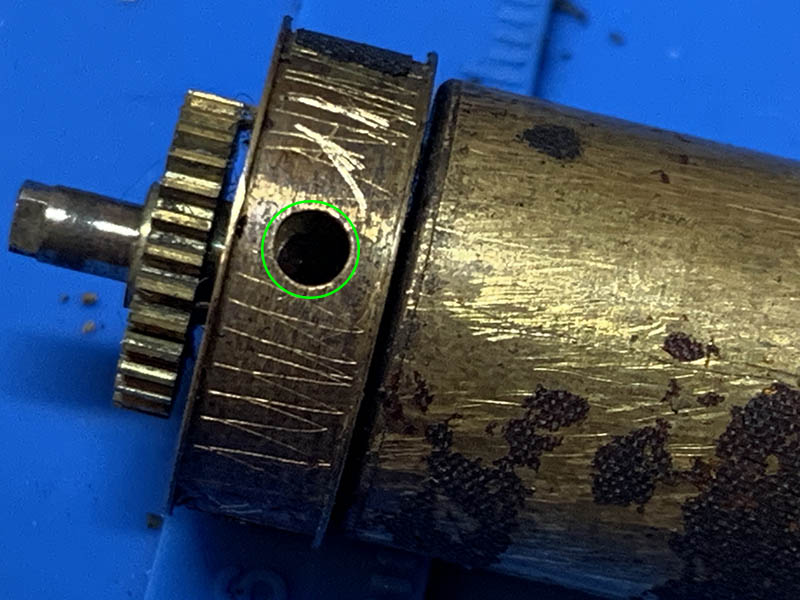
With both springs relaxed, roll the drum of the rear curtain and the pullies of the front curtain so they will take up everything as if the shutter is charged. It is not shown here but the hole at the top should roughly be at the 18:00 position.
There is a huge cog at the floor of the shutter crate that does not turn a whole revolution. It is responsible for keeping the rotation of the whole spindle within a certain range. Turn that cog clockwise until you can feel it stop, that’s its orientation when the shutter is cocked.
Put everything back together while maintaining the position of the said cog and the spindle then reinstall the top back to the shutter crate. You should be careful because the pin underneath should align with the hole on top of the drum. Slip it in and secure the shutter crate with screws.

You should be able to reproduce this alignment when the shutter is cocked. You don’t have to install the speed selector assembly to confirm this like what you see here, just make sure that this pawl is aligned to that hole. Failure to do so will result in irregular shutter operation, it may not even open at all.
Do a couple of tests with the springs tensioned a little bit just to confirm that the shutter is working, the curtains should travel properly, you should see some speed differences after installing the speed selector assembly and testing it.
Test and adjust the shutter as you would with any Leica clone, that topic has already been covered by lots of other experts. All I can say is there’s not a lot of ways to refine the adjustment for the speed, all you’re able to do is to adjust the tension of the springs. This is a very primitive copycat, it’s probably the earliest design that ripped-off Leica.
Disassembly (Wrapping Up):
With all that tedious work done, it is time to wrap everything up. The first thing you need to do is to test and adjust the shutter. I will not talk about the whole process here because it’s a common subject. What I can say is you don’t have much to do in terms of adjustments except for the tension of the curtains, that’s all. This is a crude camera so don’t expect too much from it. We don’t even know if it works properly when it came out of the factory.

Reassemble everything up to this point so you can test the shelter comfortably. Everything important had to be put back where they belong.
After you are done with the shutter speed adjustment, it’s now time to put all the parts together. Trace all of your steps back so you know how to put things back together again. All that note-taking will be handy in this process.

That stupid cylinder used for positioning the viewfinder should never be tightened, there should be some play or else the viewfinder will not operate smoothly when triggered. Seen in this photo is the spring and lock for that viewfinder. It’s a little bit adjustable, I should have made by adjustments earlier before I have installed the rangefinder mechanism.

The old rubber dampers have been replaced with foam. Also note that the eyepiece assembly can be put back onto the top cover at this stage, this means that we do not have to disassemble it while we remove the top plate much earlier.

Adjusting the rangefinder mechanism is a lot easier with this camera. All you need to do is turn the screw in the left “ear” of the focusing unit to adjust the horizontal alignment. You adjust the vertical alignment by turning the bezel of the prism, just like what you would do with any Leica clone.
Now that everything is back together, do some more tests and see if everything works properly. Reinstall the dial for the slow speeds before you put the focusing unit and the top cover back. I have forgot them it so it became a little bit more complicated for me because the focusing wheel is blocking my way.
Conclusion:
I’m just glad that the whole exercise is done. I am not at all impressed nor happy with the whole project. I only wanted to work on it since I wanted to experience how to shoot and enjoy the Nikkor 5cm f/2.8 that came with this camera. Despite all my efforts, I wasn’t able to restore this back completely. I could make the1/500s work nor open at all. All the speeds are firing almost 1/3 of a stop faster. The slow governor is working but it’s not timed perfectly. Pushing the pop-up viewfinder back won’t make it flush with the top cover because the spring that locks it has lost some tension, I got it in that state anyway. Overall, I wasn’t completely satisfied with my work but the fact that I was able to get it working at all it’s enough for me as some kind of consolation. And I’m going to say it again, I’m just doing this for the Nikkor.
Look at how shiny it is! It used to be dull, grimy and full of corrosion but it’s now looking presentable. The focusing unit works smoothly without lubrication of any kind. The rangefinder patch is so weak, I can’t see the patch clearly especially when it’s dark.
That’s all for the series. I am both happy and proud to have presented another article for my readers, and it’s about a topic that we don’t see much of. We have dismantled one of the rarest cameras down to all of its tiny components. Not only that, we have also reviewed it in modern context. Do you like this article? It is another original content that you can’t find anywhere else. Please help me with my life’s work, support this site by leaving me a little tip. Some places will ask for a tip even if they did nothing at all, but here, we are saving cameras and keeping everything documented for the next generation! This site would not have lasted for so long without your support, thank you very much for everything and please come back again. I will see you guys next time for another amazing article about photography. Ric.
Help Support this Blog:
Maintaining this site requires resources and a lot of time. If you think that it has helped you or you want to show your support by helping with the site’s upkeep, you can make a small donation to my paypal.com at richardHaw888@gmail.com. Money isn’t my prime motivation for this blog, I believe I have enough to run this myself but you can help me make this site grow.
Leave me some tip?
Thank you very much for your continued support!
$2.00
Helping support this site will ensure that it will be kept going as long as I have the time and energy for this. I’d appreciate it if you just leave out your name or details like your country’s name or other info so that the donations will totally be anonymous. This is a labor of love and I intend to keep it that way for as long as I can. Ric.
