
Hello, everybody! Because of the generous support that I got from all of you, I am motivated to finish this series earlier than scheduled. I’m not saying that I am like a jukebox that will only play whenever a coin is inserted, but a little bit of donation makes me feel that my contribution to the community is welcomed. It has been many years since I have started this website and this is one of the few instances where everyone seems to so eager to see the final part of a series. Your prayers have been answered, this article will be the best resource for this camera around in the internet unless someone else will be able to write something better. If you’re content creator, please don’t rip my content off. If you must, at least help advertise for me and leave me a little tip, that will be very much appreciated. It’s fair for me to ask.
Introduction:
The Voigtländer Bessa R is a quirky camera, but it’s very popular. There’s many people who have had the bad luck of owning lemons just because of how it was constructed. In this case, popularity does not mean reliability. You will know why I made the statement in this article. Despite having a bad reputation for its reliability, some people have been lucky with their cameras so it’s not entirely the camera’s fault. It’s still a great camera, all you need to do is inspect the camera very well before buying one and ask for a warranty. That should give you enough time to run a few rolls through it.

I am somewhat disappointed at the amount of plastics used within the camera. I could accept it having a plastic exterior but seeing plastic used in some of the important parts inside the camera turned me off. It is ironic because it’s not the plastic parts that will give in first, what some of the metal parts.
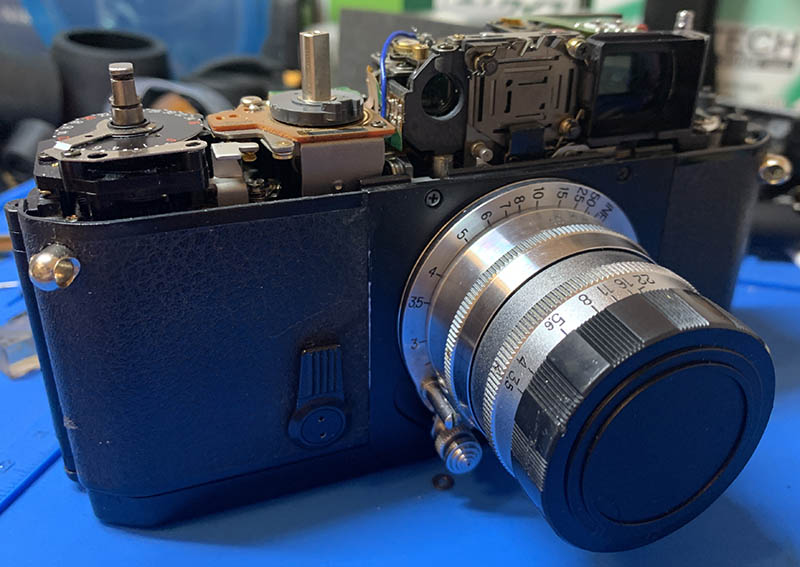
We have discussed this camera’s features and history briefly in Part 1, along with how to take apart some of the major assemblies. This part will be dedicated to fixing what’s wrong with the camera and finishing the whole project. Since this camera is kind of popular, there are many others who wrote reviews of it so I won’t be repeating what others did and concentrate on high quality and unique content that this website is known for.
This will be the last part of the series so I have a working camera at this point. Because of that, I will show you the pictures that I took with it after the repair. It’s a film camera so there’s nothing much I could say about it in terms of producing pictures, so I will focus on its meter and how it handles. I will also give a bit of commentary regarding the viewfinder in this article and how it influences the overall experience.

(Click to expand)
My biggest worry with this camera is the short base for the rangefinder. Thankfully, this is not much of a problem for closer subjects because it’s easy to see the difference with the patch. I think it’s reasonable to assume that this camera is adequate for most situations especially if you are not shooting with a very fast lens wide-open that has a shallow depth-of-field.

The problem with the short rangefinder base becomes apparent when shooting at objects that are further into the scene, or close to infinity. This is because the difference in parallax isn’t that obvious. You also do not have the ability to magnify your view like how it’s possible for older Leica cameras, which I think is a missed opportunity. Perhaps it would make it too expensive to produce.
Compared to most rangefinder cameras, this one vibrates quite a bit, almost to the same levels as an SLR. That’s because it has a mechanism within it that acts kind of like the flapping mirror of an SLR which is the cause of the extra vibration. It’s not much, but it’s enough to prevent me from shooting with much slower speeds than I’m used to with other rangefinder cameras. Apart from the vibration, it’s also quite noisy.
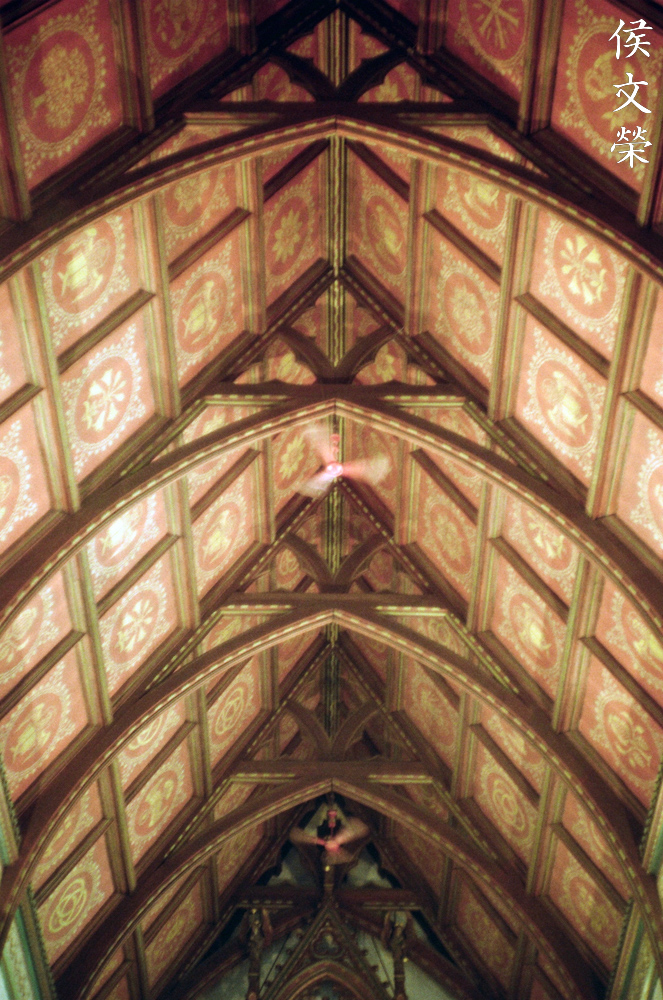
If you must shoot with a slower shutter speed, lean against the wall or something stable. That will help a lot in giving you more stability. You can guess how slow the shutter is on this photo just by looking at the spinning fans at the ceiling.

What I like most about the viewfinder of this camera are the sharp frame lines. They help you compose a lot easier even with poor lighting. When shooting at 50mm, the frame line covers about 60% of the frame, that’s because it has a built-in 35mm frame that covers more area, about 85%. While this is great, the only drawback is you don’t get a 1:1 magnification ratio which a lot of people prefer. If you wear eyeglasses, it is probably better for you because it makes it easier to see the corners of the viewfinder.

To accurately frame your shot, simply use the patch as the absolute center of your composition. You don’t need to compensate that much even if you are shooting at the minimum focusing distance because it will correct the frame lines for any differences in parallax as your focus.

Another thing I like most about this camera is the accuracy of the meter. This scene is challenging, it has a bright area in the background contrasted by the very dark pews opposite to it in the frame. I didn’t make any corrections to the reading and just trusted meter and the photo turned out perfect. From this picture, I can say that the meter is probably heavily biased towards the center. It may have a 60/40 ratio just like a Nikon F3.

I’m impressed by how the meter performs, the exposure is always perfect. If I suspect that there will be a misreading I will just take my reading with my main subject at the center and then then compose.


(Click to expand)
I took these photos because I wanted to see if the meter can be tricked by bright sky, so far everything is looking great. The TTL meter is so dependable, I will trust it all the time from now on after seeing these. It is typical for such a simple metering system to get tricked by a bright sky, but this camera is smart.


(Click to expand)
I must say that I am very pleased with the pictures I took with this camera. The most modern camera that I used for shooting with LTM lenses before this one is the flimsy Canon 7 that I had. While that camera has some merits of its own, it pales in comparison to this one when it comes to comfort. This is a true modern camera and its ergonomics reflect that.
I have enjoyed shooting with this camera a lot, I really like it. Will I recommend this to anybody? I do not think so only because of how much they are going for these days. They used to be affordable but they are kind of expensive today because of hype. I have waited for this camera for many years because I wanted a broken camera so I can repair it for an article and also to save money. I got this for $110.00 because of its jammed shutter, a working one would have cost me some $280.00 at the very least. Never purchase these at the price they are going for these days because you will only help make these more expensive. Wait for someone selling these for an honest price and get it as soon as you can. Just make sure that you are able to test it and get a refund if it gets broken. You can test it by running a few rolls of film through it. See if it is able to focus properly and the patch is centered. Any misalignment in the rangefinder can be tolerated, it’s easy to adjust it yourself. Test the shutter, they should all sound correct at every speed. It is rare for a Copal shutter to exhibit major problems that you cannot notice, it’s one of the most reliable mechanisms ever made in photography. If the shutter behaves incorrectly in certain speeds or won’t open at some of the fastest speeds, you should skip it because it may require a shutter replacement and it’s not cheap. The meter should be reasonably accurate, test it with another camera that has TTL metering, the results of the readings from both cameras shouldn’t be off by a lot. Turn the ISO selector and the meter should show an accurate reading that reflects the changes that you have made. Fire a few shots and count the numbers in the frame counter, they should be accurate. Open the back door and the frame counter should reset. The advance lever should feel ratcheted and it could cock the shutter. Do this a few times and make sure that the camera could achieve an exposure cycle. Slightly apply a little bit of pressure to the film sprocket and the take-up spool, wind the shutter and they should be able to turn in sync with the advance lever. Use a flash and test if it can be fired using the synced speed. Also don’t forget to turn the frame line selector, it should be able to display the selected frame lines properly. Lastly, see if the self timer works, if it does not trip the shutter, you’ll have to replace the whole shutter unit. The cosmetic condition of the camera isn’t a good indicator of its reliability, that’s something that you should remember. Happy hunting!
Before We Begin:
If this is your first attempt at repairing a lens, I suggest that you see my previous posts regarding screws & drivers, grease and other things. Also read what I wrote about the tools that you’ll need.
I suggest that you read these primers before you begin:
- Essential tools
- Best practices 1
- Best practices 2
- Best practices 3
- Ai conversion
- Working with Helicoids
Reading these should lessen the chance of ruining your lens. Before opening up anything, always look for other people who have done so on the internet. Information is vague and scattered but you can still find some information if you search carefully.
For more advanced topics, you can read my fungus removal article. It has a lot of useful information, it will be beneficial for you to read this. I also recommend that you read the working with helicoids article so you will not get stuck because you couldn’t reassemble the helicoids back properly.
Disassembly (Shutter):
The shutter mechanism itself is very reliable, some will even say that it’s “bulletproof”. In most cases, you won’t have to go this deep when working with this camera or any of its related models. I’m showing you this part just so you will know what to expect. I removed the shutter because I thought there’s dirt in the timing mechanism somewhere or something is dirty so some parts aren’t moving freely. It’s a good thing that the problem lay somewhere else because this is the last part of the camera that I am willing to mess around with. Take as many pictures as you go so you will know where things came from. You’ll also need to remember to put back any shims found around these parts.
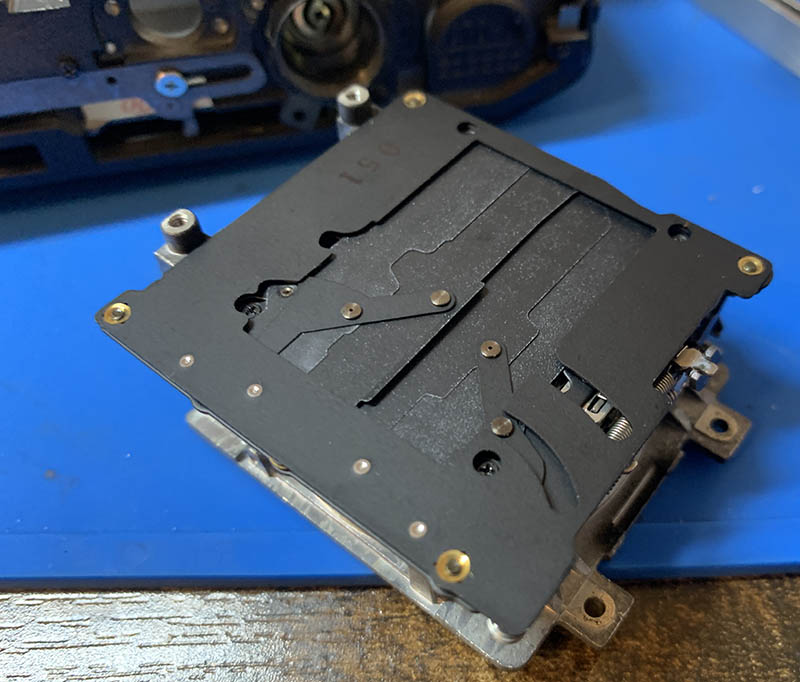
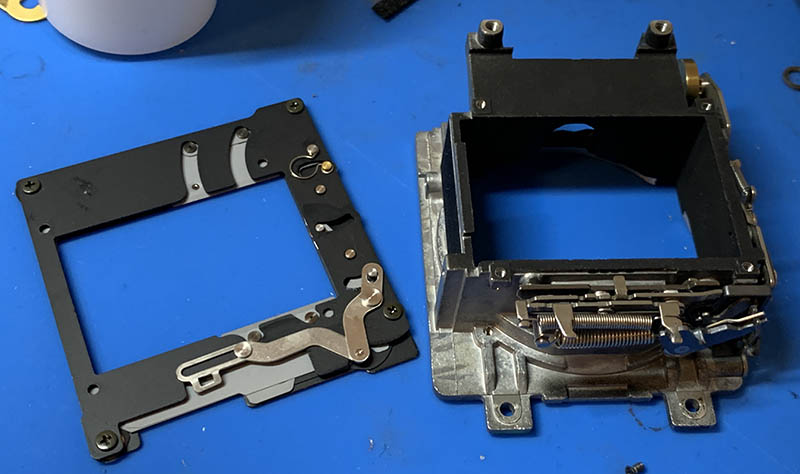
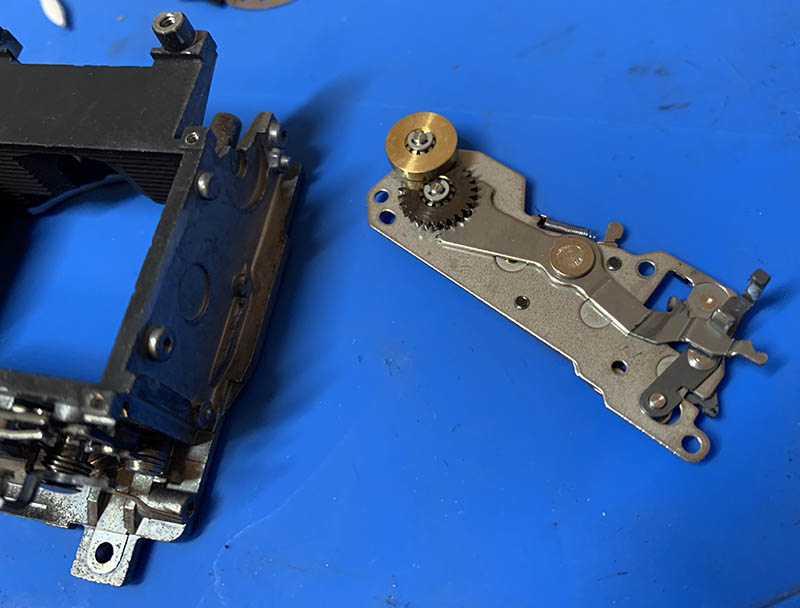
This is the whole false shutter assembly. This takes the place of a proper mirror-box that you see in all SLR cameras, the mechanisms on it will look familiar to you if you took time to understand how an SLR works. I am impressed by how creative the concept is, but I’m also disappointed because this is the weakest part of every rangefinder camera that Cosina made in this period. There are just too many moving parts and a lot of them need to be synced, the sad part is some components are flimsy.
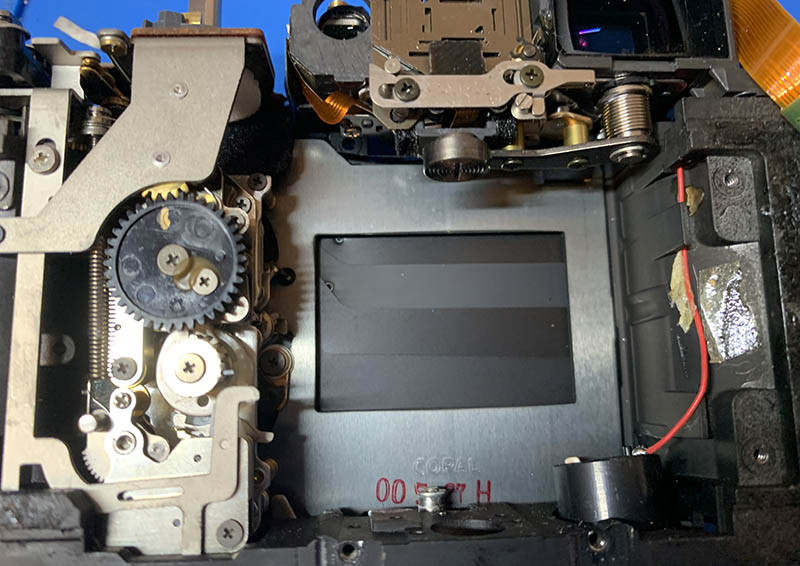
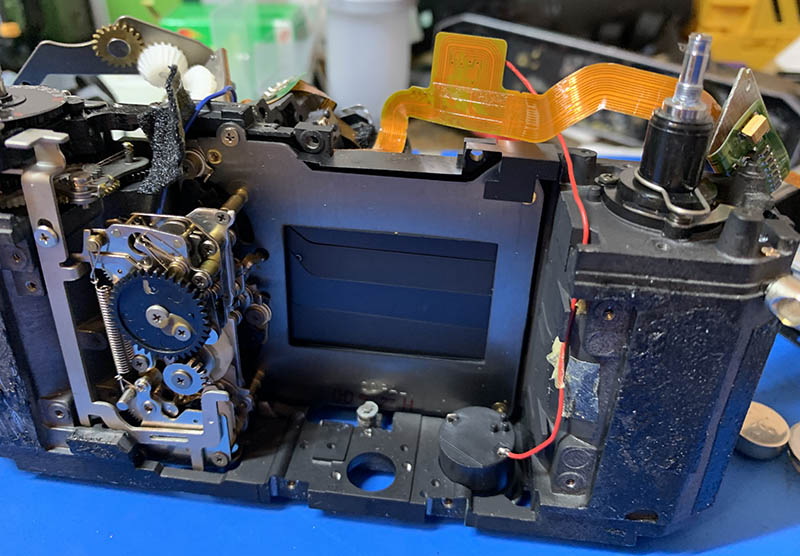
Without the false shutter assembly, you are left with a huge cavity at the center of the chassis. Study and document how each part works so you will understand more about the inner workings of this camera.
Before you continue, draw a few marks so you will know how the shutter speed selector cogs align. This is helpful and will save you a lot of time later guessing how to put this back later.
Extract the 2 screws on the green part of the speed selector assembly while being careful not to damage anything here.
Extract another screw at the front part of the speed selector assembly so you can remove it. Be careful so the contacts of the light meter’s switch and other things won’t snag on anything while you pull this away.
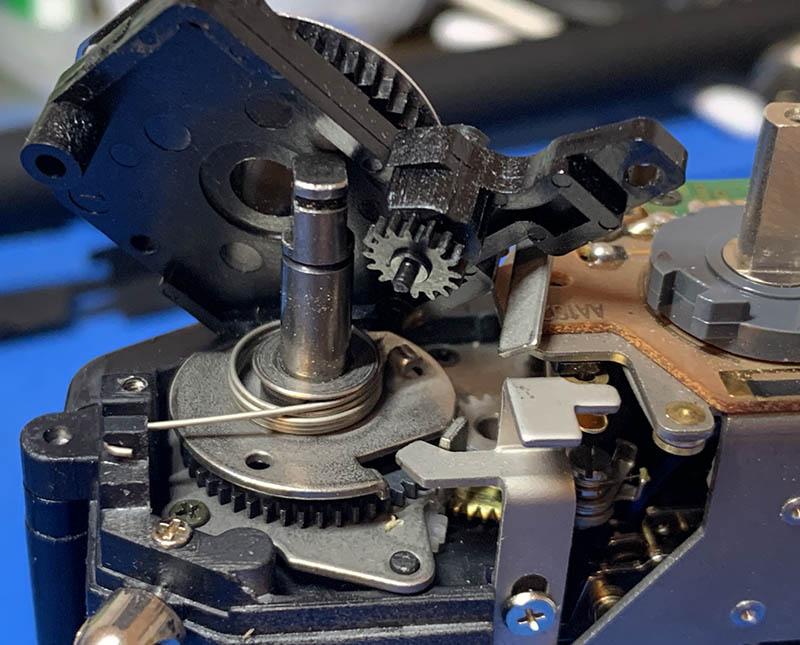
An optional thing for you to do is to remove the film counter assembly, there are 2 screws securing this. I was able to take everything apart without touching this, removing it just makes things easier to access. It’s annoying to put this back because you’ll have to insert the plastic spigot into its hole and make sure that the gears are meshed properly.
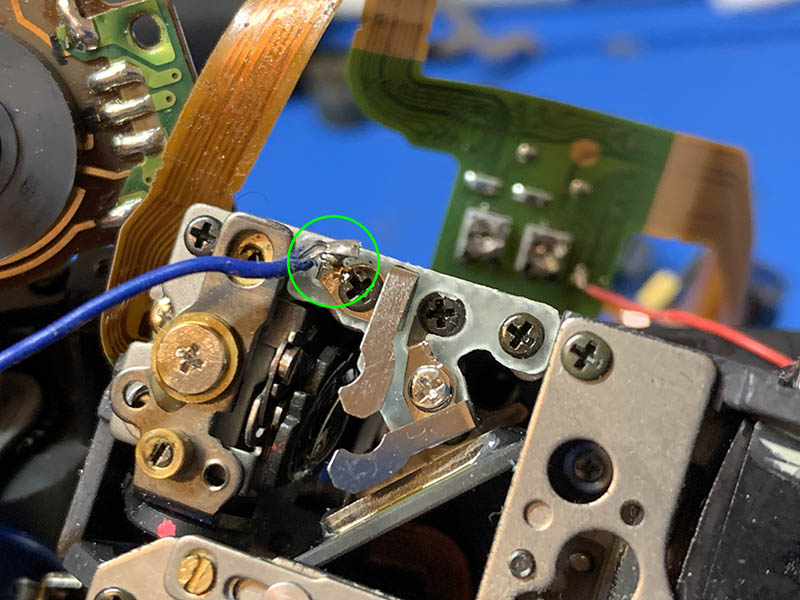
At this point, you may want to unsolder this or just unscrew the contact of the hot-shoe. Only do this if you want to remove shutter mechanism.

Locate and extract this so you can remove the shutter mechanism.

The last screws that secure the shutter mechanism are located here. Once they are gone you can easily remove the whole shutter mechanism like you see here.
The Copal shutter is a very reliable unit and it’s very unlikely to be at fault when your camera develops the common issue of the gray shutters staying open but the main shelter won’t fire. I do not recommend you do any adjustments or lubrication to the Copal shutter in any case unless you know what you’re doing. It requires expert experience and a special jig in order to properly service this thing. That is why people just replace the whole unit from a batch of spares. That is the standard “repair” procedure in many shops, it is not economical nor practical to fiddle with this on your own.
Disassembly (False Shutter Assembly):
This part of the camera is unique to the Bessa series. It shields the shutter from light come from outside through the lens. This additional mechanism is just one more thing that can go wrong, it’s the first time something like this has been done and it shows because all early Bessa models have the same tendency to develop the dreaded jammed shutter syndrome. While the cause can be manifold, most cases can be traced to this mechanism. It manifests as the false shutter being tripped but the main shutter will never open until some sort of mechanical intervention is done such as fiddling with the speed selector or the self timer. None of them are real workarounds, they will just agitate the mechanical parts enough so the shutter lever will be tripped, at least that’s how I saw it.
This issue seems more like a defect to me than anything else, later Bessa models are more reliable but will develop different problems elsewhere, mostly related to the film advance cycle. With that being said, this is the first place that you should investigate if your camera exhibits the said issue. Study how this part and all of its surrounding mechanisms work together and you should be able to figure out what’s wrong. This is not something that a beginner should attempt because you will require the dexterity and experience or the tools that an expert has, but it’s a good place for you to understand how things work. If you are a real repairman but you do not have the experience of working with this camera, read this section because you will learn valuable insights about what to expect. You can also use the photographs as reference so you’re able to compare what is in front of you to another camera.
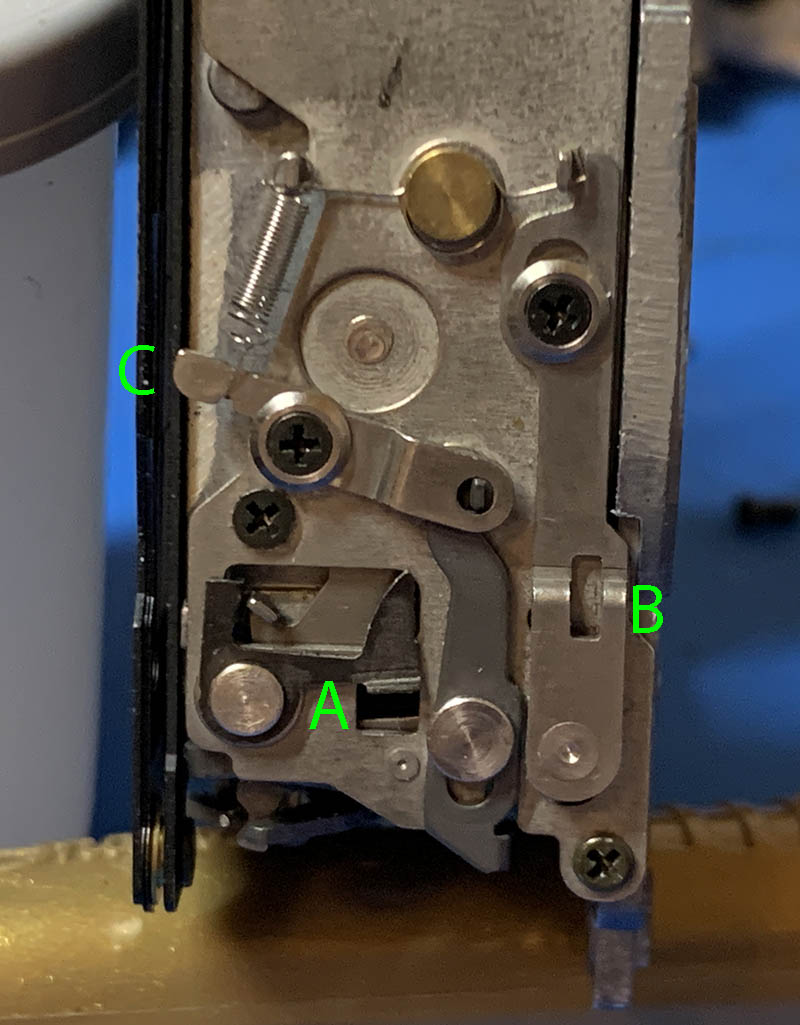
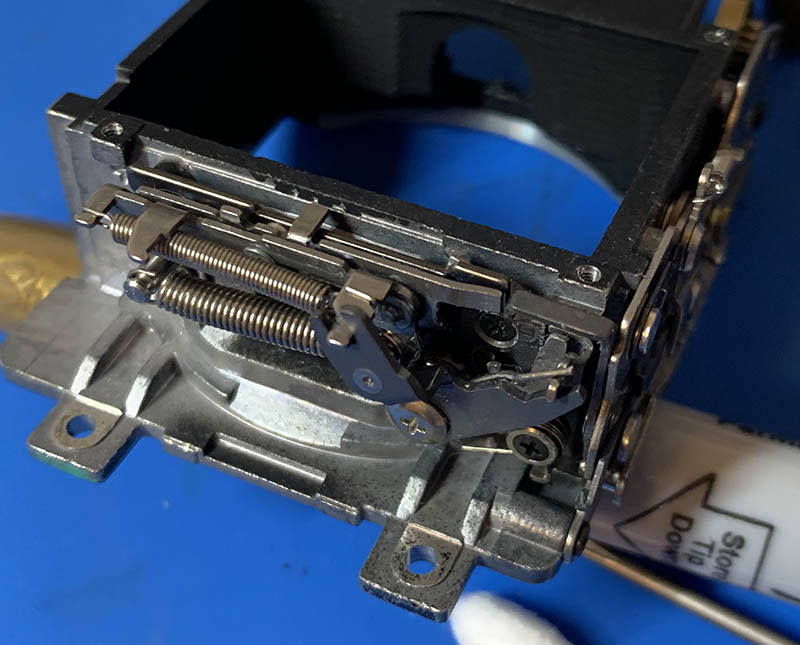
This shows the side of the false shutter mechanism. This operates very much like the mirror-box of an SLR camera. I will explain how this side works in brief. Depressing the shutter will trigger B, this will release the tension of the springs underneath the assembly and open the shutter. That will trigger A, it will depress a lever to activate the shutter mechanism to begin an exposure. Once the exposure cycle is done, a lever in the shutter mechanism will depress C which closes the false shutter, that completes the whole process. It is worth noting that a lot of things are going on with this mechanism, I’ve only explained just a few things so it’s best for you to find out how the whole thing works on your own.
When inspecting these you should take note of the following:
- A should move without obstruction so the lever can depress completely when its lock is depressed.
- B should trigger A when you depress it after charging the mechanism.
- C should release and close the shutter when you depress it.
Apart from what I mentioned above, study how the parts at the bottom work. Your charge the springs by pulling the main lever. Each movement that A, B and C does has an equivalent action underneath the box, no matter how minor it is. There is an interlock under the box that will delay the triggering of A, it is very delicate and can get easily damaged. This is the main culprit why so many of these cameras will develop a jammed shutter described as the false shutter opening but not triggering the actual shutter. This is why it is best to send your camera for repairs as soon as you notice something wrong. Continually operating the camera even after it has been unjammed by luck will just make things worse. This is what happened here.
Extract all 4 screws to remove the shutter. You can operate it if you want just to see how it works. You can see how complicated the bottom of the box is, all of the parts here should work precisely.

The part I encircled is the slot that connects to the sliding arm under the box, you move it to operate the shutter. Clean all of the parts here carefully with a Q-tip and spirits. You apply a very thin layer of grease so these parts marked as A will slide smoothly. You apply a very small drop of fine watch oil onto B so it will pivot smoothly. Remember to never apply too much lubrication or it will spatter all over the place.
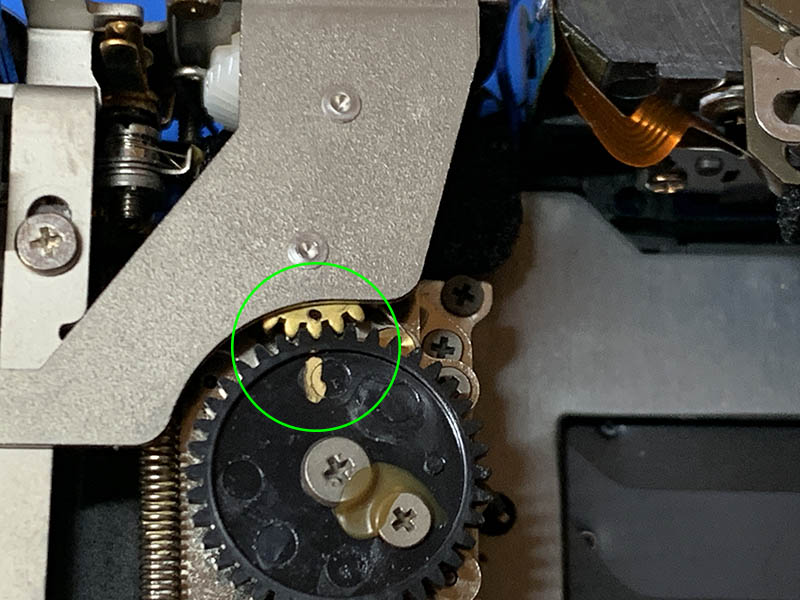
Extract the 3 screws securing this mechanism. Clean everything here very well so they will move freely. I also lubricated some of the pivots here after cleaning. That huge brass wheel and the connecting gears were all cleaned very well. I dismantled everything to clean all of the solidified grease and dirt then apply a fresh coating of oil. This brass wheel serves as a balance so the whole thing won’t vibrate as much.
I cleaned and lubricated everything important under the box. Nothing should feel “off” when you operate it, if something does not feel correct or precise, then it’s most likely damaged. Every part here has a clear purpose. Make sure that the springs are all doing something intentional and nothing is out of place.

The part you see here is bent, this is cause by the force of the springs operating on a jammed lever. That is enough to deform this arm so that part A does not move property because it slides underneath this. It should be straight in order to catch the lower arm that triggers A. Apologies for the poor photo, I taped this because I don’t want it to be soiled.
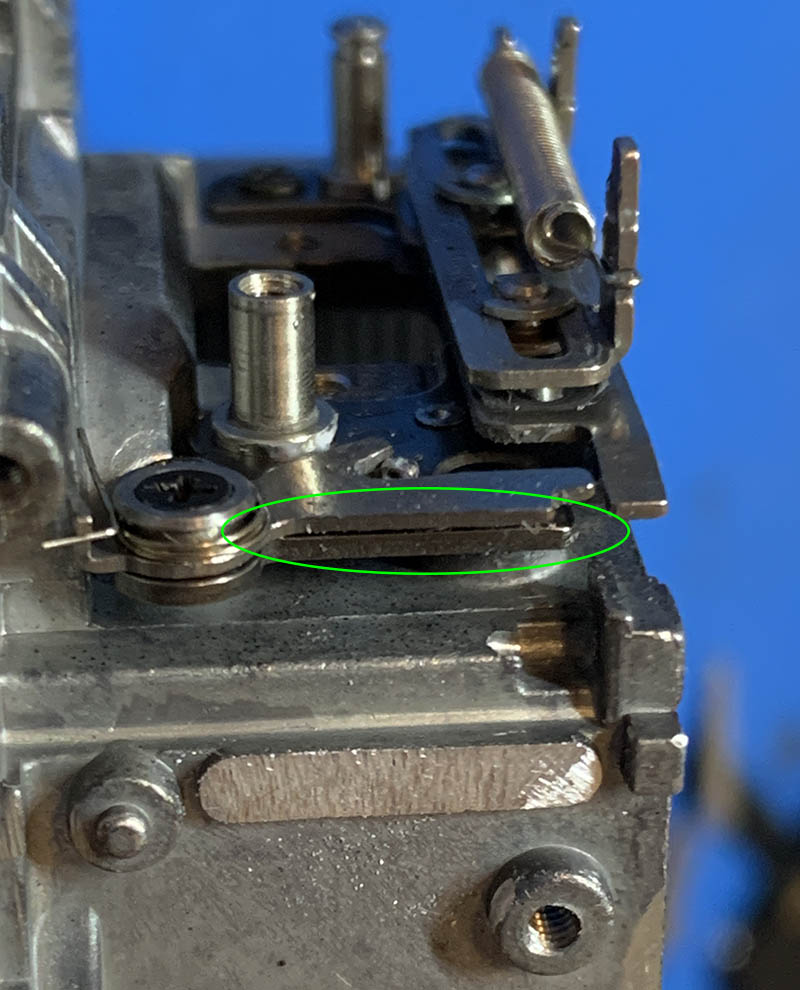
Bending the arm back to place ensures that part A will not get stuck and will travel effortlessly. I’m unsure if this part should be straight or not but I don’t care at this point, I just want a working camera.
Any modifications or corrections done with this mechanism will impact the exposure cycle somewhat. It’s going to be normal that some speeds may be off. In my case, the very fast speeds are just slightly slower compared to what I expected them to be. This is something that I can live with, it beats having a broken camera doing nothing but collecting dirt at the cabinet.
You should also make sure that all of the springs and levers are intact, they should also work properly as well. Before you continue, test the whole thing just to make sure that everything works properly before a final pass is done or else you will have to open the camera up again to this state just to do corrections. It is never too safe when you are working with cameras.
Putting back this thing isn’t easy, but the most convenient way I have discovered is to charge the shutter so the trigger lever stays out of the way by a 1-2mm. Install the false shutter unit at this state while being careful not to trip the shutter. Once the false shelter unit is installed, trip the shutter with a thin rod. This will put everything back in place and resetting the cycle. Install the screws of the false shutter unit and do a couple of tests to make sure that everything works.
Adjustments:
Before you go any further, check some more things like the speed selector dial and make sure that all of the speeds agree with what’s written on the dial. See if the light meter works properly and also check for any signs of misaligned gears by winding the shutter a few times and checking if the frame counter works properly. Open the back door and make sure that the frame counter is able to reset. Also check if the self timer works. Play around with the rangefinder to make sure that it operates properly before you make any adjustments later. If you need to make some final lubrication of any major assemblies, this is the time you should do that. Just make sure that you don’t apply too much. Plastic parts will require synthetic grease, a little bit goes a long way. Metal parts will acquire molybdenum grease, that’s my preferred type. That will help make the operation smoother. In this particular camera, I skipped lubricating many parts because the camera isn’t really that old despite being dirty outside.
Clean the rangefinder mechanism’s glass parts with lighter fluid so there’s no traces of oil and dirt. Use a clean Q-tip for this then blow any debris away using a bulb blower. In fact, you should blow everything in the camera with your bulb blower just to make sure that you don’t leave any dirt and fibers inside of it.
At this point, you should see if you need to change any light seals. Once you put everything back, there’s no easy way to dismantle any major assemblies again.
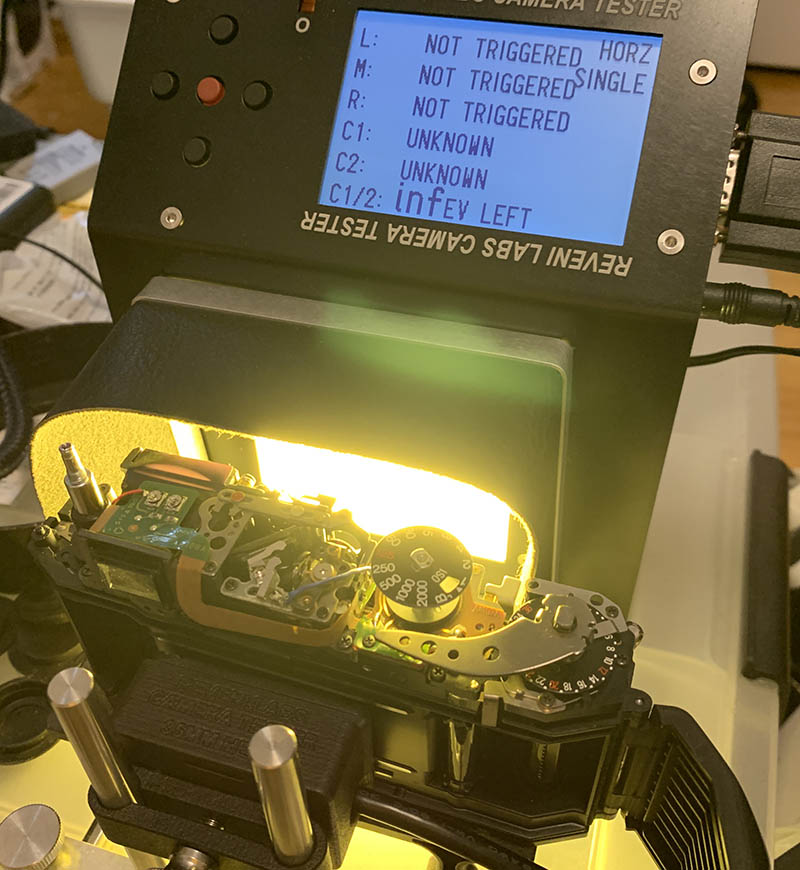
I did a quick check to see if the shutter speeds are acceptable. They look fine, or at least nothing is off by a lot. This is what you should do as soon as you have partially reassembled the camera.
I reassembled the camera up to this point so I can test the light meter. You should test the meter using a trusted lens and another meter as a reference. For this, I used my Nikkor-Q•C 5cm f/3.5. The meter I used as a reference is my Voigtländer VC Meter. They should share similar electronics, at least that’s think how I see it. I took a reading of my wall and tested if the camera will show the same reading. I was happy to see that both values agree with each other except that camera’s reading is just 1/2 stops over, that’s close for me and my mind is at ease.
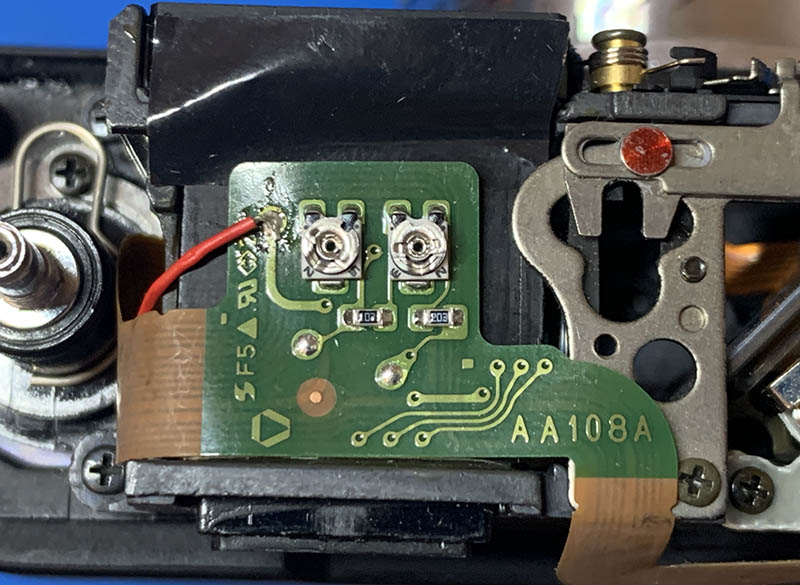
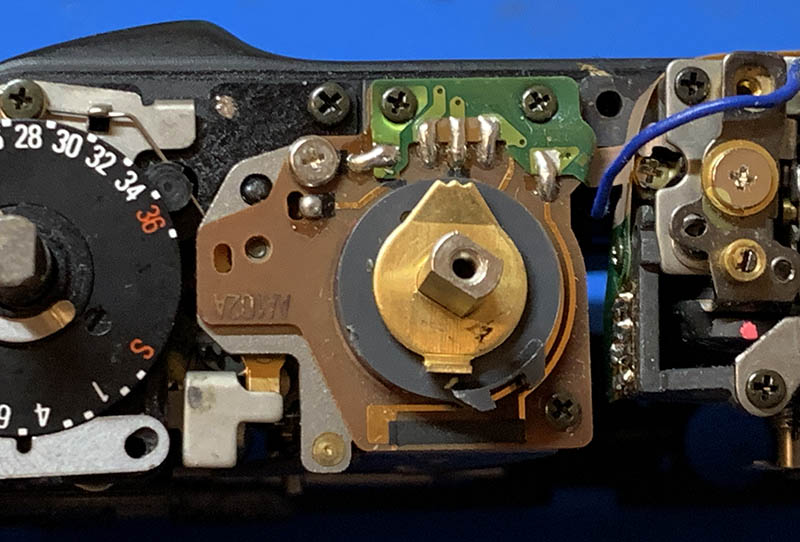
These are the potentiometers for adjusting the light meter. I left it as-is because the reading is accurate. It should not be tampered with anyway.
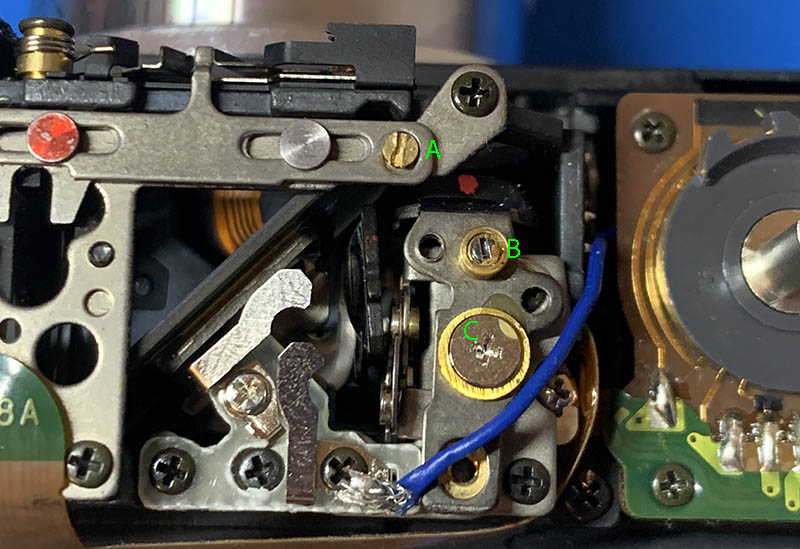
These parts will help you adjust the rangefinder mechanism. If I’m not mistaken, A is used for the parallax adjustments. You do not mess with it, I accidentally did so now I am unsure of its accuracy! There’s no way for me to determine how this is adjusted. You turn B to adjust the patch vertically, you loosen C and move of the arm it secures ever so slightly to adjust the patch horizontally, at least this is what I know. Test your rangefinder at 3 distances, the closest distance, somewhere around 5m and at infinity, which should be at anywhere more than 1km. You should get all of them to agree.

Use double-sided tape to reinstall the shell. I prefer using tape over glue for this one because the shell is made of plastic so it won’t lie flat on the surf yourself the camera. It’s also easier to peel it off.
Any final adjustments should be done before you put the top cover back, you can also test everything a little bit further by using a dummy roll of film so you can check if the whole operation works. Once you’re satisfied with everything, you can congratulate yourself and grab a beer. I seldom test if the flash works at all, unless it’s a camera from a customer.
Conclusion:
Surprisingly, I have wasted a whole evening trying to figure out what went wrong with this camera. I was able to isolate the issue the next day. Discovering the cause made me so happy because I have helped a lot of people who are suffering from owning a camera with a similar problem. Of course, not every case is going to be the same even if the symptoms are similar, but at least we can narrow things down. This is a big achievement for this site and it’s one of my biggest contribution to the community at large. I’d never thought that I would ever take one apart for you, but the stars have all aligned and destiny has given this camera its salvation in my little workshop.

It’s such an enjoyable camera to use despite all the plastic parts. The 35mm frame lines makes this useful for use with my W-Nikkor•C 3.5cm f/2.5. Since the viewfinder’s magnification isn’t high and the area you can see it’s quite big, it makes things a lot easier when framing with a wide lens. The rangefinder’s short base isn’t an issue for a lens this wide.
This is the most in-depth article about repairing this camera, you won’t find anything like it anywhere else even if you try. I hope you like it, and for those who have to face the same issue please consider leaving a tip. Producing this article requires a lot of time, effort and money. Your help goes to hosting this site, that will make this helpful resource available to everyone for as long as you are helping me support this. That’s the best you can do today because not a lot of people create original content at this quality level. This site has been going on for around a decade now, and that’s thanks to you, without your help I could not do it alone. I was also made aware that some people are making content like videos from my articles. I bet they are earning more than me because this website earns roughly $25.00 a month from views. If you see any, please tell them to donate something to this site and also mention my work, I guess that’s fair. Thank you again for your patronage and see you guys again next time, Ric.
Help Support this Blog:
Maintaining this site requires resources and a lot of time. If you think that it has helped you or you want to show your support by helping with the site’s upkeep, you can make a small donation to my paypal.com at richardHaw888@gmail.com. Money isn’t my prime motivation for this blog, I believe I have enough to run this myself but you can help me make this site grow.
Leave me some tip?
Thank you very much for your continued support!
$2.00
Helping support this site will ensure that it will be kept going as long as I have the time and energy for this. I’d appreciate it if you just leave out your name or details like your country’s name or other info so that the donations will totally be anonymous. This is a labor of love and I intend to keep it that way for as long as I can. Ric.

1 Comment (+add yours?)