
Hello, everybody! Have you ever been duped into thinking that something might be fake? You pass it and regret later after finding out that it’s probably the best bargain you could ever find. It has happened a lot with some of my friends who collect expensive watches. It has happened to me several times before, but I am more lucky than stupid so I am usually blessed with good deals. Today, I will show you one such lucky find, a real find of a lifetime. In all my years hunting for rare items I have ever only seen and touched 2 of these. Please read the whole article to know why this is so special.
Introduction:
The Nikkor-Q.C 13.5cm f/3.5 featured in this article is a special one, it is one of the very few existing lenses that Nikon made that came with an Exakta-mount. Only a few people have knowledge of its existence and even fewer people have ever seen one in person. I am extremely lucky to own such a rare oddity. Nobody knew exactly how many of these were made, we can only date them by their serial numbers. My example is probably from 1954.

Compared to the usual ones that came with a rangefinder mount, this one is quite short. It has to be since the Exakta is an SLR, complete with a flapping mirror. You may easily assume that this was modified using a talented specialist shop at first glance but the quality is so consistent that it can only come from Nikon. I almost dismissed it when I first saw this, singing it’s a fake.
Optically, there’s nothing different between this and the rest of the 135/3.5 family. They all have the same optical formula so the performance should be identical across the board. The only thing that’s different is the focusing unit because the mount is obviously made for something else. I have made several articles of the 135/3.5 series so I will not be doing the traditional test photos session in this article, there’s no point.

The rear has nothing, it’s bare because this does not need to couple to a rangefinder or anything at all. I noticed how beautiful the quality of the mount is, then I thought that this has to be genuine.

It feels strange when you pair it with an Ihagee Exa. The camera itself is light so the balance of the setup is biased heavily towards the front. There’s nothing special about its use except that it’s much easier to get a focused photo because you are essentially viewing through the lens instead of acquiring focus through a rangefinder patch. It’s highly advised that one should use a prism so that the image isn’t reverse. It can be stressful to frame and focus if everything is in reverse!

There’s nothing to be gained when melting this to a digital camera, you could have achieved this without spending all that money by buying something that’s made with a different mount.
I can’t recommend this to anyone even if you are shooting with an Exakta. This is only for collectors, there are a few options that are cheaper. I don’t know the going price for these because they are so rare. These can probably go from as low as $70.00 to as high as what people are willing to pay for them. I’m lucky, it’s sold for way lower than what I have just said. This is what you get when you’re a good person with a good hobby such as repairing cameras and maintaining the site. When you see one of these, buy them as quick as you can because these are so rare. Of course, only do so if the price is reasonable or else you’ll just be a sucker feeding the people that manipulate the prices of used camera gear. Happy hunting.
Before We Begin:
If this is your first attempt at repairing a lens, I suggest that you see my previous posts regarding screws & drivers, grease and other things. Also read what I wrote about the tools that you’ll need.
I suggest that you read these primers before you begin:
- Essential tools
- Best practices 1
- Best practices 2
- Best practices 3
- Ai conversion
- Working with Helicoids
Reading these should lessen the chance of ruining your lens. Before opening up anything, always look for other people who have done so on the internet. Information is vague and scattered but you can still find some information if you search carefully.
For more advanced topics, you can read my fungus removal article. It has a lot of useful information, it will be beneficial for you to read this. I also recommend that you read the working with helicoids article so you will not get stuck because you couldn’t reassemble the helicoids back properly.
Disassembly:
Since I have covered nearly every version of this lens, I won’t be repeating a lot of steps here. The biggest difference with this lens is the focusing unit or lower barrel, so this is the only part I will cover here in this article. There’s nothing different nor special about this section. Once you have serviced one of these, you are probably knowledgeable enough to get your way around any of them. You can also read my article of the Nikkor-Q•C 13.5cm f/3.5 to know more about servicing this lens.
As usual, take as many notes as possible so you will know how to put things back again later. If you are a novice, this is not something for you to practice around with. Send it to repairman, you will require special tools and experience in order to get the job done properly.
Like all lenses from this family, we begin by unscrewing the front barrel until we get it off. Just make sure that you are not grabbing the aperture ring while you turn the barrel or you will damage it. You may find a shim or two here, don’t damage or misplace any of them.

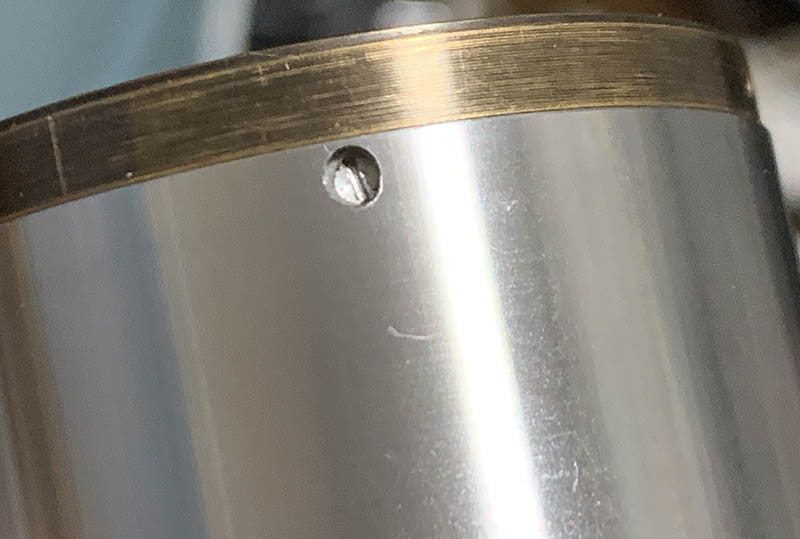
Once the front barrel is gone you can now access this screw. Extract it so you can dismantle the helicoids. Extract all of the screws of the focusing ring while you’re at it. Remove the focusing ring after.
Once the focusing ring is gone, you can access these screws. Carefully extract all of them so you can get the helicoids out.
Make sure that you have taken enough notes so you will know the correct alignment of this thing. Do this before you remove this assembly.

Extract these screws next and make sure not to misplace any of them.

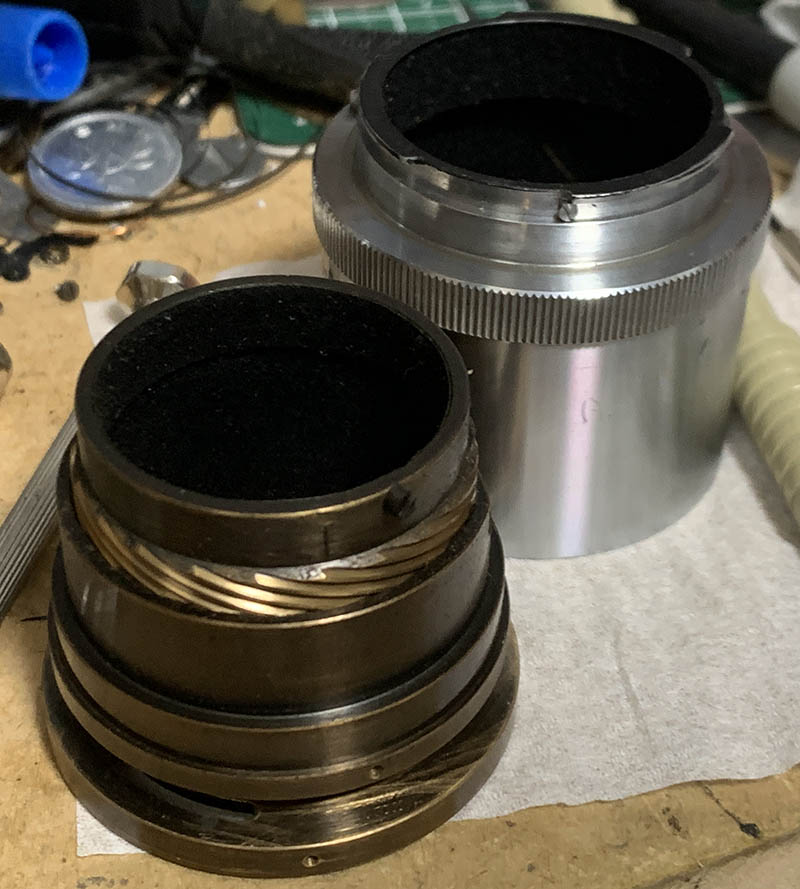
The screws secure the outer sleeve of the barrel. Slip it off so you can dismantle the lens even further.

Extract this huge screw as well but be careful not to damage it because it’s made of brass.

Once that screw is gone you are now able to separate the helicoids. Do not forget to mark the spot where the helicoids separated, because this is also the same place where they should mesh. Many people do not do this so they end up with a lens that won’t focus properly. To prevent this happening to you, follow my article on how to work with helicoids. Follow my guide very well and you should be safe.
I cleaned all of the big parts with a strong toilet cleanser – the grainier, the better. I scrubbed everything using a brush then rinsed them all very well with hot water before making a final rinse with pure alcohol to remove any remaining residue. Pay special attention when cleaning the helicoids or the other threads, they are fine in some places and they can be caked with gunk, using a wooden toothpick helps here for stubborn deposits. Dry them well before you continue. When lubricating, be sure not to apply too much, all you will need is a thin film of fresh grease. Combine the helicoids then exercise them by turning several times, this will ensure that the grease is applied evenly then wipe off any excess oil. If you’ve applied too much grease it will settle in the iris mechanism eventually, necessitating the need to open it again just to give everything another overhaul.
Conclusion:
It took me a few hours to service this lens. I’m so familiar with these at this point so you can say that I’m an expert on servicing these. There were no surprises at all and I was able to do everything effortlessly. It is a lovely lens, its rarity only makes it even more special.

The lens is now as shiny as it used to be, I bet it had never been this clean for decades. It’s sure isn’t in the best condition when I got it but it’s still pretty good considering its age. I wonder who it belonged to and how it came to be. I also don’t know how many of these were made.
That’s it for this article. There’s nothing much to say about this lens because I have covered the numerous versions of it before. Despite of it, this is the only resource available on the internet about its maintenance and other small details. If you enjoyed this article, please consider leaving me a small tip. That will help in keeping this website online, I’m not earning anything from the ads here so your support helps sustain the best Nikon repair website around. Thank you very much for visiting, I will show you another rare object in the next article. See you again, Ric.
Help Support this Blog:
Maintaining this site requires resources and a lot of time. If you think that it has helped you or you want to show your support by helping with the site’s upkeep, you can make a small donation to my paypal.com at richardHaw888@gmail.com. Money isn’t my prime motivation for this blog, I believe I have enough to run this myself but you can help me make this site grow.
Leave me some tip?
Thank you very much for your continued support!
$2.00
Helping support this site will ensure that it will be kept going as long as I have the time and energy for this. I’d appreciate it if you just leave out your name or details like your country’s name or other info so that the donations will totally be anonymous. This is a labor of love and I intend to keep it that way for as long as I can. Ric.
