
Hello, everybody! Do you believe in the “Leica glow“? It is a legend taught by the “Leica church” which has been described as something ethereal, akin to angel dust. Some will say that it was done intentionally but I see it as just an excuse to justify the high cost of a poorly coated optic, if at all. It’s like a ghost, it is there or not depending on what you believe in. Today, I’ll show you something that exhibits something similar. I do not dare say that it’s the same thing but I will let you decide the matter for yourself. Believe it, or not?
Introduction:
The Nikkor 5cm f/2.8 was produced for a very short time, somewhere between 1936–1940 about the same time as the Seiki Kogaku Kwanon and Seiki Kogaku S. Seiki Kogaku (Canon) could not manufacturer their own lenses at that time so Nippon Kogaku (Nikon) had to do that for them. It is one of the first Nikkors for the consumer market because at that time, Nikon concentrated its production for the Japanese military. It did not stay for long probably because the faster Nikkor 5cm f/2 made more sense. Both were only made to fit the unique bayonet mount (by Nikon) for the earliest Seiki Kogaku cameras mentioned before. This mount has no official name to my knowledge so people call it the Hansa-mount, or Seiki-mount for me.

The whole thing is made of metal apart from the glass and the felt lining at the mount. It is heavy since everything is mostly made from brass. The workmanship is better than many Nikkors that were made in the years right after the end of the war, or the MIOJ (Made in Occupied Japan) series. The fit and finish is nice even to this day and even after being stored poorly for decades under undesirable conditions.
It is basically a 4-element-in-3-groups design of the Tessar type that is popular around this era. It looks a lot like the Zeiss Ikon A-G Tessar 50mm f/2.8 for the Contax mount, you can think of it as a Japanese copy. I cannot comment on performance comparisons because I don’t own the German lens. To my knowledge, this is the only 50/2.8 Nikkor of its kind. I haven’t seen anything like it from the postwar years, that’s really a big mystery to me. Perhaps it’s better for production to just stick to the 50/3.5 family for the cheap end of the market? It does not make sense to have too many products that will potentially compete with each other.
What is also worth mentioning is it has 13 separate blades in iris and it looks like that were all made using good stainless steel because they haven’t rusted all these years. It is in contrast to the poor materials and workmanship that is commonly seen with all postwar Nikkors just before the occupation ended in 1942. It will result in circular discs and also help render smoother blurs.
It is not surprising that it comes with a tiny filter size, something that is common with vintage lenses from the years before 1960. It will be really challenging to find accessories for it. I have never seen these with a shade or anything similar. Besides, where will you be able to mount it anyway?
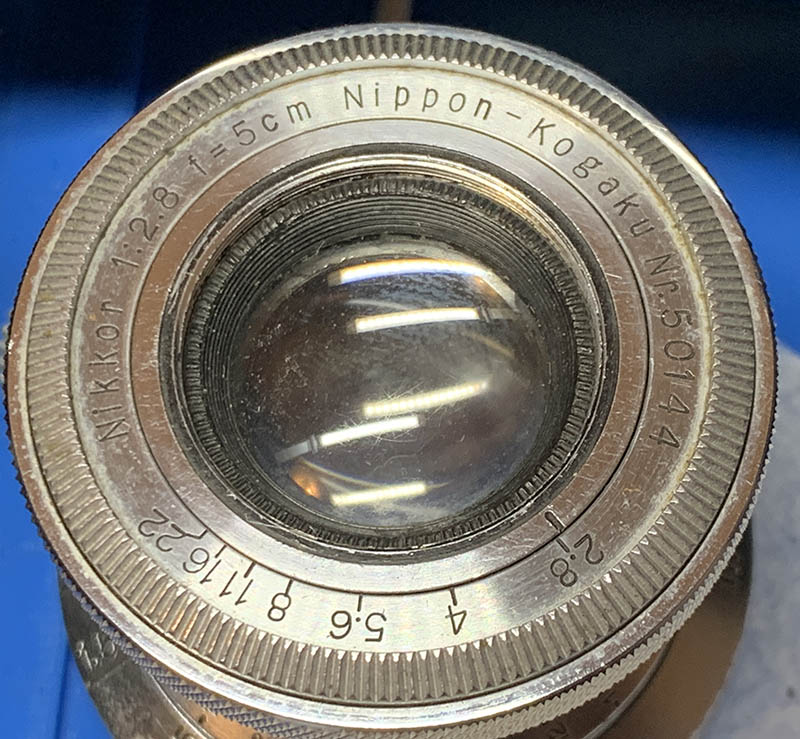
It is totally uncoated. Every Nikkor made for consumers from this period are never coated, at least nobody found one that shows otherwise. This means that internal reflections and light transmission, etc. will all be inferior compared to coated Nikkors made later after the war. Despite of it, this is a sharp lens and you’ll soon see how good it is despite its age. It definitely performs better than some contemporary Leicas.
A common annoyance with lenses from this period is how you need to look at the face of the lens just so you can set the aperture properly. There are no click indicators for each f-stop but at least the values show the ones that we are all familiar with, no odd and weird aperture numbers here. The engravings look great and precise, they don’t look sloppy like some Soviet products.

I got mine as a kit together with this poorly-stored Seiki Kogaku S. Both were mean just before the war, or during the war depending on who you ask because World War II began much earlier for us Asians (1937). It has a special mount which some enthusiasts call the “Hansa bayonet mount“, it has an internal helicoid like what you see from a Zeiss Ikon Contax II but how it couples to the rangefinder mechanism is different because it depresses a lever underneath it very much like how it works with Leicas. Instead of a pressing a roller attached to a lever that is coupled to the rangefinder mechanism the gear attached to the helicoids will turn another smaller gear housed inside the circular “ear” that’s located to the right of the mount if it is facing you. At the center of it it’s a push-pin that pushes on a lever underneath it as you focus. There is also a gear that you turn with your right index finger to focus just like with a Zeiss Ikon Contax II. How it is mated to the camera is most unusual because the whole thing screws into a 39mm mount that’s similar to the one you see with Leicas but the pitch of the thread is different, making it incompatible. This mount is what will be called the short-lived J-mount in later years. All this engineering fluff was necessary because the Germans still maintain the patents for these technologies during the mid-1930s. It is also important to mention that the lens and the weird mount are both from Nippon Kogaku (Nikon), with great difficulty. It’s interchangeable so you can internally mount small lenses to it very much like a Zeiss Ikon Contax II but its diameter and coupling ears are different so you won’t be able to use the lenses interchangeably.

It is possible to mount the whole thing to a cheap M39 adapter but it won’t go all-the-way so you’ll have to modify the threads of the adapter to completely accept it. I was able to shoot it with my Nikon Z fc in this manner as you can see in the photo.

Interestingly, I tried mounting the barrel to the focusing unit of the Nikkor-Q•C 5cm f/3.5 and I was able to successfully use it in this manner without any modifications.

And here is the whole thing mounted to my Nikon Zf. This will be the way that I will shoot it with for the article except for the part where I shoot it with film.
Let’s now see how this lens performs. Many of you are curious as to how one of Nikon’s earliest lenses will fare with modern sensors. This is not a common lens at all, I think this is the only place where you can see how this lens performs. I took these photos with my Nikon Zf at f/2.8, f/4, f/5.6 and f/8. We’ll see the most changes happen in these apertures, these are also the most common apertures that people will prefer to shoot this with. Here’s a spoiler, this lens performs remarkably for something this old. It keeps on giving great photos and you will even see it improve up until f/11, but only at the extreme corners.
There is a very slight hint of distortion, it’s hard to see but you will notice a slight bulging at the center. It is impressive for a lens this old.


(Click to enlarge)
Vignetting is unusually even across the whole aperture range but you’ll only notice any change from f/5.6 where the corners begin to look a little bit less dark and at f/8 weird things begin to look more even. This is an indicator that the corners won’t look decent up until you reach f/8 and beyond. You will see this later when we take a look at how sharp this lens is.


(Click to enlarge)
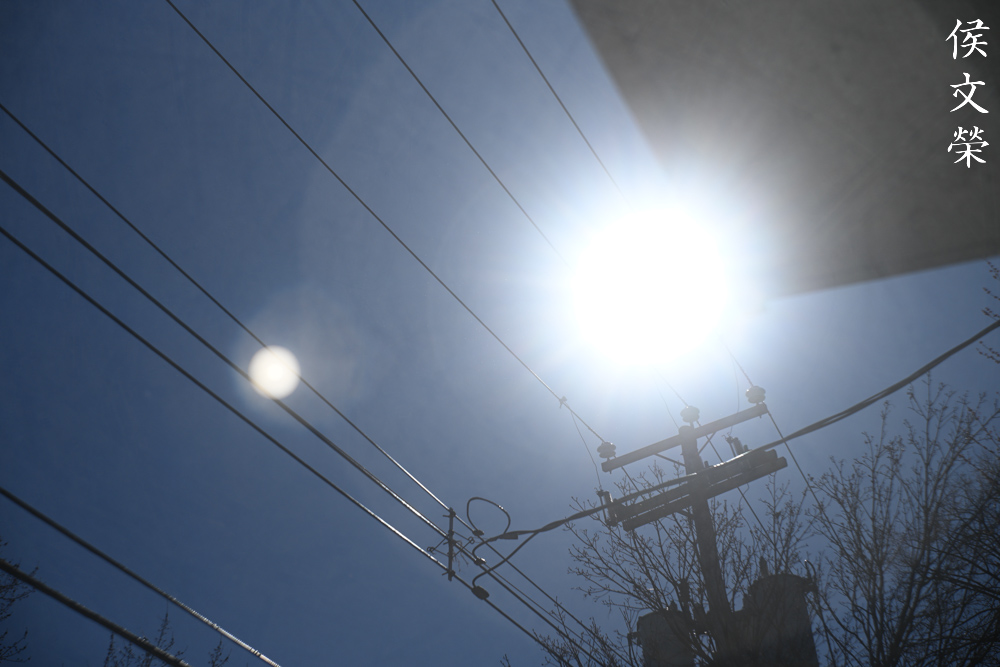
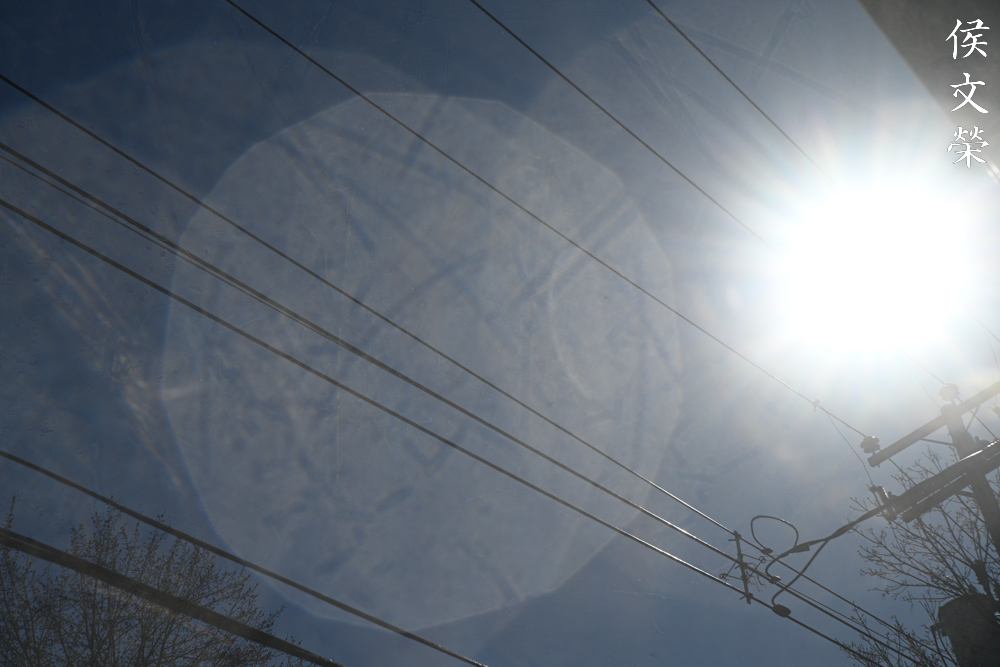
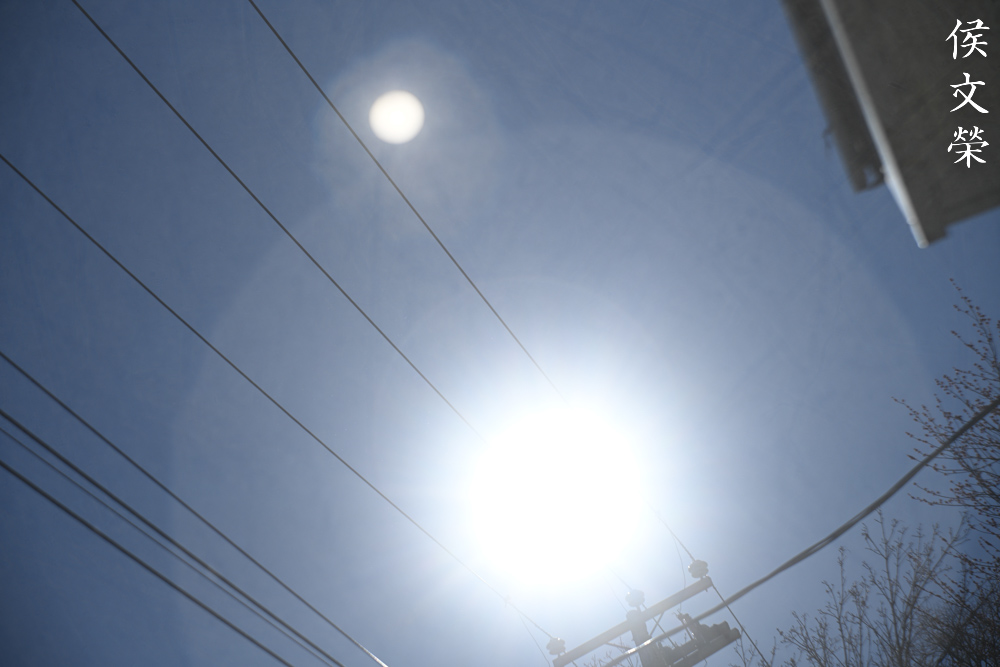
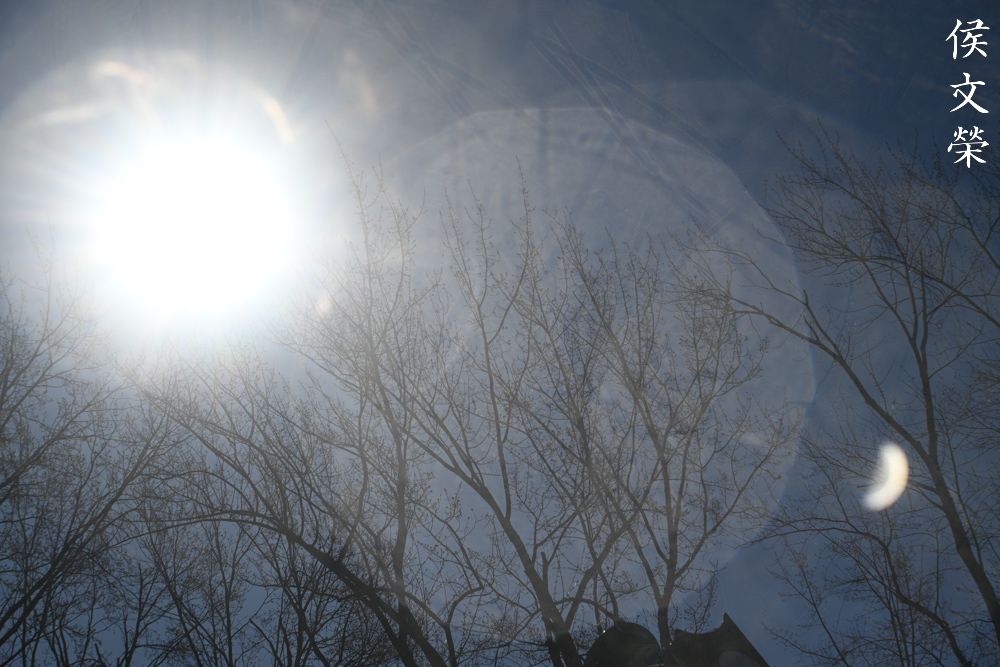
Since this is uncoated, it’s vulnerable to flare and ghosting. The internal reflections are brutal and the flare will make everything lose saturation and contrast. Note that the blobs look filthy, that’s because the glass has suffered from fungus damage so what you are seeing is the result of the scarred surface of the glass.


(Click to enlarge)
Just like every Tessar that was made before recent years, this lens does not render exquisite blurs like what you would get from a Sonnar. It can look ugly so you must stop the iris down a bit to help correct this. It’s not really a problem because this is part of the package of the old Tessar design.


(Click to enlarge)
Surprisingly, chromatic aberration appears to be corrected rather well. You see it at extreme conditions, it is obvious when shooting wide-open but you’ll have to magnify to somewhere close to 100% to see it. It’s pretty good especially considering how old this is. You’ll see very little hints of it at f/4 and it’s nearly gone by f/5.6 where you will only see a purple pixel if you try really hard. I would say that it is performing better than I have expected in this department.


(Click to enlarge)
Sharpness at the center is excellent even when shooting wide-open, the resolution is acceptable but you’ll notice that it is somewhat lacking a bit. Stop the aperture down to f/4 and the center looks a bit better, it is due to the improved resolving power so you’re able to see finer details with more fidelity. You won’t see any huge Improvements at the center by stopping to iris down to f/5.6 or f/8, that’s because the center is already approaching it’s peak performance just before f/5.6.
The corners tell a different story, they look ugly from f/2.8 up to f/5.6 but they look so much better at f/.8. I remember mentioning this before when we were looking at the vignetting, so here’s the proof. Honestly, you will have to shoot at f/5.6 at the minimum in order to get decent looking corners. I’m impressed, this is a very good lens for it to perform like this even at the corners.

Since this is an uncoated lens it is susceptible to flare even at the slightest. It can give you lower contrast across the whole frame even if the sun is nowhere near the frame, a bright sky is enough. The picture will look hazy as if you’re in a dream sequence.


(Click to enlarge)
Chromatic aberration is strong under certain situations even when the iris is stopped-down. The best way to correct this is by shooting from f/8. In the set above, you can see that the spires look much better if the iris is smaller.

It performs really well so long as you don’t have things that will trigger flare or ghosts in your scene. Even a white mannequin won’t be that much of a problem. This photo looks very good but if you look at what’s blurry over at the left of the frame you will notice that the bokeh isn’t as smooth as you would want. Don’t fault this lens for that kind of performance, it is just natural for Tessar-type lenses to render beautifully at the center in terms of sharpness and contrast but perform in a mediocre fashion when it comes to how it renders out-of-focus details. It’s not bad at all, you can even say that it’s pretty good for a lens from 1938.

It renders colors naturally but with less contrast than what we are used to seeing from later lenses. This is what many people call the “vintage-look”, or at least that’s part of it. Note that the gentleman wearing a white hoodie looks as if he is glowing, this is the appeal of shooting with vintage lenses.

It is fast enough for shooting Interiors while still maintaining a reasonable shutter speed.

The low amount of distortion is exceptionally valuable for shooting maps and other military use or should I say art and architecture.
That tendency for the lens to flare can be used creatively if you have the vision for it. It can add a certain interesting element into the picture.


(Click to enlarge)
This is certainly one of the more interesting lenses that I have shot with. I say that because it handles very poorly when it comes to ergonomics but there is a certain kind of charm when shooting with it despite of all the inconvenient quirks. I really liked it a lot when it comes to performance because this is a very good lens if you consider how old it is. It smokes what the other German company has at that time. What I am most impressed with is how good it handles distortion, it’s almost undetectable with the naked eye. That’s really amazing for a lens that was calculated using a pen, paper and an abacus for each person employed to calculate the values required for manual raytracing.
Let’s now see how this performs with film. This lens was made for use with black-and-white film, and that is why we are interested to see how it performs with its intended medium. I have not shot a roll of black-and-white film with it yet so we will see some examples that were taken with color film. I’ll update this in the near future so we can see some real black-and-white photos. But for now, these are enough to give us a good understanding of how it performs with film.


(Click to enlarge)
As expected, an uncoated lens will perform poorly in these examples, even with film. It does not look as bad when compared to digital, but just ever so slightly.

Bright objects such as the white and yellow notes will bleed into the surroundings thanks to the uncoated nature of this lens.

The good thing is it renders colors beautifully with a slight desaturated look and the colors look neutral.

The bright maximum aperture (for its time) enables you to use faster shutter speeds when taking pictures indoors. This is not a lens for shooting lowlight photography with unless you use it with a very fast film.

The reasonable amount of distortion makes it a very good lens for taking photos of architecture.

This lens renders with a certain character, giving your photos that “vintage look” because it’s a real classic lens made before the war.

Here’s another photo showing how little distortion it has, so low that you won’t even notice it.
It has a charming way of presenting a scene, giving you pictures that look old even if you have just taken them last week. This is because vintage glass aren’t perfect so all of the flaws work together, giving you a unique look to the photos it takes. If you want to have a period-correct look for reenactment, this is going to be perfect if you pair it with a low-contrast monochrome film.

It’s not optically perfect by any stretch but it is pretty good even when compared to German lenses of its time.
Because it’s uncoated, even stray light coming from unexpected angles will cause your photo to lose a lot of contrast. A dedicated shade maybe useful but I can’t find one for it, you can fashion one from a piece of cardboard and a rubber band.

When the sun is behind you, you don’t have to worry about getting pictures that look washed-out. This is a very important technique that you should consider when shooting with very old lenses.
This is a pretty sharp lens specially when you are shooting at smaller apertures. The effects of diffraction is not going to be as obvious when shooting with film, at least until you’re shooting at f/16.


(Click to enlarge)
This is the rest of the roll. It is difficult to shoot with because of its outdated ergonomics, I got tired easily just by having to look at the front of the lens check which aperture I’m at. Not only that, it’s also tedious to always make sure that you cover the front with your hand just so the sun will not burn a hole through the curtains. The engraved numbers are also very small, making it hard to see which aperture you’re at. It is not too different from shooting with many lenses of its time but the tiny engravings really took at toll on me that afternoon, it wasn’t pleasant at the slightest.
I cannot recommend this lens to just anyone because this is so special. You’re considered lucky if you get the chance to own it, this is so rare that only a few people have seen this with their own eyes. For those of you who have this lens, please go out and shoot with it. It’s a fine lens and it’s best to have fun taking lots of photos with with this instead of leaving the lens inside a cabinet, only to rot as collectors tend to do. It is a shame that such a beautiful lens wasn’t coated and sold during the American occupation of Japan. It’s going to be definitely one of the best sellers of Nikon. If you are out looking for one, these aren’t cheap at all. I got one for a reasonable price because it came with a Seiki Kogaku S and both items were in terrible condition. I am just lucky that I have the skills to restore both back to a decent operational condition. This is a very old lens, so if you’re looking for one make sure that the iris is complete and undamaged. The iris is usually oily and the inner surfaces of the glass tend to be fogged with condensed lubricants. It’s natural for lenses of this vintage to be in poor state, you may even see fungus. These can be cleaned easily by an expert repairman, but balsam separation and broken aperture blades will require someone even better. It has no helicoids so the aperture ring is the only thing that you can operate. It’s very hard to find filters or accessories for this lens, so if yours came with them then it’s like winning a small-time numbers game. It’s rare but it’s not impossible to find one because there’s a few available online, but for an exorbitant price. If you are a sultan or just rich, you can get one of these at any time you wish. For us simple folks, we need to wait for the right time in order to buy one of these because it’s difficult to find them selling for cheap. I will leave you guys waiting for that opportunity, happy hunting.
Before We Begin:
If this is your first attempt at repairing a lens, I suggest that you see my previous posts regarding screws & drivers, grease and other things. Also read what I wrote about the tools that you’ll need.
I suggest that you read these primers before you begin:
- Essential tools
- Best practices 1
- Best practices 2
- Best practices 3
- Ai conversion
- Working with Helicoids
Reading these should lessen the chance of ruining your lens. Before opening up anything, always look for other people who have done so on the internet. Information is vague and scattered but you can still find some information if you search carefully.
For more advanced topics, you can read my fungus removal article. It has a lot of useful information, it will be beneficial for you to read this. I also recommend that you read the working with helicoids article so you will not get stuck because you don’t know how to put the helicoids back.
Disassembly (Main Barrel):
This is a very valuable lens, the same can be said for everything Nippon Kogaku right before 1953. If your lens needs to be serviced, bring it to a real professional. These are delicate and will require special tools and experience just to dismantle them safely, all of which are beyond the casual amateur. I have years of experience and I have collected several tools to help me so I can do this properly, do not follow me and my instructions if you are a beginner trying to service something valuable like this.
We typically begin with the rear for lenses of this type, they are not complicated but there are things that you should be aware of and I will show you what they are. Just like everything else, you should take plenty of photos and references before you remove anything so you will know how to put them back later.
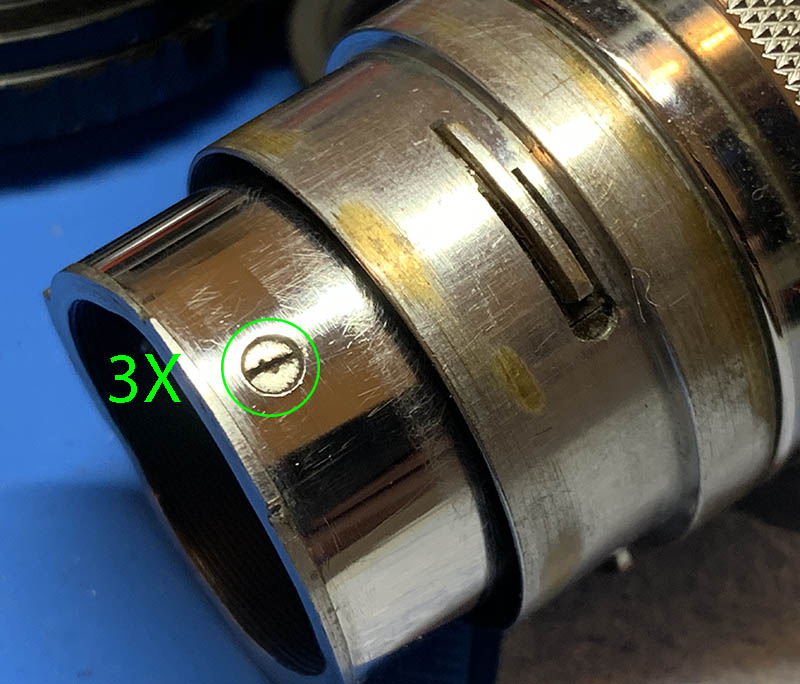
We begin by removing the rear baffle and lock of the barrel. Locate and extract these screws, be sure to use a driver that fits perfectly or else it will scratch the rim and even strip the screws, or worse.
Once the screws are gone you’re able to unscrew the lens lock. As you can see, there is a felt lining inside the mount. This material is usually filthy so I always replace it with fresh felt.
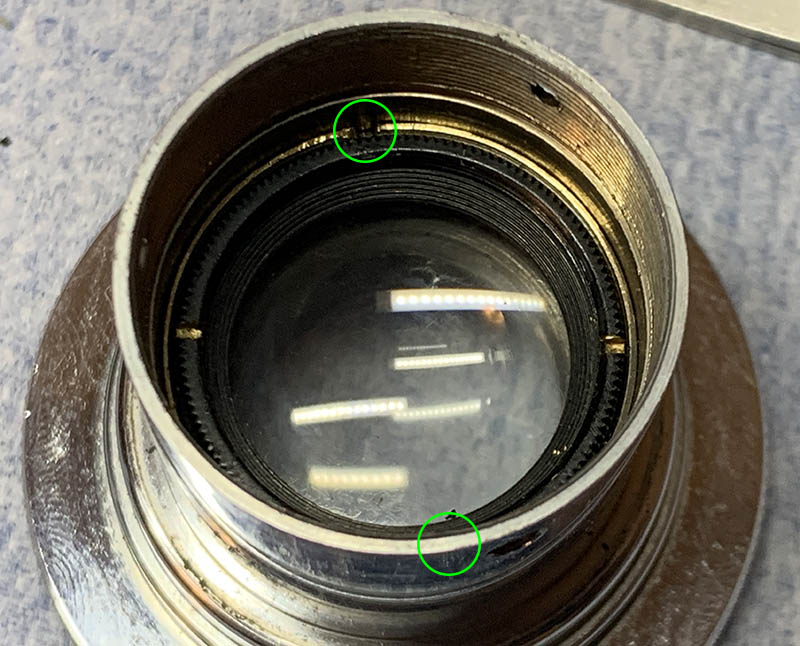
Use a special tool like a pipe-key to remove this thin retainer. If you don’t have a pipe-key, I have written an old article detailing how to make one yourself.
Carefully unscrew the retainer until it comes off, make sure not to scratch anything while you’re at it.

Look for this little set screw and carefully extract it. Make sure that you do not strip its head because you not get it off easily without creating damage.
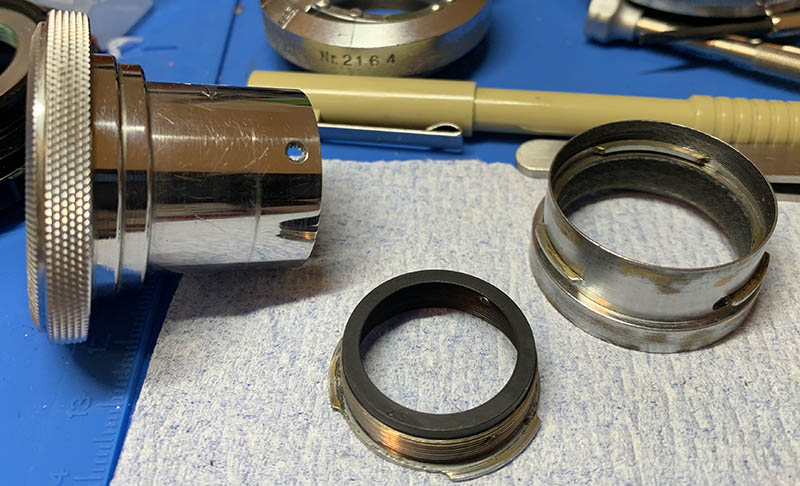
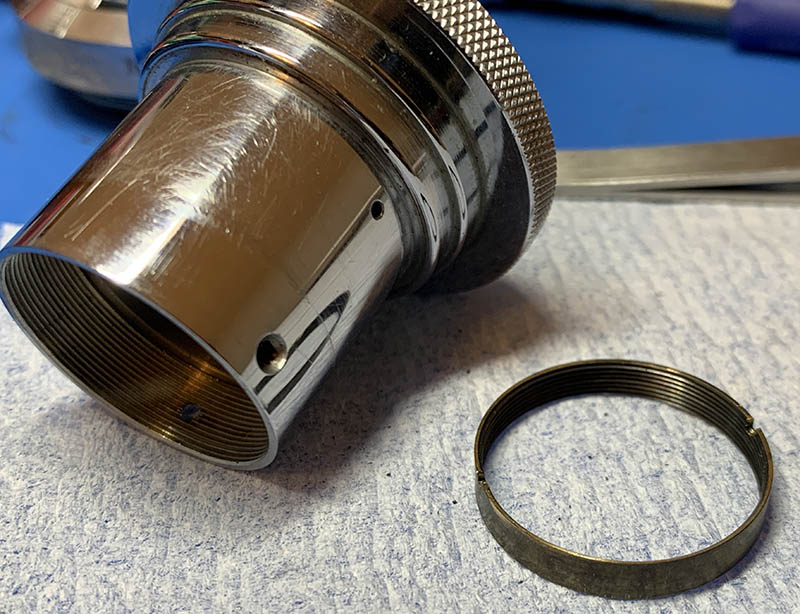
Pull the front assembly off from the rest of the barrel. Note that I have shims here, do not lose or damage any of them because they are used for adjusting the focus of the lens.
Extract this screw carefully, mine did not came out easily so I had to pick it out. The neck is very thin, it is only about 1.2mm so be careful not to damage it.

Unscrew the aperture ring once the screw is gone. This part is usually greasy so it’s best to clean the gunk before you proceed so your hands won’t be filthy.
I cleaned all of the big parts with a strong toilet cleanser – the grainier, the better. I scrubbed everything using a brush then rinsed them all very well with hot water before making a final rinse with pure alcohol to remove any remaining residue. Special care must be used when cleaning the helicoids, the threads are fine in some places and they can be caked with gunk, using a wooden toothpick helps here for stubborn deposits. You should only apply a very thin film of grease to the threads of the aperture ring, the thinner, the better. Your choice of grease should be one that has a little bit more resistance but not so heavy that it will turn the whole barrel and decouple it from the lock when you change the aperture. As for the black felt lining, look for one that is about 1.1mm a thick, cut it to size and replace the old material that is full of germs.
Disassembly (Objective):
There’s nothing special in this section if you are used to working with vintage lenses all this type. If you’re an avid follower of my work, you’ll be familiar with this already because you have seen it many times over.
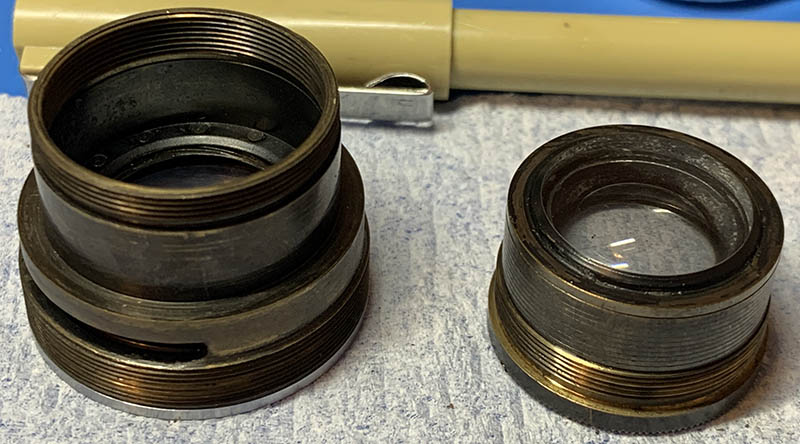
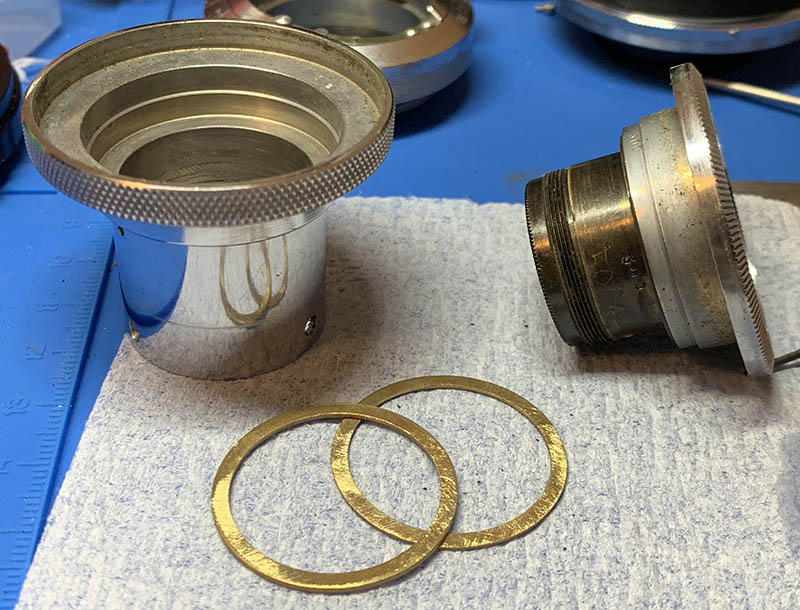
Unscrew the rear optical housing from the objective. Never use heat or solvents here since you can easily damage the glass. If it won’t come off effortlessly you can apply a drop of alcohol or lighter fluid around the threads and let it soak it all up. Wait for a few more hours then repeat the process until you are able to unscrew this thing off.

The 3rd group and its housing can be unscrewed using a very small lens spanner. I do not think you can dismantle these things any further.

Unscrew the front part of the objective using a rubber tool. If it’s stuck, do that alcohol check again until you are able to remove it safely,

Use a rubber tool to unscrew the bezel off so you can remove the front element. The bezel took me a lot of time and effort to remove because it got stuck halfway, there is a very high risk of cross-threading the delicate brass threads. If yours won’t come out safely just leave it as it is to prevent any further damage.

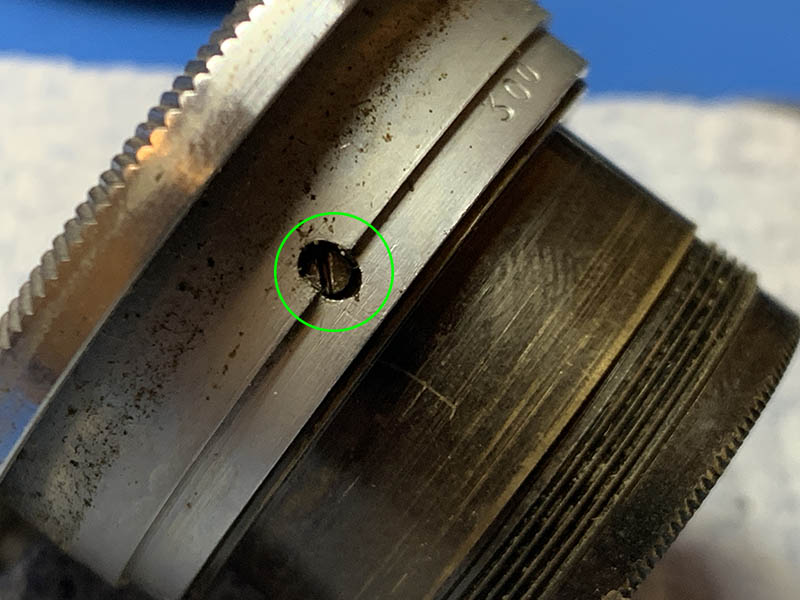
Carefully extract this set screw so you can remove the iris sex time in my face mechanism. It’s only about a millimeter in diameter if I’m not mistaken so be very careful when removing this.

You should mark the original alignment of the iris mechanism before you remove it since it’s adjustable. I removed the iris mechanism by using a rubber tool to push it from behind while being careful not to push on the blades themselves.
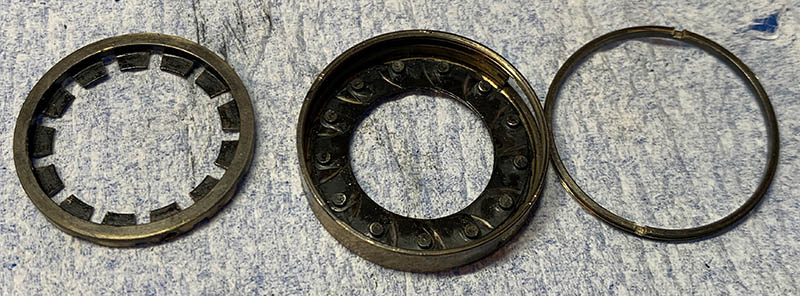
Use a lens spanner to carefully unscrew this retainer and you are able to open the iris mechanism up. But before you open it, see if you can work the iris and see how tight this ring should be.

These are usually greasy due to their age and a type of lubrication used. Study how the blades look, make sure that you know which end of the blade should be inserted into the diaphragm.
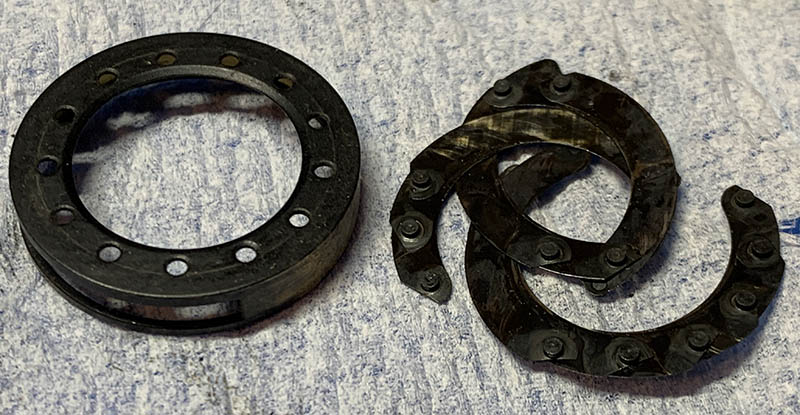
Carefully remove the blades and make sure not to damage anything because they are so delicate. You’re not going to want to fabricate any of them, it’s never an easy job.
Clean each iris blade individually with a Q-tip soaked with lighter fluid, you can even pickle these in a vat of lighter fluid with a drop of machine oil overnight if you want, that will definitely dissolve any stubborn greasy deposits. Be very careful when cleaning these because it can be brittle due to their age, you should always handle them carefully by their pins.
If your lens has fungus, read my article on how to clean lens fungus, just make sure that you dilute it with distilled water so it’s not going to be too strong as it may damage the coating.
Conclusion:
Never in my life would I imagine to service such a rare and historical Nikkor but here it is. It is not really a challenge for me because I have serviced so many lenses over the years but I have learned a few things in this project. It just shows that there’s always an opportunity to grow. I found great satisfaction after I have completely overhauled this little gem because I finally see how beautiful it truly is after all the dirt is gone, you can say that it is “born again”. It will never be this disgusting again because I will make sure to start it properly this time.

The iris mechanism has now been rebuilt completely, the beautiful stainless steel blades are now shiny. It took me just one try to get this right, it’s very easy because the housing is shallow. I also lubricated it with powdered graphite by sprinkling some of it all over the blades and exercising them so that the powder is going to evenly coat everything. Blow off the excess powder just to make everything neat. Never use any wet lubrication like oil or grease for iris blades.

The lens has now been totally rebuilt, it hasn’t looked any better then this for almost a century. I’m happy that the worst is over and I can now enjoy shooting with this lens. It will never be filthy again because I’ll take very good care of it, I will hug it and squeeze it and name it “George“.
And here we are again at the end of another quality article that you will never find anywhere else. It is just one of the many excellent resource that you can find only in the site. It’s my life’s mission to present every information I could regarding vintage Nikon equipment, I’m closer to completing my work with this post. I hope you like my work because I put a lot of effort into it. You can also help me with my mission by giving a little tip using the link below, just think of me as an attractive waitress that serves you the best articles in the internet. Doing so helps me offset the cost of purchasing, developing and scanning film. You’ll also be one of the many people who are responsible for keeping this site up since it’s directly wired to the host of this site. This is a media-heavy site so I must pay for a little extra just to get the bandwidth required for a smooth experience. I only earn a few cents per unique visitor and that is not even enough for me to buy a piece of paper at Staples. This site has helped guide a new generation of camera repair enthusiasts, and it has done so close to a decade now. I never in my wildest dreams expected that this site will endure for so long nor will it grow this big, all of that is thanks to you. I thank you very much and see you again, Ric
Help Support this Blog:
Maintaining this site requires resources and a lot of time. If you think that it has helped you or you want to show your support by helping with the site’s upkeep, you can make a small donation to my paypal.com at richardHaw888@gmail.com. Money isn’t my prime motivation for this blog, I believe I have enough to run this myself but you can help me make this site grow.
Leave me some tip?
Thank you very much for your continued support!
$2.00
Helping support this site will ensure that it will be kept going as long as I have the time and energy for this. I’d appreciate it if you just leave out your name or details like your country’s name or other info so that the donations will totally be anonymous. This is a labor of love and I intend to keep it that way for as long as I can. Ric.
