
Hello, everybody! Do you believe in curses? Some folks believe that items can be cursed, it can come from the previous owner or just a stroke bad luck. You’ll sometimes wonder why things are always in a messed up state or why they’re always broken. The good thing is, curses can be lifted by good karma, faith or the patience of a good healer. Today, I will show you a cursed camera. It has been featured on the internet for a couple of years now, with the owner desperate to find a way of lifting the curse. It’s destiny that brought me and the camera together. Do you think I have enough good karma to lift the curse of the evil jammed shutter? I have been saving cameras and lenses for years, along with presenting you the best articles you can find on the internet. Let’s see if all that goodness will change the fate of this poor thing.
Introduction:
The Voigtländer Bessa R was sold from 2000 up to 2004, it was preceded by a minimalistic model called the Voigtländer Bessa L which doesn’t come with a viewfinder nor a rangefinder. It’s a brave gamble by a small company relative to the giants of the time called Nikon and Canon. The company is named Cosina, a company with a long history and experience. They dared to sell a concept that went against what the market was used to, the effort resulted in an instant classic that spawned a whole line of cameras. Many people are attracted to these because they offer something unique and that not a lot of brands give. It’s still very popular these days and the price has shot up due to the hype from influencers. I will show you if this hype is deserved or not in this series, you will be the judge of it.

This is the most modern LTM camera you can ever buy. It has a lot of modern conveniences which helps in simplifying the process of taking great photos. It is a great “Sunday camera” for leisurely taking photos at a park or the streets. It offers the best in terms of comfort of all the LTM cameras I have ever used.
The chassis is based from the several cheap SLR designs that Cosina made for other brands. Along with it, the shutter unit is identical to the said cameras – it’s a Copal. There are many similarities between this and the Nikon FM10 because they share the same low budget heritage. Despite that, Cosina integrated a few premium features to this camera that made it very unique and modern.
Some of the key features of this camera:
- TTL metering with bright LED display inside the viewfinder similar to the Voigtländer VC Meters.
- The meter stays “awake” like the Voigtländer VC Meter Version 1.
- A bright, parallax-corrected viewfinder with approximately 0.7x magnification.
- Variable bright line frames comprising of 50mm, 75mm and 35/90mm combination.
- A hot shoe, this is actually a big deal.
- A false shutter mechanism to prevent light leaks coming from the lens mount.
- A 1/2000s maximum shutter speed.
These features, especially the platform which it was built from all share a similar trait, they’re all cheap or made to the same level of craftsmanship. From the cheapest plastic Voigtländer Bessa L to the expensive Zeiss Ikon ZM that costs a lot of money, a luxury camera with economy at its core. Despite that comment, all of them are great cameras to a certain extent and some were reliable enough even when use roughly. I can say that these are better cameras compared to the tin toy that is the Canon 7. These cameras at least have some level of quality inside, it’s just that there’s plenty of lemons.
The ergonomics and handling are excellent, it’s simply the best LTM camera out there. The viewfinder is very bright and clear, you can easily see the meter inside of it. The frame lines are parallax-corrected and look sharp and defined. The patch is also clear, but a little tiny. It feels balanced when held despite being a plastic camera. The shutter is very loud compared to classic rangefinder cameras which operates like a whisper than a clunk, but it’s all good.

This combination with the Nikkor S•C 5cm f/1.4 is a joy to shoot with, but you will benefit more from the great viewfinder if you were to shoot with longer lenses. The balance feels great despite the lens being a bit heavy, it does not feel tiring to hold.

If you have a heavier lens such as the Nikkor-P•C 10.5cm f/2.5 then things will change quite a bit. You are going to notice how light the camera really is, and you’ll appreciate a more heavier camera instead. This is my biggest issue with the camera is when it comes to ergonomics, apart from the speed selector dial as it is situated too close to its surroundings, making it difficult to manipulate.
It’s a very quirky camera but it’s the most modern camera of its type. You won’t find another LTM camera with the same features that you will find with this one, and all of them are very old or made from the old Soviet Union. The only exception is the Yasuhara 一式 T981, which I suspect to be related to this one. The going price for one of these has shot up in recent months, it’s more likely due to “influencers” who knew nothing hyping this thing up, creating an inflated price, very much like what do you see with the Fujifilm cameras. Once something has reached the “yuppies”, it’s spoiled forever. I don’t think these deserve the price that they are going for, because you will soon find out about how flimsy they are and that they are not in the same league as the classic rangefinder cameras made during their peak. The asking price for a good one starts at $450.00, but just a few months ago, you could buy a nice sample for $280.00! There’s definitely a slimy “influencer” or two who made a video or article to pump these up. Enough of the rant, I invite you to read the rest of the article to see and understand if these are worth the price and to see how to take one apart for repairs.
Before We Begin:
If this is your first attempt at repairing a lens, I suggest that you see my previous posts regarding screws & drivers, grease and other things. Also read what I wrote about the tools that you’ll need.
I suggest that you read these primers before you begin:
- Essential tools
- Best practices 1
- Best practices 2
- Best practices 3
- Ai conversion
- Working with Helicoids
Reading these should lessen the chance of ruining your lens. Before opening up anything, always look for other people who have done so on the internet. Information is vague and scattered but you can still find some information if you search carefully.
For more advanced topics, you can read my fungus removal article. It has a lot of useful information, it will be beneficial for you to read this. I also recommend that you read the working with helicoids article so you will not get stuck because you couldn’t reassemble the helicoids back properly.
Disassembly (External):
This section will show you how to take the shell apart so you can access what’s inside the camera better. I think you can service the most common issues with it without dismantling the camera too much, but you should at least have a firm understanding of how this camera operates. This article will help you plan your repair steps better because you can anticipate the steps better. I did not know where nor how to start this project so some of my steps were not done in the correct sequence. Please keep that in mind, just see my pictures and plan your actions with it. This isn’t a camera that I’d recommend a beginner to practice with, it’s moderately challenging and there are many interlocking parts. This is a project for a more experienced person. If your camera needs to be repaired, please send it to a professional and never take it apart. You’ll need special tools to work with this and you will need the experience to make the correct judgment.
Extract all 4 screws to remove the bottom cover. You can leave the battery cover on if you wish. You can do this now or later, it’s all up to you.
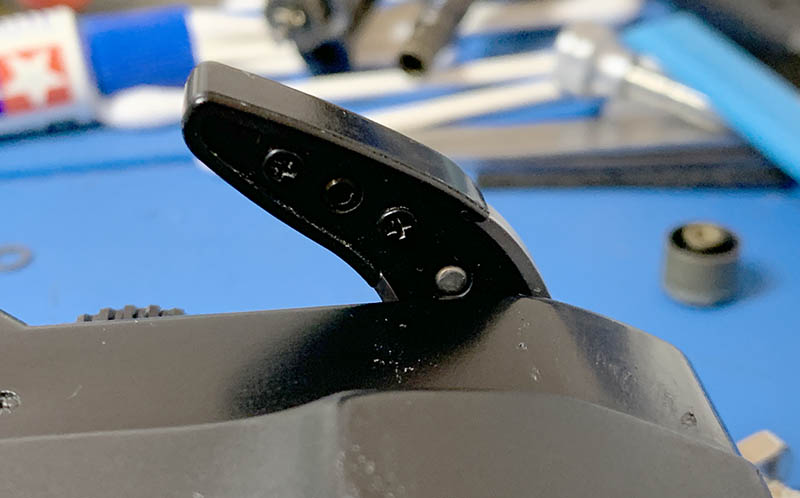
Carefully unscrew the cover of the timer lever and remove everything.
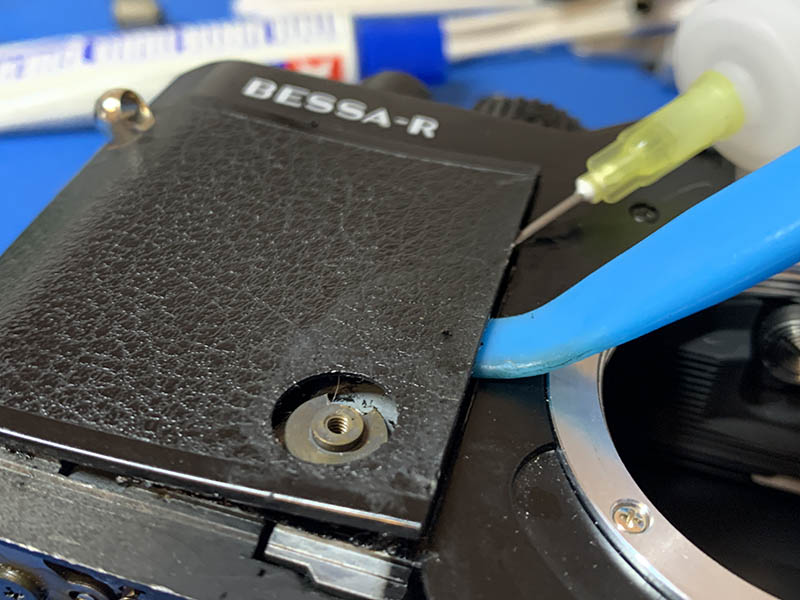
Be careful when removing the outer shell, these are made of brittle plastic and not flexible rubber. I made a mistake so I ended up with a small crack! The adhesive used is tough so I had to apply some alcohol to dissolve the black gunk and carefully lift the shell so I can safely remove them.
(Click to enlarge)
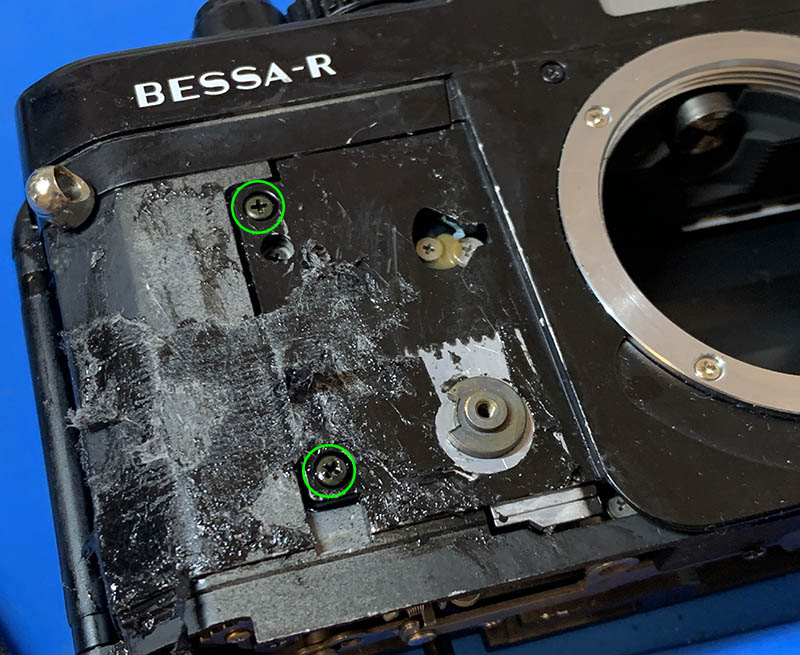
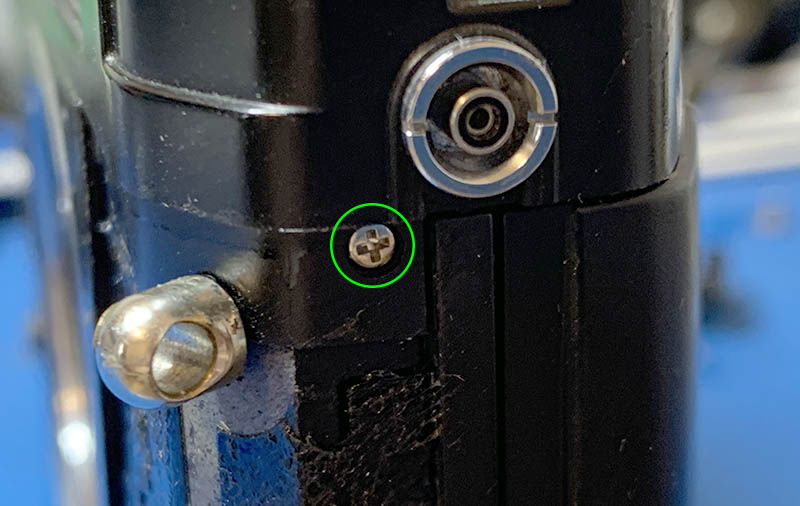
Once both of the shell on either side or the camera are gone you can extract these screws. Unfortunately, you are not able to remove the front plate just yet because you have to get rid of the top shell first. I did not know it so you should be doing this a little bit later in this article.
(Click to enlarge)
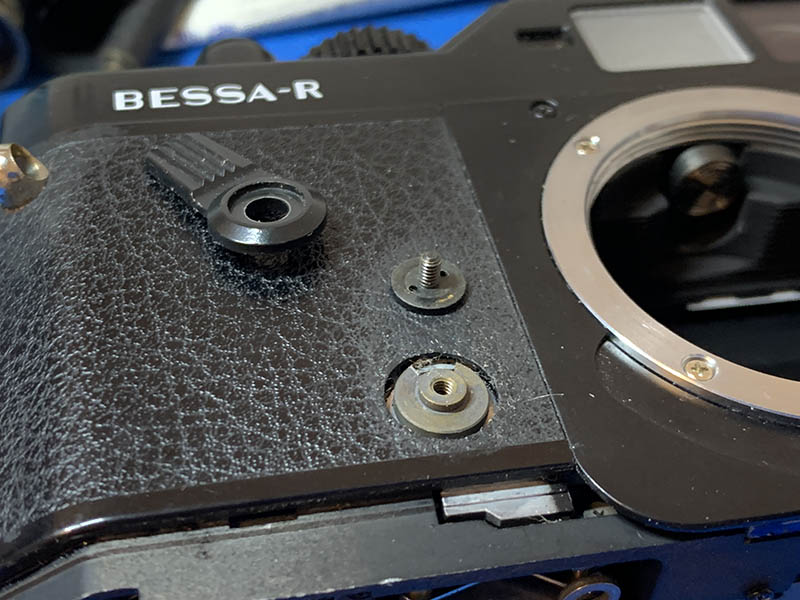
To disassemble the winding lever you must extract the screws underneath it. Once the screws are gone it’s easy to remove the cover. You will find a disc underneath it, push it aside and lift it off so you can remove the circular spring and the lever itself from the camera. You may find washers and other things here, too.
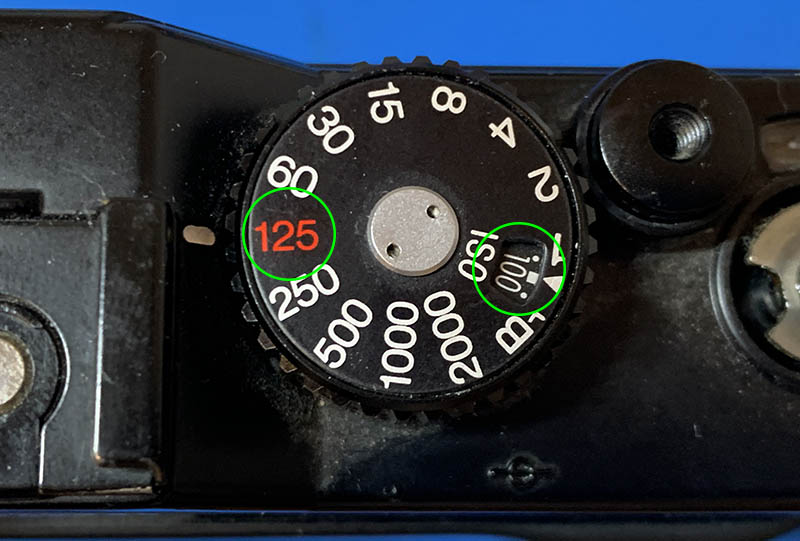
Before removing the speed selector dial, set it to something that you can easily remember. This is what I did for reference.
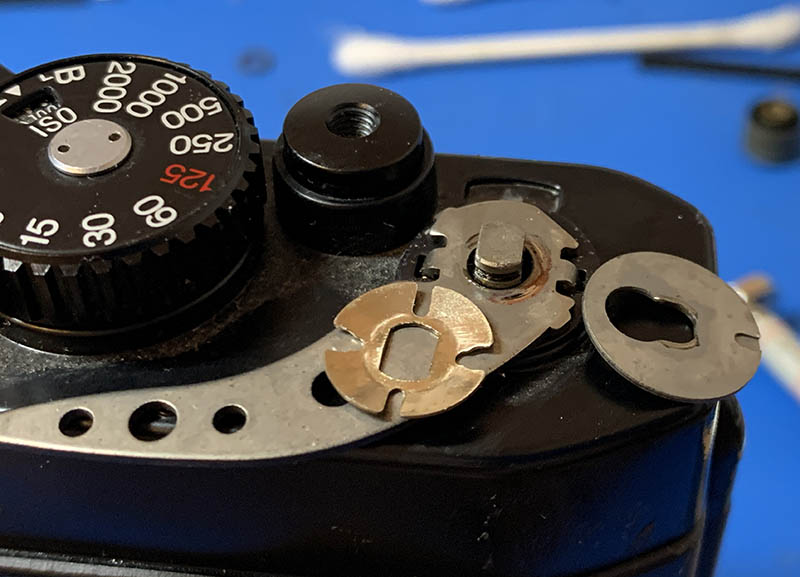
Carefully unscrew the center of the dial in order to dismantle it, but be careful not to turn it. Inspect how everything looks like underneath the dial, this should be the correct alignment of the parts in reference to what you see in the previous photo.
Use a screwdriver and lift the cover of the hot-shoe and then push it out. You will see screws underneath it, extract them and remove the hot-shoe itself.
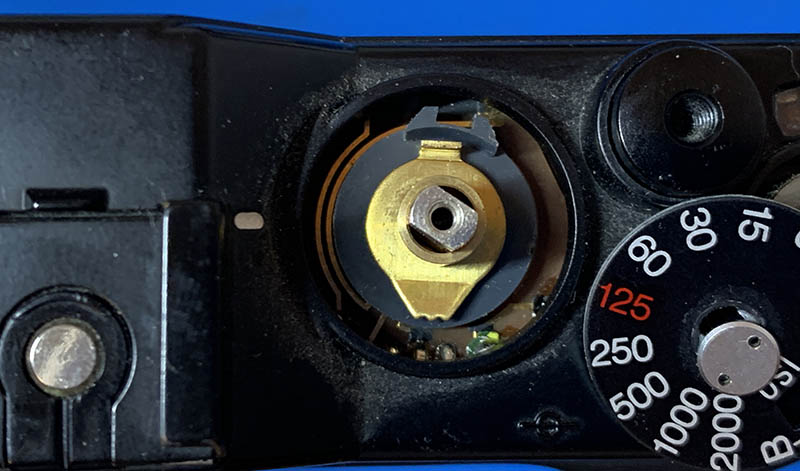
Extract the screw at the center of the rewind lever to remove it, then unscrew the nut securing the rewind fork. You will need to jam the rewind fork with a chopstick so it won’t turn as you unscrew the nut. Leave the fork alone, do not depress it or else it will make it difficult for you to open the back door later.
(Click to enlarge)
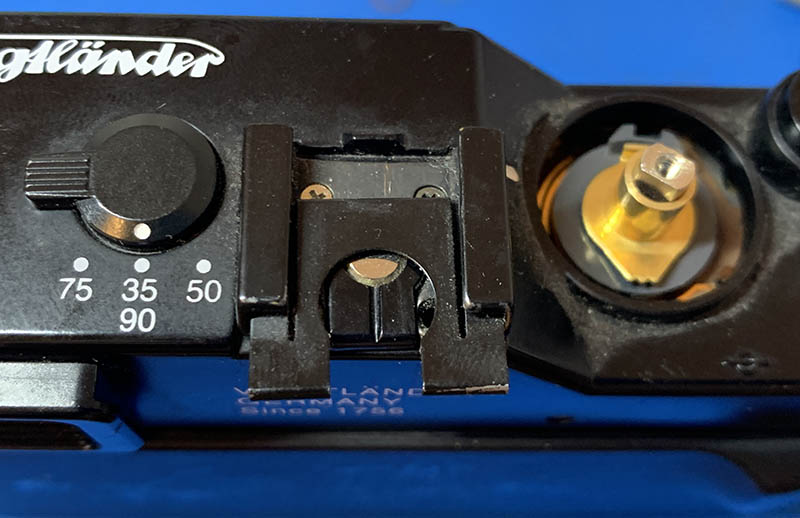
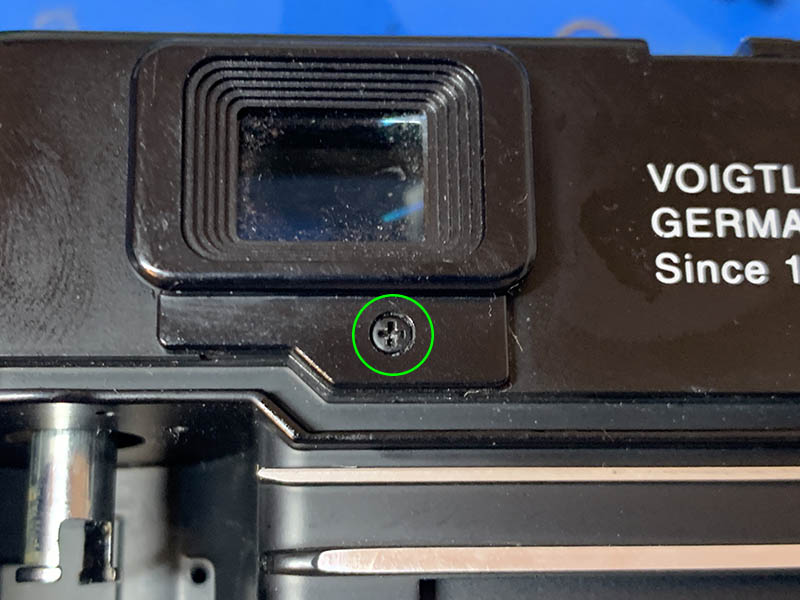
Carefully locate and extract these screws in order to remove the top shell. I forgot to mention it, there’s 2 more screws at the front of the camera, you must remove them also.
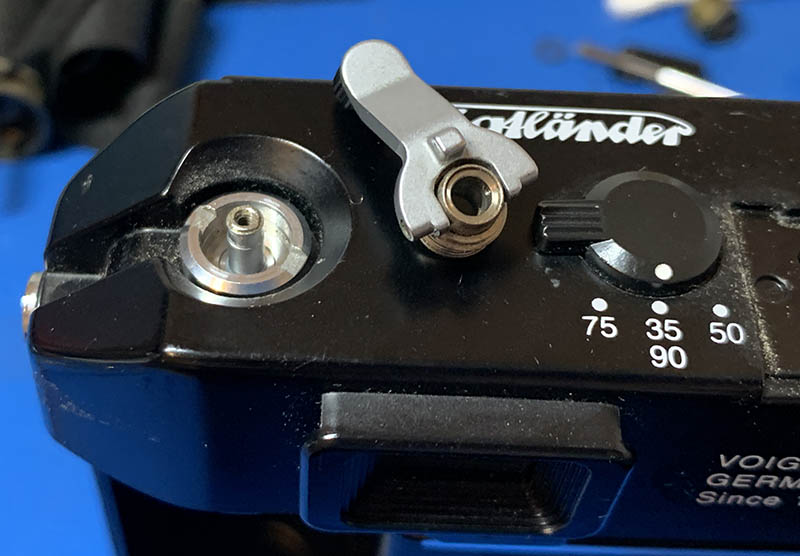
The top can be easily removed once all of the screws are gone.

The front plate can be easily removed now that the top shell is gone.
You should be making your diagnostics at this state. This is when you can still access everything that you require in order to understand how the camera works while it’s still fully operational. You should only go further if you cannot find the problem at this point. For many troubles and adjustments, this is enough.
Disassembly (Internal):
This is the point of no return. Once you begin removing the important assemblies, you are already set in your mission to take the camera apart and find out what’s wrong with it. Needless to say, this is not for a novice to tackle. You can easily brick your camera by shorting the electronics or warping the delicate and flimsy parts you can see here. Of course, losing small parts such as springs and the like are very real. This is a job for experts. Take as many photos as you can so you will have plenty of references later. That is the only way you can put back everything together.
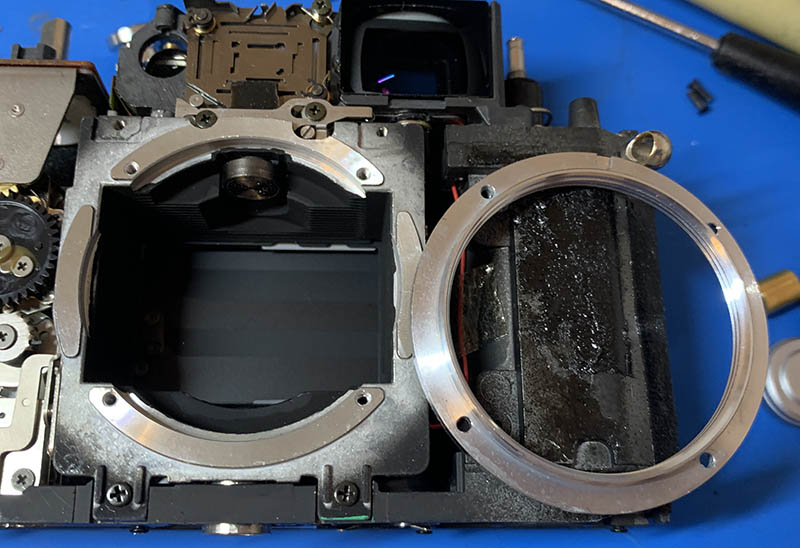
You can remove the mount if you wish, it appears to be a completely optional step.
(Click to enlarge)
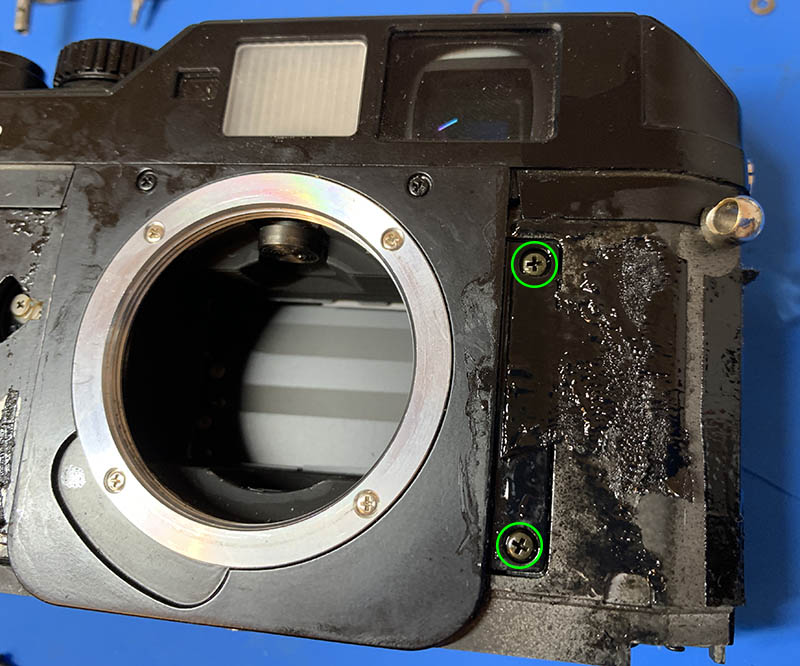
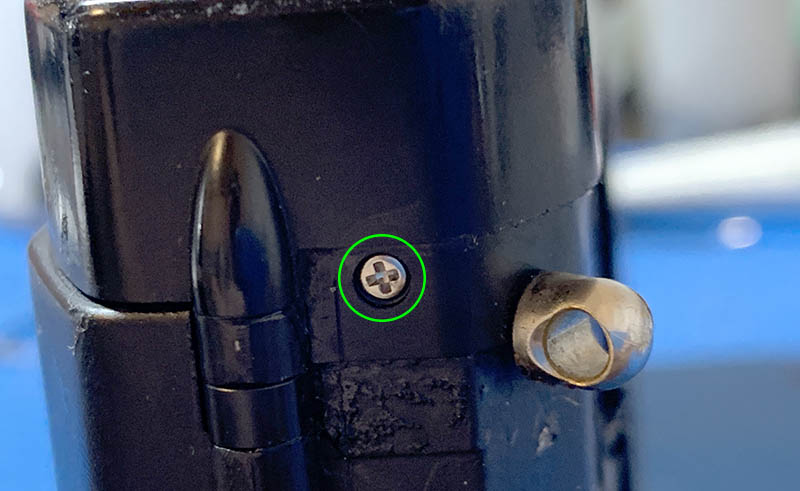
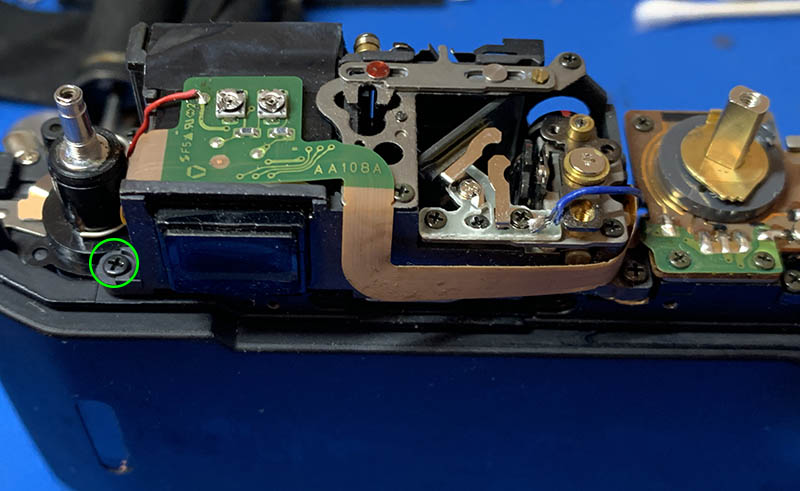
Extract the 3 screws that secure the rangefinder assembly. I have only highlighted 2 of them, the third one is at the opposite side of the screw highlighted in the first picture.
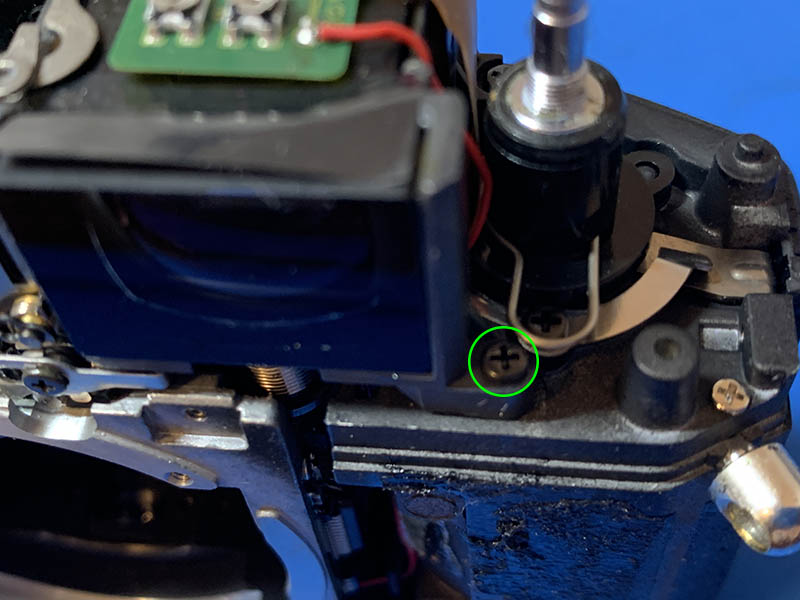
Extract these screws, they secure the false shutter box assembly from the back. There are 2 more screws at the front, somewhere at the bottom of the assembly.
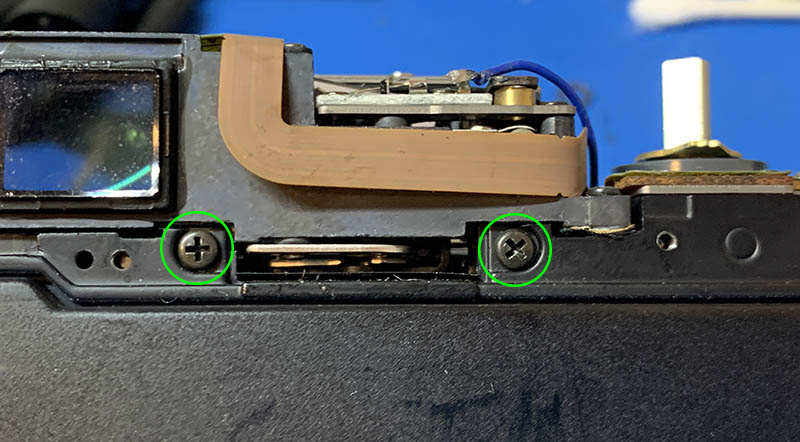
Just in case, you may want to unscrew these so the battery chamber can be pulled down a bit in order to give you some room to wiggle the false shutter box assembly. You won’t be able to pull this off because there is a wire soldered to it at the other end, so be careful.
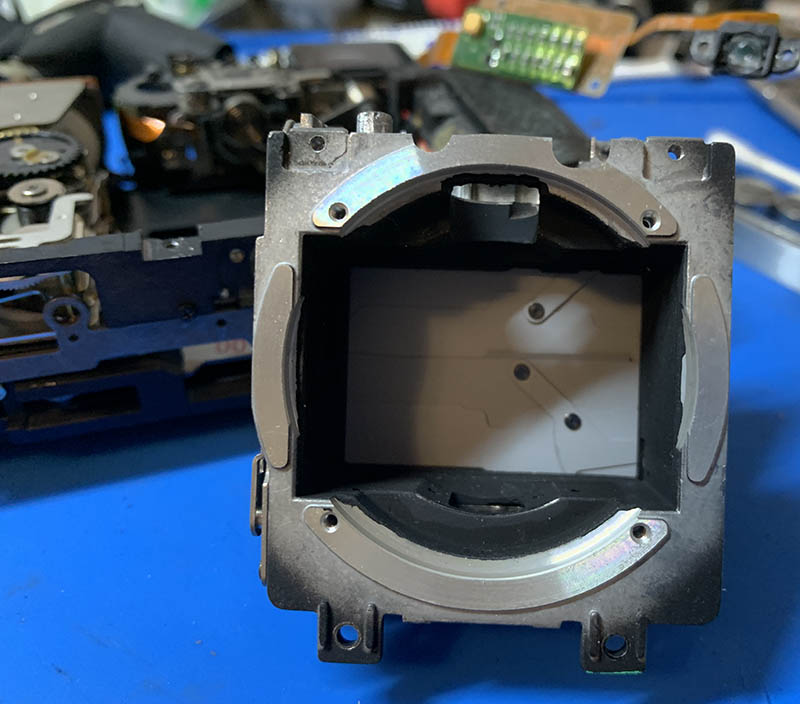
Carefully remove the false shutter box assembly and make sure that the hook of the shutter lever won’t get caught while you remove it. Some other things may get caught so be careful, one of them is the big roller attached to the end of the rangefinder arm. Depress the arm by pressing on the roller and remove the rangefinder assembly in order to free you some space so you can safely reviews the box.
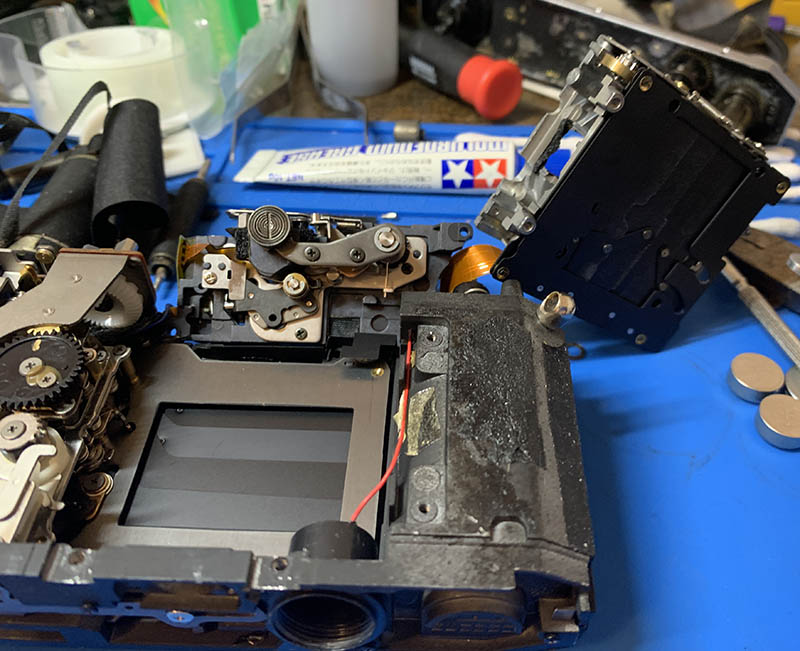
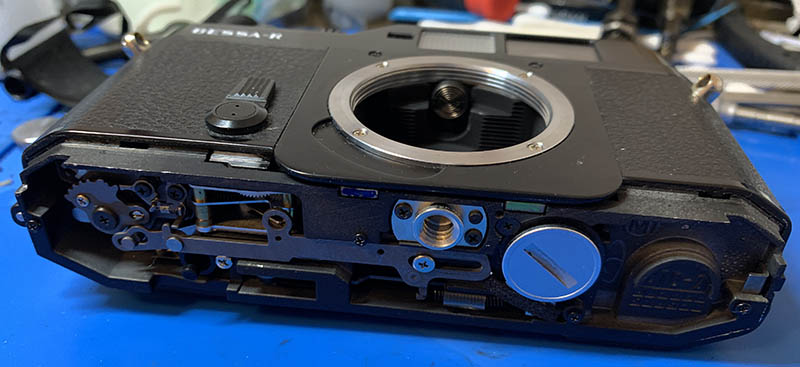
This is how it should look like. It can be very tricky but it’s not impossible.
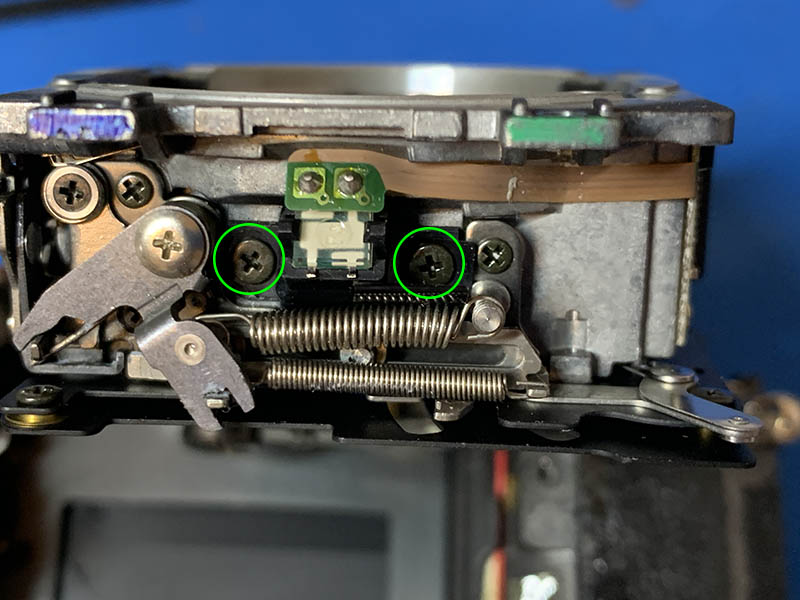
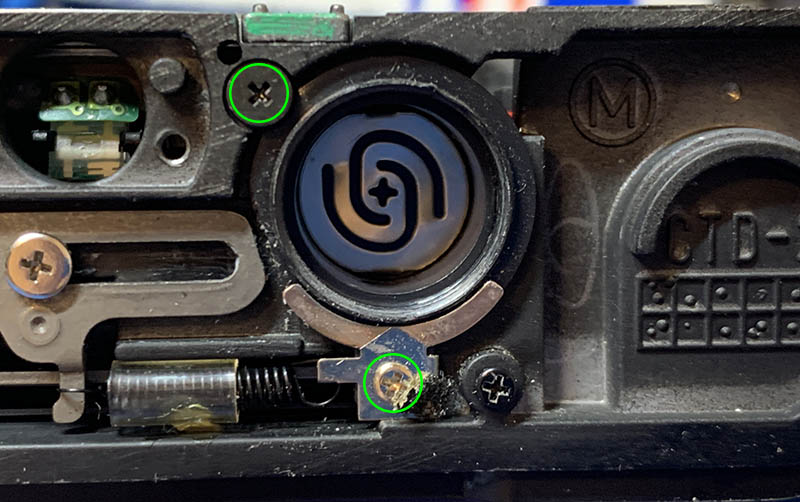
Extract these screws so you can remove the housing of the metering cell. Be careful as you pull it off so you will not damage anything, especially the delicate sensor of the meter.
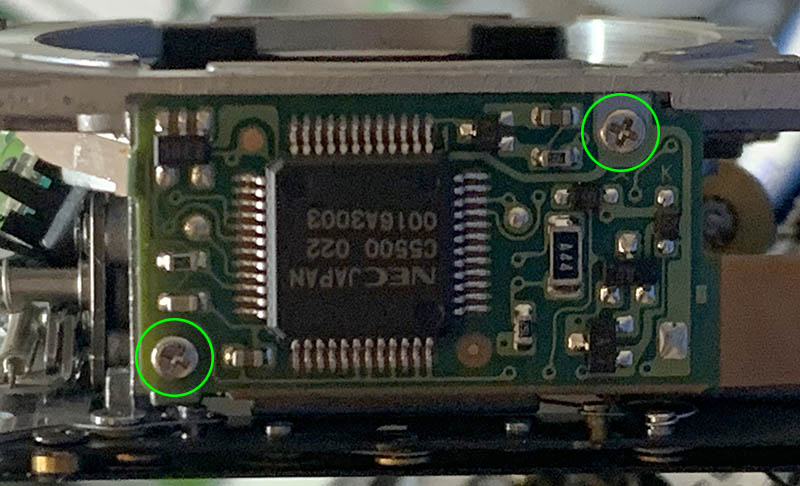
Use a non-magnetic screwdriver to extract these in order to remove this circuit board from the side of the false shutter box.
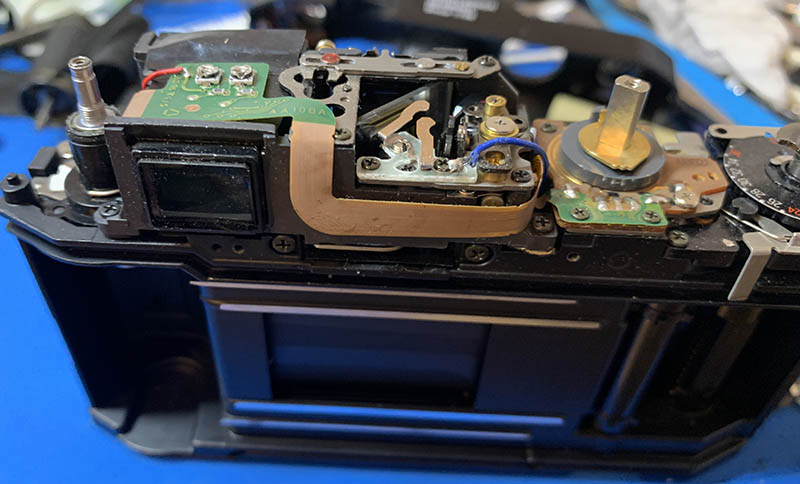
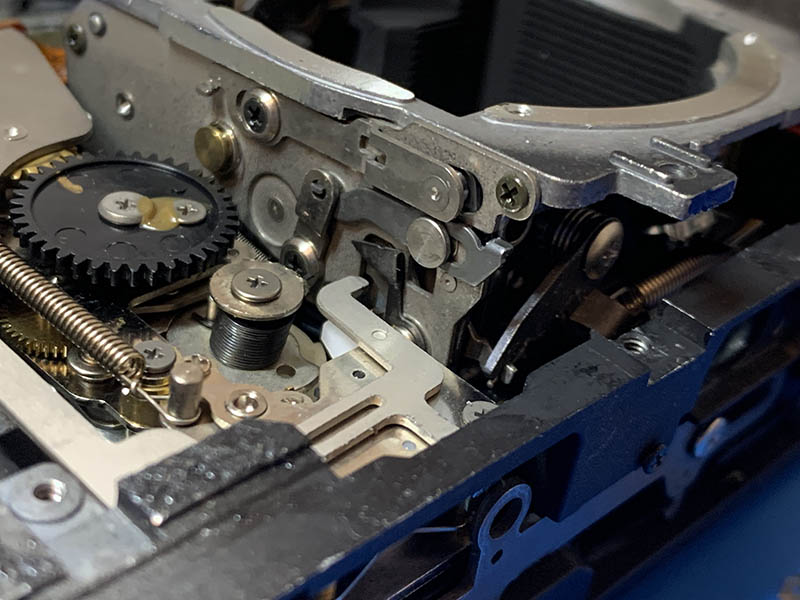
You can now marvel at the delicate engineering that produced this mechanism.
We have torn the camera apart, down to its basic assemblies. At this point, you can now test each part to figure out which one is broken. You will rarely find the need to go any further. For this camera, I should’ve stopped at this point because I could have easily fixed the problem and save me a lot of time and effort. I wasn’t familiar with it so I went deeper. This turned out to be beneficial for you because you will see more content in this series just because I went overboard.
Conclusion:
Compared to many other cameras, it wasn’t that difficult to tear this one apart. Many things felt logical, it’s an easy camera to service if you do this for a living. The problem is finding the parts if something has to be replaced. There are some things that can be fabricated or sourced from the parts box, but there are things that can only be replaced. Cosina will never sell you anything unless you’re an official partner. This is very sad but that is how the industry turned out to be in recent years, that’s why there’s this movement pushing for the “right to repair”. I support this movement because it’s sustainable.

We will tear this camera down to the state you see above. There will almost be no secrets left for it to hide once were done with the series. You should read part 2 of this series so you won’t feel longing for more.
I have been waiting for many years to be able to present this camera to you, and I am very happy just to do that with this article. I’m sure that it will benefit everyone who are curious about the real cause of the dreaded curse of the jammed shutter. If you think this article will benefit the community, I’d appreciate it if you can leave me a little tip. Producing these articles take out of time, effort and money. This is a media heavy site and hosting it is not cheap. While I can do this with my own resources, your efforts have helped this site a lot. It would not have lasted for almost a decade without your help. A decade full of the original and high quality articles that made you come back all these years and also inspired a whole generation of camera repair enthusiasts. See you guys again in the next part of this series, Ric.
Help Support this Blog:
Maintaining this site requires resources and a lot of time. If you think that it has helped you or you want to show your support by helping with the site’s upkeep, you can make a small donation to my paypal.com at richardHaw888@gmail.com. Money isn’t my prime motivation for this blog, I believe I have enough to run this myself but you can help me make this site grow.
Leave me some tip?
Thank you very much for your continued support!
$2.00
Helping support this site will ensure that it will be kept going as long as I have the time and energy for this. I’d appreciate it if you just leave out your name or details like your country’s name or other info so that the donations will totally be anonymous. This is a labor of love and I intend to keep it that way for as long as I can. Ric.

Sep 25, 2024 @ 22:24:41
Great timing! Currently have an R2A torn down for a shutter issue and have run out of ideas. Different mechanism but similar enough to learn from. Thanks!
Mar 26, 2025 @ 19:44:31
This is a very helpful guide! I have a Bessa-R that had iced tea spilled on it and now the rangefinder is all gunked up and sticky 😦 (still functions accurately and correctly though)
Any recommendations on what substance(s) to use to clean out the sticky iced tea residue?
Jul 20, 2025 @ 15:18:01
Thank you for the guide! How did you remove rangefinder guide selector next to rewind crank?