
Hello, everybody! I just bought a DNA testing kit, you know, the one that’s hip with the kids these days. I bought it because I wanted to know what are my health risks because I’m not young anymore. I did not get one because I want to avoid accidentally banging my relatives like what some people actually think and do for themselves. I’m also curious to know if I have relatives around the world, maybe I will find an uncle living nearby that I have never ever heard of, isn’t that exciting? Speaking of finding secret relatives and genealogy, I would like to share with you a “secret relative” of the Nikkor 135/3.5 family. It is not well known so it might as well be an urban legend for some people but we will know everything about it here in this article.
Introduction:
This adapter for Nikkor-Q•C 13.5cm f/3.5 will enable you to use the front barrel of the lens and mount it to any camera that uses the Nikon F-mount. It was made for a short time to coincide with the release of the legendary Nikon F. Not a lot of people knew about it and it’s only ever mentioned in the catalogs. It isn’t really a proper “lens” so to speak because it was ever only sold as a separate item as far as I know.

It is much shorter compared to its rangefinder cousins. It’s because the F-mount requires a longer flange distance in order to stay clear of the flapping mirror. While the construction is all-metal, the adapter feels somewhat “cheap” because the bayonet mount is part of the lower barrel. While it keeps things simple, it gives the impression of cheapness like what I have just mentioned.
Since we’re just talking about the adapter, we will not discuss anything about the optics because they are all identical across the board, from the first version up to the last one that came out of the factory. I won’t be doing any example images for obvious reasons but I will leave some commentaries about how it feels like to use this setup, I think that will give us more value in terms of content. I have written many articles about this lens so just look for them in my database if you’re curious about how it performs optically.
Now, you may ask yourself why Nikon made such a thing in the first place. It was made just so the people who already own the lens won’t have to purchase another one to use with their Nikon F. This is attractive as an option because lenses weren’t cheap then as they are not cheap today. The downside is you’ll lose the capability to use a lens with an automatic diaphragm like the Nikkor-Q 13.5cm f/3.5 Auto. That lens is the proper one to use with the Nikon F. You will also have to put up with the rotating front just like many other rangefinder lenses of that time.

It’s normal for the adapter to have an off-centered focusing scale, the infinity mark will also overshoot the center of the scale. This is intentional, these lenses all have a shim that’s used to adjust the focus. If that is gone or not installed, the adapter will have to compensate for that. This may sound sloppy, but you can’t expect the customers to do fine adjustments without specialized tools back in the day. Sending the whole thing back to Nikon for adjustments is also out of the question.
Manipulating it can be very awkward. Focusing with it isn’t the problem, it’s how you’re able to turn the aperture ring without accidentally moving the focusing ring in the process. It’s also unnatural to see the aperture ring at the front of the barrel. While it’s easier to see, it can be obscured if the numbers aren’t at the right position because the front turns along with the focusing ring.

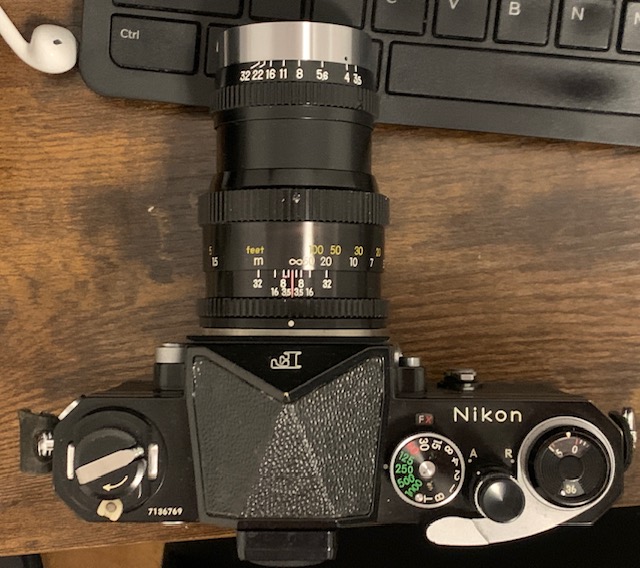
The best way to enjoy shooting with this lens is to use it with a film camera that’s of similar vintage. This Nikon F2 is more than a decade older than the lens and adapter but it’s a good illustration just so you will understand how it looks like when mounted to a camera. You won’t be able to do TTL metering the easy way with this setup because the iris won’t be actuated automatically, you will have to stop the iris down in order to take an accurate reading. This is not a problem when shooting on a sunny day because you’ll be able to focus properly even with the iris stopped-down. This will become troublesome in darker scenarios so you should focus first before metering and taking your picture with the iris properly set. Alternatively, you can just use a light meter which can make things even faster. It’s a big hassle these days but this isn’t such a big deal back in the day because photographers were not spoiled by modern conveniences.

It’s a lot of fun shooting this lens with a digital Nikon such as this Nikon Df. Since this lens is pre-Ai, you’ll need a camera that has a foldable meter coupling tab. It’s likely that the lens won’t even touch the tab at all but it’s best to play it safe because repairing the damage caused by this is never cheap.
This brings absolutely no value in terms of practicality so I will never recommend this setup to anyone. It’s only something for the true collector. It was sold just so existing Nikon rangefinder users can save money and reuse their existing lenses with the then-new Nikon F. This is a very rare item and their rarity dictates their prices, I am lucky enough to get one for an affordable price but some people are even luckier since they were able to own these for a little bit cheaper. Even if you have all the money in the world, you won’t be able to buy one unless something comes up for sale. If you’re looking for one, buy it at any condition. I will purchase one myself even if it is in a terrible state. There’s nothing much that can go wrong with it, it’s just an adapter. If you have accumulated enough good karma or just lucky to have the right friends, you’ll be able to on one of these at any price. That’s just how it is, happy hunting.
Before We Begin:
If this is your first attempt at repairing a lens, I suggest that you see my previous posts regarding screws & drivers, grease and other things. Also read what I wrote about the tools that you’ll need.
I suggest that you read these primers before you begin:
- Essential tools
- Best practices 1
- Best practices 2
- Best practices 3
- Ai conversion
- Working with Helicoids
Reading these should lessen the chance of ruining your lens. Before opening up anything, always look for other people who have done so on the internet. Information is vague and scattered but you can still find some information if you search carefully.
For more advanced topics, you can read my fungus removal article. It has a lot of useful information, it will be beneficial for you to read this. I also recommend that you read the working with helicoids article so you will not get stuck because you couldn’t reassemble the helicoids back properly.
Disassembly:
The focusing unit itself is simple in terms of construction. There’s nothing that can go wrong with it if you are an experienced repair person. There’s not a lot of parts, it’s just a hollow tube with helicoids. It doesn’t feel like something from Nikon if you think about its quality and construction because it feels crude, some even claim that it was outsourced but that’s just a rumor if you ask me.
I won’t be discussing how to dismantle the front part of the lens because I have written several articles of this topic over the years, if you need to service yours, read my article about the Nikkor-Q•C 13.5cm f/3.5. I have detailed every step in that article for you to follow.

Just like every lens in this series, you can separate it by unscrewing the front part from the focusing unit. Just be careful not to grab the aperture ring when you do so to prevent damaging the iris mechanism.
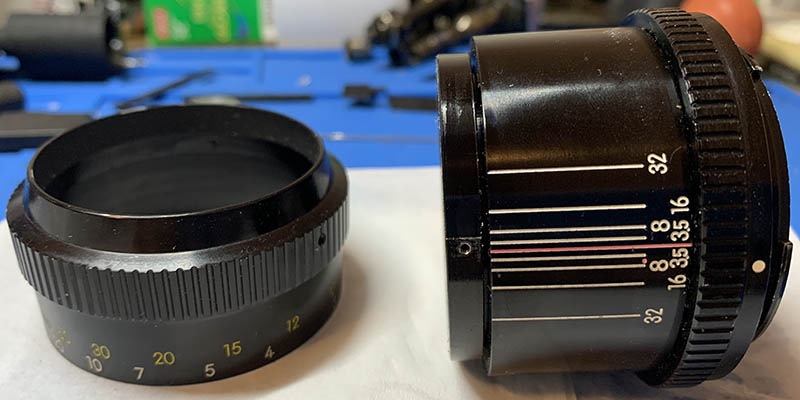
Extract all of the screws of the focusing ring in order to pull it off from the rest of the barrel.

Carefully extract this screw using a driver that fits perfectly so you won’t scar it, like how you see here.

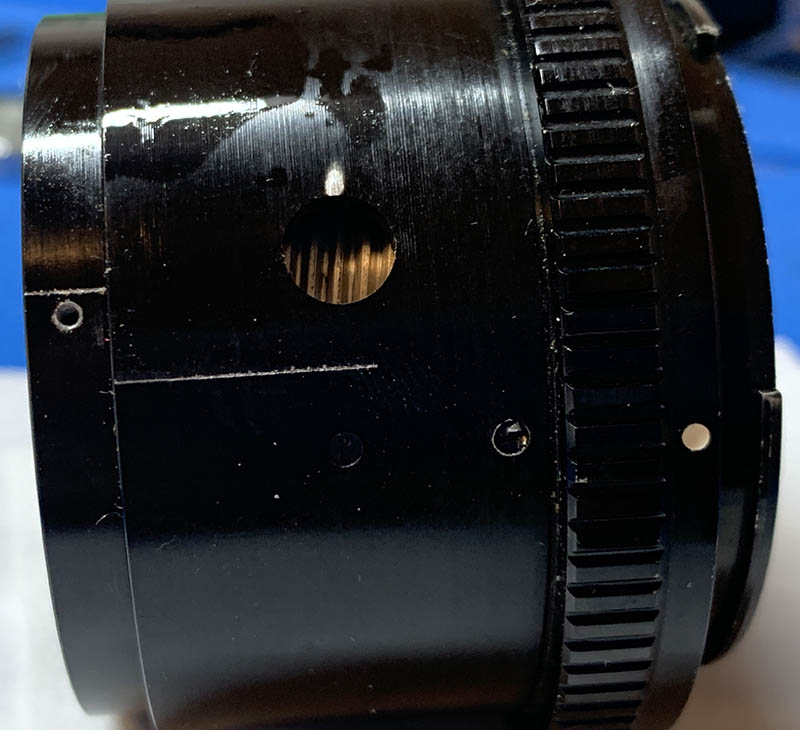
Removing the screw will allow you to pull the sleeve off, revealing these holes. They are used for adjusting the sleeve because each lens has a different focus point. This allows for a certain amount of slop, if you’re not seeing the focusing scale being somewhat aligned then this is the only way to make your adjustments so you will end up with at least something that is useful.

Take note of the helicoids’ alignment when the barrel is set to infinity, I made shallow marks as a guide.

Turn the helicoid to reveal this screw and extract it. This screw is used to constrain the helicoids so they won’t turn beyond the focusing range.
Once the screw is gone you are able to collapse the helicoids. Make a small mark, you should be able to reproduce this alignment later when you reassemble the helicoids.

Once that screw is gone you are now able to separate the helicoids. Do not forget to mark the spot where the helicoids separated, because this is also the same place where they should mesh. Many people do not do this so they end up with a lens that won’t focus properly. To prevent this happening to you, follow my article on how to work with helicoids. Follow my guide very well and you should be safe.
I cleaned all of the big parts with a strong toilet cleanser – the grainier, the better. I scrubbed everything using a brush then rinsed them all very well with hot water before making a final rinse with pure alcohol to remove any remaining residue. Pay special attention when cleaning the helicoids or the other threads, they are fine in some places and they can be caked with gunk, using a wooden toothpick helps here for stubborn deposits. Dry them well before you continue. When lubricating, be sure not to apply too much, all you will need is a thin film of fresh grease. Combine the helicoids then exercise them by turning several times, this will ensure that the grease is applied evenly then wipe off any excess oil. If you’ve applied too much grease it will settle in the iris mechanism eventually, necessitating the need to open it again just to give everything another overhaul.
Conclusion:
The adapter took me a short time to service but I learned a lot from this project. Never in my mind that I would see myself working on one of these so this is a very valuable experience for me. It’s also very lucky for you that I got to service this because I’m able to present to you this very rare subject, something that’s only whispered between collectors.

This isn’t something that you will see me use regularly. In fact, I have never used it ever since I gave it the cleaning of its life. Despite that it’s still a beautiful lens when attached to my Nikon F.
We’re now at the end of another exclusive article; did you enjoy it? There’s not a lot of information about this item anywhere in the internet, and there’s absolutely nothing about how to service it. This is the only place where you will find exclusive content about it anywhere on the internet. That’s all thanks to you, it’s not easy to maintain this website, documenting and writing these exquisite articles take a lot of effort, not to mention how much resources it takes just to keep this going. The tip that you leave me helps a lot, it is invaluable in helping me offset the cost of hosting this site and also with helping me pay for the purchase and processing of film. I’d also like to announce that we have finally reached the 10th year of operation! It is an amazing feat now that I look back at how far we have gotten since the first article I wrote around 10 years ago. This website started with me showing people how to remove screws and clean fungus, and it’s now grown to be this comprehensive resource that you cannot find anywhere. Thank you very much and I hope that you will continue supporting my work for 10 more years to come! See you again, Ric.
Help Support this Blog:
Maintaining this site requires resources and a lot of time. If you think that it has helped you or you want to show your support by helping with the site’s upkeep, you can make a small donation to my paypal.com at richardHaw888@gmail.com. Money isn’t my prime motivation for this blog, I believe I have enough to run this myself but you can help me make this site grow.
Leave me some tip?
Thank you very much for your continued support!
$2.00
Helping support this site will ensure that it will be kept going as long as I have the time and energy for this. I’d appreciate it if you just leave out your name or details like your country’s name or other info so that the donations will totally be anonymous. This is a labor of love and I intend to keep it that way for as long as I can. Ric.
