
Hello, everybody! Do you know about the Uyghurs? They are a Turkic people living in East Turkistan which is called Xinjiang by the CCP Chinese. They are a proud people with a long and profound history. They are culturally different from the rest of communist China, because they are not part of the Han majority. They are closer to the Uzbeks, Turks and other Central Asians. Their way of life is threatened and many of them have fled to other countries as they are being persecuted, much like the Tibetans. This is to say that not all people who live in communist China are all “Chinese“, some are cultural minorities who have their distinct way of life that’s in danger of being wiped out. Today, we’ll talk of something along those lines. It’s a lens that looks similar the rest of the family, but it’s certainly different in small ways. It is important to make a distinction so we will know exactly what’s in front of us.
Introduction:
The Nikkor-S•C 5cm f/1.4 is one of the lenses that I have covered many times in this site. Many of you got familiar with it through my articles. I did not think that I would ever write another article about it, but here I am presenting you with another one. This time it’s an early version from the first part of 1950. This is the coveted “5005” series, the earliest production of the Nikkor-S•C 5cm f/1.4. This particular lens is from the 2nd batch which has less digits in the serial number, but still valuable compared to common later versions that everybody has. These are valuable because some people consider them as “Made in Occupied Japan“. While it’s technically not an “MIOJ” lens due to the lack of the engraved country of origin, the date it was manufactured should put this together with the other genuine “MIOJ” Nikkors. This is only important for a certain group of collectors, whatever its true nature should be.

The barrel is similar to the more common later version except for a few minor differences such as the different typeface used, along with being somewhat heavier. The last version (in black) is the lightest, it has many parts that are made of a lighter alloy.
The optical design is identical to the Nikkor-S•C 5cm f/1.4 so I will not be talking more about it. You can see my other articles about the Nikkor-S•C 5cm f/1.4 to see how it performs. The Sonnar-type design is a classic and it has not changed since its Inception up to the last one that rolled out from the factory. This is one of Nikon’s most popular design (that was copied from the original Sonnar).

The older Nikkor-S•C 5cm f/1.4 looks the best when paired with a Nikon M or any similar camera. This is a good combination if you want to have a setup that is correct for the era.
We will not be discussing about its ergonomics or anything else because it is nearly identical to the other versions, it makes no sense for me to repeat something that I have written many times over.
I won’t recommend this particular version because it offers nothing compared to the Nikkor-S•C 5cm f/1.4 (later ones), it’s just something for collectors to brag about. They’re also much more expensive, prepare to spend upwards of $500.00 for one in great condition. This one is defective, as you will soon know, and so I got it for much cheaper because it’s bundled with a camera. Early Nikkors have a reputation of using bad materials for the aperture blades, this one is no exception. So if you’re looking for one, make sure that the aperture blades are complete. It’s acceptable to have some blemishes on the glass because of its age, but never buy one that has balsam separation because it’s not an easy or cheap fix. These are also rare, you’ll be spending a lot of time looking for these and checking the serial numbers to make sure that the lens is a genuine “Made in Occupied Japan” one. For that, see Roland Vink’s excellent database. Just be vigilant so you can find one for a great deal.
Before We Begin:
If this is your first attempt at repairing a lens, I suggest that you see my previous posts regarding screws & drivers, grease and other things. Also read what I wrote about the tools that you’ll need.
I suggest that you read these primers before you begin:
- Essential tools
- Best practices 1
- Best practices 2
- Best practices 3
- Ai conversion
- Working with Helicoids
Reading these should lessen the chance of ruining your lens. Before opening up anything, always look for other people who have done so on the internet. Information is vague and scattered but you can still find some information if you search carefully.
For more advanced topics, you can read my fungus removal article. It has a lot of useful information, it will be beneficial for you to read this. I also recommend that you read the working with helicoids article so you will not get stuck because you couldn’t reassemble the helicoids back properly.
Disassembly:
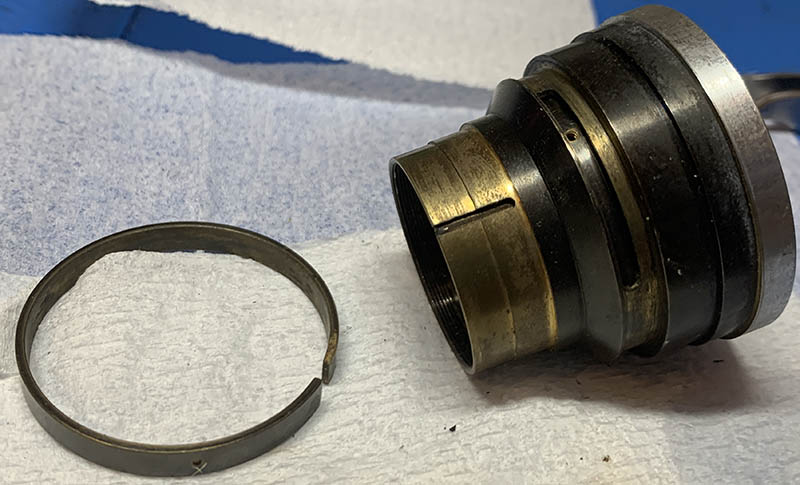
There’s nothing special about its design, it comes off the same way as other similar Nikkors. I was hoping to see any major differences in terms of construction but I found none. The biggest difference I saw with it is the use of a retainer instead of a simple circlip for the iris mechanism. Some of the parts also use the heavier type of brass instead of stainless steel or aluminum alloy. All this makes it a bit heavier compared to the later variants that followed.
I will not recommend this repair to any novice because you will need special tools for it. If your lens needs attention, send it to a professional to have it clean properly. You may not be able to put the iris back and you will end up with a collection of expensive spare parts.

As usual, the lens can be dismantled after unscrewing the collar at the rear, it secures the front part of the whole lens to the main barrel. Carefully pull the front part out and be careful not to lose any off the brass shims you will find here. They usually have one here, mine has two.

The rear optical block is unscrewed using a special tool, you can make one yourself by following this article that I wrote long ago.

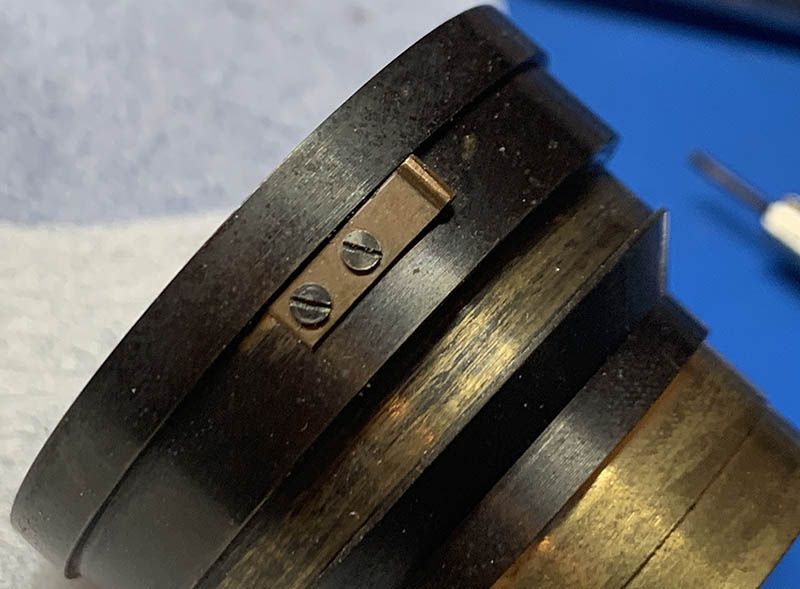
Carefully extract these so you can remove the aperture ring. Be careful not to lose any of these.

Pull the aperture ring off and clean it very well, these are usually greasy on the inside.

Carefully extract this screw, it serves as a pin to couple the aperture collar to the iris mechanism inside.
Pick on this collar with your nails and carefully move it out of the way. Don’t forget which side should be facing the front.

The front optical block can be unscrewed from the housing just like this. It can be difficult sometimes so I drop some alcohol or paint thinner into the seam to soften up any seals or gunk.
Carefully extract these to remove the spring, don’t forget which side should face where.

Once you have unscrewed the housing of the 2nd group off, you can unscrew the retainer for the front element and remove it from the bezel. The housing of the 2nd group should not be dismantled further because it’s a sealed unit, just leave it alone.

Carefully unscrew the retainer of the iris mechanism and pull the diaphragm cup off. This will allow you to pick the iris mechanism apart.
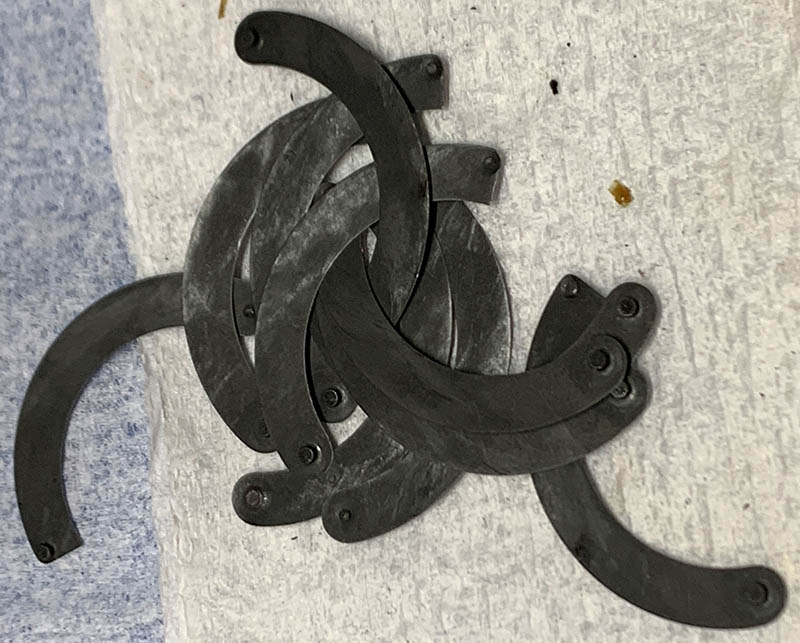
Do not bother picking off each blade from the housing, just pop them off by tapping the rear and letting them land on a soft surface such as a towel. While I was working on this, I realized that I am missing one of the blades, the previous guy lost it! One of the blades is damaged and had one of its pin replaced with a thicker one. Of course, it won’t fit inside the hole so I had to bore the hole to make it slightly larger so it can fit. If you have any spare blades to sell, please contact me.
Each leaf was cleaned very carefully with Q-tips soaked in solvents, I used Zippo fluid for this as alcohol is not the right solvent for the type of grease used. Be sure to handle these carefully, accidentally destroying one is out of the question.
If your lens has fungus, read my article on how to clean lens fungus, just make sure that you dilute it with distilled water so it’s not going to be too strong as it may damage the coating.
Never lubricate the iris mechanism, if you must, a light dusting of powdered graphite is enough, blow off any excess powder after actuating the iris several times to finish the job.
I cleaned all of the big parts with a strong toilet cleanser – the grainier, the better. I scrubbed everything using a brush then rinsed them all very well with hot water before making a final rinse with pure alcohol to remove any remaining residue.
Conclusion:
It did not take me a long time to service this lens because I am familiar with it by now after all these years of overhauling similar designs. Despite that, I had a nice time because I discovered some differences. They are insignificant and will only be interesting to the hardcore Nikon fans. I was expecting to see more but a lot of the subtle differences are just differences in the materials used. At least that satisfied my curiosity.

The lens looks really shiny and clean after being serviced. The metal plating looks so much better, and the lettering were all repainted. The ultrasonic bath stripped away all of the paint but the good thing is it also cleaned all that dirty and hardened deposit outside of the barrel.
Well, there’s nothing much in this article. I was hoping that there would be more things to show but there isn’t a lot of differences between this and the other versions. Either way, I hope that you have enjoyed this article. It’s currently the end of winter but it’s still very cold outside so I’m not able to take pictures for my other repair articles and reviews. If ever you are wondering how I’m doing, the industry that I am in is not doing very well. The company I am working for has imploded and we are just waiting for a new investor to take over. The future is uncertain, and I hope things turn out well. If you have enjoyed this article, help me a bit by leaving me a tip. That will be very much appreciated especially in these times. Keeping this up takes a lot of effort, and I thank all of you for helping me maintain this project for as long as possible. See you guys again in the next article, Ric.
This article is dedicated to the suffering of the Uyghur people. Many are held in concentration camps or other similar facilities. Some are forced to harvest tomatoes, to be sold to Europe and elsewhere. The BBC did an excellent investigative report that I recommend you to watch. It is for the same reason that lots of companies banned the use of cotton picked from this part of the world.
Help Support this Blog:
Maintaining this site requires resources and a lot of time. If you think that it has helped you or you want to show your support by helping with the site’s upkeep, you can make a small donation to my paypal.com at richardHaw888@gmail.com. Money isn’t my prime motivation for this blog, I believe I have enough to run this myself but you can help me make this site grow.
Leave me some tip?
Thank you very much for your continued support!
$2.00
Helping support this site will ensure that it will be kept going as long as I have the time and energy for this. I’d appreciate it if you just leave out your name or details like your country’s name or other info so that the donations will totally be anonymous. This is a labor of love and I intend to keep it that way for as long as I can. Ric.
