
Hello, everybody! Despite the busy schedule I managed to pace my time in order to post this to my blog on a timely manner. Apart from being busy at work, I was sick with hay fever. Hay fever is a thing here every spring and it affects a significant part of the populace. Keep your masks on to prevent hay fever from ruining your Spring. As I promised a before, I would like to present to you some unusual Nikkors as we have dealt with conventional ones in the previous posts. This approach is to nurture your growth and you start with simpler lenses then proceed to the more exotic ones. The subject of our post this time is a mysterious and unique Nikkor that many people do not know much about.
Introduction:
This one is a mystery to many people because it is the only Nikkor of its type that got into production. This lens was designed to aid photographers who used flash guns. Back in the days before TTL metering, photographers need to adjust flash output by re-calculating its power as you go nearer or further from the subject (hence GN for guide number). Nikon’s engineers had to find clever ways to solve this like the GN-Nikkor 45mm f/2.8 Auto and its unusual coupling mechanism. Another good example is the earlier production type Micro-Nikkor-P 55mm f/3.5 where the aperture opens up as you go closer to its maximum reproduction ratio of 1:2 (native) or 1:1 with the included M- ring accessory.
This has a switch at the focusing ring to couple it to the aperture ring so that these move together when you turn either one of them. For example as you focus your lens closer the iris would stop-down and when you focus further the iris would open-up to compensate. It allows you to shoot without even thinking about changing the power of the flash. While this is clever it has a catch, the focusing ring on Nikkors go the other-way and this means turning the focusing ring to the right makes the lens focus to infinity and in order to make this clever iris compensation trick work, it had to turn the other way! This is very annoying so I don’t use this lens as often as I would like to. It’s such a pity because I have grown to love this lens.

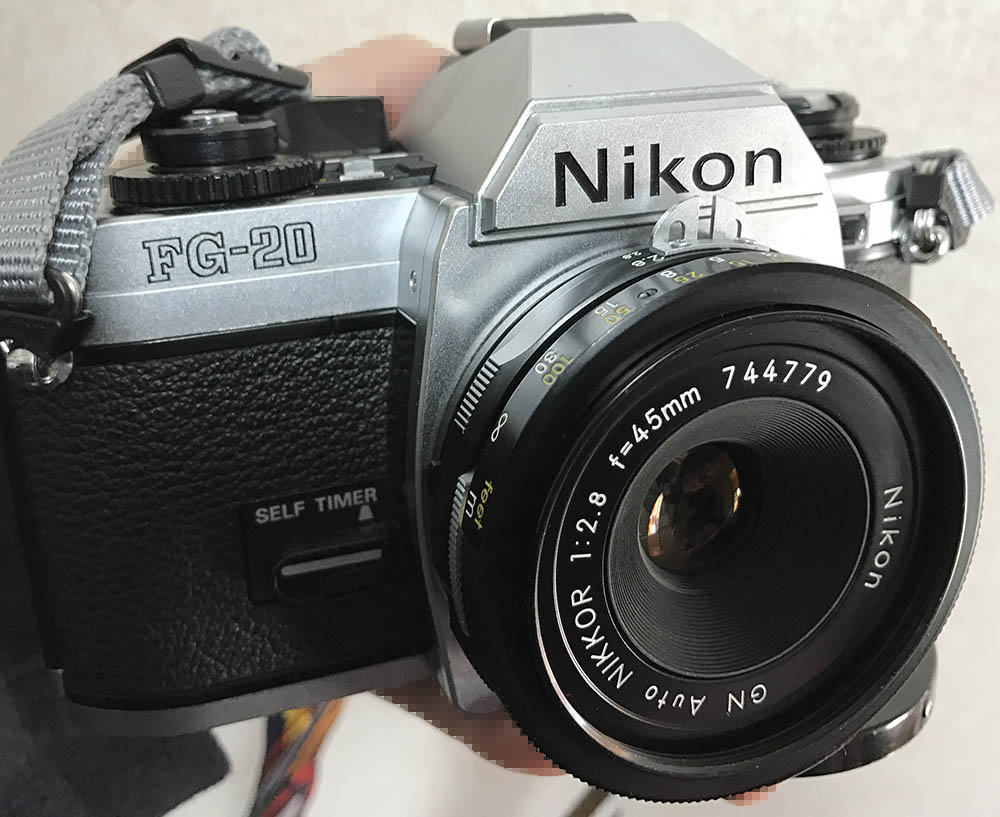
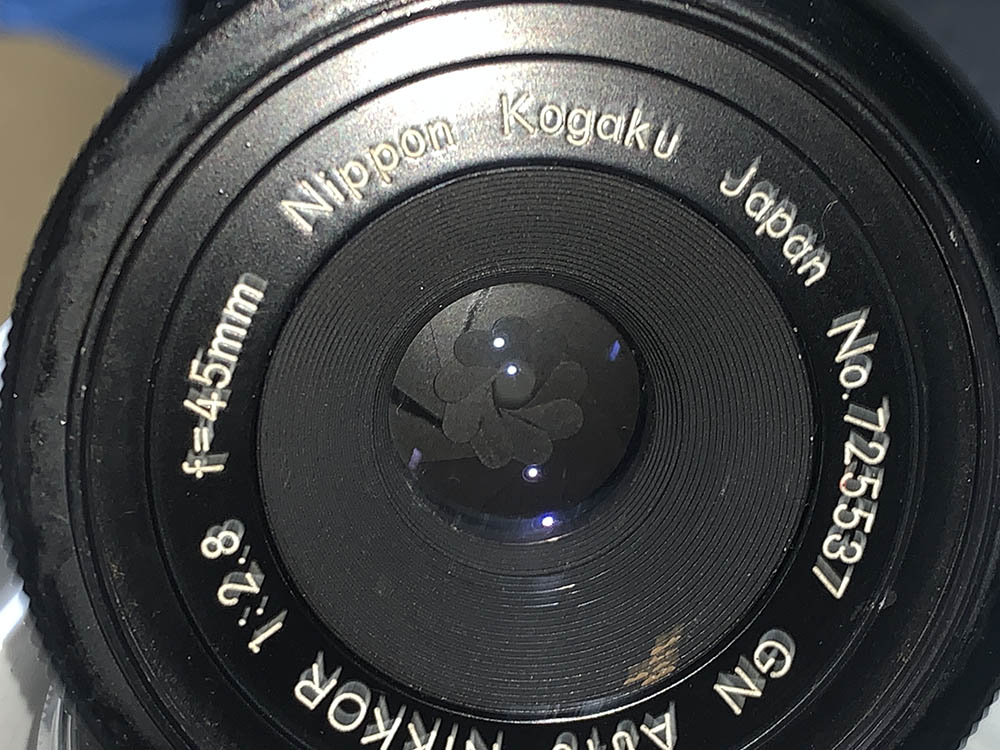
This is a nice example of precision engineering. Look at the nicely engraved numbers, it is something that you don’t anymore see in current lenses from mainstream brands. If you think this is all the engravings this lens has then just wait until you read the whole article. This is one of Nikon’s most ornate lenses and it’s one-of-a-kind.
I got this lens for a nice price, considering that the aperture ring is already factory Ai-d. I need to overhaul the lens however since the focusing was dry and there was dirt inside the lens but overall it was in an OK state. I did get artifacts within the bokeh balls when I shoot bright lights in the dark, I tried cleaning the lens but I still don’t know what is the reason behind this but it’s very likely to be balsam separation that’s still invisible to the naked eyes.
This lens was made specifically for flash photography and it has a nice trick in order for you to get the right exposure with your flash all the time. Please watch this video to know how it does that because it’s easier to understand the gimmick with a video. It’s difficult to illustrate something like this with words or pictures alone.

My Nikon D4 dwarfed this lens, making it look like a lens cap. This is a later production lens where you only get 7 aperture blades (earlier ones have 9). Later lenses are cheaper in the used market due to them having only 7 iris blades. This comes with a special lens shade when bought brand new. That shade can fetch a high price when you buy it separately.

This lens is so thin it makes the Nikkor 50mm f/1.8 Ai-S look bulky. The only Nikkor that is thinner than this is the Nikkor 45mm f/2.8 Ai-P. This lens was engineered differently from other Nikkors since the helicoids doesn’t have a linear turn rate. It had to do this since light decays in a non-linear fashion (inverse-square), this had to follow how light decays because it was made to sync with the output of a flash gun.

The silver lens to the left is the Nikkor 45mm f/2.8 Ai-P. It’s the “successor” to this lens and both are of the same Tessar-type vaiant. I say “type” since they aren’t Zeiss-patented Tessar lenses but they derived from the Tessar design. These are the only lenses of this type for the Nikon F-mount. The Tessar is a well-loved lens design like Zeiss’ Sonnar, it has a cult-status amongst classic lens users even though the Tessar is technically obsolete and superseded by other modern lens types. The strength of the Tessar is its small size and nice sharpness (for its time) and contrast due to the relatively few lens elements that was used in the formula. It is an old design and one of the most-copied lens formulas. There are modern revisions to the design and some have no relevance to the original design apart from the name alone.

It’s so thin that there is no space for the aperture claws so Nikon decided to simply put the the aperture claws directly above the engraved numbers. In case you’re curious about what’s underneath, here it is. The numbers 4 and 8 were skipped in order to give way for these 2 screw holes, how rude!

Knowing how a lens performs is the key to successfully using it so I’ll show you a couple of photos that I shot with this lens in real-world scenarios. I’m not interested in shooting brick walls or pixel-peeping and comparing the results to a graph because that makes the whole experience of photography technical, something for engineers and not the artists.

I don’t shoot brick walls but I shoot accordion shutters instead. Distortion is not much of a problem with this lens but you will see it in the lines near the periphery of your frame. This isn’t what you would want to use for shooting architecture or art where you need a lens that has nearly no distortion.
The following sets of pictures were shot from f/2.8, f/4 and f/5.6 in that order from left-to-right. These should give you an idea on how this lens performs throughout the first 3 stops where most people would want to use it. This is also the apertures where most changes happen so it’s interesting to see how it performs in these values.


(Click to enlarge)
Vignetting isn’t much of a problem with this lens as you can see here. There is a little bit of corner darkness but looks even, not bad at all. I’d say that it’s pretty good in this aspect since it’s simple to correct it by over-exposing it by about 0.7 stop.


(Click to enlarge)
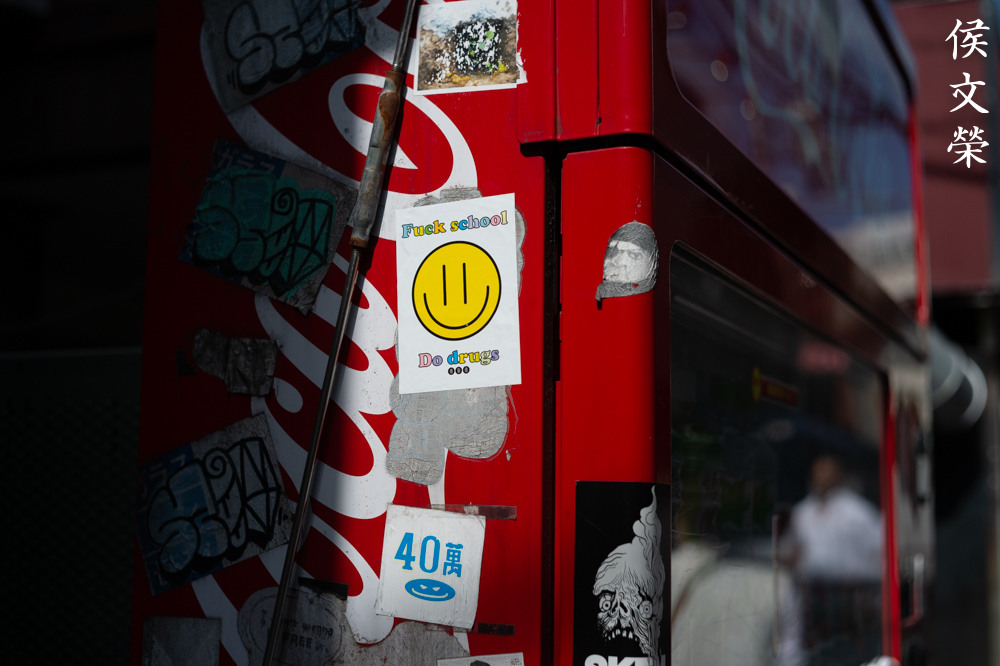
This doesn’t focus close at all and its closest focusing distance is a mere 3ft. This is important because nobody uses this lens with flash at that distance anyway when the aperture ring and focusing ring are coupled. The good news is the performance is nice throughout the focusing ranges that matter. It’s a great lens as you can see from the picture above, the contrast is great at f/2.8 but a little bit of flaring and aberration is masking the sharpness of this lens. Look at the bell on the bicycle and you will see what I mean. The smily face in the first set also illustrates this. That was taken intentionally like this so the white background will “bleed” into the smiley face’s black border. To be honest, it’s not as bad as I was expecting. Stop it down to f/4 and the sharpness improves a bit because the flaring is now gone. Contrast improves a little bit because the contrast is already looking good wide-open. The frame is clean, this is a very good aperture for using this lens. By f/5.6, the resolution is beginning to peak, you can see that there’s nothing much to improve from this point. It still looks great by f/11 and I haven’t seen the usual ugly effects of diffraction. It was probably intended by the designers because shooting with a flash means that you’ll probably stop it down most of the time. It’s also worth noting that the bokeh looks decently smooth. This goes against the popular myth that Tessars have terrible or harsh bokeh. It’s true that classic Tessars tend to do that but modern ones are better at it.


(Click to enlarge)
The 45mm focal length fits my taste as this is not as wide as a 35mm so I do not need to get too close to my subjects and it’s not as tight as a 50mm or a 55mm that I’m so used to. The only thing that kept me from using this lens on a daily basis is the reversed direction of the focusing ring. It needs some getting used to and you will miss a couple of shots at first.


(Click to enlarge)
These pictures were shot in order to see how it performs when focused at the middle distances from 2-20m. I will assume that this range is what many people will want to use this lens with. So far, the results mirror that of the previous sets wherein we check how this looks at closer distances with the difference that the aberration or magenta cast is absent wide-open. This is a good lens if you’re going to ask me. The flare resistance is not perfect but it’s not terrible at all, it adds to the image more than it takes away from it.

It’s time for more real-world pictures. I took this at f/8, the colors tend to be on the cooler side but the rendering looks neutral. I think this was intended because the big flash bulbs of years-past were warm and older lenses tend to be calculated for the black and white films which benefit from a slightly-blue cast. While there were bulbs that were made with different colors for different lighting conditions, I’ll just assume that Nikon did this for the sake of the common bulbs that many photographers used. This bluish-cast is not an issue because it’s easy to fix your white balance these days in post. It also gives a nice, unique look to your pictures, it adds to that “vintage look” that many people are into these days.


(Click to enlarge)
These were all taken at f/8, you can see how beautiful everything is and the resolution is good. It’s apparent in the details of the skin, hair and faces of the subjects. You can also notice the cooler cast in the pictures as evident in the 3rd one with the 2 girls. The photo of the train was shot at the “Golden Hour” and the bluish cast helped make it look more natural instead of 24K solid gold. I like the look a lot.


(Click to enlarge)
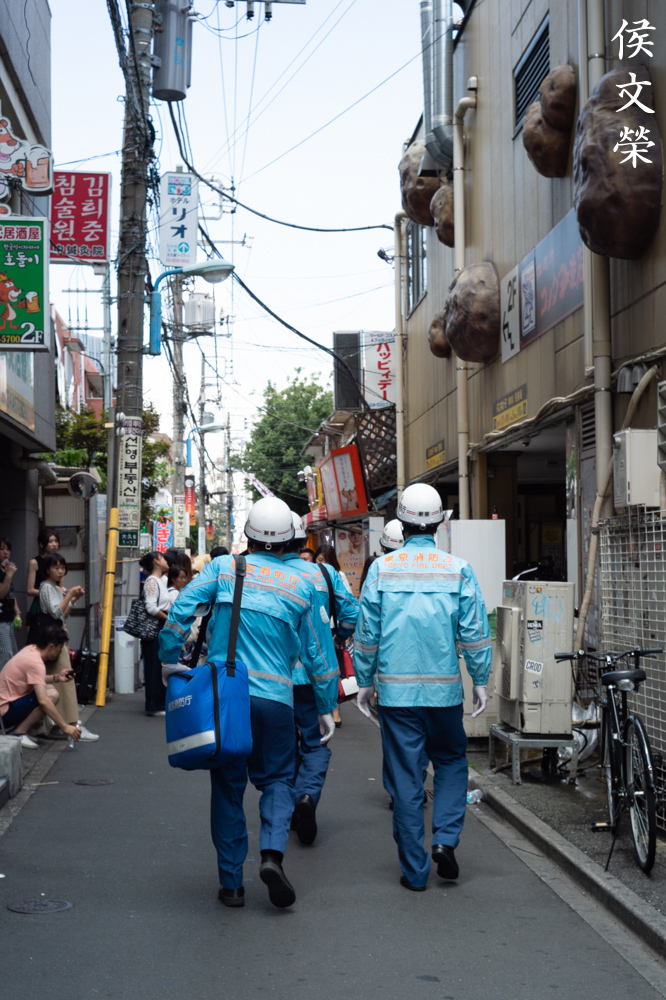
Here are some more shots that I took at Korean town. I do not know what’s going on with the pretty boys and the make up, I thought it went away with The Human League. The cooler cast of the pictures are obvious despite me shooting in AWB mode. This is such a fun lens to use if only I can get used to focusing the opposite way.
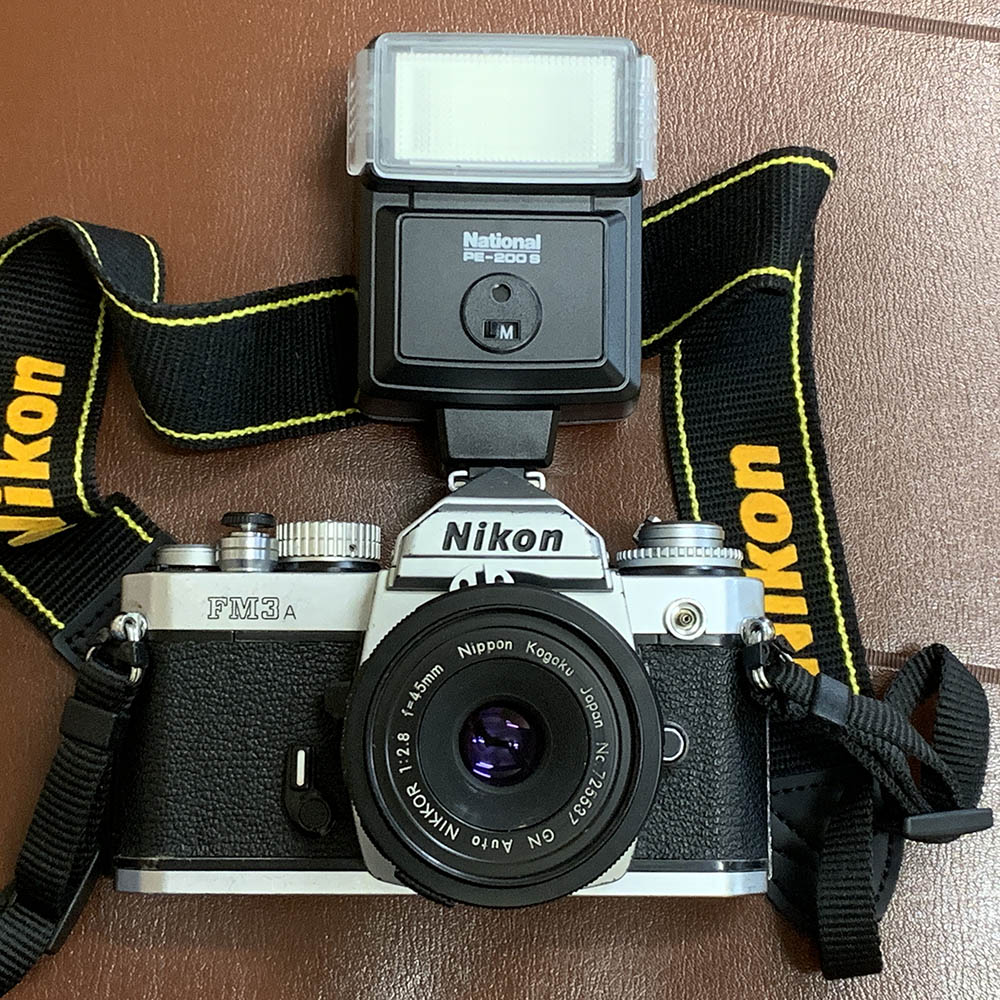
Let’s now see how it performs with film. It’s important for us to study how a lens performs with pictures that were taken using film. Film has a distinct look, something that is almost impossible to simulate in digital because film grain’s pattern looks organic, not even like what we have in a sensor. I shot the photos with flash, I coupled the focusing ring and the aperture ring so it will change its aperture as I focus. I used a manual flash for this and set the ideal aperture and focusing distance according to the scale at the rear of my flash. I then coupled the coupled the focusing ring and the aperture ring so they are locked together. I recall that I was shooting with f/8 or maybe f/11, I wanted maximum depth-of-field so I won’t have the need to focus using the viewfinder. Focusing using the lens’ focusing scale is convenient, I am used to it since I shoot with manual-focus lenses regularly. I took these using the Nikon F6 and an old Nikon SB-4. The film I used is Fujifilm Industrial 100. To make things clear, I took these using my 9-bladed version.

Using flash enables you to shoot with a slower shutter speed. You can get a trippy effect when dragging the shutter with flash.

Since I was focusing using the distance scale, I would sometimes mis-judge my subject’s distance, giving me blown-out results. You’ll have to remember this when using this lens, always see if your subject is at the close or far-end of the scale because the flash won’t compensate for it since it is all-manual. The GN-Nikkor 45mm f/2.8 Auto and your flash will give you good exposures at the correct distance and not what’s before or after that.

Here is another example, I got the lady in the middle exposed properly but the one to the right is blown-out. It is impossible to get all of them exposed evenly when shooting with a manual flash and your subjects are moving. If they could even stay still for a bit then I would have done something to get the exposure more even.

I am impressed by this clever gimmick. Flash exposure was not perfect but it is still better than guessing the right exposure using your head or a flash meter. I felt like a newspaper photographer from the 1960s.

It feels great when you got it right. The exposure is correct and the subject’s face isn’t blown-out or too dark. You can appreciate the fine details and you can also give yourself a pat in the back.

There are people who react really quick, they can blink just before you take an exposure. This is one problem with flash photography that many event photographers are familiar with. I should know, I did that for a few years. I was lucky that the clown was just about to blink in this photo.


(Click to enlarge)
I had a great time with this. Using it with a manual flash and film brings me closer to the true essence of this lens. It would have been better if I used my Nikon F but I don’t have it with me at the time. You can’t do any tricks with your exposure since it’s constrained by combination that you set using your manual flash’s scale so the background looks dark but the subject is spot-on. You can do that but you’ll have to compensate by adjusting the combination to suit your creative vision.
That is all for the introduction. I hope that you got a complete idea on how this lens works. I like this lens a lot mainly because it renders with a unique look and it’s sharp. If you want a lens that renders this way then this is the lens for you. The only alternative to this is the Nikkor 45mm f/2.8 Ai-P but it does not render pictures like this since it’s a modern lens in every way. It is one-of-a-kind and the prices for these aren’t getting any cheaper, collectors want several of these. I find this funny since this lens was once the cheapest Nikkor you can buy but they now sell for a lot more. If you want a tiny, light lens then by all means, buy this lens and enjoy the pictures. Hunting for one in the used market isn’t difficult but you should find one with an Ai ring like the one I have here or else you won’t be able to use it with Nikons that have the Ai interface. This isn’t an issue for people who shoot mirrorless cameras and those that do not have the factory Ai ring are cheaper so this is a great chance to buy them for a good price. Prices vary from $150-250, that will all depend on the condition, the inclusion of an Ai ring or the rare hood or the lens having a 9-bladed iris which is the most desirable type. Let’s now begin our repair article.
Before We Begin:
If this is your first attempt at repairing a lens then I suggest that you check my previous posts regarding screws & drivers, grease and other things. Also read what I wrote about the tools that you’ll need to fix your Nikkors.
I suggest that you read these primers before you begin (for beginners):
Reading these primers should lessen the chance of ruining your lens if you are a novice. Before opening up any lens, always look for other people who have done so in Youtube or the internet. Information is scarce, vague and scattered (that is why I started this) but you can still find some information if you search carefully.
I highly recommend that you read my working with helicoids post because this is very important and getting it wrong can ruin your day. If I can force you to read this, I would. It is that important!
For more advanced topics, you can read my fungus removal post as a start. This has lots of useful information, it will be beneficial for you to read this.
Disassembly (Rear):
This lens isn’t your usual Nikkor and the conventional way of removing the objective first then taking apart the focusing unit won’t apply. You will find that I go about doing things in no particular order simply because I do not know what I’m going to get when I remove this or that part. I hope that this guide will be useful for experienced technicians and professionals so they can plan their steps better before attempting to repair this model.
I started from the rear as I did not know what this lens had in store for me. Opening a lens from the rear will give you an idea of how a lens was made since you can see a lot of things when the bayonet mount is off.

Start by removing these screws on the bayonet mount. Mine came off easily but if your’s stuck, place some acetone and wait for it to work on whatever Nikon used to lock these things.

The lens can be easily taken apart now that the bayonet mount is gone. See how tight and packed it is inside? Despite this, Nikon still made the objective a separate assembly.

This mechanism links the aperture ring to the iris assembly. Be careful not to bend or damage this part. You can unscrew it if you want to.

The aperture ring easily comes off just like that because the bayonet mount is the only thing that’s holding it in place. The detailed scale shows the guide numbers at any given combination.

This is the aperture ring detent spring. Videographers remove these to de-click the aperture ring. I left mine intact but I made the springs shallower so that the ring does not need a lot of effort to click. I’ll explain this later when we come to the focusing ring and why I did this.
That’s it for the rear. If you intend to use this exclusively with flash then I’ll recommend that you remove the detent spring but otherwise just leave it so it can click into the proper aperture numbers properly. Just make sure that you don’t lose it because this part is unique to this lens and fabricating one is a waste of time.
Disassembly (Focusing Ring):
This is simple but you’ll have to be careful because of the small mechanisms that are involved with the focusing ring so go through each step slowly. Also be sure not to work on a carpeted floor or rug or you might lose some of the tiny parts that can be found in this assembly.

Remove the focusing ring by extracting its screws, I circled the parts where the screws used to be in. While removing this, be careful with the aperture coupling switch. See the next 3 picture to understand why.

Apply pressure to this switch while you remove the focusing ring. You don’t want what is under this to fly across the room or get lost. You do not want to remove these screws in this step as well. These screws simply hold the grip and the switch together and has nothing to do with its mechanical function.
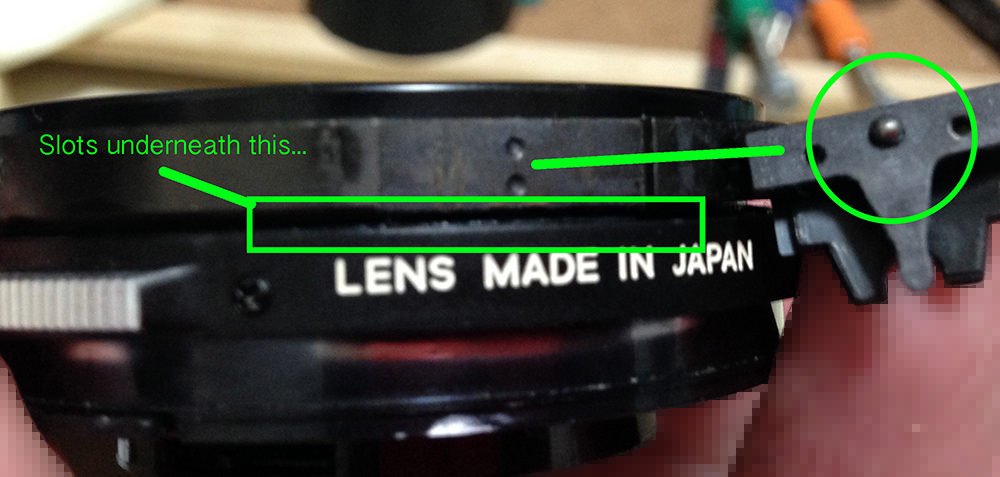
Carefully remove the aperture coupling switch, be mindful of what’s under that thing (circled). Check out that pin under the switch, that pin is inserted into the slots underneath the aperture ring when you slide the switch down. If the pin is inserted into any slot, the aperture and focusing rings are now synced so that they’ll both turn when either one is rotated. This pin is prone to wear/tear so I modified my aperture detent spring to be shallower. It will save the pin from stress each time the focusing ring is turned.

This little bead is spring-loaded. Underneath this is a brass cup and a spring. See how small and delicate they are? This is the reason why I told you to be careful with this. Sorry for the blurry picture.

Time to remove the narrow grip. Remove the screws that secure this part to the lens.

You can now safely remove this ring. Mine came off easily because it wasn’t glued.
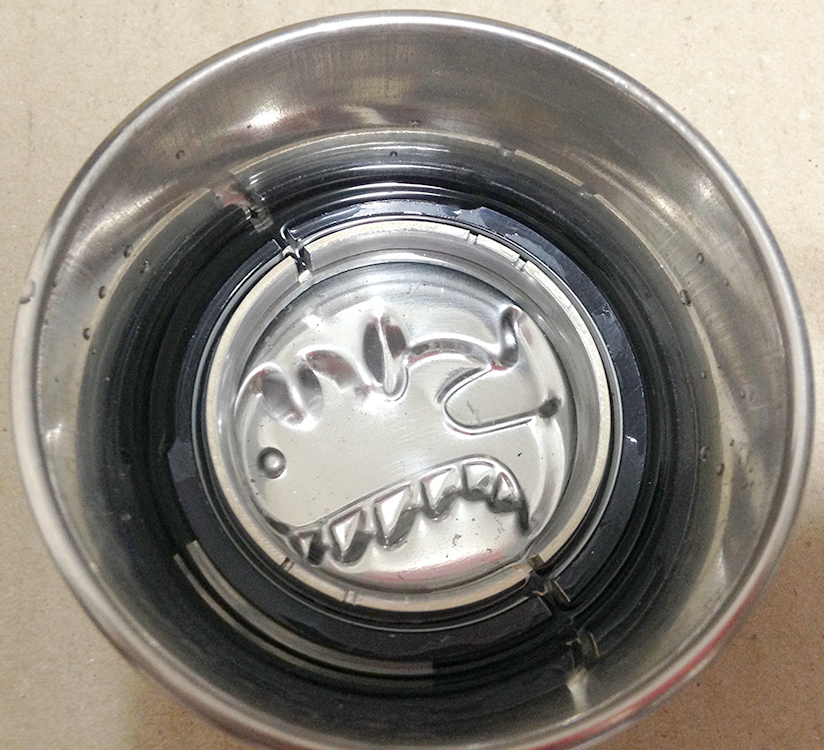
I hope that you kept everything safe. Follow my guide, you’ll be fine because you will know what to expect. Using a dish can help prevent losing anything because the dish can catch anything that fell from your lens as you work on it.
Disassembly (Front):
Now, back to the front.. You can actually start from the front instead of the rear like what I did, it does not really matter as far as this lens is concerned.

Start by removing this ribbed cone with a rubber stopper. These are usually cemented so a drop of alcohol helps to soften it.

The front barrel should be removed by using a wide rubber tool. This is too narrow for my bare hands so a rubber stopper or a rubberized cloth helps.

Carefully remove it and be careful not to scratch the glass.

This section is probably the easiest because you don’t need any special tools. If something is stuck, just used some alcohol or acetone to soften the cement and wait for it to work. It’ll probably take a few applications depending on what was used so you’ll have to be a little patient. It’s not unusual for me to wait over-night and attempt another try the next day. It’s better to wait than make something that you’ll regret later.
Disassembly (Internals):
This part can get confusing (or frustrating) because the lens’ engineering is unorthodox. You should carefully document each step and don’t rely on my notes alone. Take all the notes and pictures you can, that will save you a lot of time and guess work later.

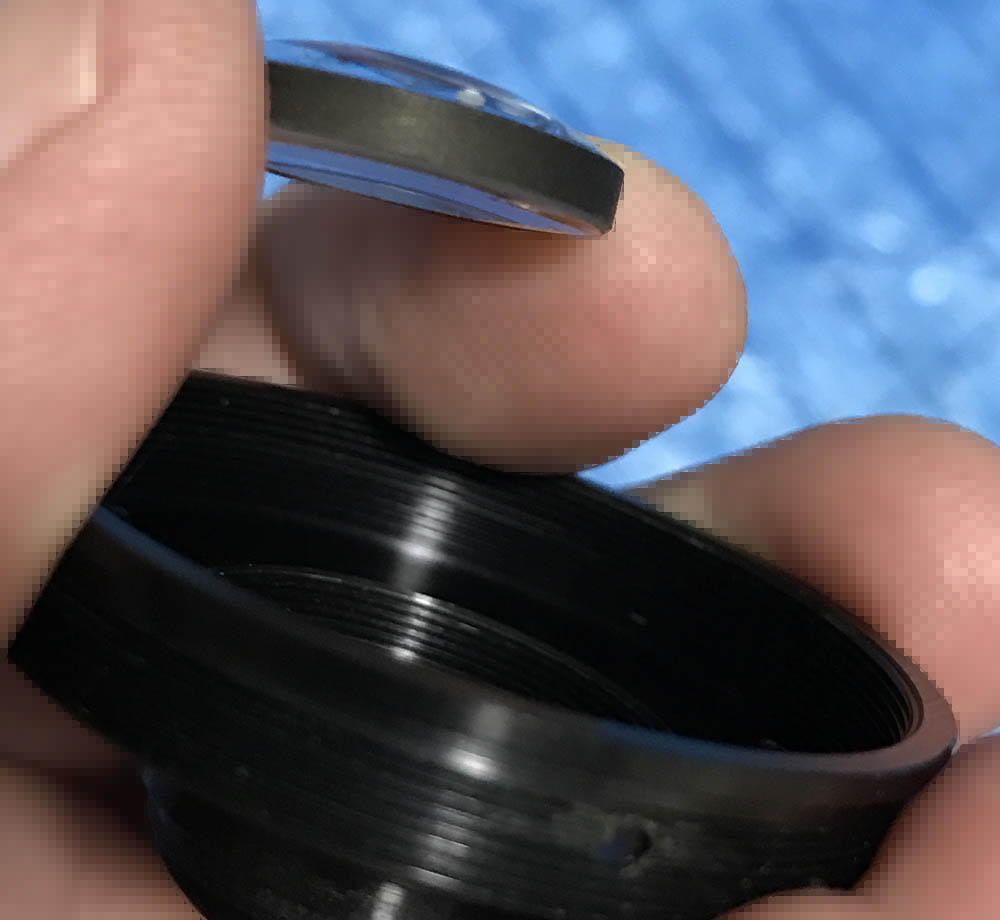
Remove the rear lens assembly. Simply use your hands to unscrew the ring from the objective’s casing. If yours is being held by glue, drop acetone into the holes and wait for it to soften the glue before proceeding. Be careful not to use too much acetone because it might ruin the cement (Canada balsam) used to cement the doublet together. The rear element assembly is called a doublet because it’s basically two separate lenses glued together to form a single unit (check the picture). You don’t want to accidentally damage the rear element so be careful. Any harm to this part will affect your pictures no matter how small the damage is.

Now, on to the focusing unit. The iris is vulnerable, be careful not to damage the blades. The screws here secures the objective so remove these to remove it.

Before removing the screws I made a mark so I will know how these should be aligned when I re-assemble this later. If you got this wrong, your iris will either not open or close correctly and you will end up with the wrong f-stop all the time.

This was made differently from what we are used to and instead of having helicoid keys we have these posts instead. Remove these so you can freely turn and separate the helicoids.

These are fragile and I wonder why Nikon didn’t use more robust parts for this. Now that you are aware of this, be careful when turning the focusing ring since these can snap from their necks or base easily.

And here is the other one at the other side.

Before I forget it, mark where these posts should be when this is focused to infinity so that you’ll know how far you need to turn the helicoid when you re-assemble this. While these threads have only 1 insertion point, you’ll still want to take pictures as to where they separate to give yourself some peace-of-mind. If you’re new to lens repair, please read my article on working with helicoids. I wrote that article because there are many people who get stuck in this part. You do not want to end up being one of them so please read my article.

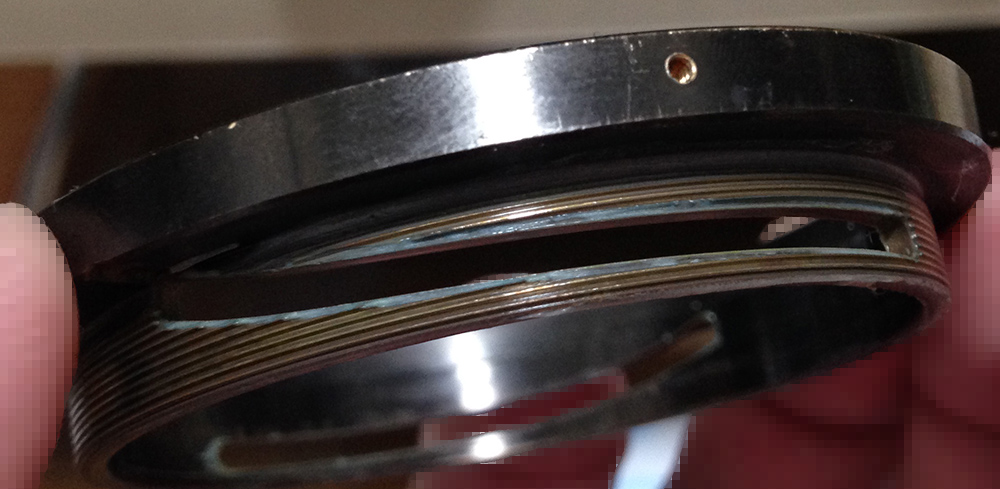
And off it goes. Notice that the groove and how it is not linear (exponential). It had to be this way because of the inverse square law and how that affects how light decays. If this is linear the change will never match the light that the flash is outputting. This is the reason why this lens has a cam instead of proper (real) helicoids. Now you know.

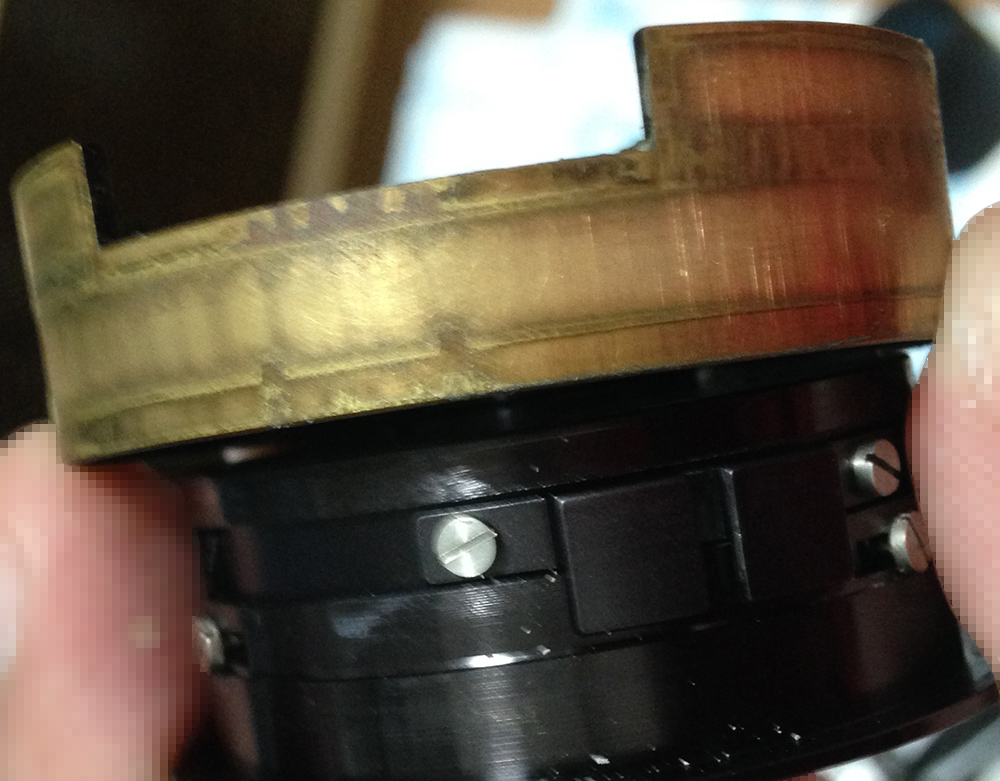
The inner part slides-off. Notice how these slots have etched the inner brass barrel, these should give you a clue on where these should be positioned.

Remember these screws that we removed a few steps before?
Those screws hold this part in-place. You can now remove the objective and the iris assembly.
That’s all there is for this lens. It’s not complicated at all, it’s just unlike most lenses we are used to work with, that makes it a challenge for many people including those who are experienced with Nikkors. If you are mechanically-inclined, this lens is going to be a fun project and you will learn a lot of new things just by working on one of these. I had a great time with this, it was all worth it.
Conclusion:
Putting this back together wasn’t difficult at all but I need to be aware of the order in which these things should go together as this is a very unusual lens as far as Nikkors are concerned. I also found myself using more grease than what I was used to just to get it to focus smoothly with a nice, damped feel. I made a mistake in my initial choice of grease, I should have used a heavier type for this so keep this in mind. I initially wanted it to focus with minimal resistance so I used my usual grease, it turned out that a grease with more resistance is better for this. It feels great now that I applied a thicker grease and it feels so good to focus. Be sure not to apply too much or it will migrate to the iris and this will end up with an oily iris problem later.
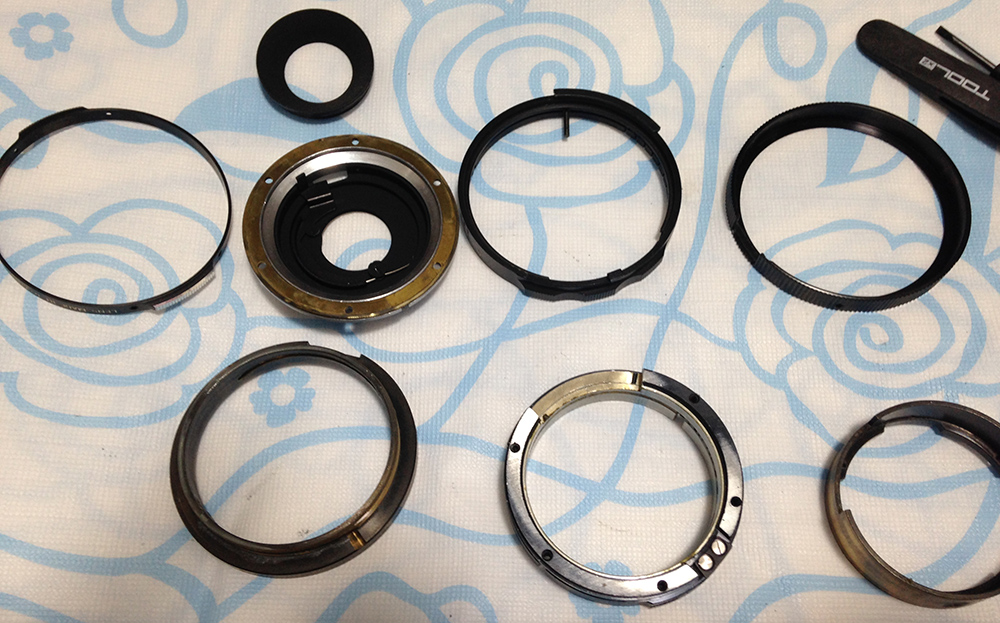
These are the bigger parts. I cleaned them very well before applying grease to the parts that are involved in the focusing of this lens.
The focusing has a tendency to ramp or “bunch up” from the closest focus distance to just about normal distances and this slot explains why.

And this is the view from the other side.
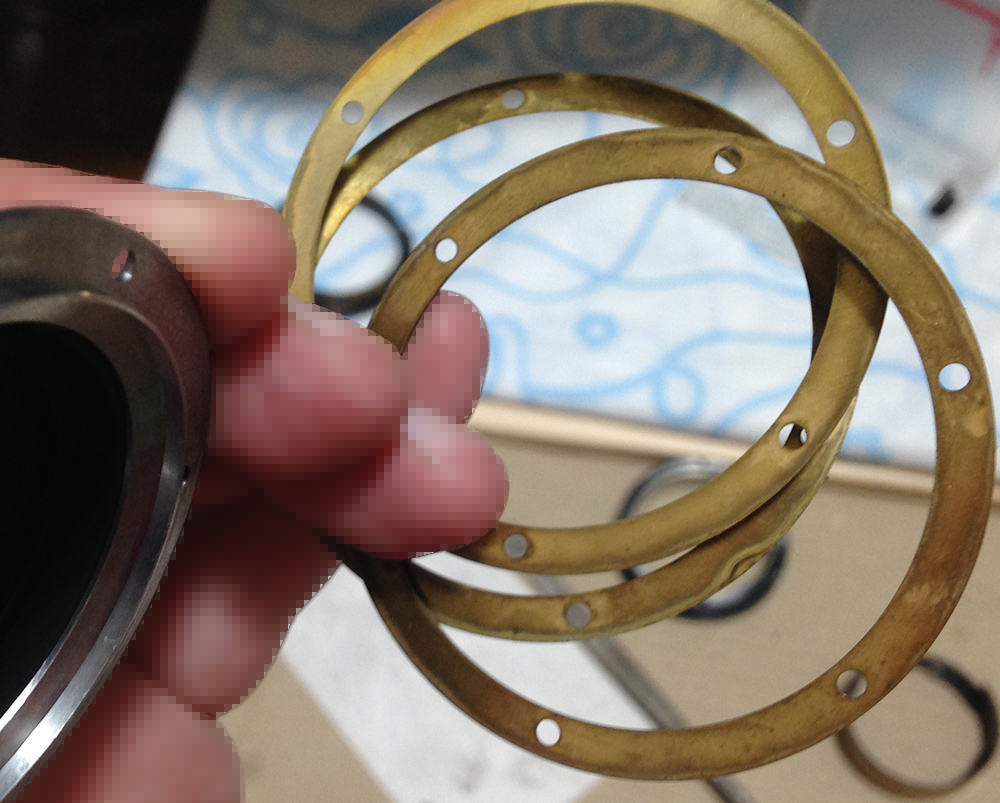
These thin brass shims are used to adjust the lens’ focus so don’t damage or lose these. Each lens is uniquely calibrated so you may have more or less of these.

I hope that you enjoyed this post and if you would like to support me, please share and repost this to your favorite facebook page and websites so that I get more hits. This site earns a few cents for every ten views or so, it’s petty but that’s how things are. If you would like to support my work, you can do a small donation to help me maintain this blog. Until next time, please stay safe and enjoy your craft, Ric.
Help Support this Blog:
Maintaining this blog requires money to operate. If you think that this site has helped you or you want to show your support by helping with the site’s upkeep, you can make a small donation to my paypal.com (richardHaw888@gmail.com). Money is not my prime motivation for this blog and I believe that I have enough to run this but you can help me make this site (and the companion facebook page) grow.
Buy me a roll of film or a burger?
Thank you very much for your continued support!
$2.00
Helping support this site will ensure that this will be kept going as long as I have the time and energy for this. I would appreciate it if you just leave out your name or details like your country’s name or other information so that the donations will totally be anonymous. This is a labor of love and I intend to keep it that way for as long as I can. Ric.

Mar 13, 2016 @ 22:08:24
Always wondered what these look like on the inside.
Thanks Rick.
Mar 14, 2016 @ 00:38:17
Thanks, Ron. I am going to look for the 45P so I can see what’s inside of that too
Mar 03, 2017 @ 03:08:32
Thank you. This was very helpful. I just took out everything and did a cleaning for my 7 bladed 45mm. Everything works great now.
Mar 03, 2017 @ 03:35:46
Hello, mr. Reader.
Glad that you overhauled yours successfully! Do note that this lens works best with heavier grease. Ric.
Apr 09, 2017 @ 15:47:02
Amazing! Very, very nice. Thanks.
Apr 12, 2017 @ 07:53:29
Thanks!