
Hello, everybody! Do you remember “Somewhere in Time” with Christopher Reeve? I love that movie a lot despite it being corny. I think its soundtrack is also one of the best scores ever written for a movie, I can still remember the first time I heard it and I can never forget it when I hear it. Movies like this are timeless and you can still enjoy them to this day. It’s difficult to think of a movie made today that has the same impact, it is easy to forget a movie as soon as you walked out of the theater. Today, I will show you a lens that will bring you back to the olden days, very much like the plot in “Somewhere in Time”. It’s also a classic that only people who have a deep appreciation for the past will revere.
Introduction:
The Nikkor-Q•C 5cm f/3.5 is one of Nikon’s oldest lens designs for the 35mm format. Its history dates back before the war and it was also supplied to the first Japanese 35mm cameras made by Canon called the Kwanon. The design is very simple and it’s simply a clone of what the Germans had. Nikon didn’t know how to make or design lenses for 35mm cameras so they had to start somewhere and the best lens manufacturers at that time were German. The lens has undergone many changes through-out its life from 1935 to 1956. It has seen several barrel updates and they were sold in different mounts. It’s what gave Nikon the required know-how so they can start making original designs after the war and that makes this lens special. Many people are not even aware of these and you certainly won’t find a lot of information about this lens online and photos that were taken with this lens can be difficult to find. Most people who own these are collectors and they usually do not use their gear to take pictures, which is a shame.

I got this lens for a small price but these usually go for around $500 and up. I was lucky and it was fated that this lens ended up with me. The barrel is a clone of the Leica Elmar 50mm f/3.5 but you adjust the iris via a ring behind the front ring which makes it more convenient since you can see the values without having to look at the front of the lens. The optical formula is also a clone of the Leica Elmar 50mm f/3.5’s which is a clone of the Zeiss Tessar. It’s a clone of a clone!
This lens is not only interesting because of its vintage but also because of its optical formula. The rigid Nikkor-Q.C 5cm f/3.5 that replaced it has a similar optical formula but the iris is located behind the 2nd element which makes it closer to a Tessar while this one has the iris behind the 1st element which makes it an Elmar-type lens. I don’t know why it was made this way or why the later lens was made that way, the only explanation I can think of is since this lens has to be collapsible, it’s easier to design a lens with the iris closer to the front just like what Leica did.

The lens is perfect with my Nicca 3S, it’s tiny this setup is so light that I don’t mind carrying it all-day as my neck won’t hurt. Handling is quite quirky, the focusing is done via the focusing tab on the infinity lock. Turning it using its front ring is also fine but you can sometimes adjust the iris if you slipped. It is something that you will get used to when shooting with lenses that do not have click-stops for the aperture ring. The Voigtländer (Cosina) VC Meter is a perfect match for this setup.

This is how it looks when collapsed. It makes for a really compact setup that you can put inside your coat’s pocket. A Leica Elmar 50mm f/3.5 (pre-war) is even smaller but it doesn’t handle as well as this lens because you turn the aperture from the front compared to this where the aperure ring is situated just behind the front ring so you can see it easily.
One of our readers mentioned that he has a site comparing the form factor of the Leica Elmar 50mm f/3.5 to this lens so I am adding it here so you will have more things to read about this lens. Head over to Bryan’s site and see how similar the 2 lenses look.
There are only a few collapsible Nikkors mode and one of them is the usual (but still expensive) Nikkor-H•C 5cm f/2, another is the exotic and expensive Micro-Nikkor-P•C 5cm f/3.5 which is a specialized lens and Nikon’s very first Micro-Nikkor. Both of these lenses are positioned higher in the market and they also have better build quality, too. The build quality of this lens doesn’t feel cheap but it certainly isn’t up to Nikkor standards in the 1950s. You can not blame Nikon for that since Japan was rebuilding itself from the ravages of the war which nearly destroyed Japan’s industrial capacity entirely.

Here’s the original Nikkor that started it all as far as 35mm lenses go. This is the Nikkor 5cm f/4.5, it’s also a collapsible model but its design was based on the collapsible Zeiss Tessar. It’s mounted on Canon’s first ever camera. They don’t have the capability to make lenses back then so they collaborated with Nikon (Nippon-Kogaku) to make Japan’s first 35mm camera. Nikon wasn’t at all interested in making consumer cameras back then but Nikon was Japan’s only optical company that had the capacity to make things happen so it was a natural match, a weird start for 2 rival camera companies.
Let’s now see some pictures that were taken with this lens. Knowing how it works will help us avoid its flaws and exploit its strengths. Different lenses will perform differently and this is why we’re interested in seeing pictures. I won’t do the usual set of photos that were talen under different apertures because it’s not easy to do this for this lens without using a tripod.


(Click to enlarge)
Vignetting can be observed wide-open but stopping it down to f/5.6 will help a lot. The vignetting is still present by f/8 but it’s hard to detect unles you are shooting an even-colored wall, it’s practically as-good-as-gone.

The vignetting isn’t much of a problem in real-world photos but it’s there if you bother to look for it. The lens is decently sharp at the center wide-open for subjects that are further from you, it’s not perfect but it’s pretty good for a lens that was made immediately after the war.


(Click to enlarge)
The quality of the bokeh is not so bad but it’s certainly not great either. I will say that it’s tolerable, you do not expect a lens from this class and vintage to excel in this department. Sphero-chromatic aberration along with flare will be your primary concerns with this lens. The coating used is old so it doesn’t do its job as well as the more-modern ones but it helps give a “vintage-look” to your pictures due to the lower contrast and other aberrations.
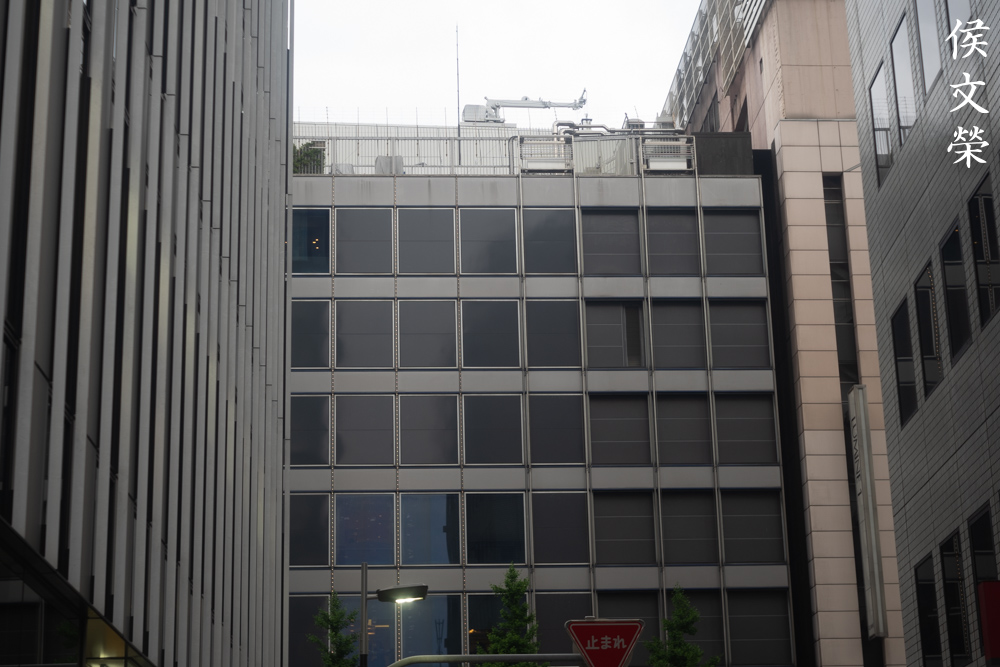
The distortion profile is of the barrel-type. It’s not a lot but you can find that in the vertical lines on this picture specially if you look at the lines near the edges of the frame.

Here’s another picture that shows the barrel-type distortion but this time it is for the horizontal lines. It’s not so bad to be honest but some people won’t be pleased by this, it’s perfectly fine for me considering it’s a really old lens.
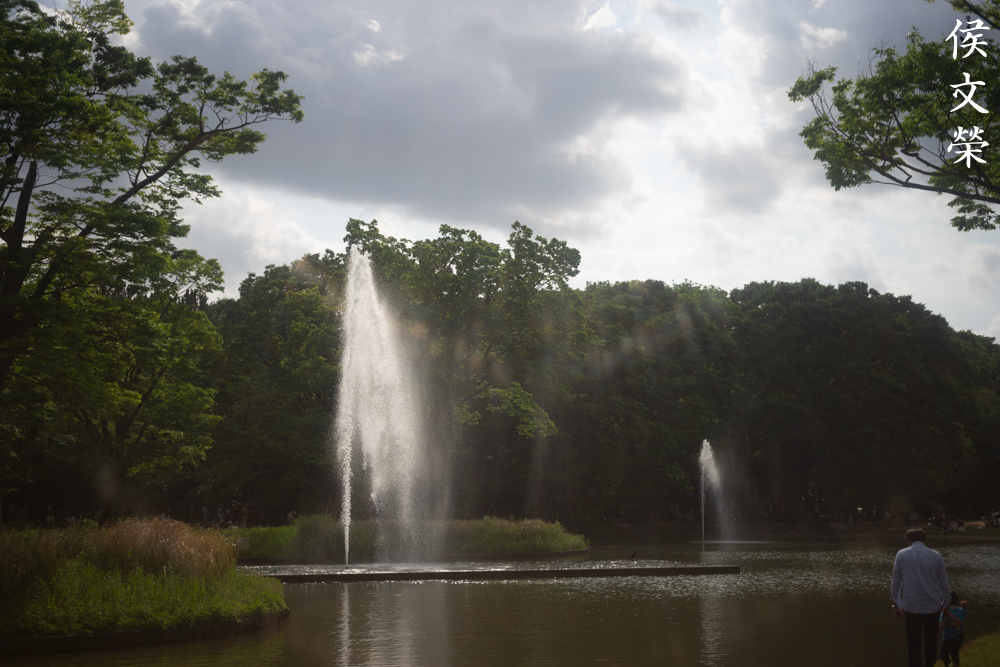
The ancient coating technology is ineffective when you have the sun in your frame and you’ll get ugly “god rays” in your frame. This is fine if you want to have this effect but I personally don’t like it. Many older Nikkors do it, most specially the ones with lower element-counts.

Sphero-chromatic aberration can be avoided easily by not over-exposing if you have elements with high contrast or very shiny things such as metallic highlights. Stopping the lens down also prevents this and it should be gone from f/5.6 or f/8. I stopped the iris down a bit in this picture.

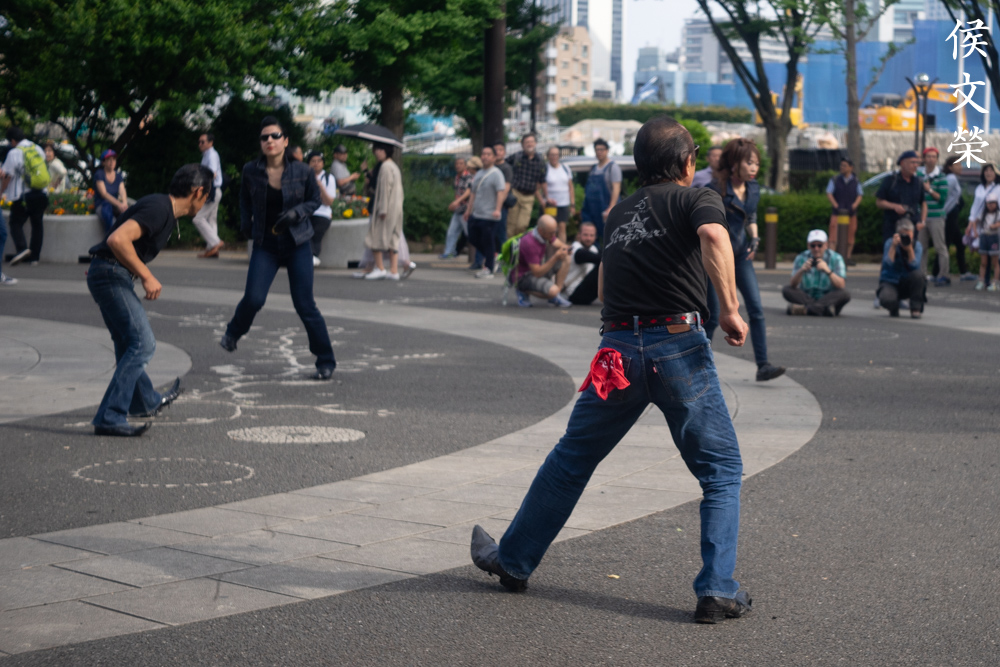
The performance of this lens is actually quite respectable when it’s stopped-down a bit. Resolution is so-so and f/8 seems to give the best results. You will be quite happy to see that saturation is nice and contrast is quite high, too. I stopped the lens down here and you can appreciate the details.

If you don’t have the sun within your frame then you can use it wide-open if you wanted to and not worry much about spherical aberration or flare. This is a good lens even wide-open under this situation but resolution is lacking.

Spherical aberration adds a nice glow to your subjects’ skin and highlights. I love this effect when used correctly as it makes the picture look natural and not “sanitized” like what most modern lenses tend to deliver.

Colors look great and you get nice tonality which isn’t clamped.

See how nice spherical aberration is when used properly? The golden trims on the girl’s costume shines and her skin healthy because of the nice glow. I like it as it adds another layer to the rendering.

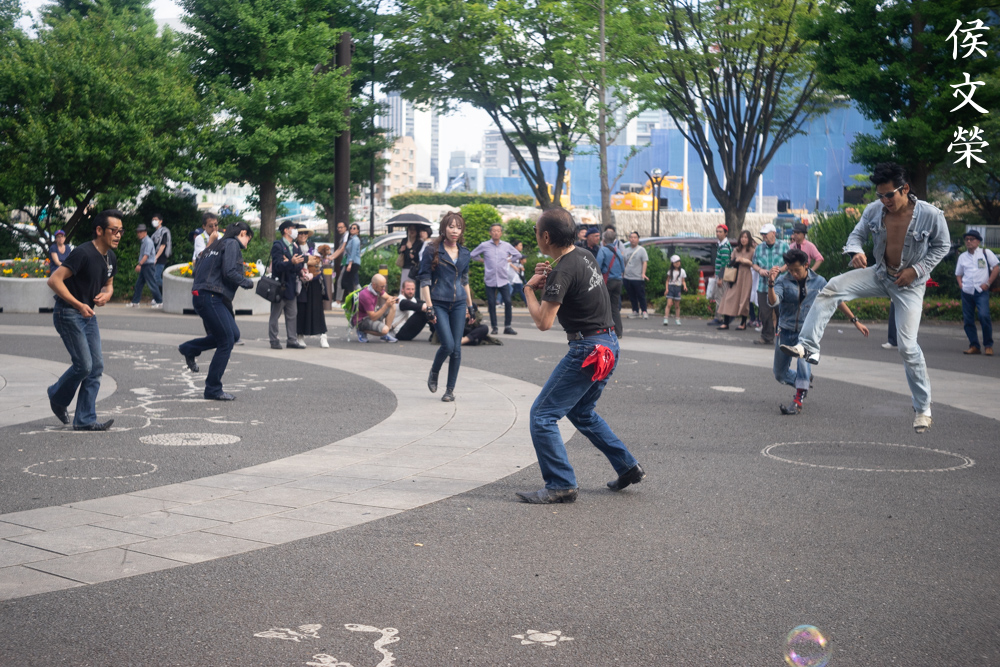
The rendering is quite smooth and you won’t see a “wall-of-focus”. This is a term that I use at work to describe harsh focus transition. It looks natural so your pictures are pleasing to look at. The quality of the bokeh isn’t bad at all despite the bokeh balls exhibiting edge and center artifacts wide-open. You won’t see it when you stop the lens down a bit.


(Click to enlarge)
Here are some more pictures. Please click on them and inspect them with a larger monitor and you judge it for yourself.
Let’s now see some pictures that were taken using film. This lens was made for monochrome film and it’s beneficial for us to see pictures that were shot using its intended medium. Color film works a bit differently but at least it’s still film. Photos that were taken with film has a unique look and it’s hard to simulate using a digital sensor because of film grain, etc. This is why we are interested in seeing pictures that were taken with film in order to see how it renders with it. I took these using a Nicca 3S with Fujifilm Industrial 100.
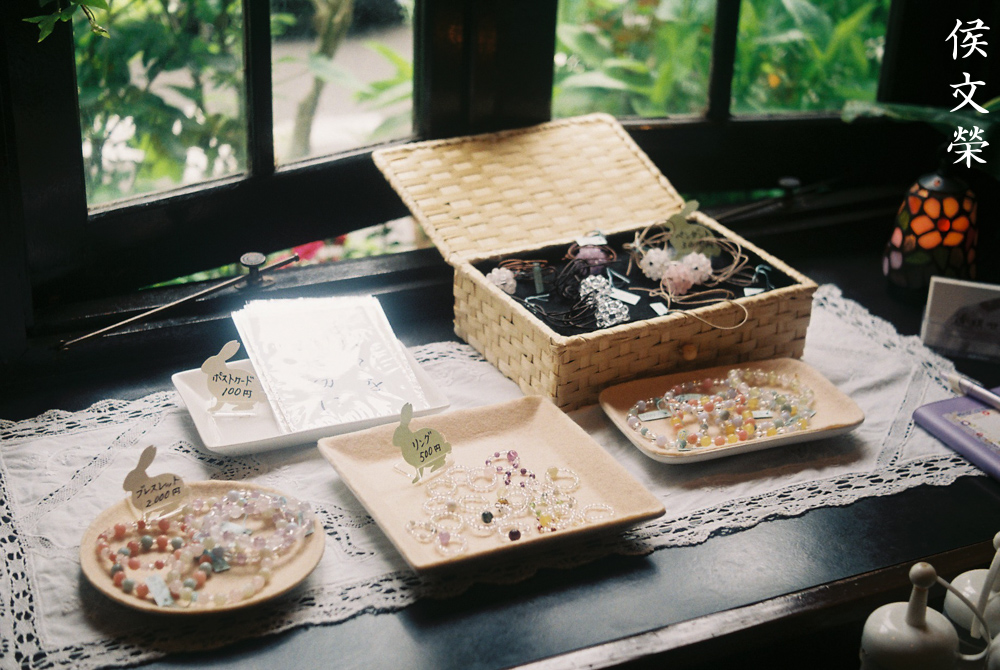
Spherical aberration makes light-colored things glow, this picture would be looking quite ordinary without it. Sure, it’s just a picture of some trinkets on a table but the glow sure adds another dimension to it, making it look like a photo that was taken from a long time ago. This effect is good for jewelry, it makes it look even shinier because of the glow in the highlights.


(Click to enlarge)
Sphero-chromatic aberration and flare can be observed in these photos. The combined-effects give the picture a unique, vintage look that’s absent with a lot of pictures that were taken with newer lenses. Some people consider the look “obsolete” but some people shoot with older lenses just to get this look.

The focus is a bit off in this picture, I was hoping that the rather slow speed of f/3.5 would help me with acquiring focus but I guess I failed.


(Click to enlarge)
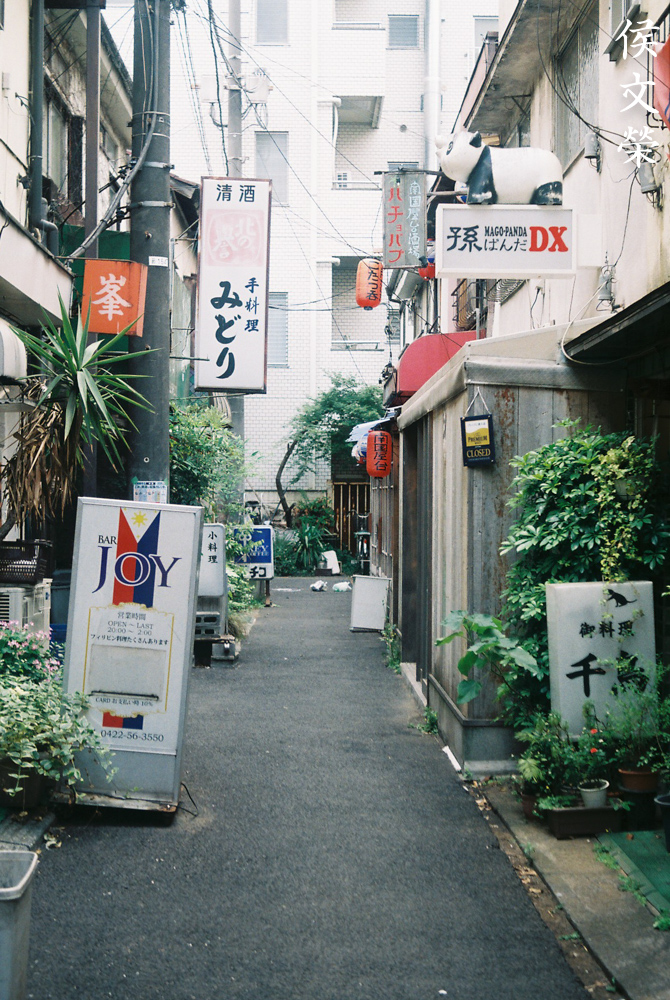
The character of the bokeh is quite busy when you have foliage or anything that has a high-frequency in terms of details on your background. The lens is sharp wide-open in the center which is typical of Tessar-type lenses but it has trash corners that’s also typical with older Tessar-clones. You can see a lot of chromatic aberration in the areas where the sky meets the leaves. It’s distracting in this picture but it also makes it look natural at the same time.


(Click to enlarge)
Sharpness and details are quite decent when focused on far objects. I won’t use this lens for pictures like these if I can avoid it, I don’t like how it looks. I am distracted by the haze and glow at infinity.

Here’s spherical aberration at work again, it can be too-much at times but I am used to it and I don’t mind it these days as I learned how to appreciate it and use it to my benefit.


(Click to enlarge)
Contrast and saturation looks great as expected from a Tessar-type lens. The colors look great and you won’t even think that these were taken with a lens that’s using a design that was calculated before the war.


(Click to enlarge)
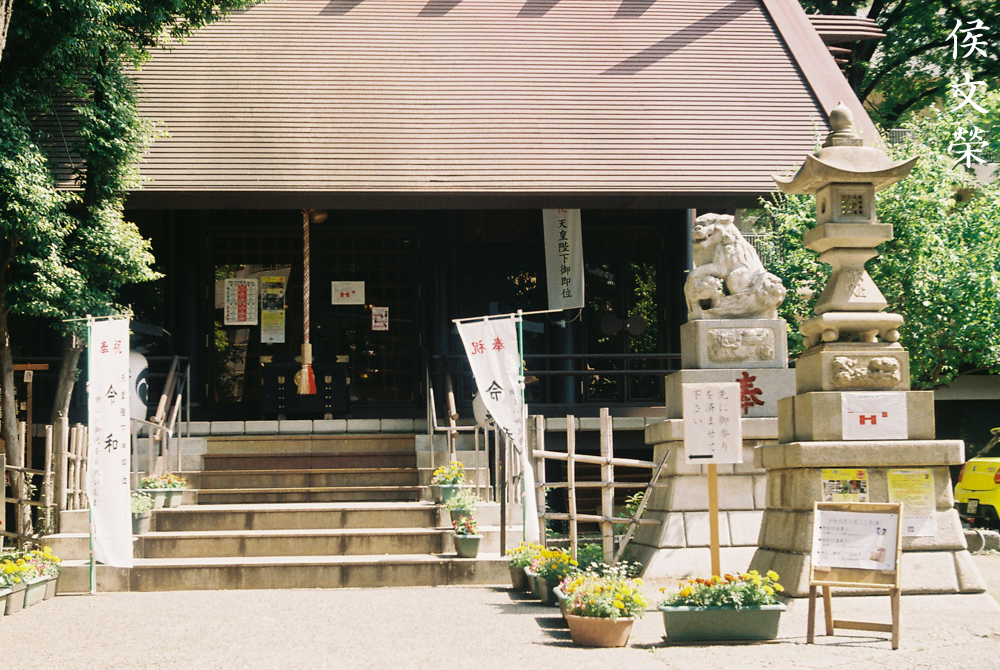
Here’s some more pictures from the rest of the roll. These were taken with the iris wide-open or stopped-down to f/11 as in the case of the photo of the temple. This lens sure has a unique character and I was surprised to see the lens do this since I was expecting it to render boring-looking photos but the photos look interesting because the rendering looks well-balanced in terms of how it handles its aberrations and its strengths – sharpness and contrast.
Did you enjoy my photos? I hope that it satisfied your curiousity because it’s not a lens that many people talk about online. I certainly love it a lot but I’ll only recommend this for collectors or people who appreciate older lenses. It is expensive, rare and quirky, a lens that’s supposed to be preserved rather than used regularly. For a small amount of money you can get a Russian one and you won’t even care if you lose it. Let’s begin with the repair article.
Before We Begin:
If this is your first attempt at repairing a lens then I suggest that you check my previous posts regarding screws & drivers, grease and other things. Also read what I wrote about the tools that you’ll need to fix your Nikkors.
I suggest that you read these primers before you begin (for beginners):
Reading these primers should lessen the chance of ruining your lens if you are a novice. Before opening up any lens, always look for other people who have done so in Youtube or the internet. Information is scarce, vague and scattered (that is why I started this) but you can still find some information if you search carefully.
I highly recommend that you read my working with helicoids post because this is very important and getting it wrong can ruin your day. If I can force you to read this, I would. It is that important!
For more advanced topics, you can read my fungus removal post as a start. This post has a lot of useful information and it will be beneficial for you to read this.
Disassembly (Focusing Unit):
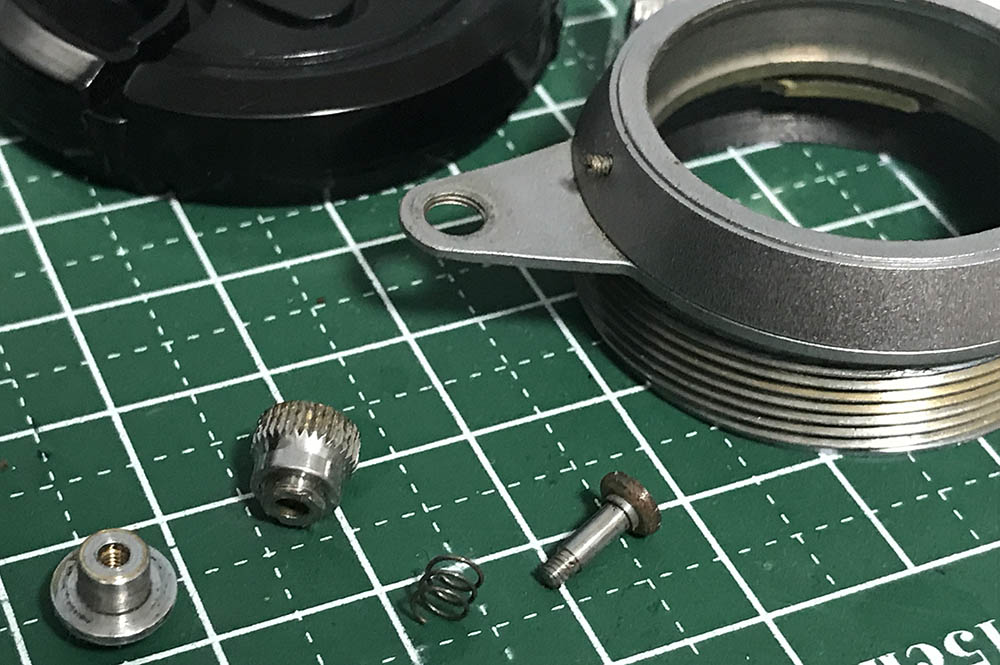
This lens can be broken-down into 2 basic parts, the focusing unit and main barrel. The focusing unit houses the helicoid/focusing ring and main barrel houses the objective and its associated mechanisms. We will want to extract the main barrel first so we can work with the focusing unit without having to worry about damaging the glass. This is where you’ll spend most of your time on, it’s easy to work on this if you have the right tools such as openers, rubber cups and the correct drivers. Be careful when working with this lens because it’s old and the parts can be brittle at times. This is a precious lens, I will send this to a proper repairman if I were you. A legit Leica specialist is your best choice because this lens shares a lot in common with an Elmar. It shouldn’t cost a small fortune to repair so I recommend that you give yours to a repairman to service it just-in-case.
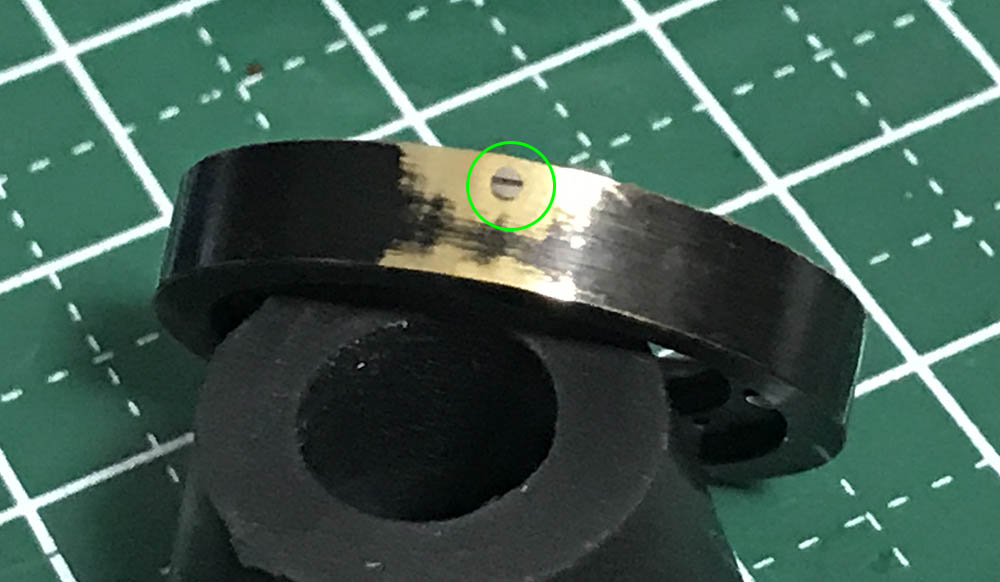
Like most collapsibe lenses from a long time ago it has a locking ring to help lock the main barrel in either the collapsed or extended position. Remove it and you can separate the lens into its 2 basic assemblies.
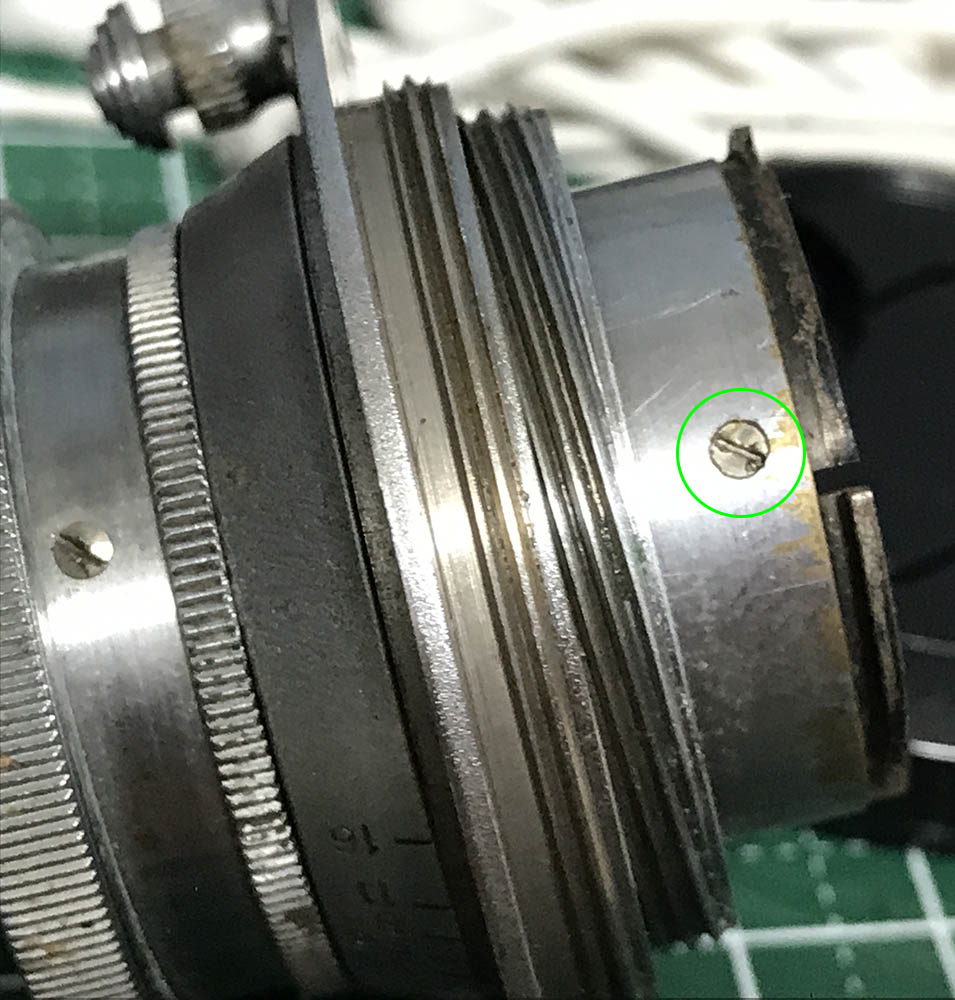
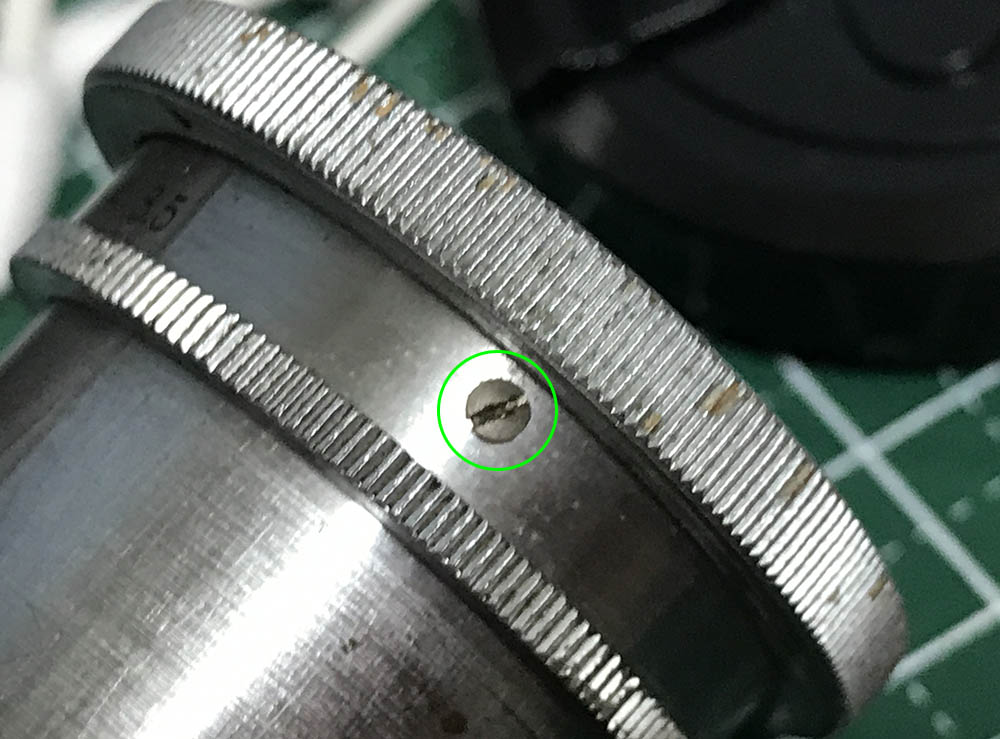
Remove this screw so you can unscrew the locking ring.
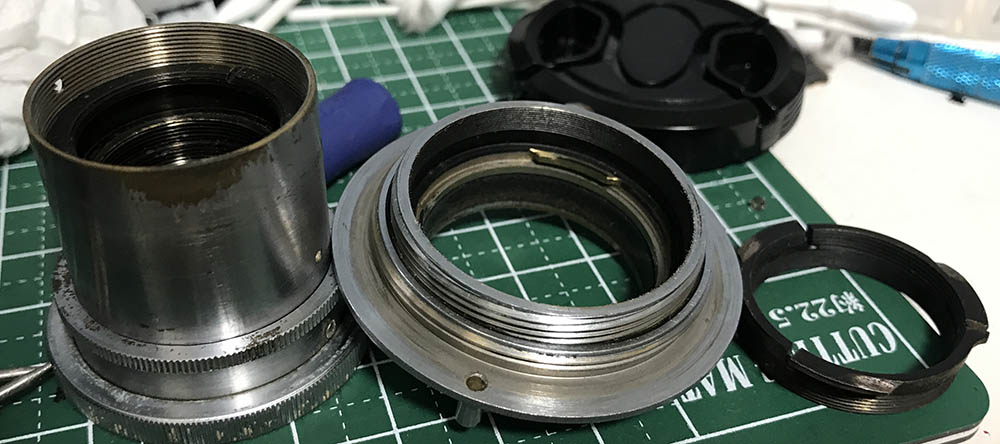
Unscrew the locking ring and you can pull the main barrel off. Store that in a safe place while you work on the focusing unit.
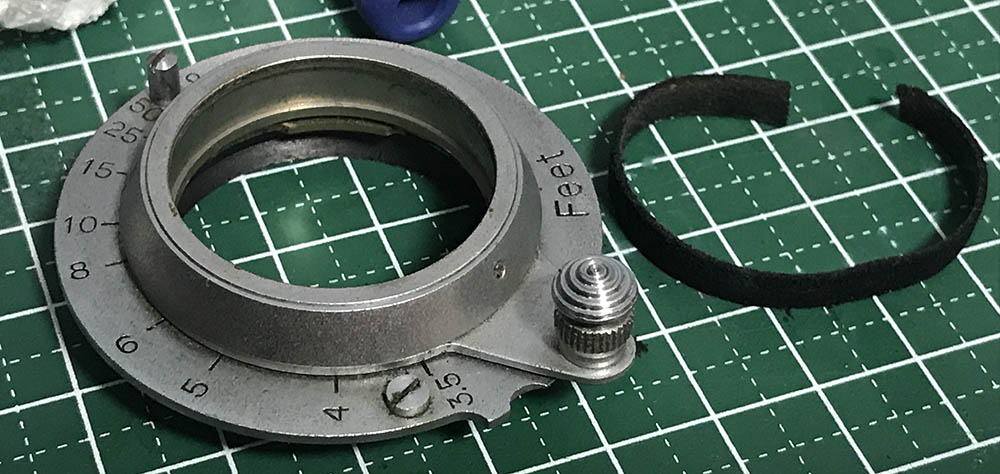
The felt lining is worn and full of germs so I replaced it with a new one. The felt lining makes sure that dirt and light won’t get inside the camera. It also helps add friction so the main barrel isn’t too loose. The new felt lining was a bit tight at first but it felt perfect after a bit of use.
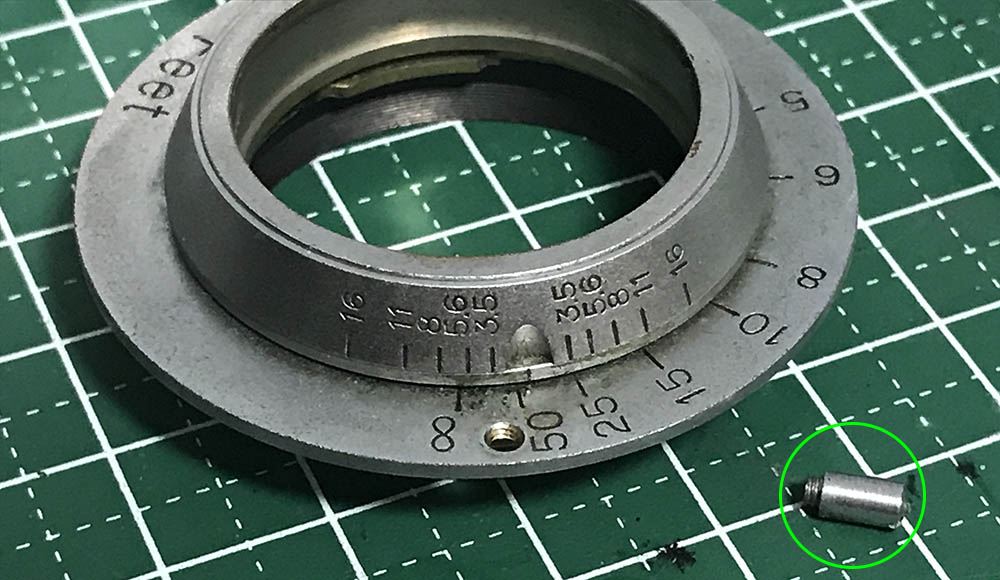
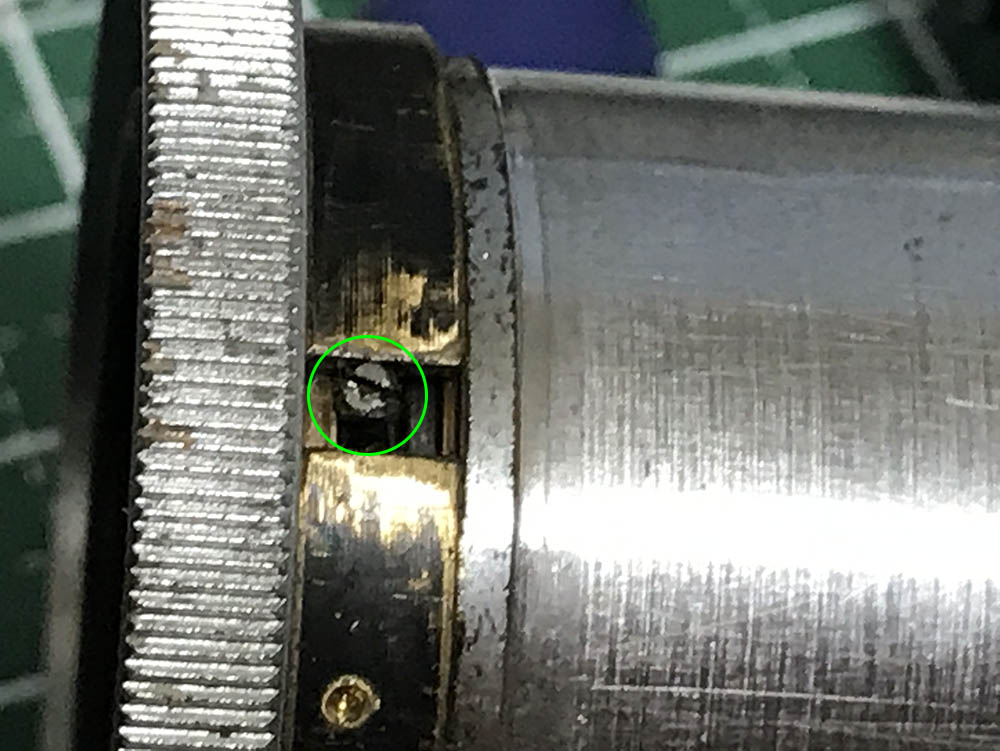
The focusing unit’s helicoid can be taken apart once you removed this. This is just a tall screw that acts as a stop so you cannot turn the helicoid beyond the focus range.

Separate the helicoid and never forget to note where they separated. Mine’s about here. Many people forget to note how their helicoids separated and it is the cause for a lot of despair, stress and anxiety amongst amateurs. Read my article on how to work with helicoids to educate yourself on how to do it properly and avoid a miserable experience.
You don’t need to dismantle the infinity lock, I just wanted to clean this very well so I did this. Unscrewing the knurled part after unscrewing the bottom screw will allow you to take this apart.

The focusing scale can be removed after extracting this screw. It’s tight and you will have to pull it carefully with your fingers. You can leave it alone, it was filthy and I wanted to clean what’s underneath it that’s why I did this.
Clean the helicoids very well, make sure that all residue is gone before you apply a fresh coat of grease. You don’t have to apply a lot, a thin film will be more than enough. I chose a slightly thicker type of grease so it feels a little bit damped. Just make sure that it’s not too-thick or you may strain it while you turn the helicoid or it will loosen itself without you knowing. There are many lenses that end up being junks because they fell-off from the camera.
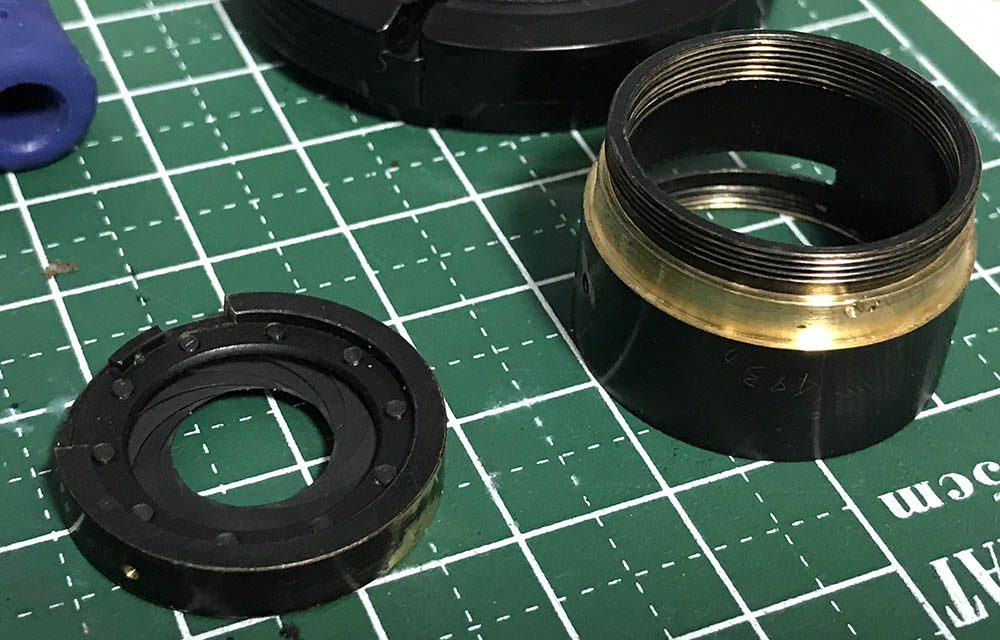
Disassembly (Main Barrel):
Here’s where the bulk of your time will be spent. The main barrel contains the important parts of the lens and you will need special tools to work with this. Most of the parts here are delicate so you should handle it with care. If anything is stuck, don’t force it and just apply a small amount of alcohol and that should help dissolve the seal or dirt.

Carefully remove the rear baffle using a pipe-key or a lens spanner that has long, thin bits installed and be careful not to scratch the rear element.
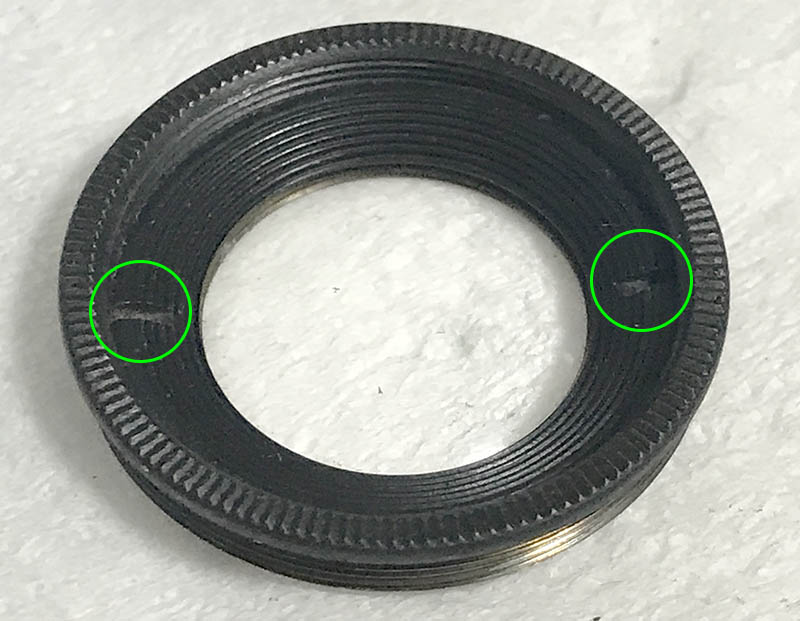
The aperture ring is secured by these screws (2). Be careful when removing these because the threads are delicate and the screws are tiny. You will have to seal these later with lacquer so they won’t go anywhere once you’re done repairing the lens.

Slide the aperture ring away carefully.
Extract this screw carefully, it serves as a pin to couple the aperture ring to the iris mechanism inside.

The rotator ring can be carefully removed by flexing it a bit. Be careful and don’t warp the ring or it won’t lose its circular profile.

You can remove the front element and its housing later but I chose to get it off as soon as I can to prevent damaging anything. You can unscrew it with a rubber plug. It can be tight so use a bit of alcohol if yours is stuck.
Carefully Unscrew this retainer ring using a lens spanner and don’t scratch the front element while doing it. Again, use a bit of alcohol if your’s is stuck.
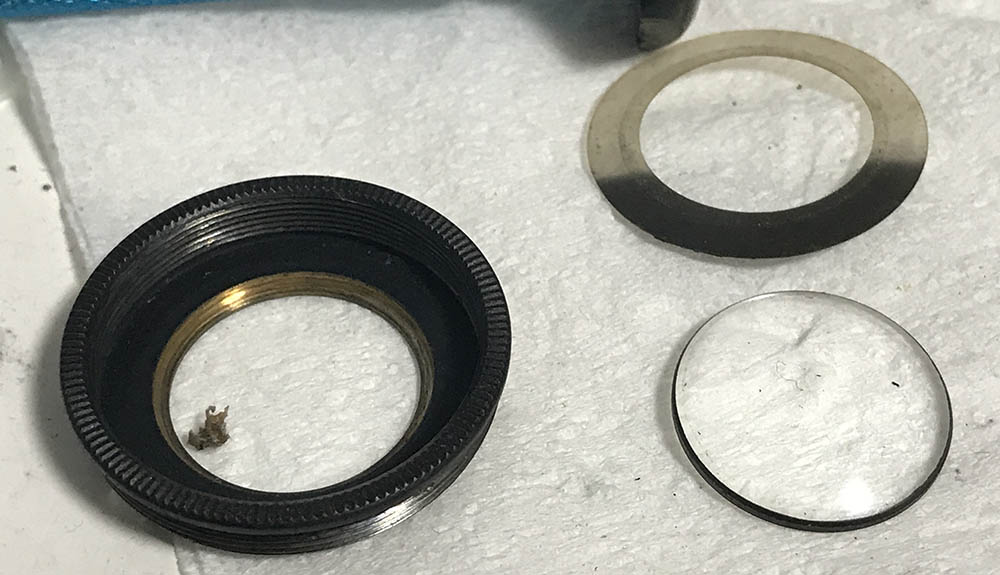
This is how everything looks like. Don’t use too much alcohol or solvents so you won’t dissolve the plastic bushing underneath the retainer ring. Set the front element aside while you work with the rest of the lens.
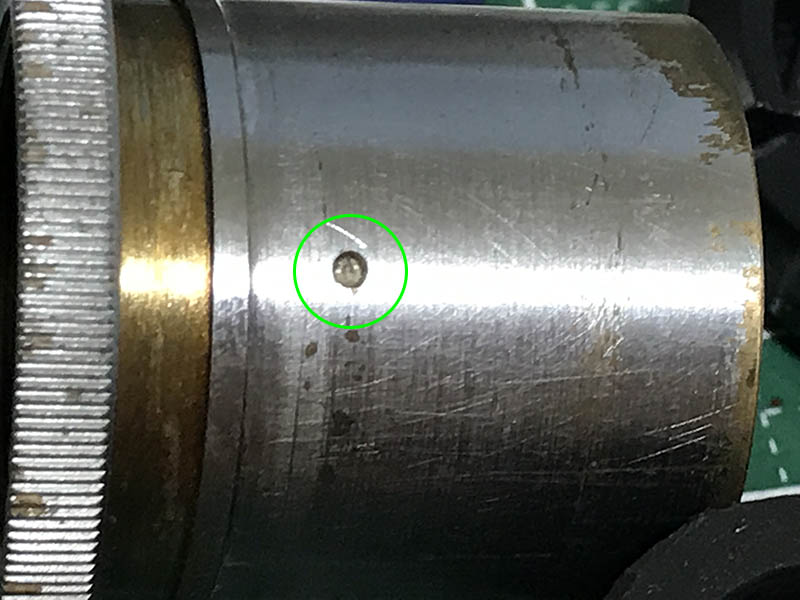
The objective is secured by this small screw. Carefully extract it with a small driver that fits it perfectly. When you putting the objective back again, don’t forget to align this screw to a dimple in the housing of the objective so that it won’t turn while you manipulate the aperture ring.
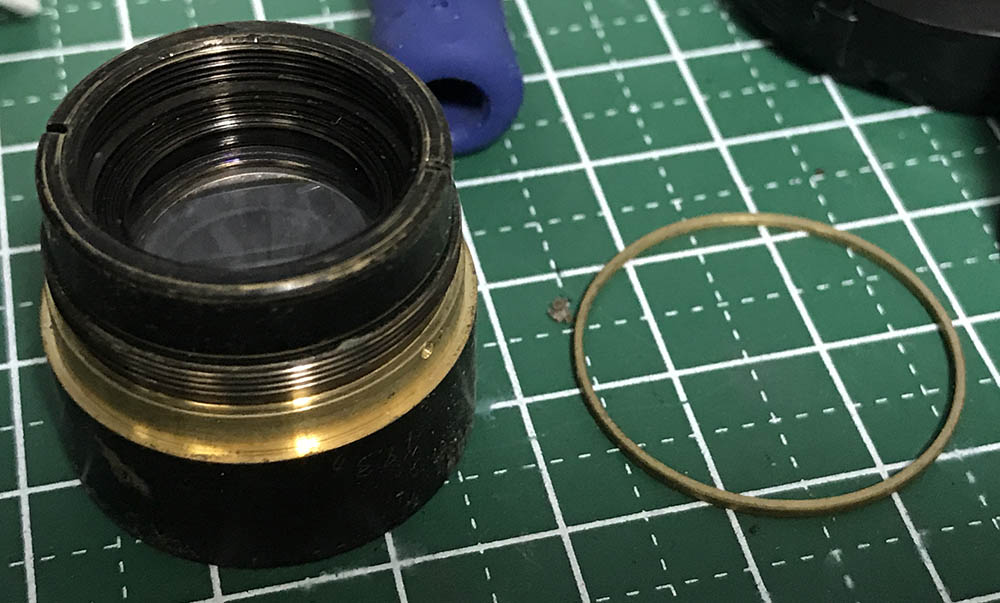
The objective can now be removed. The rear baffle and the tiny screw that’s securing it has to be removed in order to extract it. Do not lose this shim, it’s there to calibrate the focus of your lens.

The rear assembly of the objective can be unscrewed just like this.
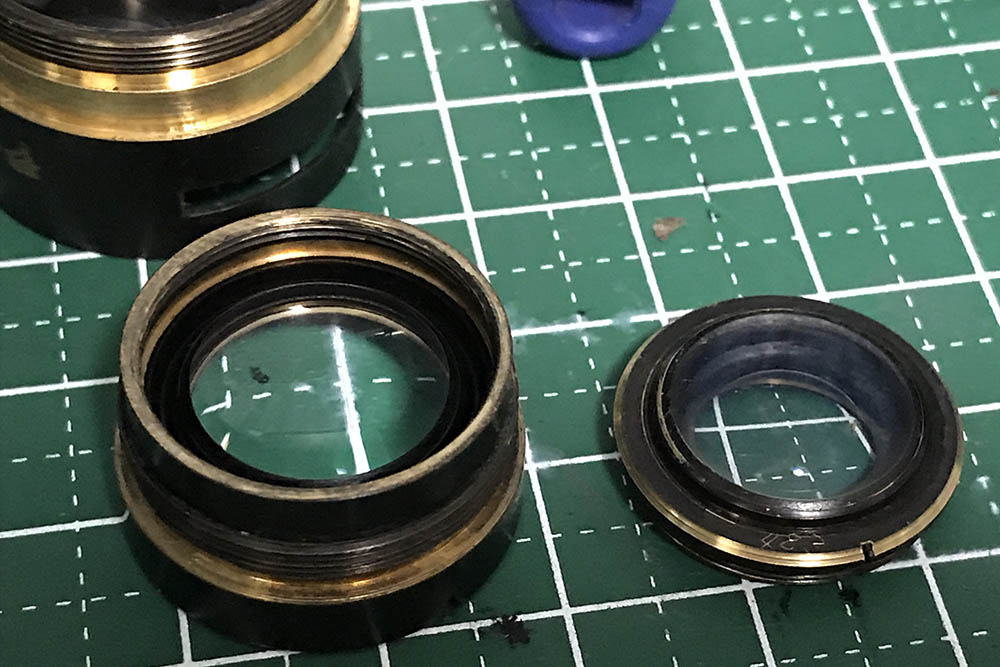
The housing of the 2nd and 3rd elements can be unscrewed using a spanner and be careful not to scratch the glass. The 2nd and 3rd elements are glued into a single group called a doublet so don’t use alcohol with it. Don’t bother removing it from its housing because you don’t have to do it to clean both of doublet’s surfaces.

Remove this screw so you can remove the iris mechanism. This screw sinks into a depression in the housing of the iris mechanism so it stays in place.
The iris mechanism can now to carefully removed. The iris is delicate so do not damage it with your tools or fingers.
Nikon uses hard coatings so don’t worry about wiping the glass using a lens tissue that’s soft, lint-free and moist with alcohol. The same can’t be said for German lenses so we should be thankful for this. Clean and polish all of the large parts to remove any corrosion. Never apply any grease or oil here, it’s going to end-up in the iris one of these days.
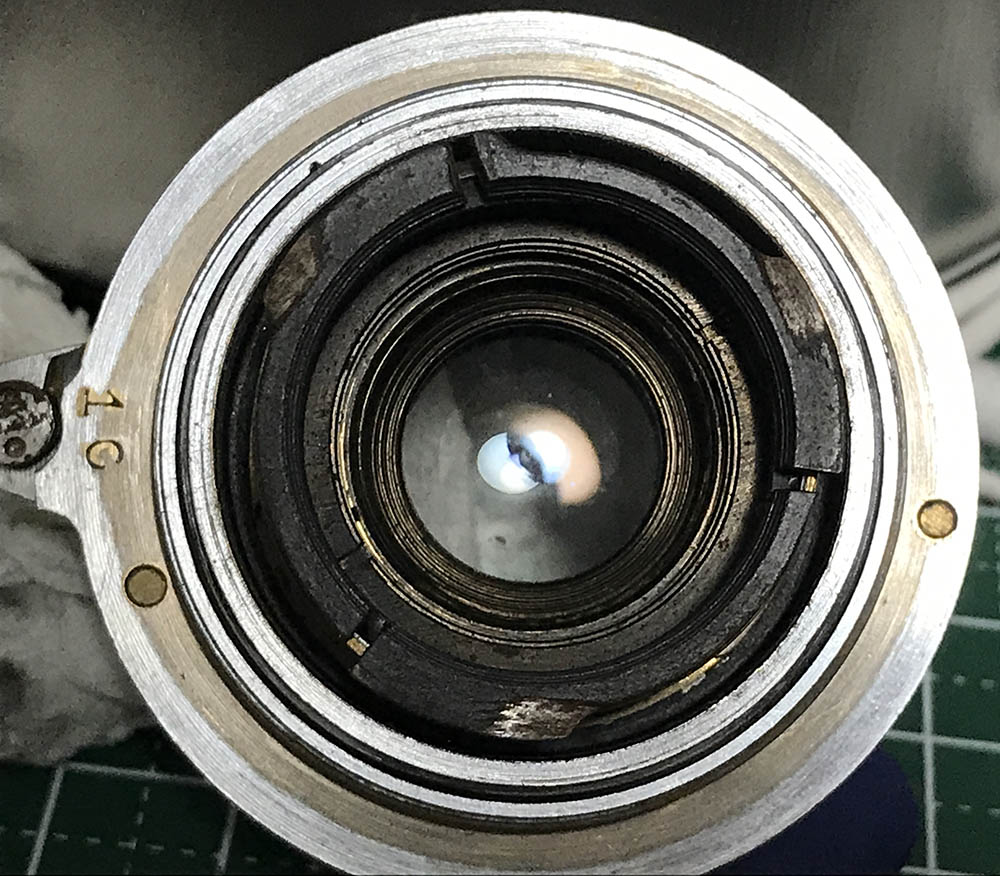
Disassembly (Iris Mechanism):
The iris mechanism is housed in its own case which is unusual for Nikkors. I can only name one other Nikkor that has. It’s small and delicate so handle it with care. Study how it works first before you dismantle it to give you an idea of how it works so you will know where things should go or how they connect to each other. Taking plenty of photos will also help you later when it’s time to put it back together again.
The iris mechanism can be opened once you remove this screw. It’s tiny and delicate so don’t lose it. This also sinks into its own hole underneath it so the ring of the iris mechanism doesn’t turn.

Before opening it, I made a few scratches to help know how it should align.

You can now open the iris mechanism. The parts here are delicate so handle everything with care.

The iris blades were so oily that they are stuck together. Carefully remove it by poking of the pegs from behind and never handle the iris directly. It can be a tight fit so do it slowly.
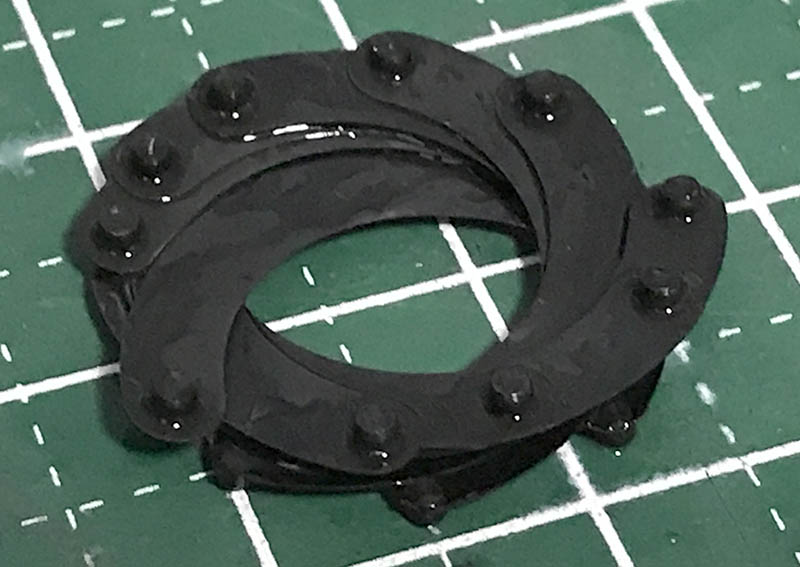
The oil is so thick that it binds everything together. Never lubricate the iris using oil or grease, I will show you how to do it properly later.
The iris blades were carefully cleaned using a lens tissue and lighter fluid. It was covered in bad grease so I had to carefully wipe each blade. The blades are delicate so only handle them through their pegs.
Conclusion:
It only took me about 2-3 hours to overhaul this with most of that time used on the iris mechanism. It’s a bit difficult to put back because of its size and I recommend that you read my article on working with a preset-type Iris. That will help you gain more knowledge on how to repair these things. Soaking it in solvents won’t help much because oil may be hidden in the small crevices of the assembly and only a complete overhaul will clean it properly. There’s no adjustments for this lens’ focus so if you can’t focus it properly then your helicoid wasn’t put-back the right way and you should back-track a bit until you get it right.
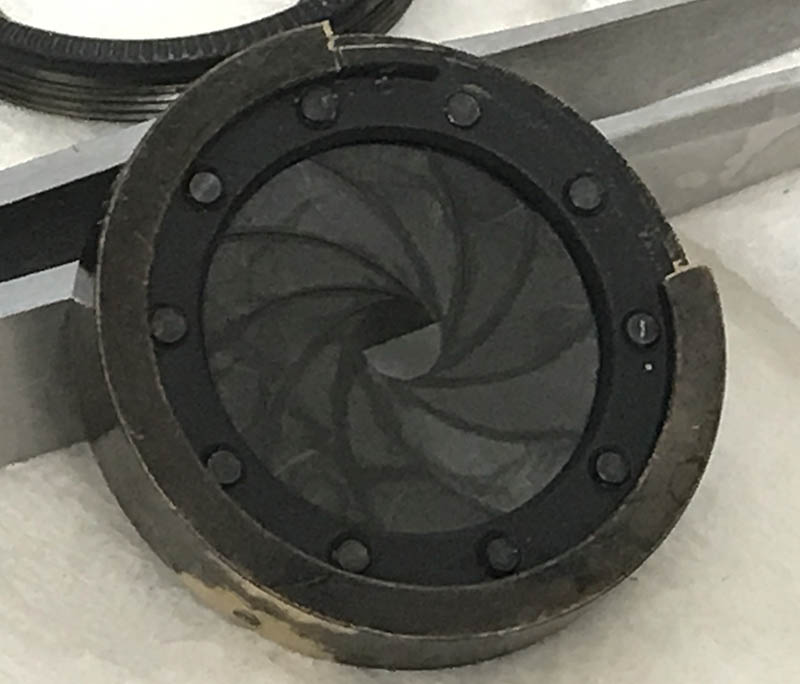
After re-building the iris mechanism, I dusted it with powdered graphite. It was then exercised so the powder will settle where it should belong. Using a bulb blower, I removed the excess powder and exercise the iris again just to make sure that I remove some more of the powder until I leave a thin film. I do this with every iris that I work on so they operate smoothly.

This is how the objective looks like after overhauling it completely. It comes as a single unit that you can remove from the main barrel and you put this back the same way, too. Don’t forget to put the shim back, it can be difficult to center the shim because it wiggles a bit inside the barrel.

This lens will surely reach its 100th birthday now that I have overhauled it. This is how you treat such an important lens, you take care of it and use it. I collect lenses but I also use them regularly when I have the time.
Thank you for supporting the site. I try my best to present new and original work each week and your help enables me to do just that. You can’t find any information about the repair of this lens anywhere on the net so I hope that this will be useful for somebody. See you again next time, Ric.
Help Support this Blog:
Maintaining this blog requires money to operate. If you think that this site has helped you or you want to show your support by helping with the site’s upkeep, you can make a small donation to my paypal.com (richardHaw888@gmail.com). Money is not my prime motivation for this blog and I believe that I have enough to run this but you can help me make this site (and the companion facebook page) grow.
Leave me some tip?
Thank you very much for your continued support!
$2.00
Helping support this site will ensure that this will be kept going as long as I have the time and energy for this. I would appreciate it if you just leave out your name or details like your countrym name or other information so that the donations will totally be anonymous. This is a labor of love and I intend to keep it that way for as long as I can. Ric.

Sep 12, 2025 @ 17:38:21
Thank you for posting this! I just picked up one off Ebay with heavy internal haze. I worked on one several years ago, which was even older- but was constructed differently. My 705 block lens is like yours, and following the instructions- all internal (and external) surfaces cleaned up well. I posted a thread on RFF with the work done on my own lens, and a link back to this excellent page.