
Hello, everybody! The recent Olympics has been controversial, we are even discussing some of the topics to this day and for many days to come. Some find it amusing well some people were offended. Some say it was done in poor taste, while some people claim that it points to the next step in human psychology. I do not dare to make such bold claims because I am merely a camera repair enthusiast. But this is what I can say, we can all agree that some parts of the event left us scratching our heads. To me, it was the huge disrespect by the Australian “dancer” to her sport. In this website, we do not disrespect anything related to Nikon. In order to wash away the trauma, I will present to you another “Olympic“, one that is hailed by many as a masterpiece and the best there is, even to this day. Let’s all celebrate and enjoy the “Olympic“.
Introduction:
The Nikkor-S 50mm f/1.4 (Olympic) was made in 1964 under a limited batch of less than 1700 units. It’s even rarer than Nikkor-S 50mm f/1.4 (Millennium) that is a reproduction of this lens. That year is special because of the Summer Olympics hosted by Japan. Many companies saw that as a chance to showcase their prowess by manufacturing exceptional products to be used for covering the games. Nikon made a couple of such projects, the lens you see here is one of them. It’s also the last lens ever mean by Nikon for the Nikon S rangefinder system that isn’t a reproduction. Many people consider this to be the best 50mm Nikkor of its kind because of how well it performs technically, it’s surprisingly good even at f/1.4. That’s a big departure from what many people were used to with the older Nikkor-S•C 5cm f/1.4, which renders a lot differently because it’s considered to be “soft” when shot at larger apertures; that’s just the case when shooting with Sonnar-type lenses. Speaking of which, this is the only 50/1.4 rangefinder Nikkor that isn’t a copy or derivative of the famed Sonnar design.

This is by far the largest rangefinder 50/1.4 Nikkor ever made. It is longer and considerably wider than the older Nikkor-S.C 5cm f/1.4, and it’s heavier, too. The barrel is all-metal so it feels great when you hold it. A lighter type of alloy is used on some parts in order to make it weigh less so it feels a bit different when it’s held. This is in contrast to the older lenses which uses brass.
Just like the Nikkor-S 50mm f/1.4 Millennium that is a reproduction of this, it’s a big departure from the traditional Sonnar design that Nikon has been using since. It has a 7-elements-in-5-groups configuration of the classic Gauss design. This is a big shift from the status quo which brings certain benefits like how it does not exhibit the troublesome trait of most traditional Sonnar lenses like shifting focus when the iris is stopped-down or the susceptibility of developing balsam separation. On the downside, we now lose the lovely rendering of the Sonnar. It’s not that this lens doesn’t render beautifully, the Sonnar just has a very unique look to the pictures it takes which makes it endearing to a lot of people, me included.

This is the schematic of the optical formula. You can read all about this lens in the amazing article written by Sato-sensei, the “Kit-lens King” in The Thousand and One Nights No.77. That article explains the history and everything about how it was manufactured along with the story of how the new Nikkor-S 50mm f/1.4 Millennium came to be.
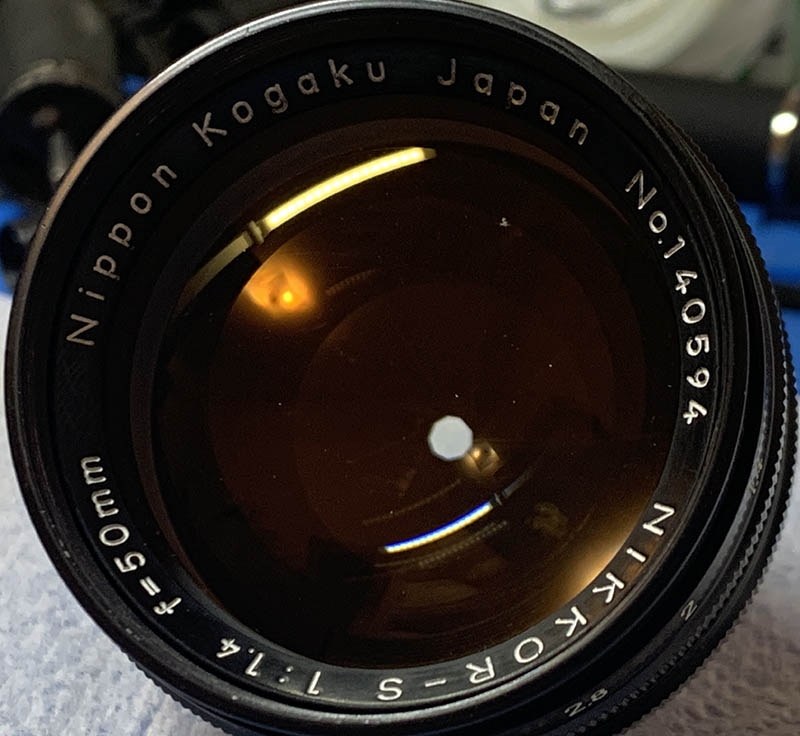
The iris isn’t truly circular because of the straight-edged blades but it has enough of them in order to not make it look too polygonal. This will also affect the look of the pictures you take with it, some people like it while some people don’t. Visible in this picture is the deep-amber hue of the front element. This is due to the radioactive lanthanum mixed into the glass to make it perform better. The reproduction model has none of this so the Nikkor-S 50mm f/1.4 Millennium has a clear look when viewed from the front.
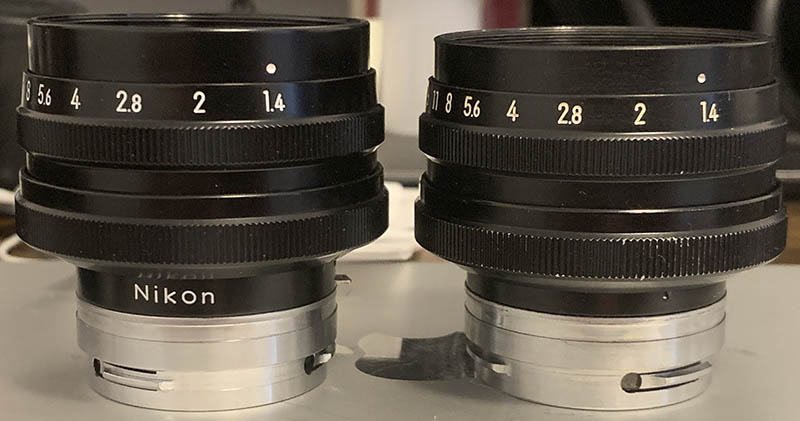
The next set of photos will show both lenses side by side in an attempt to find any external differences. It is important to note that the Nikkor-S 50mm f/1.4 Millennium should be considered a different lens since it has a different lens composition as the recipe of the glass has changed from the original by not using a radioactive front element. To the left is the Nikkor-S 50mm f/1.4 Millennium, while the one on the right is the Nikkor-S 50mm f/1.4 (Olympic).

(Click to enlarge)
There is a noticeable difference in the height and proportions of both lenses when viewed from the side. I find that the older lens is closer to the usual 50mm rangefinder Nikkor in terms of proportion. There’s also no “Nikon” engraved in the black part of the barrel.


(Click to enlarge)
Apart from the obvious yellowing of the radioactive glass, I can’t find any noticeable differences when the lenses are viewed from the top or bottom; maybe the newer one is a little bit wider but I can’t be sure.

It’s a little bit demanding to adapt this lens because it requires an adapter with built-in helicoids. They are more expensive and many of the cheaper Chinese ones are of poor quality. I’m using the Amedeo one, it’s not cheap at all but at least I’m sure of the quality.

Of course, the best way to enjoy this lens is to shoot it with a film camera. The Nikon S2 is the best one, it has a huge 1:1 viewfinder so it’s easier to shoot with.

I do not own the original hood for this, as it can be expensive and it’s even rarer than the lens itself. This one is a CCP (Cheap Chinese Product). You must be careful when using a CCP or any attachments made in the recent decades following the 1960s because many older lenses use a different thread pitch. You’ll be able to get the attachment/filter halfway through but it won’t go in completely. Forcing it will only cause the thread to bind, resulting in a ruined lens. If something won’t go in smoothly, just forget about it.
Let’s now see how this lens performs. It’s important to know how your lens performs, this will help a lot in understanding where it excels and it will also give you the insight so you’ll know where it fails. I captured these photos from f/1.4, f/2, f/2.8 and f/4, these apertures show the biggest changes. It’s also likely that a photographer will shoot within these apertures on a regular basis. These photos were taken with a Nikon Zf.
I won’t do a comparison with the Nikkor-S 50mm f/1.4 Millennium, check that out for yourself.

There’s a little bit of barrel distortion happening, this isn’t surprising and is considered tolerable. In fact, a lot of lenses of this class exhibit similar qualities even if they were made in the last 20 years.


(Click to enlarge)
The corners show significant darkness at f/1.4, but it improves considerably by f/2. Stopping the iris down to f/2.8 will help improve the corners a little bit, but it won’t get any better from this point. It’s interesting, this just means that the lens performs close to its peak at f/2, the only reason to stop the iris further is for acquiring a deeper depth-of-field. We shall see if my statement is correct later in this article.


(Click to enlarge)
It performs poorly when shooting at bright lights, this isn’t surprising because that’s just how things were back in the day when lens coatings weren’t that effective yet. However, you can use this for your creativity if you choose to do so.


(Click to enlarge)
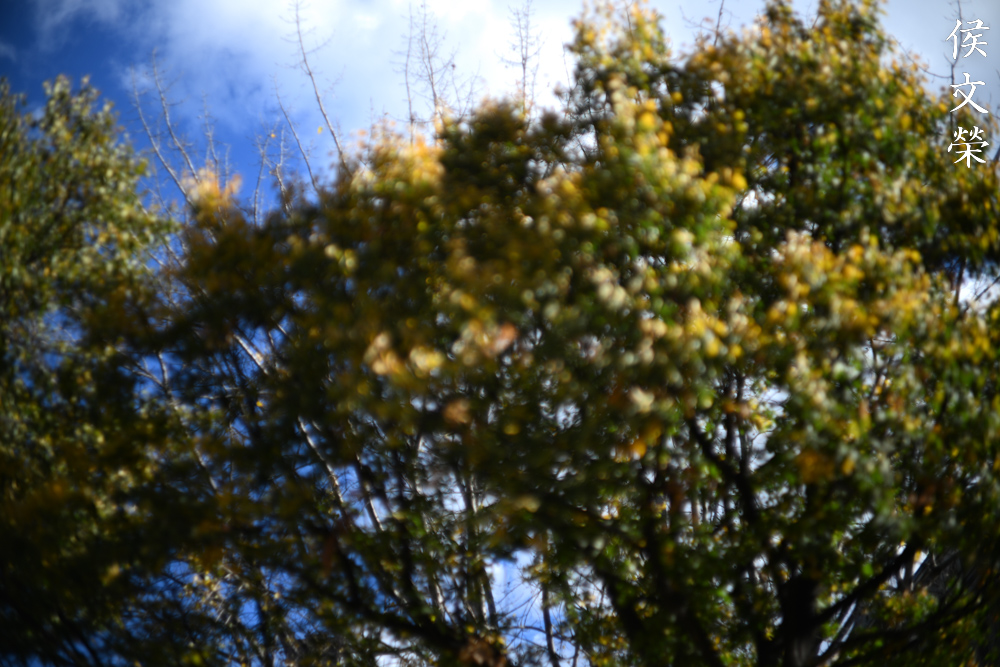
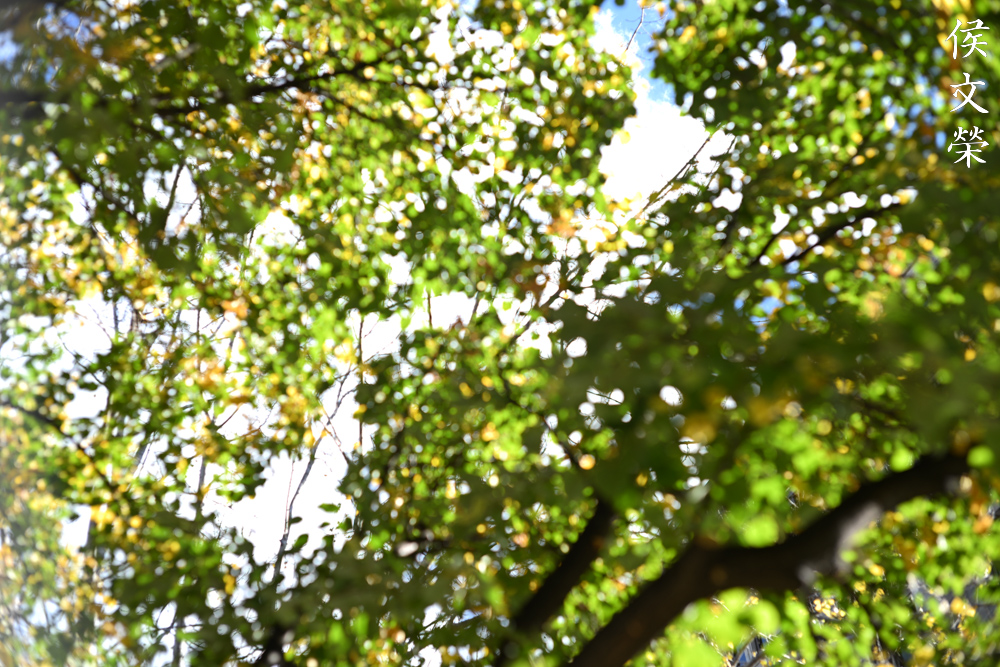
The character of the blurry parts of the photo (bokeh) look to be refined. It will never be as “painterly” like what we are used to seeing from a classic Sonnar, but that is to be expected. It’s possible to make it look a bit rough in some places but it’s pretty good in general, especially for a lens of this age.


(Click to enlarge)
The orbs look relatively clean, there’s only minimum traces of outlining but it’s tolerable. Surprisingly, the orbs don’t have an angular look to them even if I stop the iris down. This is because the iris has numerous blades which helps make the aperture look more circular than polygonal.


(Click to enlarge)
Coma can easily be observed when shooting at larger apertures, but it’s almost gone by f/2.8. If you must, shoot at f/2 so coma won’t be as noticeable. This isn’t surprising at all, it matches my expectations of it.


(Click to enlarge)
Chromatic aberration can be seen when shooting wide-open, but it almost goes away by f/2. It’s gone by f/2.8. This is impressive, it performs a stop better than I expected. The radioactive glass is probably what’s correcting this. There’s also no noticeable traces of spherical aberration.


(Click to enlarge)
Sharpness at the center is good at f/1.4, but it’s a bit mediocre when shooting at closer distances. You will see a significant improvement at f/2 thanks to the jump in resolution, it’s now able to resolve finer details. It gets just a little bit better at f/2.8, and you won’t even notice a lot of improvement at f/4. You only do it to get more things in focus or to make the corners look sharper.
This is a very sharp lens, especially considering how old it is. My sample performs a lot better when taking photos of things that are further than a meter or so, it’s probably deliberate. In any case, the performance of this lens is exceptional. I have never seen any lens from this era performs this well.
This lens renders photos exquisitely, with the correct balance of sharpness, clarity and character. It’s hard to believe that it was made in 1964!

Shooting at lowlight scenarios is a breeze because it performs really well even that f/1.4.

The level of performance that I get from this lens is phenomenal, similar lenses of its class and age won’t be able to present the high contrasting pattern of this shirt as cleanly as it did. It is not perfect, I can still see some artifacts but this is still the best I’ve seen.

It renders colors with a faithful neutrality, the tonality is also excellent. You’ll get a clean look, the photo above exhibits beautiful details and saturation without making the scene look “cartoonish”.

The level of detail in this scene is a nightmare to render for many older lenses because it has all kinds of clutter and frequency. This lens is able to capture the blurry parts cleanly without making them look busy or rough. The focus transition is also very smooth and gradual so you won’t get an abrupt change.

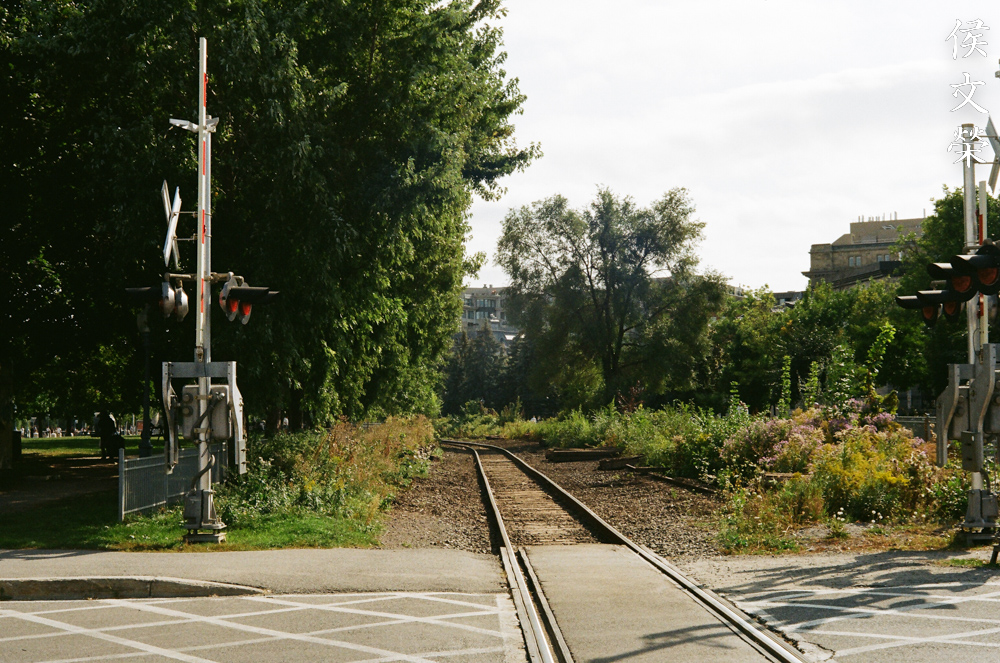
This is great for urban photography, I prefer a 50mm lens over anything else,

Coma is visible in this photo but you’ll have to look hard to find it. Despite that, this lens still shows a low amount of coma compared to similar lenses from the same era.

You’ll need a tripod when dragging the shutter. This is the best I could do, I had to lean on the wall just so I could get a steady shot.

The subtlety of tones that you are able to achieve with this lens is amazing, the contrast is great but it is not so much as to clamp all the delicate tones from your photo.


(Click to enlarge)
This is definitely the best rangefinder Nikkor that I have shot with, nothing even came close. Paired with a great digital camera, this lens is still capable of giving you great photos despite its age. It felt a bit strange because what I’m seeing in the LCD screen doesn’t look like something that was shot with a vintage lens. I will take more photos with it in the coming years.
This lens was made to be shot with film, so it’s best that we see how it performs with its intended media. I think it’s only fair that we do so. Film has a different quality because it has grain, with reacts differently to light. The grain structure can also help mask or amplify any flaws are artifacts that the lens may have. This is the reason why we should see how well it performs with film.

I’m not sure if this is caused by flare or just overexposure, but it looks like the latter to me because I took this photo with a small aperture.

The color is vibrant, with very good contrast, this is probably caused by the radioactive glass.

The sun stars look great, they’re well-defined and look even.

A 50mm lens is also great for portraiture amongst many things. It gives you enough of the background as context and it will not distort your subject compared to a wider lens.

It’s nice for environmental portraiture so you can present your subject in a setting to help you tell a story.

This focal length is a classic, there are many amazing photos that were taken with a 50mm lens.

Taking photos of water on a sunny day will usually result in purple artifacts at the shiny areas, this lens has none of it as far as I can see.

It has amazing resolution which helps you resolve even the smallest details. The corners also look great, it does not have the best resolving power at the extremities but it’s enough to make them look acceptable.

Unlike the older Nikkor-S.C 5cm f/1.4, this lens performs admirably at every distance, especially at infinity. The older lens struggle a bit more at that distance even at smaller apertures if I remember it right.


(Click to enlarge)
This is an amazing lens for shooting with film, it has no equal in the Nikon rangefinder world. The recent Nikkor-S 50mm f/1.4 (Millennium) is probably just as good but that’s just a reproduction of this lens. This is the ultimate 50mm Nikkor for rangefinder photography if you are a Nikon user. I will admit that I wasn’t expecting this lens to be so good but the results I got from the lab blew me away.
Despite being an amazing lens and the best 50mm rangefinder Nikkor ever made, I won’t recommend it because of its rarity and price. You can get the similar Nikkor-S 50mm f/1.4 Millennium for a lot less but it still cost you a small fortune. I was lucky enough to get this for a reasonable price because it has a minute chip on the front element and very early signs of balsam separation at the fringes. Neither will affect what I take with it even in tough lighting. The going price for these very wildly, some going for about $1,000.00 to crazy amounts north of $3,000.00. Never purchase these for that much, you’ll only feed the people who manipulate and inflate the prices of used camera equipment. I got mine for $570.00 and I won’t pay more than that. This isn’t the lens for the casual photographer, just leave this to the collectors. If you are willing to pay for one of these, make sure that the iris is dry and clean. A little bit of dirt and oil is not a bad thing at all because it can be easily remedied with an overhaul. A lens with broken iris blades is something that I will consider a deal-breaker. Check the glass and make sure that there’s no serious damages such as deep scratches or huge cracks. Some shallow cleaning marks can be tolerated because this lens is old. Look for signs of fungus or haze, both can be easily cleaned but they can also leave irreversible damage. It takes a good look from an expert to determine if the damage can be corrected or not. Use a magnifying glass to inspect and look for signs of balsam separation, this is something that I will consider serious but a master repairman can fix that for you for a price, something that you may want to avoid as much as possible. It’s not a very complicated lens at all so just operate the aperture ring just to make sure that it works properly and the iris is changing properly as you turn it. This is a very special lens, something that a collector won’t be able to part with easily, I sure won’t sell mine until I die. Just wait for one of these online and you may get lucky and find something in acceptable condition and priced reasonably. Happy hunting.
Before We Begin:
If this is your first attempt at repairing a lens, I suggest that you see my previous posts regarding screws & drivers, grease and other things. Also read what I wrote about the tools that you’ll need.
I suggest that you read these primers before you begin:
- Essential tools
- Best practices 1
- Best practices 2
- Best practices 3
- Ai conversion
- Working with Helicoids
Reading these should lessen the chance of ruining your lens. Before opening up anything, always look for other people who have done so on the internet. Information is vague and scattered but you can still find some information if you search carefully.
For more advanced topics, you can read my fungus removal article. It has a lot of useful information, it will be beneficial for you to read this. I also recommend that you read the working with helicoids article so you will not get stuck because you couldn’t reassemble the helicoids back properly.
Disassembly:
The overall schematic of the barrel is simple but it’s different to what you would expect from the Nikkors of the same genre such as the older Nikkor-S.C 5cm f/1.4. This lens is much more substantial that’s why it needs a wider barrel to house the glass and iris mechanism. It can be confusing if you aren’t familiar with this lens but I will guide you through everything so you won’t make a mistake.
If your lens needs to be serviced, send it to a real repairman. This is a valuable lens with historical value, it is not something that an amateur should be practicing with. You will require special tools and experience in order to safely service this lens. If your repairman isn’t familiar with this lens, show him this article so he can plan his work ahead and finish the job safely.

Locate and carefully extract this screw, that will enable you to open up the lens.
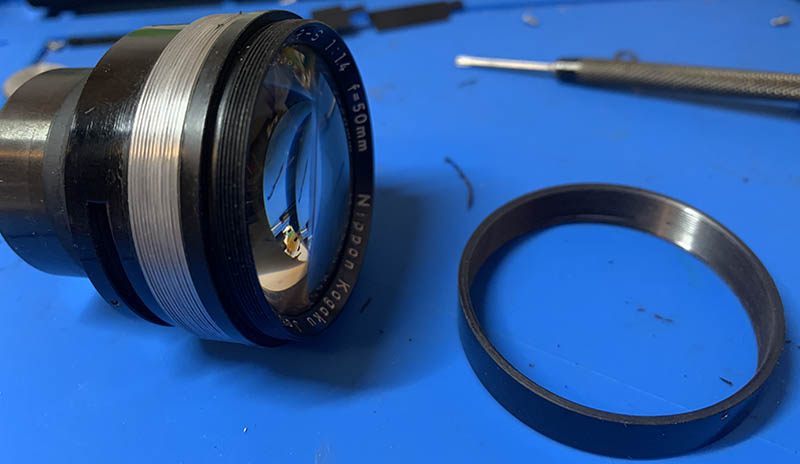
Unscrew the bottom until it comes off, then pull the objective off. Notice that there’s a brass shim under it, this shim ensures that the lens will be able to focus properly. Do not lose or damage it.
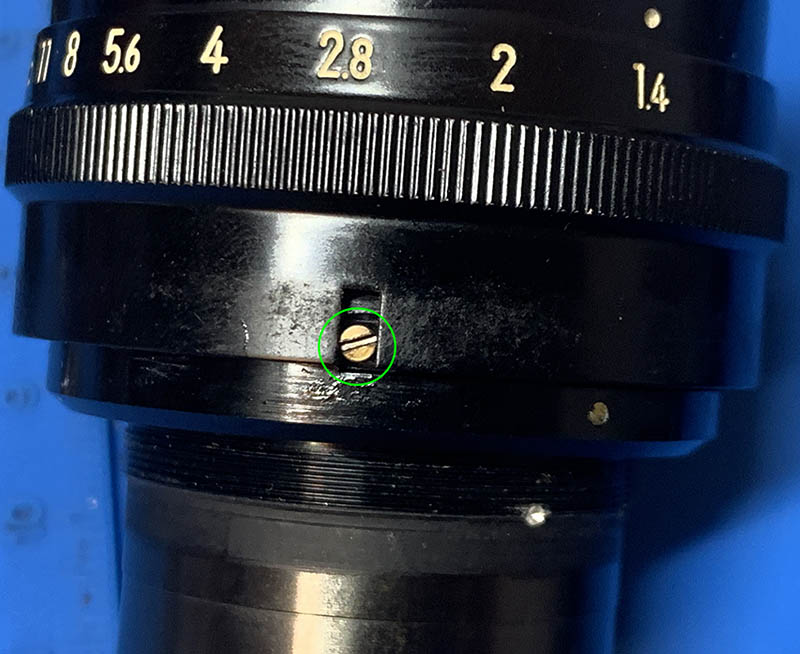
Unscrew this to decouple the aperture ring from the iris mechanism. You should be gentle because it has a narrow and delicate neck.
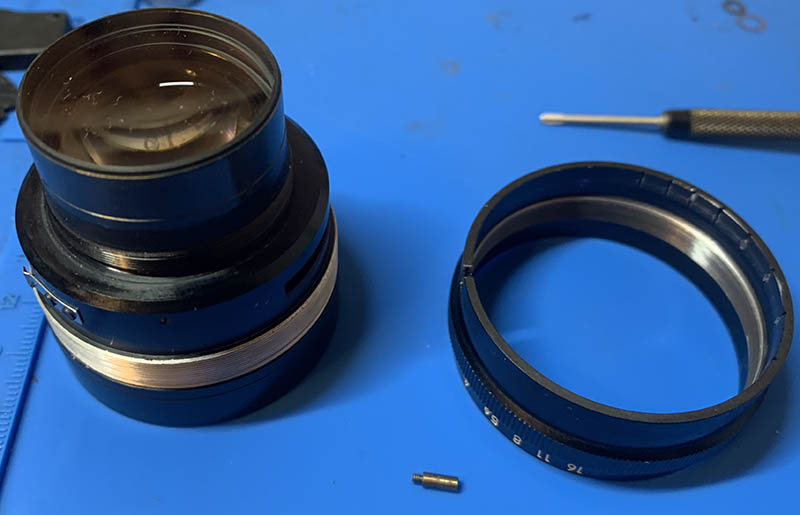
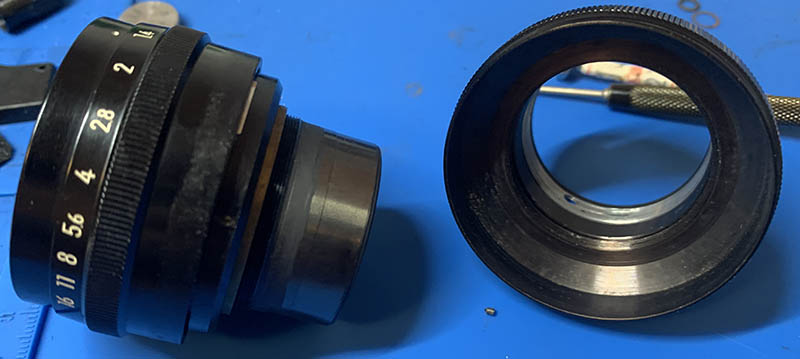
Unscrew the aperture ring until it comes off.

Locate and carefully extract this screw to remove the front ring.
The front ring can be unscrewed just like this. This is an optional step because you don’t need to remove it in order to further dismantle the lens.

Here is how you can unscrew the rear, the 4th and 5th groups are both sealed to their housings. Do not ever try to remove any of them from their housings.

You can remove the 3rd group using a special tool. You should be very careful when doing so because it is very delicate, one slip and you will crack this piece and turning your lens into a useless junk.

Use all of your strength to unscrew the front optics assembly. These are usually sealed so you will need a little bit of alcohol to soften up the seal, just place a small drop at the seam and wait for it to do its job.

You can remove the 2nd group using a lens spanner.
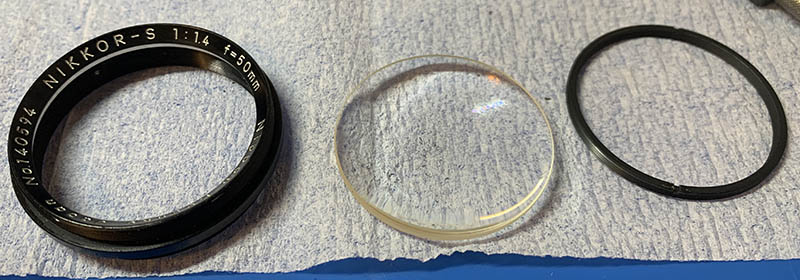
The front element can be extracted after its retainer ring is removed with a lens spanner.

Before you continue, mark the alignment of the iris mechanism because it’s adjustable. Extract the screws found here, there are 3 of them in total. These screws secure the iris mechanism. I didn’t know how things were put together, if I did, the next step should be removing the iris mechanism from the main barrel as a single unit. Keep this in mind while you read the rest of the article.

Carefully pick on the brass circlip with a sharp tool then use your nails pick it out.
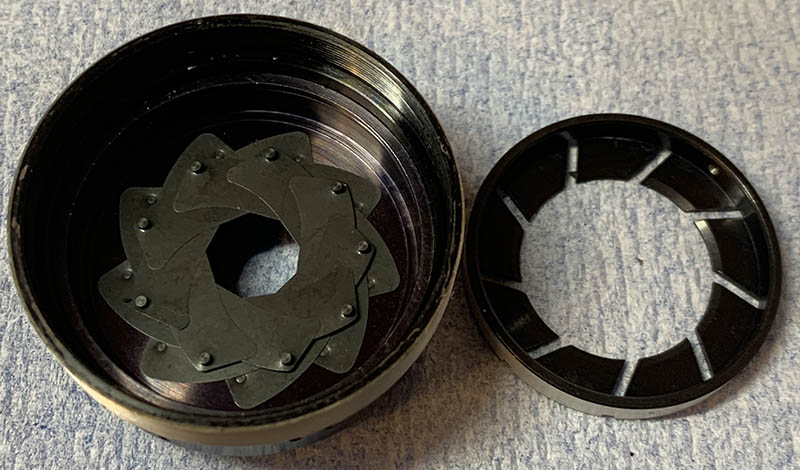
Once the circlip is gone, you can pull the diaphragm plate off. Inspect how the iris looks like so you will know how to put it back again later. I removed them by carefully tapping at the back of the main barrel and letting the blades drop on top of some cushioning so they won’t be damaged as they fall.

The housing of the iris mechanism can be removed with your fingers.
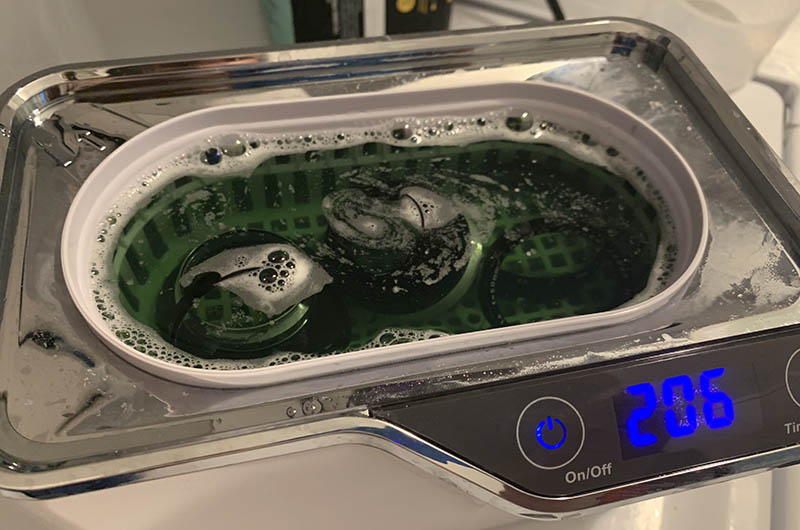
All of the bigger parts that are not delicate were cleaned using an ultrasonic cleaner. That will never be enough so they were scrubbed with a toothbrush and a strong toilet detergent. They were then rinsed very well with hot water, then finally rinsed with pure alcohol to remove any residue.

Each leaf was cleaned very carefully with Q-tips soaked in solvents, I used Zippo fluid for this as alcohol is not the right solvent for the type of grease used. Be sure to handle these carefully, accidentally destroying one is out of the question.

The iris mechanism is intricate, but I did the job in one attempt. I applied a little bit of powdered graphite into the blades themselves, then I operated them in order to distribute the powder much better. I finally used a blower to remove the excess powder. Read my old article on how to work with preset iris blades in order to know how I do this.
Do not apply too much grease to the aperture ring because the excess lubrication will migrate to the iris one of these days, and the only way to correct that is with an overhaul. If your lens has fungus, read what I have to say in my fungus cleaning article. When cleaning with an ultrasonic cleaner, be sure to rinse the parts very well with running water and then scrub the parts with detergent. You will also want to do a final rinse with alcohol then dry the parts carefully. This will get rid of any residue and make sure that all of the parts are very clean. If you must lubricate the iris, a very light dusting of powdered graphite will help a lot, just be sure to exercise the mechanism in order to let the powder spread evenly then use a bulb blower to remove the excess powder. This will help keep the iris working smoothly without the danger of using wet lubrication. It’s also safe because it won’t clog anything nor will it make things rusty.
Conclusion:
I have always been fascinated with this lens, I have waited so long and I’m finally able to present it to you. There’s no secret that this lens has to hide anymore. It did not take me a long time to service it because it is a simple lens and I am used to working with Nikkors. Reassembling the iris mechanism took the most of my time, along with cleaning the parts individually. Despite that, it only took me a single try to get the iris mechanism back together. This is where experience comes into play. Overall, I have enjoyed every second of my time and I will surely be happy to work on another one in the future.

This lens is so much fun, I ended up using it more. It has become one of my favorites and I won’t sell this lens for any amount of money unless it’s something that I can’t refuse.
And that’s the end of another exclusive repair article that you will never find anywhere else. Did you enjoy it? I only concentrate on original content that are not sponsored by anyone. If you want to keep on seeing this website grow, please support my work by leaving me a tip. No matter how small, your contribution is a big help in making sure that this website will exist for the future and benefit more people. It has helped a lot of people throughout the years and it has inspired a whole new generation of repair enthusiasts. The internet is full of charlatans writing lousy articles who have no love or passion for the art, we’re different. I will continue to create high quality content until I can’t. Thank you very much for your support, I’ll see you again in the next article and Merry Christmas, Ric.
Help Support this Blog or Show Me Your Love this Christmas:
Maintaining this site requires resources and a lot of time. If you think that it has helped you or you want to show your support by helping with the site’s upkeep, you can make a small donation to my paypal.com at richardHaw888@gmail.com. Money isn’t my prime motivation for this blog, I believe I have enough to run this myself but you can help me make this site grow.
Leave me some tip?
Thank you very much for your continued support!
$2.00
Helping support this site will ensure that it will be kept going as long as I have the time and energy for this. I’d appreciate it if you just leave out your name or details like your country’s name or other info so that the donations will totally be anonymous. This is a labor of love and I intend to keep it that way for as long as I can. Ric.

Jan 08, 2025 @ 16:08:18
Bonjour Monsieur Haw .Meilleurs vœux pour l’année 2025.Je suis français et j’aime beaucoup votre site, quels sont vos 3 objectifs Nikon préféré ?? Bonne journée. ( Hello Mr. Haw. Best wishes for the year 2025. I am French and I really like your site, what are your 3 favorite Nikon lenses ? Have a nice day. )