
Hello, everybody! There’s a Japanese song that goes “赤く咲くのはけしの花 白く咲くのは百合の花” or so, which is the opening lyrics to Fuji Keiko’s (藤 圭子) legendary song “Yume ha Yoru Hiraku” (夢は夜ひらく) which means “My Dream Blooms at Night“. The lyrics translate to “A flower that blooms red is a poppy, if it’s white then it’s a lily“. This means a young girl has two paths, one of modesty or promiscuity. It details the life of a stool pigeon who spends her nights with different men. It is a mature theme with heavy lyrics, something that we don’t get to hear much of these days. That’s why this song is considered a classic. The topic of duality is often spoken about because it’s common to only have one of two outcomes in life. This is also something that’s applicable to a lens in the production line. Would it be destined to become an old collapsible type Nikkor, or will it become part of the upcoming standard which is rigid bodied Nikkors. Its story will be told in this article, but unlike the girl in the song whose life is full of bitterness, this one has a happy life of being sought after by collectors so it doesn’t spend its life going from one owner to another.
Introduction:
This variant of the Nikkor-H•C 5cm f/2 is rare as it’s made within a small batch. No one knew how many of these were made nor the exact dates they were produced. All we know is this is a transitional version that was made around late 1948 to sometime around 1949. This period marks the transition between the older collapsible version produced before 1949 and the standard rigid version that became more common after 1950. Nobody knew that exact story but it’s easy to speculate that Nikon just don’t want to waste the old production version and completely replace it with the new one. A solution had to be found so we get this oddball version. As far as I know, it only appears in Nikon S-mount so you won’t find any of these in Leica mount. There’s also the possibility that some of the ones destined to be fitted to a Leica were modified to the Nikon S-mount in this way. There’s no way to tell so everything’s a wild guess.

Everything is made of metal except for the glass. It’s also heavier compared to the usual rigid type Nikkor-H•C 5cm f/2 because it has extra parts to make it what it is. The quality of the finish is a bit crude when it’s compared to later lenses but it’s definitely better than the ones made immediately after the war. The parts fit together nicely and the screws are all excellent, you can see how beautiful they are. Mine isn’t the best, it has seen better days as you can see from the photo. All of the engravings in the bezel are gone so I had to repaint them later as you shall see.
It’s optically identical to the Nikkor-H•C 5cm f/2 and every other lens that bears its name. It’s just another “Japanese Sonnar” as some people will call it. I have covered this lens family extensively in my site, I don’t want to repeat everything I’ve written about it. Please read my article on the Nikkor-H•C 5cm f/2 and you shall find out more about its optical properties.
As of writing, I have already covered several variants of this lens so this is just another addition to my big collection of Nikon rangefinder lenses. Below are my existing articles about is this lens and its variants.
- Nikkor-H•C 5cm f/2 (Nikon S-Mount)
- Nikkor-H•C 5cm f/2 (Collapsible)
- Nikkor-H•C 5cm f/2 (Leica Thread Mount)
- Nikkor-H•C 5cm f/2 (Blackbelt)
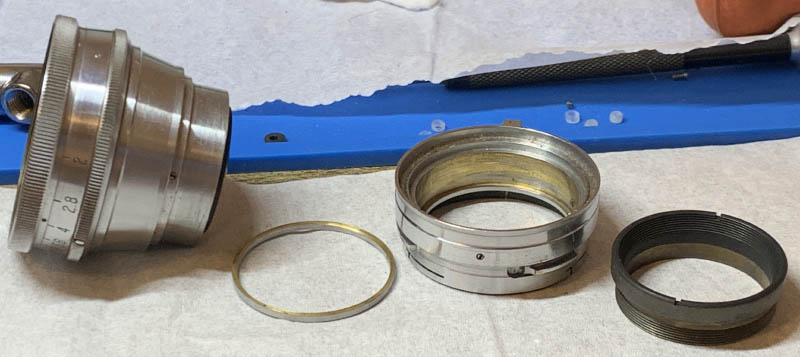
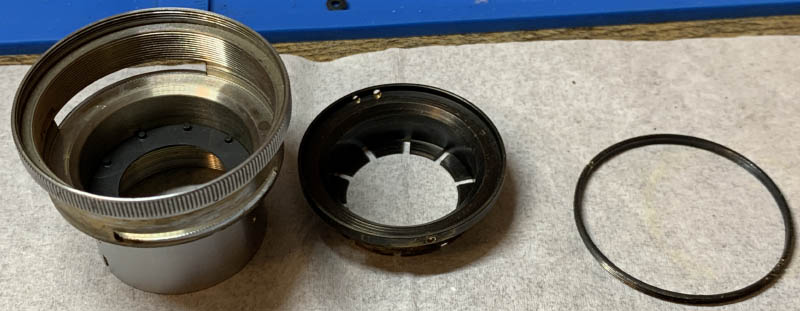
Like what I have mentioned in the opening paragraph, somebody decided to produce this batch into the rigid version instead of the collapsible ones in either Nikon S-mount or Leica mount. This means it shares the same front parts with the collapsible version but the mount has been modified so it won’t collapse. It’s done by inserting a metal collar between the front parts and the mount. The mount has no way to make it collapse anymore because it doesn’t have the special guides and locks. This means that you won’t be able to modify this into a collapsible version for the Nikon S-mount on its own, you’ll require the special parts that I have mentioned such as the guides and locks.

Since the front part is identical to that of the collapsible version, this one doesn’t have any click stops, too. It can be difficult to read the small numbers engraved to the aperture ring especially on a sunny day. The dimensions are comparable to that of the usual variant but this one is noticeably heavier. Seen here in the photo is the collar that serves as a filler so its narrow neck won’t stand out.

There’s nothing remarkable at the rear except that the mount is similar to the collapsible S-mount variant from what I can see but I couldn’t be sure about that.

The best partner for it is the Nikon M when you want things to look period-correct. The small but bright viewfinder has a clear patch that makes it easier to shoot with a 50mm lens (or anything).
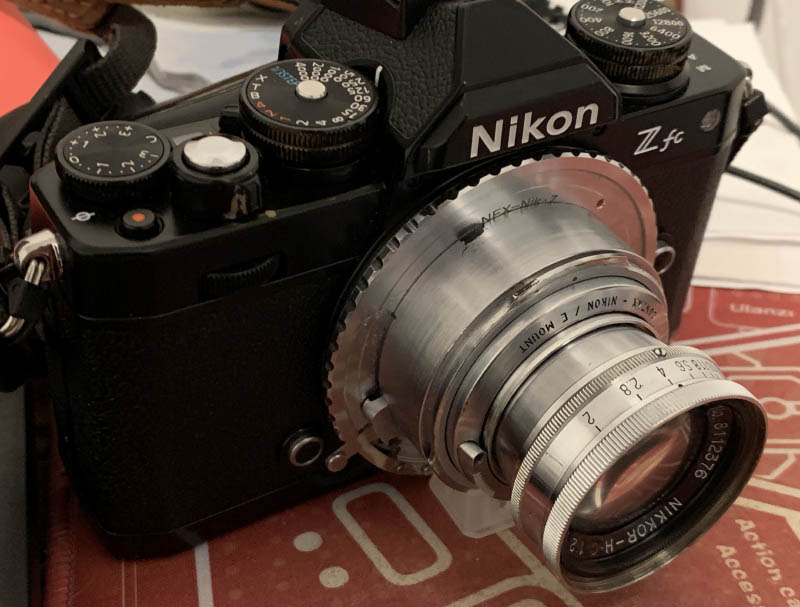
You will need a special adapter if you want to use it with a mirrorless camera. The adapter must have the special helicoid in order for you to focus since this lens doesn’t have it. A Nikon Z fc isn’t the best choice for it because it has a cropped sensor, the Nikon Zf will be better.
I won’t recommend this lens if all you want is something to use on a daily basis. It’s far too precious and it is so rare that it will take you years to find one that you can afford reasonably. This is a collector’s item so it’s only significant for someone who is serious with their hobby. The ergonomics aren’t the best either, it is going to frustrate you because it will make you work much slower. They don’t appear often, I have only ever seen these for sale less than 4 times in 12 years or so. Each time I see one they’re always priced at an exorbitant rate because every serious collector wants one of these. The prices range from a few thousand up to somewhere above $5,000.00 regardless of the condition. If you’ve found one, just take it so long as you can afford it even if it’s in bad shape. I did not pay much for this so I’ve hit the jackpot, I think I have only paid $800.00 for my precious lens if you consider that it came with a valuable camera. The lens gods have treated me very well that day and I consider this as good karma because I have helped many people in the community. I’ve always wanted one of these and the dream is now a reality!
Before We Begin:
If this is your first attempt at repairing a lens, I suggest that you see my previous posts regarding screws & drivers, grease and other things. Also read what I wrote about the tools that you’ll need.
I suggest that you read these primers before you begin:
- Essential tools
- Best practices 1
- Best practices 2
- Best practices 3
- Ai conversion
- Working with Helicoids
Reading these should lessen the chance of ruining your lens. Before opening up anything, always look for other people who have done so on the internet. Information is vague and scattered but you can still find some information if you search carefully.
For more advanced topics, you can read my fungus removal article. It has a lot of useful information, it will be beneficial for you to read this. I also recommend that you read the working with helicoids article so you will not get stuck because you couldn’t reassemble the helicoids back properly.
Disassembly:
Taking it apart is pretty straightforward if you have been following my work for some time. If you’ve seen my article on the collapsible Leica version then half of what’s covered here can be found there. What you’ll see here is how the lower barrel is constructed and how to take it apart. Like every precious vintage lens, I will advise against any of this servicing it on their own. It will require special skills and tools to work on. It is a very valuable lens so you should only send this to the most qualified repairman. If he has not work on anything like this before please show him this article to help him get this way around.
Unscrew the rear collar with a rubber tool then pull them out off. Be careful not to lose the shim, it’s the only thing that’s used to adjust the focus of the lens.

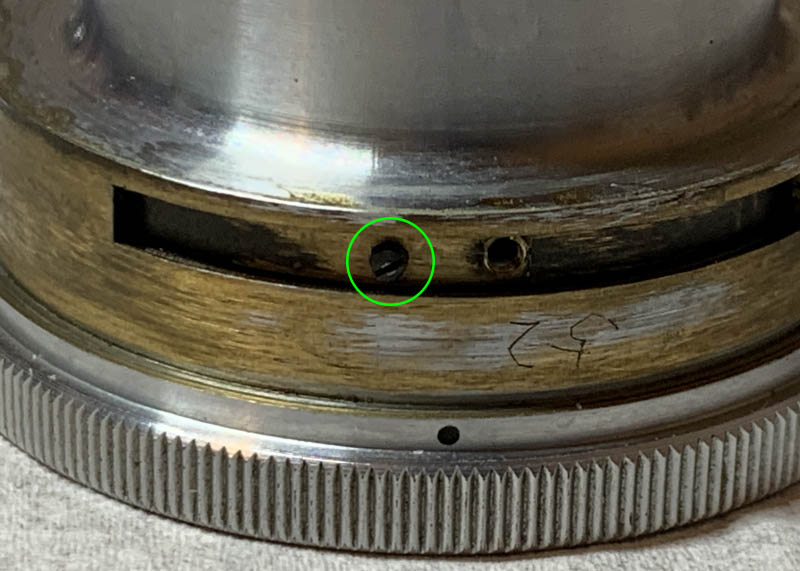
Carefully extract this and make sure that you don’t strip it. This long screw secures the inner ring.

Once the screw is gone you will be able to turn the inner ring until it comes off. You don’t need to do this unless you want to make sure that everything is clean.
Extract these screws so you can remove the collar and be careful not to lose any of them.

You can pull the collar off like you see in this picture. It’s a thick piece of brass which makes this heavier.
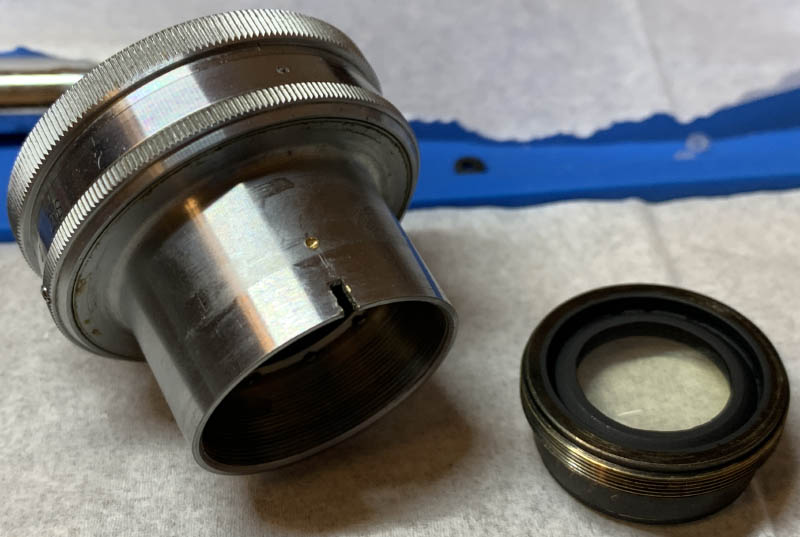
The rear optical block is unscrewed using a special tool, you can make one yourself by following this article that I wrote long ago.

The front optical block can be unscrewed from the housing just like this. It can be difficult sometimes so I drop some alcohol or paint thinner into the seam to soften up any seals or gunk. You can then dismantle it even further just like this. Don’t bother removing the glass from their housings as they are permanently fixed, you won’t be able to remove them without damaging anything. Since all surfaces of the groups are accessible for you to clean there’s no point in taking this apart even further.

Carefully extract the screws securing the aperture ring. They are special screws so don’t lose them. They couple the aperture ring to the iris mechanism inside of the objective’s housing.

The aperture ring can be further dismantled like this. It’s secured by two very small screws, they are as tiny as 1mm if I recall so you will never find any replacements for them. This part isn’t necessary you only do it if you really want to clean everything thoroughly. As you can see, it can collect a lot of germs underneath.
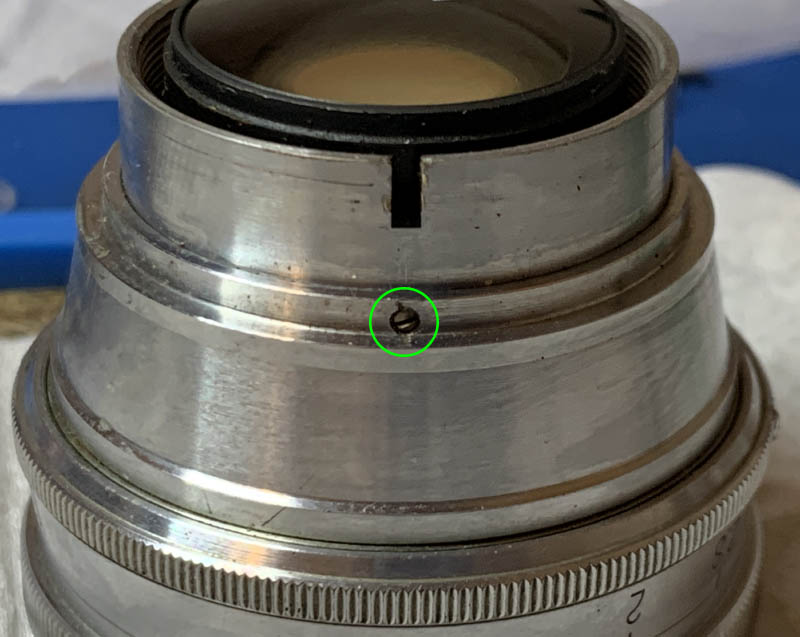
Extract this screw, it serves as a guide to prevent you from turning the aperture ring beyond f/16 which is the limit of the aperture range.
Carefully unscrew the retainer of the iris mechanism and pull the diaphragm cup off. This will allow you to pick the iris mechanism apart.

Study how the iris looks like before you go any further so you won’t forget how to put it back later.

Do not bother picking off each blade from the housing, just pop them off by tapping the rear and letting them land on a soft surface such as a towel.
Each leaf was cleaned very carefully with Q-tips soaked in solvents, I used Zippo fluid for this as alcohol is not the right solvent for the type of grease used. Be sure to handle these carefully, accidentally destroying one is out of the question.
If your lens has fungus, read my article on how to clean lens fungus, just make sure that you dilute it with distilled water so it’s not going to be too strong as it may damage the coating.
Never lubricate the iris mechanism, if you must, a light dusting of powdered graphite is enough, blow off any excess powder after actuating the iris several times to finish the job.
I cleaned all of the big parts with a strong toilet cleanser – the grainier, the better. I scrubbed everything using a brush then rinsed them all very well with hot water before making a final rinse with pure alcohol to remove any remaining residue.
Conclusion:
This one took me about 3 hours to overhaul, which is unusually long for me because this is a simple lens and I have overhauled so many similar lenses so I should be very familiar with it. The thing that took me a long time was put the aperture blades back. For some reason this one took longer than usual and I had to try several times just to get it right despite my experience and skill, perhaps I was too tired that night. It is also worth mentioning that repainting the engravings and waiting for the paint to dry also took time. The whole exercise is worth it because I have now overhauled one of my dream lenses. It’s not a total victory, I wasn’t able to get rid of the haze in the front element but I did get rid of most of the cloudiness that can be found in the inner surface of the 3rd group that’s facing the iris. It’s really stubborn, I don’t want to do the trick of using cigarette ash because I don’t want this lens to stink and I have quit smoking (for now). It is of utmost pleasure for me to be able to present to you my work on this rare l lens.

The engravings were repainted with enamel paint. Please read my article on how to repaint engravings to know how I do it. I tend to avoid this as much as possible but this lens has seen better days so all of the beautiful paint has corroded to nothing.

The finished project. It’s unfortunate that it has a very stubborn haze in the front element which I wasn’t able to remove with any means. Since the front element is permanently fixed to its housing I’m not able to remove it in order to polish the surface back to its clear state. The haze is bad enough to cause all of the pictures taken with it so they all appear slightly “milky” and with lowered contrast.
We’ve done it again! Our impressive collection of repair articles can now boast of another masterpiece. It is the only place on the internet that you can find about the intimate details of this mythical Nikkor. If you like this article or support my work, please help me by leaving me a tip. It’s not much compared to what a beer server demands these days just for bringing beer to your table, even if she’s hot. I’m not hot nor can I serve you alcohol but I’m bringing you something of more value. Your help enables me to keep this up for as long as possible. I’m not earning much from views, I probably only get $0.30 each day. I do not sell anything in my site nor do I link anything to vendors so I am just relying on your charity. Thanks to every supporter I have, this site has been going on for more than 10 years now! Please continue to support us. I am waiting for you in the next article, Ric.
Help Support this Blog:
Maintaining this site requires resources and a lot of time. If you think that it has helped you or you want to show your support by helping with the site’s upkeep, you can make a small donation to my paypal.com at richardHaw888@gmail.com. Money isn’t my prime motivation for this blog, I believe I have enough to run this myself but you can help me make this site grow.
Leave me some tip?
Thank you very much for your continued support!
$2.00
Helping support this site will ensure that it will be kept going as long as I have the time and energy for this. I’d appreciate it if you just leave out your name or details like your country’s name or other info so that the donations will totally be anonymous. This is a labor of love and I intend to keep it that way for as long as I can. Ric.
