
Hello, everybody! Do you remember Ziggy? He is a popular cartoon character from several decades ago, with a toy line that many people collect. He came in various costumes, making Ziggy fans collect them all. It’s a harmless hobby with many collectors and you will be surprised at how much these toys can go for. I used to collect them, too. Remembering Ziggy takes me back to my younger years where things are much simpler and happiness came in smaller packages. Today, I’ll show you something that’s just as collectible, I can say that it’s exciting to complete the collection, but unlike Ziggy toys, it’s a hobby for the truly devout followers of the way of Nikkor.
Introduction:
The Nikkor-H•C 5cm f/2 is one of Nikon’s most prolific designs because it came with many variations and it was produced for a long time, from immediately after the war to about 1962. You can say that this lens is just as influential as the original Nikon camera is when it comes to its significance for the company and the Japanese optics industry, too. While many of you are familiar with the Nikkor-H•C 5cm f/2 in S-mount fit, this one is the first version with the rigid barrel for the Leica Thread-Mount. The next iteration of this is the Nikkor-H•C 5cm f/2 with a black band, affectionally called the “Blackbelt Nikkor” by collectors. Both of them were preceded by the collapsible Nikkor-H•C 5cm f/2. All these variations makes this lens attractive for collectors and hoarders.

This is the first rigid-body Nikkor-H•C 5cm f/2 for the Leica-mount if I am not mistaken, every design that came before are all collapsible such as the rare Nikkor-H•C 5cm f/2 (collapsible). This is the earliest sample that I have of the rigid-type, the later version is the Nikkor-H•C 5cm f/2 (blackbelt) with a black ring. These look similar, but you will find out later that they have differences internally.
Optically, this lens is identical to the Nikkor-H•C 5cm f/2 (blackbelt) and the Nikkor-H•C 5cm f/2. I do not want to repeat whatever I’ve written about the optics of this lens so please read my previous articles that I have mentioned above. I am not aware of Nikon changing the optics ever so slightly so let’s assume that nothing changed, it’s the same magical lens in a slightly different barrel. Despite its barrel being similar to the Nikkor-H•C 5cm f/2 (blackbelt) from the outside, internally, there are minor differences that I thought will be of interest to the hardcore Nikkor fanatic so this article will concentrate on the repair section.

It’s a very handsome lens once it has been serviced. The design is a real classic, a testament to the quality of Nikkors from the postwar years. You will not find any modern lenses that has the same build quality.
And just like the Nikkor-H•C 5cm f/2 (blackbelt), this lens is also able to focus really close, not quite at the macro-level but it’s still closer than usual. When this is done, the lens decouples itself from the camera’s rangefinder, you will either require a special visor for this or measure from the film plane to your subject.
I will not repeat what I have done in my previous articles about this lens family, I have covered it enough so just read my other Nikkor-H•C 5cm f/2 articles such as the one for the Nikkor-H•C 5cm f/2 (blackbelt). I will focus instead on the shooting experience.

Focusing at the extended minimum distance can be challenging without a scope/magnifier, you will have to guess how close you are by measuring the distance between your subject and the film’s plane. This is not an easy task, you will have to try several times if you’re shooting something important.

It has that beautiful and refined rendering that’s typical of a Sonnar. The focus transition is so smooth, it’s the best thing that I love about this lens.

Of course, the background blur is smooth, it’s what everyone expected from a Sonnar. It’s also sharp and I love how the contrast doesn’t look unnatural, it’s the complete package.

Overblown highlights will be surrounded by a subtle glow, adding another interesting layer to your photo and helps give it a nostalgic look.

It’s also nice for portraiture, I have heard a saying once that went “Tessar for men, Sonnar for women“, it’s just describing the characteristics of the photos taken with both legendary optical formulas.

Stopping the iris down a bit will tone-down the said “glow”, this is important if you don’t want your photo to look “too nostalgic”.

There is a sense of clarity to the photos it takes, I see this as a sign of a lens’ quality, the glass used in this lens are definitely world-class.

With the subtlety that this lens displays, it’s able to render a wide range of tones in your photos. This is a nice lens if you want a delicate rendering.


(Click to enlarge)
I really enjoyed shooting with this lens a lot, I am so familiar with it that I already knew how a picture will look like at any given situation. This is truly a classic Nikkor in every sense.
I believe that every Nikkor enthusiast should own a copy of this lens, in whichever mount it comes. This is a significant lens in Japanese photographic history and should be valued as such. Can I recommend this? Yes! They are getting cheaper these days, you can purchase one for less than $200 in recent years and in good-enough condition, too. Many Leica shooters enjoy shooting these, I do not see any reason why you won’t, too. For many Leica owners who do not have enough money left after buying their cameras, this is the next-best-thing to a real Leica. It’s not made in Germany but it still has enough pedigree and prestige. The secret is, it even outperforms many early Leicas. When you are looking for one, be sure that the iris is clean and dry. Check the glass very carefully, there should not be a sign of balsam separation, that is the biggest weakness of early Sonnars and its derivatives. Turn the focusing ring, it should not be seized at all, a little stiffness is acceptable, you will want to service it anyway. Lastly, many lenses of this age come with small cleaning marks on the front element, that’s normal. You may even find bubbles in the glass, too. It’s normal and it should not affect your images in any obvious way. Happy hunting.
Before We Begin:
If this is your first attempt at repairing a lens then I suggest that you see my previous posts regarding screws & drivers, grease and other things. Also read what I wrote about the tools that you’ll need to fix your Nikkors.
I suggest that you read these primers before you begin (for beginners):
- Essential tools
- Best practices 1
- Best practices 2
- Best practices 3
- Ai conversion
- Working with Helicoids
Reading these should lessen the chance of ruining your lens if you are a novice. Before opening up anything, always look for other people who have done so in YouTube or the internet. Information is scarce, vague and scattered (that is why I started this) but you can still find some information if you search carefully.
I highly recommend that you read my working with helicoids post because this is very important and getting it wrong can ruin your day. If I can force you to read this, I would. It is that important!
For more advanced topics, you can read my fungus removal post as a start. It has a lot of useful information, it will be beneficial for you to read this.
Disassembly (Rear Barrel):
The construction of this lens isn’t complicated at all but it has many small and delicate parts that you will need to be careful with. Using the right tools is important as well as knowing when to give up if what you are trying to remove won’t budge. Do not attempt repairing this yourself if you are new to camera repair, send it to a real repairman if you need help, if that person is not familiar with this lens, show my article to help make things a lot easier. It’s better to spend a bit more and get the right results.
To many people, this is the starting point of repairing this lens. If you need to clean the helicoids then this is a must. If all you need to do is to clean the front glass then you can skip this section. You can also read my article on the Nikkor-H•C 5cm f/2, they share many similarities.

Unscrew the rear baffle with a lens spanner, this thing is what’s keeping the whole lens together.

Removing the baffles will allow you to separate the focusing unit from the rest of the lens.

Focus to infinity and measure the height of the focusing unit, you should be able to recreate this later. If you failed to do so or the difference is too big then you have reassembled the helicoids incorrectly.
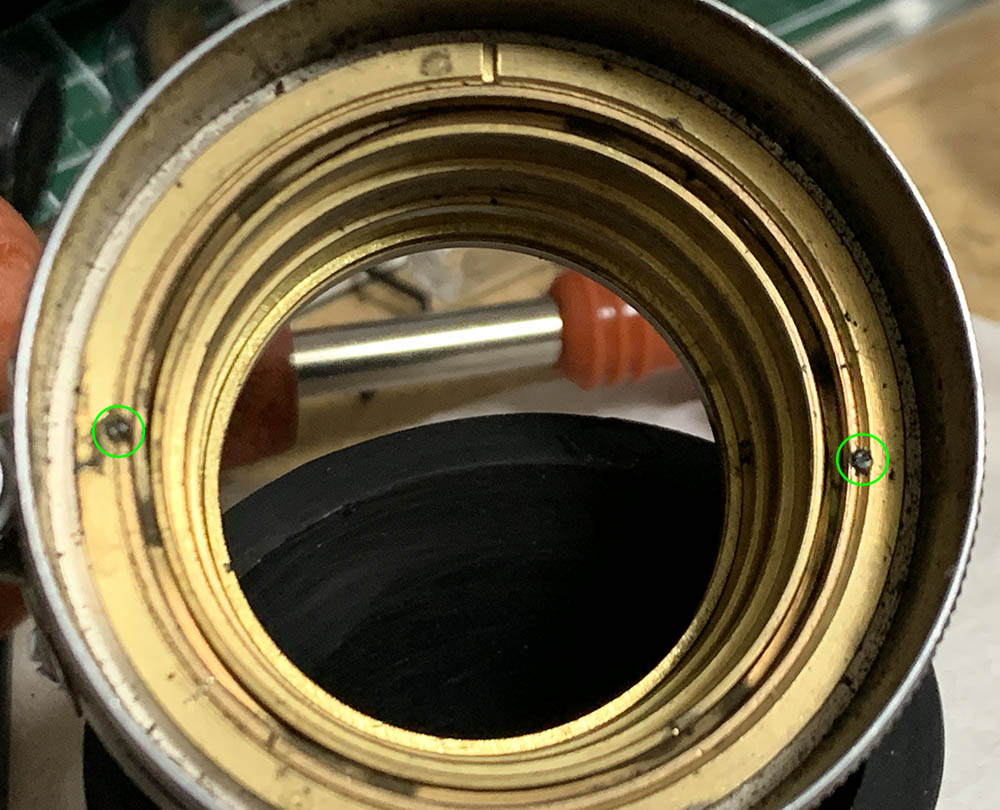
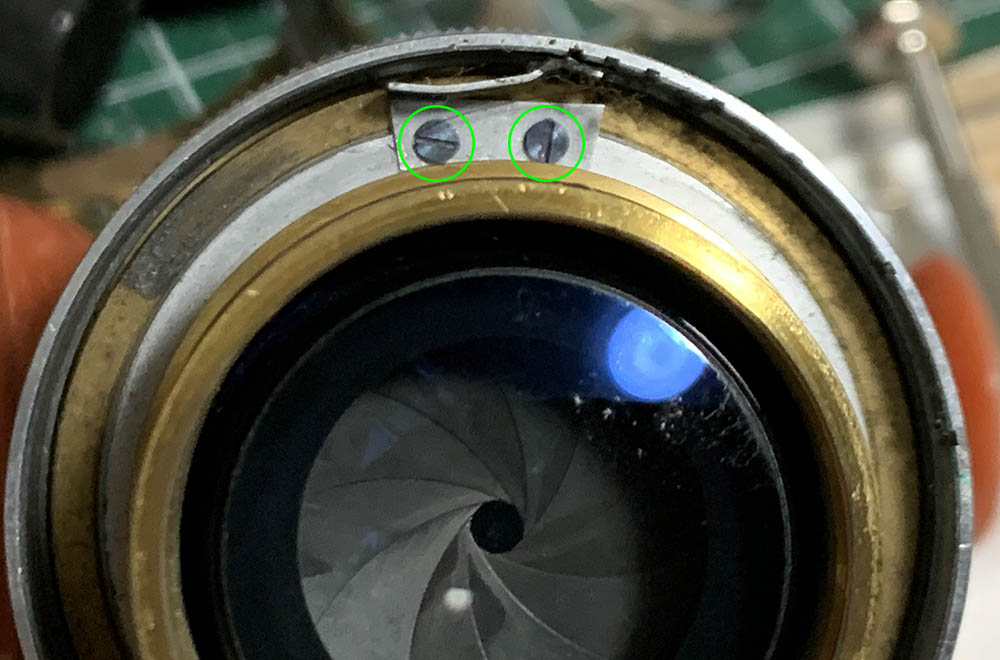
These very delicate screws should be extracted, they should be heated well in order to make sure that the adhesives are undone, but not too hot as to change the properties of the metal. Also make sure to make a small mark so you will know its alignment in relation to the central helicoid.
These are the smallest screws that you will find on any Nikon product, they are merely 1mm in diameter, I only ever see similar ones on Zeiss lenses. These are very delicate so be careful.

Once the screws are gone you will be able to unscrew the brass ring securing the focusing ring. While you remove this, make sure that the helicoids are at infinity so you can take reliable references.
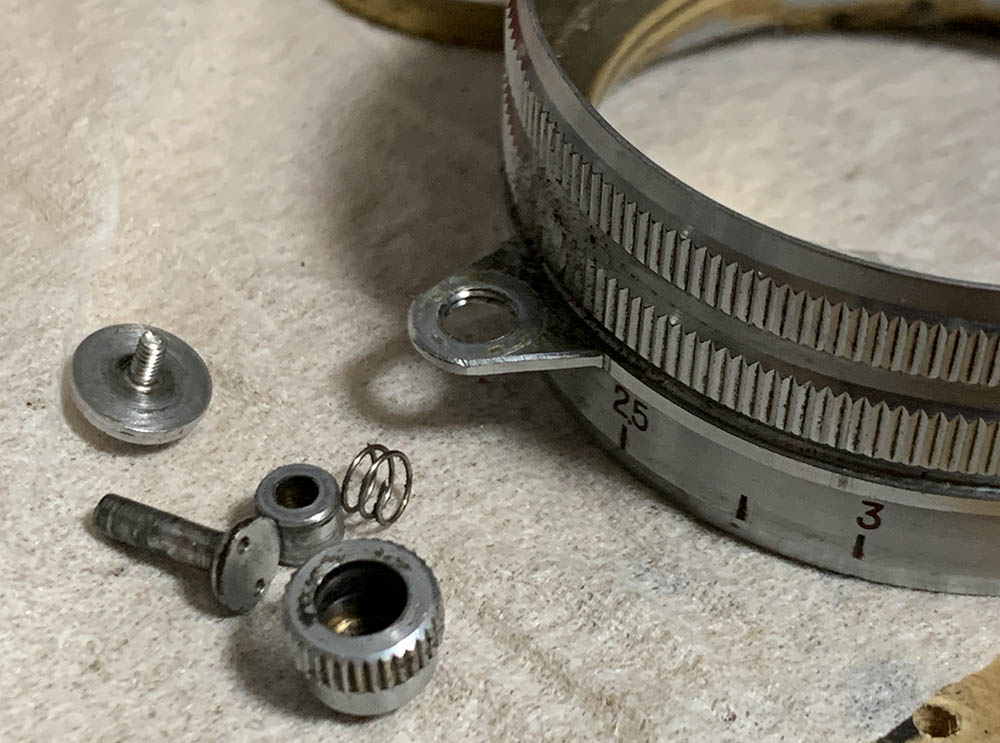
This is optional, you can dismantle the lock by turning the bottom while holding the head in-place. Clean everything very wee since these tend to get filthy. Don’t lose anything here.

Carefully extract these so you can further dismantle the lower barrel.
Carefully unscrew this with a lens spanner.

The helicoids can now be thoroughly cleaned and serviced.

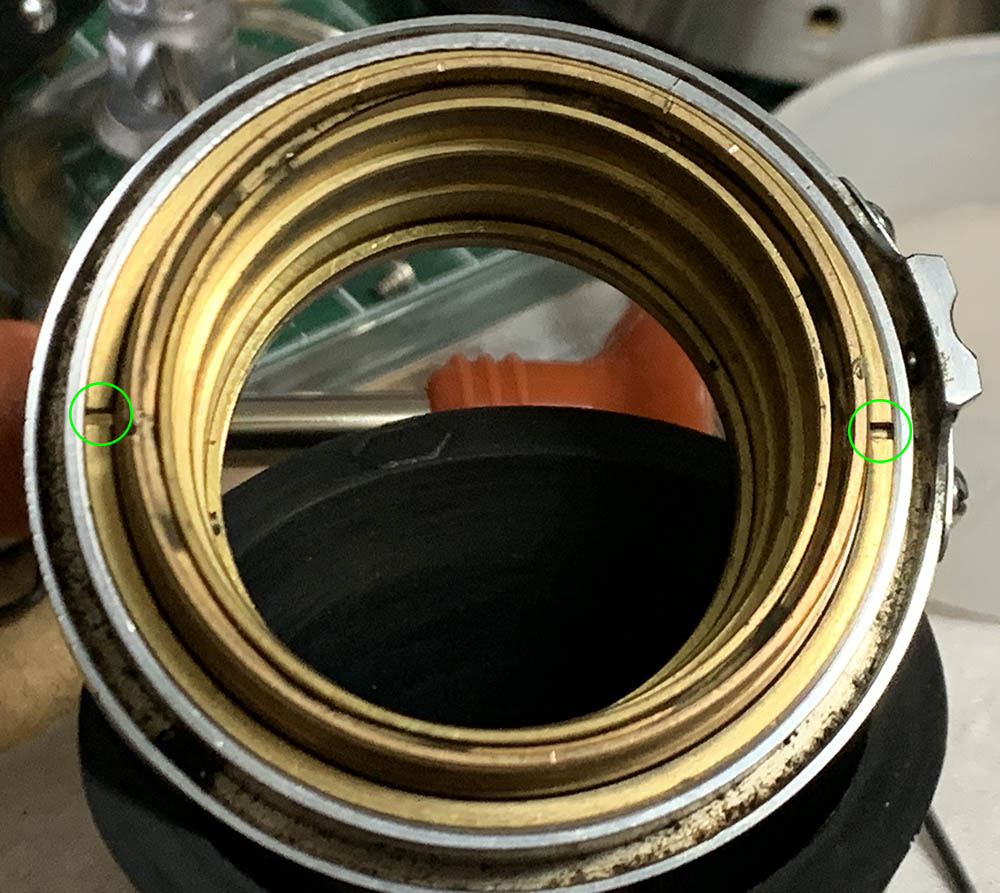
Extract the 2 screws securing the spring for the clicker, be careful not to lose the tiny bearing.

You can extract this screw if you want, that will help you with separating the helicoids and cleaning them.

Turn the helicoids until they part but don’t forget to mark where they separated, failure to do this will end in suffering. Read my article on how to work with helicoids to prevent that misfortune from happening to you. Many people do not listen so they end up messaging me for tips, good luck with that, I am busy with so many things.
I cleaned all of the big parts with a strong toilet cleanser – the grainier, the better. I scrubbed everything using a brush then rinsed them all very well with hot water before making a final rinse with pure alcohol to remove any remaining residue. Special care must be used when cleaning the helicoids, the threads are fine in some places and they can be caked with gunk, using a wooden toothpick helps here for stubborn deposits. Dry them well before you continue. When lubricating, be sure not to apply too much, all you will need is a thin film of fresh grease. Mate the helicoids then exercise them by turning several times, this will ensure that the grease is even. Wipe away any excess to make sure that you did a good, clean job. If you applied too much grease it will settle in your iris mechanism eventually, necessitating the need to open it again jut to give everything another overhaul.
Disassembly (Front Barrel):
I will include the part where I dismantle the iris mechanism in this section because it belongs to the front barrel assembly anyway. Many people will just skip the first part where I dismantled the rear barrel and go directly to the optics, that’s all fine if all you need to do is to clean the optics.
I can say that the assembly of the front barrel and iris mechanism is quite simple, very typical of what you will see with many lenses from this era, they are mostly clones of German designs. Servicing this part will require the use of a few special tools, if you don’t have them, don’t proceed.
Extract these to remove the spring.

To remove the rear optics block you will need a special tool to reach the deep within the barrel to access the slots of the optics’ housing.
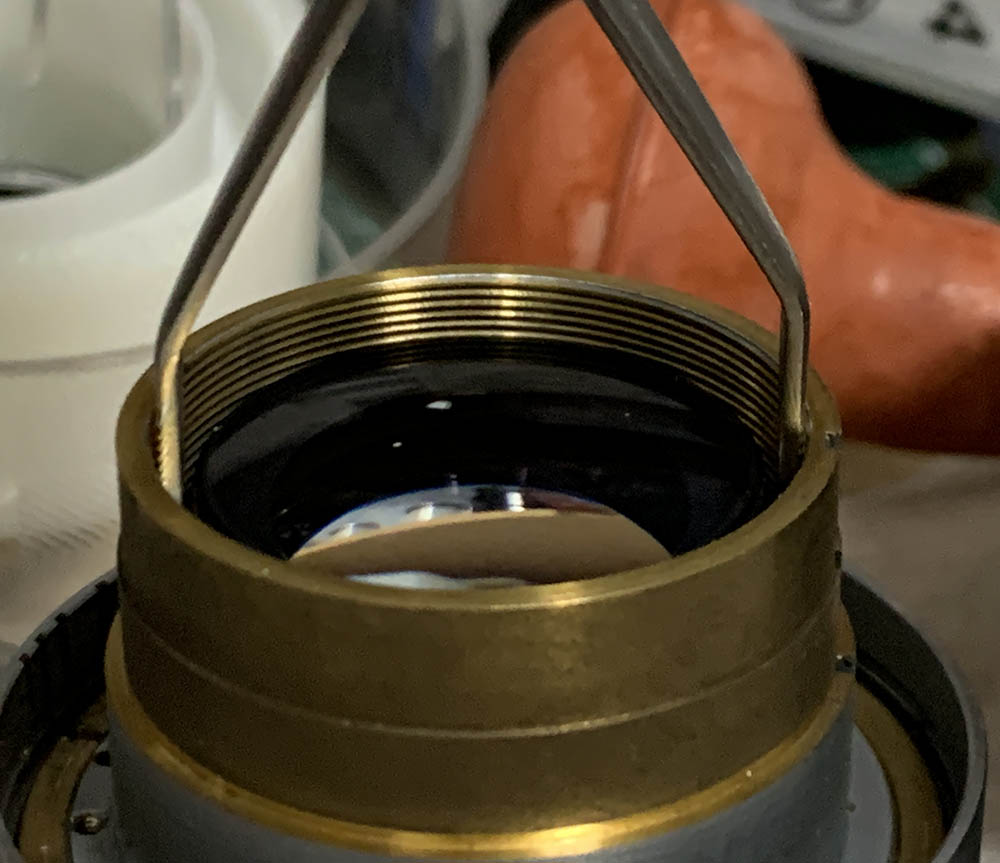
I have a special tool for this purpose, make one yourself.

Carefully remove it with a lens sucker. It’s heavy, so be sure not to drop it.

The front optics block and its housing can be removed using a rubber cup. If it’s stuck, just apply a drop of alcohol or acetone to the threads, sit back and let the solvents do their job. Do not apply too much, all you need is a drop every 30 minutes or so.

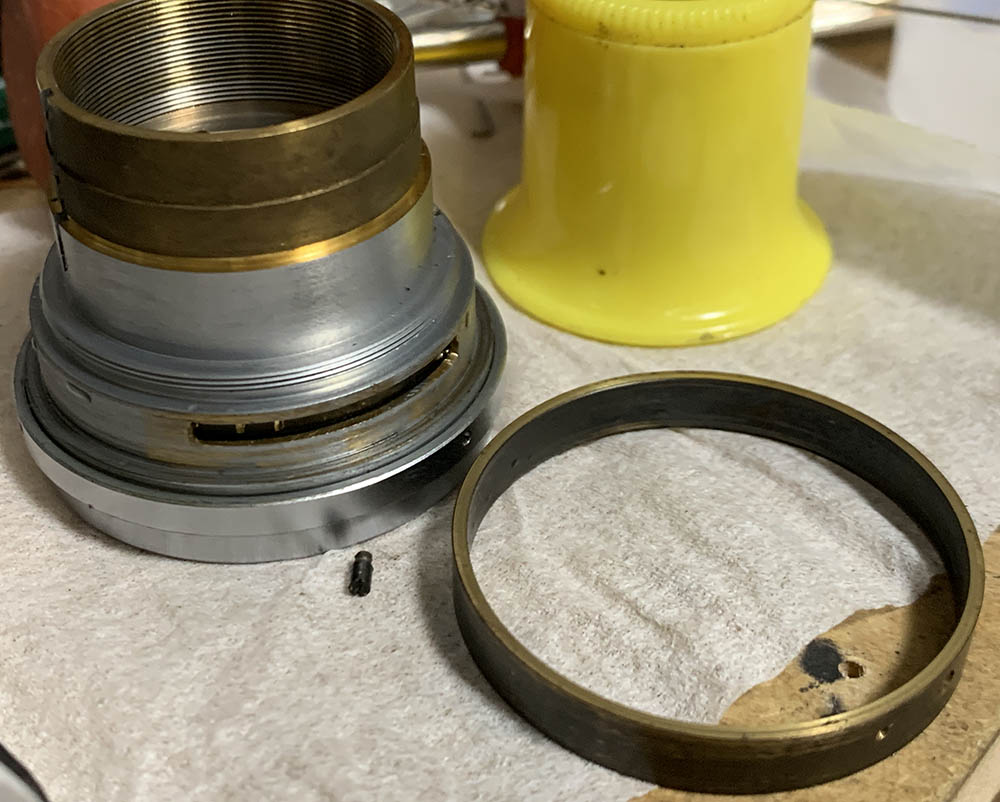
Loosen these just enough so you can remove aperture ring, but not too loose that they’re coming off.

Slide the aperture ring off from the rest of the barrel.

The retainer for the iris mechanism is secured by a tiny set screw, loosen it then turn the ring.

Once the retainer is gone you can proceed to the next step.

Locate and extract this screw, it serves as a pin to couple the collar to the iris mechanism,
Once the screw is off you can safely remove the collar.

The iris mechanism is secured by a retainer, carefully unscrew it and pick the diaphragm cup off with your fingers so you won’t damage the iris.

The iris is soaked in oil, carefully remove them by poking at the pins on the other side, that’s enough for you to safely remove the blades one-by-one.

Carefully loosen the screws of the aperture scale and remove it from the rest of the front barrel.
Like what we did with the rear barrel, clean everything really well. You don’t need to lubricate the iris at all because it’s designed to operate without oil. If you must, a small amount of powdered graphite is enough to make it operate a bit smoother, just don’t forget to blow any excess powder off. The only part that will need a bit of lubrication is the aperture selector ring, be sure to only apply the bare minimum because it’s too close to the iris mechanism. Even a very thin film is more than enough, you will not notice it but that’s all that’s needed for the part to turn smoothly.
If your lens has fungus, read my article on how to clean lens fungus, just make sure that you dilute it with distilled water so it’s not going to be too strong as it may damage the coating.
Conclusion:
I’ve always thought I wouldn’t learn anything new from dismantling this lens, but I was wrong. Compared to the later Nikkor-H•C 5cm f/2 (blackbelt) version, this one has a few details that suggested that it’s of an older design. How things were put together and the placement of the screws told a story, at least to me. I found it interesting to see that Nikon was already thinking of optimizing things even during the very early days of its history. I suppose this bit of information is valuable to Nikon maniacs like me.

See how shiny and clean it is now? The engravings have been restored, too. The feeling of achievement is enough to justify all the trouble of cleaning and adjusting the lens. Before I forget it, you should calibrate the focus of your lens if you’ve dismantled the rear barrel completely like I did. All you need to do is turn the focusing ring at infinity and test the focus with a mirrorless camera. Separate the front barrel from the rear barrel again the make small adjustments until you’re satisfied. To know more about how I do that, see my article on calibrating a lens’ focus, that should show you how it’s done in DIY setting.

It’s now time to celebrate! Here’s a good meal for a job-well-done, it feels wonderful to see something as valuable as this lens being used to take photos. Collectors will just buy them then put them in a drawer, I think that is a sad fate for any Nikkor. If you love your equipment as much as I do, please bring them out and use them, that’s the only way to enjoy them.
Thanks for following my work, if you liked this article please share this with your friends so it will get more views. This site earns around $0.40 a day, we are totally reliant on views. You can also support this site, it helps me offset the cost of maintenance and hosting. You’re also helping me purchase, process and scan film. This site promotes the use of film so we are all in this together. See you again in the next article, Ric.
Help Support this Blog:
Maintaining this requires resources and a lot of time. If you think that this has helped you or you want to show your support by helping with the site’s upkeep, you can make a small donation to my paypal.com at richardHaw888@gmail.com. Money isn’t my prime motivation for this blog, I believe I have enough to run this alone but you can help me make this site grow.
Buy me a roll of film or a burger?
Thank you very much for your continued support!
$2.00
Helping support this site will ensure that this will be kept going as long as I have the time and energy for this. I would appreciate it if you just leave out your name or details like your country’s name or other information so that the donations will totally be anonymous. This is a labor of love and I intend to keep it that way for as long as I can. Ric.

2 Comments (+add yours?)