
Hello, everybody! Anybody rocked a mullet several decades ago? I once had a mullet and even had it quite recently. It’s considered ugly today, and you’ll get images of MacGyver in your mind whenever you see somebody who has it. That was the 1980s for you. But mind you, not all things from that time is ugly. There are things that were made back then that made plenty of sense, some of the most beautiful things were made during that time, too. Today, I will show you something that stuck-out amongst the rest. Compared to what the other manufacturers were making, this is pretty in a sea of ugliness.
Introduction:
The AF-Nikkor 80mm f/2.8 Ai-S is an odd lens today. Many people do not see or even knew about it but it has attained cult status amongst people who do and that all has to do with a special characteristic of this lens which you will see later in this article. This was made to compliment the Nikon F3AF, that’s the first professional autofocus Nikon that entered production. Without any lenses that could autofocus that camera would have been useless. Back then the servos and motors needed for this were relatively huge and fitting them to a small lens was challenging but Nikon did it and in an elegant way, too.

It’s a familiar-looking shape but back then many AF lenses have unusual or even out-of-place form like what Pentax and Canon had for example. Those were ugly, Nikon thankfully had better sense and taste! The engineers did a lot of work just so that the barrel is cylindrical as it should be. That made it easier to grip and it doesn’t feel odd in your hands. This may sound trivial, I don’t think anybody realized how difficult it was until they consider that it was the early 1980s and miniaturization wasn’t as good as it is today. Do you remember how ugly the old handy-cams were? That’s just the result of what technology could offer us back then.
The optical formula is quite simple, 6-elements-in-4-groups. What’s unique about the design is that the rear moves in-and-out instead of the while block which was quite common back then. I think this was done to help the motor so it won’t get worn-down, all it has to do is to turn the rear block instead of all that glass. This is something that we’ll see more often these days in many AF-Nikkors, you can even say that this design pioneered approach. Since the rear optical block does the focusing it has helicoids within it and nothing is between that and the glass so gas from the grease settles to the elements. It’s not unusual to find these with foggy rear elements. That can be a problem, I don’t think it’s easy to access the rear elements so be careful not to but one that’s hazy.

This is a very nice lens to hold, it has the right weight and there’s a button at the side for AF-lock. It’s situated comfortably so your fingers could reach it. It’s a bit difficult for left-handers, though. There’s also a big A/M switch, this enables you to switch-between manual and autofocus modes. It can be easy to switch it accidentally if you’re not careful. The focusing-ring is damped, I think it has to be a bit more lighter but it may suit some people’s tastes. You may not need to use this much so long as there’s enough light. In the dark, I would suggest that you focus manually since this lens has will hunt a lot. It’s something that you should get used to, it’s an AF lens from the early 1980s.
Since this is a lens with a modest maximum aperture the front element isn’t as big as what you would find in most 85mm portrait lenses. You may want to use a shade with it to shield the front from stray-light and fingerprints. It isn’t really recessed and it will benefit a lot from a bit of protection. You can use any hood that has a 52mm thread and fits any 85mm lens.
It’s important to learn how your lens performs so you’ll know its strengths and weaknesses. This will help you make efficient choices when it comes to which lens to bring with you on an assignment. I took these photos using a Nikon Z6. These were shot from f/2.8, f/4, f/5.6 and f/8 from left-to-right. You will notice the most changes in terms of image quality and rendering with these apertures. I assume that these are the most common apertures that it will be used with.


(Click to enlarge)
Vignetting is quite pronounced wide-open but cleans-up nicely as you get to f/4. The distortion profile is quite moderate, it’s not bad at all but you’ll see it when you shoot photos like this which is something that nobody does.
It’s fairly-resistant to ghosts and flares which is quite nice. I’m not saying it’s immune to this but it performs better that what I had expected here.


(Click to enlarge)
The character of the bokeh is quite smooth but not as good as other lenses of this class which are usually faster than this. Its higher-than-usual contrast is the reason why it’s not as smooth as the other 85mm portrait lenses. Despite this, it’s still manages to render smooth out-of-focus details.

It has the tendency to give you that “soap-bubble-look”, some people like the effect but I generally don’t. The character of the bokeh isn’t pleasing here, it looks quite unrefined in some parts, akin to cheaper lenses. Knowing how it handles will help you avoid this look so you could get the best out of it.
This is a better example. It’s not super-smooth but it’s tolerable.
The quality of the bokeh in this photo reminds me of lenses that were over-corrected for sharpness. The look is “clamped”, lacking smooth gradations. I don’t think this is ugly at all but it certainly doesn’t look premium to me.
This isn’t so bad at all but it still retains that “cheap” feel.
Foliage is usually a difficult subject to render for out-of-focus details. I use it to test if a lens has good or poor bokeh quality. It doesn’t look ugly here but I expected it to perform better specially at this kind of scene.

The foreground bokeh characteristics isn’t that great either, it’s a bit rough. I don’t like how the background looks here, too. The strength of this lens is its ability to render sharp details at the center or near it but that comes at the expense of bokeh quality.


(Click to enlarge)
Chromatic aberration can be seen wide-open at areas of high-contrast or at overblown details. It happens more when you focus it further compared to closer distances where it’s quite decent. The first and last sets were cropped so you can see the effect better. Stop the iris down to f/4 and it’s gone but it’s still not perfect as you can still find some artifacts. It stays even if you stop it down to f/8 which is a shame but you’ll only see traces of it at this point. The good thing is it’s not bad at all at closer distances. This hints that the design was probably optimized for portraiture. I may be wrong, it may just be this sample that I have, I don’t have another lens to reference this with.


(Click to enlarge)
This is very sharp even wide-open. Contrast is quite high and the resolution is nice, too. Stop it down to f/4 and the center looks a bit better. The corners don’t look quite as good as the center in my opinion. This changes when you stop it beyond f/5.6 where it finally looks acceptable. The center reaches its peak performance at around f/5.6, the resolution at the center looks great, it starts to pick-up at f/4 but stopping it down to f/5.6 really pushes it by a bit. I will shoot this lens at this aperture if I need pin-sharp center performance. It performs better at closer distances like I mentioned previously.
Here are some shots that were taken under “real-world” scenarios. I’ll share to you my experiences with it and make some commentaries about using it with a digital camera. All of the photos here were shot wide-open.

This is surprisingly good wide-open. It’s able to resolve the feathers and the details of the beak. The contrast and saturation looks great, too.

While the center looks great in terms of sharpness it doesn’t look as good at the corners or anywhere near them. It’s adequate but it’s just not as sharp. I don’t like how the character of the bokeh looks here, this could be better.

The corners look awful wide-open. While the character of the bokeh isn’t as great as I hoped for it doesn’t look terrible at all and is quite acceptable. It’s mediocre at best in my opinion.

Despite being corrected for higher contrast it does render delicate details at times. It still manages to maintain a nice balance which looks pleasing.
The frame compression that you get from an 80mm ens is nice, it’s flat and you could shoot pictures like this with a flatter perspective and still get a bit of foreshortening. Subject isolation is nice, too.

It renders photos with that “vintage-look”, some people like this but others avoid this. I personally like it since it makes my photos look more natural. I am not pushing for my preferences, this is something rather personal.

You may want a faster lens for shooting at low-light conditions. Thankfully, modern digital cameras perform quite well at higher-ISO values so it is not much of a problem these days compared to the days when I was still using a Nikon D700.


(Click to enlarge)
Here are more photos, click on the photos and observe them. It’s a nice lens but it’s nothing spectacular. Using this with a digital camera means that it’s manual-only but that shouldn’t prevent you from enjoying it. You’re better-off using an AF-Nikkor 85mm f/1.8D instead if you need autofocus. If you’re a manual lens lover like me any of the 85mm classics are better than this. It is something that is best left for people who love unusual lenses to enjoy.
Let’s now see some photos that were shot with film. Film has a unique look, it’s difficult to simulate with a digital camera because of grain. Film grain is also helpful at times for covering flaws like bokeh artifacts. It was designed to be shot with film so it’s only fair that we judge this lens using its intended medium. I took these with a Nikon F4 loaded with Kodak Gold 200.
This won’t focus to near-macro distances but it’s sufficient to take photos of small things like these trinkets. It’s really-sharp at closer distances.

The rendering looks natural as if your photos were shot with a vintage lens. The colors look neutral with a slight-bias towards the cooler-side.

The character of the bokeh is smooth but not better than many lenses from this class. In fact, it fairs poorly compared to a Nikkor 85mm f/2 Ai-S. This is not going to hold its own against the exquisite Nikkor 85mm f/1.4 Ai-S.

Sharpness is this lens’ greatest strength at the cost of the smoothness of the bokeh. It’s not bad but it looks over-corrected for my taste.

The subject-isolation properties of this lens is very good. It’s not a fast lens if you ask me but it’s adequate for low-light photography so long as you use it with a film that’s fast-enough.

The compression it offers is quite good, giving you a flat view. Resolution is quite nice as you can see here. Each lock of hair looks great and the contrast looks good, too. Your photos look saturated, almost cartoon-like at times. It’s something that people either like or hate.

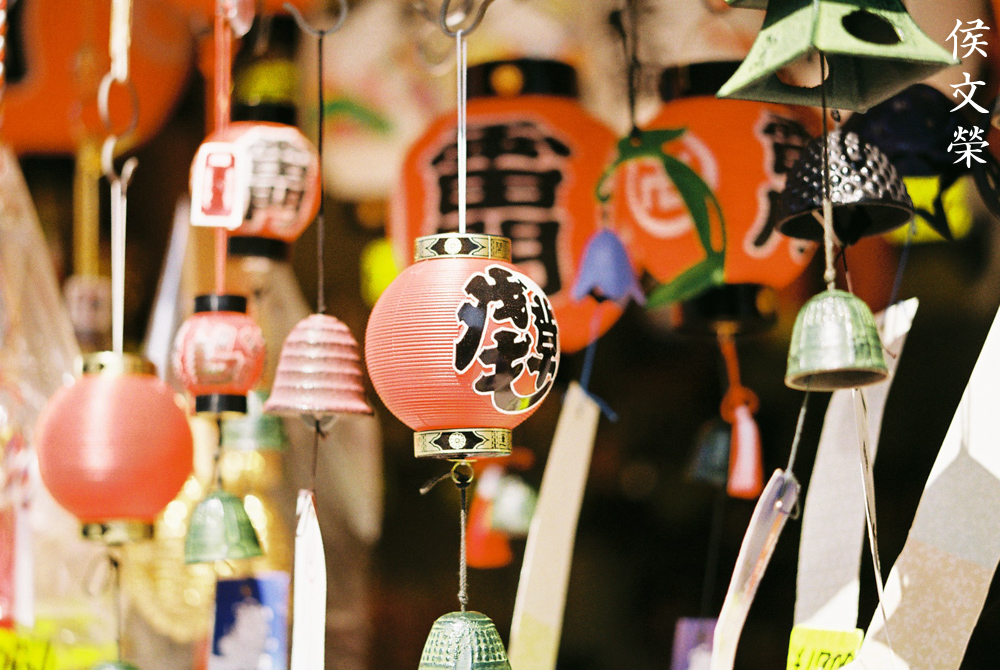
You couldn’t take photos like this with a wider lens. This is how you utilize a focal length’s ability to compress your composition. A wider lens will make the lantern smaller, a shot like this requires a longer lens, ideally something like an 85mm lens.

Of course, portraiture is one of this lens’ greatest use. You’ll be able to shoot nice portraits with this but in my opinion, its contrast is just too-high for my taste. I would prefer something that has a more “milder” rendering to it. It’s not a bad lens for portraiture at all, just not something that I’m comfortable with.


(Click to enlarge)
Here are more photos that I took that afternoon. This is a very nice lens, it’s very addicting to use and you’ll have a great time using this lens for taking photos of just about anything. Most of the photos were shot wide-open but I took some of them at f/5.6 and one of them with f/8. This is an amazing lens with film and I highly recommend shooting film with it.
I highly recommend this to anybody shooting with a Nikon F3AF or a Nikon F4. It’s a lot of fun to use, the AF-lock button is very useful when you focus-recompose your frame. Its decent speed means that it’s still a viable lens for use today. Using this with other Nikons is pointless since you could only use it as a manual-focus lens, you could’ve just use the Nikon 85mm f/2 Ai-S or a Nikon 85mm f/2 Ai instead and both lenses are faster, too. You won’t be able to use it to its potential if you couldn’t autofocus with it. I’m not saying that you couldn’t enjoy this as a manual-only lens but it’s pointless. This is great when shooting film as its high-than-usual contrast enables you to take nice photos of just about anything. These aren’t expensive at all these days and a nice one could cost you less than $100 depending on condition. A good one should be able to focus smoothly despite the noise and slight grinding. It has to be free from oil on the inner and rear elements since there’s a helicoid at the rear optical block. Just remember these and you should be able to find a good sample.
Before We Begin:
If this is your first attempt at repairing a lens then I suggest that you check my previous posts regarding screws & drivers, grease and other things. Also read what I wrote about the tools that you’ll need to fix your Nikkors.
I suggest that you read these primers before you begin (for beginners):
Reading these primers should lessen the chance of ruining your lens if you are a novice. Before opening up any lens, always look for other people who have done so in Youtube or the internet. Information is scarce, vague and scattered (that is why I started this) but you can still find some information if you search carefully.
I highly recommend that you read my working with helicoids post because this is very important and getting it wrong can ruin your day. If I can force you to read this, I would. It is that important!
For more advanced topics, you can read my fungus removal post as a start. This post has a lot of useful information and it will be beneficial for you to read this.
Disassembly:
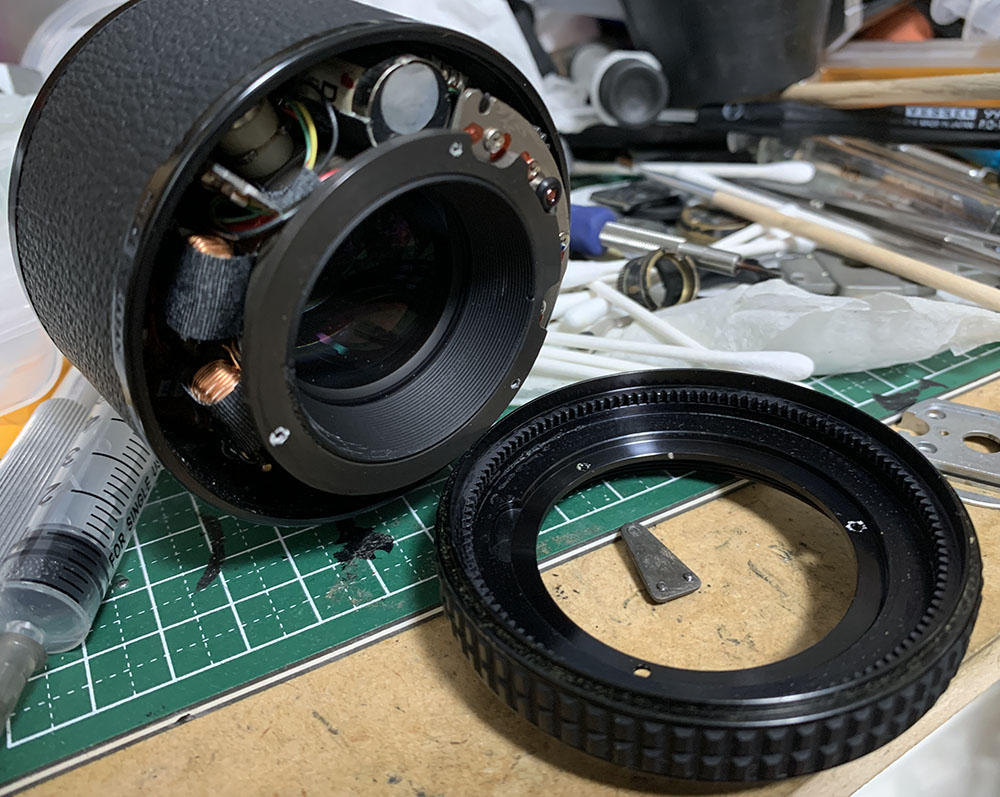
You won’t normally have to open this lens up like you would a manual-lens but there may be times when you would need to do so such as when there’s fungus in the elements or the rear elements are fogged with grease and oil. It’s important to only remove the trouble parts and leave the rest alone. It’s not wise to touch something that’s working, that’s stupid. You’ll have to be a bit careful when handling this lens since there are electronic parts within it and you could brick the lens with static electricity from your hands. It’s best to always work with this while the focus is set beyond-infinity so you’ll have a good point-of-reference when you reassemble it. Take plenty of photos, it’s mandatory for any kind of repair.

The bezel can be unscrewed with the help of a rubber tool. You don’t need a lot of friction to turn it but if yours is stuck a few drops of alcohol will help loosen this part.

Extract these screws to remove the focusing ring assembly. Make sure that it’s focused beyond infinity when you do this so you’ll have a good point-of-reference.
Carefully separate the focusing ring assembly. The grease looks filthy in my sample, I didn’t replace it but I really wish I did. A nice coat of silicon grease will make this focus like-new.

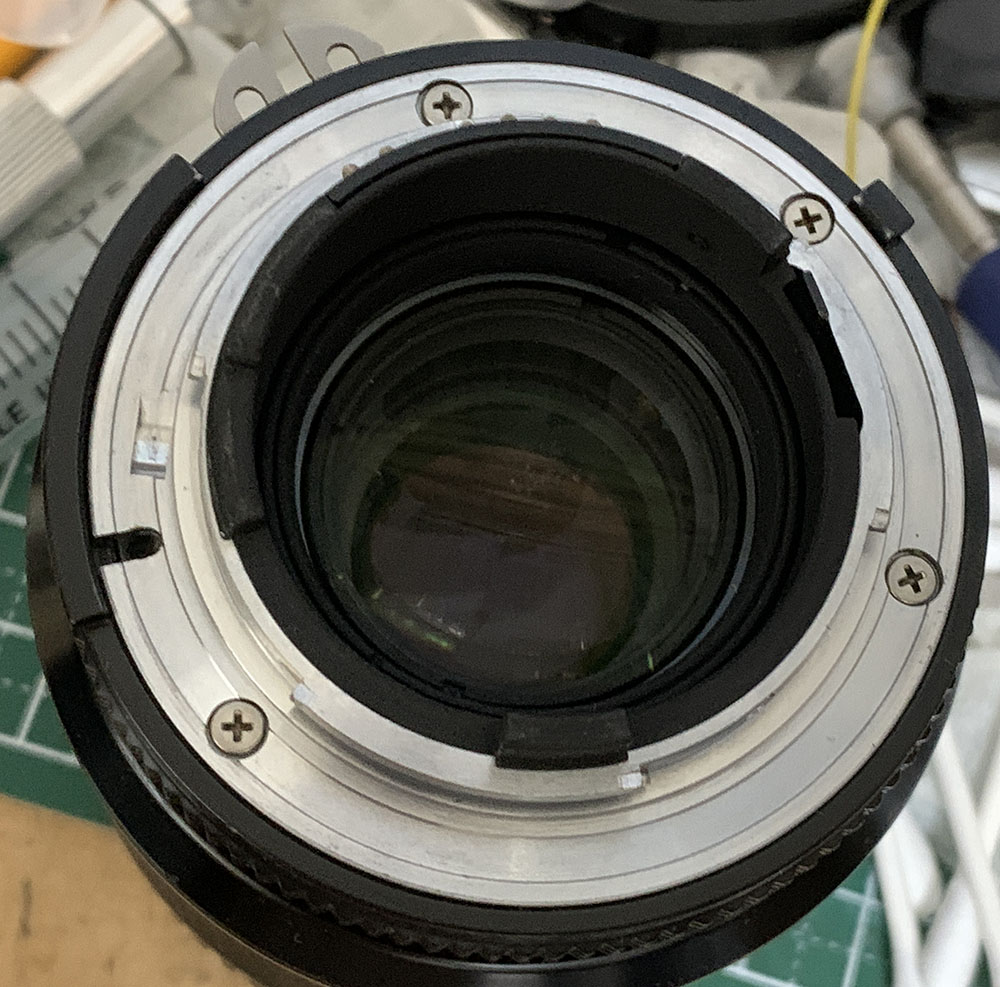
The front element can be removed once you unscrew the baffle. You do not need to remove the focusing ring assembly to get this out.

Extract the front element with a lens sucker and don’t forget to not which is the side facing the front so you won’t put it back facing the wrong way.

There’s a spacer underneath it. Be sure to mark its leading edge.
The 2nd group can be extracted with a lens sucker. Note that I used a pen to mark which side should be facing the front.
You can clean the cogs here if you want to. Only do this if needed, leave this alone if your lens is working fine. The AF-drive is engaged with a tiny clutch mechanism, something that reminds me of older car gearboxes.
Carefully extract the screws to remove the bayonet mount. Many people get stuck here because they stripped their screws. To prevent this, read my old article on how to remove bayonet screws.

The screws aren’t all-identical, there’s a tiny one at the 2:00 position. Do not forget this detail so you won’t damage your lens later during reassembly.
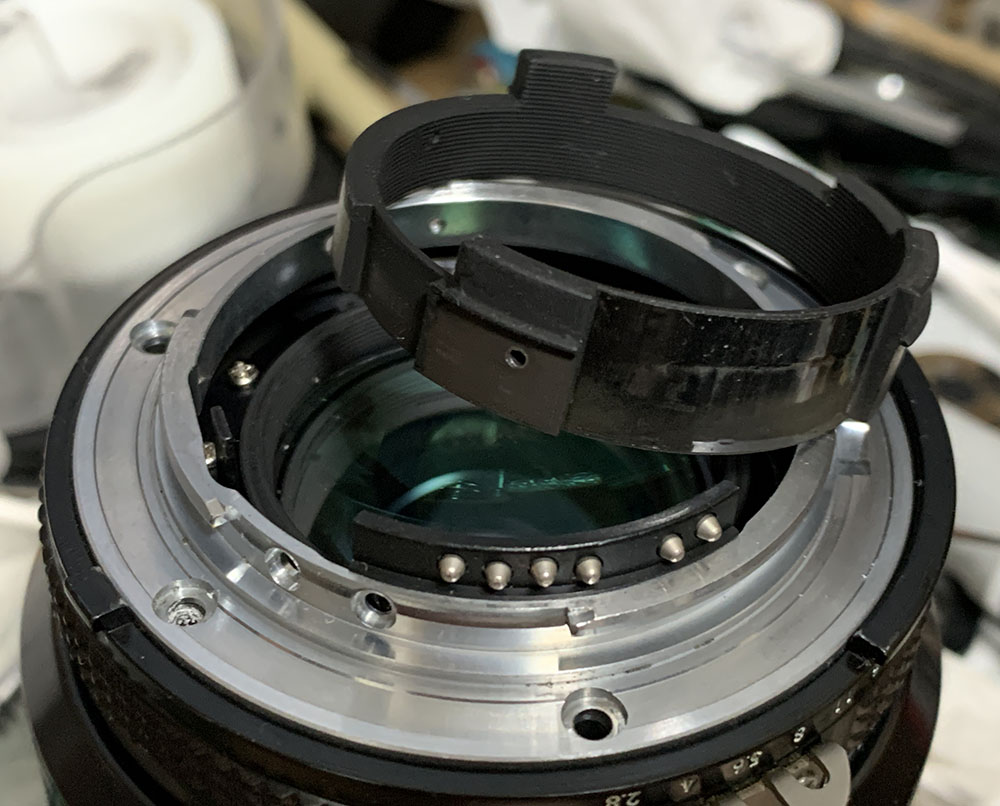
Like all Nikkors with electronic contacts, remove the baffle first before you remove the bayonet mount or you’ll damage the ribbon or contact block. It is important that you note which screw should be placed at which hole, the one that’s connected to the contact block is smaller than the rest. Leave the tiny screw at the 6:00 position, that’s to prevent you for over-turning this so you won’t turn it beyond what’s needed and destroy your camera.

Carefully remove the bayonet mount and be careful not to damage the strip of printed circuitry.

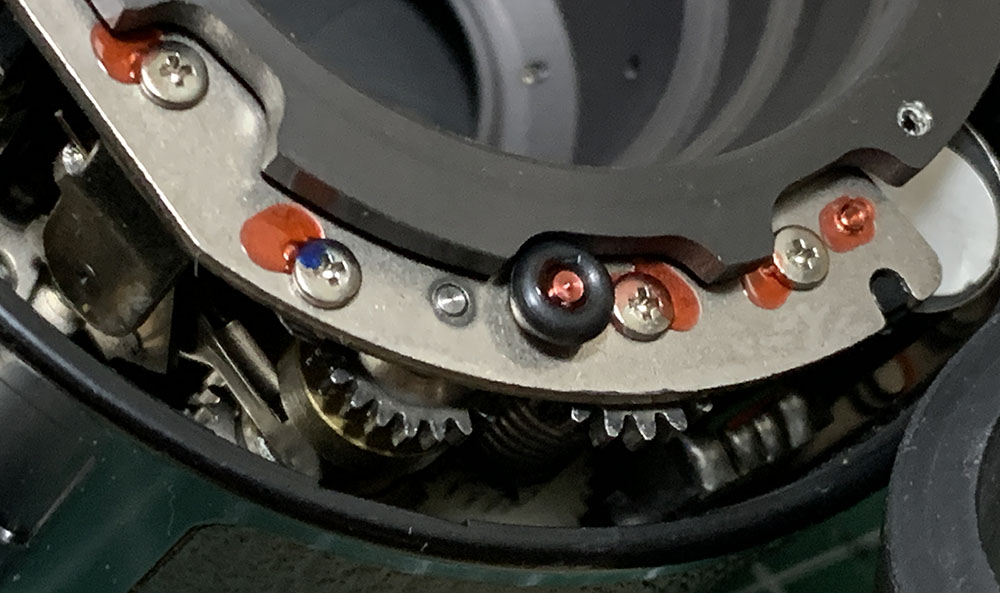
The throat can now be removed. Note that there are shims here to adjust its focus, do not lose or damage any of them. You should also remember to put them back at the proper orientation so it won’t obstruct the movement of its stop-down lever arm.

Here’s a closer look. The fork of the stop-down lever arm should catch a pin from the iris mechanism so it could actuate it. Don’t forget this when you’re putting this thing back.
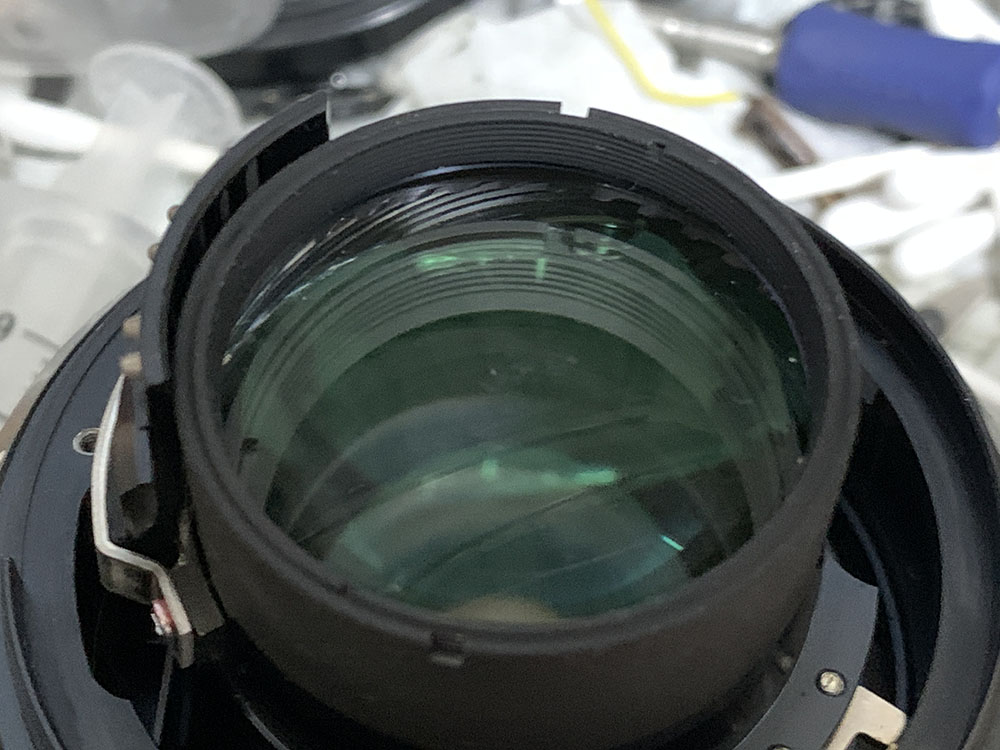
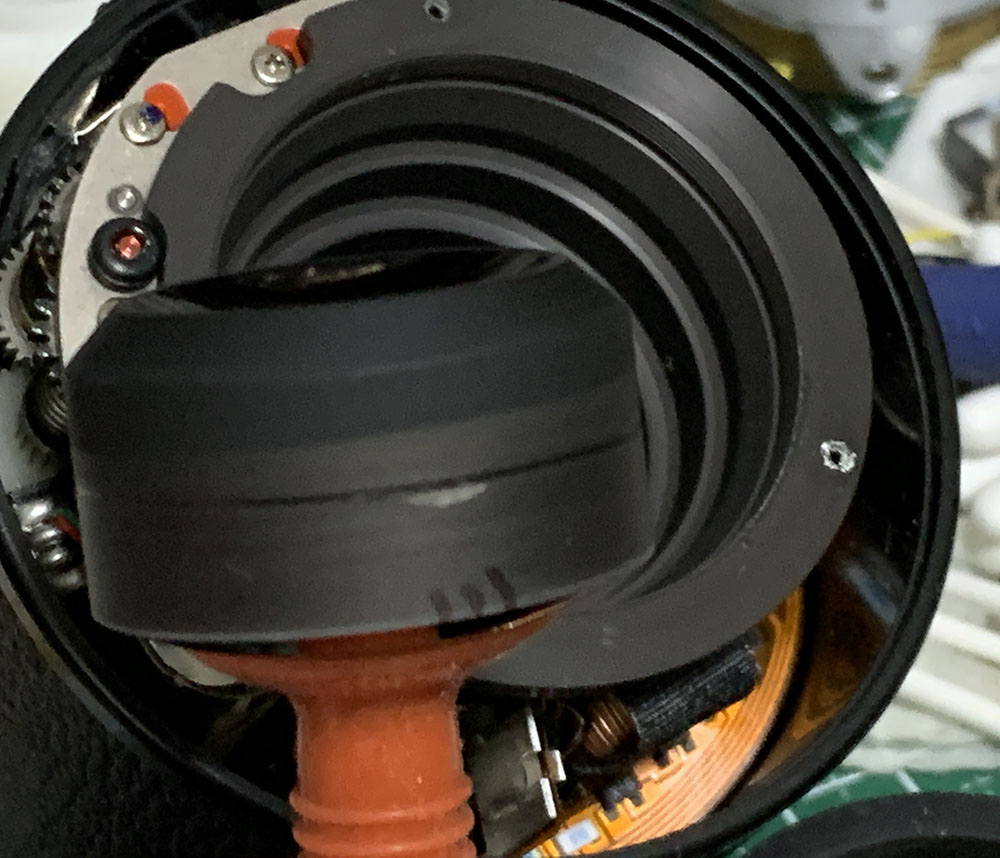
This is the problematic part. Don’t remove the rear optical block as a whole, you may damage the delicate parts here. Instead, remove them one-by-one. Start by removing the optics by unscrewing the collar and then remove the helicoid carefully. It’s adjustable so don’t forget to note its original position. When removing the helicoid, don’t forget to note where it separated. Many people get stuck here because they don’t know how to put it back. Read my article on how to work with helicoids to prevent this from happening to you. There’s a small prong here that’s linked to a strip of brass that’s coupled to the focusing gear-train. Be sure that it’s undisturbed or else this won’t focus properly.
You would rarely need to lubricate the gears and springs. If you have to, get a Q-tip and saturate it with alcohol and clean every tooth carefully. Be sure that you do not leave any old lubricants because that will contaminate your fresh grease. Only use silicon or lithium-based grease because of the plastic-to-plastic contact between the cogs and their opposing parts. Some metal-to-plastic contact points should never be lubricated with petroleum-based oils or grease. This is something that you should be aware of. Never apply a lot, that will end up in the iris mechanism and create a mess. You should never flood the lens when cleaning it. Flushing the parts means that you’ll make a mess inside and that will foul the electronics, ruining them and making the lens unusable in AF mode. If your lens has fungus, follow my advices at the how to remove lens fungus article. Thin the solution down so you won’t use it at strong concentrations and damage the coating.
Conclusion:
It’s a nice little project that took me under an hour to perform since this is a simple lens. I didn’t have to open the whole thing up and that made things a lot easier. It’s refreshing to repair something that you don’t see quite often, I learned a lot from this project so I hope you enjoyed this, too.
Thank you very much for your support. If you enjoyed this article, please do me a favor by sharing it with your friends. This blog earns $0.20 daily and it gets that from views. You can also consider supporting my work, that helps ensure that this site is kept alive. It also helps me purchase and process film so I could show you how a lens performs with it. This site promotes its use, I would like to share the joy of shooting film to the next generation. Thanks a lot to you for supporting this site through the years. Ric.
Help Support this Blog:
Maintaining this blog requires money to operate. If you think that this site has helped you or you want to show your support by helping with the site’s upkeep, you can make a small donation to my paypal.com (richardHaw888@gmail.com). Money is not my prime motivation for this blog and I believe that I have enough to run this but you can help me make this site (and the companion facebook page) grow.
Leave me some tip?
Thank you very much for your continued support!
$2.00
Helping support this site will ensure that this will be kept going as long as I have the time and energy for this. I would appreciate it if you just leave out your name or details like your country’s name or other information so that the donations will totally be anonymous. This is a labor of love and I intend to keep it that way for as long as I can. Ric.

Aug 05, 2020 @ 17:37:24
Any thoughts on repair for Nikon 135mm f/2 DC?