
Hello, everybody! I’m now down with the flu so I’m going to keep this brief. I am usually resistant to sickness but lately stress from work has been getting to me so that probably affected my resistances somewhat. I’m feeling a lot better now but I will need to take the doctor’s recommended rest period of 5 days. After that, I’ll assure you that I’ll be back to my usual health and even better, I will practice kung fu again this coming spring so that my body will regain my old resilience to sickness. This is a tale of redemption for me and this also happens with lenses so read on!
Introduction:
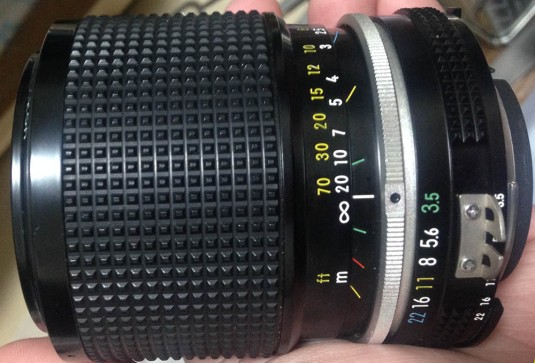
Today’s topic is about a lens that many would consider fit for nothing but parts due to its heavy fungal infection but I will show you that almost nothing is not worth a try as far as old Nikkors are concerned! Ladies and gentlemen, may I introduce to you this little gem, the Zoom-Nikkor 43-86 f/3.5 Ai lens!
 It looks really great on a camera of the same vintage, don’t you think it looks sexy on this Nikon F3HP? I love the Nikon F3 and for me, this is the best manual SLR ever made. You may have heard about this lens and read reviews about it. Some people will claim that it is useless due to a variety of reasons such as optical performance and ergonomics as well as the unfortunate pedigree of being part of the 43-86 family. There are some lens review writers on the net and they gave the Zoom-Nikkor-Auto 43-86mm f/3.5 a bad name. Sure, I won’t deny that the Zoom-Nikkor-Auto 43-86mm f/3.5 sucks but you’ll have to put things in context and then you will realize how good that lens really is and what it stood for. It’s the first zoom lens that was made affordably with a lot of compromises due to the time it was made but it’s a decent performer then. This lens redeemed the 43-86 family because its optical performace is quite good for its time and category. For a cheap lens that came with many cameras in a kit, this lens sure is a decent performer with no compromise in build quality. I will show you some samples here to back-up my claim but please do not set your expectations too high and remember that this is a cheap zoom lens thats made to give the economically-challenged photographer a zoom lens that they can use for fun and work. Yes, you heard me right – I said work. For some pros who can’t afford much, it was all they had and it sure help paid the bills!
For those new to this blog, this is the 3rd and last part of the 43-86 series that I made. The others can be accessed through the links below and I recommend reading them,too. You should read them in order to understand why this lens exists and what its heritage is.
You may wonder why I give such high praise for this lens in the introduction when some people actually consider this family of lenses rubbish. I’ll tell you now that the lenses on this family all perform decently in every condition and it gave the convenience of having to do away with a 2-prime lens setup. True, the earlier versions of this lens like the Zoom-Nikkor-Auto 43-86mm f/3.5 and the Zoom-Nikkor-Auto 43-86mm f/3.5 C will NEVER match the charts of the latest kit lenses but do put into consideration the era that these lenses were introduced and what the market had to offer back then which is basically nothing much and you will probably appreciate this lens family more.
 This lens is a total redesign of its predecessors, it was given a new optical formula and a redesigned lens barrel. Having worked on the 2 previous versions of this lens (this is part 3 of 3), I will tell you that the overall schematics for the lens barrel did not change much but it is totally different so no parts can be shared between these versions. Compared to the older ones, this lens feels better in your hands and its performance was enhanced. It still retained the rather slow maximum opening of f/3.5 and that means that it’s still hard to focus with this lens in conditions that’s darker than a sunny day. You will want to use a faster film with this lens because the slow maximum aperture will constrain you to use it at f/3.5 and your shutter speed should be faster to compensate for that.
 Here it is with my Nikon FE2. It makes for a nice setup for travel photography. While the Nikon MD-12 adds some weight and bulk to the whole setup it’s still small and light so my neck won’t hurt by the end of the day. I shot with this combo for a whole day and it was a nice combo to use in terms of size and weight.
 It balances really well even without the Nikon MD-12 motor drive. This setup sure makes for a good travel photography combinations. Just use a faster film to compensate for the slow f/3.5 maximum aperture and use a matte focusing screen so it won’t black-out. You will find that split prisms tend to go dark (the prism part) when a slower lens is used.
Aside from the native Ai-spec compatibility and the obvious cosmetic changes, the inside of the lens was actually engineered to be much smarter than the previous version in that it is now much easier to work with compared to the ’60s technology of its predecessor. It is easier to take-apart and the construction is more robust. Needless to say, this lens sold really well and production lasted for 5 years but new ones were still available from the shops up until the ’90s. This lens family was replaced by a variety of zoom lenses and the ’80s was all about zoom lenses because their performance got better due to engineering and manufacturing techniques. Today, zoom lenses sell better than prime lenses and this all harks back to that magical era in photography in the ’80s which I call the “Silver Age” of photography. This was an era of experimentation and manufacturers went wild so the design of the products from this era was the most interesting for me. Some of the things we take for granted these days stem from that very era such as AF, button layout and the shape of cameras and lenses.
Nikon listened to their customers back in the day so they improved the optics of this lens by a huge leap with technology that was never available to them in the early ’60s when it was first designed. The new optics which debuted in the mid ’70s fixed what many have been complaining about all along – sharpness and artifacts. You can get sharp and really useable images even wide-open. Stop the lens down to f/5.6-f/8 and the results are better! Distortion didn’t go away but we cannot do much about that for the time being. It is safe to say that this lens helped regain people’s trust in Zoom-Nikkors.
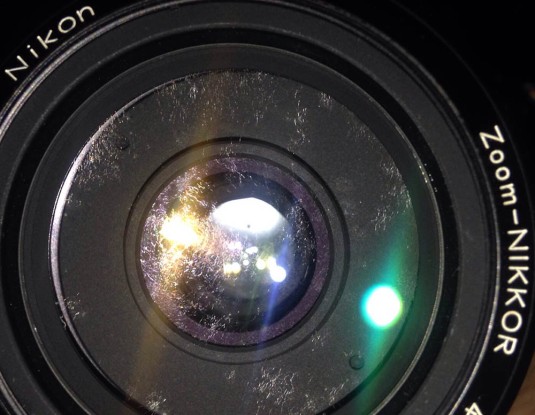 The lens was in a terrible state when I got it. The fungal growth was so serious that you are not able to see what’s on the other end of the lens when you look at it from the front. I was lucky because none of this caused any serious damage to the lens elements. It is not always like this by the way. There are times when the fungus will leave a bald spot on the coating even though the fungal growth isn’t really bad.
Let’s now talk about the performance of this lens. I used this lens with the Nikon D750, a Nikon Df and my Nikon FE2 loaded with Fujifilm Industrial 400 film. Learning how to use this lens means that you will use it to its best potential, avoid its weaknesses and use only the good points in order to enjoy it. While it’s true that equipment is half of the equation a real artist shouldn’t be hampered by his equipment and here is where the other half of the equation comes into play – skill and experience.


(Click to enlarge)
As mentioned earlier, distortion is a big problem when using this lens. The first picture was shot at 43mm and the second one was shot at 86mm. See how the straight lines turn into curved bows? Avoid placing bold lines in your frame if this bothers you. You cannot fix this without using the computer so just avoid situations where the lines can make the distortion obvious. Shooting this lens at 60mm helps a lot and that’s the only way you can work around this problem without resorting to post. This lens isn’t what you want when you shoot architecture and art for a living.
 Here’s a sample when you use this lens on a real-world scenario. If this doesn’t matter to you then it’s fine. Just shoot at around 50-70mm and the distortion will be less severe. It’s typical for zooms to have their best performance when you use them at the middle focal lengths of their zoom range. This is one of the tricks when using zoom lenses.


(Click to enlarge)
Apart from distortion, another big problem when using this lens is vignetting. It’s effects are severe and you might as well dial-in +1 or +2 in your exposure compensation just for negating its effects wide-open. The samples were shot from f/3.5, f/5.6 and f/8 so will see how it looks like in these apertures. The first set was intentionally shot that way and you can see that vignetting at the far-corners is so severe that it’s about more than 2-stops at the extreme corners. Vignetting at f/3.5 can spread into the middle of the frame, too. The vignetting isn’t obvious by f/5.6 and goes away by f/8. The second set of pictures shows a real-world scenario (or close to it) and you can see that it doesn’t affect your pictures as much but you will want to avoid shooting the sky or any background that looks even. It’s ugly and we can all see it but this shouldn’t prevent you from enjoying this lens, just use your exposure compensation dial like I said because this isn’t accounted for by the meter.


(Click to enlarge)
Here are some samples shot at f/3.5, f/5.6 and f/8. The performance is decent wide-open, it is good enough unless you zoom-in and pixel-peep. When viewing it at 1:1 you will see its flaws like the lack of resolution, spherical aberration and a lack of contrast. Vignetting is going to make your frame darker, too. The quality of the bokeh isn’t good at all but this in not the lens that you will want to use for that. Stop it down to f/5.6 and things improve a lot in terms of sharpness and vignetting while the contrast hardly improves. The contrast won’t improve by much as you stop this lens down further so keep that in mind. Stopping it down to f/8 will improve the sharpness and resolution even more. You will begin to see the finer details in your frame even better such as hair and the weave of fabrics. When it needs to be sharp and clear, you have to shoot this at f/8 or f/5.6 at the least. You can also notice the bokeh balls turn angular as you stop it down.


(Click to enlarge)
This is probably as blurred as it gets when using this lens. The slow maximum aperture is the reason behind this combined with the poor 1.2m minimum focusing distance. The subjects need to be close to you and your background needs to be further into the frame in order to make this look even blurred but you can’t do much when you’re limited by its speed and minimum focusing distance. You can also notice in the 2nd picture that it’s not as bad when shot wide-open on real-world subjects. Spherical aberration is at play and it is not as sharp as you want it to be but it’s decent.


(Click to enlarge)
These were shot wide-open. Sharpness is OK considering that these were shot using the ends of the lens’ focal range. The first picture was shot at 43mm, I wish it can be wider but that’s all I have. The panning shot of the Mario Cart was shot at 86mm. I noticed that this lens performs better when shooting objects that are a bit further into the frame. It’s also worht noting that the pictures look “OK” despite all the technical flaws of this lens. The last picture with the lady was shot wide-open. I wouldn’t call this a sharp picture but that may be due to some movement. It does look decent and for people who are working in the field this may be adequate. It’s better than not getting the shot because you were changing lenses, at least you have something to show your editor!


(Click to enlarge)
Here are some pictures taken with the iris stopped-down to f/5.6 or f/8. Most were shot at f/5.6 and you can see that they are sharp enough and you can see the details clearly when they’re focused. I can say that these are perfectly-useable pictures, if it was sunnier today then that can improve the contrast a lot but I can’t do much about the weather. I will also mention that it’s hard to focus on moving subjects with this lens so please forgive me for some focusing errors present in these. It’s odd but the lens has a rather long focus throw and that’s the only thing that I don’t like about this lens.
 I shot this at f/8 with film. See how nice it is? The sun star looks nice but there is a weird magenta glow surrounding it. Despite being shot with film, the details look crisp as if it’s a picture from a digital camera. It also has that vintage look that many people are after these days. Do you like this picture? I like it a lot to be honest.


(Click to enlarge)
Here are some more pictures that were shot with film and most were shot at f/5.6 or so. I love how this lens renders when shot in bright sunny day with film. The pictures all look “natural” and there is a delicateness to them that’s common with pictures taken with old lenses. It’s safe to say that this lens is best used from f/5.6 if sharpness and details matter for the shot. While shooting at f/3.5 will be adequate, f/5.6 is where I would really use this lens for almost anything.


(Click to enlarge)
I took these photos with film. Lighting was adequate so I can stop the lens down to about f/5.6 or even f/8. You can’t see the vignetting because I stopped it down to avoid it. Do you remember what I said awhile ago on how you can maximize the lens by learning to use it properly? Here’s what I got by applying what I said. The pictures look sharp, vignetting is not present and the distortion isn’t obvious. I applied every trick that I mentioned here, it made it appear that I took these pictures with more expensive lenses but these were shot using Nikon’s underdog and using film no less.


(Click to enlarge)
Here’s the rest of the set. You can see slight hints of the vignetting on some of these. Can you tell me which one was shot at f/8 here just by judging the details and vignetting? This lens was a joy to use, I gave the Nikon Z7 back to the Nikon staff after a minute or so with it because it was too easy to use. The camera is close to perfect and I wanted to challenge myself so I whipped-out my Nikon FE2 along with this lens and shot these models. Every person turned their head to me when they saw what I did. There are time when it’s more about the experience than the precision of the tool that matters, it’s like driving your old VW Beetle on a Sunday morning despite having the latest sportscar in your garage. We’re craftsmen and artists, there are no substitutes for passion.


(Click to Enlarge)
As you can see from the sample images above which I took almost exactly 12 months ago, the lens is VERY capable of producing sharp images as long as you got the focus right. I’m always shooting my subjects while I’m on-the-move so some blurriness you see here’s the result of nervousness and slow shutter. With this technique, even 1/250s will result in a blurred image when you are not careful. The lens handles really well and I can say that this lens is great for street photography despite the fact 43mm can be quite lacking when compared to 35mm. Overall, it works for me because I do have the 86mm on the other end that I can count on when I need the extra reach and when I have no time to swap my lenses. The moody picture of the scavenger and his trolley would not have been possible if I didn’t have a zoom with me at that moment.
Do you see the strength of this lens? It gives you convenience at the cost of distortion and some degraded image quality but it does render really nice and it’s sharp from f/5.6 and up. The minimum focusing distance can be quite annoying at times so please bear this in mind because 1.2m is really too far for close-ups. This can be fixed with extension rings or a 4T close-up filter but I just couldn’t be bothered with those. The results are said to be good with these options. The focus throw also felt awkward because it is too long for both 43mm and 86mm. So long as you don’t need super fast focusing you will be OK. I am not sure why the focus throw is that long but it has always been like this since the first version but you’ll soon get used to this after a few hours with this lens.
Would I recommend this lens for daily use? Absolutely! So long as you are aware of all of its weaknesses then you can make this lens work for you instead of being in the way. For collectors who just need to have everything, I am sure that you already have one in your collection if not then shame on you for skipping such a historic lens from Nikon. They’re cheap these days and you can find a mint one for very little money. Many people who got these lenses were amateurs or people who never care much for their gear so you will see plenty of samples with bad fungus damage such as this one. Just make sure that you get a clean copy. That’s it for the introduction, let’s begin with the teardown!
Before We Begin:
If this is the first attempt at opening a lens then I suggest that you read my previous posts regarding screws & drivers, grease and other things. Also read regarding the tools that you will need in order to fix your Nikkors.
I highly suggest that you read these primers before you begin (for beginners):
- Essential tools
- Best practices 1
- Best practices 2
- Best practices 3
- Ai conversion
- Working with Helicoids
Reading these primers should lessen the chance of ruining your lens if you are a novice. Before opening up any lens, always look for other people who have done so in Youtube or the internet. Information is scarce, vague and scattered (that is why I started this) but you can still find some information if you search carefully.
I highly recommend that you also read my working with helicoids post because this is very important and getting it wrong can ruin your day. If I can force you to read this, I would. It is that important!
For more advanced topics, you can read my fungus removal post as a start. This post has a lot of useful information here and there and it will be beneficial for you to read this.
Disassembly (Lens Barrel):
OK, this will be long and confusing so please pay attention. Zooms are more complicated than primes by design because the lens barrel also needs to zoom in and out to keep the lens assemblies inside in sync.
You will find that I will go back and forth frequently on this lens because as I didn’t know the correct order for taking this thing apart but I edited the order of my pictures so that it’s easier to follow for people who are unfamiliar with this lens. You will think that I will be more knowledgable than this after working on the other versions of this lens family but I will tell you now that each lens is new to me the first time I work on it.
The biggest gotcha of this lens is the rear helicoid. Be sure to take plenty of notes and also observe how things are put together before you remove anything. It is very frustrating if you got it wrong.
 Begin by unscrewing this set screw. Be sure to keep this safe as they are so small they can be easily misplaced, some are so small that they resemble poppy seeds!
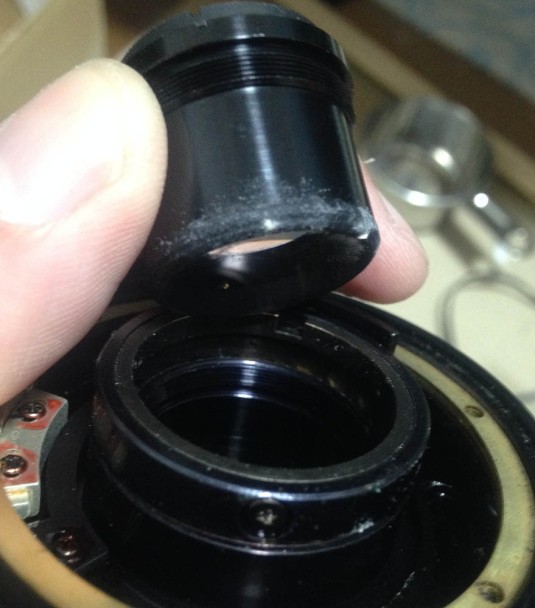
 The set screw secures the front ring. The front ring is usually glued so you may want to use a bit of solvent or acetone to dissolve the glue. Use a grippy rubber glove and that should give you enough friction to unscrew this with your bare hands.
 With the front ring out of the way, the rubber sleeve can easily be removed. Thi is held in -place contact cement so run a toothpick underneath it’s circumference to un-stick it.
 Remove these set screws and if I recall this properly there are 3 of them. You see that red lacquer used as thread lock? It’s very popular here in Japan and dissolves in alcohol so I would place a drop of alcohol on these to soften them up before I remove them.
 The front elements assembly is connected to the helicoid and the whole assembly is also connected to the focusing ring. Mine was glued so I had to use a lens opener on the slots.
 Be careful not to damage the front element!
 as the usual with helicoids, NEVER forget where it separates from the rest of the lens. You will have a hard time getting this back if you didn’t mark where they separated. For this, I made a small mark on the black paint to mark where the infinity sign is when this thing separated from the the lens barrel.
 Now that the rubber grip is gone, you can now unscrew this to separate the focusing and zoom ring. Forgive me, but I forgot how many screws there are to remove in this step as it has been around a year since I worked on this lens!
 The focusing ring can now be removed. Before you separate then, make sure to mark it so you will know where it should be in reference to the lens’ midline/infinity line.
 Remove these screws using a long JIS screwdriver. Make sure to exert enough pressure by using your elbow’s weight to prevent stripping these. These will be tough to remove because 1 or all of them will have some sort of thread lock applied to the screws and if it doesn’t move, place a drop of solvent and let it work on the stuff before you attempt to remove it. Now, some people will use a precision butane torch for this and it’s totally OK. In fact, I do it sometimes myself as a last resort. Just make sure that you’re not heating it close to the glass elements. Many beginners get stuck here so please read what I wrote on how to reamoce screws from bayonet mounts.
 The bayonet mount can easily be removed now that the screws are gone. There’s nothing that will snag here so there is nothing to watch out for.
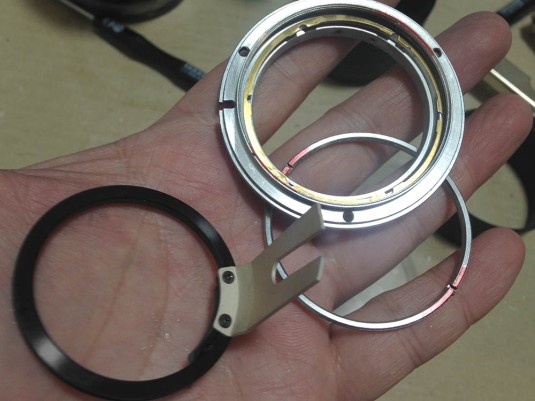 The bayonet assembly consists of these parts. I advise you not to open this up unless it’s in really bad shape. The slots on the brass ring has bearing balls and in more higher-end lenses, this would have bearing balls running the circumference of this part. It’s a cost-cutting decision but it’s still nice that it has it. I assume the other makers wouldn’t bother.
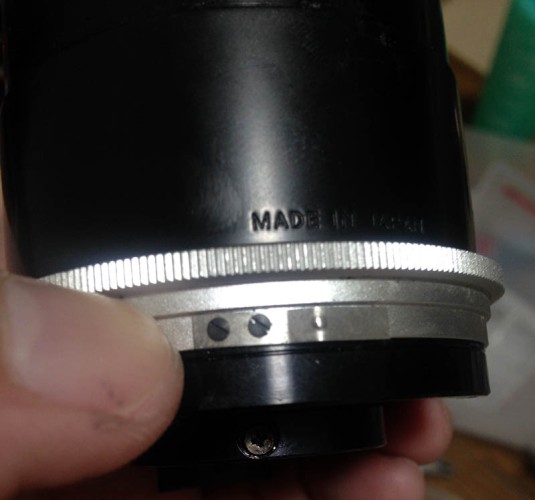
 Now, before you start removing the aperture ring be sure to remove these 2 screws first. It can be tempting to remove the aperture ring at this point but you’ll risk damaging this if you forgot to unscrew these. These 2 screws connects the aperture fork found inside to the aperture ring.
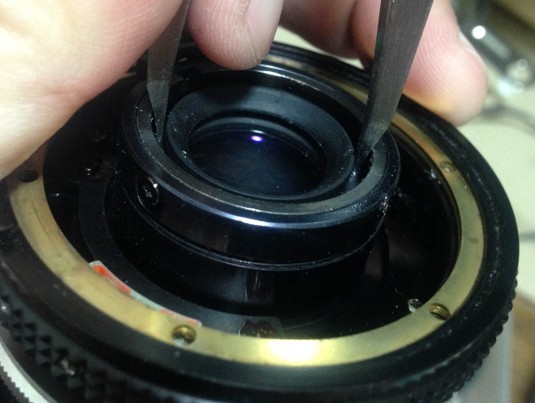 Use a sharpened compass to remove the rear elements group. It is very vulnerable at this point and it’s a good idea to keep this in a safe place while you’re working on the rest of the lens. You can remove the aperture ring at this point if you want to but I’ll leave that for later.
 Store the rear elements group in a safe place. Man, just look at that growth! Disgusting!
 Now is the time that we’re waiting for, we can safely remove the aperture ring! I wonder know why I didn’t remove it as soon as I got rid of the screws but here it is.
 Now, this is very important so pay attention. With the lens focused all the way to infinity and zoomed all the way out to 43mm, take some notes on this screw’s position. It should be like this when you get your lens back. I know that there will be some small variations between lenses when it comes to tolerances but that is why I am encouraging you to take notes!
 Do take special notes from the other side as well. This part can be frustrating if you got it wrong so take your time and take plenty of notes!
 Now that we have removed the front and rear elements group and set them aside we’re now safe to work on the rest of the lens without thinking much about them. Now, back to the front part of the lens! Carefully unscrew this tall-headed screw and be careful not to strip its head by using a driver that would fit the slot perfectly. It’s very amusing to know that this little thing controls the push-pull and focusing action of the lens.
 The focusing barrel can now be safely removed once that screw is gone. Yuck, how filthy!
 For the 2nd elements assembly, use a lens spanner with the long bits installed so you can reach these slots. If yours was glued then you may want to do the acetone routine on this. I was really skeptical at first when I saw the fungal growth but it will be gone later.
 My fingers tips fit inside the barrel so I just picked the 2nd elements assembly with my fingers.
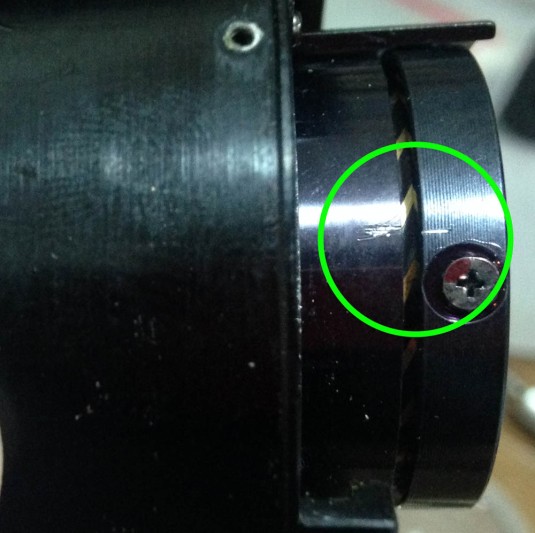
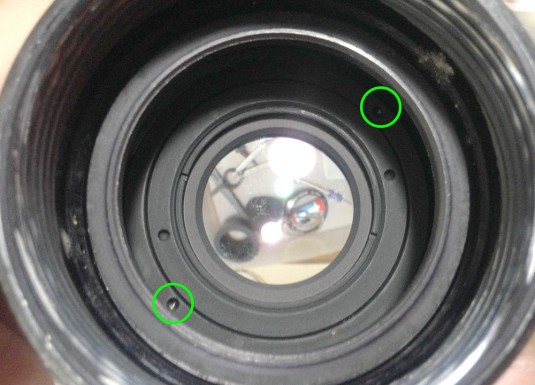 Do the same for the 3rd elements group but this time, be careful which slots you should be using. I encircled the correct one so you will avoid opening his up by mistake.
 Again, since my fingers fit into the lens barrel; I simply picked the thing with my fingers.
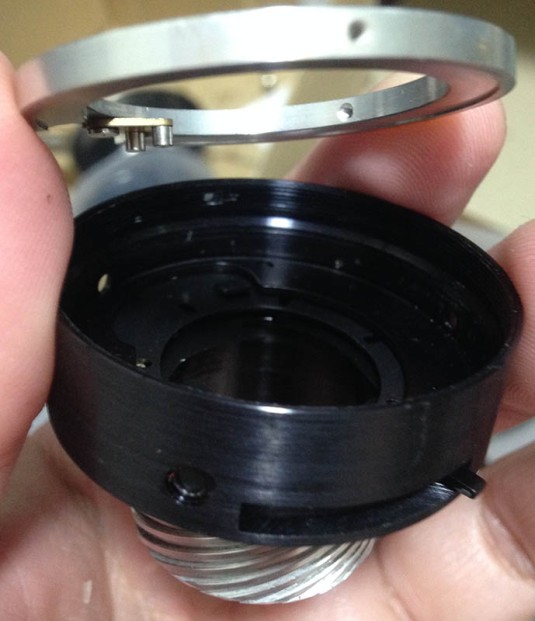
 Now, on to the more complicated part! These screws secure the basket inside, The basket, as I call it holds some of the elements group and keeps it in place while the rest moves as you zoom or focus in or out. This is a common part on many of Nikon’s zooms of the era. As you can see from the picture above, the spacing is different which can only mean that the legs of the basket is not symmetrical. Take note of that to avoid headaches later on.
 Once the screws are all gone, the basket can now be removed safely. It is also noteworthy that the legs of the basket function like some kind of rail that keeps the iris mechanism’s assembly (including the elements group connected to it) in place when you zoom if I am not mistaken so its proper alignment is important. Don’t worry, it’s not that scary.
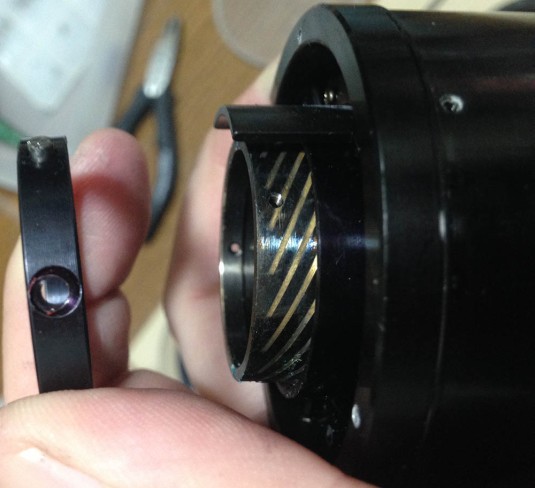
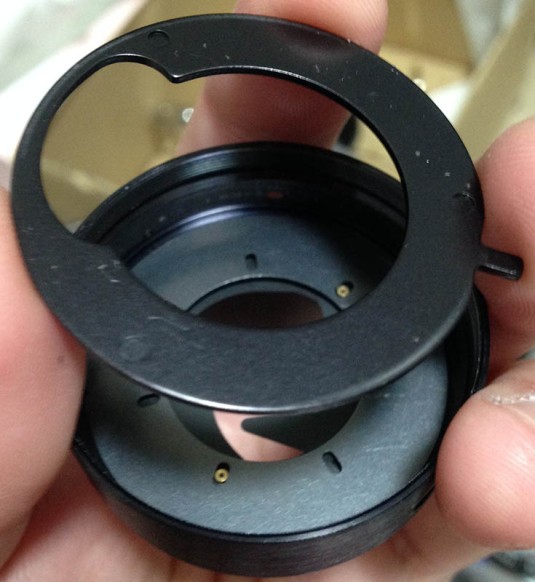
 Time to remove the decorative sleeve with all those colourful lines. There are 3 screws in here that secure this so you will have to get rid of those first before you can remove it. It can be removed earlier but I just did that now. You see that groove at the center? That is the groove where the leaf spring that controls the tension of the zoom/focusing ring was placed. If you want it to be stiffer, just bend the spring until you got what you want, just be careful not to make this too tight and make your lens a pain to use.
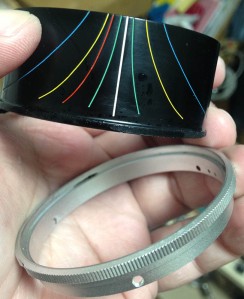 The sleeve and the grip comes off like this. You don’t have to do this but I just had to just to make sure that everything is clean before I put this thing back together.
 I am not sure if the spring has to be removed in order for you to go on but I just did it out of wanting to clean this lens thoroughly inside and out since it is in a very filthy state.
 On to the most frustrating part of the lens – the rear helicoid! This part is common to all the lenses in the this lens family and it’s such a pain so please be careful and take plenty of notes before you dismantle anything! I made a mark here so that I’ll know that this is the correct position when the lens is zoomed out to 43mm and focused to infinity. If I got this right during reassembly then I’m OK at least for this part of the lens. It will get more complicated later, trust me.
 Remove the screw that secures this ring and get it off the rear helicoid. This ring is used to hold a pin that acts as a cam and you can see that picture in the earlier steps.
 The most delicate part of this operation! Before you remove the iris assembly, do a lot of observations on how high this should be inside the lens barrel and most important of all – how it separated from the rear helicoid and it’s position in relation to other parts in the interior of the lens barrel. I can imagine that many beginners get this wrong.
 Now that the iris mechanism and its helicoid is off, we can now remove the rear helicoid. Make sure to take not where it separates. This is where mine separated, see the marks? Do not be a LJB (lan jiao bin) and scratch your head later after the fact!
 With all those out of the way, we can now pull this cup off from the lens barrel. This cup is what’s holding the optics together as it slides in and out of the lens barrel. Notice the leaf springs? I suggest leaving these alone as altering the tension of these is not advised.
That’s it for the lens barrel. This will take the bulk of your time because it’s complicated. I spent the whole night dismantling and cleaning this thing. Just remember to take plenty of notes and you should be fine. This lens can can get confusing even for experienced or expert repairers so don’t even work on this if you’re new to the hobby.
Disassembly (Objective):
We don’t have a common housing for the objective as far as zooms go because the optics were designed to be integrated into the main lens barrel. This part is not difficult at all but just make sure that the lens elements are facing the correct direction when you put them back together later or you will have to open this thing again just to flip one single lens element. I need apologise because I forgot to take pictures for the rear group! I was probably too busy with lens so I forgot to take any pictures of its disassembly. I’ll tell you now that there’s nothing special with it and once you have gotten this far you will have the skills and experience to figure this on your own.
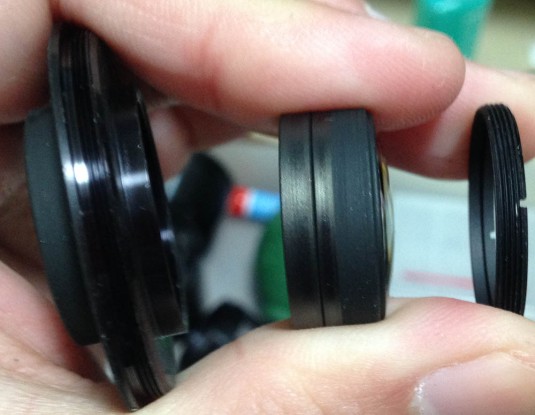
 The front elements group can be accessed by removing this ring. Be careful not to drop any of the elements into the floor as they can free-fall now that nothing holds it together!
 The front elements group consists of these parts. Be specially careful with solvents as the front element is made up of 2 separate glass elements that were glued together and you do not want the solvent to ruin the glue!
 This elements group can be disassembled just like this.
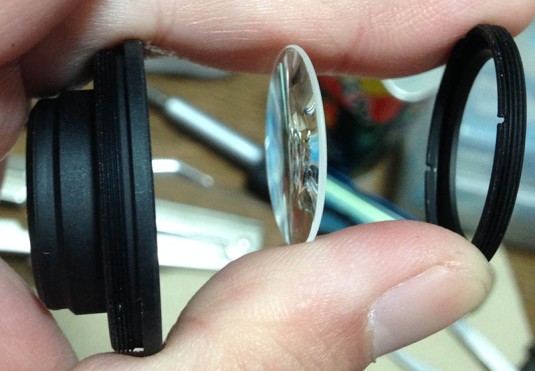 Be careful which side this element should be facing when you reassemble your lens.
That’s all for the objective. It’s not as complicated as the lens barrel but you must still use plenty of caution because some of the parts can be hard to take apart. You will also need some specialized tools or even modify a few tools just to make them fit. When working with the optics of zoom lenses, you need to be careful about removing the optics because some of them were adjusted at the factory and the tolerances are very important. If you seated the element in the wrong way there’s a chance that you can screw your lens’ focus and one end will be sharp while the other end will be soft. One end focuses to infinity the right way and the other end won’t. These are just signs that you have seated the elements in the wrong way. One way to avoid this is to count how many turns it took to remove an assembly or measure how deep it was before removing it. If you don’t have to dismantle something then don’t unless it was infested with fungus like this one.
Disassembly (Iris Mechanism):
As far as iris assemblies go, this one is unremarkable. There are no special tricks used on this and you can be sure that this is going to be wasy as long as you took lots of notes. It’s important to mention that you don’t have to open this unless the lens is filthy or oily. This had to be done because I wanted to disinfect the lens as thorough as possible.
 This ring on the iris assembly can easily be removed with just your bare fingers.
 These screws secure the iris mechanism inside. Before unscrewing these, make sure that you made adequate notes and marks on ring inside this thing. If you see anything with a dab of red lacquer then that means that it was adjusted precisely at the factory and you must put it back the same way you removed it.
 With those screws gone, you can simply pick this ring off of the iris mechanism. Be sure to not damage the iris itself while doing so since the blades are very delicate. Notice that thing to the left? Make you that you took pictures of it before you take this apart. The legs on that thing has to be in the right place when you put it back or else the iris won’t open or close properly. It’s linked to the actuator.
 The ring secures the rotating plate and this plate that is in charge of constraining the iris’ movement as you open and close the iris using the aperture ring. Did that make sense? It is called the regulator and the thing in the previous step constrains how much this turns.
 This rotating ring is connected to all of the iris’ blades and it opens or closes the iris as you turn it. The tab sticking out from the side is what’s connected to the stop-down lever.
 The blades can now be accessed. Use a tweezer to carefully remove them one-by-one or if you are lazy like me, simply drop these into the palm of your hand.
As you can see from the pictures, there was nothing wrong with the iris mechanism and I usually skip this because it’s just so much bother trying to put these back but I intended to do a thorough cleaning so this thing had to be opened-up. Make sure that you don’t put too much grease on the helicoids because the grease might migrate to the iris and you’ll end up with an oily iris problem in the future.
Conclusion:
This lens is something that I will never consider working on as a lazy Sunday afternoon’s project. As you can see, it can get complicated as it is. If all you want to do is to clean the lens elements then this will be quite an easy project since you can access all of the glass elements without having to open this thing to its bare components. There are a couple of Nikkor zooms that work the opposite of this meaning you have to dismantle it down to a certain degree before you can access the inner-most elements.
For the beginner, this lens will teach you the ins and outs of a classic Zoom-Nikkor design as its design is mostly the same with other Zoom-Nikkors in principle. And if you did not take notes on the rear helicoid part then it will teach you to be more careful next time! There are no “safe spaces” for lens repair, any mistake is paid for by money and if this is not your lens and if you aren’t comfortable with your skill yet then skip this and practice more with primes until you develop the discipline required to handle that rear helicoid assembly. I know that I am making this sound like a big deal because it is! Responsibility is everything here and it can get expensive really quick.
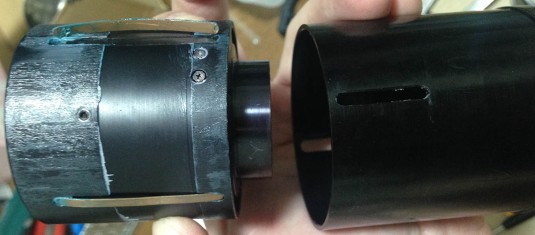
 Here are the major parts of the lens minus the lens elements. It’s such a complicated little gem that one wonders why and how this became Nikon’s budget zoom back in the day.
To calibrate the infinity focusing of this lens, simply reassemble it but leave out the front ring and the 3 long set screws that secures the front elements group to the focusing ring. It’s a simple procedure for this lens so don’t worry. Now, focus all the way to infinity and with the aid of the focus confirmation dot on modern Nikon Cameras, focus on something around 6km or further. Turn the front elements group assembly until the focus aid dot is lit. If the dot lights up then you got it squarely where it’s supposed to be. Try zooming to the other end and see if the focus shifted or not. If the focus is still spot-on on the other end of the zoom then you nailed the focusing of this lens. Once you are satisfied with the results, tighten the 3 set screws to secure the front elements and focusing ring together. Shoot and confirm focus at various distances just to be sure. If things are off then you got the seating of the elements wrong. The distancing of the elements assembly has to be put back the right way and this will take some time as you calibrate it by turning the element groups until they are properly-spaced.
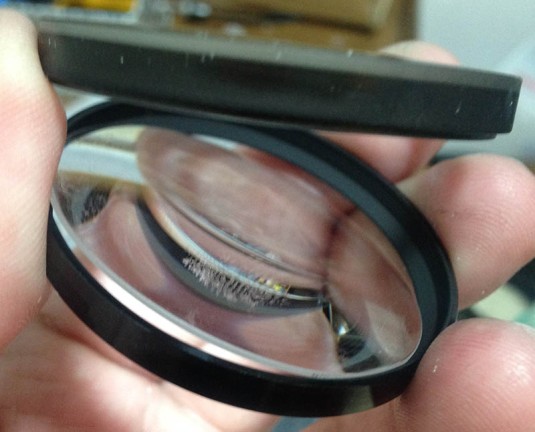
 Fungus-free! The haze you see here is just condensation and it went away the next day. It was inside a dry box so no worries. The lens is now very useable and respectably sharp at any aperture!
 Just to make sure, I had this little thing facing the sun for hours to kill whatever is left in there. Sure, all that mechanical cleaning will get rid of the fungus but I just wanted to be safe just in case. Just take a look at how it was before I cleaned it and it’s understandable.
I hope that you enjoyed this write-up! I was hoping to write you a higher quality article but the flu is really taking a toll on me. I do feel better now, unlike 2 days ago where I just felt miserable and helpless. This project stands for “revival” for me and with that spirit, I wish to see my health get back to its former vitality Thanks for the support and, they are what’s giving me the mental strength to keep going, Ric.
Help Support this Blog:
Maintaining this blog requires money to operate. If you think that this site has helped you or you want to show your support by helping with the upkeep of this site, you can simple make a small donation to my paypal.com account (richardHaw888@gmail.com). Money is not my prime motivation for this blog and I believe that I have enough to run this but you can help me make this site (and the companion facebook page) grow.
Helping support this site will ensure that this will be kept going as long as I have the time and energy for this. I would appreciate it if you just leave out your name or details like your country and other information so that the donations will totally be anonymous it is at all possible. This is a labor of love and I intend to keep it that way for as long as I can. Ric.

Feb 09, 2017 @ 18:45:31
Richard my friend, I just found you website, and I have to say it’s THE BEST site on nikon’s stuff on the internet, i just subscribe and I”ll take all my extra time to read start to finish. It’s really amazing. I’ll learn anything I can, any info you drop. Thanks! Best brazilian regards, and keep going.
Feb 10, 2017 @ 00:31:48
Thank you, Gugo!
I am happy that you liked the site! Ric
Dec 25, 2018 @ 10:01:55
I have one of the later ones (9XXXX s/n) and I find it very useful for shooting movies on a Nikon. The focus stays where you set it (of course) and the manual aperture is quick and easy. It’s very robust. I had it left over in my box from analogue days.
Dec 29, 2018 @ 02:44:54
nice that you kept it! it’s not really as bad as some make it out to be.
Dec 30, 2018 @ 09:22:33
I use my Ai 50mm all the time, for both still and movies, sadly the 28 and 135 are pre Ai so cant be put on a dSLR body. Id like to to get them converted as they always had a great look
Apr 28, 2019 @ 21:21:27
Hello, Richard,
Thank you for this teardown instruction. I acquired a 43-86 AI in as-new condition – except for fungus inside the front elements. I followed your instructions to take it apart and clean the fungus out. All is now perfect!
Jul 05, 2020 @ 19:58:42
had the first PRE AI version. That lens was so bad, it soon became a paper-weight. I even thought there was something wrong with my camera ? Later I would read that the 3rd version the AI was not that bad, so I purchase that one. The lens is built like a tank, plus it is rather compact compared to other push and pull Nikon zooms, this is what I like about it. I mainly purchased it from a collectors point of view due to its history, but I rarely keep bad lenses in my repertoire, no matter how nostalgic. I have a tendency not to throw away any lens even if its are doing nothing but collecting dust in my closet. However, the first 43-86 I purchased was so bad, it eventually found its way to the round file. I have a friend of mine who swears by this lens(3d version) and this guy owns a Nikon D850 ! Thank you for the very thorough article. Lucky for me my 43-86mm came in very good condition so i did not have to open it up. Even if I did, I would probably screw things up. Have fun with your 43-86 and thanks again !
Jul 17, 2020 @ 12:31:38
Hi Richard, so glad I found your site, even though some years since you wrote this very interesting article on the AI 43-86. I managed to find a very clean/good condition example of the later ones (S/N 9xxxxx) here in Johannesburg South Africa last month. Fortunately, our air is very dry here so no fungus. Truly enjoying this lens on both fx and dx bodies – even quite acceptable wide open!
Many thanks again.
Regards
Aug 13, 2021 @ 13:35:07
Wow! What a great article! I was one of those financially challenged pros back in the 1980s and I opted for the AI-S 43-86mm over the AI-S 85mm not just so much for cost as for the convenience of having a zoom. I probably used that lens more than any other for many years back then, and I have hundreds of great portraits I took with it, as well as great some landscapes and seascapes. Of all the old Nikon AI-S lenses I owned as I became more successful, the 43-86mm is the only one I still have today and it still works like a charm on my DSLRs and Z7 and Z6 II. Sharp, and the bokeh is beautiful. I wish I had held on to some of the others, like my 20mm and 24mm f/2, my 55mm Micro-Nikkor, my 300mm AI-S ED, and a few more.
Thanks for your work here, Richard. It is greatly appreciated, by me, and I can see, many others.