
Hello, everybody! The coronavirus problem seems like it’s going to reach its peak in the coming weeks. This means that people will have to stay home to prevent catching the germ or help transmit it. While this is inconvenient for work and other routine it’s going to be a good chance to bind with family or spend more time with your hobby. Staying indoors can be fun if you’re used to spending time alone. Programmers and repairers won’t find this unusual at all, photographers can also have a good chance at trying new fields such as macro photography. If you find yourself needing to stay home you should see what today’s lens can do and that may help make your time indoors fun and productive.
Introduction:
Today, we are going to talk about the AF Micro-Nikkor 60mm f/2.8D. This is a very good lens so its popularity hasn’t really changed much throughout the years. I had one a decade ago but I sold that for an AF Micro-Nikkor 105mm f/2.8D so I could have better working distance between me and my subjects for macrophotography (bugs). That was a big mistake because this lens is so good that I began to miss it and after a long time looking for a junk, I finally got suckered into buying a real junk advertised as having few fungi but this turned out to be more than that. Let’s see what’s special about this lens that has people buying this lens for nearly 3 decades (since 1989).

The AF Micro-Nikkor 60mm f/2.8D is a very compact lens. It feels solid but in reality it has plenty of plastic parts. Despite that, it was built solidly so it will take a beating. This is a really handy lens for macro photography but you’ll have to get really close to your bugs and at 1:1 magnification, the end of the lens is just about 2 inches away from the subject. This makes lighting your subject difficult and in the case of natural lighting, you will have to position yourself really well in order for your subject to be properly illuminated.
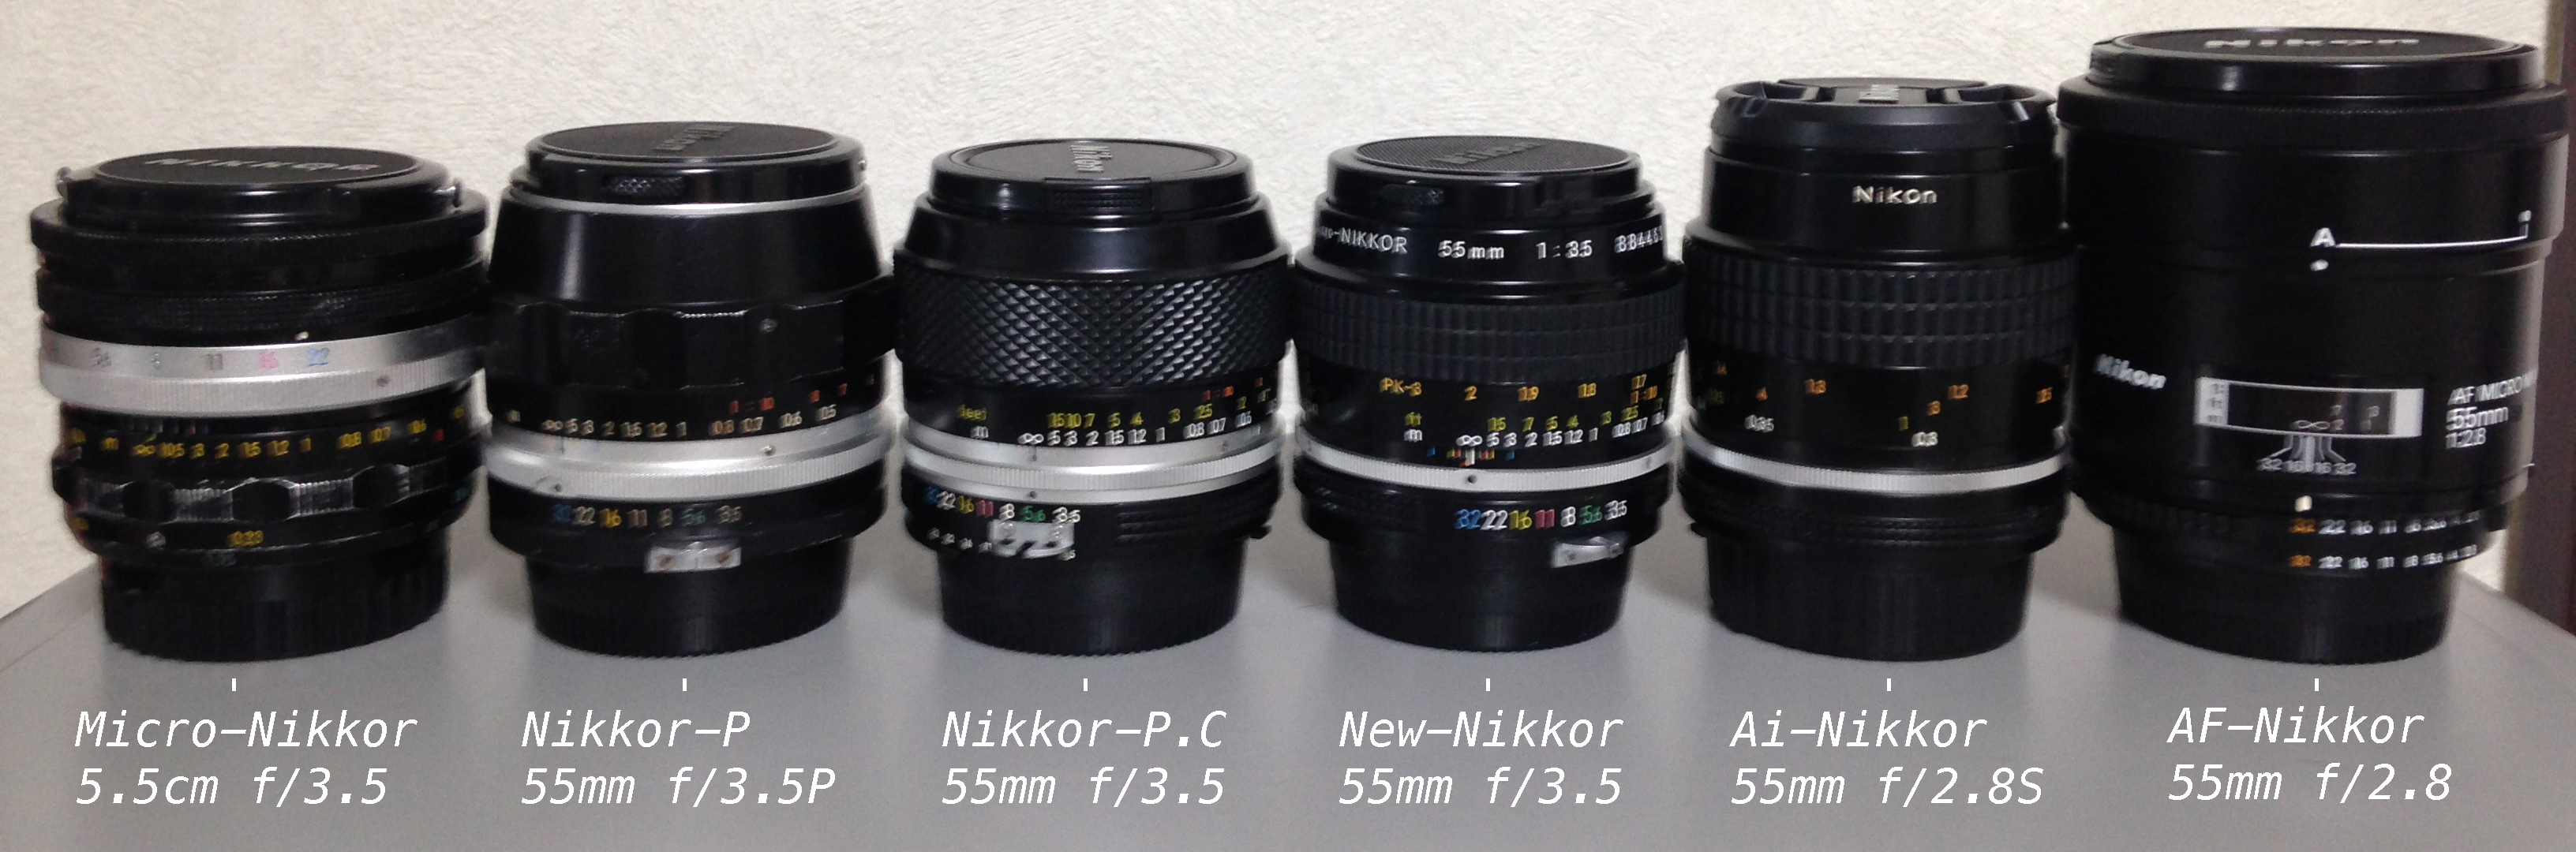
These are all of the of Micro-Nikkors belonging to the 55/3.5 family of lenses. They are all great. The AF Micro-Nikkor 60mm f/2.8D is a descendant of this lens family and it had detached from it by having a 60mm focal length. I am not sure why this was done but I’m suspecting that the new formula had to be a bit longer in order to make the lens extend a bit less when it gets to 1:1 magnification. The AF Micro-Nikkor 55mm f/2.8 is a great autofocus macro lens and is considered to be one of the sharpest Nikkors made. The problem is it feels like a toy because of the liberal use of plastic. To address this issue the AF Micro-Nikkor 60mm f/2.8D was made with higher standards when it comes to its barrel’s construction, making use of rubber and metal to make it feel more solid.
The AF Micro-Nikkor 60mm f/2.8D has been made since 1989 to the present. This is a good testament to its design, while this was replaced in 2008 by the newer AF-S Micro-Nikkor 60mm f/2.8G ED, this lens is still being made today. I suspect that people who still shoot with old film cameras need an aperture ring buy the AF Micro-Nikkor 60mm f/2.8D or some photographers just need the aperture ring for the technical job of using bellows for coin and extreme macro photography. The current Micro-Nikkor uses a new autofocus motor, it doesn’t have a proper aperture ring so you change the aperture using the dials of your camera. It sounds archaic to rotate the aperture ring to change the aperture of the iris but it’s still useful to have a mechanical ring to turn when you don’t have any means to couple the electronics from the camera to the lens. This is the case when using bellow or when you reverse the lens for extreme macro photography. I personally like to use the aperture ring, it feels more natural.
Let’s see some photos that were taken with it. Knowing how it performs is a big deal as you will know its strengths and weaknesses. This knowledge will be valuable and you’ll know when to bring this lens with for an assignment. I use my Nikon Df to shoot these.


(Click to enlarge)
These pictures were shot at f/2.8, f/5.6 and f/8 in that order from left to right. I must stress again that its effective aperture changes as you focus in or out so f/5.6 may show up as f/8 in the exif data. Wide-open, the center is already very sharp as expected from a macro lens. The resolution is really high but the depth-of-field is shallow at 1;1 magnification. Stop it down a bit and the center gets even sharper, peaking at f/8 to f/11. I recall that diffraction starts to degrade the center of this lens at about f/16. When shooting small objects that aren’t flat, you will want to stop-down to get more focus. I usually shoot bugs from a starting point of f/8, moving up to f/16 when I have to get more things in-focus. It has a flat field so using this for slide or document copying is excellent.

It renders beautiful, sharp images when used as a normal lens but 60mm is going to be a bit long. The bokeh is a bit busy when it is used to shoot objects that are further away in the frame as you can see here. This was shot wide-open, I wanted to see how it renders foliage in the background.
The AF Micro-Nikkor 60mm f/2.8D can be soft around the corners when shot with things that are further away. I guess it was calculated to perform best at 1:1 magnification or closer to it. Besides, this was shot wide-open. Maybe I’m asking too much from this for wanting it to have sharp corners at these distances. Chromatic aberration looks terrible, too.

It is reasonably flare-resistant but this does not mean that it will not exhibit any flares and ghosts when given the right variables. This was shot at f/8 so you can see the pretty sunstar. Stopping it down will also “solidify” the big blue blobs. A hood is unnecessary since the front element is deeply-recessed within the barrel. The corners have now improved at f/8 and is now sharp, I also can’t find any strong chromatic aberration in the frame.

Here is the same framing as the image above but I moved a bit so the sun is positioned in a slightly different way in the frame. You can obviously see a huge difference, ghosts are nowhere to be found so I suspect that “angle of incidence” is at work here. Ghosts are reflections of the individual elements so this makes some sense.
Even at f/5.6 the corners look decent enough. I love the saturated colors this lens gives. Foliage is a difficult subject for many lenses but this lens does it beautifully.

Of course, the lens is a great performer at 1:1 magnification. This was taken stopped-down at around f/8. Just look at the amazing details, I expected no-less from a Micro-Nikkor.

This was shot at around f/5.6. My trusty Nikon Df seems to get fooled by this lens, it changes its effective aperture as you focus really close and doesn’t go back or report the proper aperture when you rotate the aperture ring. Don’t know if this is just happening with my setup. This is annoying, it makes the Nikon Df’s meter off by as much as 1-2 stops. I don’t recall it happening with my Nikon D90 many years ago, I couldn’t change the aperture directly using the aperture ring with that camera. Maybe this is a bug?
Let’s now see some photos that were taken with film. This lens was made to be used with film so it’s only fair that we judge it with its intended medium. Film has a unique look that’s difficult to simulate with a digital camera and that’s thanks to grain. Film grain looks different from noise, it looks natural and aesthetically-pleasing compared to the structured-look of noise. This is the reason why many people still shoot with film, it’s the same reason many new photographers are discovering the joy of shooting film. The film that I used is Kodak Gold 200 and the camera that I shot it with is the Nikon F100.

The depth-of-field is quite shallow wide-open, you should stop the iris down to f/5.6 or more in order to get more things in-focus. You’ll lose that smooth, delicate look of the background but at least you’ll get more things in-focus.

You can exploit that thin depth-of-field to blur-out the background. It’s good for removing unwanted details from the background and highlighting your subjects to your viewers. This lens is amazing wide-open, the resolution and sharpness is more-than-usable.

The Nikon F100’s meter is great, it managed to meter this scene the way that I saw it. This lens is the perfect partner for the Nikon F100 for taking photos like this, its in-body motor is powerful-enough to drive this lens so you’ll get reliable autofocus performance with it.

For even trickier scenarios, using the spot-meter is the best option. This lens communicates with newer, electronic cameras. It can send information like the exact aperture and distance settings, these enables the camera to judge your scene better and give you better exposure settings. This is invaluable if you’re shooting with film because every frame counts.

This should show you how sharp this lens is despite me using a cheap film. I am impressed by what I saw, imagine shooting this more expensive films. It is certainly an amazing lens with film.

Grass, foliage, stems and twigs are difficult subjects to render. If a lens has terrible bokeh quality, these will render poorly and results in smears, busy-looking details and generally distracting-looking features. I’m impressed, it managed to render this background smoothly despite its iris stopped-down to f/5.6 or so. It performs better than the AF-Micro-Nikkor 55mm f/2.8 in this department, maybe that extra 5mm helped a bit?


(Click to enlarge)
Here are more film photos, these should give you a better idea on how this lens performs with film. It’s a nice walk-around lens because of its practical specifications, wedding photographers can leave their 50/1.8 lenses at home and use this instead, shooting it wide-open if needed. The bonus part is this can shoot really-close, enabling them to take photos of the rings and cakes. I also imagine that this lens is also useful for nature photographers. If there’s an interesting flower or insect nearby you won’t have to change lenses just to shoot whatever you want. Changing lenses can mean losing the shot, this is important and you should consider this when choosing lenses.
I can recommend this to just about anyone who needs a macro lens, even to those who don’t. This is an excellent lens and it’s going to be useful for a lot of things even if you don’t shoot at 1:1 magnification often. This will be nice for food photography. Wedding photographers will appreciate this because it can take nice detail shots of the rings. People who shoot coins may find it a useful lens but the Micro-Nikkor 55mm f/2.8 Ai-S may be a better option. If you like shooting bugs then forget about this, you need a longer lens for that so you won’t scare your subjects away. People who shoot toys will love this, a longer lens will make toys look smaller due to foreshortening. This is very versatile, you won’t have a problem looking for a scenario to use this.
Before We Begin:
If this is your first attempt at repairing a lens then I suggest that you check my previous posts regarding screws & drivers, grease and other things. Also read what I wrote about the tools that you’ll need to fix your Nikkors.
I suggest that you read these primers before you begin (for beginners):
Reading these primers should lessen the chance of ruining your lens if you are a novice. Before opening up any lens, always look for other people who have done so in Youtube or the internet. Information is scarce, vague and scattered (that is why I started this) but you can still find some information if you search carefully.
I highly recommend that you read my working with helicoids post because this is very important and getting it wrong can ruin your day. If I can force you to read this, I would. It is that important!
For more advanced topics, you can read my fungus removal post as a start. This post has a lot of useful information and it will be beneficial for you to read this.
Disassembly (Lens Elements):
The elements of this lens can easily be serviced and cleaned if you have the proper tools. If you don’t, I’d suggest that you just send this to a repairman. As with all or most autofocus Nikkors, you really don’t want to open-up the lens more than what you need to access the elements. Autofocus lenses are more intricate mechanically and aren’t as tough as classic all-metal manual focus lenses. The electronics are delicate, a small mistake can brick your it. This is why you do not see a lot of people open electronic lenses just to clean or service it until it is absolutely necessary. I wouldn’t trust a beginner to do this due to the delicate electronics and the need for some special tools. It’s a simple task for experienced repairers.

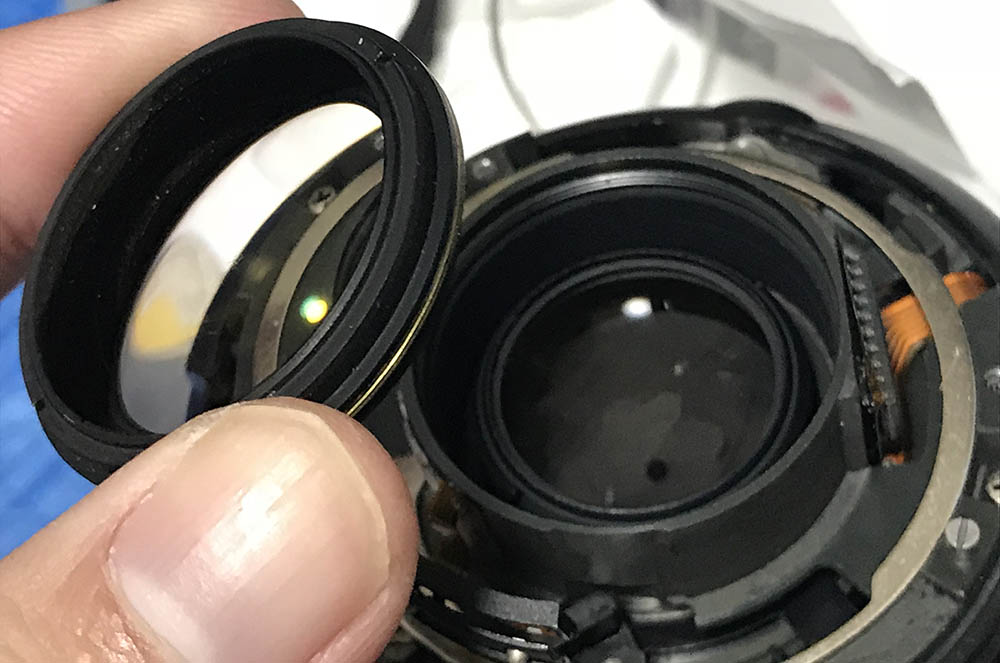
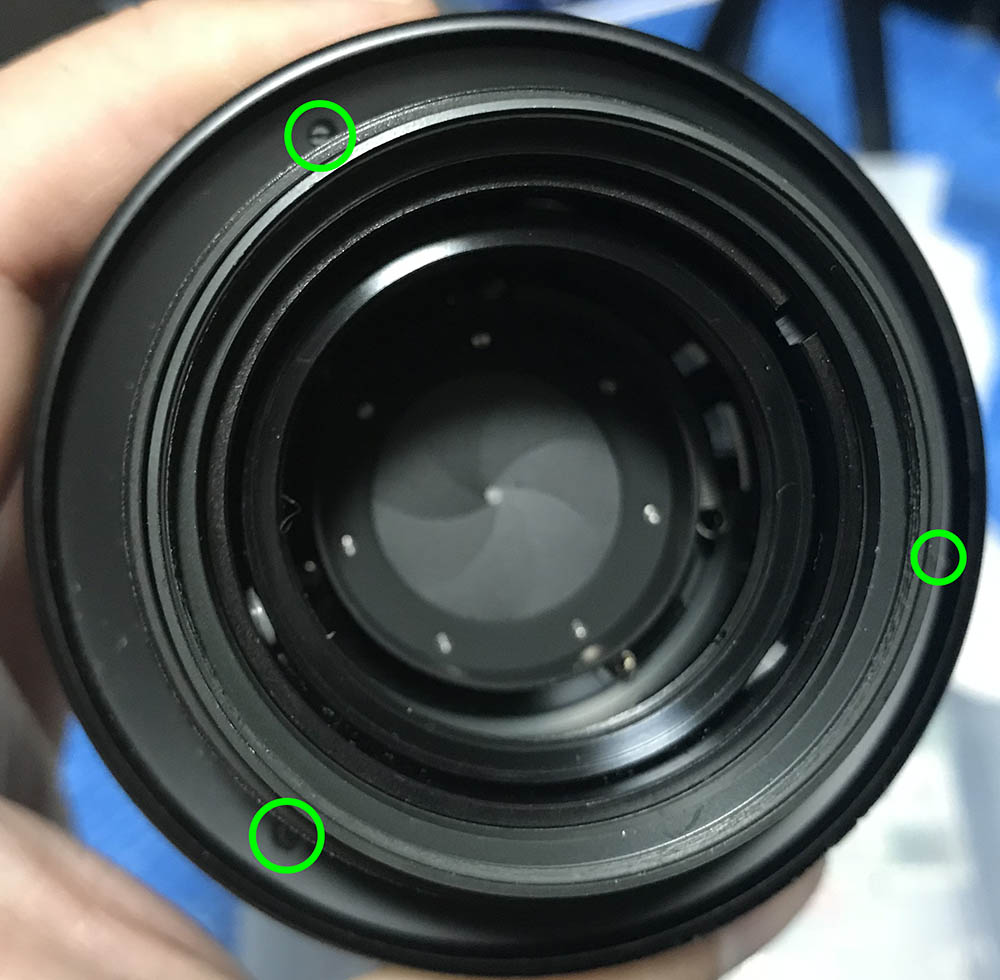
Begin by removing the innermost cup using a rubber cup. Be careful while you remove it so you won’t damage the delicate threads. This isn’t glued in-place as far as I recall so you don’t have to use some alcohol on it.
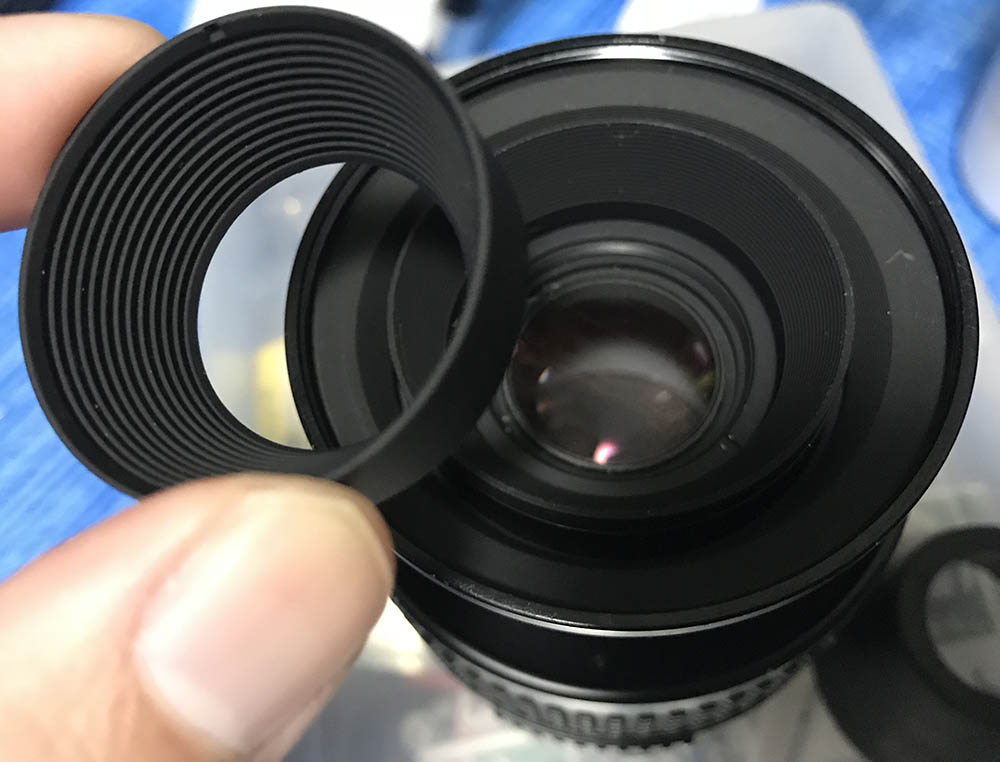
The cup comes-off just like this. Be careful not to scratch the front element.
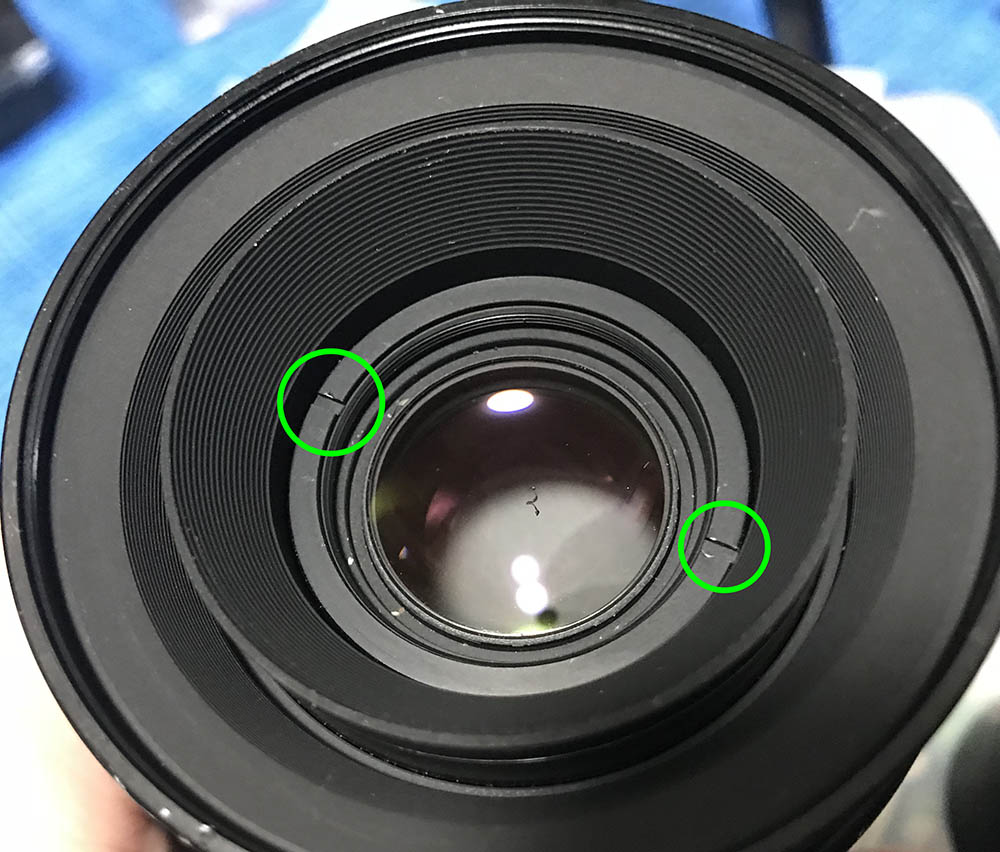
Use a lens spanner to extract the front elements assembly. There is a burr at the front element and it came from the cup.
The front elements assembly comes off easily. It can be opened by removing the collar at the rear, thankfully I don’t have to do this. It’s clean so opening it is just a waste of time and I might introduce some dirt into it.

I forgot to show you that the second cup can be removed just like the other one. Extract it in case you really want to thoroughly clean this since dirt can accumulate underneath it.

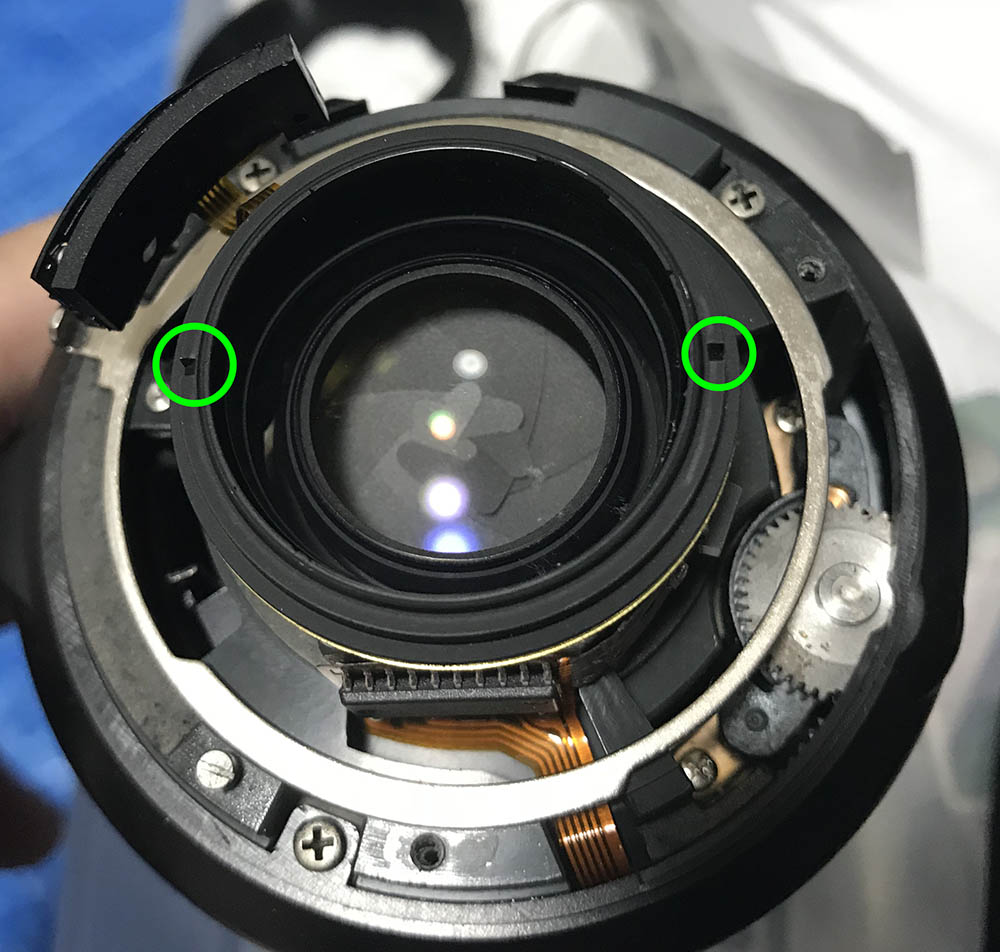
It’s time to remove the rear and inner elements. On this particular lens, you don’t have to remove the bayonet mount to access the inner elements, I am just removing this so I can open the lens to access the focusing mechanism and its AF drive.
That screw inside the green square is optional. That thing secures the inner ring and I didn’t remove it until much later. You’ll see what I mean later and decide for yourself.

Just like most AF lenses with a contact block, you’ll need to remove the rear baffles from the bayonet mount in order to remove the bayonet. To remove the baffles, get a small driver and carefully remove all of the smaller screws you see at the throat of the bayonet, there are 3 bigger ones that secure the baffle. The small ones secure the contact block so they should be removed.
If all you need to do is clean the lens elements just extract the screws for the baffle and the contact block so you do not need to remove more parts than what’s necessary. You just need to get the baffle out of the way because the rear element is bigger than the hole.
The rear baffle can be tight, you should be careful when removing it or you may harm the delicate contact block. If you damaged this then your lens is bricked and goodbye, AF.
You can access the rear element, there’s no need to disassemble more things than what’s needed. Skip the next few steps if all you want is to clean it.

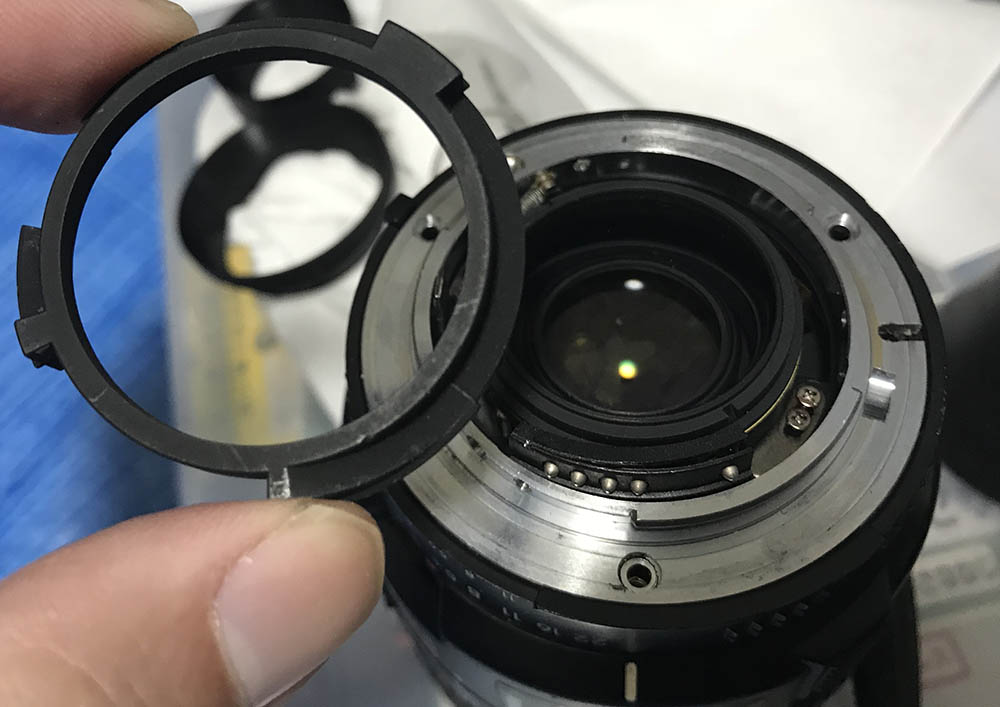
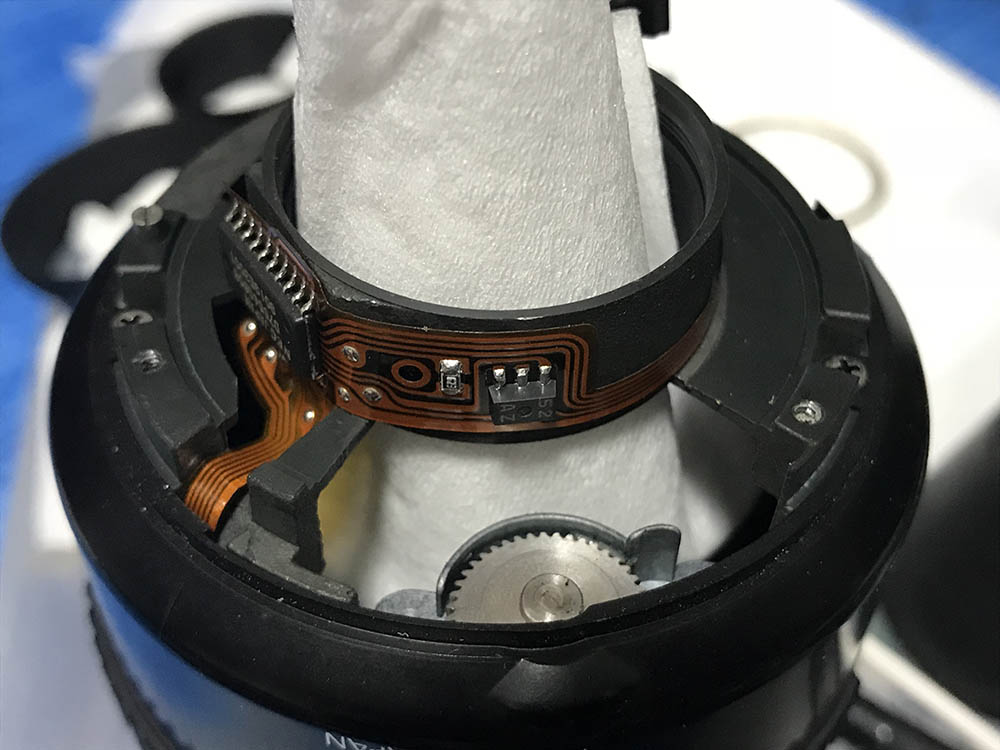
The aperture ring assembly comes off just like this. You’ll have to be careful if you remove this, that post for the stop-down lever can catch on something inside, you will need to wiggle it just to get it free. The sensitive and delicate electronic parts are exposed such as the contact block, its ribbon and the IC. I’ll advise you to discharge any static electricity before you touch this just in case. If you removed the screw inside the green square a few steps back you can totally open the aperture ring assembly to remove the AF drive spindle. Thoroughly clean it, use a tiny amount of high-quality watch oil to lubricate it. There is a tiny brass washer under it, be very careful not to loose it. It can be easily misplaced because it is small.
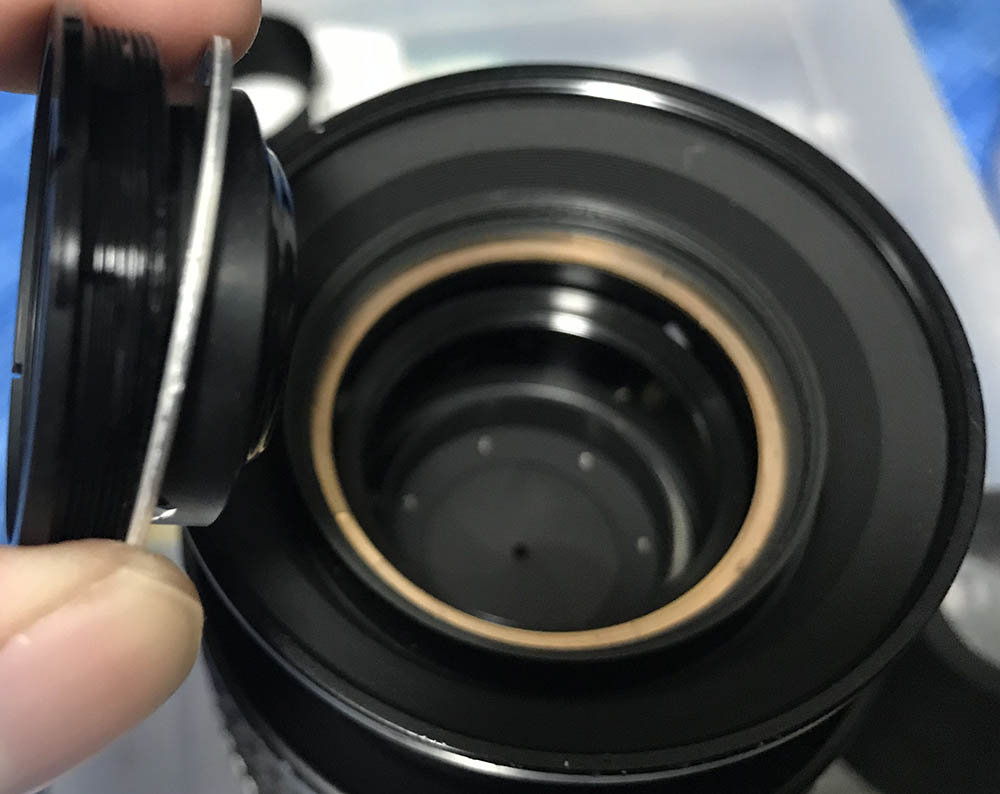
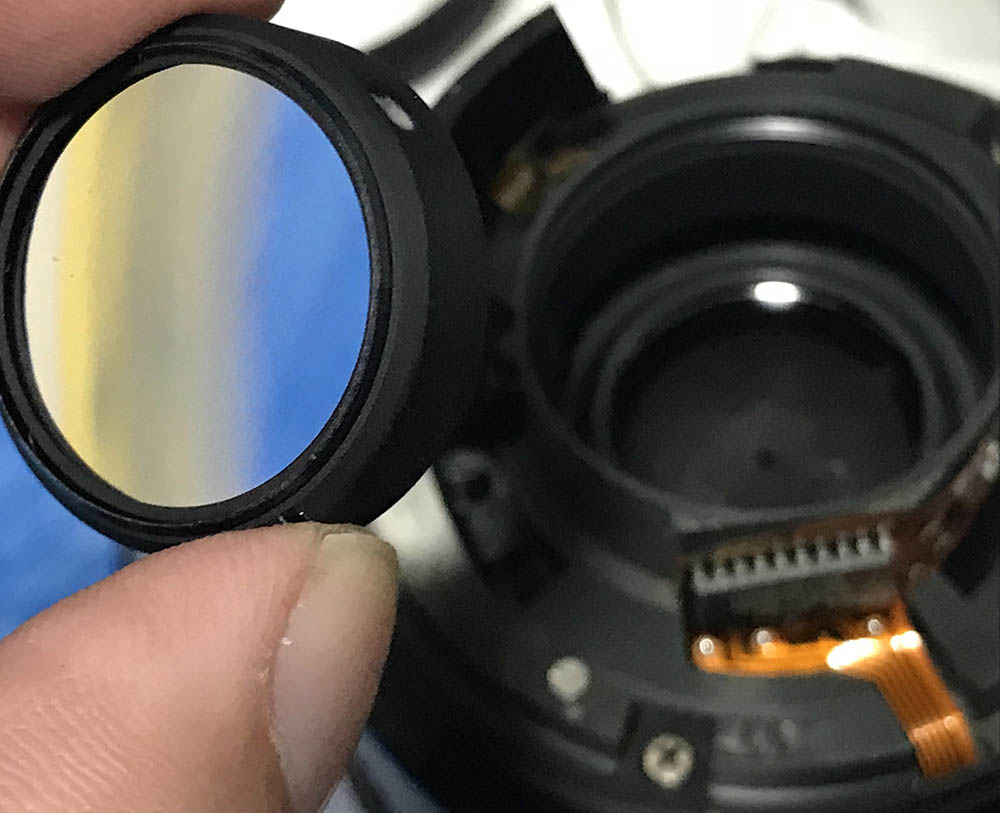
To remove the rear element simply use a spanner. It should come-off easily but be careful not to slip or you will damage the rear element.
The rear element can be extracted with your fingertips. If you didn’t extract the bayonet, use a lens sucker to extract it.

The inner elements assembly can be removed using a thin slotted spanner. The slots are very shallow so this can be challenging to remove if you don’t have the proper tools.

This is what I use for things like this. I used a Dremel to grind some material off from the tips. I rarely use this but it’s very handy when I needed it.
Carefully extract it with a lens sucker. This holds the innermost elements so don’t invert the lens or you may drop what’s inside.

The innermost group is a doublet, a cemented group consisting of 2 separate elements. I used a lens sucker to extract it from the iris assembly’s housing. The fit can be a bit snug.
That is it for the elements. This is a very simple lens to clean if all you need to do is to remove some dirt. It may take me less than 30 minutes to do this. If you are new to this thing then it may take you a bit longer. Putting it back together can take some time, there’s not a lot of space for you to move your tools if you didn’t remove the bayonet. Still, it’s not really very difficult and I am sure that you can pull this thing off.
Disassembly (Main Barrel):
Just like what I said in the previous section you don’t want to do this unless it’s necessary to fix something wrong within the barrel. This wasn’t focusing smoothly, I could live with that but I wanted to be sure so I opened this. The majority of my readers won’t have to go this far but this was how I repaired mine.
Never remove this, it secures the spring for the A/M button.

Here’s the “clutch” mechanism for the AF drive. Mine was so dirty it was not turning smoothly. It’s a bit gritty when you turn it and while it really doesn’t affect the lens’ focusing, I’d want it to be as smooth as possible so the motor on the camera won’t be stressed.
If you want to flush this with naphtha without removing it cover the insides with a sheet of lens tissue. You will also want to protect the electronics with something like 3M Magic Tape. Place a few of drops of naphtha, exercise the cog to dislodge any hardened dirt then blow this with air. If you really want to make a clean job you will have to remove the clutch mechanism to flush it thoroughly. Lightly lubricate it with a small amount of high-quality watch oil. Only oil the spindle and pivots, not the teeth.

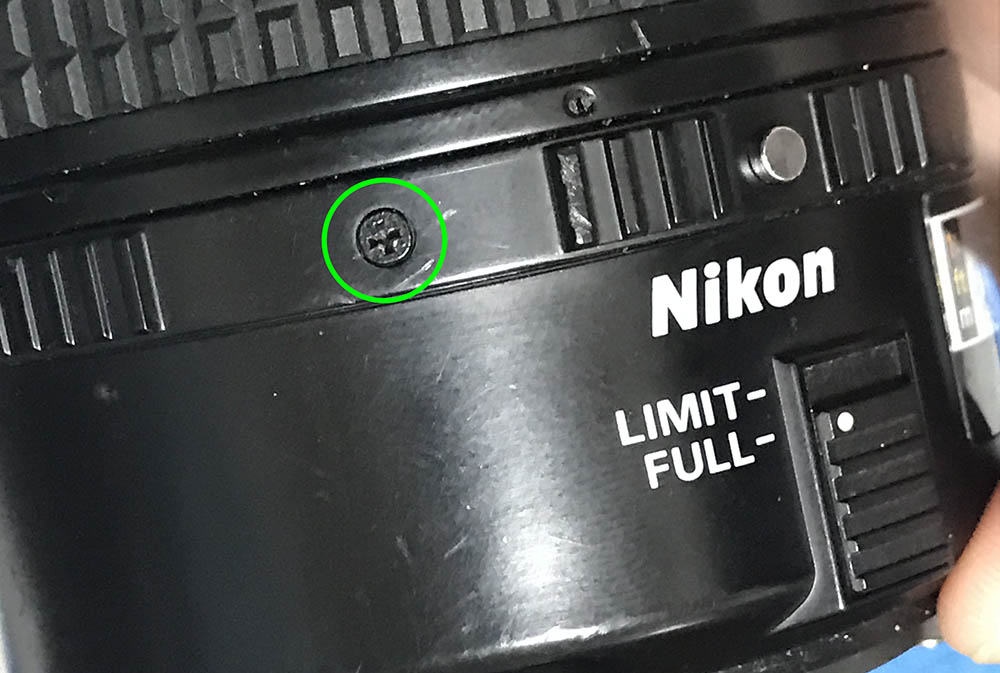
To remove the barrel housing you’ll have to remove these screws. There is a way to remove the housing easily but this involves removing the window of the focusing scale. This is a delicate operation so I didn’t want to risk it and I did it the hard way. There is a small screw that is in the way, you can extract this by accessing it through focusing scale’s open window. It’s likely made of acrylic so it can be brittle. It is delicate, if I cracked it then I will end up with a cracked window and an ugly lens.
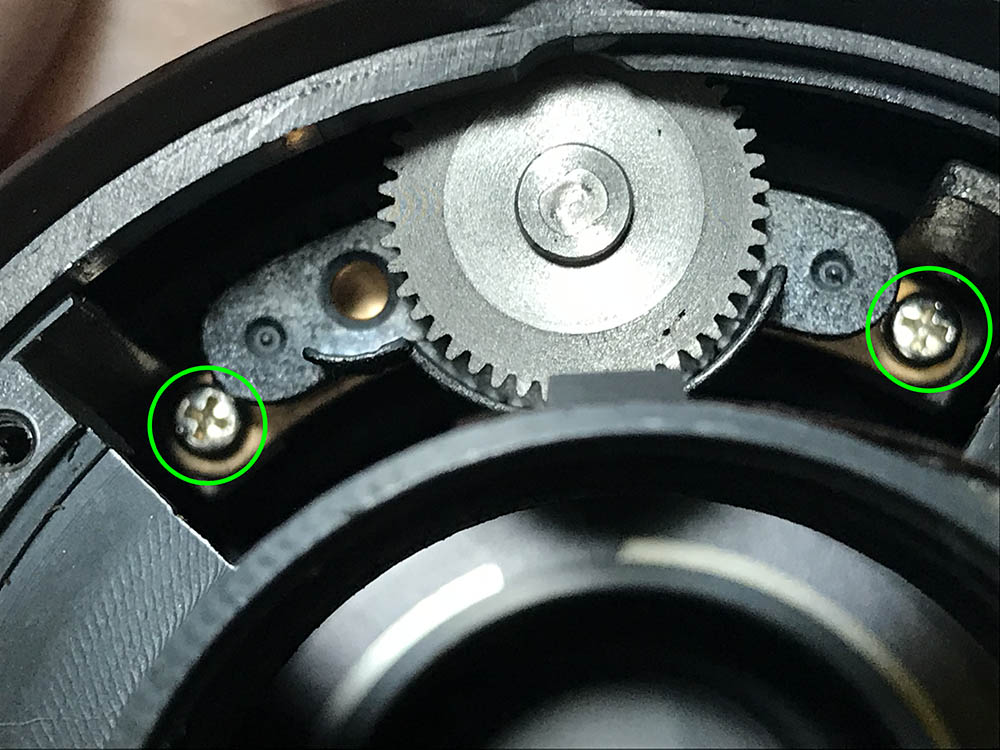
The clutch mechanism is in the way, you’ll have to remove this by extracting these.

The brace is attached to the clutch mechanism and A/M mechanism’s inner ring. You will have to remove the clutch mechanism in order to get further, there’s no other way.

Here is the clutch mechanism, the brass collet couples to the brace. It mates to the cog below when you set the lens to A and decouples it when you set it to M. The collet moves up-or-down as you switch it back-and-forth between A and M. Flush this thoroughly with naphtha, lightly oil the spindles with a tiny amount of high-quality watch oil, never oil the teeth.

Once the clutch mechanism is out of the way you can now carefully remove the housing just like this. Be careful with this, you can damage the delicate brush underneath it. It’s made of thin copper, if you damaged that then say good bye to its electronics. That A/M ring’s retention collar can be removed after extracting its tiny set screws.
To put it back, remove the clear window from the housing then reassemble the housing and the A/M ring mechanism. Remove a screw on the focusing scale then put everything back. Remember that the brace should be coupled to the brass collet. After you have everything back together, manually focus the lens so the screw hole for the scale is accessible via the open window of the focusing scale and the reinstall the screw. This screw acts like a guard so you can’t pull the lens off into two separate parts. That clear plastic window can be reattached by bending it slightly so its tabs can go under the slots of the window.
Here are the delicate electronics, never touch these with your barehands. If you have to clean the contacts, use Q-tips moistened with alcohol to gently wipe them. Make sure that the Q-tip is not dripping-wet while you do this.

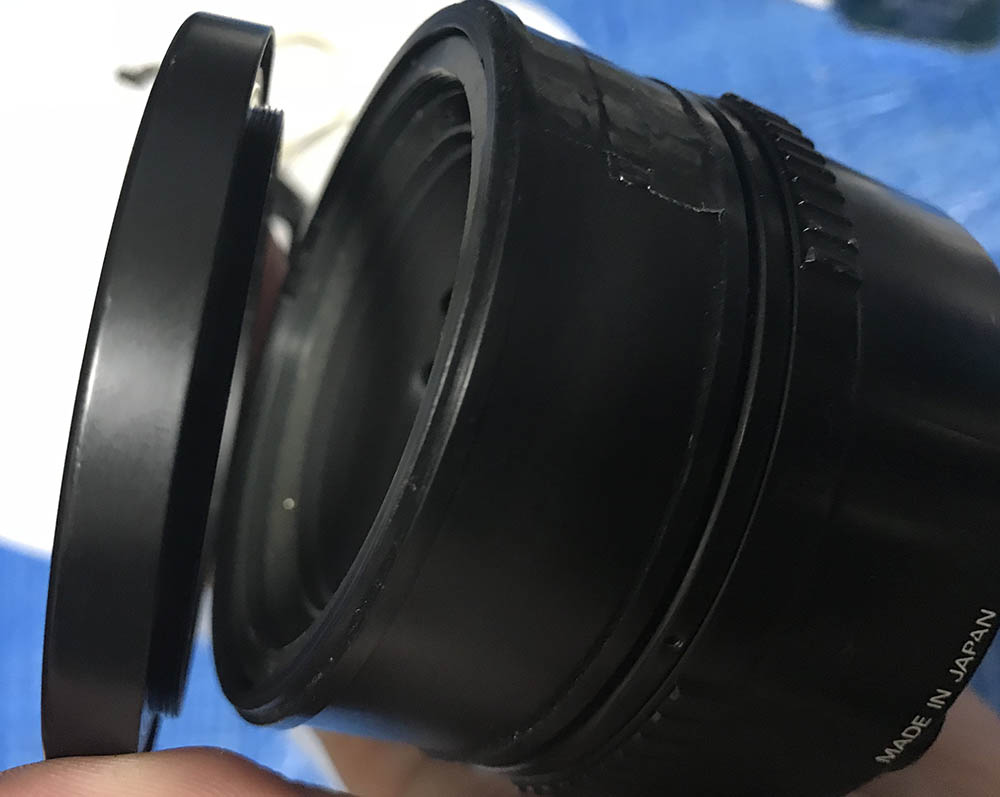
This step is optional and is only required when you need to remove any dirt underneath it. A set screw is used to secure the front barrel and you should carefully extract it. See the scar on the collar? The damn seller from Yahoo! Auctions Japan didn’t show this in the pictures. The seller is a cheat, I would not have bought this if he had shown this. This indicates that this has either been dropped or had a bad scruff with the pavement.
The front barrel can be safely unscrewed, disregard the fact that the rubber is missing. I removed it so I can clean it, you may not need to remove yours.
The front collar can be removed by loosening these grub screws.
Once the grub screws are loosened or removed you can now unscrew it off.

The collar holds the focusing ring in-place, simply pull the focusing ring off. You do not need to remember how the focusing ring was attached, it doesn’t matter as it clicks back into-place whichever position you put this back.
At this point, the access holes for the rollers are visible and you can further disassemble it by removing the rollers and pulling the cam off. I did not do this because there wasn’t a need for me to do that, I doubt that anybody will ever have to do this as well. Leave it be.
Conclusion:
Having seen this I hope that you don’t get too confident to do it yourselves. I will advise you to bring this to an experienced camera repair professional if you are new, you’ll need special tools to achieve even the simpler tasks such as cleaning an element or 2. Without the right tools and experience this will just become a potential disaster for you and the lens. For those who have no interest in repairing, this can help you determine if the repairman you sent your lens to is competent or not. You can judge his work with my article, see if he’s lying to you when he said that he cleaned this or not or he can’t open this or that. I plan to weed them out so we only have legit repairmen in the business. We should support the honest repairmen as much as we can, they aren’t really earning much. As you can see from all the articles that I wrote, repairing lenses is never an easy task.

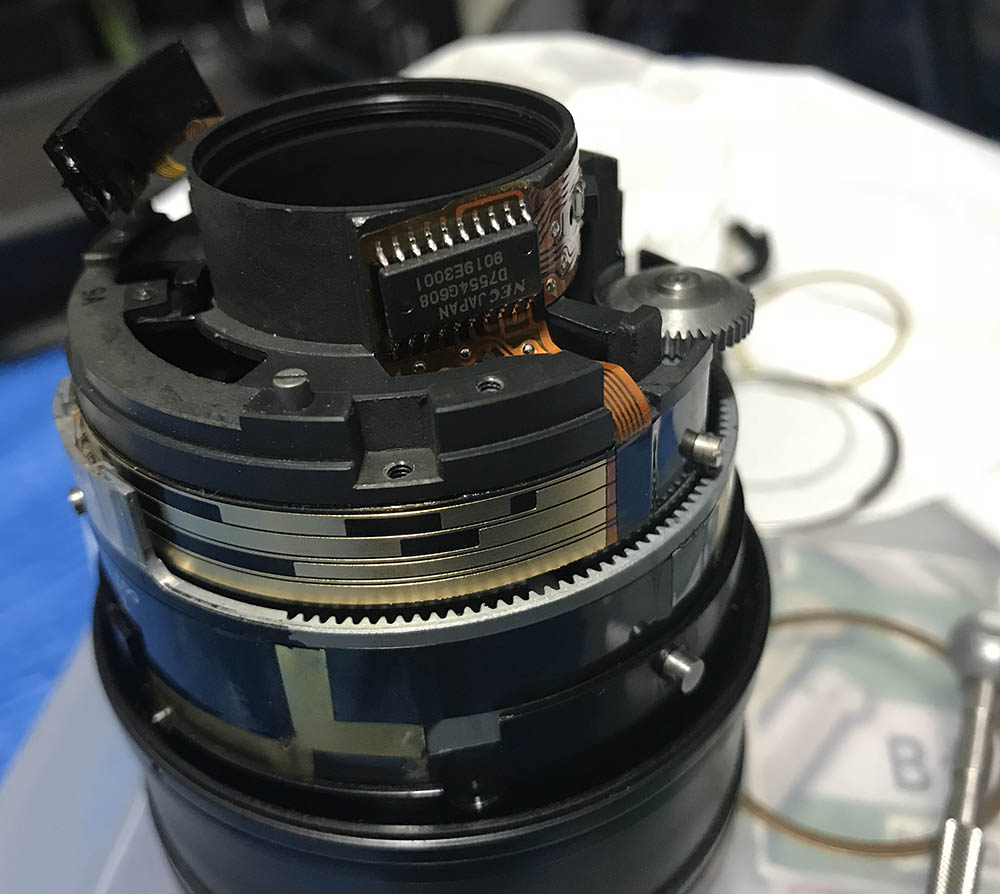
In order for the barrel to extend like this, a series of telescoping cams were used instead of a set of helicoids. Helicoids can be stiff, that will strain the motor of the camera. This is the smarter way to achieve the same thing with minimal resistance for the motor. It’s a clever design, doing this enables the barrel to extend in a non-linear way so the front, middle and rear elements can be spaced in a non-linear fashion as it extends or retracts. A helicoid is linear so this is impossible with helicoids. In case you’re asking how I got to this, this is a set of spares from my spares box.

These are the teeth that couples to the AF gear train. The gears on the clutch mechanism engage these so this cam turns. This is different from what you are used to seeing, I hope you learned something new today. Don’t bother to grease this, it’s lubricated using a special grease. Regular ones can make this stiff.
This now focuses smoother. I’d like to point your attention to the notch near the bottom-edge of the focusing scale window, this is how it looks like if the clear window is gone. This is where you can access a little screw so you can do a cleaner job when removing the barrel housing. You’ll have to remove the clutch mechanism but at least this can save you some work. I didn’t do it like this so I can be sure that I won’t crack the clear window. Do this at your own risk.
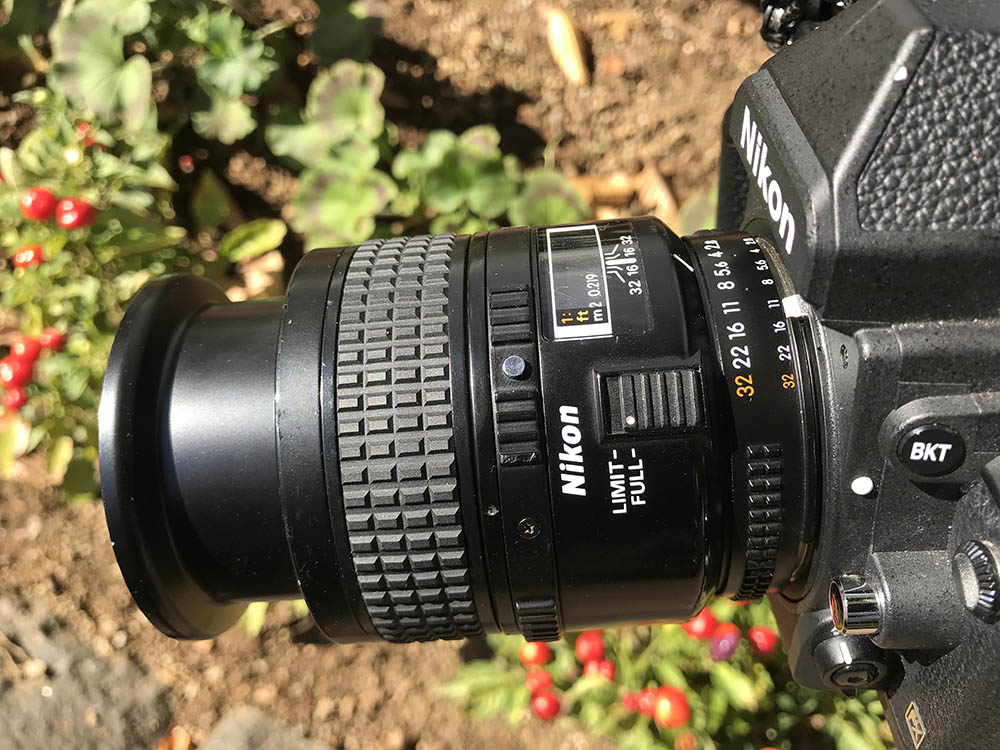
Here it is with my Nikon Df. It lens balances really well with most cameras. Despite the plastics used, it is tough and will tolerate a lot of abuse. Despite it being damaged on the outside, I got it to work properly and I’m enjoying using this as a lot.
I hope that this will be of help to anybody, I found nothing on the internet about the repair of this lens. The repair manual floating about on the net is really of no use, it’s more for parts numbers. This article is useful for people who need to clean their AF Micro-Nikkor 60mm f/2.8D since it is susceptible to dust and dirt getting into the inner elements. The rear is prone to fungus, I have seen many samples with this problem. I do not know why that is but that seems to be the pattern. Maybe the coatings there are more nutritious? Whatever the cause is, this is something common. You will sometimes see a badly-damaged element sitting next to a lens element with no spec of fungi damage at all. Your guess is as good as mine.
Thank you for your support. In the spirit of transparency, I’ll disclose to you what I do with the money you are donating. I use that to pay for hosting. It’s also used to purchase, develop and scan film. Thanks again, I’ll see you guys soon in another article. Until next time, Ric.
Help Support this Blog:
Maintaining this blog requires money to operate. If you think that this site has helped you or you want to show your support by helping with the site’s upkeep, you can make a small donation to my paypal.com (richardHaw888@gmail.com). Money is not my prime motivation for this blog and I believe that I have enough to run this but you can help me make this site (and the companion facebook page) grow.
Leave me some tip?
Thank you very much for your continued support!
$2.00
Helping support this site will ensure that this will be kept going as long as I have the time and energy for this. I would appreciate it if you just leave out your name or details like your country’s name or other information so that the donations will totally be anonymous. This is a labor of love and I intend to keep it that way for as long as I can. Ric.

Dec 27, 2017 @ 18:26:22
Richard, great blog post and very timely. I have the same 60mm lens with grease on the diaphragm blades. How does one continue to remove or clean the diaphragm blades?
Dec 28, 2017 @ 01:25:02
Glad you liked the blog, Chuck!
Sorry but I really cannot help much with that as I never went that deep. If you have any questions you can send me pictures. Ric
Jan 16, 2018 @ 08:53:50
What a wonderful blog I just found!. I bought this lens recently, and while I don’t have the need to open it, I always enjoy seeing how electromechanical devices are built. And if that wasn’t enough, I also get to know a bit of photo gear history.
Jan 16, 2018 @ 10:33:28
Glad you liked it!
Oct 22, 2018 @ 07:45:36
Thanks for the write up, Richard. Am I right in assuming there are two versions of the AF 60/2.8 Micro. A D and an earlier non D version.?
Oct 26, 2018 @ 14:40:01
Ric, great write-up as always. A point that needs to be noted for anyone buying for/or cleaning one of these is that the front two elements (no’s 1 & 2) and the back two (no’s 7 & 8) elements are cemented into carriers and so their inner surfaces can’t be accessed for cleaning. Discovered this and Nikon repair manual confirms.
Sep 18, 2019 @ 20:24:06
I also love this lens, it is a favorite of mine. Thanks for the detailed write up! Note that your Df is not in error when it changes the aperture at close-up focus distances. The effective aperture scales with the physical opening diameter of the iris ONLY if the the light is entering the front of the lens from objects at infinity (such that all the light rays are parallel). In that case you get the classic exposure scaling f^2=D^2/L^2, where D is the opening diameter, L is the focal length, and f is the f-number. At close-up distances the light rays do not enter the lens along the same trajectory, but rather are spreading outwards from the subject. This means that the amount of light entering the lens from the close object is less than the amount traveling in parallel straight into the lens from infinity. That’s why the effective aperture is smaller as you focus closer…the Df does this correction automatically for you using the focus data from the lens (AF-D info).
Jan 24, 2020 @ 13:02:58
This is a brilliant blog, very enjoyable…
May 05, 2020 @ 18:24:30
Thank you, thank you!! Just read this blog and decided to check my 60mm. And knock me down with a feather, there’s a tiny bit of fungus growing on the inside of my rear element!! Going to buy some vessel screwdrivers tomorrow.
Nov 25, 2020 @ 07:35:01
I have an issue with my auto/manual focus ring selector on my Nikon 60mm Macro lens. The ring appeared cracked and lost its ability to reliably engage and move when I pressed on the silver nob to Auto or Manual Focus. A local camera shop guy was kind enough to do a temporary fix by gluing the crack, which bought me over half year more of use, but now it refuses to engage for auto focus mode. I do not appear to need to open the lens up, but do you have any recommendations for how (or if) this may be remedied? Thank you in advance for any and all recommendations.
Mar 29, 2021 @ 06:12:34
Hy
I have a weird problem with the lens that i just purchased
At infinity focus the camera shows f/2.8 but if i move the focus ring (auto or manual) the camera shows f/3.2 and i can not use f/2.8 at all,the maximum apperture becomes just f/3.2.
With my 35mm f/2.8 AF-D lens i had a focusing problem and i fixed it by cleaning it’s mechanism but with this lens this problem is weird and out of my league
Has anyone had a problem like this one? The thing is that when i use the FN button on f/2.8 at infinity the petals are moving just slight,exactly like when i use f/3.2
Mar 30, 2021 @ 07:43:12
A difficult one that could be caused by a tiny misalignment and one not helped by the extreem complexity of disassembling, mikeno62 on YouTube might have an idea.