
Hello, everybody! Do you love Genesis? I am a big fan of Phil Collins and he is the better frontman for the group if you ask me. Not that Peter is bad but Phil just took the band and its music into a higher level. He defined Genesis’ sound as we know it today and most of the band’s best songs were sung by him. I could not think of Genesis without thinking about him, I was shocked when he left the group to pursue his solo career which he did very well. Life is like Genesis’ story, sometimes you find yourself replacing an old favorite and you eventually mature into your own style and start walking your own path. Today, I will show you a Nikkor that out-performed an old favorite. It’s so-good that it eventually got its own fanbase and defined a lens family. It is now not only a little brother to the one that it’s supposed to compliment.
Introduction:
The Nikkor 105mm f/1.8 Ai-S debuted in 1981 and was sold until 2005. It was the fastest lens of its type and is a high-mark of optical engineering. It has a 5-elements-in-5-groups design of the Xenotar-type compared to the common Gauss-type which would have resulted in a lens with typically 7 elements so this was a remarkable feat. One of my lens heroes, Sato Haruo-san said that this was not an easy task according to his excellent essay. The lens designer stretched the limit of this design and came-up with a masterpiece to say the least. If you think that you have seen this somewhere then that’s because it was made to complement the Nikkor 85mm f/1.4 Ai-S so they look alike. The 2 lenses were sold as offerings for the then-new Nikon F3 that was released a year earlier, the most beautiful Nikon ever made (to me).

The barrel is fat as it is wide making it a nice lens to pair with a bigger body. I love how it handles despite being huge. The body’s construction is typical of Ai-S lenses which is good but not as tough as the Ai and earlier lenses. The shade can be deployed rather easily but it’s too-shallow in my opinion. It handles similarly to the Nikkor 85mm f/1.4 Ai-S because that’s also a fat lens. This is a great lens to pair with that when you need speed.
This lens had a long production life and was still sold despite being replaced by the AI AF DC-Nikkor 105mm f/2D, a special lens which autofocuses and it also has a neat gimmick which allows you to alter its bokeh’s characteristics. It’s nice but some people prefer manual lenses instead.

Take a look at me now, there’s just an empty space. The bright glass enables this lens to gather a lot of light. This will surely get the attention of all your models, they can even look at it like a mirror. This uses a 62mm filter so it’s easy to source filters for it.

It’s perfect when paired with a Nikon F4, the bulk of the camera helps a lot. I am amazed at how well this combo felt in my hands when I was shooting with it, I never felt tired holding it despite the setup being over 2kg. You are going to look like a more serious photographer with this and people will stare at you and your dinosaur setup. She’s get a hold on you, believe it.
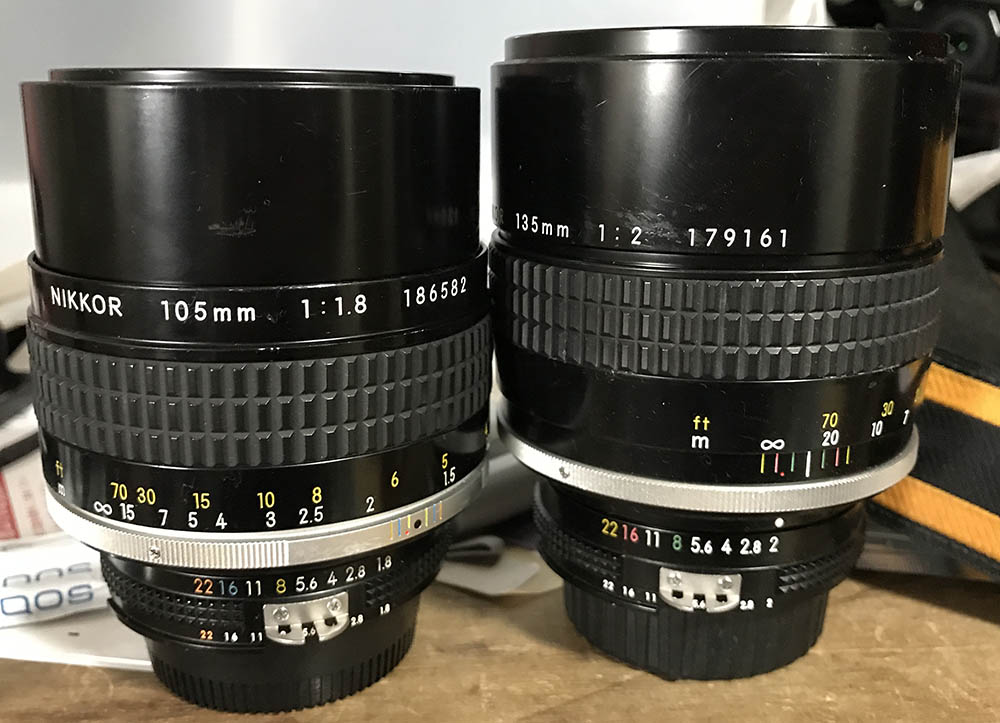
Two hearts, believing in just one mind. The Nikkor 135mm f/2 Ai is a really good lens but some people wanted a 105mm instead. This picture shows the size difference between the two. They handle similarly but I prefer the new one because it has a shorter focus throw which is useful for tracking faster subjects. Both have a built-in hood which is handy but they can be knocked-off easily since they just slide-out from the main barrel.

They both have really large front elements that’s vulnerable to damage and it’s best to use the lens hood to protect these. The build is typical of the Ai-S line of Nikkors which is better than what most lenses have today but the old Ai and New-Nikkor lines were built even better, don’t even get me started on the earlier Golden Age Nikkors, those were made to survive a Soviet attack.
Let’s now see some sample photos taken with this lens. It’s important to see how a lens performs in order to understand it better and maximize its use. I like to know what are the strengths and weaknesses of my lenses to help me avoid its weaknesses and exploit its strengths. I took the following pictures from f/1.8, f/.8 and f/4 as these are the apertures where you will see the most changes in this lens’ rendering, these are also the values where most people would want to use this lens with. I should have shot more photos from f/5.6 to f/8 but I got lazy, all I can tell you is this is excellent at these apertures, it’s performing at its peak from f/4 to f/5.6.


(Click to enlarge)
Vignetting is kind of heavy wide-open but it improves by f/2.8 and is almost gone by f/4. This is typical for a lens of this class. Stop the iris down if you’re going to shoot something like the sky or an even-colored object. This should all be gone from f/5.6 on.


(Click to enlarge)
Chromatic aberration is present wide-open but this isn’t as bad compared to the New-Nikkor 135mm f/2. In fact, it looks much better. Stopping-down the iris to f/2.8 helps a lot and you’ll only see traces of it at f/4 in extreme cases. I wouldn’t worry much about it. Spherical aberration can be seen wide-open but it’s not bad at all, I can say that it handled it pretty well.

Sphero-chromatic aberration can be observed in the “TAKANO” sign. This is easy to avoid by stopping the iris down to at least f/2.8. This was taken wide-open so vignetting is present at the corners of the frame. The good news is it isn’t as dark as one would imagine in real-world photos.


(Click to enlarge)
The bokeh balls looks clean and even. No onion-rings, no edge artifacts and no roughness, this is as good as it gets. The shape of the iris is polygonal but it has 9 blades so it still looks round rather than the ugly lozenge-shaped iris that you get with a Nikkor-Q 135mm f/3.5 Auto, that lens should at least have 7 blades in its iris but it only has 6 straight-edged blades.


(Click to enlarge)
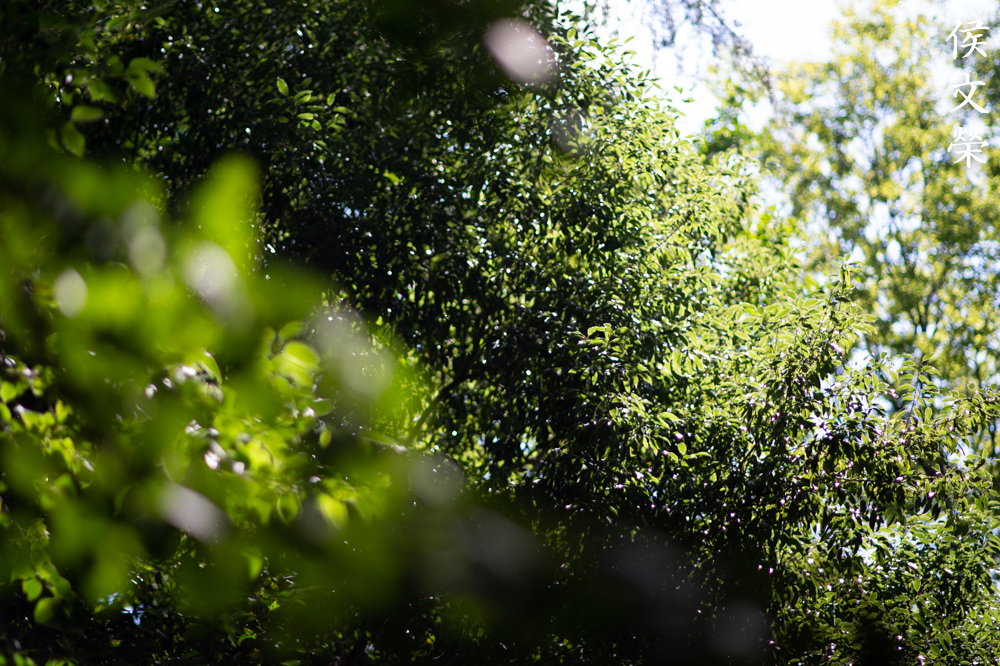
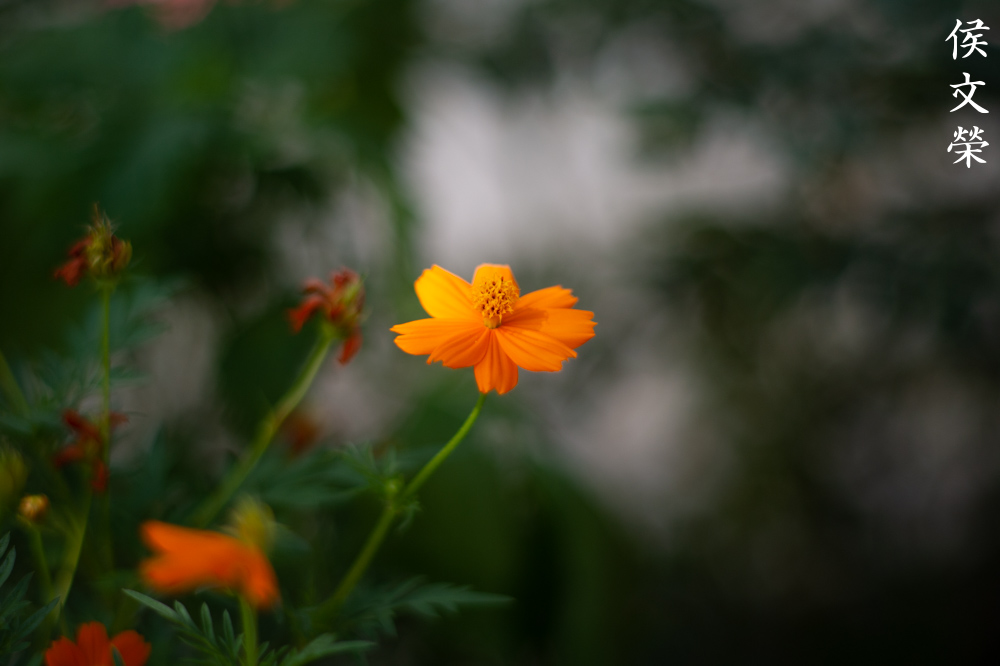
Here’s how it looks like when focused at different distances. I took photos of foliage and twigs because they’re great for triggering artifacts, if a lens has poor bokeh quality then this simple test should reveal it easily.

The bamboo leaves and other details in this scene pose a challenge to other lenses that have lesser bokeh quality. This lens did a perfect job rendering it and the bamboo leaves look smooth with just a slight hint of nervousness. If this was taken using a lens with poorer bokeh quality then this would have looked much “busier” due to artifacts.


(Click to enlarge)
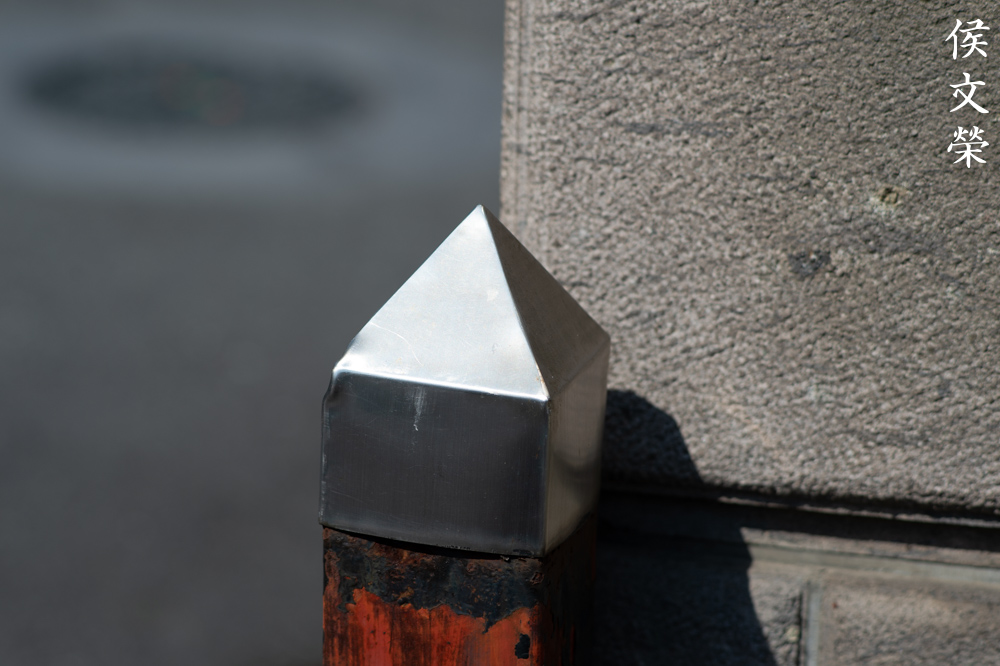
Sharpness at closer distances is good but it is lacking a bit since resolution is not enough to resolve it. Stopping it down to f/2.8 fixes this and things start to look much better. It looks even better by f/4 and it’s at its peak at f/5.6. Its bokeh quality remains excellent and consistent at closer distances thanks to the long 105mm focal length. Contrast seems higher than usual and you get rich colors as a result. It may be a bit too high for some people but it’s ok for me, it reminds me of the Nikkor 85mm f/1.4 Ai-S’s rendering which I think is one of the best Nikkors ever made.


(Click to enlarge)
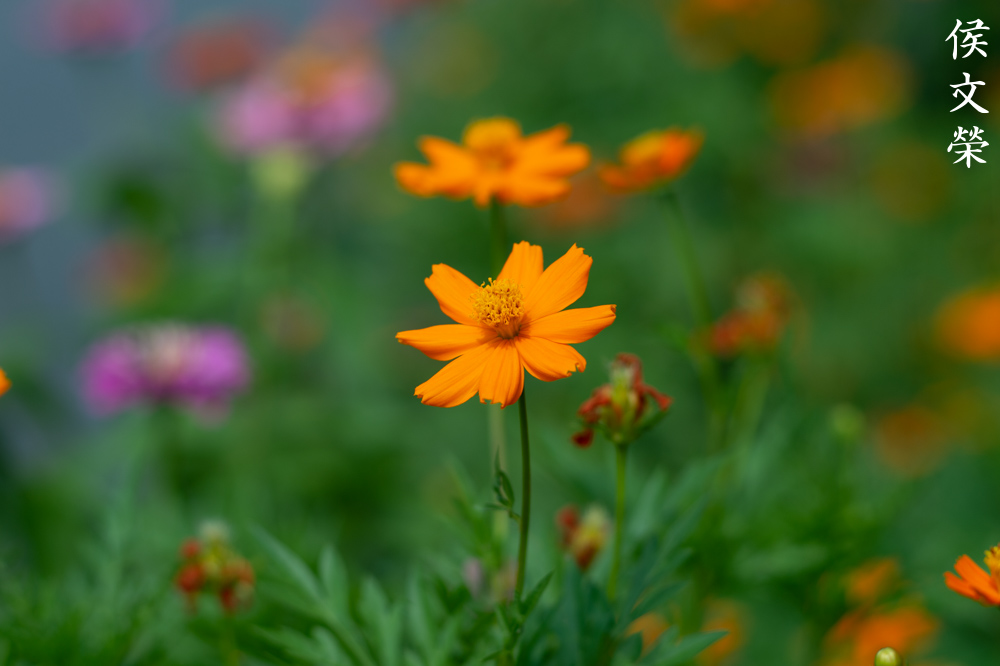
The previous set was taken at its closest focusing distance, these were taken a bit further than that but not further than 2m. Image quality is top-notch, I think it looks even better at these distances. The center of the frame is sharp and clear, every detail was resolved beautifully even wide-open.


(Click to enlarge)
These are probably the most common distances that people would use this lens with. Everything looks great at the middle of the focus range and you’ll be amazed at how well this lens performs. Shooting things that are closer to or at infinity is a different story, while it’s technically still great the resulting photos aren’t as good as the ones shot at distances closer than 17m 0r so. If you really have shoot at these distances then simply stop this down to f/2.8. It’s still great wide-open but just not as good, unfortunately. Maybe this was intended to be a specialized portrait lens? Can this just be sample variation?

The gorgeous bokeh quality that you get with this lens is second-to-none. It’s perfect in my opinion, it’s at the same level as the Nikkor 85mm f/1.4 Ai-S. It can’t be surpassed at this focal length unless you’re willing to pay more for more exotic glass.

Using a telephoto lens helps bridge the gap between you and the subject. It’s great for establishing a scene, a wide lens won’t give you this effect and it is better for people in this case if you were to ask me.

This was taken at f/4, it looks great at this aperture. The resolution you get is perfect at the center and the corners are not too-far behind.

Focusing with this lens can be challenging with moving subjects, you’ll have to anticipate their movements even if they’re not moving a lot. The shallow depth-of-field can work for-or-against you depending on the situation. This photo should have been taken at f/2.8 at the very least to get more things in focus, giving you a little bit more allowance for mistakes.

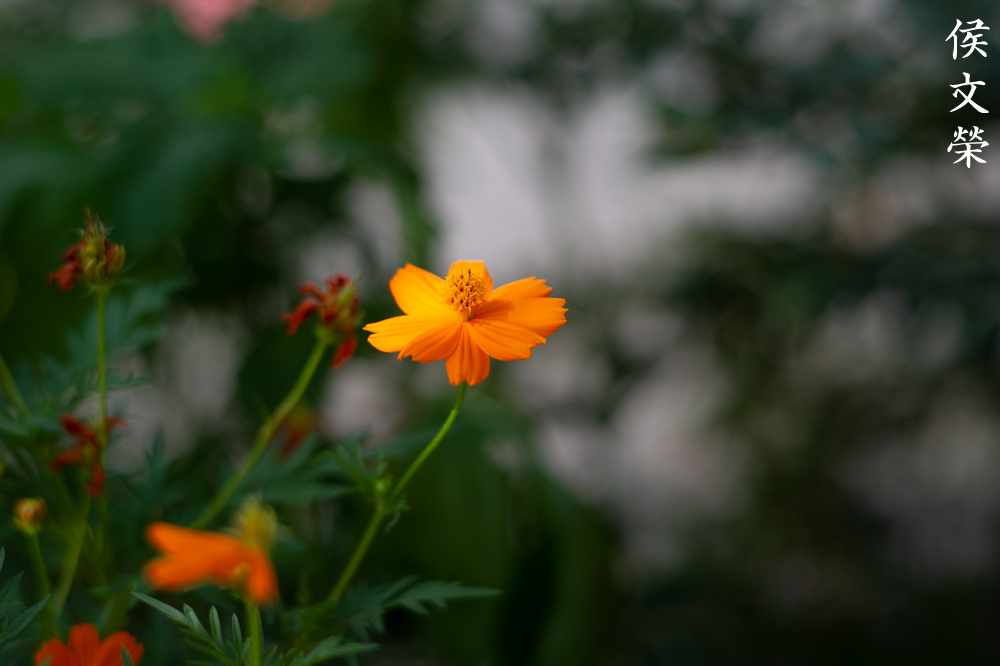
Gorgeous bokeh quality! There’s no roughness in the background and all the transitions look smooth. The shallow depth-of-field can be difficult to work with specially with moving subjects but you can nail your focus with plenty of practice.

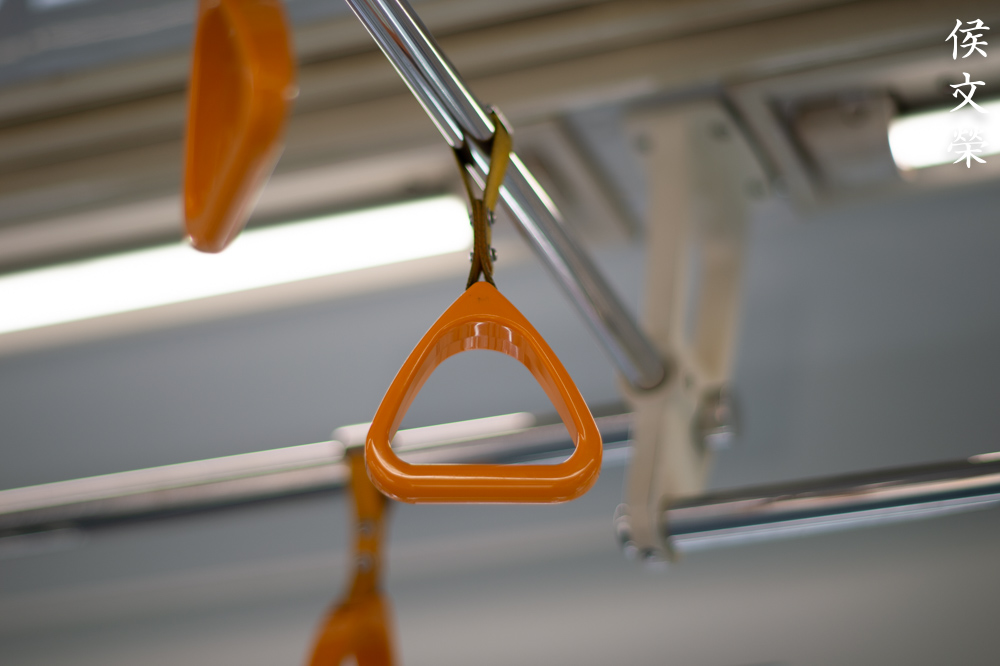
Sphero-chromatic aberration can be observed in this picture. There will be times when it can get distracting because your attention is drawn it like the one we have here in the white straps.


(Click to enlarge)
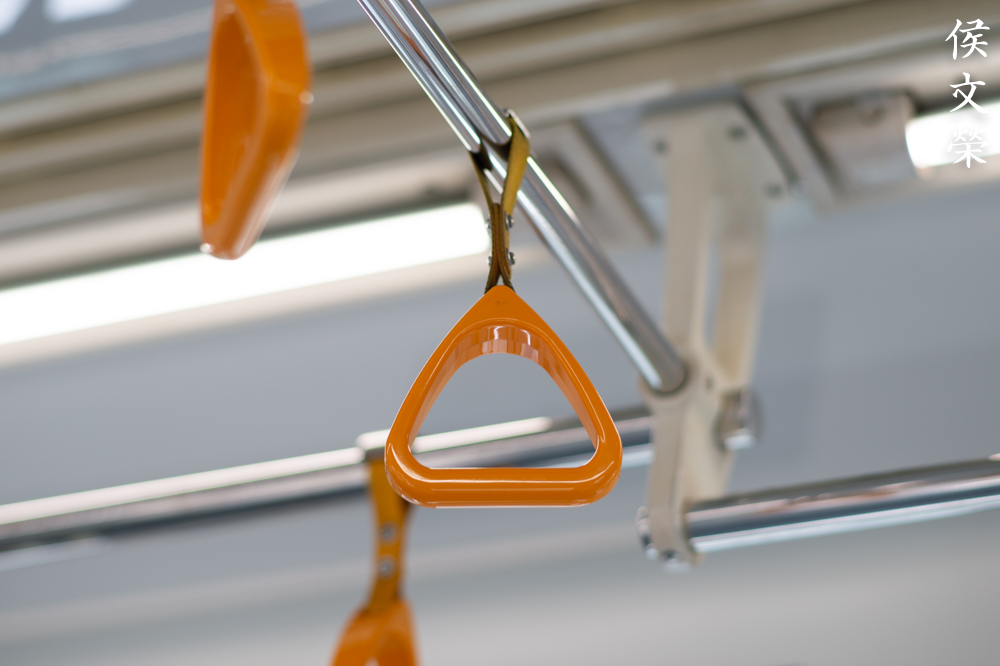
The shallow depth-of-field can help you isolate your subjects. This can also be used to direct your viewers’ eyes to them. The compression you get with a 105mm lens is enough to give your composition an intimate feel wherein your subjects’ sizes aren’t too-different from each other. A wider lens is not going to give you this as the closer subject will be bigger, making the one at the background look a bit “detached” from the story. It all depends on what story you want to tell your viewers.


(Click to enlarge)
Here are some more photos that were taken with my Nikon Df. It’s excellent as far as I’m concerned and it’s hard to find a better lens in this class if your budget only allows you to spend less than $450 for this. If you want to buy a 3rd party manual lens then just skip that and buy a Nikkor. There’s a reason why these things remain expensive to this day.
Let’s now see some pictures that were taken with film. Film has a different look that’s quite difficult to simulate with a digital camera because of grain, grain can help mask flaws so I consider it to be more forgiving compared to digital except for exposure since you should get the exposure just right. This lens was made for use with film and it’s only fitting that we see photos shot with it to fairly assess this lens’ performance. I don’t shoot charts but I shoot real-world photos and base my observations from it. These were taken with Kodak Color Plus 200 using a Nikon F4 and a Nikon FA.

This is probably not something that you would want to use this lens for. It’s more forgiving when shooting film so sharpness at further distances looks just as good as it is at closer distances compared to the results we got with a DSLR. I am exaggerating this because I am documenting my observations so don’t think that this lens is terrible at these distances, the difference that we can observe is minimal, a non-issue.

It is easier to get the faces of everyone in the frame in-focus if you position your subjects in roughly the same plane as your main one. This is specially important with faster lenses like this, you would ideally want to shoot this at f/4 if you can.

I missed by focus here, the shallow depth-of-field can be tricky to use and it can sometimes trick you when you’re using a split-prism because it can get a bit dark at the center depending on your viewing angle. A 105mm will be perfect for making your model’s face look less-round, she has a pretty face.

Just look at how beautiful the background is, the details melt into a wash of color like an old painting and yet our muse looks sharp. This is your reward if you nailed your focus perfectly. Her skin was rendered perfectly, it looks smooth, soft and healthy. This lens is perfect for portraiture because of this.

Well, Kodak Color Plus 200 has a yellowish tint so this ended up looking like this but I don’t mind. Some chromatic aberration in the white straps, you’re not going to notice it much since film has this “rustic look” that many of us embrace. As a Buddhist, I just look at it as another expression of “wabi-sabi” which makes this totally fine to me. However, this won’t look pleasing when you enlarge this frame and hang it on a gallery.

Film grain helps make the de-focused areas look more organic, it helps with breaking-down the blurry parts and making it look smoother. Compared to the New-Nikkor 135mm f/2, this lens seems to have a more-refined feel.

That thin slice of depth-of-field is handy but it’s now over-used, some people hate this look now. This should have been taken at f/2.8 but I just don’t have enough light to support that aperture.

The focus is off by a few centimeters but this will still pass. Shooting using a camera without a digital rangefinder can be tricky at times specially if your eyesight isn’t perfect. The transition from what’s focused to what’s not is so smooth, you won’t get that “wall-of-focus” look in your photos that many of the newer lenses tend to give you, this is a masterpiece of lens design if you ask me.


(Click to enlarge)
Here’s some more pictures that were taken using film. These should help in informing you about this lens’ performance with it. Film photography has a growing user base and part of that reason is its unpredictability, you’re only going to see your results once the roll has been processed. That adds a sense of excitement that the instant-gratification of a digital camera can’t give you so more youngsters are drawn to this medium today.
Are you now a believer because of my pictures? This lens is the best option if you have around $450 to spare for a fast 105mm Nikkor. This won’t focus automatically neither is it a fast f/1.4 one but it’s still a very good lens if you know how to use it. If you love taking portraits then this is something that’s should be in your kit if you’re building a kit on a budget. The newer one can autofocus and has DC but it is a bit slower at f/2 which does not really mean anything in real use. That lens costs around 50% more in the used market, it is probably to get that instead if you have the money but that lens is delicate as there are more things that can go wrong with it. This one was built to last and you can bet that your grandchildren will still be using this so long as it’s been taken cared for. When buying one of these, be sure that there’s no oily iris and the helicoids should turn smoothly. Many of these were used by pro photographers and a beater can be bought for less but you’ll have to test the lens first to make sure that there’s nothing wrong with it.
Before We Begin:
If this is your first attempt at repairing a lens then I suggest that you check my previous posts regarding screws & drivers, grease and other things. Also read what I wrote about the tools that you’ll need to fix your Nikkors.
I suggest that you read these primers before you begin (for beginners):
- Essential tools
- Best practices 1
- Best practices 2
- Best practices 3
- Ai conversion
- Working with Helicoids
Reading these primers should lessen the chance of ruining your lens if you are a novice. Before opening up any lens, always look for other people who have done so in Youtube or the internet. Information is scarce, vague and scattered (that is why I started this) but you can still find some information if you search carefully.
I highly recommend that you read my working with helicoids post because this is very important and getting it wrong can ruin your day. If I can force you to read this, I would. It is that important!
For more advanced topics, you can read my fungus removal post as a start. This post has a lot of useful information and it will be beneficial for you to read this.
Disassembly (Lens Barrel):
It’s surprising to me that this lens has a separate housing for the objective. I am used to seeing AI-S lenses with the casing of the objective and the inner helicoid merged into a single piece to save space and weight but this is not the case for this one. This is good news since it makes this lens easier to fix. This is not a simple lens to work with due to the large glass and you’ll need special tools to open some of the rings because of their size. Be careful that your hands don’t slip or you’ll end up with an expensive junk.
I won’t be showing you how to work with the objective since mine is clean. I don’t want to subject the lens to unnecessary trauma so I just left it alone. If yours is dirty, just read my other articles and those should help give you the knowledge that you need to work on your lens.
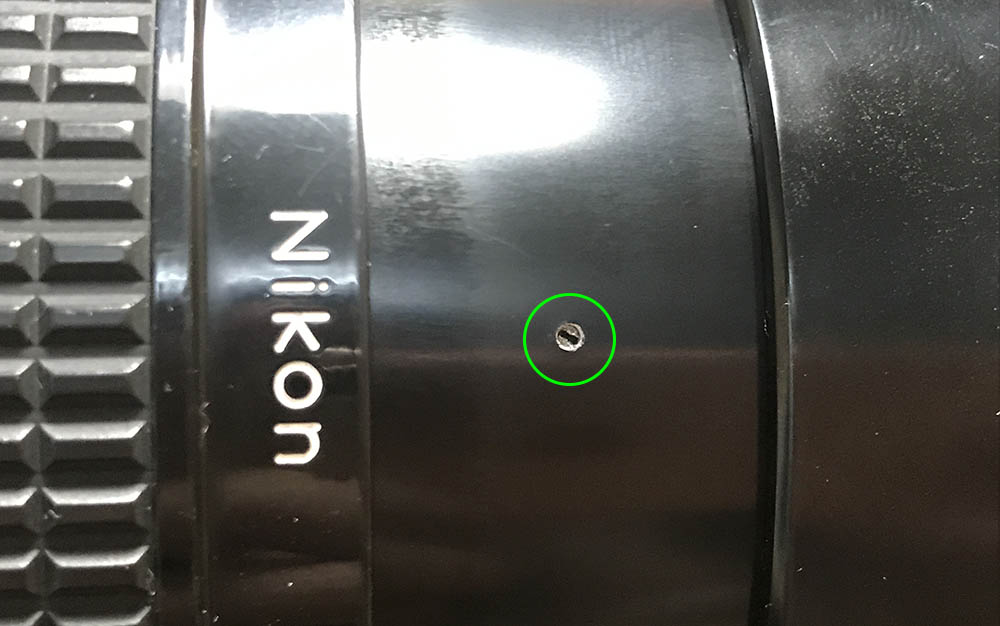
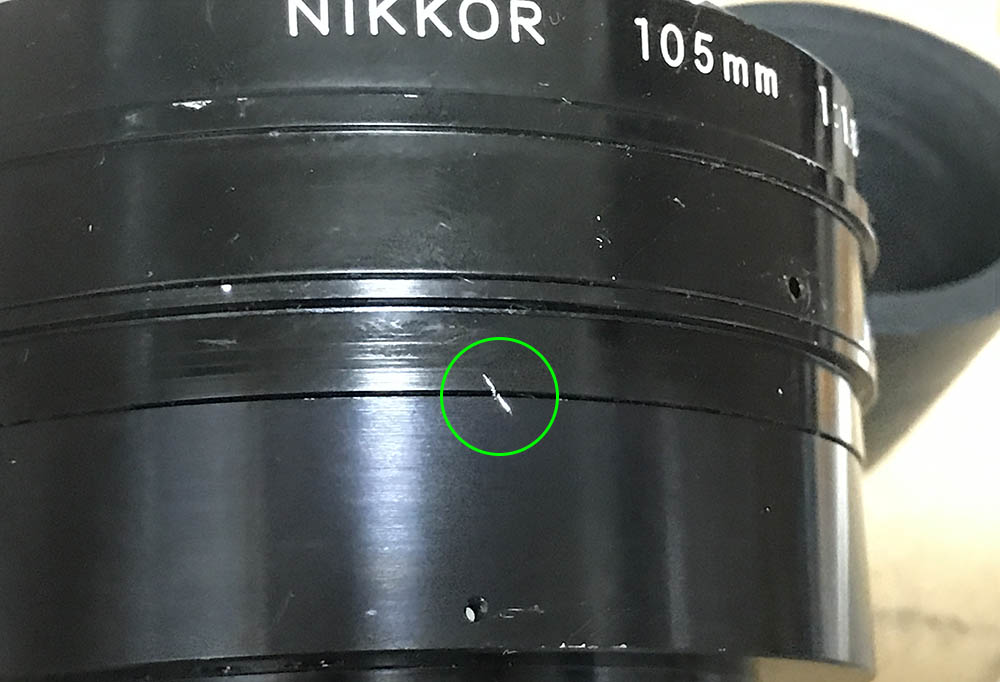
The most important thing to do is to remove the objective first so you cannot damage it while working with the rest of the barrel. The front barrel has to be removed in order to do this. Locate and extract this little screw first.

You can now turn the front barrel off once the screw is gone. It may be tight or it can be stuck so just apply a small drop of alcohol on the screw hole and it should soften the seal.

The objective can be safely extracted by pulling it off using its front and take care not to scratch the rear element while doing this.
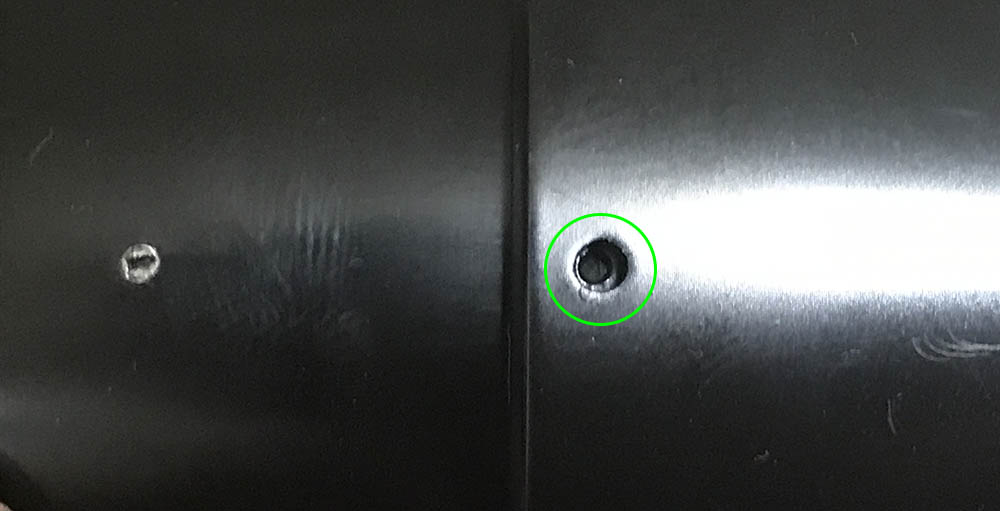
The shade can be removed by locating and extracting this screw via its hole. There may be more than one, just check yours to be safe.

Using a rubber tool, unscrew the front ring to dismantle the front barrel. It’s not necessary to do this and the only time you’ll have to do this is when the lining of the shade has to be replaced or the lens is filthy.

The focusing ring’s rubber grip can be removed by running a toothpick or a thin, blunt rod underneath it to lift it from its glue. Be careful, the rubber is old by now and can be damaged rather easily. The distance scale is secured with tape and you should remove it later. From this point on, you will want to work with the barrel while it’s turned to infinity. This will help you when you take your notes as you will have a point of reference.

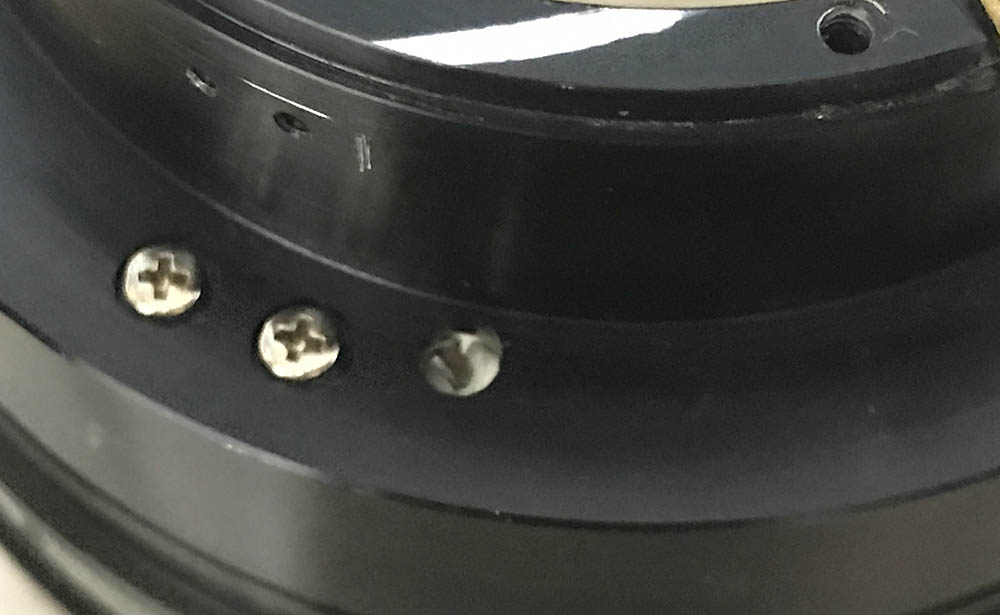
The bayonet mount can be removed once these screws are gone. Many don’t know how to do this properly and they end up stripping these screws. If you are new to lens repair, read my guide on how to remove bayonet screws. It’s important that you use the right drivers for this job, slap anybody who tells you that these are phillips screws. These are JIS screws and you need to use a JIS driver for these.

The bayonet mount can now be safely removed. It contains the mechanism for the stop-down lever actuator. You don’t dismantle it further than this in most cases unless there’s something wrong with it. Be sure not to bend that lever, it has to be straight.

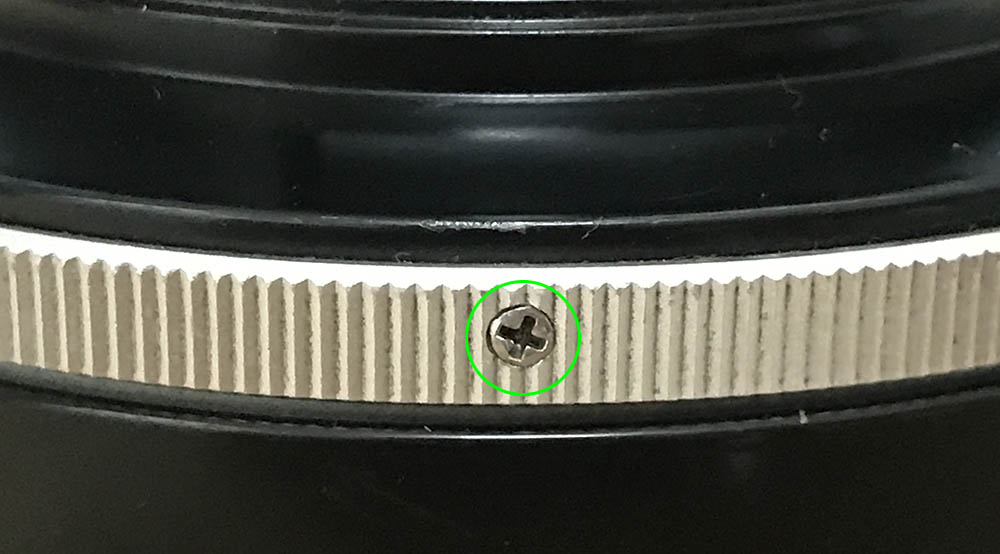
The aperture ring has 2 screws that you should extract, these are sealed and applying solvents or hear can help you remove these safely.

The screws link this to the aperture fork underneath it, this couples the ring to the iris mechanism so you can control the iris by turning the ring. There’s a bit of grease on the slot, don’t apply too much grease on this part or it will end up fouling your iris.
Extract these screws on the grip to remove it. Make sure that you don’t use a driver that’s bigger than the head or you’ll strip its surrounding metal. Don’t use a smaller one either, that’s going to strip the head.

You will also have to remove the detent spring as it’s in the way.
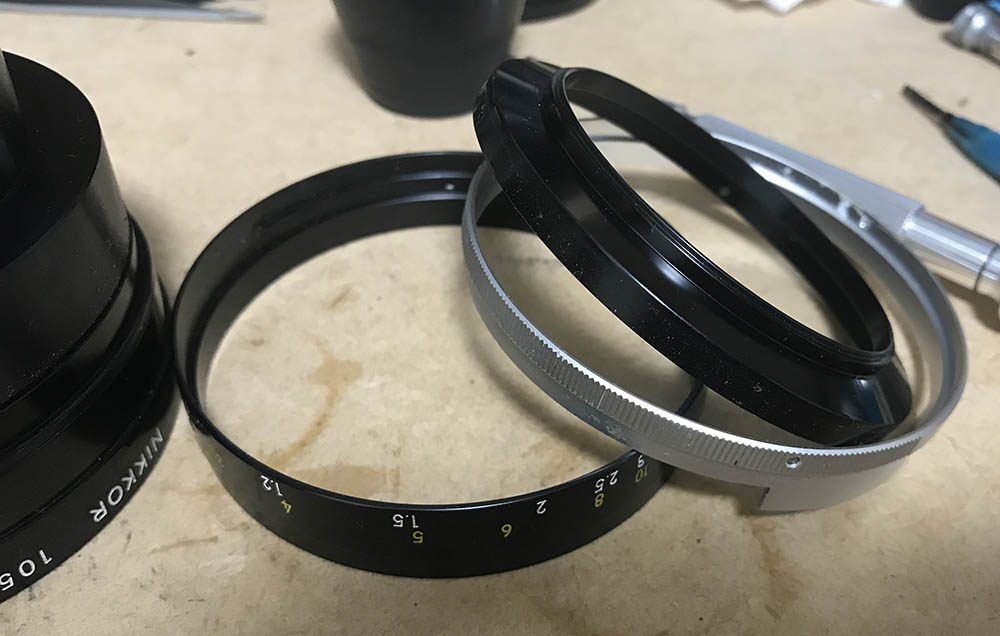
The grip, sleeve and the distance scale can now be removed. The grip has a ridge that constrains the rotation of the focusing ring, you adjust your lens’ focus by adjusting the distance scale and taping it to secure it.

There’s a pair of helicoid keys in the barrel because it’s huge. Take plenty of notes so you’ll know how to put these back later. Remember to put these in the same place where you found them later during re-assembly.

The helicoid keys are secured by these screws. Heat and extract them.
Once the keys are gone you can now turn the helicoids beyond their range. I usually collapse the central one and make a diagonal mark so I will know if I got it right later when I put them back. If these are off by a lot then I didn’t put them back correctly and I’ll have to figure out where I went wrong.
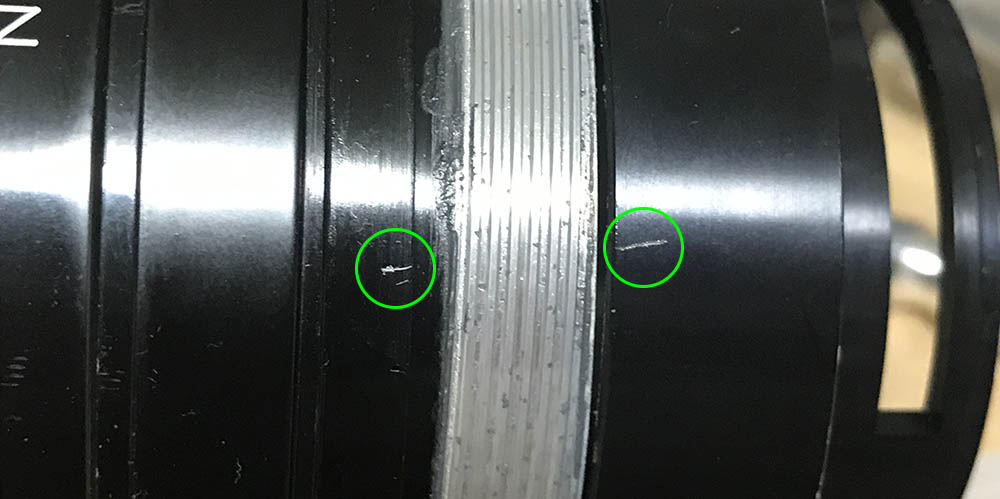
Separate the central helicoid from the outer one and mark the place where they separated because this is also the spot where they should mate. If you don’t know how to work these, read my article on working with helicoids. It is important that you read that because many people get stuck here.
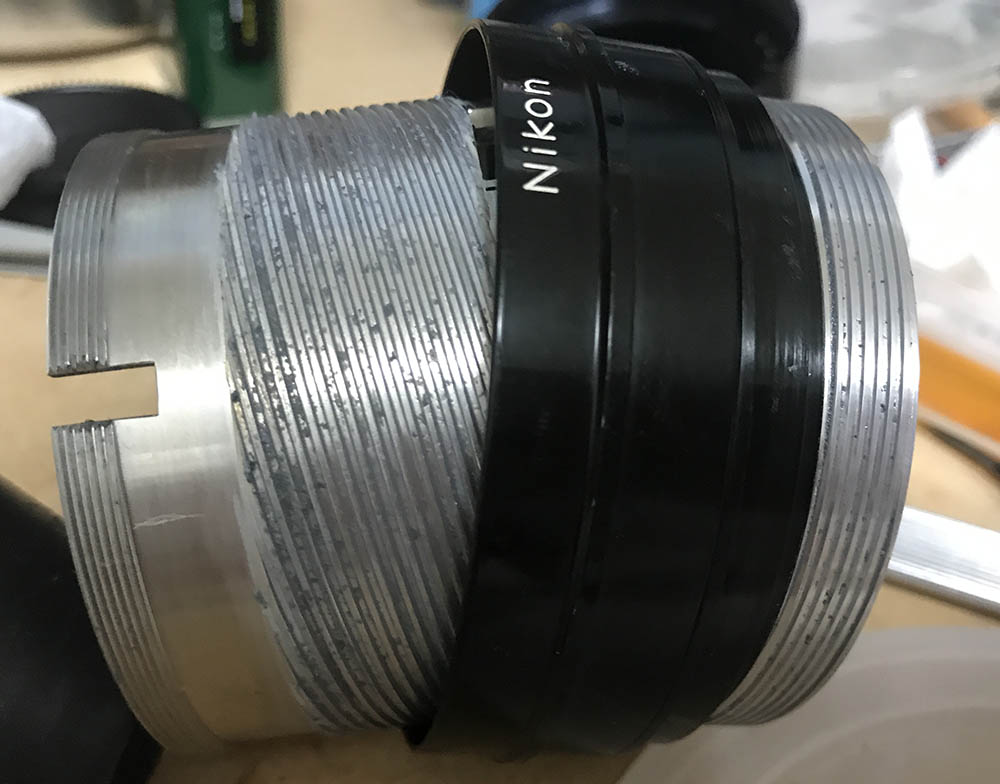
Do the same for the inner one and never forget to mark where they parted.

This can be done earlier. The lip of the central helicoid can be unscrewed to give you better access to it. Germs and oil tend to accumulate under this so it’s important to clean this properly.

Carefully clean the helicoids and leave no residue. Make sure that you apply a thin film of grease so it won’t end up in the iris. Having too little of it is not good either, just apply enough to get a smooth, damped feel.
There’s a hole near the screws of the helicoid keys. You use this to access the adjuster for the helicoid keys to control its play. This will enable you to turn the tiny screw to adjust how tight or loose your helicoids should be. I do not usually mess around with these.
Conclusion:
That took less time than expected. It was pleasant working with this lens, it has no clever tricks and everything seemed logical. I also didn’t have to fix or clean the objective and that saved me even more time. This one took me a little more than an hour or so to repair since my lens isn’t a junk, it was not dirty at all and nothing’s damaged but the grease had to be replaced just to be sure that it’s clean.

Assemble everything to this point and adjust your lens’ focus. You can read my article on how to calibrate your lens’ focus to help you understand how I do it. Getting it right is important with this lens because of its very shallow depth-of-field.
That’s all for this lens. I hope that this helped somebody or a least generate some interest and discussion about this masterpiece from Nikon. Share the article on social media to help spread the work about this lens. Facebook is now banning people from mass-sharing and forcing people to pay for more shares via their paid advertisement scheme. I don’t want to pay $20 just so I can share my work, I can hardly afford it for something like that. If you like to help me support my work, please consider supporting this blog and that’s going to help me a lot. Having said that, I dedicate this to Miss Hennessy, she is one of our avid supporters and I could not get this far without her help. It is supposed to be my summer vacation but I’m working from home and also updating this blog so I will end this article here. Thank you very much, Ric.
Help Support this Blog:
Maintaining this blog requires money to operate. If you think that this site has helped you or you want to show your support by helping with the site’s upkeep, you can make a small donation to my paypal.com (richardHaw888@gmail.com). Money is not my prime motivation for this blog and I believe that I have enough to run this but you can help me make this site (and the companion facebook page) grow.
Buy me a roll of film or a burger?
Thank you very much for your continued support!
$2.00
Helping support this site will ensure that this will be kept going as long as I have the time and energy for this. I would appreciate it if you just leave out your name or details like your country’s name or other information so that the donations will totally be anonymous. This is a labor of love and I intend to keep it that way for as long as I can. Ric.

Mar 16, 2020 @ 15:09:16
Hi Richard.
Thank you for your article – one of few which enticed me into buying this lens. 🙂
I have a question regarding de-click modification on manual Nikkor lens.
I purchased it quite recently as faulty and while I was having it repaired I asked the service-man for de-clicking modification. Repair (impossibility to focus) was successful and so was the modification.
But there seems to be some glitch.
When I check the operation of the aperture on the lens itself, everything is fine and aperture glides smoothly without hard stops. Situation changes when the lens is mounted on body (I use D700). There seems to be some spring working as the aperture is always returning to fully open position by itself when I take my fingers off the aperture ring after closing it.
Is this return/aperture opening movement normal here or the service-man forgot to remove some part/parts and that´s why is this happening?
I hope I could describe my problem clearly and you could get an idea what I´m talking about. 🙂
Would appretiate some confirmation or pointer. Thank you in advance.
Regards,
Petr
Apr 03, 2020 @ 03:53:50
This is the work of the stop down lever. It has to be removed.
Apr 26, 2020 @ 13:10:26
Thank you very much for reply and advice.
Can I ask one more thing?
In case that this lever is removed, will the operation of aperture working change in some particular way?
I mean this:
Now, when I’m shooting, and I want to close aperture a bit down, I focus, and then use my thumb and close it, and press the shutter. I do not see any darkening in viewfinder as aperture close down only during the taking actual photo.
So I wonder, if the stop down lever is removed, and I change an aperture prior taking a shot, will the viewfinder dim down as the aperture close down “in real time” ?
Please, can you enlighten this to me?
Thank you.
Petr
Aug 04, 2020 @ 22:58:59
Do you have any recommendations on tape for the distance scale ring?
Nov 07, 2020 @ 13:08:17
Hello,
just relubed my 105mm and adjusted infinity focus aiming at the moon during night. Is this a correct course of action or should i readjust it to something a bit closer?
Thanks a bunch, Luka
Jun 19, 2021 @ 03:56:50
My focus is completely locked and aperture seems to click only from 16-5.6
What can be the problem? I cant get anything to really move.
Jan 02, 2022 @ 14:28:40
Unable to get into the front element, have fungus. Do NOT have a 62mm rubber tool. is that all I need? It so tight up front ring? you need to explain better getting into the optical block.
Mar 27, 2022 @ 13:47:37
Thanks Richard for the article. 90% of these lenses have issue’s with fungus behind the front element. & deeper in the optical block. So, here is a professional suggestion. The back element is easy enough tio figure out and clean, but between the first element in the front and the back eelement, you didnt cover the disassembly, and I feel its badly needed. The aperture and helicoils always seem to be fine, so can you ad a section for the optical Block? Thanks, Don
Oct 20, 2024 @ 18:23:00
Richard I have a 105mm 1.8 ais where the focusing ring is completely stuck, it won’t move. Is this an expensive repair?