Hello, everybody! This is the first of a new series that I call “お店お初回” or “Camera Shop Introduction” where I will show you around the shops that I frequent and recommend. I will be adding more and more shops here so please come to my site to check if I added a new shop in my directory. This is to help people who visit here in Japan (Tokyo) find the shops and see which shop specializes in what. I will only add shops that have agreed to this series so some shops may not be able to be featured here, unfortunately. I hope you’ll enjoy this new series and do tell me if you did so I will at least get some feedback.
Today, I’m going to introduce to you Lucky Camera (ラッキーカメラ). Situated at Shinjuku right near to the Shinjuku Sanchome (新宿三丁目) station along the Marunochi line, it is a bit off the track from the center of Shinjuku but it’s worth the walk if you are a Leica or Bronica fan. The shop has been around for 7 decades and the current owner is the third generation shop owner, the grandson of the first guy who started this business in 1940. I sometimes get “lucky” here and find interesting stuff. I would also like to say that Lucky helped revive my interest in classic camera gear some years ago. Let’s have a closer look!
Here’s the storefront. You can spend minutes looking at what’s being sold here! There are many beautiful lenses and cameras on display here and some time in the past, there was a Noct-Nikkor 58mm f/1.2 Ai-S here on display and even a Nikkor-N 5cm f/1.1 lens!
Hello, everybody! I was looking for some cheap eats the other day and I discovered this shack near my work where they sell nice meals for $4.50 only. The meal was great for its price and despite the cheap-looking exterior the meals inside can rival a more expensive restaurant’s offering. It’s the same camera equipment, there are times when some of the better things cost less and if you consider using it despite its age and appearance then it’s going to satisfy you so long as you know what you are looking for. Today, we are going to talk about one of the better deals today in AF zooms. Read my article and enjoy.
Introduction:
Today, we’re going to talk about the AF-Nikkor 70-210mm f/4 zoom! This lens is a favorite of many film photographers back in the day because it’s lite and compact. It’s a very good lens for traveling lite for people who use autofocusing cameras. Its popularity has waned a bit during the DSLR days because it lacks coatings on some of it’s rear elements and we all know that sensors are more reflective compared to film. It has gotten a bit of hype in recent years due to reviewers and online personalities expounding the lens. Let’s see if it really lives up to the hype and I will also show you how to clean this “forgotten” classic.
The lens is small for a tele-zoom with a constant aperture. It’s liberal use of plastics is the key to this lens’ weight. If you’re backpacking then you will know that every gram counts in the field. Despite the plastic housing, the lens feels solid and will tolerate some abuse. More
Hello, everybody! I’m going to introduce to you what we consider to be the gods of Nikon repair here in Japan and that is Kiitos. Kiitos is a camera repair workshop ran by former Nikon employees and they specialize in everything that is not digital. Digital cameras are best sent to Nikon for repairs because they have the parts for those and Kiitos also does not want to compete with Nikon on this field. Kiitos has such a good reputation that even Nikon itself will refer you to them if you have any manual equipment to repair. I had the pleasure of visiting them last weekend and I will show you around their workshop!
Here’s a demo by a Kiitos repairer during Nikon’s 100th Anniversary Road Show. See how she teared-down a Nikon F apart and put it back together in 45 minutes! She is a real pro and I am a pathetic amateur compared to her! I hope that they take me as an apprentice!
Hello, everybody! I’m very busy these days and I only got a good rest today. Today’s just another lazy Sunday and I was just listening to some oldies. Speaking of oldies and easy weekends, I will show you today a very good lens from almost 30 years ago but it’s still a pretty good lens for its price and since it’s a slow weekend for many, cleaning this lens is just as easy as going to the barbershop and getting a haircut (if you’re experienced).
Introduction:
The Tokina 28-70 AT-X PRO is a lens that I owned around 10 years ago and I sold it when I bought a Zoom-Nikkor 35-70mm f/2.8 AF lens. It was a very good lens and I loved using it on my Nikon D90. I shot pictures for billboards with that setup and it was a great lens for general photography. Here we are now almost a decade after and I missed the lens a lot so I bought another one for use with my film cameras because it has a real aperture ring unlike the current generation of lenses where there’s no mechanical aperture ring so it’s useless for use on older film cameras like the Nikon F3. This was a very sought-after lens back in the day and there were many versions of this lens. Every version is great except for the last one which was made with cost-cutting in mind hence the “SV” or super value specification on the name. The most desired version of this lens is the one featured here on this article and it was based on the legendary zoom from Pierre Angenieux. The zoom from P. Angenieux (Angenieux 24-70 f/2.6 AF) was considered to be excellent and common knowledge dictated that Tokina bought the rights to this lens but recent findings actually pointed that Tokina actually made the Angenieux 24-70 f/2.6 AF for the French company until its license expired enabling Tokina to use and modify the design for their own use.
The Tokina 28-70 AT-X PRO is very well-balanced when joined with a heavy professional camera like the Nikon F4. The setup feels very balanced and inspires confidence. Shake is also reduced because of the weight and you can even shoot at slower speeds than usual.
Hello, everybody! How are you guys today? I am sure that you have noticed some of my personal things creeping into this blog such as my work-related stuff. I work as an artist but I also do lots of technical stuff that’s a bit closer to engineering. There will be times that I’ll have to devise clever solutions to a problem, this is what’s keeping me sharp. I am comfortable working with both scenarios, that makes me a generalist of some sort. Speaking of being a multi-role professional and using clever gimmicks, I will showcase today an innovative lens that utilizes a really clever solution to a problem, making it flexible for more than one purpose. This lens is legendary in its own right, I shall explain to you why in this article.
Introduction:
We’ll talk about a very influential lens this time so let me have the pleasure to introduce to you the Nikkor-N 24mm f/2.8 Auto. It’s the first lens to utilize the innovative CRC (Close-Range Correction) mechanism. The CRC system is used for altering the spacing of the elements as you focus in-or-out. This is a creative and efficient concept because up until that point, most, if not all of the other lenses use simple rack-focusing wherein the objective only moves in-and-out as a single unit. With CRC, rack focusing is coupled together with another movement wherein one or more optical assemblies move closer or further in relation to the film plane to give you better results when the lens is focused up-close and the corners look better, too. In this lens’ case, CRC is used for making it achieve an impressive 0.3m minimum focusing distance. It also ensures that the image remains sharp through-out the frame at 0.3m. This was hard to achieve back in the day for a lens this wide, it also helped make this compact while giving it a reasonably-fast maximum aperture of f/2.8. Retro-focusing techniques were used on wide-angle lenses of the day, it was yet to be perfected because the technique is known to produce terrible corners at very close ranges. This is the reason why the Nikkor-H 2.8cm f/3.5 Auto only has a so-so 0.6m minimum focusing distance. CRC enabled this to overcome that since a wide-angle lens that couldn’t focus close is limited in its use. You don’t exclusively use a wide-angle lens to get things in-frame in tight spaces, this is one thing many beginners get wrong.
The Nikkor-N 24mm f/2.8 Auto is a lovely lens. This is dense and compact, it balances really well on most cameras. This lens is also great for people who shoot videos because 24mm is pretty good for videography. You can use this for storytelling, making your subjects appear more important since they’re going to appear larger in your composition as they get closer to the camera. Of course, you can also us this to get more things inside your frame.
Hello, everybody! I had dinner and the star was the stew we had last night. Many people don’t know it but I’m quite the cook, too. I sometimes leave a stew to ferment overnight and serve it to people. The result is better since you give the gravy enough time to marinate the meat, tenderizing it. You’ll also notice some enhanced flavors depending on the spice you used. There are times when something gets better when you reheat it. Nikon knew that as well so they updated some of their classic lenses and sold them as new.
Introduction:
The New-Nikkor 105mm f/2.5 was made from 1974 to 1977 as an upgrade to the Nikkor-P•C. 105mm f/2.5 Auto. The optics remained the same but a new barrel was designed for it. Nikon updated the majority of their lenses so the brand’s image look modern, most of the updates are merely redesigning of the barrels but some came with totally-new optical formulas. This new line of lenses are called “New-Nikkors” or simply “K” versions which stands for “kai” (改), it means “modified” or “improved”. The New-Nikkors all have the now-standard rubber grip, fewer bare-metal surfaces and a modern look. I love these lenses as they’re quite tough, certainly a lot tougher compared to the later Ai-S ones.
It still feels quite dense despite losing the all-metal construction of the older version. The rubberized grip makes it easier to use in colder climates, your fingers won’t feel uncomfortable touching it. The one shown here does not have an Ai-ring so you shouldn’t mount it on a Nikon that has a rigid Ai-tab, doing it will damage the camera and it will cost you a lot of money to fix it.
Kusanagi Motoko’s setup was made using an in-house tool that I wrote in 2014 which is a variation of an auto-rigging tool that I made around 2008. The character setup was made to be simple yet useable so sending data to other teams will not require a lot of effort or conversion because native Maya nodes were used.
It’s also capable of squash/stretch and even bendy joints were implemented but we never really use those because of the nature of our projects. Another reason for keeping the rig simple and robust is because we wanted it to be able to accept data from MotionBuilder without a lot of conversion work. Keeping things simple is the way to go.
The rigging done for Motoko was partly featured on CG World magazine. The picture to the right shows the team who worked on this including the motion capture crew and the producers, composers, artists and director. Thank you for this memorable project! More
Adjusting a lens’ focus is important. If it couldn’t focus properly to infinity it won’t be useful at all and the distance and depth-of-field scales do not mean anything. I will show you how to do this properly using simple tools under a DIY setting. This article is mostly relevant to manual lenses, autofocus ones are calibrated in the same manner but the guidelines differ a bit.
What’s Happening:
A lens’ ability to focus at infinity accurately is important. The depth-of-field and distance scales rely on that. You couldn’t do hyper-focus without it. You should be able to get it to focus on something distant such as the moon and the results should be sharp and the infinity symbol should be centered. It’s crucial for a lens to do this accurately specially if it’s longer than 35mm. It’s pointless to use a telephoto lens that couldn’t do this properly. Some lenses were designed to focus-past infinity so you could turn it beyond the infinity symbol. I usually see this for longer telephoto lenses, it is for compensating the resulting difference when certain lens elements expand when they are hot. Some optical glass expand when used under-the-sun for a long time so this was done in order to make the scales relevant when this happens. This does not apply to autofocus lenses, they focus-past infinity since the camera and its autofocus module will focus it accurately for you. The slack is only to give it more room to work with.
Manual lenses need to be able to focus at infinity accurately. This building is about 1.2km from where I was. This is not enough, look for test subjects that are distant such as communication towers that are close to the horizon. The moon is also fine but it’s not always possible to see it clearly. A wider lens is going to be a lot more forgiving since the wider depth-of-field will be able to compensate for any inaccuracy.
How important is this? If the lens actually focuses at 5m then it should show the same information on the scales, too. The scales should accurately reflect it since there’s no way for you to view things through the film aperture. The advent of mirrorless cameras and live-view helped somewhat but those are not solutions to the problem at all.
Hello, everybody! It’s starting to get cold here in Tokyo as we get closer to December. The temperature is beginning to get too cold for me to develop at home so I use this chance to digitize my film instead. Today, I am going to show you my film digitization workflow. I’ll also be sharing with you any settings that I use in post and I hope that you’ll like this one.
Equipment:
I’ve been getting questions on how I digitize my negatives using Nikon’s Picture Control. Hardware-wise, the technique that I use seems to be pretty popular and it was pioneered by somebody else nearly a decade ago but what makes what I do a little different is the use of Nikon Picture Control to invert the previewed images on the LCD. This makes this tedious task a little easier because you can gauge how much light you need to illuminate your negatives. I am not saying that this is the best way to do this task but I just want to show you guys a slightly different way of doing things that may appeal to some of you.
In order to digitize your slide using the technique I use you will need these:
Nikon DSLR (ideal) but any digital camera with a TTL view will do.
Flash that you can trigger remotely.
Macro lens that can reach 1:1 magnification.
Sturdy tripod.
A setup to hold/secure your film strip or slide.
This is how everything works together. The macro lens has to be capable of achieving 1:1 magnification so you can fill the frame. The Nikon ES-1 is handy for digitizing mounted slides but I use a modified one for my strip film or else the spring on the stock Nikon ES-1 will ruin my strip film. Finally, a Nikon SB-700 flash is used to provide the high-powered illumination required for this kind of job. You can swap the tripod with a copying stand if you prefer to do it that way. Check out my article on the Micro-Nikkor-P 55mm f/3.5 to know more about the lens in the picture. I love this lens for this kind of work.
Hello, guys! A few weeks ago, I made a short post showing how the Nikon D850’s negative digitizer mode work. My iPhone’s video wasn’t working properly at that time that is why my accompanying video didn’t have any audio so people have to read my commentaries to get what’s happening. I would like to make it up to you so I went to Nikon’s office this afternoon and borrowed a Nikon D850 so I can show you how this feature works and this time I brought along with me a frame of C41 negative to use as a sample to help you guys see what’s really going on. There are many quirks on how this thing works and I really hope that this video will help shed some light on this feature.
Please forgive my speech, I have sore throat today that’s why I pause from time to time. More
Help support this site by donating to richardHaw888@gmail.com over at Paypal! If you want to buy me a beer or a roll of film then that would be great,too!

 Here’s the storefront. You can spend minutes looking at what’s being sold here! There are many beautiful lenses and cameras on display here and some time in the past, there was a Noct-Nikkor 58mm f/1.2 Ai-S here on display and even a Nikkor-N 5cm f/1.1 lens!
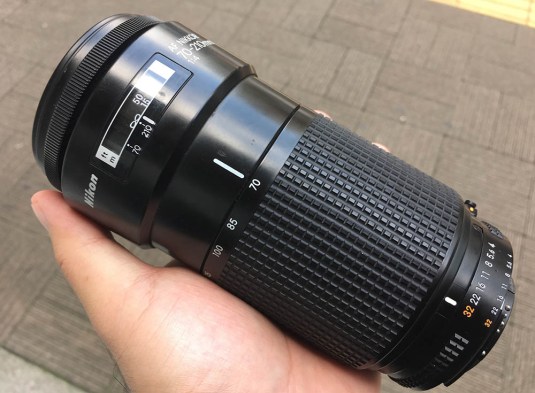 The lens is small for a tele-zoom with a constant aperture. It’s liberal use of plastics is the key to this lens’ weight. If you’re backpacking then you will know that every gram counts in the field. Despite the plastic housing, the lens feels solid and will tolerate some abuse.
 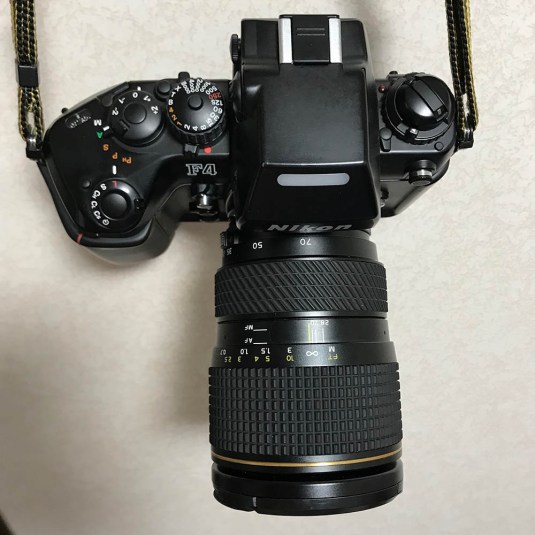 The Tokina 28-70 AT-X PRO is very well-balanced when joined with a heavy professional camera like the Nikon F4. The setup feels very balanced and inspires confidence. Shake is also reduced because of the weight and you can even shoot at slower speeds than usual.

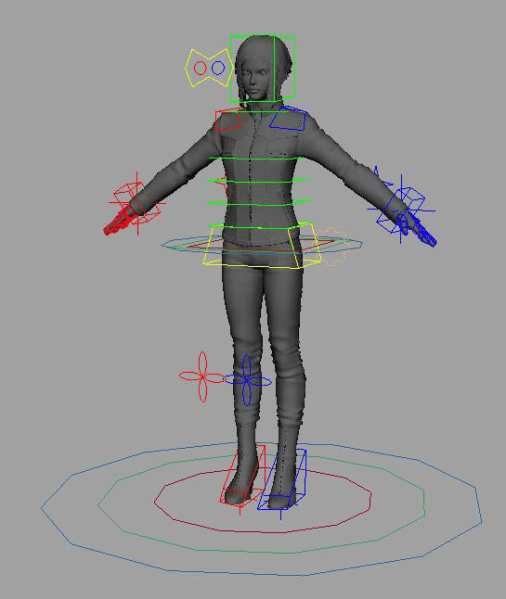 Kusanagi Motoko’s setup was made using an in-house tool that I wrote in 2014 which is a variation of an auto-rigging tool that I made around 2008. The character setup was made to be simple yet useable so sending data to other teams will not require a lot of effort or conversion because native Maya nodes were used.
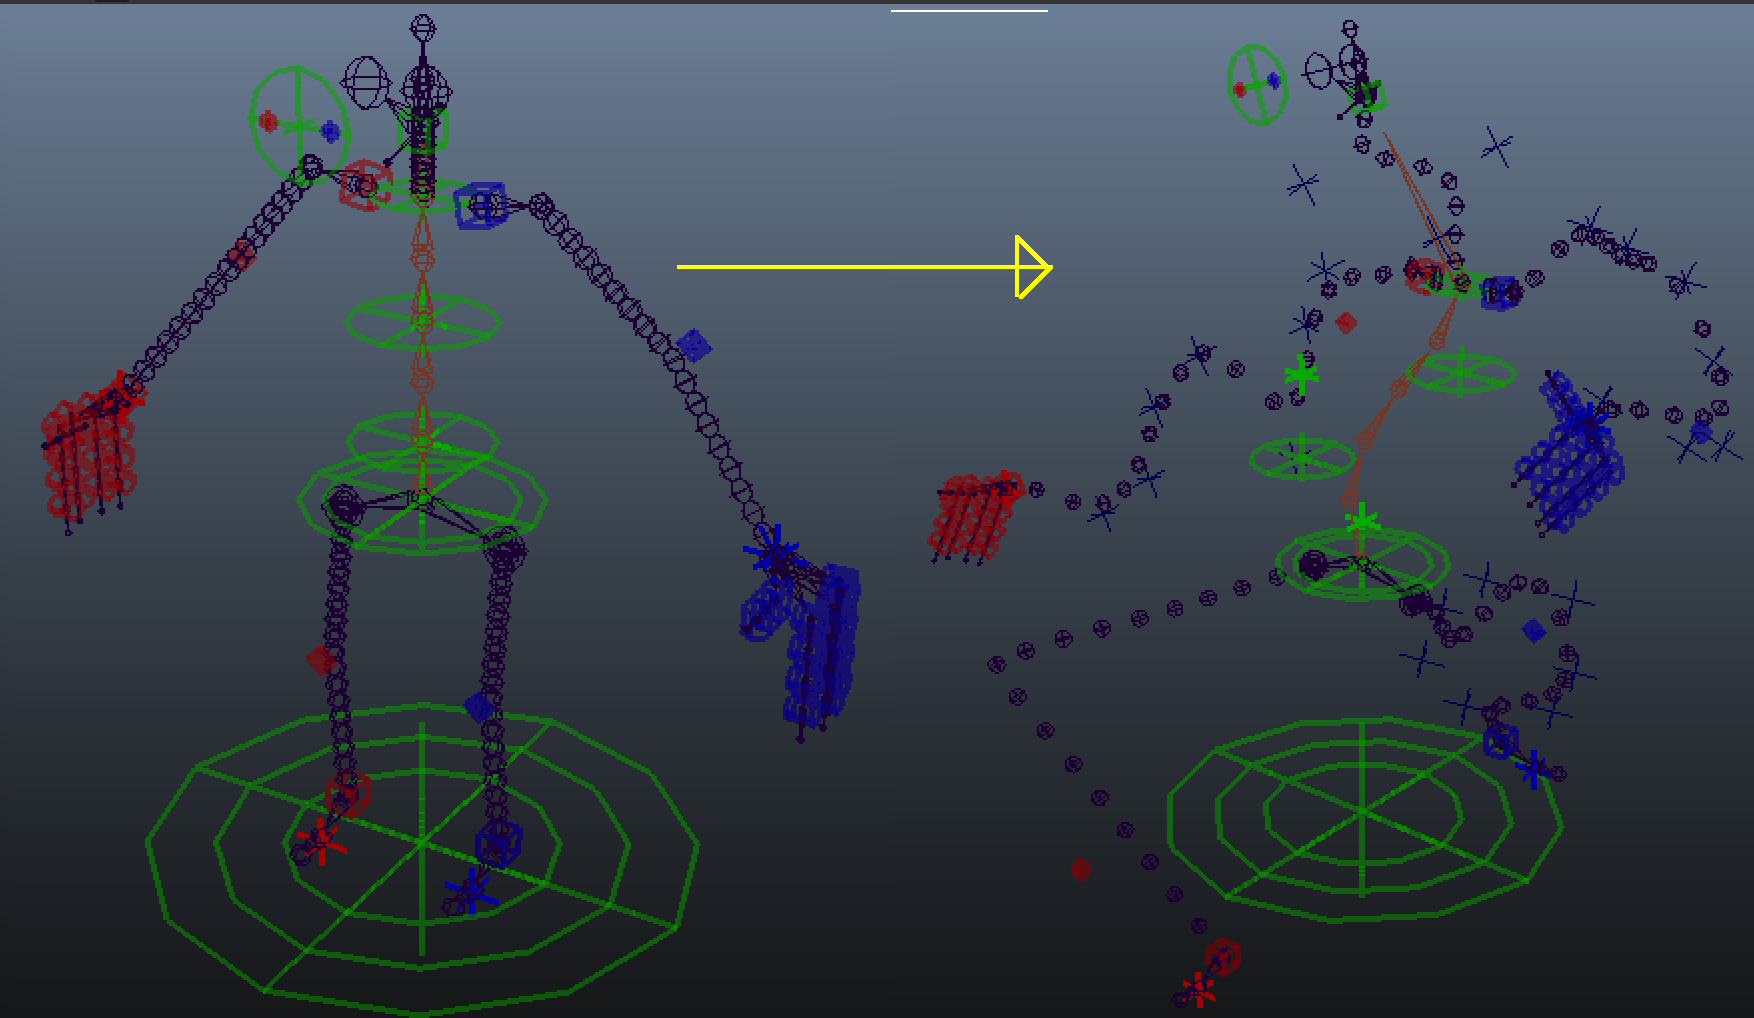 It’s also capable of squash/stretch and even bendy joints were implemented but we never really use those because of the nature of our projects. Another reason for keeping the rig simple and robust is because we wanted it to be able to accept data from MotionBuilder without a lot of conversion work. Keeping things simple is the way to go.

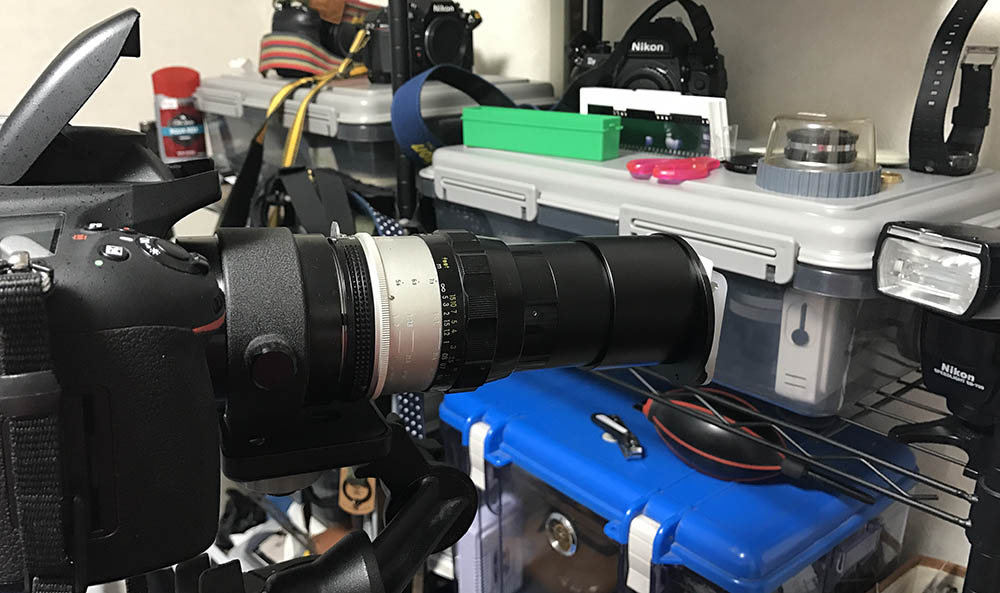 This is how everything works together. The macro lens has to be capable of achieving 1:1 magnification so you can fill the frame. The Nikon ES-1 is handy for digitizing mounted slides but I use a modified one for my strip film or else the spring on the stock Nikon ES-1 will ruin my strip film. Finally, a Nikon SB-700 flash is used to provide the high-powered illumination required for this kind of job. You can swap the tripod with a copying stand if you prefer to do it that way. Check out my article on the