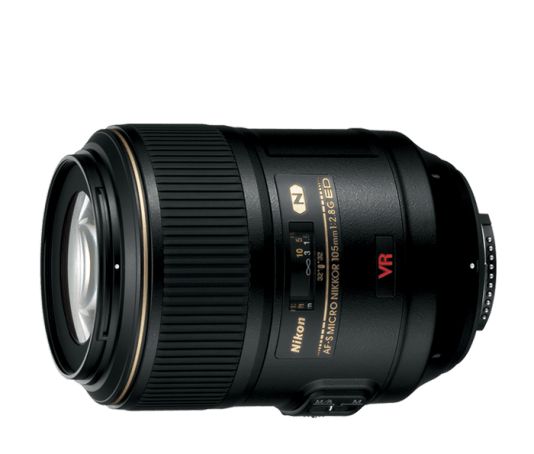
Hello, everybody. We are going to deviate from the classic Nikkors today and talk about a current production lens – the amazing Nikkor 105mm f/2.8G ED IF AF-S VR and the effects of diffraction on this lens. (picture from Nikon USA)
Being primarily a bug photographer in the warmer months, this subject is something that I am very much inclined to look into myself so that I know where and when I should stop down. Stopping the aperture down too much is something that most of us bug shooters are guilty of in the quest for better depth of field. More
Hello, everybody! Some people couldn’t seem to appreciate things that are considered “obsolete”, “vintage” and simplistic. I understand that they want something that is state-of-the-art and near-perfect in nearly everything. It’s not a bad thing to always want the best, however, it’s not good to put-down something just because it was of an older standard. Vintage equipment is a lot of fun to work with, it can also how if the person using it is skilled. New equipment can only take you so far but fundamentals mean everything. It’s what separates the good artists from the talented ones. Today, I am going to one such vintage lens that still has its place today. I will show you that gear means nothing much when you know how to use it correctly.
Introduction:
The Nikkor-S 50mm f/1.4 Auto was sold from 1962 to 1974. This was made in order to provide Nikon F users with a 50/1.4 lens, something that Nikon had for their rangefinder system. It was difficult to make since optical engineers back then hadn’t perfected the techniques required to calculate such a lens. What made it difficult was the then-new SLR systems need lenses that could provide sufficient clearance at the rear to avoid the flapping mirror. It was such a difficult feat, Nikon and the others used a slightly-longer focal length to compensate for it and that resulted in the Nikkor-S 5.8cm f/1.4 Auto being designed as a stop-gap in Nikon’s case.
It took Nikon a few years to get it right and that resulted in this lens. It was a big hit and it continued to be in production with the last version coming out in 1974 as the New-Nikkor 50mm f/1.4 (version 1) and was sold until 1976. It is a nice lens to use and I enjoy using it with my Nikon Df.
Hello, everybody. It has been awhile since I last updated the blog. I have been really busy balancing my time between work, family, leisure and learning. This post is important so I will try my best to illustrate and explain how to manually convert pre-Ai Nikkor lenses so that you can use them with Ai capable bodies and how to make it look like it was done by a professional despite the fact that you are going to do this mostly with common house hold tools and materials.
Introduction:
One of the reasons why I shot Nikon is because they stuck with the F-mount while other companies abandoned their respective original mounts each time there is a major change in lens technology. While this is good from the engineering point of view, it severed the compatibility between their older lens lineup and what they currently have and making the said legacy lenses useless for modern digital bodies (until the advent of mirrorless cameras). I once owned a Canon T60 and sold that camera in 2004 for small change for the simple reason that Canon’s older FD mount at that time was considered unsellable in my homecity. Having this in mind, my next camera purchase was a Nikon D60 and I never looked back. Choosing Nikon gave me the ability to use a roster of lenses from the late 1950’s up to the ones that are currently in production.
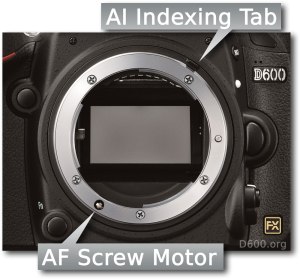
While it is true that Nikon did not change the lens mount since it’s debut, it did underwent some changes through the years that will inhibit the use of some lenses on some bodies. One such change is the mount got a bit wider (by 1mm-1.5) in the 1960’s and the change to Ai technology. Dpreview has made a great article on the Nikon F-mount and the different iterations made to it and I suggest that you read it to understand the issues surrounding it. Our main concern in this blog post is how to trim away material from the aperture ring of a pre-Ai lens so that it will not interfere or damage the Ai indexing tab of some of the higher end Nikon bodies (image from D600.org).
Hello, everybody! I was watching “Airplane” a while back. It is a silly movie with an equally-silly doctor played by late Leslie Nielsen. It’s a great movie, I found myself laughing at most of the jokes but what really them so funny is how the actors delivered their lines. They appeared serious, they delivered their lines with a straight-face despite all the nonsense. The subtlety, timing and execution was brilliant. I haven’t seen a funnier movie these days. This level of comedy could only be rivaled by Mel Brooks. If you like subtlety and smoothness of delivery then you will love today’s featured lens but there is nothing funny about its delivery, it’s one of Nikon’s better portrait lenses.
Introduction:
The Nikkor 85mm f/2 Ai-S was sold from 1981 to 1995, it’s an update of the Nikkor 85mm f/2 Ai from which it inherited its optical design. The barrel is new, it now has a linear aperture and it’s now able to shoot in PSAM modes with Nikons that allowed it such as a Nikon FA. It’s a bit lighter due to better engineering. Its well-regarded as a great lens but people are polarized by it. Like the Nikkor 85mm f/2 Ai that preceded it, the maximum aperture is just f/2 unlike the older New-Nikkor 85mm f/1.8 which is marginally brighter. It’s not really an issue, I suspect that the better coatings may have even made it better at gathering light wide-open.
Its coating has a different hue compared to the Nikkor 85mm f/2 Ai, it means that the coatings aren’t identical. That will affect its optical performance to an extent. The bright f/2 maximum aperture means that this is easy to focus specially if you have a split-screen installed. Your view through the prism is clear and it’s easier to focus due to the thin depth-of-field. A faster lens may be more difficult to focus since the depth-of-field is even shallower.
Now that we have talked about screws and lubrication, we can finally start with the actual skills for repairing classic Nikkors. Most of the things that I’ll mention here are based on common sense. Please refer to my previous blog posts because there are many important things that were mentioned there that will not be repeated here.
Helicoids are simple yet they can be very frustrating to work with, many get stuck here because they don’t know how to service them. Even experienced repairers like me get stuck occasionally if we got a lens that was reinstalled the wrong way or if we slipped.
We had a lengthy commentary on screws and drivers on the previous post, the next important subject to consider is lubrication. If you’ve read any of Nikon’s repair manuals you’ll see that Nikon uses different types of grease and lubricants on different parts of their lenses and cameras. While this is the best practice in camera manufacturing, it isn’t practical for DIY repair for a lot of reasons, some of which are:
It is expensive to keep an inventory of various lubricants.
It is not cost-effective if you are just fixing your own stuff.
You may accidentally mix lubricants.
With the above considerations outlined, we will now start discussing about the most important lubricants in camera and lens repair.
Preparation:
Before applying fresh grease to your helicoids you’ll definitely need to clean the helicoids first and remove the old, dirty grease. This is also true for any camera and lens parts that once had lubricants applied to them.
Just take a look, looks like the grease has not been replaced since 1965! This has to be cleaned and never leave any residue.
In the previous article we’ve outlined most of the essential tools for repair and maintenance of classic Nikons and Nikkors. Now, we’ll be discussing the best application for these tools so that you’ll less likely to destroy your gear by stripping or snapping a screw.
Just like everything else in life, you may mess up in your first few projects and that is okay. In my case, I messed up a few projects since there are not a lot of online material for this and any useful information out there are scattered or can be irrelevant at times. The lack of proper tools when I first started is a big contributor to my failed projects since I thought that it would be as simple as fixing a kitchen appliance. The good thing is I have managed to fix the failed projects now and I’ll show you how to prevent messing up your project from my experiences.
This guide isn’t going to be organized in any order, I’ll be updating this from regularly as I find new ways or remember anything that I have done in a previous project. A good deal has already been discussed in the previous article so please refer to that as well and I will try not to repeat anything that can be found there.
Just like most bobbies, you’ll require certain tools to repair or maintain the equipment that you use. I love repairing broken photography equipment, it helps save the planet and I save a lot of money along the way.
I’ll outline to you all the essential tools that you need for repairing lenses so that you don’t waste your time and most importantly, money on gear. Many people will give you the wrong advice on the internet, many from ignorant or arrogant personalities. This has resulted in many people, including me to botch my repairs when I was starting up. I’m neither ignorant nor arrogant, I’m a generous person with experiences to share so you won’t end up being a camera butcher.
Most of the tools that you’ll need can be bought in regular hardware stores. However, some are specialized and can only be bought in specialty stores or online. These are good investments, buy the best that you can afford but do not go overboard and buy something that is insanely expensive but of very limited use.
Hello, everybody. Thank you for taking the time and effort to read my first blog entry. I am a photographer living in Tokyo and I would like to share some of the things that I take for granted everyday here in the camera capital of the world to people who are otherwise too busy or lazy to travel here to indulge in their photographic pilgrimage.
One such “must visit pilgrimage site” for the Nikon enthusiast would be the Nikon Museum. The museum was built in anticipation for Nikon’s centenary in 2017. Showcasing what the company has achieved in the 100 years of it’s existence. From it’s humble beginnings when the Japanese government requested the help and assistance of German engineers and scientists to train and spearhead Japan’s own optics industry to what it is today – a prime mover in the industry whose name is synonymous to the recovery of Japan’s economy and export industry after the war and today as one of the world’s leading camera and optics manufacturer.
The museum has no mention of Nikon’s war time involvement except for the instance when Nikon lacked manpower due to wartime manufacturing and had to collaborate with the forerunner of Canon to manufacture and market consumer optics.
The museum can be accessed easily from Shinagawa station in Tokyo. It is around 600 meters from the station itself. A detailed map can be found in the Nikon Museum’s website… More
Help support this site by donating to richardHaw888@gmail.com over at Paypal! If you want to buy me a beer or a roll of film then that would be great,too!


 The museum can be accessed easily from Shinagawa station in Tokyo. It is around 600 meters from the station itself. A detailed map can be found in the Nikon Museum’s website…