
Hello, Everybody! How are you guys today? I’m stuck at home today to take care of baby. It was a very tiring day because my toddler is full of energy! Cameras are like humans in a way in that they come out of the factory working fine but as they age and wear it will begin to show and the performance will deteriorate. I am in my mid-life and I feel like an old man now as the years of abuse is finally taking it’s toll on my health. The good thing with cameras is that you can fix them to a certain extent or change the parts to make it work closer to factory specifications and today, I am going to show you how to perform a simple maintenance routine for your 60 year-old Nikon SP/S3/F/ and even the Nikon F2!

Look at all the yummy food! This sushi place has an all-girl staff. I would rather prefer to eat one prepared by a pretty young woman than a middle-aged Japanese chef obviously.
I performed a partial overhaul on my Nikon SP. I got it as junk so I had to spend plenty of time reviving this thing to at least get it to a decent operating condition. The viewfinder took the most time because it is the most complicated thing on the camera and the finder of the Nikon SP is legendary for being ahead of it’s time and equally legendary for being a very difficult instrument to clean! Of course, the helicoid had to be cleaned as well but I left the serrated wheel pretty much intact because it requires me to tear the rubber skin off from the front (right side) of the camera.
The shutter speed was also tested using my shutter tester and it proved to be accurate on the slower speeds below 1/60s but it is firing too fast on 1/1000s and 1/500s. If the speed is just off by 1/3 of a stop then I can still live with that but at times 1/1000s gives me around 1/1750s to 1/2700s and that is way more than what I can consider to be acceptable! This is something that had to be fixed and so I did not waste any time and quickly went to work!
Now, you may be wondering why I wrote Nikon SP/S3/S4/F in the title of the article but I am only showing you the Nikon SP here. The reason behind this is because the Nikon SP chassis is the basis for the Nikon S3, F and Nikon S4! The basic schematics should be similar on these 4 cameras so having knowledge on one is also applicable to the rest. This will also work for the Nikon S, Nikon S2 and the Nikon F2 because they’re all based on the same principle and basic idea. In fact, this will work with almost all cameras that were based on the Leica focal plane shutter design which includes the majority of the cameras from the post-war era and beyond that uses the same basic principle. There will be differences but the overall idea should be the same. This article is just going to show you the basics of adjusting the tension of the curtains in order to get the shutter speeds to be as close to what the shutter speed dial says but the actual repair and adjustment will be much more involved and you need know-how and special tools to do it properly. This article is only for your education and entertainment and there’s no substitute for a real calibration and cleaning done by an experienced repairman.
WARNING!!! Please read the following!!!
This is a VERY DELICATE operation that requires specialized equipment and experience. Follow this article at your risk and I’ll never be held responsible for any damage done to your camera! This is only for your education/entertainment so you will know how things work or how it is fixed in the most basic level. If your camera’s shutter speed needs to be calibrated then send it to the people who do this professionally such as these people in the list below.
- David Hilos (Singapore)
- Jools Abel (UK)
- Alan Starkie (UK)
You can also try asking the local camera repair guy but be aware that there are plenty of people with mediocre skills selling their services! They are probably just as skilled as me or even worse! I only do this for my own benefit so the only person I harm is myself if I made a mistake and I create mistakes a lot!
Before We Begin:
If this is your first attempt at repairing a lens then I suggest that you check my previous posts regarding screws & drivers, grease and other things. Also read what I wrote about the tools that you’ll need to fix your Nikkors.
I suggest that you read these primers before you begin (for beginners):
Reading these primers should lessen the chance of ruining your lens if you are a beginner. Also before opening up any lens, always look for other people who have done so in Youtube and the internet. Information is scarce, vague and scattered (that is why I started this) but you can still find some information if you search carefully.
I highly recommend that you also read my working with helicoids post because this is very important and getting it wrong can ruin your day. If I can force you to read this, I would. It is that important!
For more advanced topics, you can read my fungus removal post as a start. This post has a lot of useful information here and there and it will be beneficial for you to read this.
Testing:
What is the point of showing you how to calibrate your shutter speeds if I wouldn’t show you how to test it? Here are the methods that are easily accessible to you. These methods are old-school but seem to be reliable enough for our purpose.
Here is a video of me testing my Nikon S3’s shutter speed and you can see from the video above that the speeds are spot-on! This is what I was expecting from my Nikon SP but it was unfortunate that it had to be fixed.
The best way available for the amateur is to buy shutter speed testers online. There are plenty of sellers and they come in a variety of form and prices. I recommend that you get those that are activated by light and not sound as these are more accurate. There are also apps that you can download for your smart devices that do not require special hardware to operate. I will not recommend a certain manufacturer or brand at the moment yet. I’m currently using something that is activated by light and for what it is worth, it seems to be fairly accurate for my purpose.
You will at least need a shutter tester that’s capable of measuring the 1st and 2nd curtain and it should also be capable of switching between horizontal or vertical so it will work on shutters that travel either way. If you only have access to a shutter tester that can only read one value (the center) then that’s OK but it won’t do a very good job of reading what your shutter is doing so you cannot make precise calibrations and you will need to run a test roll just to see if your work is OK or not. I’ll won’t give you any recommendations on which testers to use or buy so do your own research.
There are many ways to test your camera’s shutter speeds at home. One is to close all the lights on your room and with the camera (without lens) facing a CRT monitor TV, press the shutter and take note of how wide the slit is (between the curtains) as you actuate the shutter. For example, if 1/250s gives you a slit of 1cm then 1/125s should give you a slit as wide as 2cm and 1/500s should give you a slit that is around 5mm wide. Do you get what I am trying to say? Now, if the distances between the speeds are not even then you have a defective camera. Of course, this is not accurate but it is a quick way to see wether you have a good working camera or not.
Important Pointers (PLEASE READ):
One more important thing to consider is that it’s not very important how many turns you tension or relax either curtains or the speed they travel the most important thing is how big the slit between them is and the timing they released. Many people make the mistake of over-tensioning their curtains just to get the correct shutter speeds (usually the fastest) but this will only result in the wear of the shutter’s ribbons. If they snapped due to stress then that’s going to be a bigger problem for you! Ideally, you will want to achieve what you want with less tension as possible. To get this, you will need to clean the shutter gear train and its associated mechanisms so they perform as smooth as possible. Only use the correct lubricants when you oil them and only grease the parts that require it.
The goal is to have the shutters travel at about the same time all through out the range. It is the ideal but is not always achievable. For example, at 1/1000s, your readings for both of your shutters have to be close to 1/1000s. If you get 1/950s and 1/1020s for the 1st and 2nd curtain then you should get the delta average for both and that will be your shutter speed at 1/1000s. If you find that you are tensing your springs too much to achieve this and your still getting a result of 1/850s or something close then you should consider the reverse which is to slow down the 1st curtain so you end up getting something close to 1/1000s. Remember, the important thing is how big the slit is and NOT how fast both of your shutters are traveling. If you end up doing this then remember that a difference of 2-4% at the fastest speed is acceptable ceiling because the percentage will get bigger as you select the slower speeds and you may end up with 10% at 1/125s. This is sort of OK but remember to keep the percentage as low as possible at speeds above 1/90s otherwise you may end up with a shutter that caps at 1/90s which will give you uneven exposure. I find that a difference of 15% at the slower speeds is even acceptable and will not show in your negatives. A huge percentage at the highest speeds is something that you will never want because this is where the uneven exposure shows up the most.
When resetting the tension of your shutter or calibrating it, you usually will want to have a starting point. That is usually the flash sync speed of your camera. For example, for the Nikon S, S3, S4 and F, the sync speed is 1/60s and you will want to calibrate your shutter so it will give you the best results at that speed. Everything else should follow closely or exactly to the point if your camera hasn’t been tampered with after leaving the factory. If this is not the case then you will want to clean the mechanism again until you get it. Now, if it’s still off by a lot at the faster speeds then you will need to adjust the mechanisms of the shutter such as the speed escapements and cams to get the other faster speeds to line-up properly. This is beyond the scope of this simple overview and it will vary with each different camera design. Some are simple to adjust while some are more complicated. I will leave this out for now because this may confuse you. It’s enough that you know that it’s a more comprehensive process to calibrate your shutter. The slower speeds will also require their own separate adjustments and it can get more complicated because doing it almost always involve the slow governor or retarder.
Calibration:
Before you begin, protect the shutter first by taping a card over it or setting the shutter to T and then press on the shutter so the aperture (gate) is left open. Both ways will ensure that your finger will not poke on the shutter by accident while you do the first few steps in this exercise. You should also remove any lens that is attached to the camera so that it will not be damaged accidentally as you work on the camera.
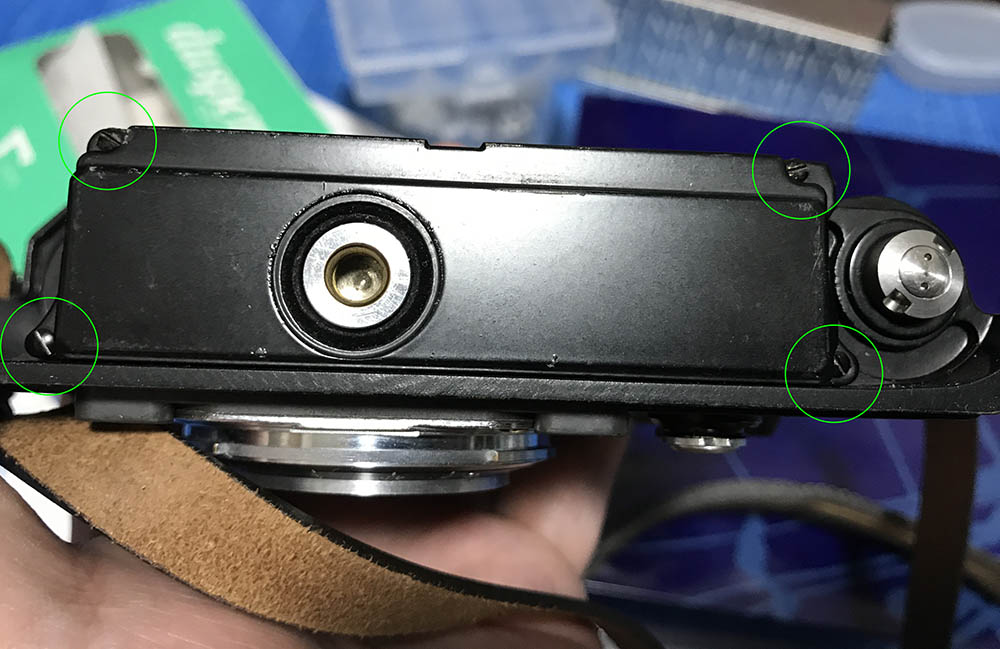
First, remove the camera’s back and then unscrew these 4 screws to remove the bottom plate. This plate protects the delicate parts underneath it so go about it carefully. Be sure to use a driver that fits properly or else you will ruin the screws’ slots!

Notice the encircled part. These two worm gears are connected to the little cogs that are responsible for the curtain springs’ tension. Loosening or tightening these will make the shutter curtains travel faster or slower.

I marked them with dots so I will know which gear is in charge of which curtain. Usually, you will only need to calibrate the rear curtain’s travel only so do not touch anything that is related to the front curtain or you will get an ugly black bar in your exposures!
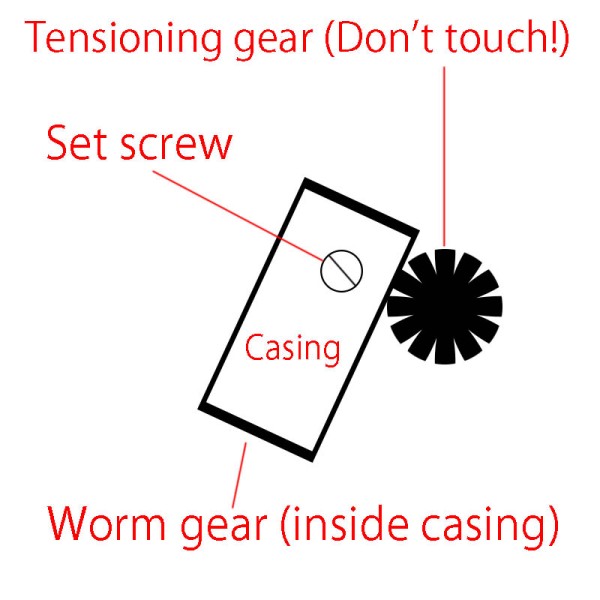
Please study the diagram above carefully. The worm gears drives the tensioning gears. It (worm gear) is being secured by a set screw that you need to loosen first. The worm gear is hidden underneath the casing but the head is accessible and this part is what you want to adjust. The little set screw is usually secured by lacquer or something else so use some alcohol or acetone to soften it up first before you loosen the set screw. Make sure that its clean before you proceed! There is no excuse for sloppiness in this part of the camera!
This is how it looks like for the Nikon S2, S3, S4, SP, F and F2. Other camera designs have different designs for these 2 adjusters but the overall scheme and idea should be similar. It can be crude like a simple pin securing the bare adjuster cog or more complicated than what you see here. The important thing is to see how much the cogs turn when you turn the worm gear and not the worm gear themselves. The worm gears are just a means to turn the adjuster cogs.
Below are the steps (ordered) that you need to do:
- Carefully loosen the set screw but do not remove it from the casing/housing.
- Loosen (CCW) or tighten (CW) the the worm gear depending on what you need.
- Check all speeds with your shutter tester.
- Repeat steps 2 and 3 until you are satisfied.
- Tighten the set screw and apply nail polish or lacquer paint to secure it.
- Put the base plate back in place.
There are no set guidelines in adjusting the worm gears apart from not turning them too much. Usually, a quarter-turn is enough but cases vary. I also learned that there are cases when tightening the screw will retard the shutter. This is totally opposite to conventional wisdom but this was the case with this particular Nikon SP. Just see what is working with you and just follow your common sense. This can be tedious and may take you an hour or so to do as you go back from steps 2 and 3 but it is all worth it! Remember what I said, what matters most is the width of the slit and not how fast the shutter travels.
My Nikon SP’s shutter speed is still a bit off but it is much more accurate than before. Its not as accurate as my Nikon S3 but at least it is within my accepted tolerance. Now, all I have to do is shoot a test roll with camera and look at the index print. I used an expired Kodak film for this that I got for less than $1. Sure, it is going to be less consistent but for my purpose, it is more than enough.
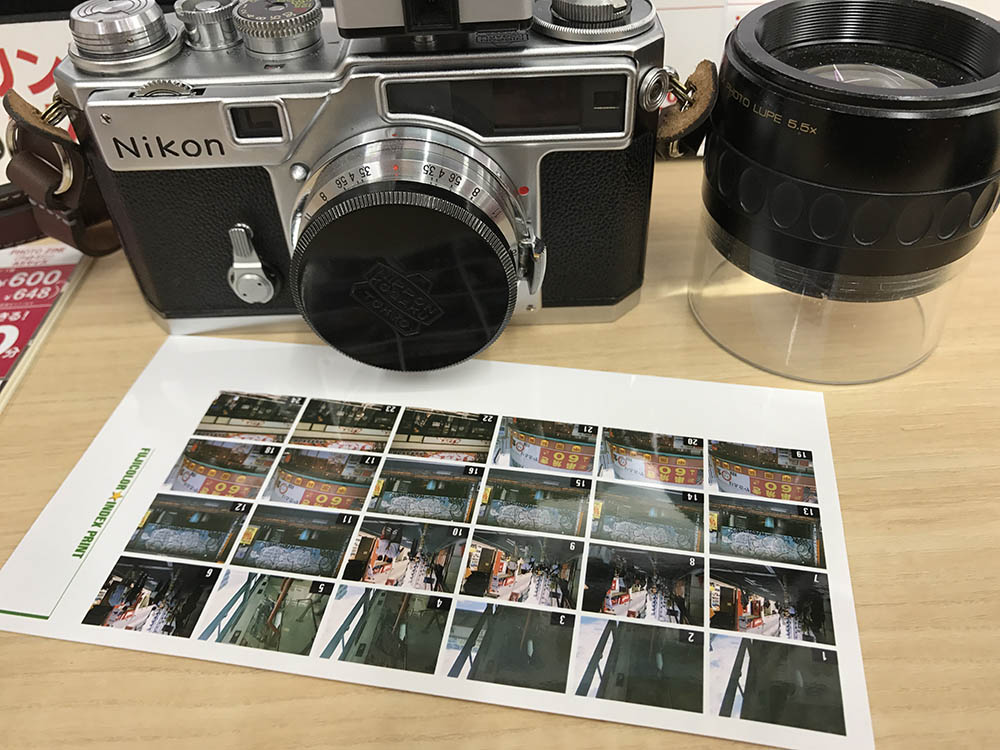
The moment of truth! Look at the index print and see for yourself! frames 1-5 were shot with the same aperture but the speed is different. It looks OK to me! The rest were shot with different speeds and aperture changes that correspond to the speed difference of a stop in succession. The exposure looks even so this means that 1/1000s is firing properly up to 1/60s! These speeds matter to me the most so I was more than happy to see this!
For the Nikon F (Bonus):
Here is a bonus! I have added a picture of the Nikon F with it’s bottom plate gone. I was calibrating my Nikon F so I took a picture of it to add to this article as reference for people who wanted to calibrate their Nikon F cameras.
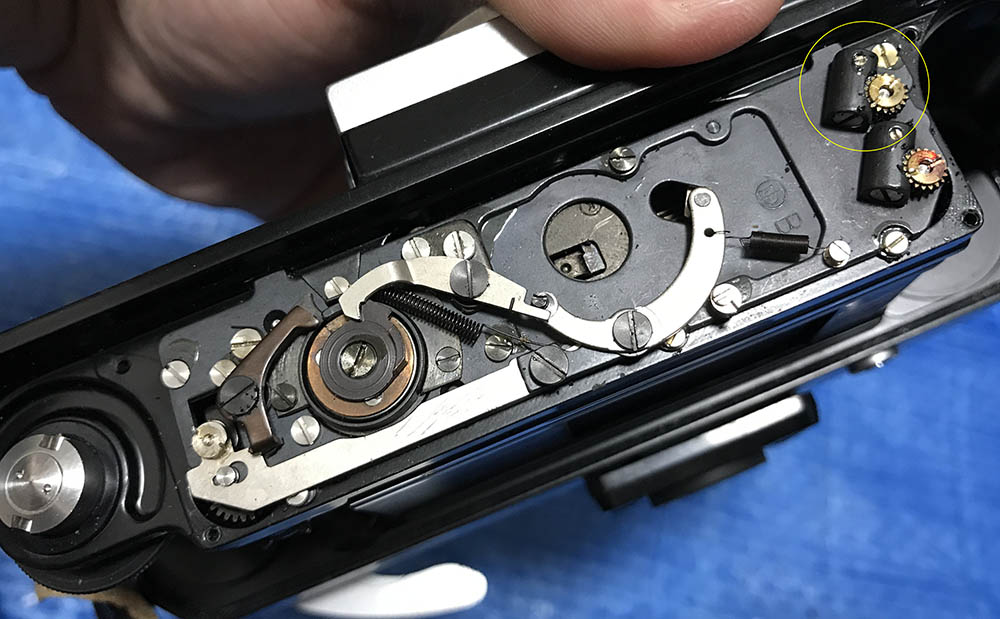
Notice the big similarities? They are not totally the same but they both share a common schematic for the shutter mechanism so it should basically be the same. That S-shaped lever you see in the middle is for triggering the reflex mirror. Look at the encircled part to the upper-right hand corner of the picture, that is the worm gear mechanism for the rear curtain. It’s basically the same as that for the Nikon SP and the Nikon S3. Be careful with this, mine was locked securely with lacquer a drop of alcohol was needed to soften it up first before I worked on this. Do mark the gear with a dot in the 12 o’clock position so you will know how much you have turned it as you loosen or tighten the worm gear. A quarter turn both ways is usually enough.
This Nikon F’s shutter is firing erratically, I cannot get a consistent shutter speed and the speeds vary wildly in the 1/1000s speed but seems to be consistent for the slower speeds from 1/250s and slower. It is a symptom that the spring has gone bad or that the grease is caked or the shutter s rubbing on something. After all the calibrating work, I found a nice compromise where the shutter is firing within 1/3 of a stop difference. While the critical 1/1000s still fires erratically and I get readings from 1/890s to 1/1350s. I managed to keep the more important slower speed firing at a predictable and somewhat constant speed. I can make this work consistently but it will require me to overhaul the camera and I don’t have the time for that now.
This to me is more than good enough as I am not all crazy about this because this camera was bought as a junk last year. I am simply happy that this camera is still working. Older Nikon cameras are tough and in many ways, immortal! This old camera was built to last forever (with proper care)!
Prevention:
What causes this problem? leaving the shutter cocked is what is causing these springs to store tension longer than they were designed for. It’s also specified in the Nikon camera manuals so this is something that you should never do! Leaving it this way (cocked) over-night is long enough and when done regularly or left in that state for too long, the spring will wear out over time and cause this to happen. Caked grease and oils will also cause it to happen and this is something that we can’t help. I make it a point that I do not leave the shutter cocked for too long on all of my cameras to prevent this from happening.
Conclusion:
Overall, I am happy with the job I did with the Nikon SP. Again, I advise that you just give this to a professional to work on specially if it is an expensive camera like a Nikon SP. It will be the wiser thing to do as they should have the spare parts or know-how to revive a bad spring/drum back to it’s factory tolerances. I have ran a couple of rolls with this one now and the negatives all came out predictably as expected. Success!

My Nikon SP keeping me company while I finish this bowl of Japanese-style Chinese food. All that MSG makes my sight fuzzy and “bokelicious“.
Here we are again at the end of another blog post! Wow, all this blogging business is very tiring so I hope that you are enjoying my blog. If you love my blog, please share this with your friends or help support it. I am using the fund to pay for the upkeep like paying for the domain,etc. I am also using it to buy me a few rolls of film from a big Jewish business that I will not name unless they support me 😉 Thank you very much! Keep shining, Ric.
Help Support this Blog:
Maintaining this blog requires money to operate. If you think that this site has helped you or you want to show your support by helping with the upkeep of this site, you can simple make a small donation to my paypal.com account (richardHaw888@gmail.com). Money is not my prime motivation for this blog and I believe that I have enough to run this but you can help me make this site (and the companion facebook page) grow.
Helping support this site will ensure that this will be kept going as long as I have the time and energy for this. I would appreciate it if you just leave out your name or details like your country and other information so that the donations will totally be anonymous it is at all possible. This is a labor of love and I intend to keep it that way for as long as I can. Ric.

Oct 25, 2017 @ 09:21:51
Hey! Great article. Is it much harder for Nikon S2? My slow speeds are wrong.
Oct 28, 2017 @ 04:43:48
Hello, Dmitriy!
Sorry, I was busy. Not so much really, but it can be tricky. These things are best done by technicians.
Mar 06, 2018 @ 00:05:01
hello Richard, any experience with Nikon S3 film advance lever? got a S3, but the whole film advance lever parts are missing, wondering how it looks like, or if I may swap the set from a Nikon F body. appreciate your advice.
Mar 18, 2018 @ 22:53:35
It is similar to an F. I am not sure if its interchangeable but it looks to be. Ric.
Jan 01, 2019 @ 15:55:15
Hello Richard, Very good article! I have a Nikon S3 with a slow speed at 1/15th ( it is acutally closer to 1/2 sec). The problem is only at 1/15th. I wonder, if the tension is adjusted for this speed, what kind of effect it can have on the other speed? Thanks for your advices
Jan 01, 2019 @ 16:09:11
Hello. This is very tricky to solve. it has something to do with the 2nd curtain arm at the back wall of the bayonet chamber near the curtains. it is hard to adjust. different leica-type cameras have different “sickness” when it comes to this speed. some at 1/4, 1/8 and 1/15. the easiest way is to move the slow governor and try your luck, otherwise you will need to adjust the said lever but that’s the last option and is very dangerous. one more thing that can cause this is tension is too high for either starting or closing curtain so the 2nd curtain pawl is catching on the slow lever at the front and charging the spring of the slow governor too much. Ric,
Jan 03, 2019 @ 12:17:59
this is mainly caused by a warped pawl. its hard to fix this and it requires a lot of trial and error
Jan 03, 2019 @ 14:19:30
another problem is the triangular lever at the floor of the chamber. you may need to replace the whole thing.
Jan 07, 2019 @ 17:42:43
Thank you very much Richard. I will leave theses speed aside as they are not really important to me. But it is a bit anoying. I will focus on simple stuff like cleaning the rangefinder prism as it needs a just a bit more contrast. Otherwise, the camera is working fine. Thanks again Richard 🙂
Dec 04, 2022 @ 09:09:08
Great post! The S3/SP manual said we could use the intermediate settings, but accurate intermediate speeds might not be guaranteed. Any experience about that? Thanks for sharing!
Aug 19, 2023 @ 06:17:55
Hi Richard, great article thanks. I just acquired a beautiful early 1960 F. When I received it, the shutter was firing but both curtains travelled together, at all speeds. After exercising it a while, the slow speeds began to work and these seem accurate. But for the speeds from 1/60 above the curtains travel together (no light gets through). It doesn’t appear to be a curtain tension issue. Any ideas about this?