
Hello, everybody! I was listening to the Rolling Stones and I heard one of my favorites named “Paint It Black“. There are times when I feel really upset it’s maddening and I wanted to “paint everything black” like what’s in the song. I cope with it by sharing my work with you and by drinking alcohol, I won’t say that the latter is healthy but at least it helps. While we’re on the topic of “black”, there was a time when Nikon wanted to “paint things black”, lenses and accessories were sold in black versions to make them look modern, etc. Read this article to find out what that is.
Introduction:
The Nikkor-P•C 8.5cm f/2 is one of Nikon’s legendary lenses, it is called by its nickname of the “Japanese Sonnar” by some and that’s understandable since it was “heavily-based” on the Carl Zeiss 8.5cm f/2 which is a Tele-Sonnar. It’s an amazing lens in its own right, it’s sometimes even better than the Zeiss, I personally prefer the Nikkor because that’s all I have. This was popular and its production life is quite long for a rangefinder Nikkor. It’s understandable that it went-through several changes in its design, we’ll discuss the last one in this article. It was sold for a short time with only less than 1400 made. It’s one of the rarer rangefinder Nikkors you’ll ever find but it’s certainly not an elusive lens to find since there’s almost-always one for sale at any time.
The black treatment made this lens look sexy, it’s one of the most beautiful Nikkors you’ll ever find. If I’m not mistaken, the main reason for this is not only cosmetic but to make the whole lens lighter. Brass is heavy so some of the parts were replaced with aluminum alloy. I may have forgotten it since I haven’t worked on this for a long time but I swear that the black parts were made from a lighter material compared to brass.
The optical design is identical to the older Nikkor-P•C 8.5cm f/2 so we won’t talk about it in this article and we’ll concentrate more on its aesthetics. The look is similar to the Nikkor-P•C 10.5cm f/2.5 and you can easily mistake one for the other at first glance. Its look is exquisite, the black accents made the lens look more premium and it matches any camera well. While the original all-chrome looks is appealing, it reflects light. That’s going to be a problem if you’re a photographer covering a dangerous situation or you just wanted to be discreet.
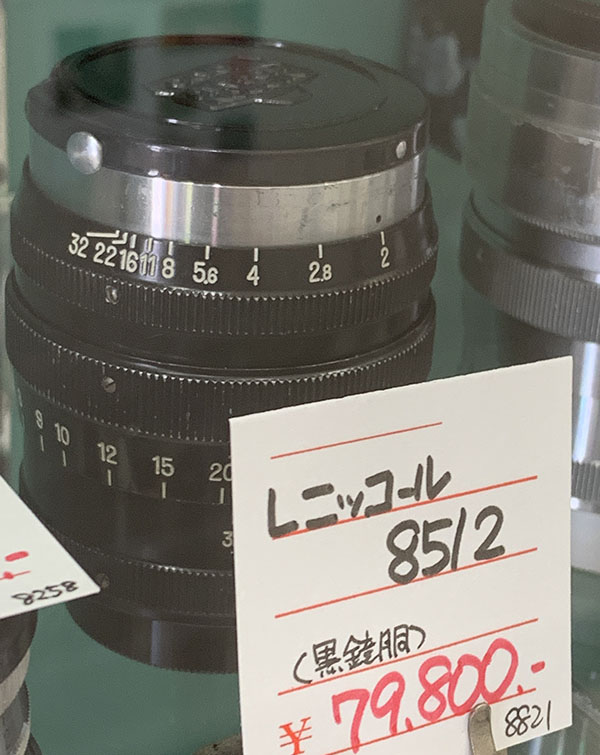
This is the first black version, it’s just black paint over the usual brass body. This version os the most expensive as not a lot were made. This rare series of rangefinder Nikkors are called the all-black line by collectors because the lower barrels were also painted black unlike the late ones with the chrome lower barrels. Note that this is a Leica Thread Mount version which can cost a lot as you can see in this photo. I was lucky to get mine for a real bargain just because I got it as a junk.
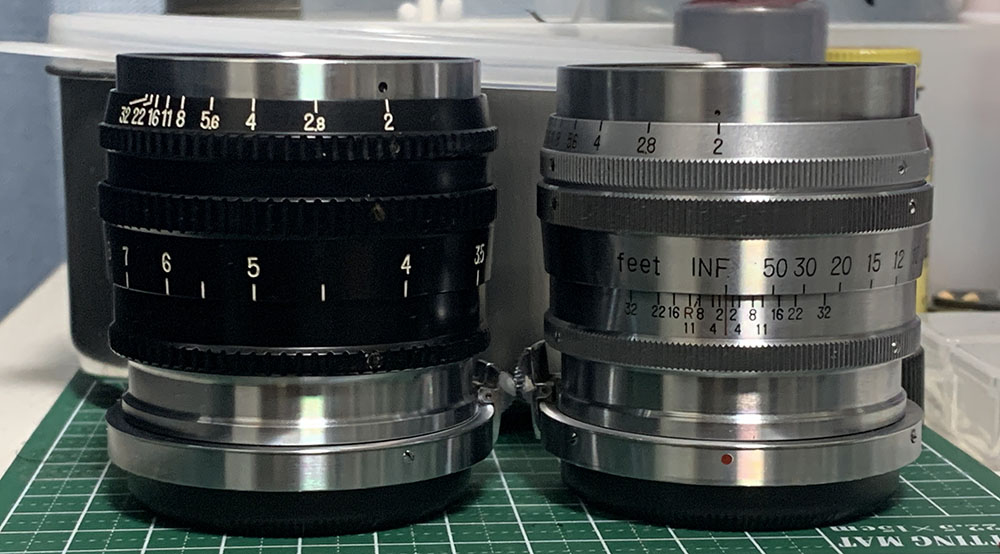
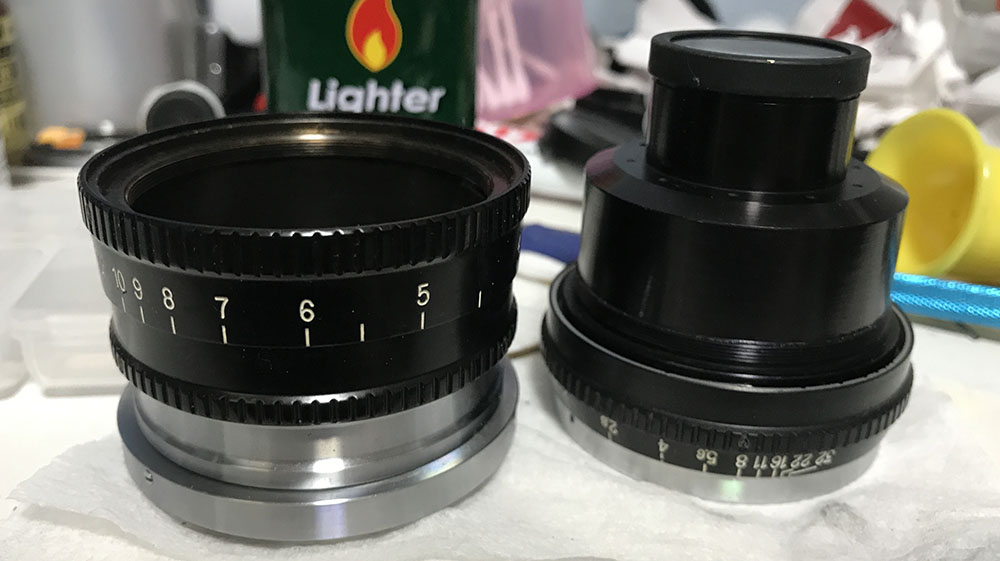
This is how it compares to the more-common earlier model, the dimensions are mostly identical and the height difference you see here is caused by the different rear caps attached to the lenses. The more-modern black look will surely make less heads turn since it’s more discreet but only people who are knowledgable with Nikkors will notice it.

The optical design is identical so the front elements’ sizes are the same. The biggest differences in terms of look is the different lettering used.

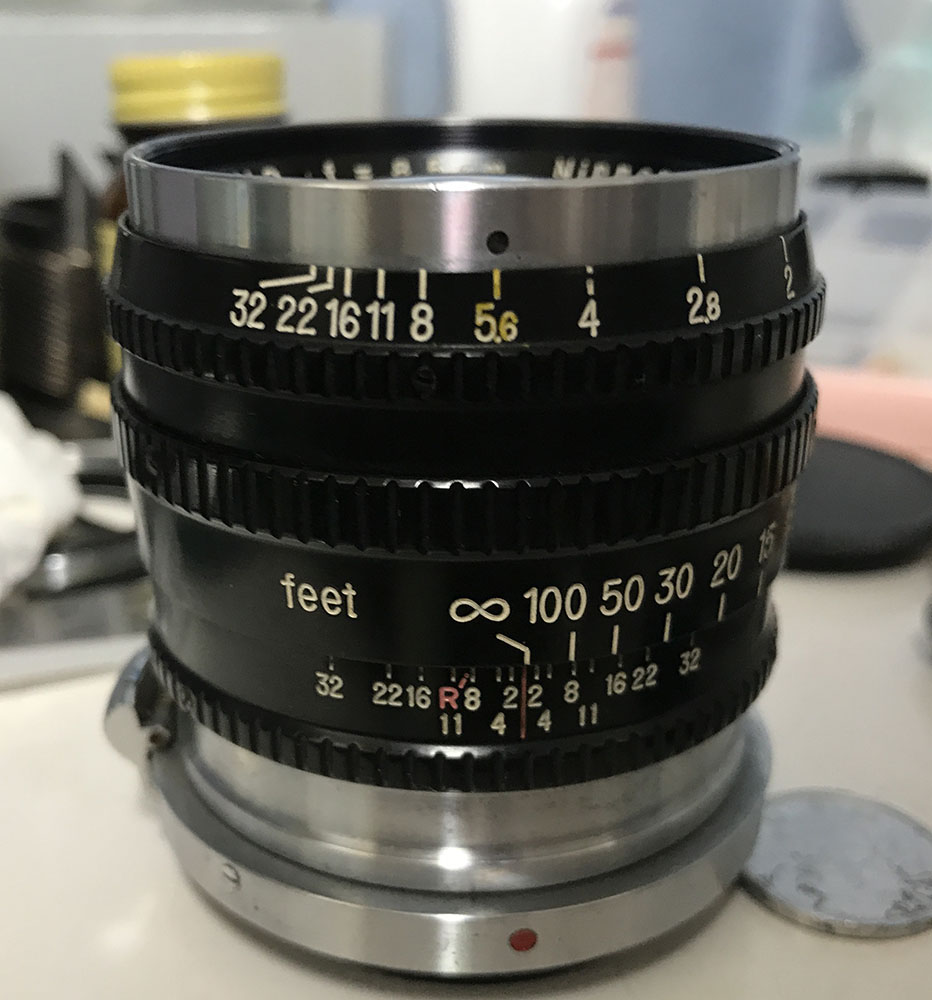
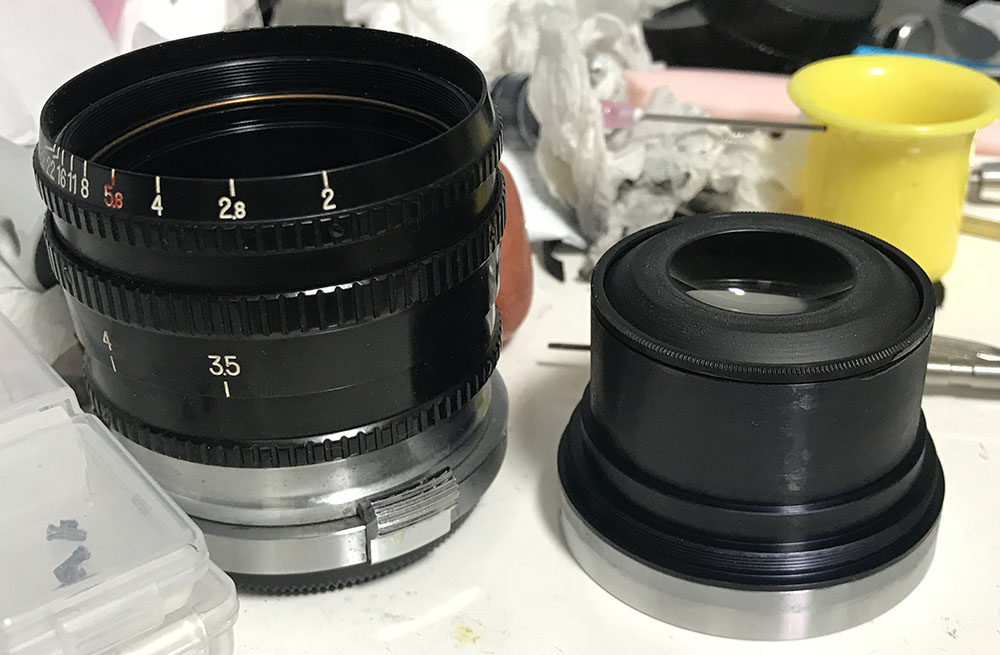
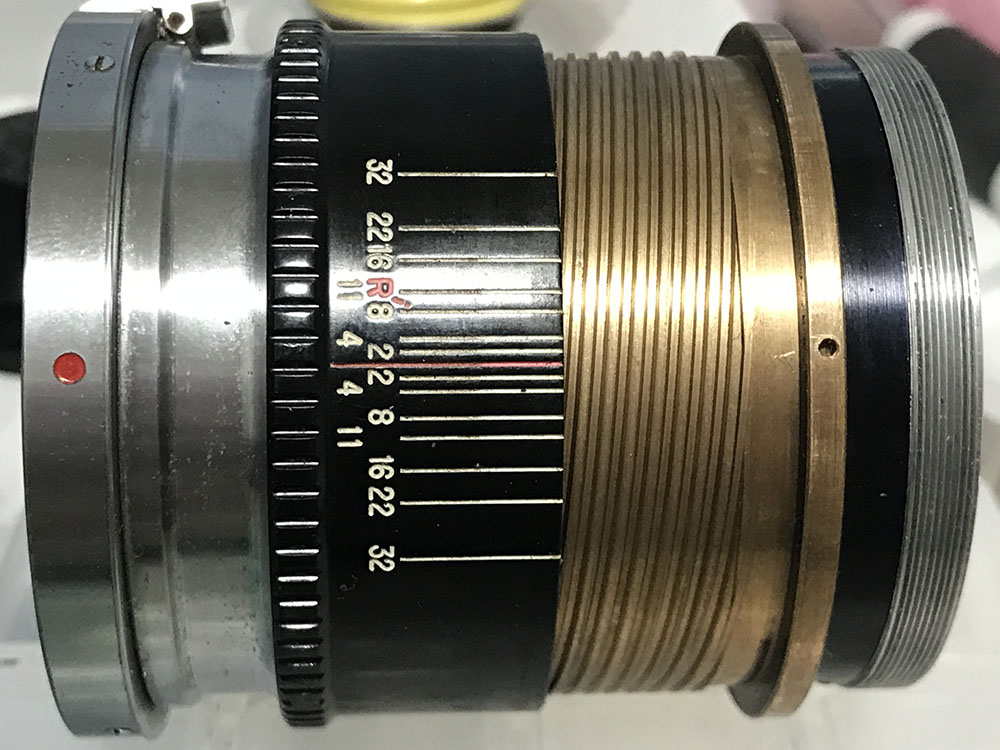
This is how it looks like with the iris stopped-down to f/32. I don’t know why would people want to shoot with this lens at this aperture but it’s there if it’s needed.
This lens was filthy when I got it so I bought it for an insanely-low price. It’s in great condition except from being dirty and all it needed was cleaning.

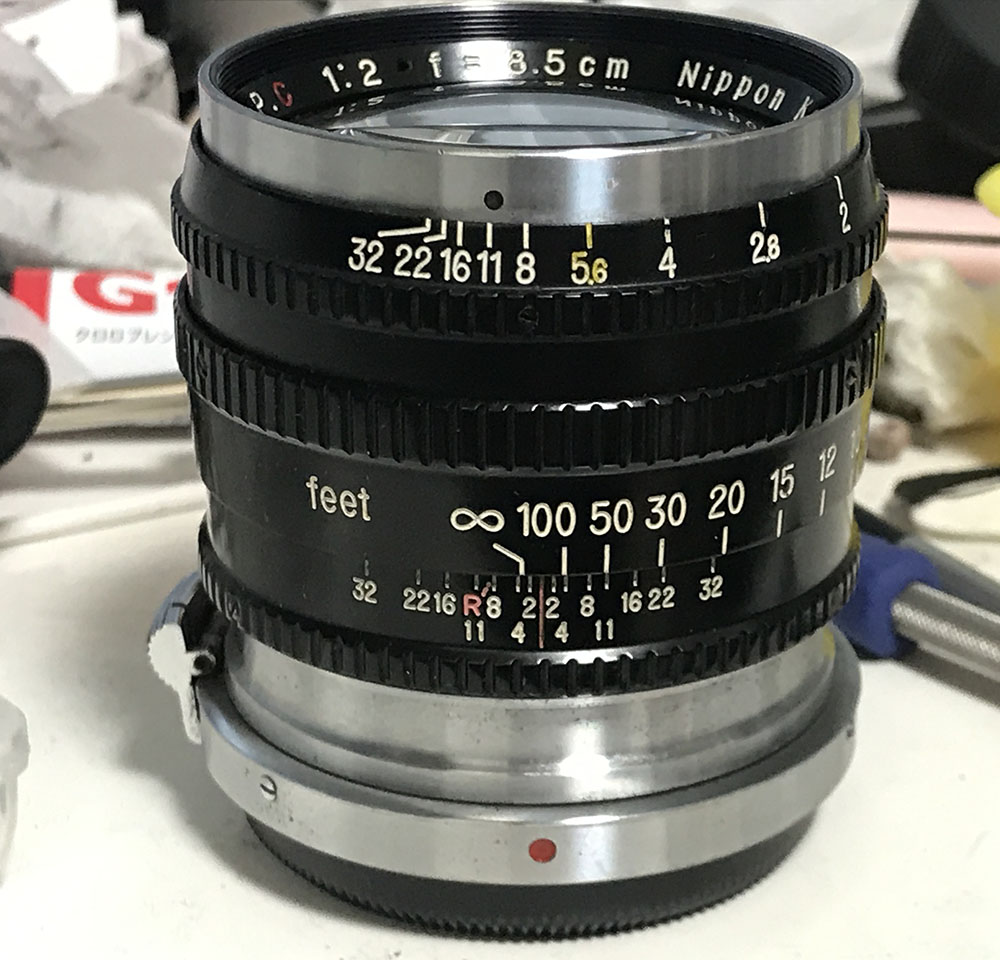
This is how it looks like now after a thorough overhaul, see how nice, white and clean the engravings are? The chrome looks shiny, too. This is how the barrel looks like when fully extended, the beautiful depth-of-field scale with its pink accents make this a stunning lens to look at.
Here are some things that our friend, Roland Vink has to say:
“The dot in “NIKKOR-P.C” is always lower by a full-step. On almost all other rangefinder Nikkors (and later in F-mount lenses) the dot is mid height, for example, “NIKKOR-P·C“.
Early NIKKOR-S.C 8.5cm f1.5s also have the low dot, but somewhere around no. 264xxx its position changed to mid-height. There are three main batches of the Nikkor-P.C 10.5cm f/2.5 with the dot/period positioned lower, roughly between 817312-818144, another from 819834-819908, and the last one from 912501-912800 (based on information collected so far). All the rest have the dot positioned normally. The Nikkor-P.C 8.5cm f/2 is the only Nikkor where all samples have the dot positioned low.
Somewhere around the mid-1950s, Nikon dropped the “·C” designation since coated lenses by then had become standard. The Nikkor-P.C 8.5cm f/2 is the only one to carry the “.C” mark right to the end, even though it continued to be made through to the late 1950s and early 1960s.
At the same time the “·C” designation was dropped (or a little after on some lenses), Nikon changed the font for the engraving on the lens. For example, the old font has a “3” with a flat top, the newer font has a rounded top. The newer font continues to be used for F-mount Nikkors right up to Ai-S lenses still made today. However, the Nikkor-P.C 8.5cm f/2 uses the old one even for the late black series, except for a few very-late lenses such at the one shown in this page, the latest serial number I have seen. Even that has its front ring engraved with the old style font, but it has the new font on the distance and aperture scales.
Many late production lenses with black barrel and modern styling are often engraved “J. PAT. 188,481″ near the base, but is often missing, with no clear pattern that I can see.”
Thank you, Roland Vink, your knowledge and guidance have been useful to use all in the Nikon community. You are a valuable asset to us all.

The Nikon SP is the best camera to use this with, the 85mm frame-line is the best thing about it. It balances perfectly with all Nikon rangefinder cameras and handling it is exquisite except for the insanely-long focus-throw which is something that cannot be helped since this lens is coupled to the camera’s own helicoid.
Knowing how your lens performs is key to maximizing it. You’ll learn how to exploit its strengths and avoid its weaknesses. This will help you decide if the lens stays in your cabinet or gets in the bag. I don’t do “scientific” tests, I merely shoot pictures and observe them then make my judgement based on my impressions of the pictures that I took and its practicality when shooting real-world photos. With that said, I took the following sets of photos with a Nikon Z6. These were taken from f/2, f/2.8. f/4 and f/5.6 from left-to-right. The lens is of a Tele-Sonnar type design which means its rendering changes as it is stopped-down from its maximum aperture. This is a really desirable trait in an artistic sense as it allows you to play with the characteristics a lens by simply modifying its aperture value so you won’t need to bring another one just to get the same effect.


(Click to enlarge)
Vignetting is moderate wide-open but it can be quite dark at the far-corners specially if you’re shooting an even-colored background such as the sky. It’s not bad at all but it’s something that you should consider. It flares terribly, I can’t fault the lens for it since it’s a 1950s design with older-type coatings. It can be avoided by positioning the sun or any bright light sources away from your frame. Stopping the iris down to f/2.8 won’t help much with vignetting but the far-corners do not look as dark. The characteristics of the flare looks a lot different as it takes-on a more defined look, the edges of the iris blinds what’s on the center like a cookie-cutter. While the ghosts do not look bad at all wide-open it starts to look like blobs from here-on. Stopping the iris to f/4 is helpful in alleviating the effects of vignetting, you will only notice it at the far-corners of the frame. Flaring is kept at a minimum, it can mostly be seen at the far-corners while the blobs starts to look like orbs. Stopping-down the iris to f/5.6 is beneficial for flare-reduction and you’ll only see feint traces of vignetting. I like how the sunstars look thanks to its many-bladed iris. Some people won’t like the ring-flare but some can find creative uses for the halo, your subjects will look like medieval saints depicted in old paintings with it.


(Click to enlarge)
This is how flaring looks like when taking real-world photos. I used a shade with it but it wasn’t enough to prevent this. On the other-hand, I took these photos on purpose to show you how it looks like. Veiling-flare can be useful depending on the effect that you want. It sure makes a photo look unique, it is something that many people try to simulate digitally but you get the effect for free with this lens. Some people hate this, the best way to avoid this is to just re-angle your shot.


(Click to enlarge)
The quality of the bokeh is exquisite in terms of smoothness, the foreground and background blurring looks great. You’ll see some outlines form around the edges wide-open if you look for it but it’s not bad at all, it can be ignored in most cases. Stopping the iris down to f/2.8 makes the discs look cleaner, it is the best aperture in terms of bokeh quality if you ask me. You’ll see some soap-bubble effect with this lens but this is not the lens for that. Stopping it down beyond f/4 won’t make the discs look terrible but it does start to look a bit distracting as it’s in-between blurry and defined. That can be fixed easily by either stopping the lens down to f/8 or below f/2.8, both will make it look either blurry or more-defined and not something in-between where you are not able to register what the characteristics of the blur really is.


(Click to enlarge)
This is sharp wide-open, contrast is quite good and resolution isn’t bad at all but it will improve as you stop the iris down a bit. You’ll see some spherical and chromatic aberration wide-open with the former being more obvious. I personally don’t mind spherical aberration and a bit of astigmatism and it’s sometimes useful in adding a “dreamy”, surreal look to your photos. You are going to get some chromatic aberration on over-exposed parts of the frame, in spots that are in the focus transition areas. It’s still within my tolerance, I am not so-strict when it comes to chromatic aberration and will prefer it at times as it makes a photo look more natural. Stopping this down to f/2.8 will improve center resolution by a lot, it can now support the sharpness of this lens much better. Spherical and chromatic aberration are controlled better, you won’t see much of it from here-on. It starts to perform near its peak by f/4 and f/5.6 is near-perfect at the center. The edges start to look better from f/4, it doesn’t look bad at f/2.8 but there’s plenty of room for improvement. It isn’t weak at the corners, it’s just that it’s just not as good at the center. This is a portrait lens so this won’t matter much as you’ll frame the faces of your subjects closer to the center. Its performance is rather even along the whole focus range with a slight performance bias towards the closer distances. It’s not bad at further distances it’s just that it’s incredible as you focus closer.

This photo sure looks exquisite, it feels like it’s a miniaturize. The rendering has a nice, three-dimensional feel. The focus transition is natural and you’re not going to be hit hard by a “all-of-focus” as I call it.

This is the original “bokeh-lover’s” Nikkor and you can easily see why in this photo. It looks so refined specially by 1959s standards. Sharpness is equally excellent wide-open, it is said that it out-performed its German rivals when it came to sharpness and resolving power wide-open, this is the proof.

Even at moderate distances you’re still able to blur the background with it. I love this effect specially for shooting full-body portraits. This isn’t a portrait but you get the idea.


(Click to enlarge)
Here are some more photos for you to look at. The best trait of this lens is its amazing bokeh quality coupled with its sharpness wide-open. Its sharpness isn’t perfect wide-open but it’s still a lot better compared to most lenses that were made in the 1950s and maybe even the 1960s.
I love shooting with film. It has a unique look that’s hard to simulate with a digital camera and that has mostly to do with grain. Film grain helps mask a lens’ flaws or can amplify them depending on circumstances. That’s why it’s important that we review some photos that were taken with film. Since this was made for film it’s only fair that we judge it with its intended medium. It was sunny so I used Fujifilm Industrial 100. I took these with a Nikon SP, the best camera for the job. Most of the pictures that were taken under-the-sun were taken with the iris stopped-down from f/4 to f/8. You may occasionally see some that were taken wide-open and it’s up to you to find them.

This is perfect for portraiture, it’s Nikons original lens for that purpose. This is near-perfect for its time and it is the reason why this lens has such a huge following over-the-years even with Leica photographers.

A perfectly-exposed photo of a difficult scene. The resolving power of this is amazing for its time, the corners look great and you can see the fur strands.

The focus transition is so-smooth it makes the photo look really natural. The girl was rendered beautifully and 85mm is the best for this kind of framing. This lens has the best combination of focal length and performance.

A lovely portrait of a lovely lady. This was probably shot at f/2.8 or so since I was at the shade. The quality of the bokeh is exquisite and its ability to blur the background is helpful in hiding ugly details behind your subjects.

The depth-of-field is quite thin, you’ll want to position your subjects’ faces at the same plane to prevent blurring one of them.

I love this photo a lot because it’s quite sharp and the background is smooth which aids in isolating the subject. This was definitely shot at around f/8, it’s really sharp and the depth-of-field looks a bit wider.


(Click to enlarge)
Here are more pictures for you to enjoy. It can be difficult to nail your focus with this lens specially with moving subjects but you can do it with patience and experience. Shooting with a rangefinder camera isn’t easy specially for longer lenses because you’re not viewing through-the-lens. You can see that I missed my focus on some of the shots here and that’s fine. This lens will be useful for lowlight photography, f/2 is decent-enough for this and all you are going to be needing is a film that’s faster than ISO800 such as Fujifilm Venus 800. Something like Fujifilm Natura 1600 will be preferred but it’s not being produced anymore.
I wouldn’t recommend this lens if all you want is a Nikkor-P•C 8.5cm f/2. It’s a collectors’ piece and its price reflects that. You can get the more-common all-chrome version instead, both lenses are identical except for their looks. I really don’t see any merit in owning this apart from the bragging-rights this lens offers. The all-chrome Nikkor-P•C 8.5cm f/2 one is much cheaper except for the really-early ones which can cost a lot more. Spend your money well, read my work and then decide which lens suits you.
Before We Begin:
If this is your first attempt at repairing a lens then I suggest that you check my previous posts regarding screws & drivers, grease and other things. Also read what I wrote about the tools that you’ll need to fix your Nikkors.
I suggest that you read these primers before you begin (for beginners):
Reading these primers should lessen the chance of ruining your lens if you are a novice. Before opening up any lens, always look for other people who have done so in Youtube or the internet. Information is scarce, vague and scattered (that is why I started this) but you can still find some information if you search carefully.
I highly recommend that you read my working with helicoids post because this is very important and getting it wrong can ruin your day. If I can force you to read this, I would. It is that important!
For more advanced topics, you can read my fungus removal post as a start. This post has a lot of useful information and it will be beneficial for you to read this.
Disassembly (Main Barrel):
The construction is similar to the all-chrome Nikkor-P•C 8.5cm f/2 but there are a couple of differences which you’ll soon see. This isn’t a difficult lens to service for an experienced repairer but novices should stay-away from this. This is a very valuable lens, you should practice with cheap Soviet lenses if all you want is to get some experience. You’ll need special tools to repair it, I have the right tools for the job and it took me a lot of money and effort just to purchase or fabricate them. If your lens needs repair, just send it to a real repairer as that will end-up being cheaper and safer. Having said that, notes and photos will be really helpful so you’ll know how to put things back later during reassembly.
Like most long rangefinder Nikkors this one can be separated by turning its front assembly until it unscrews itself. Mine was stuck, I had to do a detour. If your lens isn’t stuck just do it the usual way. I do not want to ruin my lens so I had to it the other way instead.
The front elements assembly can be unscrewed from the objective’s casing. I don’t think you’ll need too much effort to unscrew this. If it’s stuck, use a bit of alcohol and apply a drop to the threads, never flood it or the alcohol may find its way to the cemented group and ruin the lens cement.

The aperture ring can be removed after you extract these.
Make sure that you know how to put this back because the numbers on the aperture ring needs to align precisely with the dot on the front ring. Note its position before you remove this.
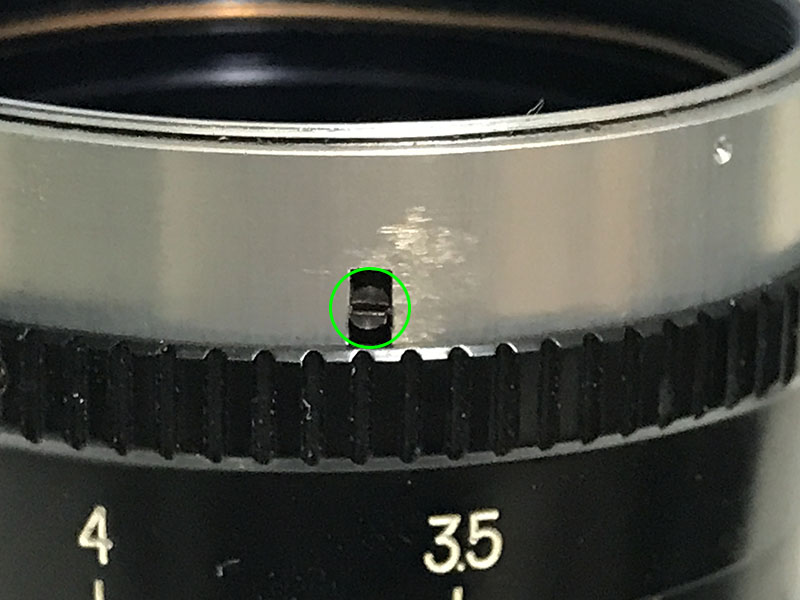
Carefully extract this screw, it’s a pin that links the aperture ring to the iris mechanism inside. It allows the aperture ring to control the iris. Before you remove it, note its height first since you’ll need to put this back again in the right way and it should sit exactly the way it did.
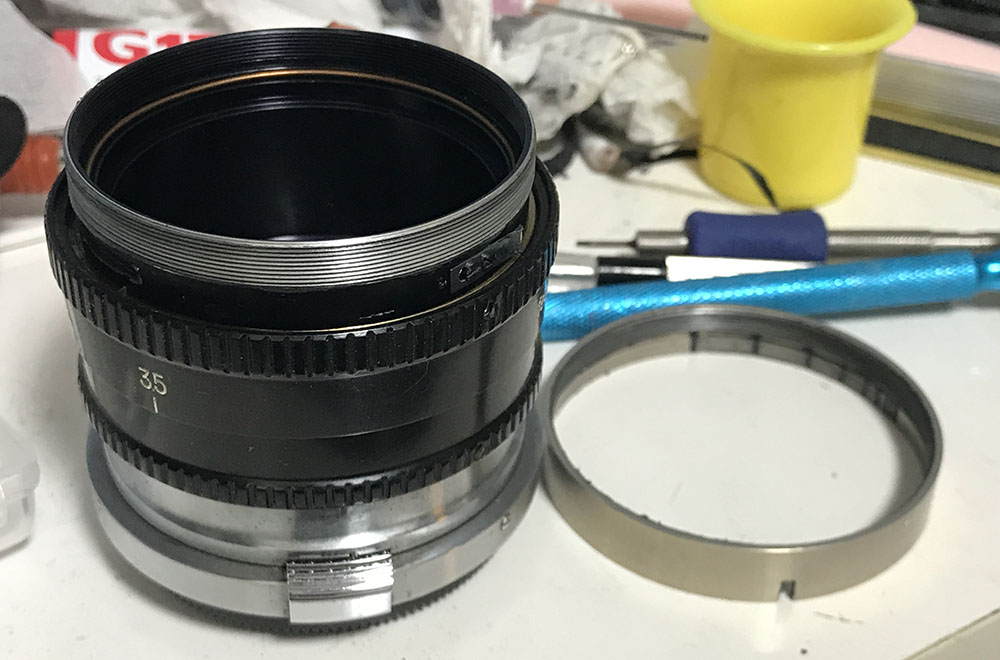
You can remove the inner collar of the aperture ring by unscrewing it. This lens’ aperture ring comes in 2 separate parts, the main one and the scale.

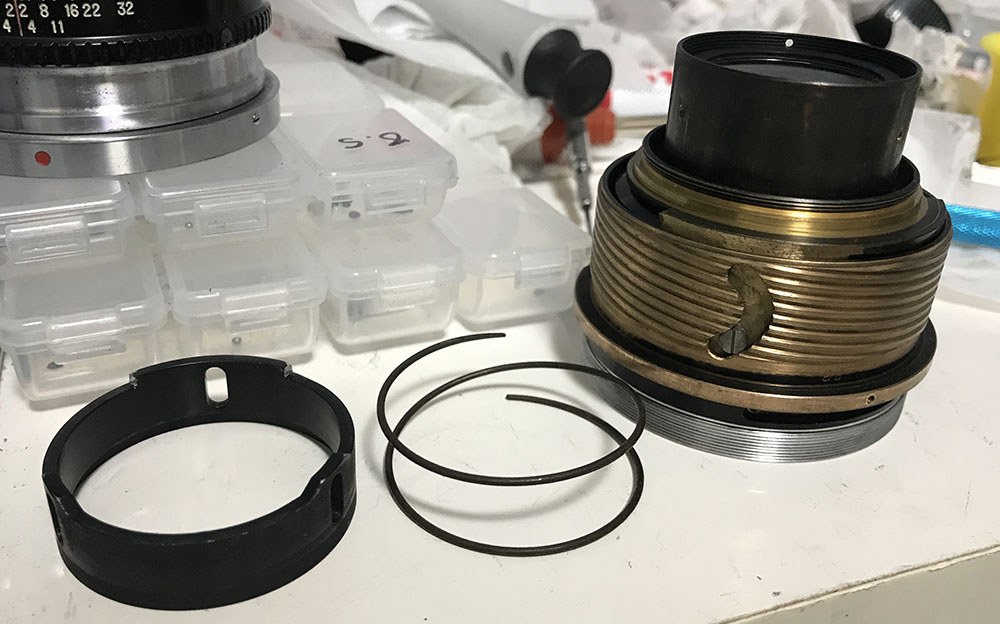
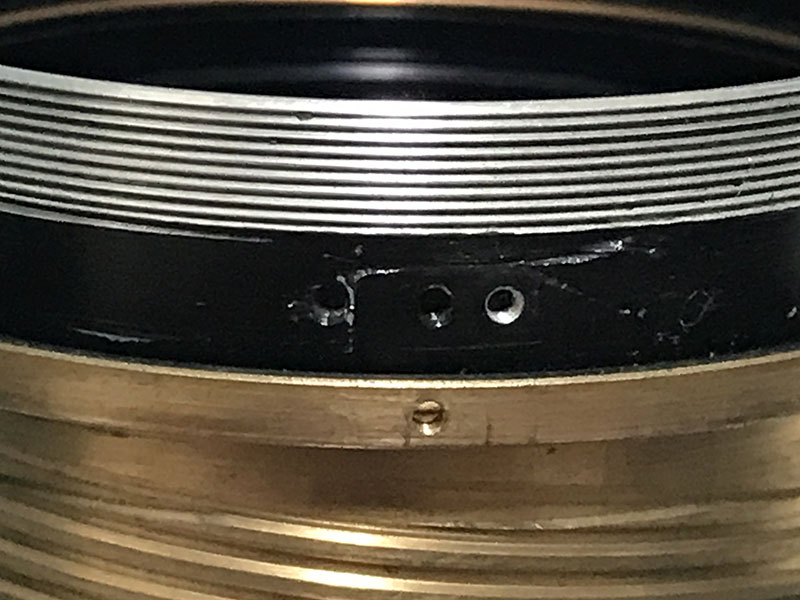
Extract this and you can unscrew a ring in the rear of the main barrel. This ring covers the rear and removing it will allow you to separate the helicoids easier since you’ll have more room to work with.
Use a lens spanner to remove the ring. Putting this ring back is easy but the screw is another story since its hole has to be perfectly-aligned before you’ll able to put its screw back.
Separate the helicoids carefully, don’t forget to mark where they parted. It’s important that you do this since this is where it should mesh. If you haven’t read my article on how to work with helicoids, please read it so you will not get stuck like many beginners tend to get into.
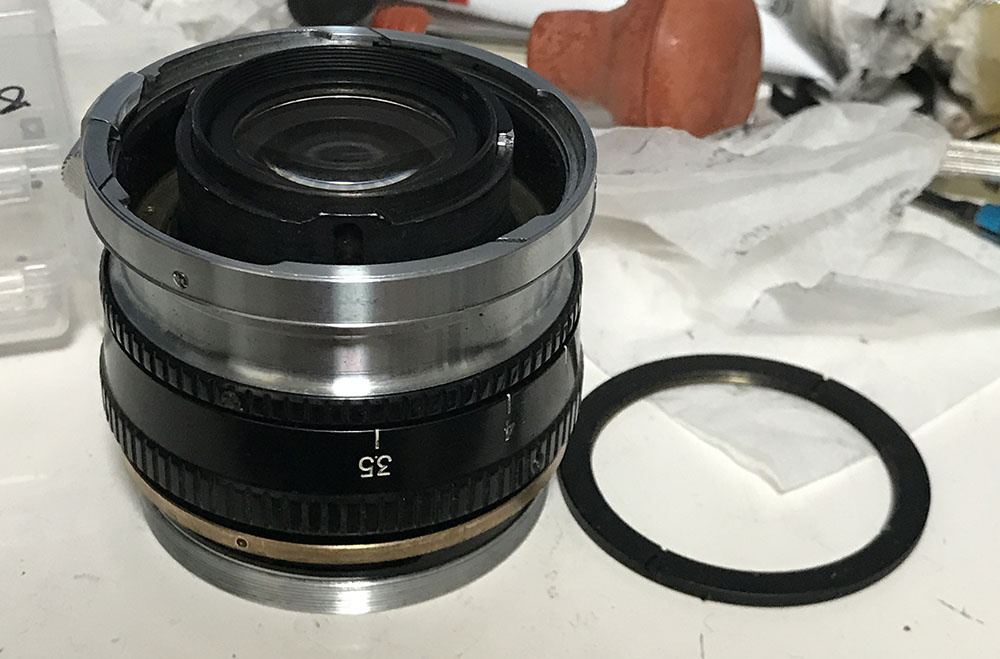
Note that you can remove the depth-of-field scale after extracting its screws and pulling it off from the lower barrel. I always clean that part because it’s the favorite place for germs and grease can get caked underneath it.

The rangefinder-coupling cam can be removed once these are extracted. It’s spring-loaded so you’ll want to be careful.
Clean this very well and make sure to scrub the spring with a wire-brush. It can be rusty at times and you should remove any corrosion.

Carefully extract this so you can remove the rangefinder-coupling cam and its assembly. There’s an arm underneath this where the screw is attached, it travels within a slot, turning the focusing ring will make the cam travel up-and-down.

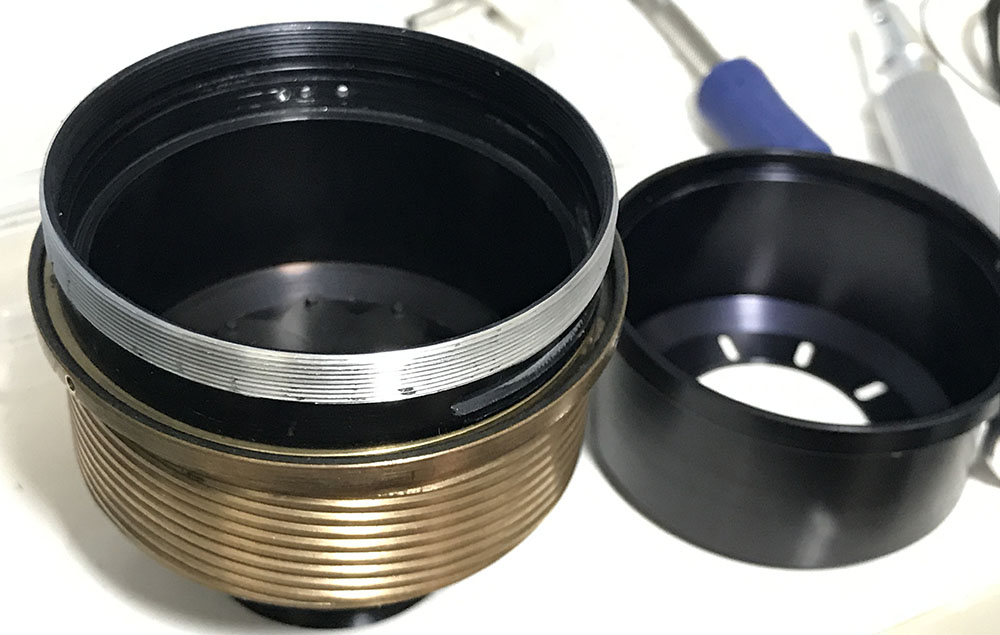
Here it is now. Do note that this job would have been a lot easier if only the housing of the objective wasn’t stuck. I had to be extra-careful with this, it’s easy to scratch the rear element.
Clean everything perfectly and don’t leave any residue. Be careful when you clean the black parts, don’t leave them in an alcohol bath for too long, that’s going to craze the paint. Cleaning them with soap-and-water is the best way. Use a thin type of grease as a thicker one will make this difficult to turn. The parts of the rangefinder-coupling cam will have to be greased, too. Don’t put too much grease on the helicoids or anything in this lens as it can migrate to the iris mechanism sooner or later.
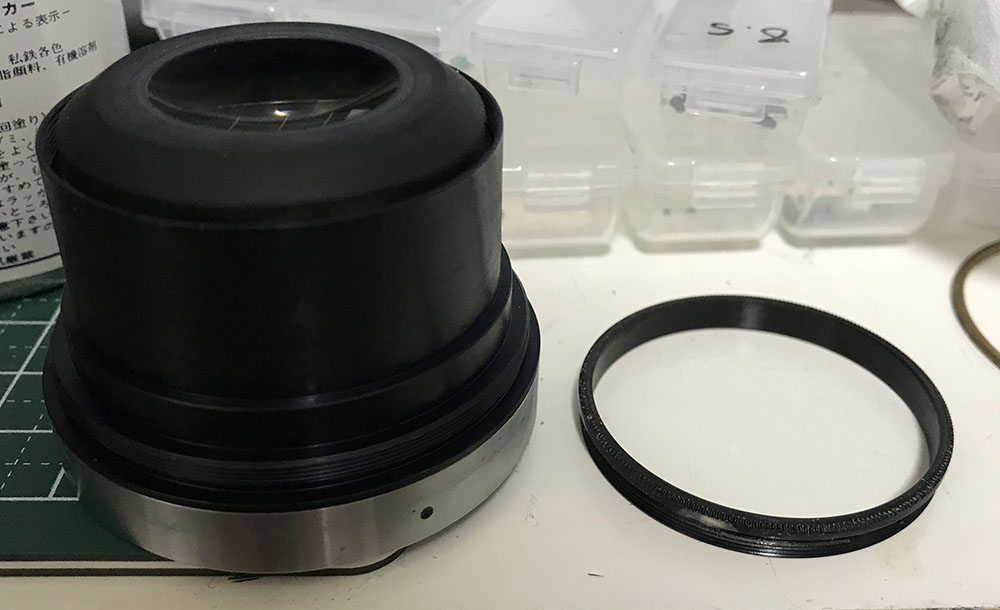
Disassembly (Front Barrel):
I’ll combine the objective and iris mechanism section into one. This lens was stuck around the objective’s casing and you’ll see that the helicoid is stuck to it. That shouldn’t be the case if your lens isn’t stuck. Handle everything with care as the glass is delicate, you can’t afford damaging anything here. If the iris mechanism is oily, make sure to overhaul it completely. You won’t clean it by flushing the iris mechanism with solvents, all you’re doing is sweeping the oil further inside the mechanism. Since you’ve gone this far it’s better to do the job right.

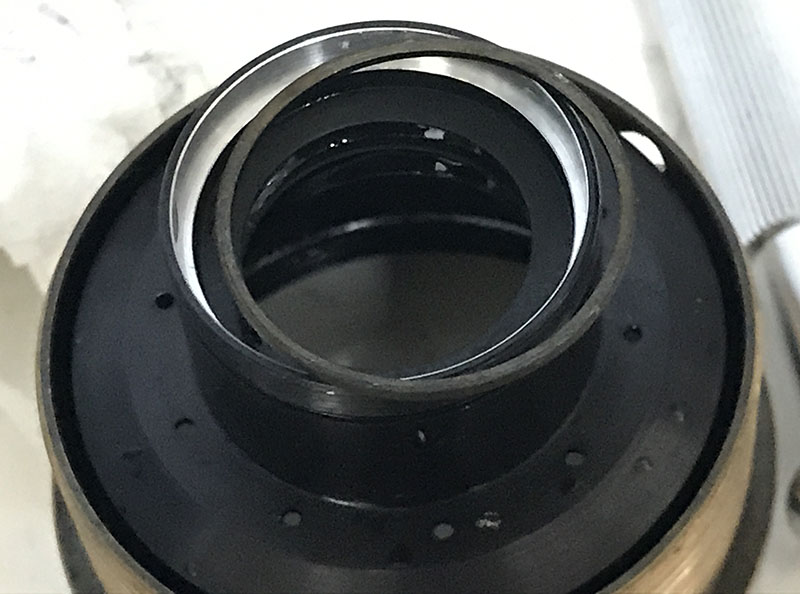
The iris mechanism is being held by this brass ring. Pick on it with a needle and you can safely remove it.
The rotator cup can now be removed. It’s deep, use your fingers to pull this out and be careful not to damage the iris leaves.

The iris looks filthy but dry. Carefully remove the leaves by dropping them inside a cup filled with alcohol, surface tension should be enough to break the fall.

The front element is being secured by the bezel. Use a rubber cup to extract it, if it’s stuck just apply a drop of alcohol to its threads and let that soften it up a bit by dissolving anything that was used to seal it. A lens spanner is the last option, I tend to avoid using metal tools and will always try rubber ones first just to be safe.

Extract the front element carefully with a lens sucker. The lens sucker may not have enough suction power for this and you may need to use the type of suckers that you use for hanging things in the toilet.
Removing the 2nd group is easy, simply unscrew its retainer and pull away that big chunk of glass. This group is basically a collection of several pieces, they were cemented-together to form a single group, in this case it consists of 3 elements. This is called a triplet for that very reason.

The 2nd group can be quite tight to remove as the fit is precise. Be careful if you try to push this from the front since you may drop the group. Removing it can be a nervous experience so you’ll have to be prepared.

The rear element can be easily removed by unscrewing its retainer.

A lens sucker is the best tool to extract the rear element. I drew a few lines, this will help me know which side should be front-facing. You should never put an element back facing the wrong way or you’ll crack the element when you tighten its retainer.
There’s a spacer underneath the rear element, make sure to note which side should be facing the front.
Finally, it’s now time to remove the objective’s housing. Mine was stuck and I had to pickle this in an alcohol bath for days before I was able to remove it from the inner helicoid. Before doing so, I took a picture just to make sure I could determine how much this should be tightened.

This is usually the first step but it ended up being the last for me because it’s stuck. Note that there’s a brass shim between the objective’s housing and the inner helicoid. This is a unique part so be sure not to lose it, this is used for adjusting its focus and they’re filed-to-fit.
Clean everything before you reassemble them. I wiped the blades with lens tissue saturated with naphtha while being careful not to bend them. This is the most frustrating part of repairing this lens, if you want to know how it’s done, read my article on how to repair preset-type irises. It requires skill and a lot of patience for this job, it’s not something an amateur will want to do. I usually take several tries just to get it right.
The glass and their housings were cleaned before reassembling them. I was lucky that it didn’t have fungus despite the state that I got it. If your lens has it, read my article on cleaning fungus. Be aware that my solution is potent, it can dissolve your lens’ coating. Only experience will tell you how much of it will be fine to use and for how long.
Conclusion:
That was a pleasant experience, despite being familiar with this type of lens I was able to learn a lot of things about the last version. It took me around 3 hours to service this with most of that time spent cleaning everything and it took me plenty of time to reassemble the iris, maybe around 20 minutes. It’s been one of my dreams to own this rare lens but I couldn’t afford it but fate found its way to me.

Everything is so clean now, I’m glad that I finally got to own this beauty. I’m very happy with this lens, it’s one of the best lenses from the 1950s. This is a legendary lens and I am proud to own one of these and lucky enough to get this for an insanely-low price.
Thank you very much for following my work. If you love this site, please do share this with your friends. You may also want to support this site, too. It’s a big help since it helps me maintain this site. You are also helping me buy, develop and scan film. This helps make this site more useful since you can see plenty of photos that were taken with film. This is a film-lover’s place, it is a place where film use is celebrated and promoted, that’s all thanks to all of your support. Thank you again and see you guys next time, Ric.
Help Support this Blog:
Maintaining this blog requires money to operate. If you think that this site has helped you or you want to show your support by helping with the site’s upkeep, you can make a small donation to my paypal.com (richardHaw888@gmail.com). Money is not my prime motivation for this blog and I believe that I have enough to run this but you can help me make this site (and the companion facebook page) grow.
Leave me some tip?
Thank you very much for your continued support!
$2.00
Helping support this site will ensure that this will be kept going as long as I have the time and energy for this. I would appreciate it if you just leave out your name or details like your country’s name or other information so that the donations will totally be anonymous. This is a labor of love and I intend to keep it that way for as long as I can. Ric.

Feb 24, 2022 @ 06:15:11
Hi Richard,
Really appreciate your insight on this lens.
I recently acquired one in pristine condition. Much to my annoyance, sand got into it after a recent beach trip. To be precise, there is a spec on the very front element and also a spec or two on one of the aperture blades. Nothing else visible at least.
Value aside, my bigger concern is whether or not leaving it in there may cause lasting damage.
Would really appreciate your expert opinion on the issue.
Cheers,
Rubén