
Hello, everybody! Today is the start of my 4-day weekend! I’ll have enough time for my recreation and self-healing. As you know, I’m busier now at my new studio, finding time to do what I love can be very difficult. I often find myself sleeping really late and it’s beginning to take a toll on my health. It’s great that I can recharge myself after all the work in the past few months at work and at home. Speaking of refreshes, we’ll be talking about something great that came out even better after being “refreshed”. This will be a very good example of how a good design can be pushed even further.
Introduction:
Today, we will be looking at the Micro-Nikkor-P.C 55mm f/3.5 Auto! This isn’t just a cosmetic upgrade of the Micro-Nikkor-P 55mm f/3.5 Auto which came before it as many people would tend to believe but this lens’ optics has been tweaked a bit. Apart from the newer coatings (hence, the “C”), this lens was revised a bit so it can render objects further into the frame sharper. Nikon did this thinking that not many people are using this lens for close-up work. While that may be true statistically, people buy these things because of their performance for close-up work. It turned-off many but to be frank, I did not find this lens to be any-less sharp than the previous one. In what I do which is shooting bugs and sometimes slides, they’re really as sharp as you can get them to be from f/5.6 to f/8.
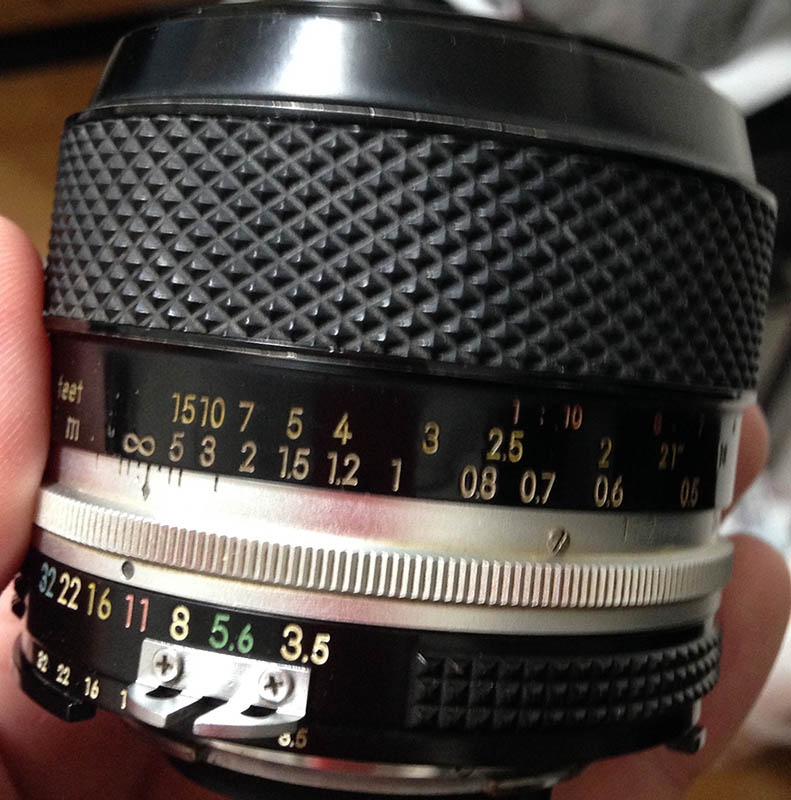
The Micro-Nikkor-P.C 55mm f/3.5 Auto is a beautifully-built lens. This lens is a little gem for people who love to shoot small objects and it also serves as a great walk-around lens due to the 55mm focal length. The new rubber ring is a welcome update to some but I like the feel of metal focusing rings more to be honest but that’s just me because I prefer durable things.
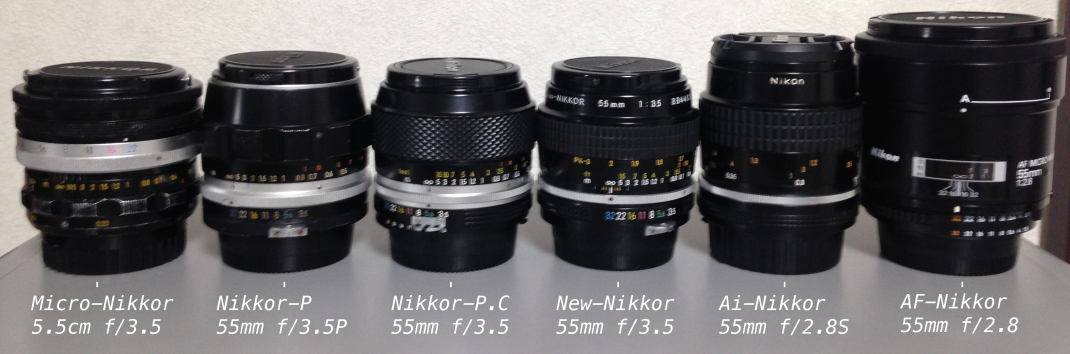
The 55mm Micro-Nikkor family for the Nikon F-mount is a venerable line of high-performance macro lenses with production spanning decades. It is the roots of today’s really popular 60mm Micro-Nikkors. Nikon began this trend in Japan but the 1st company who thought of this concept is Zeiss with their Macro-Tessar for the Contax, a practical normal lens that also doubles as an incredible macro lens.
All lenses in this line (yes, including the Micro-Nikkor 5.5cm f/3.5) feels great to my hands, I love them all just the same. The rubber grip is a nice touch. I imagine that those who use this in the cold will be thankful that they aren’t touching cold metal. At this point in Nikkor history, the majority of Nikkors all went through a design upgrade to fit the times, this lens family also got a cosmetic upgrade, too.

It’s a very handsome lens. Mine has the factory Ai-ring installed so I can use this with a modern Nikon DSLR. These were originally sold as pre-Ai lenses and you will need to do a small modification on the aperture ring if yours is not Ai-compliant. Read how to modify your lenses to Ai to know more about this. I recommend that you leave yours stock, just use a mirrorless camera for your non-Ai lenses but if you have to then that is the way to do it. This is not a reversible modification and it should only be done by an expert.
As for performance, this should perform just as good as the Micro-Nikkor-P 55mm f/3.5 Auto that went before, maybe even better if used in challenging lighting conditions due to the improved coatings applied to it. As mentioned earlier, I cannot see any difference with this lens and the rest of the Micro-Nikkors from the same family. Maybe you can see the subtle differences in controlled laboratory-like situations but in real use, these all perform about the same with each other which is excellent.
This is a true classic, it is still relevant today for shooting small static objects using a good lighting setup. If you shoot coins, stamps, slides, film, toys and other similar fields then this lens is what you need. Just like its predecessor, it won’t give you real-life (1:1) magnification without the use of the M-rings. These M-rings were sold together with the manual Micro-Nikkors from the 55mm family but they usually get misplaced so you will almost always have to look for them as a separate accessory. These are just extension tubes that will help give you 1:1 magnification. This lens will only give you half of that if you use it alone with the helicoids fully extended so think of the M-rings as essential if you need to get 1:1 magnification.
Let’s see some photos that were taken with film. Film has a unique look due to film grain and that’s why its special look is difficult to simulate in digital. It reacts differently to light, it can either mask flaws or amplify them. This is why we want to see these photos and since this lens was designed for film it is best that we judge it with its intended medium.

This was taken at around f/8. Notice how high the resolution is. The quality of the bokeh is smooth, not harsh at all. Some lenses tend to display ugly or clumpy bokeh characteristics when stopped-down but not this one. You will get polygonal-shaped discs, though. The iris is 6-sided, that’s why.

The bokeh quality is quite nice. I don’t know where I read this but all macro lenses (if not the majority) should have great bokeh quality. If a macro lens renders harsh details on the blurry parts then it’s no good because it will be really obvious since close-up photos usually have blurry backgrounds. This is a sharp lens wide-open, look at the aphids in the bud. I didn’t even know that they were there when I shot this.

Here’s another photo that was taken stopped-down. See how beautiful all of the petals were rendered? That tiny beetle at the center looks sharp, too.

This is how much this flares. The front element is recessed but this does not mean that this lens won’t flare when there’s a strong light source within the frame. It robs the frame of contrast where it appears, the other corner looks nice and contrast seems pretty good even wide-open.

This is a good example of how exquisite this is. It can render both sharp and blurry details equally well, even wide-open. This shot is tricky since it has a lot of frequency in the details which can trigger ugly bokeh artifacts but this is not a problem for this lens.


(Click to enlarge)
Here are more photos that were taken with this lens using film. Check them out and see for yourself. At the age of digital cameras, this lens can still do a lot despite being designed several decades ago, this lens is older than many of my readers.
If you still do not have one, these are usually sold cheap in the used market. They’re reasonably-priced but the performance is very good so you get very good value from these lenses. The ones that come with the Ai-rings can cost more, but not by much. I suggest that you get one if you still don’t have one, they’re so good that it’s unthinkable for an avid Nikon shooter and collector not to own one of these. If you want to spend a bit more you can purchase a Micro-Nikkor 55mm f/2.8 Ai-S, these are amazing lenses and the faster speed will give you a brighter view which is essential when shooting close. It also helps you focus better since the focus plane is easier to see. Which one you get will all depend on your budget and needs.
Before We Begin:
If this is your first attempt at repairing a lens then I suggest that you check my previous posts regarding screws & drivers, grease and other things. Also read what I wrote about the tools that you’ll need to fix your Nikkors.
I suggest that you read these primers before you begin (for beginners):
Reading these primers should lessen the chance of ruining your lens if you are a novice. Before opening up any lens, always look for other people who have done so in Youtube or the internet. Information is scarce, vague and scattered (that is why I started this) but you can still find some information if you search carefully.
I highly recommend that you read my working with helicoids post because this is very important and getting it wrong can ruin your day. If I can force you to read this, I would. It is that important!
For more advanced topics, you can read my fungus removal post as a start. This post has a lot of useful information and it will be beneficial for you to read this.
Disassembly (Lens Barrel):
Disassembling this is very easy and straight-forward. It’s nearly identical to the older Micro-Nikkor-P 55mm f/3.5 Auto in almost every aspect. Beginners can work with this with no problems at all as long as they follow this guide properly and use the right tools for the job. The one thing that I will have to warn the beginners about this lens is marking where the helicoids separate. This is a very important thing that many people skip.
As with all lenses, we would like to remove the objective and other delicate things before we work on the barrel. This is a very important approach in lens repair that’s why it is recommended here in this blog as best practice.

Extend the barrel by turning the focusing ring until you see this set screw. Loosen it with a precision screwdriver carefully. If it’s stuck, soften it with solvent, see if that would dissolve the lacquer used to seal it. Whatever you do, never damage this or else you’ll be in trouble because you’ll then have to drill this out and that will be risky. Damaging the surrounding metal isn’t something that you’d want.

Once the screw has been loosened enough, you can then unscrew the front barrel off. It’s easy to remove it but if yours is stuck, drop some alcohol into its threads to soften it up. I would drop the solvent into the hole of its screw or through the small opening near its top. Let that sit for some time to let it soften whatever is binding it before you attempt to remove it again. A pair of rubber gloves will also help you with your grip.

Once the front barrel is gone you can extract the objective, store it in a safe place so it will be safe while you work with the rest of the lens. This usually comes off easily, it’s rare that this is stuck. You can try extending the barrel and see if that will help. Check the rear element, make sure that it won’t get scratched as you extract the objective.

Now that the objective is safely stored somewhere, we can now work on the barrel without worrying about scratching anything. To remove the focusing ring, you’ll need to remove the rubber grip first. Get a small toothpick and run it through the whole circumference of the rubber grip’s inner surface. This will lift it from the glue so you can safely peel it. Be careful not to harm the rubber since it can be delicate due to age. Tearing this thing means that you will have to say goodbye to it.

Before removing the focusing ring, focus the barrel to infinity, work with it in this way from now on when possible. Doing this will help you with note-taking because you’ll have infinity as your reference point. This is a useful practice when repairing lenses. The focusing ring is being secured by these screws. They can be hard to remove if they were glued with the same glue used for the rubber grip so be careful.

The focusing ring comes off just like this. People sometimes glue this and it can be a bit stuck here and there because of that. Old, hardened grease will also bind it.

The focusing scale can be pulled-off by unscrewing its screws. Be sure that you do not scar the surrounding metal around the screws by using the right drivers. The scale is easy to remove but this can get stuck due to hardened grease. If this happened, use a few drops of naphtha to soften the gunk up before you remove it.
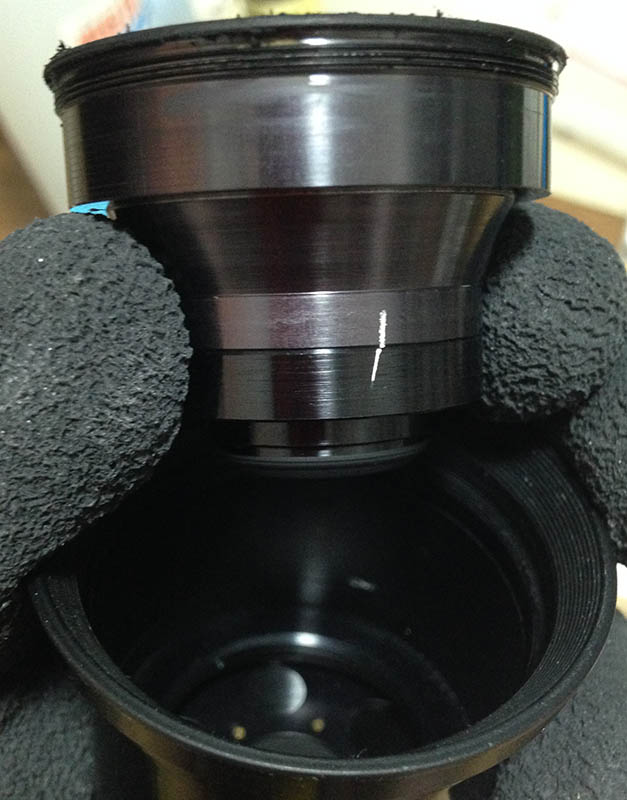
Notice there is a mark at the lip of the central helicoid. The repairman who worked on this scratched a small mark to help him determine how it should be when the lens is focused to infinity. With this scratch, he will know if he reassembled the lens properly or not. This is what I do, too. This is going to be helpful for me as it did for the previous guy. Thank you, mr. repairman.

The bayonet mount is secured by 5 screws. Carefully remove these and you can remove the bayonet. If you are new to this, read my article on how to remove the bayonet screws so you won’t strip the heads of your screws. This is where many people get stuck so do not make the same mistakes and read my article to prevent that from happening.

Once the bayonet is off you can safely remove the aperture ring right after removing a screw found at the back of the ring. Notice that big screw at the lower-right corner of the picture? That screw is used to couple the aperture ring to the iris mechanism inside. This screw has to be removed before you can extract the aperture ring.

You can separate the helicoids by removing the helicoid key. The key is used to constrain the rotation of the helicoids. Without it, the helicoids won’t be able to extend or retract. Before you separate the helicoids, make sure that you took plenty of notes so you will know how the helicoids should line-up when the lens barrel is set to infinity. It’s a very important thing because if you got it all wrong then your lens will not focus the right way and you will spend a lot of time guessing how things should be.
To remove the key, unscrew these 3 big screws. These are usually glued and it is a very delicate job to remove these safely. You may accidentally rip the heads of the screws away from its shaft if you’re not careful. What I do is I use a small torch to heat these up and then remove them while they’re still too hot to touch. Do this trick one screw at a time. It is also OK to put some MEK or acetone to help soften the seal up but that takes a long time. A torch is faster but you can do a lot of damage if you are not careful so it’s all up to you. I know what I am doing so I chose the torch over the slower process of using MEK.

This is the key. It’s longer on this lens because the lens extends quite a bit. If the helicoid key is dirty, make sure that you clean it well and scrub it using plastic wool. This should be as smooth as possible so the helicoids turn very smoothly.

Now that the key is gone, you can now turn the helicoids beyond the focus range. It’s important to see how far you can turn the inner helicoid until it’s fully-collapsed. Take lots of notes to remind you how it should be, when you reassemble the helicoids they should be able to get to this configuration, if it didn’t then you got it all wrong. If you got it off by just a little bit then that is probably OK because old grease can jam the helicoids.

Begin by separating the central helicoid from the outer one. It is important that you take note of where they separated, this is also the point where they should also mate during reassembly. If you haven’t read my guide on how to work with helicoids, read my article to know how it’s done properly. It’s very important that you get yourself familiar with helicoids, this is where many beginners get stuck. It can all be prevented by just taking notes and reading my article.

Do the same to the inner helicoid. Never forget to take notes on where these 2 will separate. I keep on repeating myself because I still get messages from people asking me how to put their helicoids back. I’m unable to answer you quickly because I am busy.

The outer helicoid/barrel also houses the aperture fork and its ring. Before you remove it it’s very important that you take note how far this should be screwed-in. This slot at the middle is where the screw on the aperture ring should be.

The aperture fork and its ring can now be removed. When putting the lens back, make sure that both the screw heads of the iris and the iris actuator are on the right places. The one at the iris should slide inside this fork’s slot while the other should be in-contact with the aperture stop-down lever at the bayonet mount. The one on the iris actuator is actually a tab and it can be a bit hard to put it back if you’re a not used to it.

This is what you should have by now. This is simple and its parts all fit into this container. I always love working with these Micro-Nikkors since they’re simple.
That’s all for the barrel. When lubricating them, be sure not to over-grease or else the grease will migrate to the glass. It will also form a gloop when it settles, it’s going to deteriorate into an oily mess as the soap separates from the oil. This oil is going to settle somewhere (or everywhere) so you have to prevent this as much as possible. It’s important not to use a thick grease, the helicoids need to extend quite a bit so the one that you want is somewhere on the thin side but not too thin as to make the helicoid feel loose. A little bit of resistance is nice for a macro lens.
Disassembly (Objective):
Working with the objective isn’t much of a problem because it’s simple but there are a few things that you should be careful of. This mainly deals with the parts being glued/sealed with lacquer or paint. The front bezel is a pain to remove in all lenses from this series so don’t rush it. I will not show how to work on the iris of this lens so that’s unfortunate for those who wanted to work on theirs. The good news is the iris mechanism’s design looks identical to the ones found on Nikkors of the same vintage. Just look at my article for the Nikkor-P 105mm f/2.5 Auto and similar lenses and you should get a good idea of how this thing should be taken apart.
Usual procedures apply to this such as being careful not to scratch the glass. This is also a simple design so there’s not much going on here and you don’t have to worry about getting the elements back in the wrong direction since most of the elements are glued to their housings. That should make your job a lot easier. Be careful working on the rear element because that is the most important piece of glass in this lens.

The bezel can be removed by using a rubber friction cup. These are usually stuck but you can soften whatever is binding it using alcohol. Just a apply a small drop of alcohol, that should spread throughout its thread by capillary action. It will take several applications and a couple of hours before you can effortlessly remove this.
Once the bezel is gone you can now remove the cup where the front optical assembly is located with a friction cup. Notice that the previous repairman scratched this mark to serve as a key. Precise optic alignment or collimation is important to a macro lens so it was a welcome sight to see because I knew that the previous guy knew his stuff.

The iris is now exposed. You can clean it carefully with a Q-tip and naphtha if you choose to. If it’s riddled with fungi, oil or debris then only a complete stripping-down of this assembly is going to be sufficient. The iris assembly is simple enough for an experienced repairman to overhaul. The good news is the iris is rarely oily with this model.

The 2nd element can be accessed by extracting its housing. The 1st element is glued to the cup so don’t bother removing it or you’ll just damage it.
That’s it for the objective. This is as simple as it gets, it’s always fun working with this. It’s a very good way to unwind after a long day at work. Never do anything careless with this assembly, you don’t want to disturb the elements and how they were secured to their housings. If any got misaligned this lens won’t give you sharp images anymore.
Conclusion:
Does this feel like déjà vu? Like I said, this lens has a lot in common with the Micro-Nikkor-P 55mm f/3.5 Auto so if you’re familiar with that lens then this is easy for you. I can recommend this to an experienced novice who has the right tools and skills. Removing the screws can be difficult, I would suggest that you work with this lens once you have gathered a bit more experience working with cheaper lenses that’s not worth saving such as cheaper lenses from other brands that you can get for $9 or less. This is a fine optic so treat this lens with respect even if you got one as a junk.
Thank you very much for reading this. I am currently getting a bit burnt-out writing things so this short article is something refreshing. Writing articles in this style is not easy and it certainly feels like a second job. I have a 4-day holiday now so I have the time to relax but I will have to use my downtime wisely because I will need to balance it with family, studying PySide for my job, camera fixing and time for myself. It’s not easy but let us see what I can do with these 4 days. Thank you for following this blog, if you liked my blog please share this with your friends. If you want to help this blog continue to help and entertain people, please consider supporting my work. It will help me offset the cost of maintaining this blog and also help with buying film to show you what many review sites don’t. Thank you very much, Ric.
Help Support this Blog:
Maintaining this blog requires money to operate. If you think that this site has helped you or you want to show your support by helping with the site’s upkeep, you can make a small donation to my paypal.com (richardHaw888@gmail.com). Money is not my prime motivation for this blog and I believe that I have enough to run this but you can help me make this site (and the companion facebook page) grow.
Leave me some tip?
Thank you very much for your continued support!
$2.00
Helping support this site will ensure that this will be kept going as long as I have the time and energy for this. I would appreciate it if you just leave out your name or details like your country’s name or other information so that the donations will totally be anonymous. This is a labor of love and I intend to keep it that way for as long as I can. Ric.

Feb 23, 2020 @ 06:03:04
Awesome guide! I’ve been trying to clean the objective assembly, but can’t seem to remove the bezel to get to the elements inside. I am using a rubber cup and have applied alcohol to the bezel multiple times and waited for quite a few days. For some reason, trying to turn it with a suction cup doesn’t work and I just get a lot of blackish deposits on the cup. The white lettering on the bezel also looks like it’s being rubbed off.
I am using the same cup as the guy in this video: https://youtu.be/dmLrUKtMR1A?t=92
Do you have any suggestions?
Jul 21, 2022 @ 15:08:29
Goood reading