
Hello, everybody! I am craving for some KFC today. I prefer original recipe over the spicy one because I find it more savory. The spicy one tend to mask the more subtler flavors of the herbs. There are people who prefer the spicy variety and that’s OK if you ask me but there are some people that will debate with you because they’re so passionate with their deep-fried poultry. These kinds of debates over which one is better seem to happen with anything and that includes lenses. Today, I will show you such a debate about which one is the better version. This has been going on since 1977 when this lens was introduced, it is somewhat controversial because people either love it or hate it and will always judge it against its predecessor. I guess this happens because the original one was so loved by so many people because it’s a masterpiece of optical design at the time and the new one has a very different character to its pictures. Please read the article to know all about this.
Introduction:
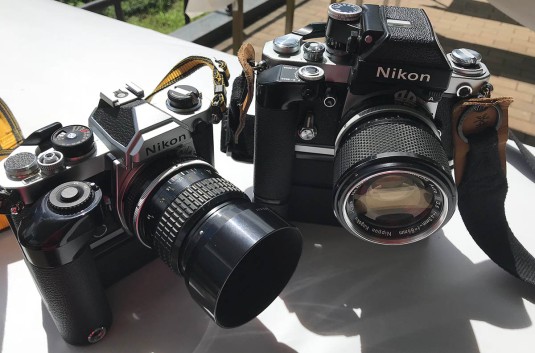
The Nikkor 85mm f2 Ai is a wonderful lens. It was introduced to replace another amazing optic – the New-Nikkor 85mm f/1.8 lens that many people hold-on to even to this day. They are totally different designs and the older New-Nikkor 85mm f/1.8 is much bigger, heavier and just a bit faster than this lens. Optically, the newer lens performs better in the sense that the pictures look “cleaner” because it’s a well-corrected lens and the field curvature is a lot flatter compared to the older lens so you get more things in-focus. The slight drop in lens speed from f/1.8 to f/2 won’t mean anything in real-life use but many people don’t like this and stuck to the New-Nikkor 85mm f/1.8 so its re-sale value is still relatively high even to this day. The older lens also renders pictures with more “character” but this is so subjective because some people either like or hate the look of pictures taken using older lenses and this has been the topic of debates for decades and I hope that this article will show you how this lens performs so you can make your own personal judgement.
 The Nikkor 85mm f/2 Ai is a lovely lens and it balances very well with smaller cameras so you can be sure that it won’t feel awkward in your hands. It feels dense despite being this small and you can appreciate just how well-made the Ai-Nikkors are. Some people prefer these over Ai-S lenses just because the Ai-Nikkors were made tougher. The drawback for this is they’re usually a bit heavier but you won’t feel a big difference in your hands. This lens debuted in 1977 and was said to be a flop due to the issues I mentioned previously. If that was true then the production numbers tell a different tale since around 90,000 were made which is a little bit more than its successor which was sold for around 15 years. Its production life was rather short at about 4 years in total because it had to be upgraded to Ai-S in order to benefit from Nikon’s latest camera technology at the time.
Compared to the New-Nikkor 85mm f/1.8, this one uses a 5 elements in 5 groups design. It is amazing how this lens performs really well despite having one less element compared to the 6 elements in 4 groups of the New-Nikkor 85mm f/1.8. When I say “better” I mean it has less optical flaws so it renders a cleaner-looking picture. I am not an optical engineer but I suspect that having one less element makes this lens gather more light than the old one despite being slightly slower. Of course, coating also makes a big difference. The lens formula was so successful that the later Nikkor 85mm f/2 Ai-S also used the same formula and the Nikkor 85mm f/2 Ai-S was made from 1981 to 1995.
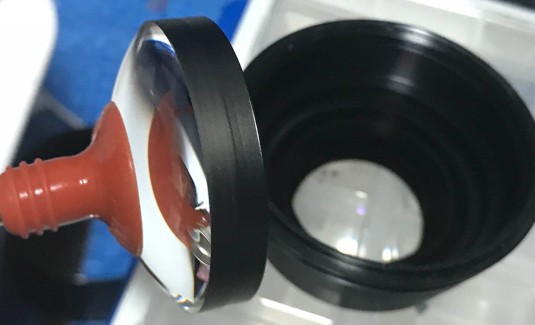
 It’s just as small as its successor, the Nikkor 85mm f/2 Ai-S but the latter is slightly smaller if you want to be exact. The Nikkor 85mm f/2 Ai-S is also a bit lighter but not by much. It’s obvious from this picture that the focus throw is shorter on the Nikkor 85mm f/2 Ai-S. If it matters to you then this will be the biggest deciding factor when choosing between these 2 versions. I appreciate the shorter throw of the later lens so I tend to bring it out more. I don’t think the Ai-S feature matter much to me unless I’m using my Nikon FA. These cameras can make the most out of the Ai-S feature because you can use P/M modes with these lenses. The Ai versions are also cheaper and better-built so these are the main reasons to go for the older Ai-Nikkors instead.
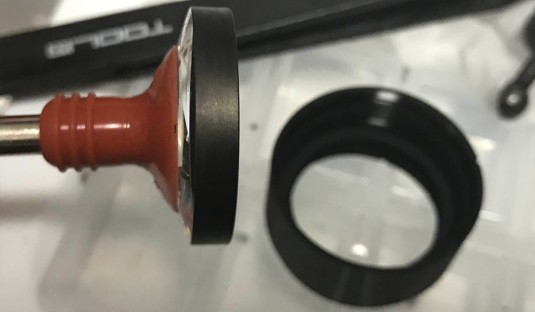
 You will want to use this with its dedicated lens hood to help protect the front element. It is also useful in helping to prevent stray light hitting the front element from an angle and that will prevent any ghosts and flares from appearing in your pictures. Digital cameras are more prone to ghosts than film because they reflect more light due to the protective glass in front of the sensor, this is why many manufacturers offer digital versions of their lenses some time in the early 2000s.
This lens is one of the best deals in portrait lenses today. This is a portrait photographer’s secret weapon and the value-to-performance ratio of this lens is very good. Once you see how this lens performs you will wonder why you will want to pay a more expensive lens. If you are fine with manual focusing then this lens will fill your portraiture needs! If you don’t believe me then please inspect my sample pictures and see for yourself!
The following sets of pictures were shot with Kodak Portra 160 and scanned with the Fuji Frontier SP-3000 at the lab. It’s important to see how this lens performs on film, too. You can appreciate a lens more when if see how it performs in both film and digital. This will give you a deeper understanding of its characteristics and since this lens was calculated for use with film then it’s only fitting that we show sample pictures that were shot using film. I’ll try to do this in all of my articles even if it costs me money, my goal is to turn my blog into the most comprehensive resource on Nikkors anywhere on the net!
The next series of pictures were shot from f/2, f/2.8 and f/4 respectively. These apertures matter more for most people and these are also the apertures where we can see the most changes as we stop the lens down. These should help you understand how this performs so you will know how to use this lens better and avoid its weaknesses. This is the way to optimize the use of your lens so you will get the most out of it and complain less.


(Click to enlarge)
Vignetting is present wide-open but it’s not terrible at all because the fall-off is linear and you don’t lose much light even near the corners of the frame. It improves significantly by f/2.8 and is gone by f/4. This isn’t a problem for portraiture at all and at this level, it even adds a little bit to your pictures by helping leading the eyes to the center of the frame. It’s where you would usually place the face of your subject and that slightly-bright spot will “highlight” that part of the frame for your viewers to focus their attention to. This is good compared to the Nikkor 85mm f/2 Ai-S where the vignetting is terrible wide-open. I do not know if this is due to sample variation but that lens is about half-a-stop darker that this if you shoot both at f/2.


(Click to enlarge)
The quality of this lens’ bokeh is one of this lens’stronger points. It’s exquisite and smooth at bigger apertures and the subject isolation that you can get with this lens is amazing. It is very smooth and refined wide-open, the background just melts into a wash of blurred details. Everything still looks smooth and blurred at f/2.8 but bright points of lights begin to look polygonal because this lens has straight-edged iris blades. The good thing is it has 7 blades so the polygons look a bit more organic. The New-Nikkor 85mm f/1.8 has only 6 blades and I hated the look of the angular bokeh balls produced by that lens. Everything looks less blurry by f/4 because you get more things in focus, the character of the bokeh is still smooth even at this f-stop. The bokeh balls look more solid and angular at this point.


(Click to enlarge)
The first 2 sets were taken at closer distances of about 1.5m to 2m. You would usually use these distances for filling the center the frame with your subject’s face. The good news is this lens is excellent at these distances. It’s very sharp even wide-open and you won’t see any imperfections such as sphero-chromatic aberration and if you did find them they’re still very well-corrected and will never be too obvious. Contrast is already pretty high at this point and the colors look saturated. Stop it down to f/2.8 and the contrast improves a bit and sharpness gets even better because there’s more things in focus. Any slight hints of optical flaws are gone by f/2.8 and this is really as good as it gets, it looks as if this lens was made just a few years ago in this regard. By f/4, the lens begins to reach its peak and you won’t benefit much from stopping it down further unless you want more things to be in focus due to the deeper DOF. Resolution is high across its aperture range but it will be obvious only by f/2.8. The last set with the Minions were shot at about 5m away and you’ll see a slight drop in optical performance specially wide-open. I don’t know if this is what the engineers wanted but the performance of this lens is heavily-biased towards nearer distances that’s more useful for portraiture. I don’t have any samples to show you but the performance doesn’t impress me when I shoot a subject that’s further than 12m or so. It’s still good but not as good as what we have when the subjects are nearer to you and you’ll want to stop it down to f/2.8 to see something better. I get chromatic aberration and other flaws appearing when I shoot subjects that are further into the frame while the contrast and sharpness still remains acceptable. Needless to say, the pictures are more than good enough to be used. Try this out for yourself and tell me what you think.
It’s now time to show you some real-world samples. There’s no point in over-analyzing a lens if you’re not going to enjoy using it to take real photos! The performance of this lens will blow you away and the results rival that of the legendary Nikkor 85mm f/1.4 Ai-S, it’s amazing how such an affordable (today’s price) lens can perform so good. I will say that it performs even better than the more recent AF-Nikkor 85mm f/1.8D in almost every way wide-open. I shot with that lens for some time so I should know. Please inspect the photos and see just how beautiful this lens renders. Please forgive me for some missed-focus, it’s a manual focus lens and I am shooting subjects that won’t stay still for me.
 This is how exquisite it is wide-open. The background was dissolved into a wash of pastel hues! The bokeh is so clean that you can’t find anything much to complain about.
 Flaring is obvious here but that may also be caused by the smoke from the burning coal. I love this picture a lot because of the lighting. You will want to shoot this lens with a fast shutter speed to prevent a blurry results. I struggled a bit here because it was dark and I was obviously shooting this hand-held.
 Exquisite! I loss count of how many times I used that word in this article but I can’t stop using it even if I wanted to. Just look at how sharp the details of the mannequin’s nose is while the shallow DOF helps blur the hair so you’re attention is concentrated at the face area. The thin plane-of-focus will give you sharp results so long as your focus is correct.


(Click to enlarge)
Here are some candid shots that I took wide-open. The subject isolation properties of this lens is very good, your subject will stand-out and you will get that nice “3D effect” that a lot of modern lenses lack these days. These pictures don’t look “flat” at all. The rendering is also very natural or organic, no harshness to them caused by over-correction and how the transition from what’s in focus to what’s blurred is rather smooth despite the flatness of its field curvature, it also helps make your subject “pop” right out of the picture.


(Click to enlarge)
Here are a few pictures shot at middle-range of about 5m away. This is probably how far I would go to use this lens for portraiture if I wanted really sharp results wide-open. You can see that this lens is great environmental portraiture at this distance as you get some of the background in the frame. I just hope that my subjects would stay still and you can obviously see the effects of a slower shutter speed and some missed-focus.
 Optical flaws begin to appear when shooting wide-open at subjects that are further into the frame and this pictures exhibits it the most. Spherical aberration is poorly-controlled at this distance and you will see the brught areas “bloom” despite being in focus. I would use a different lens for this kind of job, the excellent New-Nikkor 135mm f/2.8 will be nice for this kind of shot and it’s better-corrected at these distances as far as I can see.


(Click to enlarge)
Here are some more pictures that were shot with this lens. I believe all of them were shot wide-open because I took these at night and I don’t like using ISO values higher than 800. Notice how beautiful this lens renders everything and how delicate the pictures look. It’s a great lens for taking pictures of people because skin is rendered beautifully. While the details look sharp, it’s not so sharp as to show any flaws in the skin. I will admit that I am always floored by how good this lens is each time I get to use it for people pictures.
It’s now time to see some samples that were shot with film! This lens is excellent when it is paired with a film camera and it shows just how beautiful this lens is for portraiture. It is close to being perfect if you’re fine with using manual focus lenses.
 This was shot with Kodak Portra 160. See how delicate it is? This was shot at f/2.8 and the bokeh balls still look nice despite showing some hints of being angular. Look at her hat, it is rendered in beautiful detail and you can inspect the weave when you zoom-in. It looks very natural and the colors look nice.


(Click to enlarge)
The left picture was shot wide-open and the right one was shot at f/2.8, both pictures are sharp and the background is very smooth. The 7-bladed iris makes the background and the highlights look smoother than what a 6-bladed iris would give you. There are times I cannot make any distinction between these 2 apertures because it’s harder to judge it by looking at the blurred details. The lens also has a rather flat field so you get more things in focus even when you shoot it wide-open and this makes it so f/2 is less obvious.


(Click to enlarge)
The man in drag was shot at f/2.8, see how beautiful this lens renders skin. It’s perfect for portraiture. Despite being sharp, it’s not so sharp as to render every pore on the skin. It’s perfect for pictures of older people where you want to hide some wrinkles. The photo on the right was shot at f/2 and the only hint I have is the “cat’s-eye bokeh” near the edge. It’s a very nice picture and the flat field really helped make this picture work. If I was using a lens that has a stronger field curvature then I cannot get both her face and that statue she’s holding in focus. Learning how a lens’ field curvature affects things is important so you will know what lens to bring with you on assignment.


(Click to enlarge)
More samples that were shot at f/2.8. Despite the background having elements that are known to show ugly bokeh, the lens performed admirably here. It looks a little busy at times specially on the 2nd picture but I have seen uglier backgrounds than this. I think the older New-Nikkor 85mm f/1.8 renders backgrounds smoother but it has a high field curvature and the effect will be different. It’s just one or the other because you cannot do much when we’re talking about limitations set by the shape of the glass.


(Click to enlarge)
Despite shooting a very bright sky, we don’t get any flares and the edges of the leaves are nice. The colors look rich and saturated, it looks closer to how a modern lens renders the scene than that of vintage glass in this regard.


(Click to enlarge)
Here are some more samples that were shot with Kodak Portra 160. Please click on them and see them in better detail. I love how exquisite the pictures look and the one with the lady wearing a crown is my favorite. The rendering is so natural, you will swear that it’s been shot with a more expensive lens. The pictures of the 2 ladies in traditional attire is also nice as well as the lady with the umbrella. I have so many keepers with this roll and I am pleased with the results I got from both this lens and Kodak Portra 160. The picture of the lady with the sunglasses also looks nice but I missed my focus a bit so her hat’s in focus. The details of her hat look great and the whites don’t look “dirty” at all. Do you see what I mean when I say that this lens is one of the best-kept secrets in Nikkor land?
So, what do you think of this lens now? Do you think the debate between the older one vs this lens has some merit? Read my extensive article on the New-Nikkor 85mm f/1.8 to see which one renders pictures that will suit your taste. Having extensively shot with all the 3 versions, I can give you a quick-and-dirty analysis now. The New-Nikkor 85mm f/1.8 has better “character” and other indescribable attributes to its rendering that makes it really stand-out from the rest. It’s not as sharp as the later lenses but it does the job well. This is a real classic and its price will still remain the same for years to come. The Nikkor 85mm f/2 Ai will give you cleaner and sharper pictures at any aperture and its field curvature is rather flat. It renders beautifully but it lacks the “magic” of the older lens. In my sample, it is really sharp at distances that matter more for portraiture. It’s very sharp from 3ft up to about 20-30ft and the performance drops exponentially from there on to infinity. This is just basing from my sample but if this is true with every sample then this just indicates that Nikon may have done this purposely because they wanted to design a very good lens for portraiture, a specialized lens if you can call it that. While the optics didn’t change on the Nikkor 85mm f/2 Ai-S, I don’t recall it being much better at closer distances than it is at infinity or about 20m or so. This might indicate that Nikon tweaked the optics a bit by means of spacing and curvature differences so it performs better across its focus range. I am just basing this from my experience with all 3 versions that I own. If you have some things to say then please comment and let’s compare notes.
So, is this lens for you? Will I recommend it? Of course, I will but please read what I said above and check my pictures so you will know when to use this and when to shoot with the other versions. I’ll also repeat what I said about the focus throw differences between this version and the Nikkor 85mm f/2 Ai-S. If you want to shoot pictures of subjects that won’t stay still for you then grad the Nikkor 85mm f/2 Ai-S because the shorter throw will help you acquire focus faster but the longer throw of the Nikkor 85mm f/2 Ai will be great for studio work for more precise focusing. The Nikkor 85mm f/2 Ai also sells for less these days so that may help you decide which one to get, all I can say is that they’re all great at what they do and you can’t go wrong with any of them. Let’s now begin with our repair article!
Before We Begin:
If this is the first attempt at opening a lens then I suggest that you read my previous posts regarding screws & drivers, grease and other things. Please also read what I wrote about the tools that you will need in order to fix your Nikkors.
I highly suggest that you read these primers before you begin (for beginners):
- Essential tools
- Best practices 1
- Best practices 2
- Best practices 3
- Ai conversion
- Working with Helicoids
Reading these primers should lessen the chance of ruining your lens if you are a novice. Before opening up any lens, always look for other people who have done so in Youtube or the internet. Information is scarce, vague and scattered (that is why I started this) but you can still find some information if you search carefully.
I highly recommend that you also read my working with helicoids post because it’s very important and getting it wrong can ruin your day. If I can force you to read this, I would.
For more advanced topics, you can read my fungus removal post as a start. This post has a lot of useful information here and there and it will be beneficial for you to read this.
Disassembly (Lens Barrel):
The lens barrel isn’t difficult to dismantle but it can be confusing for beginners because it has a non-orthodox construction compared to most Nikkor primes made in this era. Your lucky that I made this guide because I don’t think anybody else has made a better guide than this one. Make sure that you have the right tools before you begin working with this lens and also have several types of solvents handy because Nikkors made in this era tend to be glued and sealed at important parts so they won’t turn loose. Take plenty of photos and notes as you go along and before you remove anything so you will know how to put everything back together again later. Having said this, it’s not a difficult lens to repair for somebody with a little bit of experience working with lenses but it’s certainly not a lens that I will recommend a beginner to work on. Find a cheap Canon junk for practice!
 There’s nothing underneath the rubber grip so removing it will be of no benefit unless it has to be done so you can clean the rubber grip and the focusing ring thoroughly. It can be easily removed by running a thin, round object underneath the whole circumference of the rubber grip to lift it from the cement. You then pick it with your finger nails until it comes-off. Be careful not to tear it because it can be delicate due to its age.
 This step isn’t necessary but I did it anyway. The name ring can be unscrewed like this. It is important that you use a rubber cup to do this so you won’t scratch the front element. I also saturated the threads of the name ring with alcohol to soften it so I can easily turn it. These are usually sealed with lacquer at the factory to prevent them from turning loose.
 To separate the objective from the lens barrel, carefully remove these 3 screws to remove the bayonet mount so you can access what’s inside. If you are new to repairing lenses, do yourself a favor and read my article on how to remove bayonet screws. Many people get stuck in this step because they stripped the head of the screws and you want to avoid the same mistake as much as possible because replacement screws are hard to obtain.
 Once the screws are gone, you can remove the bayonet mount from the lens barrel. You can easily pull it away because nothing will snag but be careful with that long lever. It is part of the stop-down lever assembly and it slips inside a hole in the iris mechanism so it can actuate the iris. Be careful not to warp this or your iris won’t actuate properly.
 This isn’t necessary but you can remove the stop-down lever assembly by removing some screws. I wanted to clean the bayoner plate as much as possible so I had to do this. Don’t dismantle the bearing of the stop-down lever assembly unless you have to, you’ll spend a lot of time putting that thing back together.
 The aperture ring can now be safely removed once the bayonet mount is gone. Clean the inside of this thing because dirt usually accumulate under this ring.
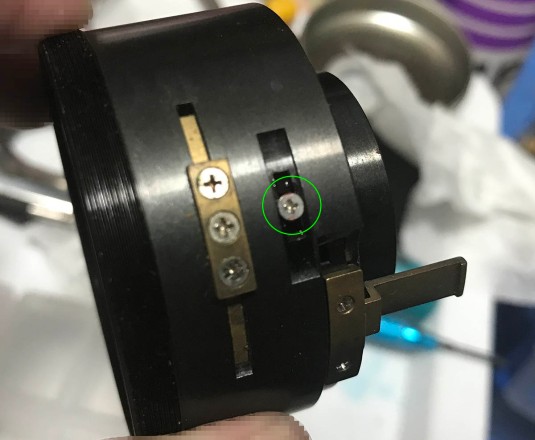
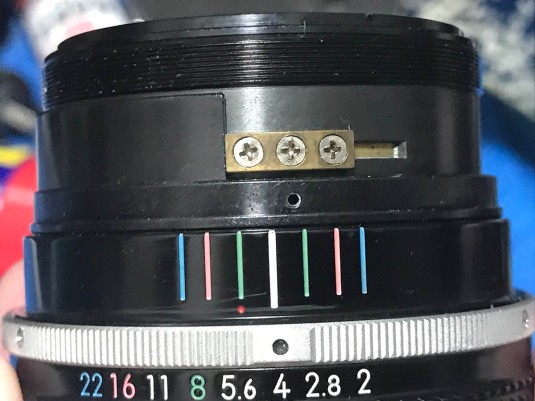
 The objective’s housing is secured with these screws. These are sealed with red lacquer as you can see in this picture. This makes sure that the objective’s casing doesn’t get loose or it can also indicate if a lens was tampered. Alcohol will soften the lacquer so you can use less effort in removing these screws.
 Here’s another one, there are 3 screws in all.
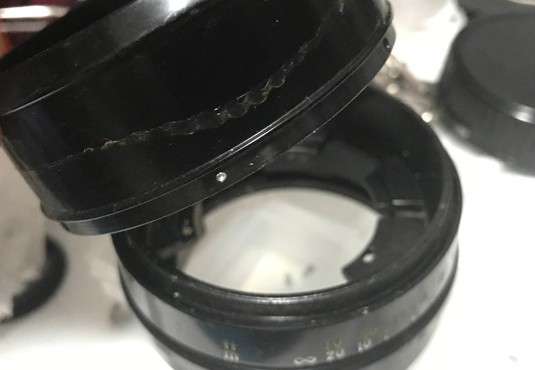
 Once the screws are gone, you can separate the objective from the lens barrel. Be careful not to drop the objective because nothing is securing it. You can either pull it away or lift the lens barrel while objective is resting on a flat surface like what I have in this picture.
 This is the aperture detent spring, it’s secured by these 2 screws. You can remove it from the lens barrel to clean it thoroughly, just don’t forget to put it back correctly and make a small mark before you remove it so you will know its proper position later. If you missed it then your iris won’t click accurately on each stop and you’ll have to adjust this again.
 You can remove the shiny grip and the sleeve by removing 3 screws around the grip. Use a driver that fits it perfectly so you won’t scar the surrounding metal or ruin the heads of the screws. Scarred screw heads look ugly and nobody wants an ugly-looking lens! You’ll also want to work with this lens while it’s focused at infinity from this point on so you’ll have a point-of-reference later on when re-assembling it and your notes will be easier to understand because you know that everything was taken while it’s in this configuration.
 The focusing ring can be removed by undoing the scales so you can access its screws. The scale is secured by 3 tiny set screws like the one you see here. Carefully remove them by using a precision screwdriver and make sure not to strip them or else it’s over for you! It can sometimes be hard to remove these because they’re sealed using enamel or lacquer. If yours are tough to remove then don’t force it and soften them with some naphtha and some alcohol, see which one worked and then repeat it until you can easily turn them.
 These screws secure the focusing ring. You will have to focus the lens closer a bit so you can access these because the focusing scale is covering them.
 The focusing ring can now be safely removed just like this.
 The scales can now be removed.
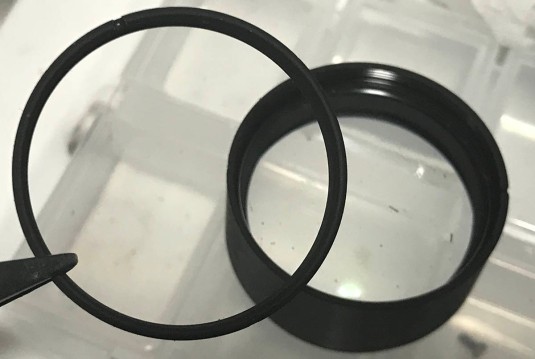
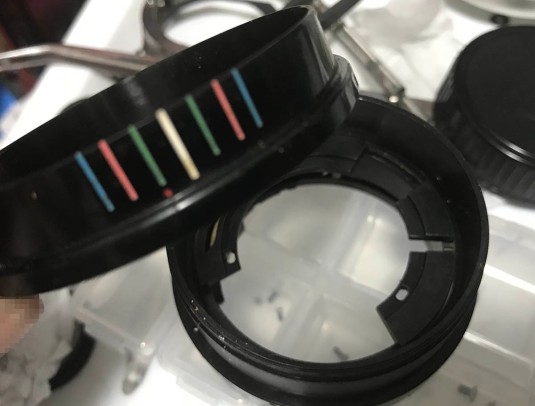 The sleeve can finally be removed.
 You can remove the helicoid key by removing these 2 screws. These can be tough so use a bit of solvent to soften these up first or heat them by using a soldering bolt. These usually are secured with a tough substance like epoxy or contact cement at the factory and these can sometimes snap when you use too much force. The helicoid key makes sure that the helicoids move in-sync so the lens barrel can extend or retract. Before removing this, see how it works first and take plenty of pictures as reference so you’ll know how everything works and how everything should be positioned.
 The helicoid key can now be safely removed. Clean it very well to remove any hardened grease and polish it lightly using a piece of stiff plastic wool for cleaning dishes.
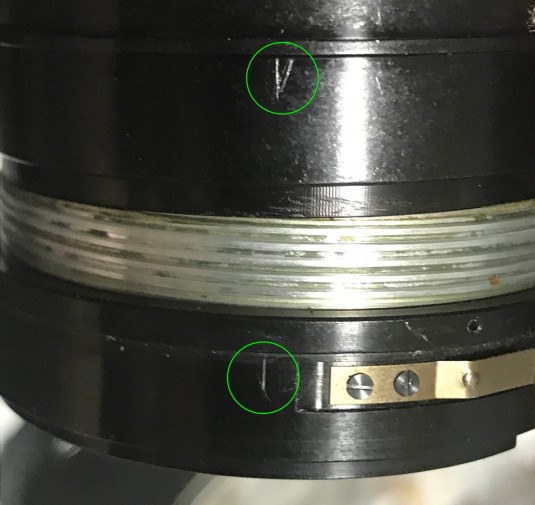 The helicoids can now be separated once the helicoid key is gone. Separate the outer one from the central one and don’t forget to mark where they separated. If you forgot to do it then you will spend plenty of time guessing how they should mate. They should mate at the same spot where they separated so I marked these positions by scratching the surface of the barrels lightly. Never scratch near a moving part or anywhere near any threads. If you are new to this, read my article on how to work with helicoids so you won’t get stuck and end up with a box of spare parts.
 It’s now time to separate the inner helicoid from the central helicoid. Again, don’t forget to mark where they separated. There’s not a lot of places where you can make a mark for the inner helicoid so you can simply make a small scratch at the inner wall because that’s where it’s safest to do so since nothing will get in contact with it there.
Clean the helicoids very well. I brush them with a stiff toothbrush and pick any hardened gunk with a toothpick. You can clean them using a strong dishwashing detergent if you’re not too keen in using naphtha. Whatever you do, just make sure that it’s really clean and you won’t feel any residue when you touch them. You don’t want your fresh grease to get contaminated! I used a type of grease that’s not too stiff because the long focus-throw of this lens can make it difficult to turn if I used a stiffer type of grease. Remember to never apply an excessive amount of grease or else it will migrate to the iris and cause a bigger problem in the form of an oily iris. While this lens isn’t prone to that, it’s better to be safe than sorry. There are a few parts that can lead to the iris and those parts can get oily over time and that oil will somehow find its way to the iris mechanism as it spreads.
Disassembly (Objective):
The objective is pretty straight-forward in its construction but beginners will have a hard time working with it because you may need special openers and spanners to dismantle it down to its bare components. You will also have to be patient with this because there are several points in this part that were sealed at the factory and you will need to prep them before you attempt to open them. The glass elements are also thick and heavy so can be damaged easily. If you damaged the glass then your lens will be close to being useless. To avoid damaging them due to dropping them on a hard surface, use several layers of soft towel so you will have a cushion underneath everything just in case.
 The front barrel is secured with a small set screw. Carefully remove this set screw so you can twist the front barrel off. If it’s stuck, just use the alcohol trick to help loosen it up.
 The front barrel can now be easily removed.
 The rear elements assembly can be unscrewed using your fingers. You can wear a pair of grippy rubber gloves to help add some friction to your grip. Do that alcohol trick again if it’s stuck, place a drop of alcohol at the seams of the thread and let capillary action do the job of coating the threads for you.
 The rear element is being secured by a retainer ring. This ring was sealed with enamel, it is impossible for you to remove it without breaking the seal and the safest way to do that is to use a very sharp knife to scour the seam and then place a couple of drops of alcohol on it. There’s no point in doing this without breaking the seal because alcohol will never dissolve enamel and naphtha will take too much time to work. MEK will help do the job but it’s too potent for this kind of task.
 The retainer ring can be removed using a lens spanner. Be careful not to scratch the rear element when doing this or else you’re lens will be irreversibly damaged. See those small bits of enamel paint at the surface of the glass? These came from the sealed threads.
 The rear element can be safely extracted using lens sucker. Be careful not to drop it, the lens sucker can sometimes lose its grip! To help you determine which side should be the one facing front, use a permanent marker to draw a small dot at the wall of the glass. It’s important that you put the elements back in the same direction or you will damage them when you tighten their rings due to pressure because the curvature is different. You will also end up with a lens that will never render properly. There’s no point in removing the other lens element because you can access both of its sides without removing it.
 If you really have to, you can remove it the same way you did with the rear element. The retainer ring was also sealed at the factory but this time the enamel is even thicker. The ring took me several applications of alcohol to soften and it took close to an hour before I got it to turn a bit. Remember, you don’t have to do this unless you need to do a thorough job like in the case of severe lens fungus.
 The 4th element can now be extracted. See how thick the enamel is? Don’t forget to mark the leading edge with a permanent marker to know which side should be facing front.
 The front element is also secured with its own retention ring. The ring isn’t sealed but it’s a tight fit, a drop of alcohol will help here. Use a lens spanner to remove it and as usual, be careful not to scratch the glass.
 The front element can now be extracted with a lens sucker. It’s heavy so be careful not to drop it! The bulbous side faces the front and the curvature is obvious so you do not need to mark its orientation.
 There is a spacer between the front element and the 2nd element. Remove it using your nails to pick on it. Remember wich side should be facing the front, I made a small scratch at the outer wall where it cannot be seen. I sand the scratches that I made using very fine sand paper to prevent them from scarring anything.
 The 2nd element is rather huge so don’t drop it. Be careful extracting thick elements like this one because the fit can be very tight and the ink at the wall of the glass can melt and fuse the glass to its housing. A small drop of alcohol will help if that happened but that is going to dissolve the ink, unfortunately. Use the best india ink you can buy to repaint this if that happened. Since this lens doesn’t have a cemented group, you don’t have to worry about the alcohol ruining any optical cements.
 The 3rd element can now be removed. Notice that it has a rather large lip at its rear, it’s delicate and easily-chipped so be careful when handling it. There’s no need to draw a dot at the walls of things like these since the curvature and shape is obvious.
This lens was infected with fungus so I had to clean it really well. I took care of the fungi using my fungus removal method and I’m thankful that there’s no permanent damage on the coating or anything on the glass as far as I can see. I was a bit nervous while working on this even though I have repaired many lenses before this one. One slip and it’s over!
Disassembly (Iris Mechanism):
I don’t have to dismantle the iris mechanism on this one but I just want to clean it really well so I won’t skip the chance to give this lens a thorough overhaul. I’m glad that I did it because I found that the iris blades were slightly dirty from a thin layer of grime. If I did not clean this then I may have to do it in the future so I might as well clean it now. This is not an easy task for beginners because this is a delicate procedure and even experienced repairers like me will find this slightly-challenging (but satisfying) to work on. You can’t underestimate this job because there are a few things here that were adjusted precicesly at the factory and you want to put them back the same way you found them unless these have been tampered with by somebody else who worked on the lens and got it all wrong.
 This is the iris assembly. It’s intricate in this model so be careful when handling it. Study how it works so you will get an understanding of how this mechanism actuates and what regulates its aperture size. Take as many notes and pictures as possible while you can.
 This ring holds everything together and it’s also an adjustable part. This was adjusted at the factory using very precise methods, you will want to put that back in the same way. It is important that you take as many references as possible before removing it. I made two small scratches to serve as a guides and all I have to do is line these up and that will help me get this back properly as close as possible.
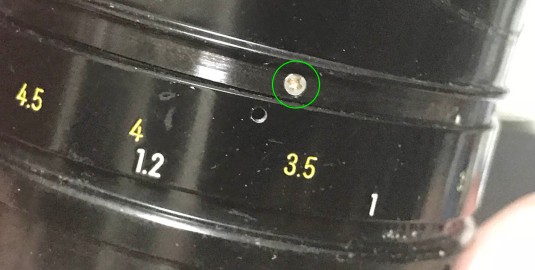
 To remove that ring, remove these screws (3 in all). They’re secured with lacquer so you can be sure that they won’t get loose accidentally and it will also determine if it had been tampered with.
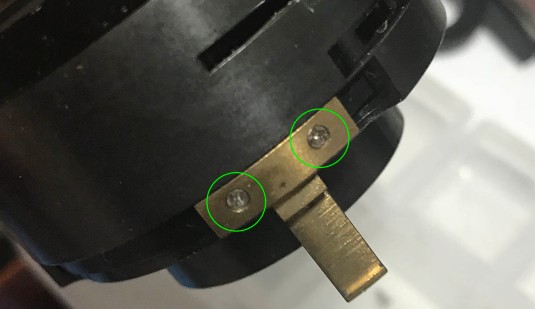
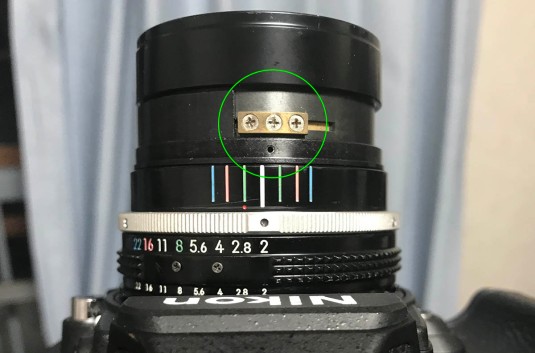
 I forgot to tell you this but before you can remove the ring you’ll have to do a few things first or else you will damage your iris! See that big brass thing over there? That needs to be removed first and also de-couple the coil spring so it won’t be damaged.
 This end of the spring is the easiest to remove and re-connect. You will have to use a pick in order to reach it but a needle should also be fine.
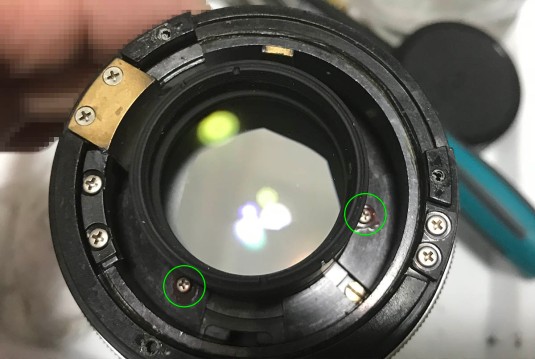
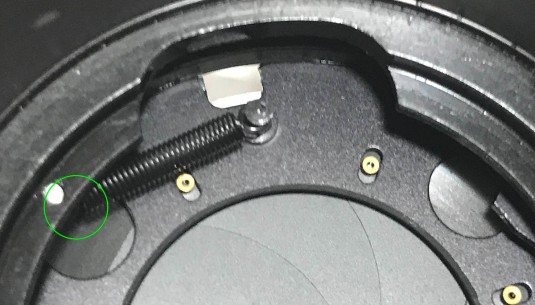
 That brass thing is the helicoid stop. It’s used to constrain the helicoids’ movement so you will never turn them past the focusing range. This is also used to adjust your lens’ focus so it won’t focus beyond infinity. I made 2 small scratches to help me know how to put it back again in the correct position later. Remove the 3 screws securing the stop and use a lot of alcohol to soften the lacquer. It’s a precision adjustment point so it has been sealed at the factory. There’s a big piece of brass underneath it and make sure that it won’t drop to the iris blades once the screws are gone or else it will bend the iris out-of-shape.
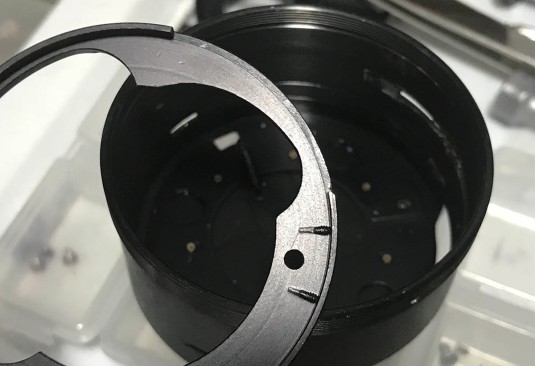
 Once the spring and the brass part are gone, you can remove the ring carefully. It’s tight because it was precisely-milled at the factory so be careful when removing it. Be sure not to harm the iris, too. They’re exposed at this point and you can easily damage it if you got careless. You can pick this out using your nails or use a plastic tool bent to an angle.
 Here’s how the other side looks like just in case you managed to undo that thin spring.
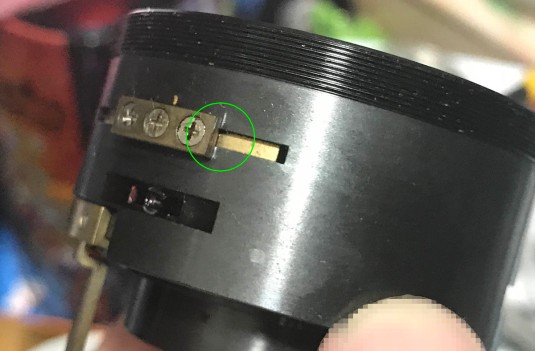
 The rest of the iris assembly is being secured by the regulator ring. You can remove it by unscrewing 2 screws at the outer side of the housing. The regulator ring controls how big the aperture is and it’s coupled to the aperture ring by a lever.
 These are the 2 screws that I was talking about in the previous step. Be careful when you remove these so you won’t damage the iris at the other side.
 The regulator ring can now be safely removed.
 The rotator ring can now be safely removed, it’s the only thing that keeps the iris blades intact so removing it will also undo the iris blades so be careful not to warp the blades.
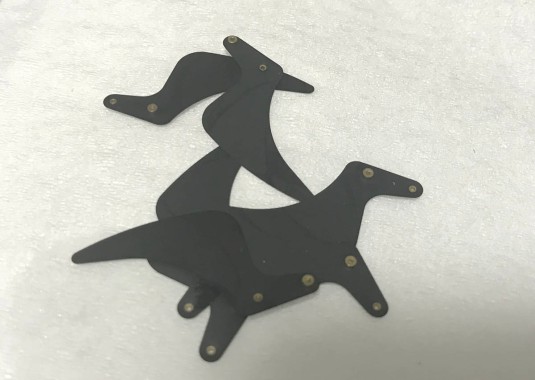 And this is how the iris blades look. The design of the blades on this lens is delicate, it has a thin base to pivot and it can easily be damaged with even the slightest of pressure. Use plenty of care when handling these.
 I wiped each blades carefully with lens tissue and naphtha. I don’t air-dry these because that will leave drying marks on the surface. Only handle these with their pegs and never use a magnetized tool to handle them, I use plastic tweezers to prevent them from being magnetized and also to prevent scratching them. I had to be extra careful with these, it’s very easy to bend them because they have a narrow section near their base. I carefully put them back, I didn’t have a hard time with these because I am used to repairing lenses but beginners may find this step really frustrating.
I cleaned everything here and pickled them in an alcohol bath. I am not sure if there are people who do this step other than me but I find this very useful because it can get rid of funky smells, kill germs and soften hardened gunk. You may want to avoid doing this for parts that were coated with lacquer or older F-mount Nikkors that were painted using a weaker type of top coat over an anodized base because the alcohol will craze the surface and ruin the finish. Be careful when handling the parts because even a slight damage is going to prevent the iris from working smoothly. Some of the parts here can be difficult to remove or re-install because they were made with very fine tolerances so you’ll need to be careful when working with them.
Conclusion:
I had so much fun working with this lens. I will admit that I wasn’t expecting this to be a good challenge but I learned a few things while working with this lens. I spent about 4 or so hours working with this lens and most of that was spent on cleaning every small part so I am sure that all the germs are dead! I haven’t worked on a lot of things lately due to the heat wave we have here in Japan so this was a great warm-up for me. I re-assembled by back-tracking on my repair notes and it didn’t take too long for me to finish it. Before you call it quits there are some things that you should do first so please stay for a bit.
 Re-assemble everything up to this point where everything is back to their original place but leave out the focusing ring because you will need calibrate your lens’ focusing first. If you don’t have any clue on how to do this, please read my article on how to calibrate the focusing of your lens. It’s not difficult to do this but you won’t finish this on your first try.
 You will want to loosen this part a bit so you can nudge it a bit but not too loose because the part on the other side may come-off and damage the iris. Once you are satisfied with your adjustments, tighten these carefully so you won’t accidentally move this and throw everything out of alignment again. Once you’re done, check again if everything’s still OK. If you’re happy then you can finally put the focusing ring and the distance scale back.
 All that work paid-off and I have a lovely lens for portraiture! Who would’ve thought this lens was bought from the junk section of Fujiya camera, it looks nice now despite having been sold as junk because of fungus and scratches on the lens barrel.
That’s it for this article. I hope you enjoyed this one and I also hope that you noticed that my recent articles have been written with better quality in the sense that I am not only concentrating on lens repair but also giving you a balanced review of the equipment that I feature by showing you more sample pictures that were shot with both film and digital. Because I am doing this, I take more time writing stuff so I only write lengthy articles just like one twice a month and then I update my older articles to our current standard or do smaller articles that are easier on my time. I am spending so much time these days with my job and helping raise my child and this leaves me very little time for the blog. This is also the reason why I cannot reply promptly to questions and messages so please be kind to me and I will reply as soon as I can concentrate on replying to your messages. There’s also very little time for me to sleep so I value it more than anything. Thank you for all the support and patronage, you are helping keep this blog alive and I can see that people are reading our blog more these days due to the improved content. See you again next time and if you liked what you see, please share this blog with your friends and photography club mates and help make this blog the best on the internet for photography-related stuff and repairs! Ric.
Help Support this Blog:
Maintaining this blog requires money to operate. If you think that this site has helped you or you want to show your support by helping with the upkeep of this site, you can simple make a small donation to my paypal.com account (richardHaw888@gmail.com). Money is not my prime motivation for this blog and I believe that I have enough to run this but you can help me make this site (and the companion facebook page) grow.
Leave me some tip?
Thank you very much for your continued support!
$2.00
Helping support this site will ensure that this will be kept going as long as I have the time and energy for this. I would appreciate it if you just leave out your name or details like your country and other information so that the donations will totally be anonymous it is at all possible. This is a labor of love and I intend to keep it that way for as long as I can. Ric.

Sep 23, 2018 @ 01:30:37
Richard, you got some great pictures with this lens. I’m not sure which version I have, I will have to check when I get home. I only recently got it and only shot one roll and concluded that it was too sharp for people pictures. Your article is making me want to take it out again, and soon. Here in the U.S. this is being recommended as an alternative to the recently more expensive longer portrait lenses.
Dec 14, 2019 @ 13:47:26
Hello Richard, thanks for your contribution to keep this lens “alive”. I’m using it with a Sony A7II. I think it’s a perfect lens for mirrorless cameras. It’s small, light and a great performer.
Sample: https://www.juzaphoto.com/adapted.php?t=3405590&l=en
Mar 10, 2020 @ 16:27:24
Hello Richard:
Well written article. I really appreciate your work!
My first manual lens i bought after my DF and its kit 50 SE is this one.
I got a serial number of 217918 which is an AI version of the copy. A bit later than yours
I did not pay much for it. And i regret a lot that i did not put a 52mm UV on day one! (I got a lens shade together when i bought it. ) I just love this one.
I actually have a question: some people say that the 85mm F1.8 AFD or AFG are better ones than this.
I want your opinions. Just out of curiosity. I am not gonna apart with mine, like never. 🙂
Apr 03, 2020 @ 03:55:10
This one is better in my experience
Aug 21, 2022 @ 15:22:29
Hello Richard.
Thank you for your wonderful inside into this lens I’m about to purchase in immaculate condition, I cannot wait to pick it up and go out and have fun with it.
I am also enquiring to ask if you would be kind enough to replace the front glass on my Nikon 35 mm F2D.
I bought it from eBay for 200 with trust and it seems I was misled a little bit.
The lens itself looks new and operates perfectly apart from a few marks and scratches on the front element.
Would you consider it worth repairing?
Kindest regards
Steven
Aug 03, 2023 @ 22:41:44
Thanks for shharing this