
Hello, everybody! Do you know the “Tokyo Shock Boys” or “電撃ネットワーク”? They’re a comedy act back in the early 1990s. They did many stupid and dangerous stunts and their catchphrase is “it’s very dangerous!“, which I think is very catchy. The stunts that they did are only for our entertainment and should never be copied at home, children shouldn’t watch their shows because they’ll probably imitate them. Today, I’ll show you something stupid and dangerous. I spent a long time thinking about whether I should publish this. Read this whole article to find out more about this.
Introduction:
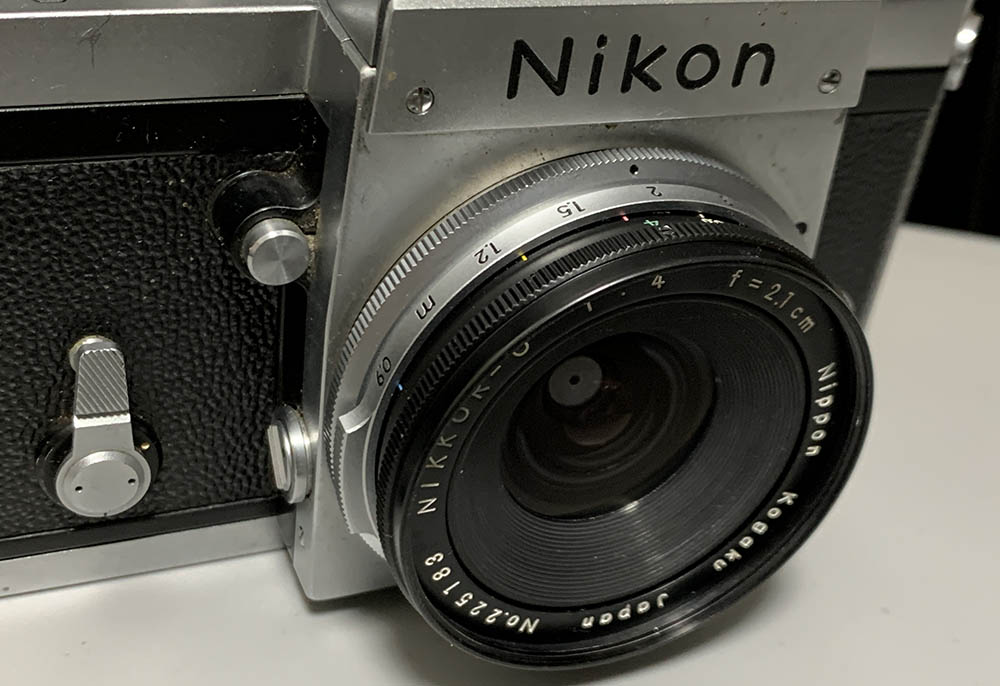
The Nikkor-O 2.1cm f/4 was launched in 1959 and was sold until 1967. This used to be the widest Japanese lens for SLR photography at the time it debuted, it helped push the Nikon F into dominance of the professional market. It was such a landmark lens that it soon gained legendary status because it opened new avenues for creative photography. There’s another version of this made for the S-mount because rangefinders still dominated 35mm photography at that time, its production was quite limited because the Nikon F would soon bring an end to that era. This lens has a lot of dedicated fans and they swear by its reputation but is this lens really what it’s made out to be or are people merely ruminating on the mythology surrounding it? We’ll find that out for sure in this article.

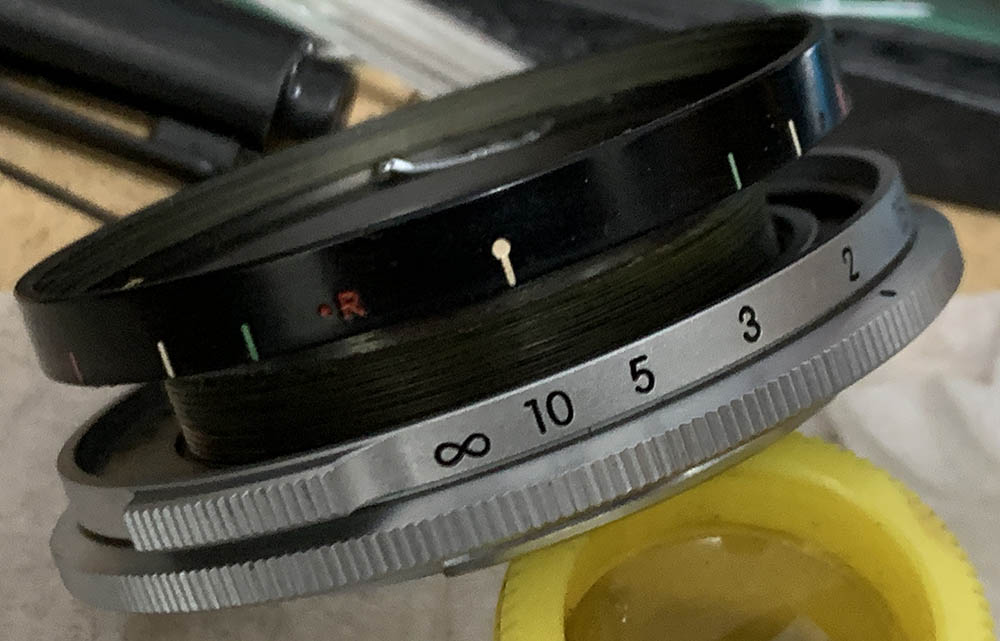
It’s all-metal which makes it tough but its characteristic stalk at the rear makes it look delicate. It’s actually quite rigid, I was surprised at how well-made it is. The rear is exposed but there’s a guard which helps prevent damage. The scale is very useful, it’s the only way you’ll be able to focus with it without viewing thought-the-lens. This isn’t a problem at all, the depth-of-field is very wide so you just guess the approximate distance of your subject or just use the scale to focus using hyperfocal distance, a technique that’s forgotten by many people apart from landscape photographers and those who shoot street photography.
It has an 8-elements-in-4-groups design which is “symmetrical” and reminds many people of the Biogon’s layout. This is not similar to the Carl Zeiss design like what some people claim, it was inspired by the latter and not a mere copycat. It has an all-manual iris since anything other than that would be impractical. Since this isn’t a retrofocus design its rear extends deep into the mount and it merely clears the shutter by about 3mm or less, making it the scariest lens to mate with many cameras, old-or-new. If you want to know more about this lens read this article for an in-depth look at what makes this special.

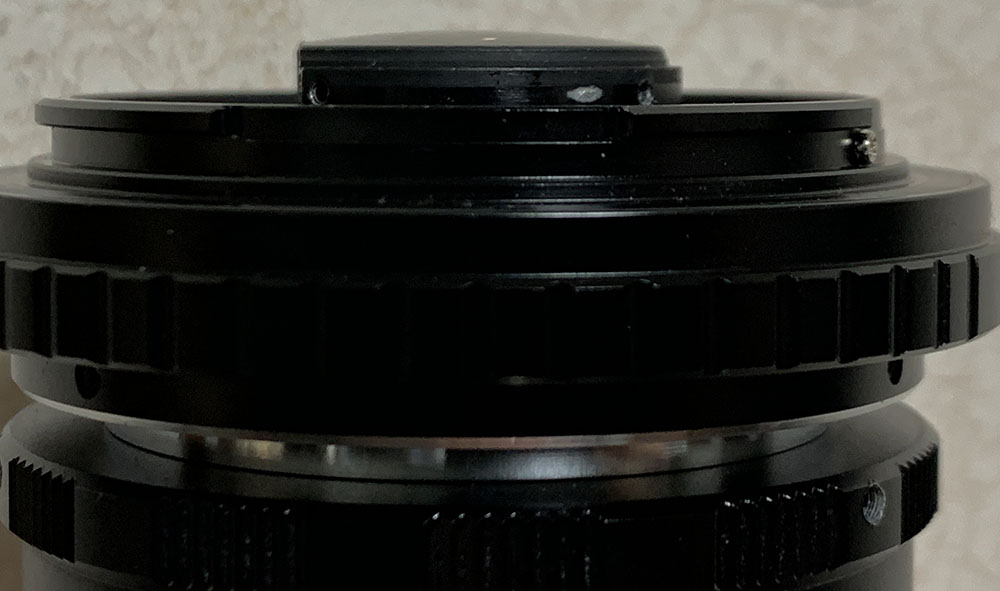
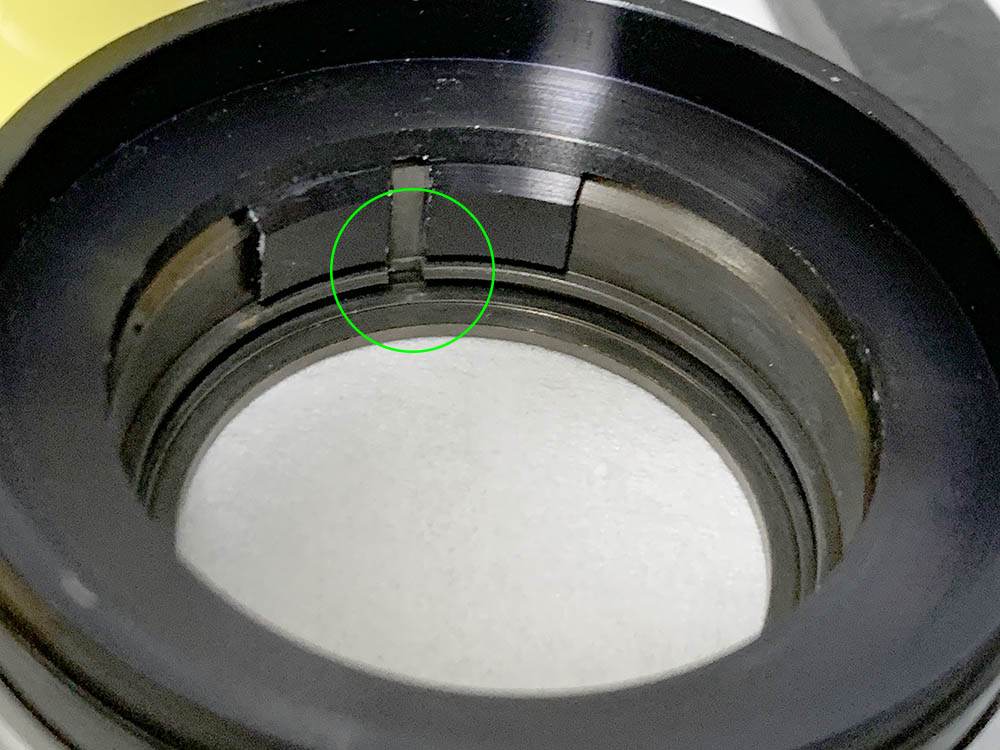
This claw needs to couple with a part in the F-mount found in older Nikon cameras. When mounting this lens, align the claw to the tab shown in the next photo then insert the lens until it sits properly at the throat of the bayonet then turn the locking-ring to engage the lock of the F-mount.
Notice that there’s a skirt around the base of the locking-ring, you will never be able to mount this safely with cameras and adapters that have a short throat. Only the last version with the shortened skirt will be useful if you intend to shoot with it because you’ll be able to mount it with more cameras and a handful of adapters without modification. If you got the earlier ones with the long skirt, never modify it and alter the adapter instead or look for ones that will take this.
If you want to know which version is the right one for you go check Roland Vink’s site, it’s the bible for all things Nikkor and check the serial numbers of what you intend to buy just to be safe.

The claw should couple with this tab located at the top of the F-mount. The only cameras that have this are the Nikon F obviously, Nikon F2, the Nikkormat FT series, and the Nikkormat EL series. Alternatively, you can also use these with many other rangefinder cameras so long as you got the right adapter with this tab present, or modify one just like I did.
The Nikon F is the best body to shoot this lens with. It’s really compact, making it a nice setup for spying. Handling is a bit awkward because the focusing ring is so thin and you’ll only be able to grab it via the 2 ears. The aperture ring is at the front which feels unnatural for an F-mount lens. Turning either ring is a clumsy operation and you’ll accidentally hit or turn the other ring unintendedly if you have fat fingers. The focus-throw is quite short as expected but that is not a problem at all.
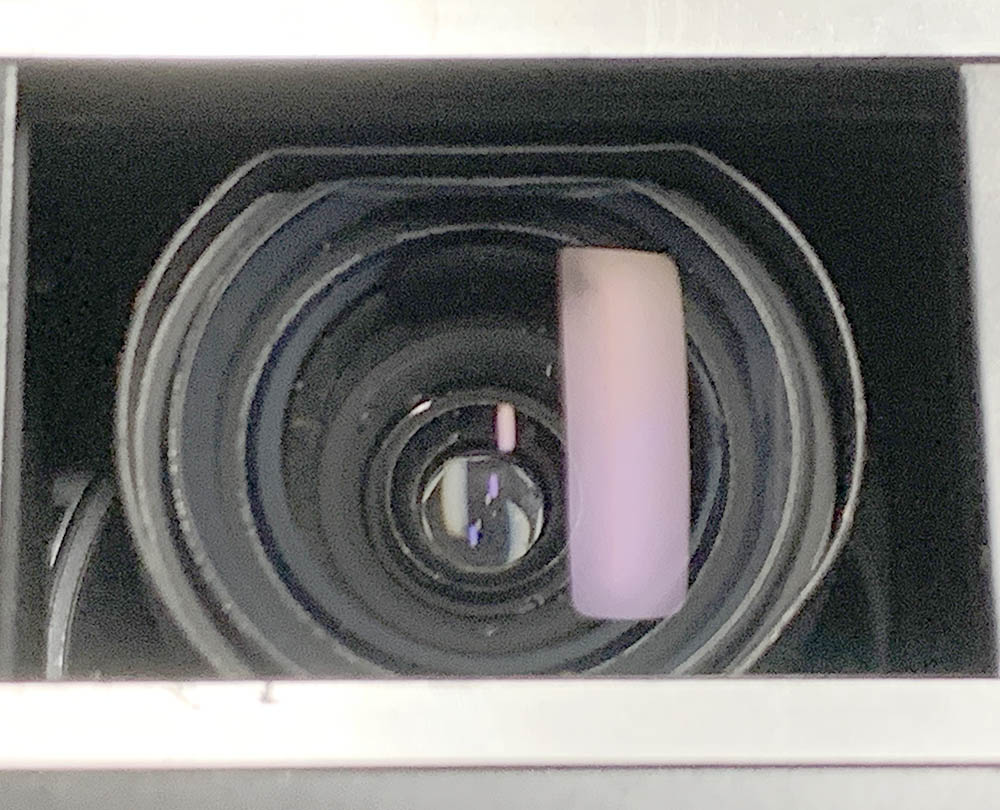
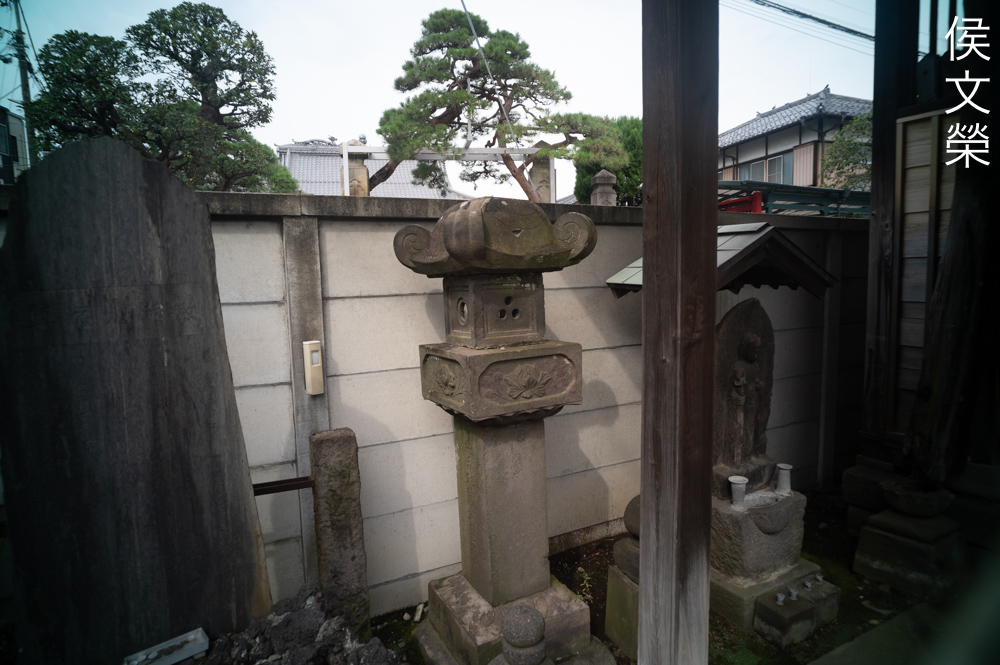
This is how much is protrudes when mounted on a Nikon F. The guard is sitting directly at the aperture gate’s top-edge so it feels very scary but it won’t touch the shutter of the cameras that allows this to be mounted with. Never mount it to any other camera, it’s very dangerous.
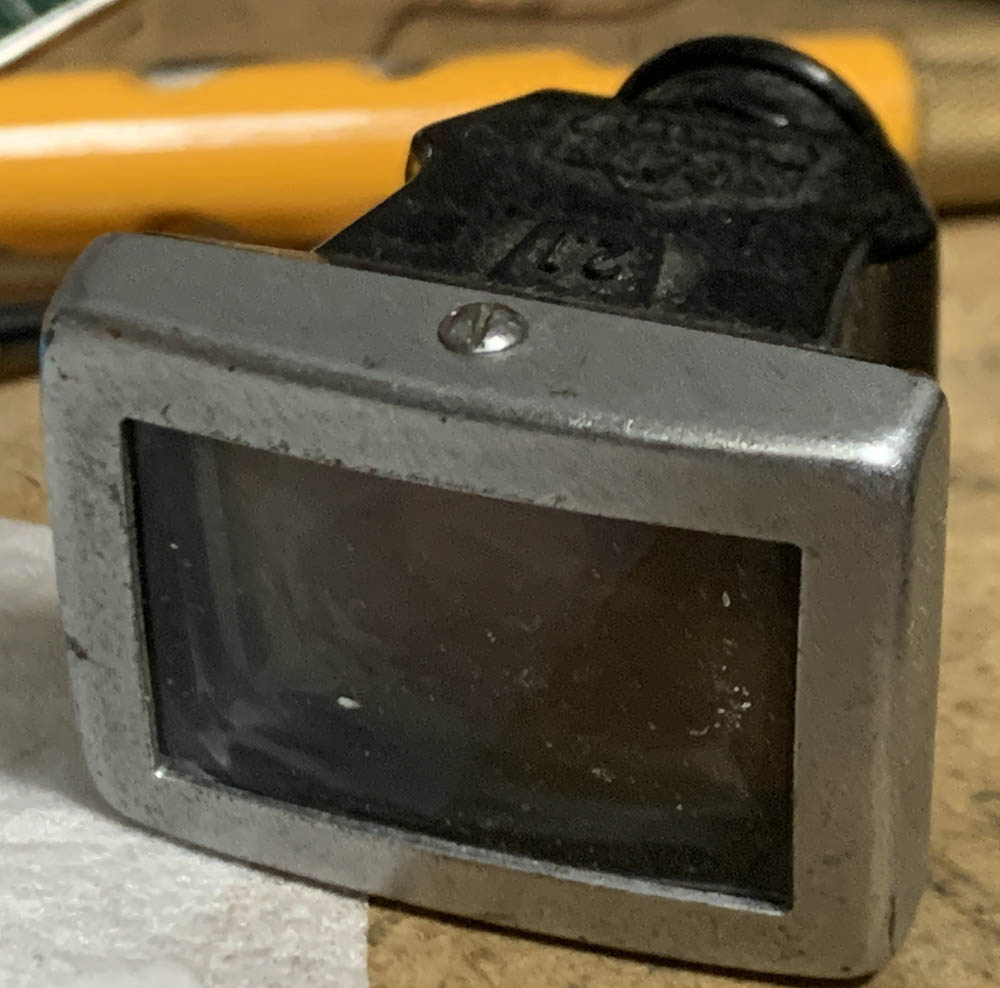
This is the dedicated-finder for this lens. My friend gave this to me and it sat in my spares for years but I’ve finally got a lens to use this with now. These come in several versions with different feet, one variant with a standard foot and there are 2 more that’s used for the flash-coupler of the Nikon F and Nikon F2. Of course, the flat one is the most useful, you will be able to use it with Nikkormats and the Nikon S rangefinders. But hold on, there’s another type, it’s the rare one with different optics which gives you a larger view and a useful bright-line frame. All of the finders mentioned here are similar in function and all of them will show large amounts of distortion akin to what you’d see from a fisheye lens but you should be able to approximate your frame with them.

This is the best way to enjoy shooting with this lens. I used a waist-level finder because a prism would be useless. I also saved some weight and space by having a smaller finder installed. Viewing-through the finder can be awkward and the slight offset makes it feel unnatural. Cosina made a special cover for the top which allows you to mount a finder via the cold-shoe, that makes things a lot more comfortable because the finder is directly at the center of your setup.
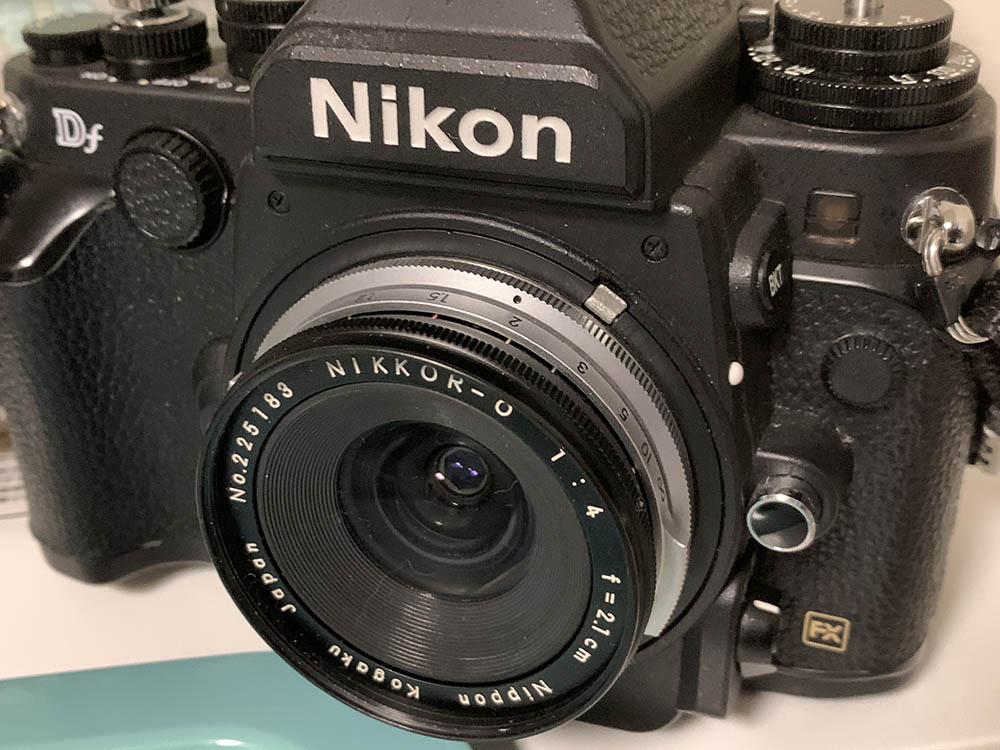
This configuration is definitely not recommended. Doing it will destroy the delicate mechanical parts of your Nikon Df. I only did this to demonstrate to you that it’s possible but the results are pointless as you’ll soon see. Removing the claw and making sure that the barrel stays upright while the shutter is on mirror-up mode is the only way to mount this.

You can focus this via live-view and use the dedicated-finder for framing for convenience, either will work. Again, never do this, it’s dangerous and it’s pointless.

(Click to enlarge)
This is how it looks like when you use this with a camera with a “normal” antialiasing filter attached, I took these with a Nikon Df. While the vignetting is just as bad with my Nikon Z6 the strange color-cast at the edges aren’t as apparent. It is because the Nikon Z cameras have ultra-thin filters over the sensor which won’t alter the light reaching it as much as a conventional one would. This phenomenon is caused by light being bent due to the thickness of the glass. You won’t get this when shooting film and that’s why I always show photos taken with film in all of my reviews.

Mounting it to a Nikon Z is safer but it’s still risky. You will need an adapter that has a tab for the claw, I modified mine so I was able to mount this easily. Removing the guard at the rear will make it safer to mount but there’s no guarantee. Just like with the Nikon Df doing this is pointless and very dangerous. I only did this to take photos for this article.
This is how much the rear protrudes from the adapter. If the guard is installed it will add another 2mm at the back, it’s definitely going to scratch something but it won’t reach the shutter, if you are careful. After seeing this do you think it’s worth the effort? I wouldn’t risk it if I were you. Looking for an adapter that will accept this is hard enough and is hardly worth the results you’ll get from this setup.

Now that I have a modified adapter that could couple with the claw I am not able to use this with my Leica IIIf and my other barnack-type cameras such as my Nicca 3S. Since the finder sits atop the camera instead of the side I won’t have to deal with the offset and viewing through it feels a lot more natural. The bottom of the finder will cover the shutter’s dial but it won’t impede its operation which is vital for these types of cameras.
If you’re really keen on using this with rangefinders there’s a rare version of this made for the S-mount, it’s rare since it was only made for around 300 times. Because of that a clean specimen will cost you the same money for a small car. It is a lens that many collectors fantasize about, including me.
Learning how a lens performs is important so you will maximizing its use. You will learn how to utilize its strengths and avoid its weaknesses. This knowledge helps in determining which lens to bring on an assignment. I shot these pictures from f/4, f/5.6 and f/8 since these are the most common apertures that people would want to use this, we’ll also get to see the most changes happen within these values. I took these with the Nikon Z6, some of them were cropped close to 1:1 so we could see the details better. All of the photos you see here have no corrections done so you’ll see the photos just the way they are.
(Click to enlarge)
It’s pointless to talk about vignetting so we’ll talk about distortion instead. Some people claim that this lens has almost no visible amounts of distortion but I these photos should prove that it does have plenty of it but not as bad as what I and many people are used to seeing in an ultrawide lens. The profile is also a lot simpler instead of the wavy one that’s common with wider lenses. This is the merit of having a so-called symmetrical formula.
(Click to enlarge)
It has rather few air-to-glass surfaces so we won’t get as many blobs from this but that doesn’t mean that it won’t give you any flare. In fact, it’s susceptible to it at the right conditions. Despite being resistant to internal-reflection I was able to produce a small blob with the shape of a teddy bear in one of my photos but that photo was shot deliberately and I doubt that you will get anything worse that what you see here in most practical cases.

(Click to enlarge)
You don’t shoot this lens to get nice blurs so we won’t talk about this subject much. It does have decent-looking blurs but I couldn’t really reach a conclusion and I will just leave this topic here.


(Click to enlarge)
Chromatic aberration along with spherical aberration are present wide-open and it can be rather high at times. I seen a lot of worse examples than these but that doesn’t make this lens perform better. Stopping it down to f/5.6 will cleanup most of it but it’s still quite strong. You’ll still see them by f/8 but only when shooting in tough situations.
In my experience with this, these won’t cause much of a problem when shooting shiny, overblown highlights like what we’re used to seeing here but shooting against-the-sky will definitely trigger this problem. This will be an issue when it is used as a landscape photography lens because it’s difficult to avoid shooting foliage with the sky as the background.


(Click to enlarge)
Sharpness is really good wide-open for a lens of this vintage but the general lack-of-resolution prevents this sharpness from manifesting. Contrast is a bit subdued when shooting wide-open but it’s adequate. Stopping it down to f/5.6 will result in very sharp centers as the improved resolution helps in bringing the sharpness out. The center is performing at peak performance by f/8. An expert once mentioned that this lens will still improve from f/11 up until f/16, I would not normally stop a lens down this far because of the effect of diffraction but it seems that this lens could handle it better.
The center is very impressive. We’re not talking about the corners because it’s pointless to comment on them when it’s shot with a digital camera. This lens isn’t supposed to be used this way and I’m merely showing you a preview of what to expect from it.
The next couple of photos were corrected in software to help get rid of the horrible vignetting but I wasn’t able to get rid of the feint color-cast. These photos are just here to help deal with your curiosity and should never be used for the purpose of judging its performance.
The depth-of-field is wide so we don’t get much blurring despite shooting up-close and with the iris wide-open. I think it handled the foliage rather well in my opinion, I was expecting some smears but I wasn’t able to see anything that I’d consider intolerable.

I only included this photo just because I love how the colors look. It has a slightly-cool cast to it which helps make the photos it takes look more “vintage”. Note how terrible the extremities look, you won’t get this when shooting this with film, as you should.
This was cropped close to what you’d get from a DX-sensor. I think it’s quite usable for use with a DX format camera, it may be a nice companion to a Nikon Z fc if you have the guts to use this. Any damage dealt to you equipment is none of my business.
The ugly corners aren’t as obvious here since the corners are underexposed anyway.
This was kind of surprising because the corners aren’t as dark as I expected even without the adjustments in post. That is all good when it comes to vignetting but the corners still look ugly despite this being shot at f/5.6.

The center looks nice but the top shows some amounts of flare which may be caused by the antialiasing filer. You’ll see the effects of distortion in this photo but this was the best that Nikon had in the 1950s so nobody complained.


(Click to enlarge)
Here are more photos that were shot with my Nikon Z6. I’d say that it’s not worth it to shoot with it in this context but that doesn’t excuse me from trying to take a few photos for you to see so you will know how pointless it is. Despite the warning I think it’s an interesting lens to be honest, maybe some people will find a creative use for this “flaw”.
Let’s now check some film photos. Film has a unique look that is hard to simulate with a digital camera thanks to grain. It reacts differently to light, this means that it could mask a lens’ flaws or amplify them. Since this was designed to be used with film, it’s best that we judge this using its intended medium.


(Click to enlarge)
Avoid placing your straight lines near the edges so they won’t look curved. You’ll get away with it most of the time, just be sure to follow my advice. Now, I am not sure if I’m just seeing things but I think my film photos look straighter than the ones that I took with a digital camera. Look at the next photo to see a side-by-side comparison.

(Click to enlarge)
Look at these photos, the left one was shot with film while the right one was shot with a digital camera. Note that there is less distortion in the one shot with film. Not only that but the corners look a lot better, with no darkening, too. This is the first time I’ve seen a lens perform differently when it comes to distortion it looks like the antialiasing filter and how thick it is really affects lenses this much specially the ones that have the rear closer to the film-plane.

You won’t be able to focus close with this, making it limited in many cases. The good side is this lens is very sharp and the corners don’t look bad either even at wider apertures. You can see how beautiful the details of the ogre looks, the subtle texture is even rendered nicely.

I’d like to get close but this is the closest I could get. Since It’s impossible to view this through-the-lens when you have film loaded in your camera I won’t know how to focus with it if I attached an extension ring between it and the camera.

Focusing at closer distances can be challenging if you’re shooting wide-open. Despite having a wide depth-of-field it’s still not enough to acquire perfect-focus at 0.9m without anything to measure the distance with.

You’re able to stop the iris down if you have enough light which widens the depth-of-field, helping you acquire focus a lot easier with guesswork.

The slight bluish-tint is obvious despite shooting with a yellowish-film such as Kodak Pro Image 100. Framing using the viewfinder is a bit tricky at closer distances but it’s not as bad when shooting at normal distances but you will still have to be aware and leave enough room at the edges in case you need to crop later.

Despite shooting this photo with enough room at the edges I still didn’t have enough to center this, maybe I should’ve been more careful with my framing if I have another chance at this.

The pictures you’ll capture from this have a nice “vintage-look”, reminding you of how pictures used to look like in our childhood, that’s if you’re old enough to even remember the film era and how it was like.
This photo looks very special in the sense that it looks like this was shot 60 years ago. The rendering characteristics of this lens is unique, if you’re tired of getting the same look from today’s lenses try shooting with a vintage one and see if you’ll like the results.
The corners look much better with film, definitely usable but not perfect. When shooting at smaller apertures you’ll be able to focus a lot easier, shooting this at f/11 to f/16 enables you to shoot with this focus-free because the depth-of-field is so wide, making this function like a pinhole-camera in this regard.
The beam at the top of the gate is curved due to distortion but that’s to be expected. You’ll see some aberrations near the top-edge, it looks like this lens doesn’t render foliage really well even with smaller apertures.

Take advantage of its sharpness at the center by positioning what’s important near it. You’ll want to shoot from f/5.6 at the very least if you want the center to be sharp but f/4 will do if you have no choice.

You’ll be able to shoot with a slower shutter with this because it’s wide and you won’t have to worry about vibrations. I think I took this at 1/25s or so, I will never go under 1/50s if my camera is not in mirror-up mode.
I don’t think that this is a nice lens for shooting landscape photos just because it doesn’t render foliage beautifully. It’s probably fine if we’re still stuck at 1959 but it’s 2021 and there are better alternatives to this.

Contrast is lower in overexposed areas of your frame, this lens is old so the coating won’t be as effective. To make this a lot worse my lens suffered from severe fungus infection when it arrived, making it look nearly-opaque.
This photo would’ve looked a lot better if I had good-light that afternoon, the colors would’ve looked more vibrant.
Just like every lens shooting this on a bright day will enable you to get the most out of it. You’ll be able to stop the iris down further and having good light results in better contrast and saturation, too. This lens performs great ever at f/16, I was expecting to see some effects of diffraction but I couldn’t see any strong traces of it.
I wonder if using a filter would’ve helped made the contrast look better. While the washed-out look helps give this an interesting look I’d prefer it to have slightly-better contrast because I want the reds too look more vibrant.
This is a good example of how bad flaring could be if you have light coming from an angle. It will fill your frame with a hazy-looking-veil, lowering the contrast in whatever it covers.

It looks like the effects of distortion isn’t as bad when your straight lines are closer to the center. You’ll still see some if you look at the stair but it’s not as obvious compared to the other photos.
This is traditionally shot with a digital camera but since this performs terribly with them I’ve posted this here instead.


(Click to enlarge)
Here’s the rest of the roll. Really, you should be shooting this with film and not with a digital camera! This is the reason why I always show examples that were taken with film in my reviews. While the difference is not obvious in most of my articles this one is kind of extreme. Did you learn a lesson from all this? The lesson is to shoot with film more.
I’ll never recommend this to anyone unless you’re going to use this safely by mounting it to the cameras that will take this lens safely and that means this is a film-only lens. If you saw my sample photos then you’ll know why I said that. It is worth noting that there are other alternatives such as the Nikkor-UD 20mm f/3.5 Auto, Nikkor 20mm f/3.5 Ai-S and New-Nikkor 20mm f/4, all of which allows you to view through-the-lens. The only reason to shoot with this is for fun, I couldn’t see any other reason to be honest. Sure, this has less-complicated distortion compared to the others but the hassle that goes along with using this is not worth it. Compactness may be the only reason but the New-Nikkor 20mm f/4 isn’t a big lens either. If you’re convinced that this lens is for you be sure to buy the last version. You’ll also need the special finder for it which is an added expense, the special hood will also cost you a small fortune. If you want to buy a cap for it consider having one printed, I got a special 3D-printed one delivered to me, it’s not perfect but it works. This is a lens for rich people if you include all the accessories, the rare S-mount version will cost you upwards of $5,000.00, I won’t spend that much money for a lens, at least not at the moment. Prices for these vary a lot but they usually go for $300.00 for the lens alone in decent condition. A complete set will set you back $500.00 at most. Be prepared to pay an extra $200.00 for one that comes with a box and other stuff. Since this was sold as junk with terrible fungus damage at the center which made it look almost opaque I got it for $210.00 which is a bit high in my opinion but I don’t care, the important thing is I’m able to show you what this lens is all about. When looking for one be sure that the iris is dry and working properly, it won’t open completely even at f/4 and that’s normal. Rotate the rings and make sure that they all work. Check the optics, they should be clean and clear. The everything should feel solid, there should be no wobble or play. Do not buy the overpriced ones offered online, wait for one that’s priced reasonably, I am sure you’ll able to buy one that fits your budget and standards. Happy hunting.
Before We Begin:
If this is your first attempt at repairing a lens then I suggest that you see my previous posts regarding screws & drivers, grease and other things. Also read what I wrote about the tools that you’ll need to fix your Nikkors.
I suggest that you read these primers before you begin (for beginners):
- Essential tools
- Best practices 1
- Best practices 2
- Best practices 3
- Ai conversion
- Working with Helicoids
Reading these should lessen the chance of ruining your lens if you are a novice. Before opening up anything, always look for other people who have done so in YouTube or the internet. Information is scarce, vague and scattered (that is why I started this) but you can still find some information if you search carefully.
I highly recommend that you read my working with helicoids post because this is very important and getting it wrong can ruin your day. If I can force you to read this, I would. It is that important!
For more advanced topics, you can read my fungus removal post as a start. It has a lot of useful information, it will be beneficial for you to read this.
Disassembly (Main Barrel):
Dismantling this lens isn’t difficult at all that is if you’re an experienced repairer. It will even puzzle experts who are not familiar with it because it’s unconventional in many ways. I will show you how this is done correctly but if yours needs to be serviced send it to a professional and recommend my article to help them do a better, safer job.
There are a couple of things that you should be careful with but the good thing is you’re able to separate the objective from main barrel easily without much trouble. The helicoids themselves have threads that look like single-entry ones, it is still safe to assume the opposite so you should document every step.
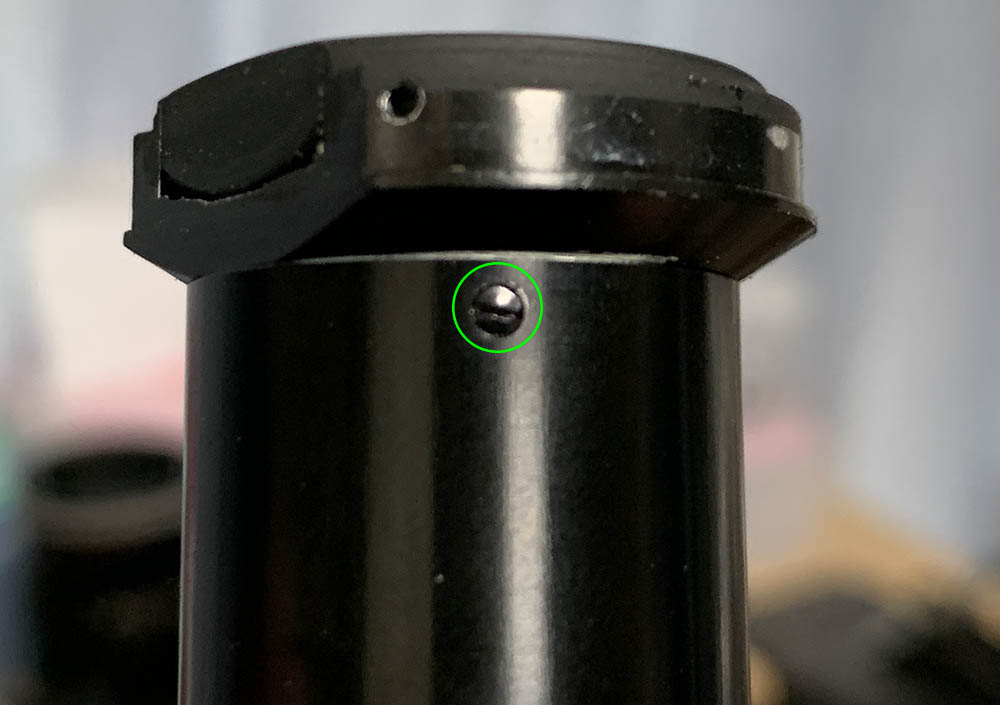
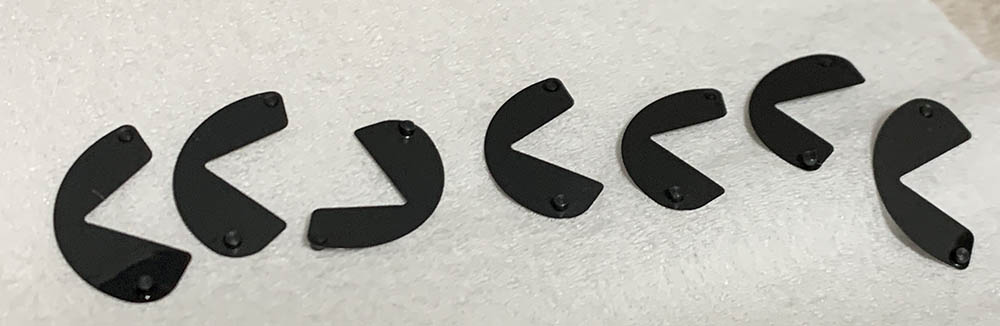
Extract the screws of the claw so you could work with the lens without it getting in the way.

Loosen the screws of the aperture ring and remove it. You can remove this later if you wish, it’s up to you.
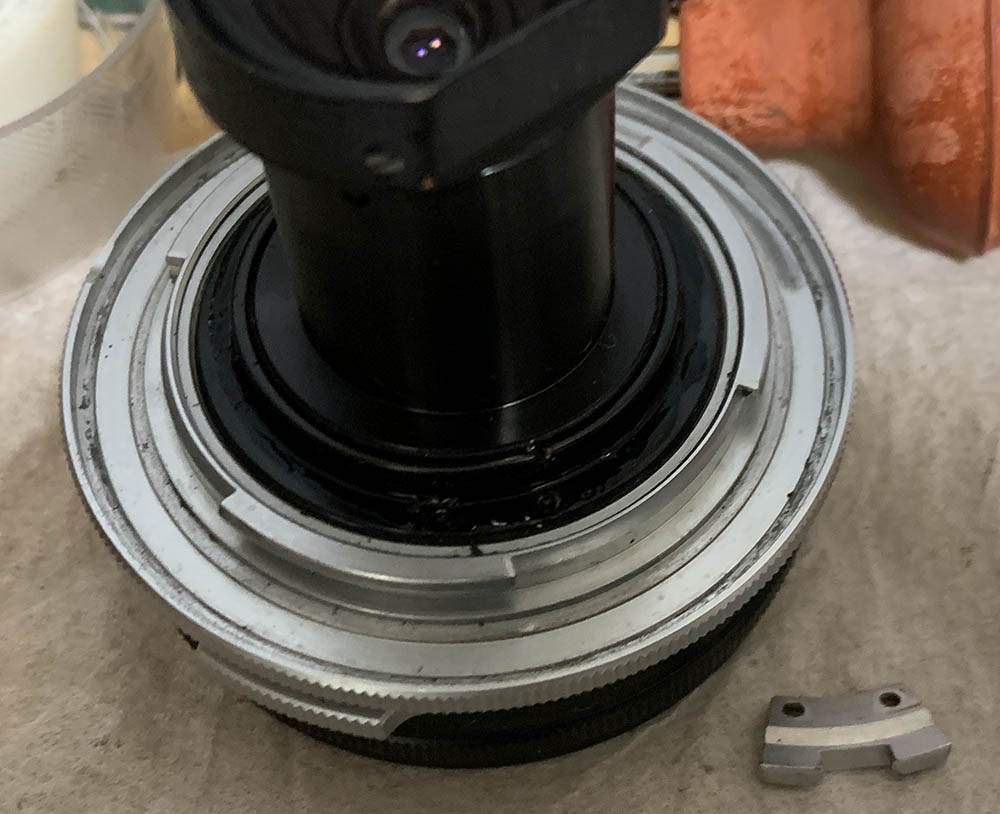
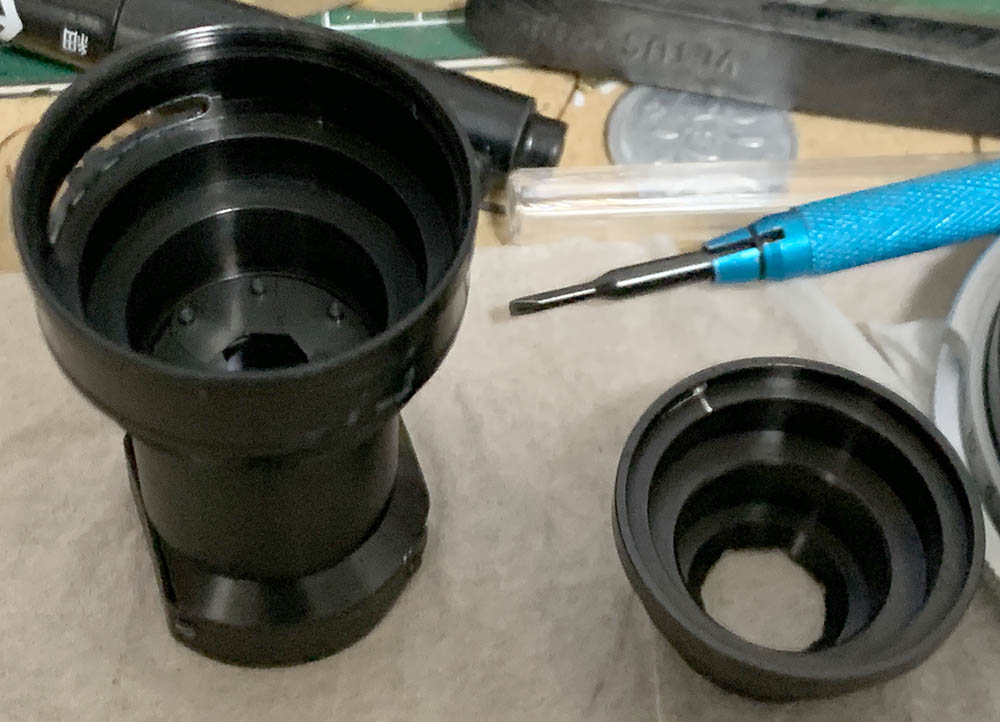
Unscrew the retainer at the neck of the barrel in order to remove the objective’s housing. It’s not easy to remove, you’ll have to align the slots perfectly in order to pull this out, don’t force it. There’s a brass shim here, be sure not to lose it.
Unscrew this ring, it adjusts the iris mechanism when you turn the aperture ring.

At this point it’s best to measure the height of the barrel, you should be able to replicate this later.
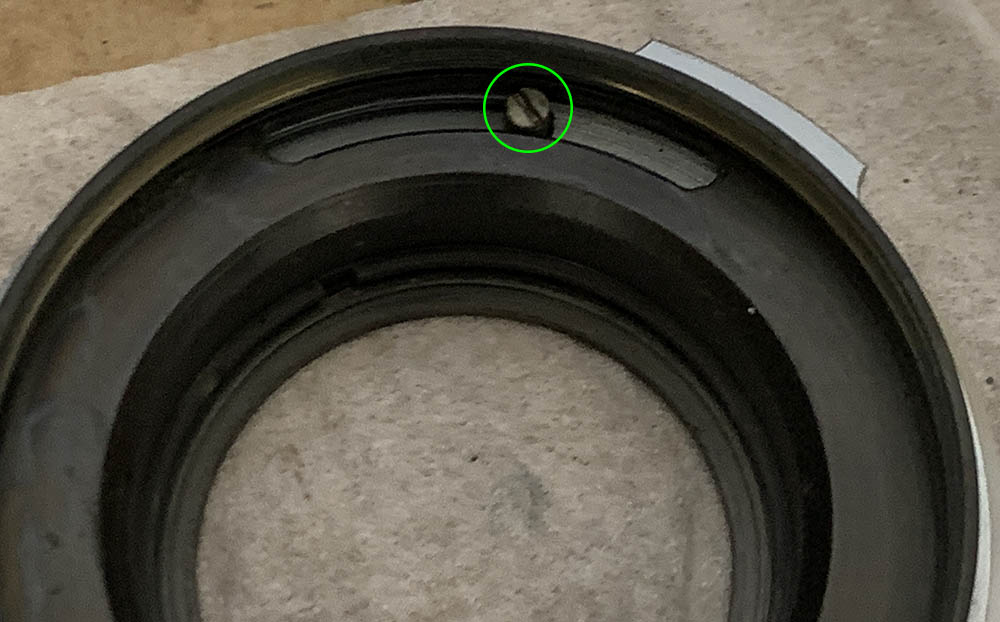
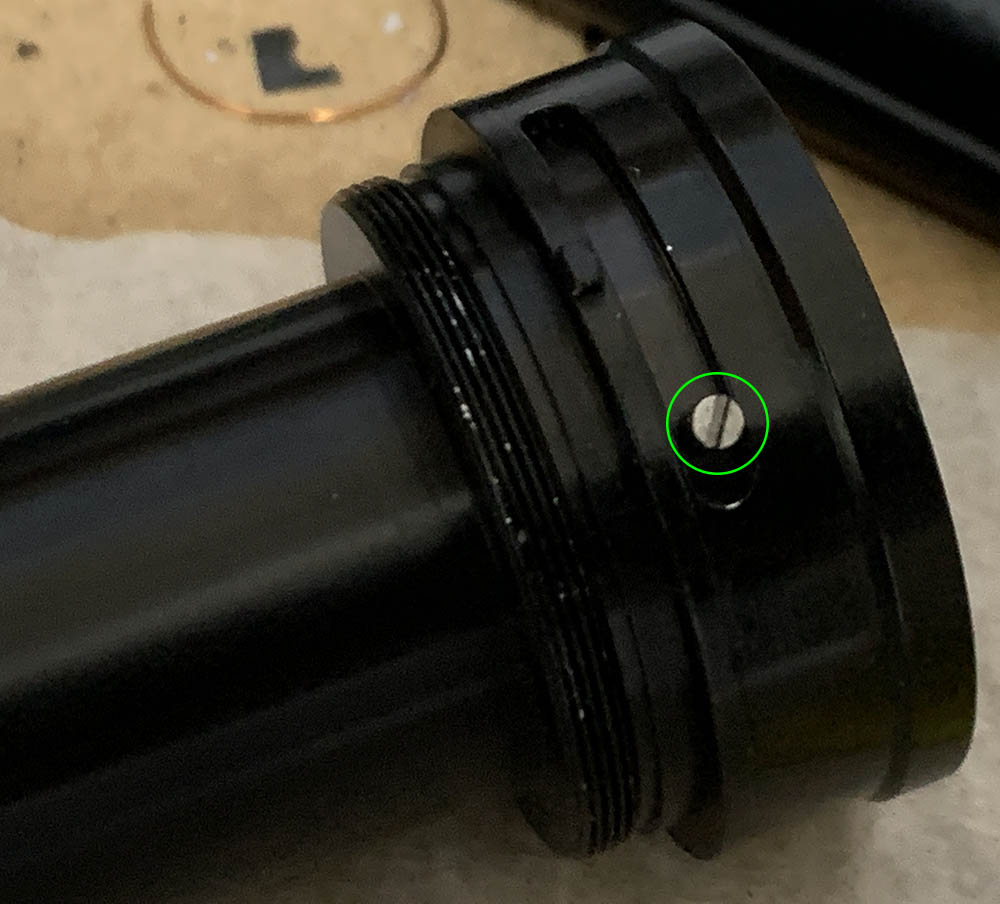
Extract this carefully so you can dismantle everything.
Once the screw is gone you’re now able to unscrew the main barrel off.

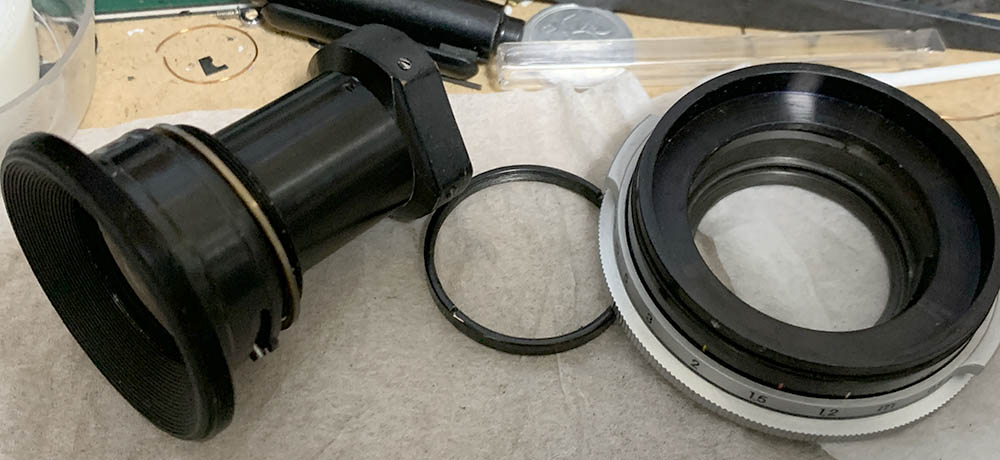
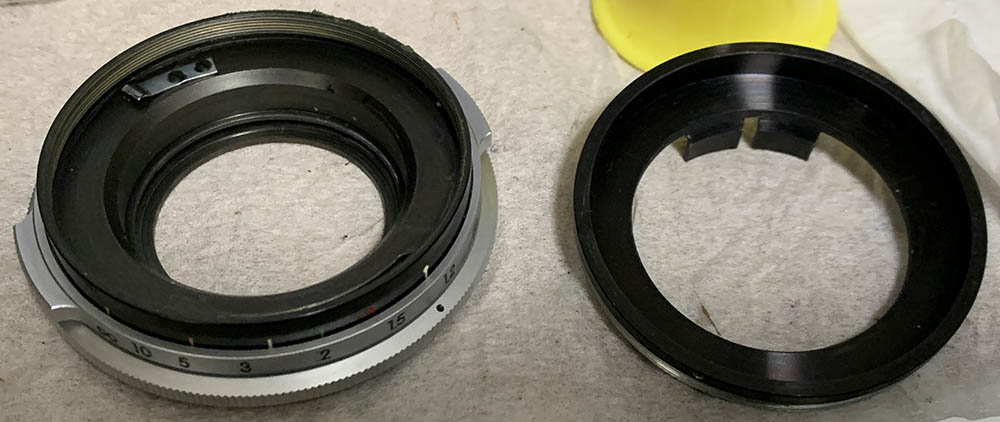
Unscrew the focusing ring from the bayonet.
Clean everything thoroughly, I scrubbed mine with toilet cleanser and rinsed everything very well. A final rinse was done with alcohol to remove any residue. Don’t pickle the black parts of the barrel in alcohol, it will lift the paint off. It is best to wipe the black parts with alcohol and clean the excess off so the solvent won’t pool and damage the paint. Once you’re done cleaning and the parts are dry you’re now ready to apply a fresh coat of grease. This benefits from a thick-type grease but not so thick as to make the rings difficult to turn. You merely apply a thin film on either thread and you exercise the helicoids so the grease will coat them better. Be sure to replicate its exact height, even a small deviation is enough to cause your lens to focus incorrectly.
Disassembly (Objective):
This is probably the scariest part of repairing this lens because the optics are so delicate. Never dismantle this just for a thrill, I would’ve skipped this if this lens was clean when it arrived to me. The important rule is never to dismantle parts that look fine and always take notes so you’ll know how to put things back again later. You’ll also need special tools, it is important to use the right tool for the right job specially for a lens this valuable.
You’ll probably spend the most time reassembling the iris if you’re not familiar with repairing all-manual diaphragms, it took me a few tries before I’ve managed to put mine back but it didn’t take me that long.

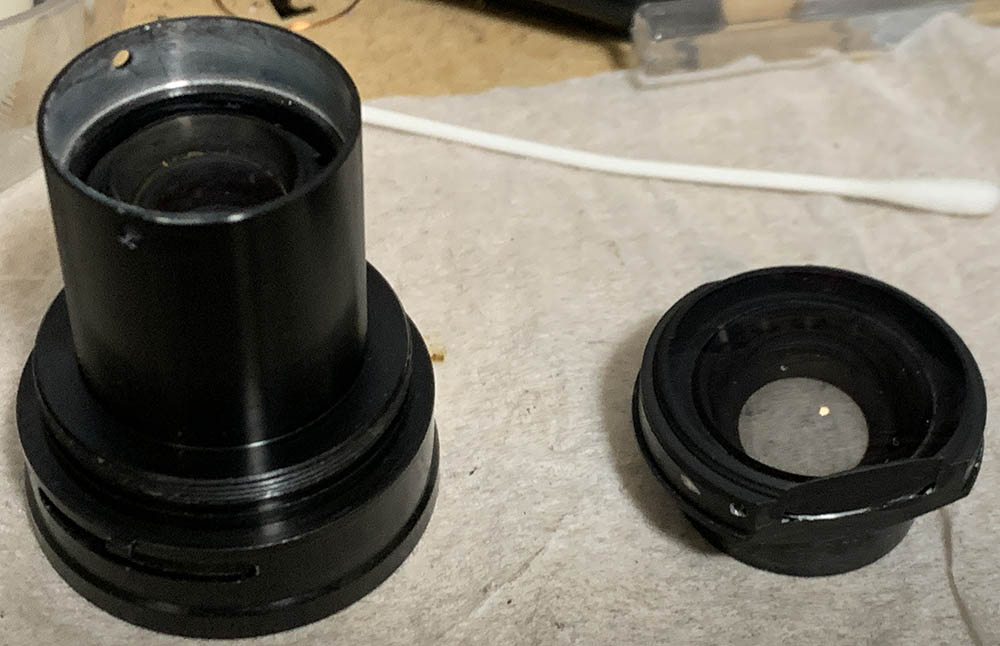
The front optics assembly can be unscrewed with your hands, be careful not to damage the rear.
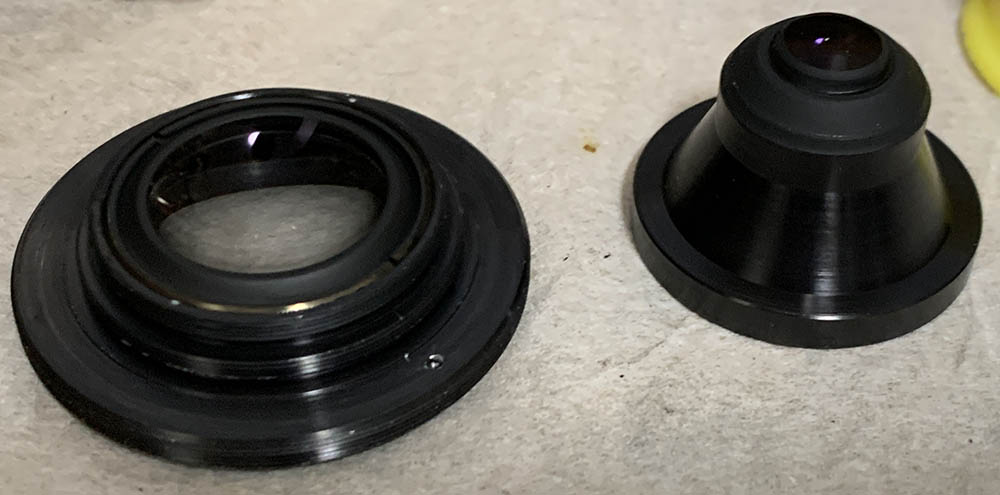
You can unscrew the housing of the 2nd group, don’t dismantle it any further as it’s sealed.
Unscrew the front element with a lens spanner while being careful not to scratch anything. Never remove this from its ring because it’s sealed.
Extract this so you can dismantle the iris mechanism.
Pick the rotator cup off with your fingers while being careful not to damage anything.
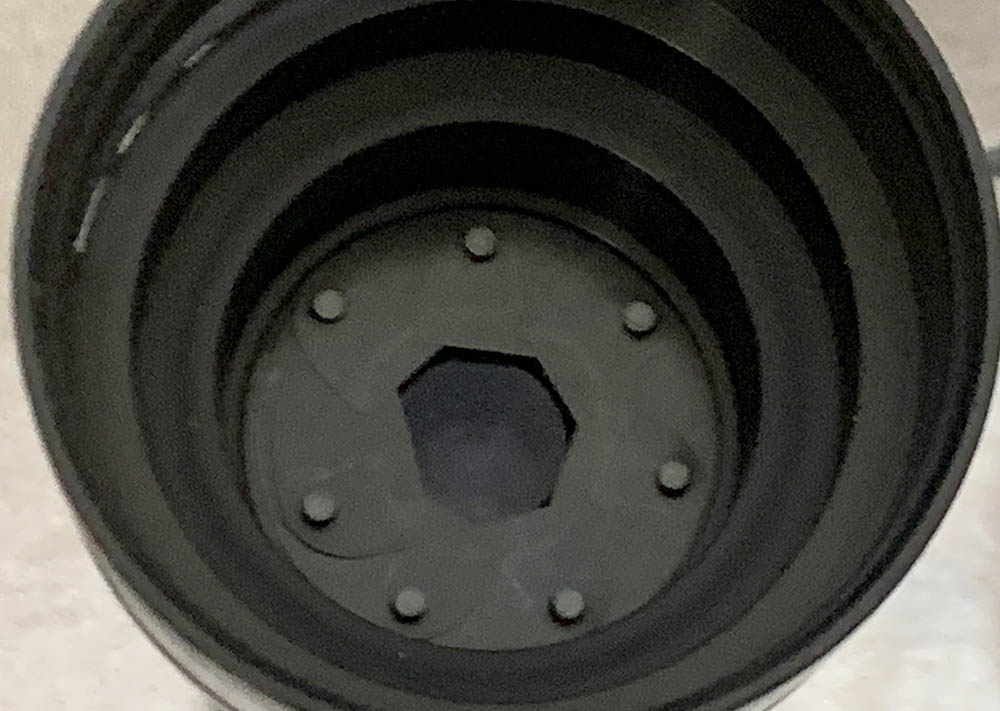
Take a photo of the iris before you remove the leaves.
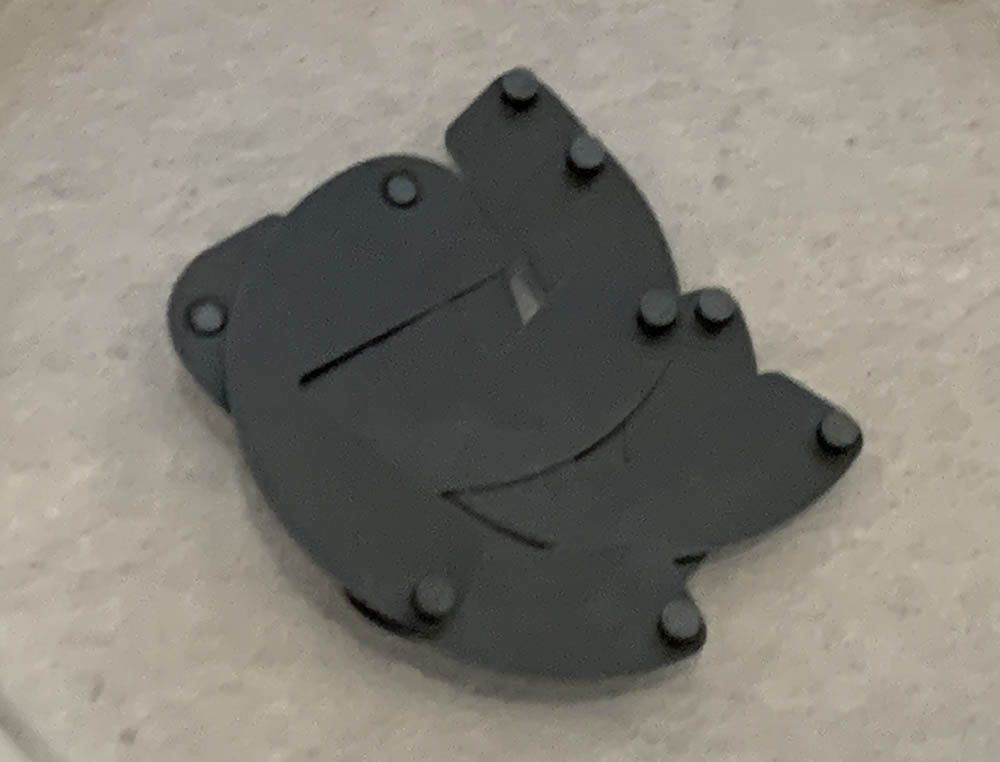
Pick each leaf off with a pair of tweezers or you can just drop all of them into a very soft surface such as wool.
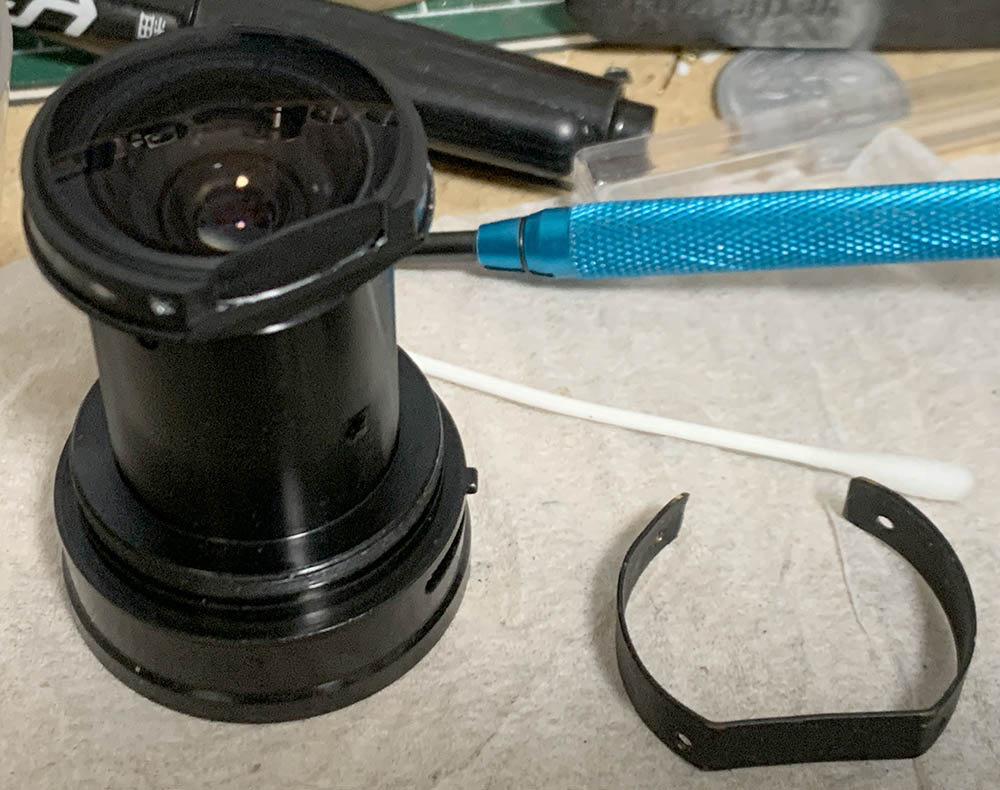
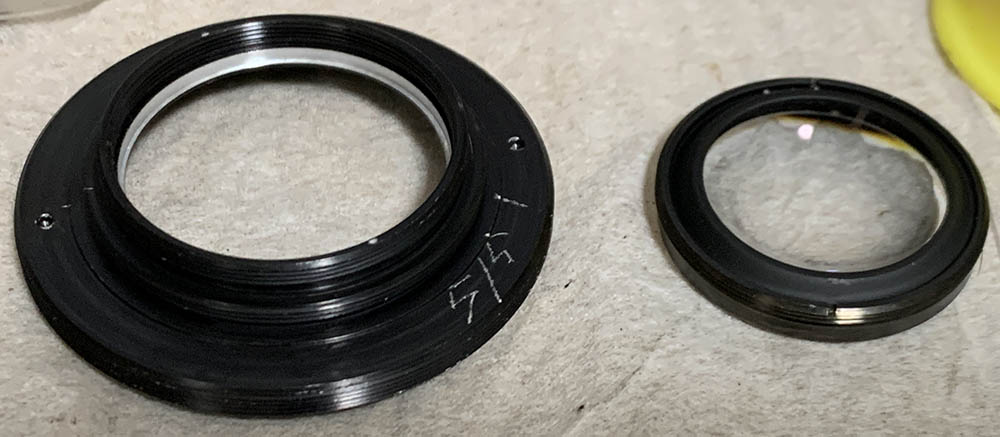
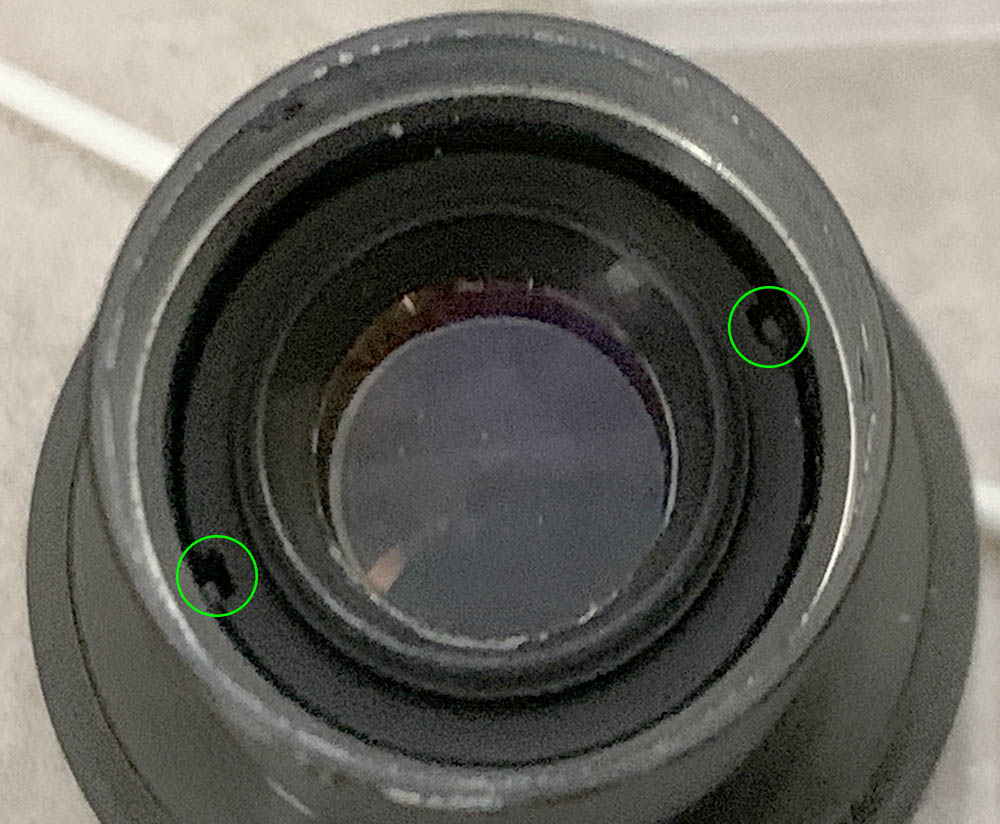
Extract the screws of the rear baffle/guard and slide it off carefully.
Extract these to remove the housing of the 4th group.
Pull the housing of the 4th group carefully. Do not dismantle this further because it’s glued.
Use a special tool to unscrew the 3rd group’s housing, be careful not to chip the lip.
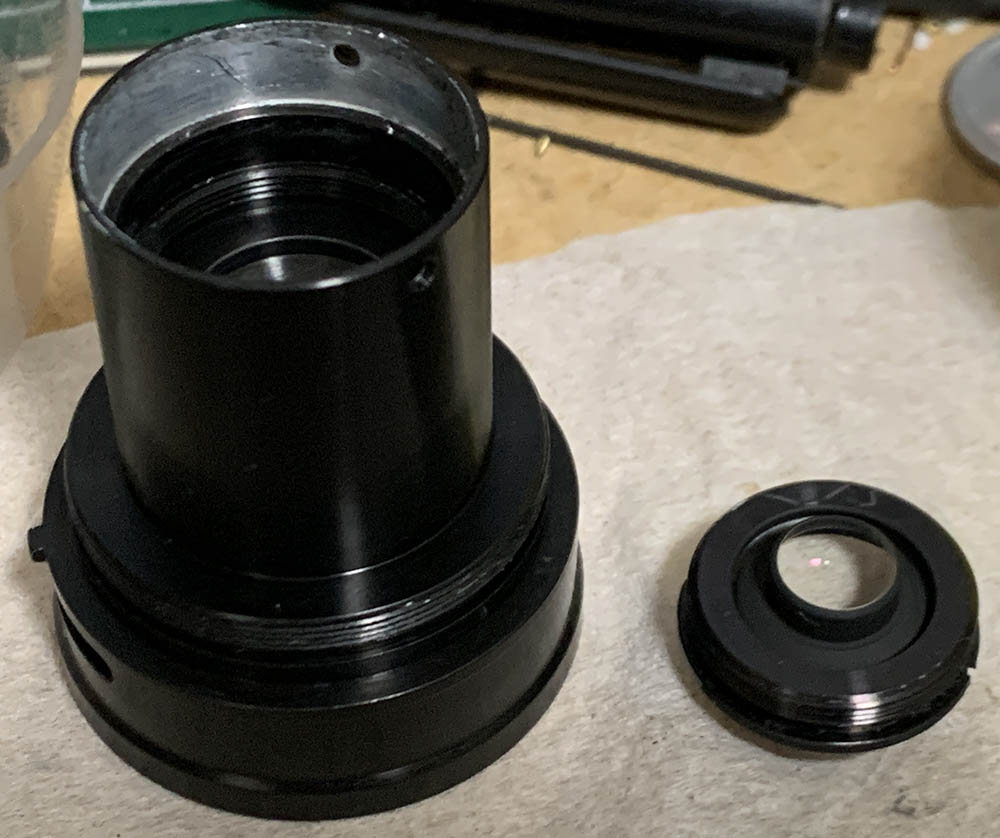
Remove the housing of the 3rd group and never dismantle this further, this is a sealed unit.
Clean each leaf carefully with lens tissue saturated with solvents. Only handle them by their pins and be careful so you won’t warp or damage any of them.
If your lens has fungus read my article on how to clean lens fungus so you’ll know how this is fixed. Dilute the solution well so it’s not going to damage the glass or their coatings. Never soak or flood the optics with solvent or anything, it has several cemented-surfaces so it’s important to avoid ruining the Canada balsam.
Never overtighten anything here and also do not apply any lubricants specially anywhere near the iris mechanism. The grease will migrate to the iris mechanism and will cause a big mess and you’ll have to overhaul it again.
Disassembly (Finder):
This is a bonus section. While the finder is simple in terms of construction you should be careful with this, some of the elements have ambiguous curvature so you should note their direction, too. The housing is fragile, the plastic can be a bit too brittle on some spots which will crack easily. Never soak the housing in solvents and never use acetone with it.
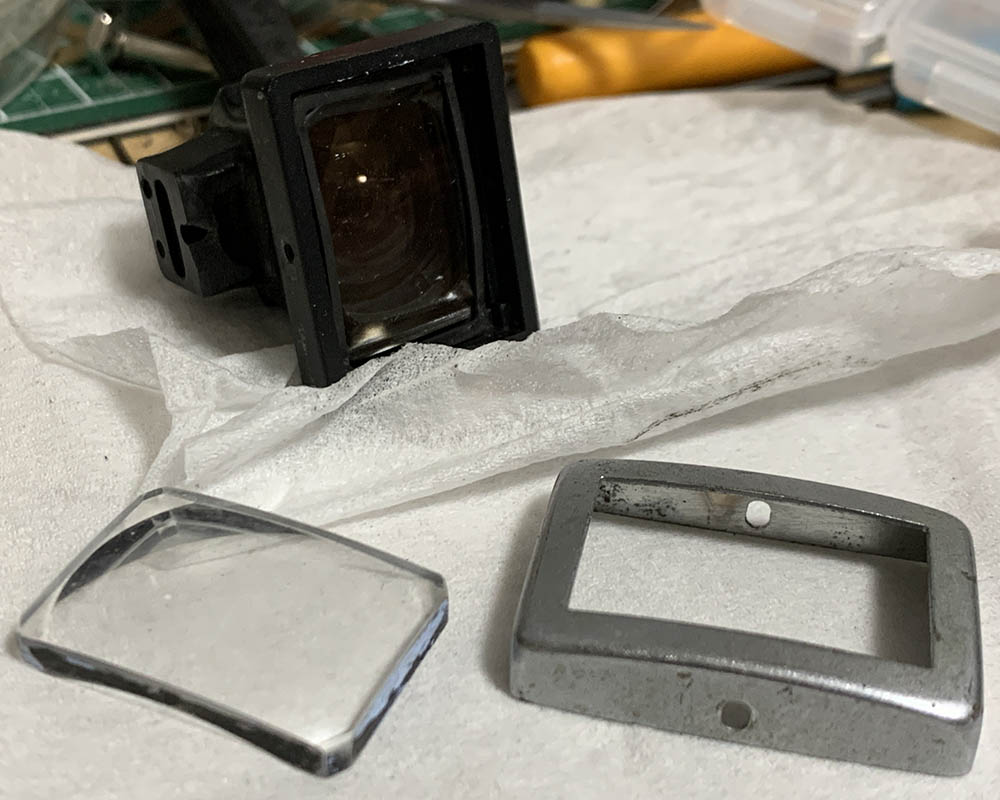
Extract the screws of the frame and remove it along with the front element. Note that the finder has no foot, I used an old Nikon BS-1 instead just so that I could use it. Of course, I had to drill holes and source screws for the modification.

Remove the spring and the 2nd group. Don’t forget to note its direction so you’ll know which side should be facing the front.
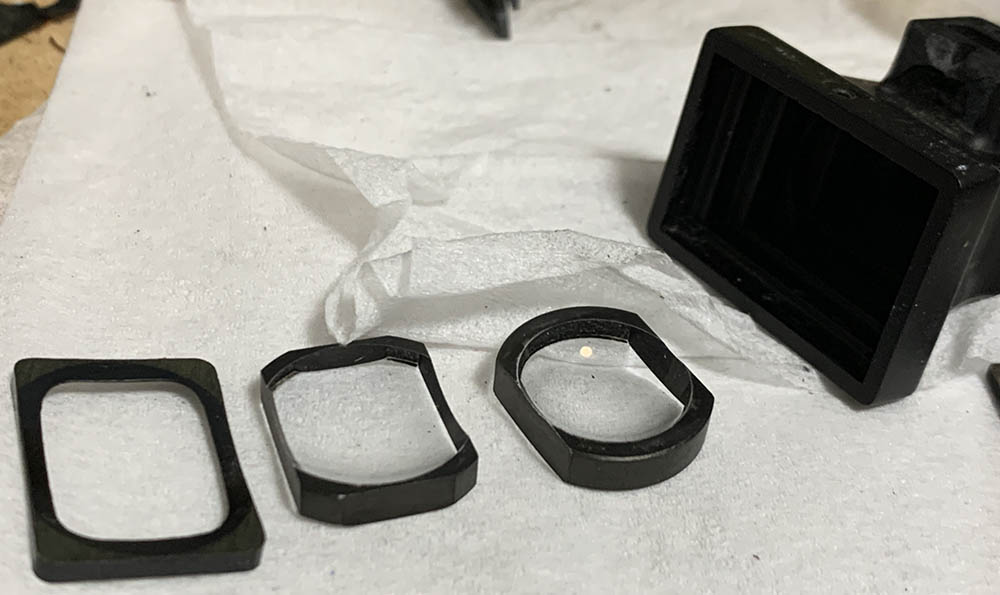
Carefully remove the plastic frame and remove the 3rd and 4th groups.
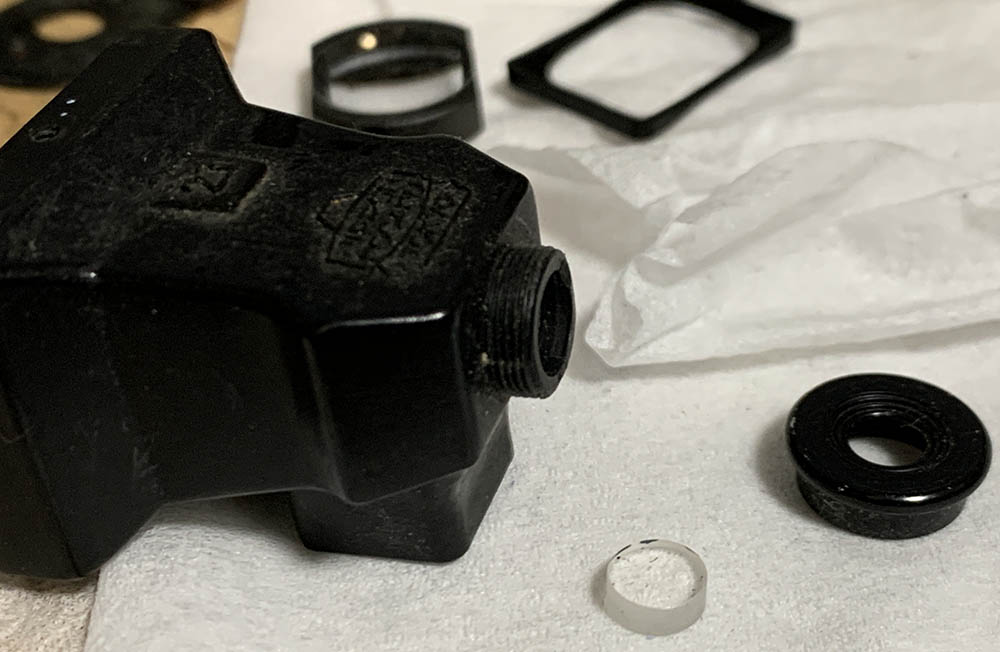
Unscrew the eyepiece and remove the rear element. Never forget to mark which side should be facing the front.
Treat this like a small lens, clean everything carefully then reassemble each part carefully. The front glass is suspended, a spring makes sure that it’s stable and you’ll have to be careful while mounting it.
Conclusion:
Surprisingly, this one didn’t take me a long time to service completely. There are not a lot of parts and everything fits perfectly like a puzzle. Now that you’ve seen how difficult the task is be sure never to attempt repairing one if you are not a professional or you don’t have the right tools and skill for the task. You only risk ruining your lens by doing so.
If you’ve reassembled the main barrel correctly then there should be no need to adjust its focus. The depth-of-field is so-wide that it’s rather forgiving of any inconsistencies but you should still be careful. Before you put everything back I would like you to see the next photo.
This is how everything should align. You will never be able to put the housing of the objective back if they do not align properly. There’s also a tab and pin at the objective’s housing, those should align with these, too.

I really enjoyed shooting with this, it was a lot of fun. Again, never do what you see here, the Nikon Df isn’t meant to be used with this lens. In fact, never use this with any camera apart from the Nikon F, Nikon F2 and Nikkormats.
This is the only article anywhere which details the complete overhaul of this lens. I hope that you liked it, this took me a lot of time and resources to produce. I’m proud to say that it’s one of the most important articles around together with Sato Haruo-sensei’s amazing article about it. These articles compliment each other, one for repair and another one for a complete writeup regarding its history and development. Please cherish these 2 treasures for posterity.
Thanks for following my work, if you liked this article please share this with your friends so it will get more views. This site earns around $0.40 a day, we are totally reliant on views. You can also support this site, it helps me offset the cost of maintenance and hosting. You’re also helping me purchase, process and scan film. This site promotes the use of film so we are all in this together. See you again in the next article, Ric.
Help Support this Blog:
Maintaining this requires resources and a lot of time. If you think that it has helped you or you want to show your support by helping with the site’s upkeep, you can make a small donation to my paypal.com at richardHaw888@gmail.com. Money isn’t my prime motivation for this blog and I believe that I have enough to run this but you can help me make this site (and the companion facebook page) grow.
Leave me some tip?
Thank you very much for your continued support!
$2.00
Helping support this site will ensure that this will be kept going as long as I have the time and energy for this. I would appreciate it if you just leave out your name or details like your country’s name or other information so that the donations will totally be anonymous. This is a labor of love and I intend to keep it that way for as long as I can. Ric.

Oct 25, 2021 @ 18:32:44
I have fond memories of thus lens, Very good sun-stars and entirely adequate for my Agfa CT18 slides + for Ilford FP3.
I cobbled together an adapter tp fit my ltm IIIf from some Novoflex raw material +araldite epoxy glue, The rear shroud got a few abrasionmarks from time to time by me turning the lens manually so that it would fit.
it served me well until I changed the camera body for an M3 and did not wish to repeat the adapter exercise then it left to take up residence in the Rørslett museum of lenses occasionally used.
p.
Nov 22, 2021 @ 18:40:23
This is my favorite lens on F2. I love it.
Aug 01, 2023 @ 02:16:52
Nice article. I own one of the ultra rare nikkor-0 21mm S mount lenses. 40 years ago I would shoot film thru the range finder. I usually liked the results.