
Hello, everybody! Do you know that I also teach martial arts? I needed to move more since I am now a middle aged man! I have been doing kung fu for years but I stopped when I moved to Japan because it’s safe over there. It has saved my life a few times, I have fought robbers and got into street fights in my youth and came out alive. I grew up in a racist society where people who look like me are targets for crime and many other things, that’s why we’re called the “Jews of Asia“. Going back to martial arts, I have taught a few people and some of them may have surpassed me in ability but not in the in-depth understanding of the art. They are now able to kick my ass in a real fight. I do not see that as a threat but I see that as a testament of my teaching prowess instead. It’s very rare to find somebody who is willing to pass the torch and even rarer to find someone who is willing to take it. Today, I’ll tell you such a story where the student surpassed the master. It’s the story of how the Japanese idolized and learned from the Germans and how the former has surpassed the latter. The Japs sure slapped the Germs in this one and they won’t recover from it at all and now concentrates on making men’s jewelry that just so happens to take photos. Read the article to know what it’s all about!
Introduction:
The Nikkor-P•C 8.5cm f/2 (Nikon S-Mount) is a very important lens for the Japanese photographic industry because it introduced Nikkors to the world due to its excellent sharpness which even bested the German original where it was copied from. The person who was responsible for bringing the world’s attention to Nikkors is no other than the later David Douglas Duncan. It was when he saw what the photographer Miki Jun was shooting with and found out that the sharp photos were taken with Japanese glass instead of the the German ones that made him curious as to who and where these excellent lenses were made and by whom. His discovery led to him being an advocate for Nippon Kogaku which will be known as Nikon decades later. Such is the historical impact of this lens that without it the impression of the Japanese postwar industry would have been very different and history would not be as we know it. It’s with no exaggeration that I say these words.
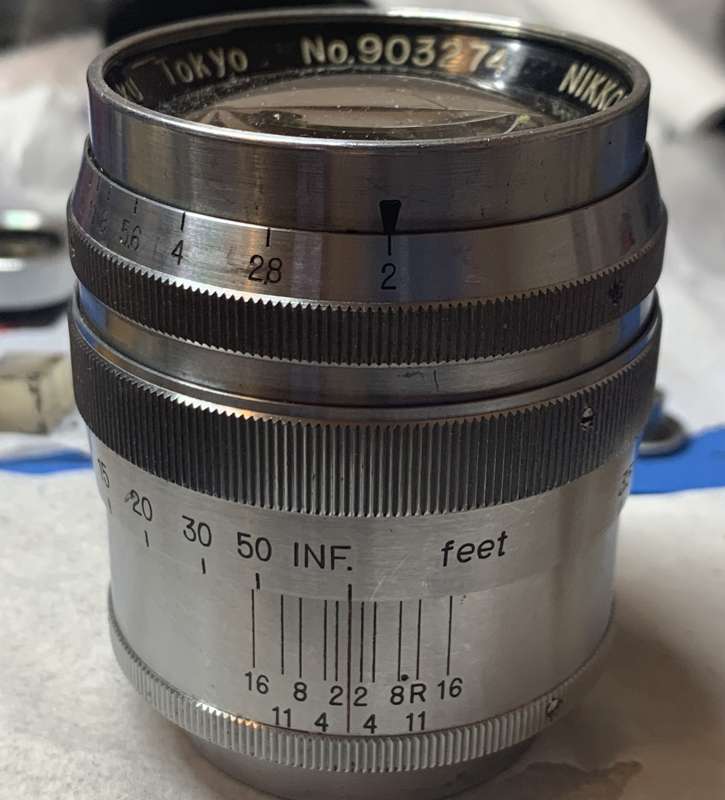
The build is exceptional, as you would expect from this era of Nikkors! Everything is made made of metal and there’s a certain heft to it. Most importantly, it feels somewhat heavier than the later versions for some reason which we will see later in this article. See that the markings are different compared to the Nikkor-P•C 8.5cm f/2 (Nikon S-Mount). The most important thing is it can only go down to f/16 and nothing more. This will be the biggest factor in differentiating how this performs compared to the later versions.
The optical design is identical to the Nikkor-P•C 8.5cm f/2 (Nikon S-Mount) so I won’t be talking about it in this article. Please see what I have to say about it in the related article or just read this amazing article from Ohshita-san instead!
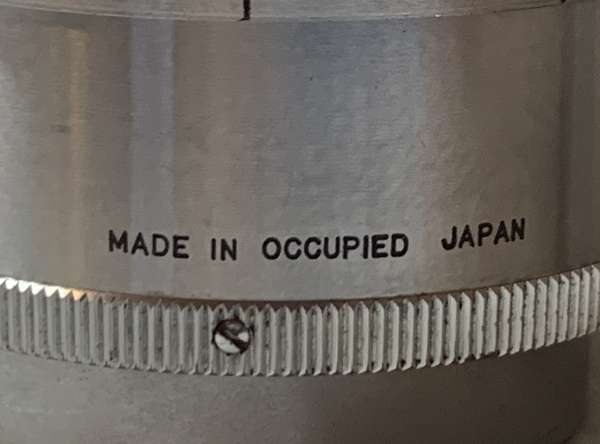
This is the coveted “Made in Occupied Japan” mark that collectors look for. The Nikkors made in this era felt different. They are usually heavier, with thicker parts and more complicated parts. Not only that, some things are also kind of crude because you must understand that the factories were just bouncing back from the war that devastated them, some had to be rebuilt from the ground! I have seen this mark appear in several place apart from where you see it here. It sometimes appear somewhere in the focusing cam, either on top or under it (for Leica mount) and around the focusing cam coupler in the Nikkor-P•C 8.5cm f/2 (Nikon S-Mount).
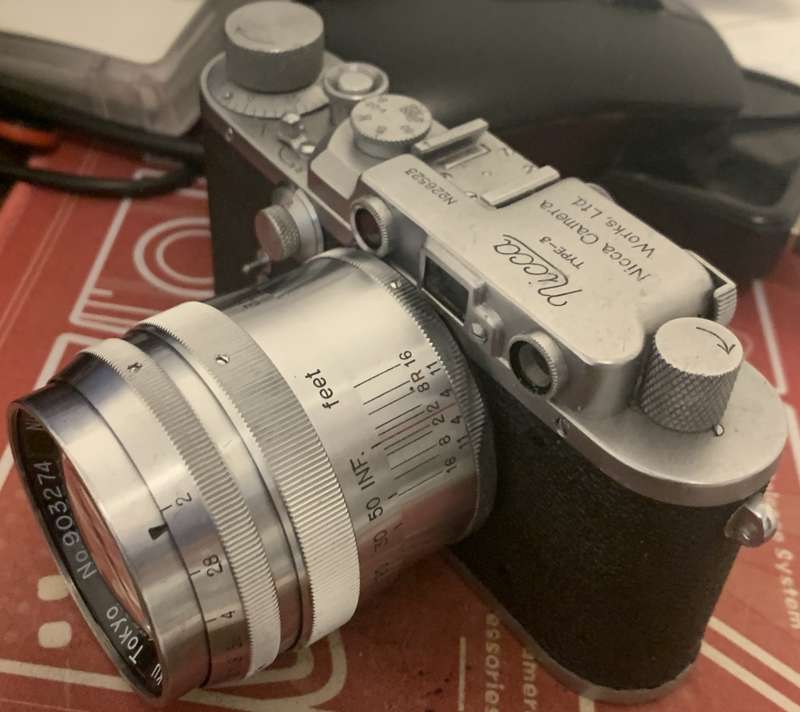
Unlike the Nikkor-P•C 8.5cm f/2 (Nikon S-Mount), the display is not facing the top squarely but it’s offset to the side like many of the Leica thread mount of this era. Notice that this one only goes down to f/16. The arrow for the aperture value doesn’t lineup with the numbers for some reason. It could easily be remedied by adjusting the aperture ring itself by drilling new holes underneath it. I won’t bother doing that because this is a very valuable lens. Both are “Made in Occupied Japan” so I’d imagine that this setup is as close to what we’ll see being used at the time in Japan when the outside world discovered Nikkor for the first time.
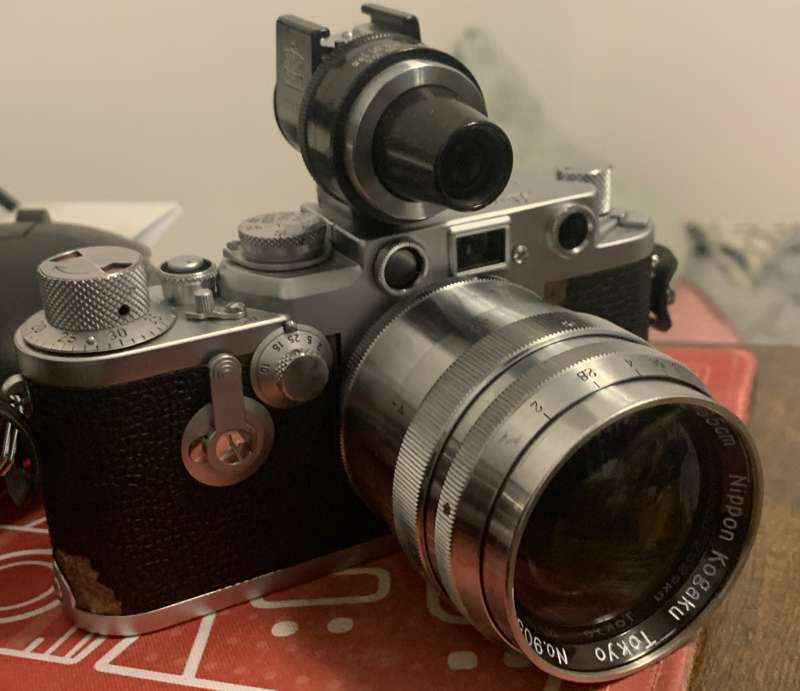
Here it is with a Leica IIIf. The varifocal finder from Nikon is black so it’s not a good match. The lens is so heavy that it’s heavier than both the camera and finder combined which makes it a bit difficult to balance.
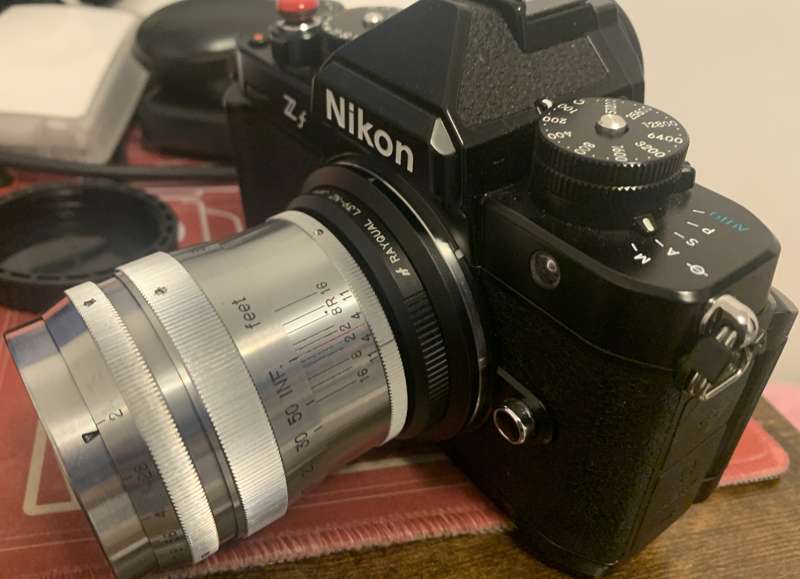
The Nikon Zf is a heavier camera so the balance is somewhat better but it’s still front-heavy. The adapter is the excellent Rayqual, I like it much better over the cheap Chinese crap. I’d buy anything that’s not Chinese as much as possible even if it’s pricier.
Since I have covered Nikkor-P•C 8.5cm f/2 (Nikon S-Mount) I won’t be repeating what I have done there so head to that link if you want to see how this lens performs in better detail!
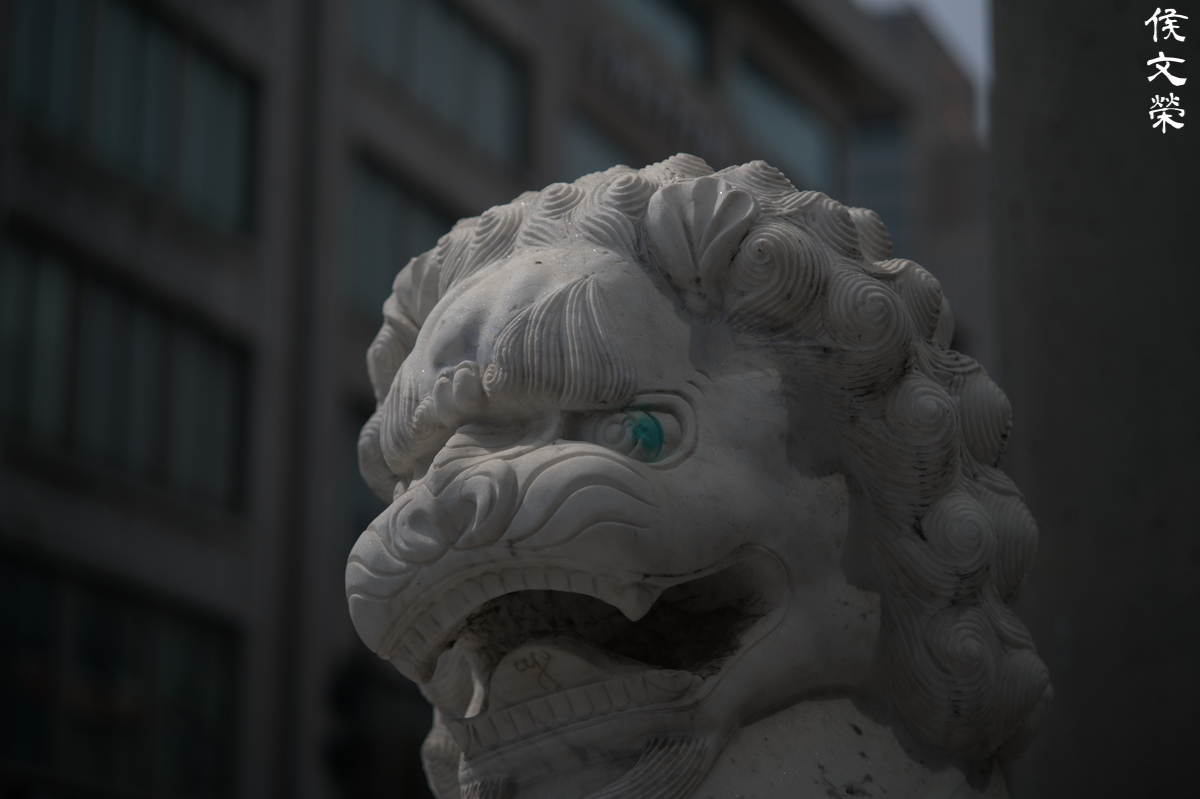
The biggest draw of this lens is its ability to blur the background into a wash of colors and even if the iris is stopped down you’re going to get beautiful and smooth blur thanks to the circular iris. Of course, the Sonnar design is famous for this look so you will definitely not be disappointed if you’re looking for that signature rendering of the famous Sonnar.

The gorgeous background blur makes the ugliest clutter look insignificant while presenting your subject beautifully thanks to the ability to separate them from the rest of the scene as if giving you that 3D effect that’s missing with so many modern lenses.

This lens is unrivaled for rendering skin, it does it naturally and without making the subject look like rubber. It’s not super sharp, it is not made to be that. It’s sharp enough to resolve every detail that counts while soft enough to exclude what’s unwanted.

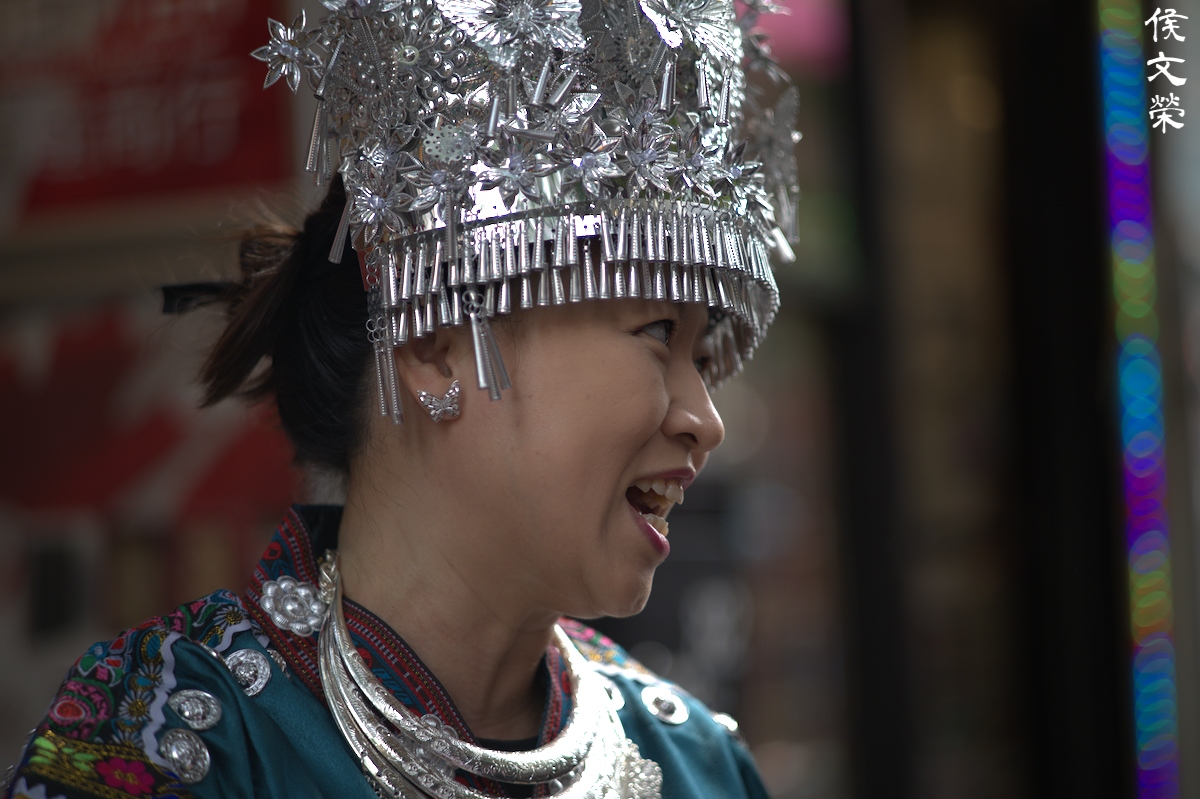
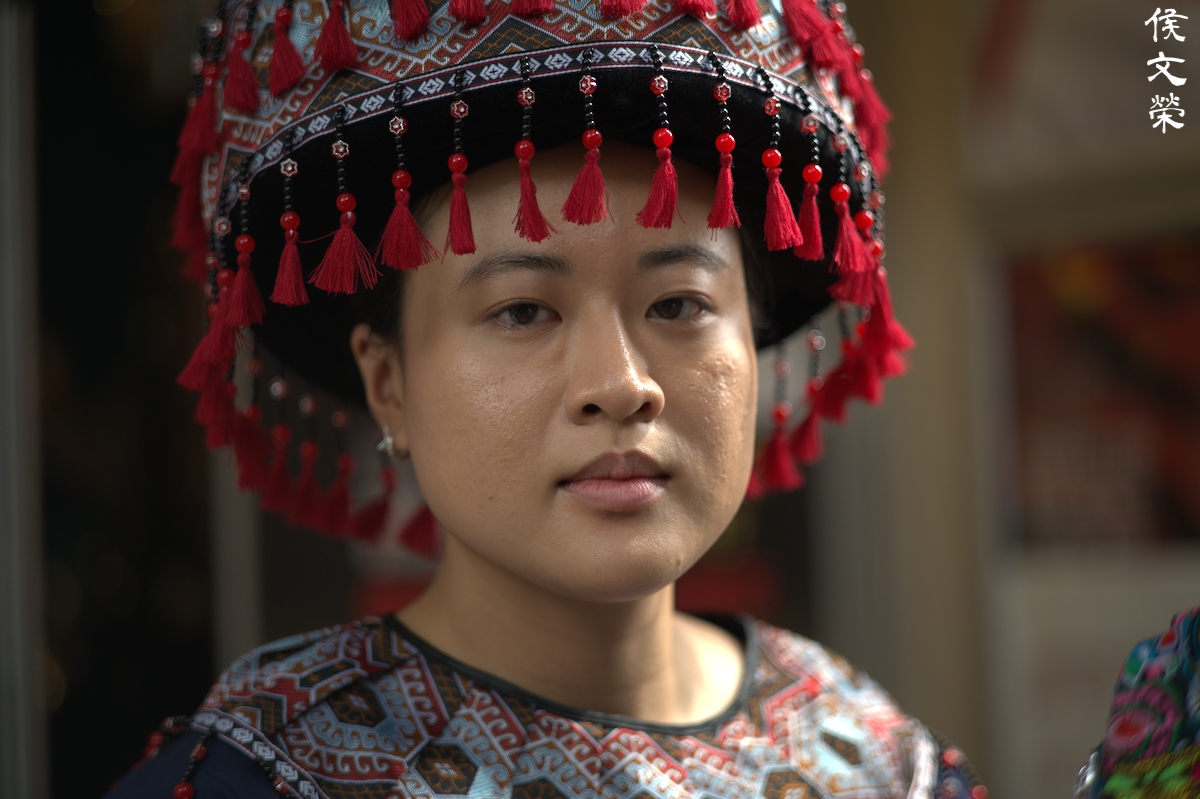
(Click to expand)
This lens excels for its intended use which is portraiture. Shooting it with a mirrorless camera is easy and it helps you focus much better since you’re able to magnify your view and see things happen before you even take an exposure. It has the typical flavor of vintage glass which means it has a lot of character in a way that all the imperfections work together so you have a more interesting look to your pictures. Sharpness is nice for its age and the rendering is very smooth as expected.
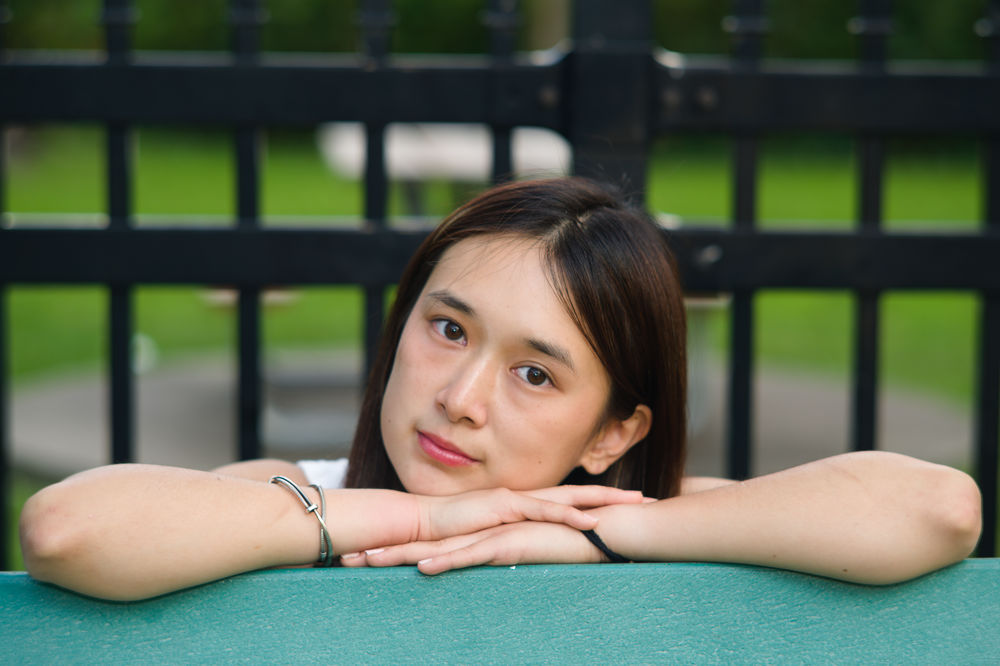





(Click to expand)
Here’s the rest of the photos with miss Audrey Li, which for some reason is underexposed in some photos. I am learning to use new software like RawTherapee and the disgusting Dark Table so some of my recent photos look a bit off. Anyway, I think this is good enough for you to appreciate just how good this lens is.
I can recommend this to anyone shooting a Leica and looking for a solid 85mm that’s won’t cost a kidney. However, the special and rare “Made in Occupied Japan” like the one you see here should only be reserved for the avid collector since they cost more than a later one, twice as much normally. I got lucky with this one and I got it for lower than what’s being sold and thanks to the sinking value of the Yen and some discounts, I was able to purchase one after waiting for a good deal for more than 12 years!
Before We Begin:
If this is your first attempt at repairing a lens, I suggest that you see my previous posts regarding screws & drivers, grease and other things. Also read what I wrote about the tools that you’ll need.
I suggest that you read these primers before you begin:
- Essential tools
- Best practices 1
- Best practices 2
- Best practices 3
- Ai conversion
- Working with Helicoids
Reading these should lessen the chance of ruining your lens. Before opening up anything, always look for other people who have done so on the internet. Information is vague and scattered but you can still find some information if you search carefully.
For more advanced topics, you can read my fungus removal article. It has a lot of useful information, it will be beneficial for you to read this. I also recommend that you read the working with helicoids article so you will not get stuck because you couldn’t reassemble the helicoids back properly.
Disassembly (Main Barrel):
The construction is typical of all 8.5/2 Nikkors except there’s a small detail that we shouldn’t overlook and I will explain that later. Before you begin you must make sure that you have the correct tools, older lenses require special drivers so you won’t leave scars on the screws as they’re usually made of softer material. In short, your screws should fit perfectly and should have a parallel profile in order to avoid deforming the slots. Stripping the screws will lead to bigger headaches and a costly mistake since these are not in any manner, cheap. If you’re unsure then just send it to a repair guy and show him my article, that should make things work!
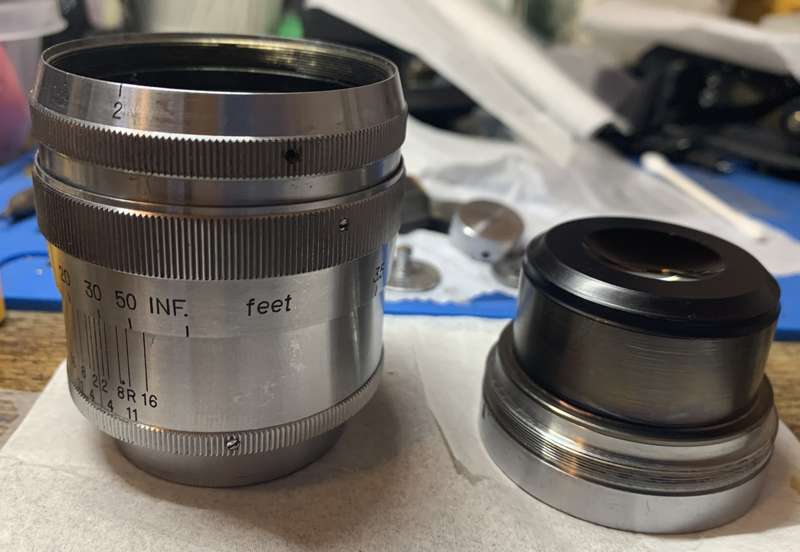
Unscrew the front barrel off from the rest of the lens to keep it safe and be sure not to scratch the glass.
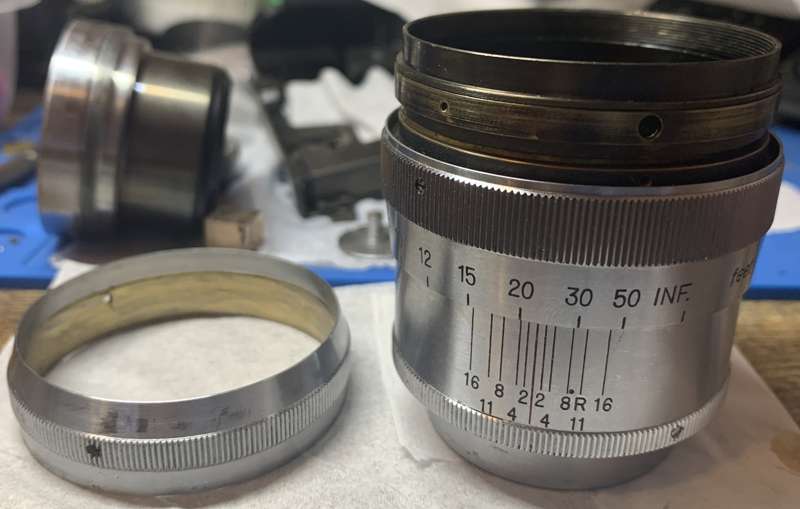
Extract the screws of the aperture ring and slide it off, revealing even more things underneath. At this point, it’s best to extract the 2 screws that couple the ring to the iris mechanism (they’re the bigger ones). Just make sure that the iris won’t come apart because those 2 screws are the only things securing it. We do this so we won’t accidentally turn on the aperture ring with such force that it’s going to ruin the blades or warp them permanently.
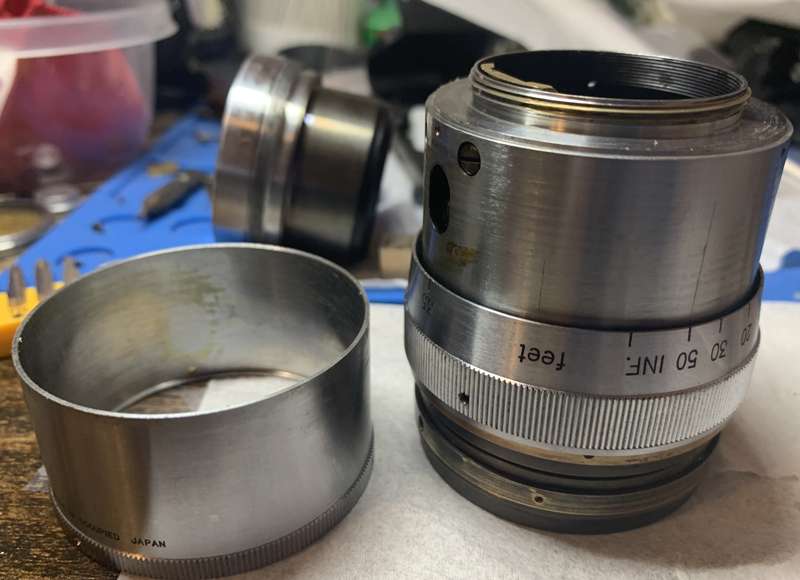
Extract the screws around the knurling so you could slide the sleeve and the mount off.
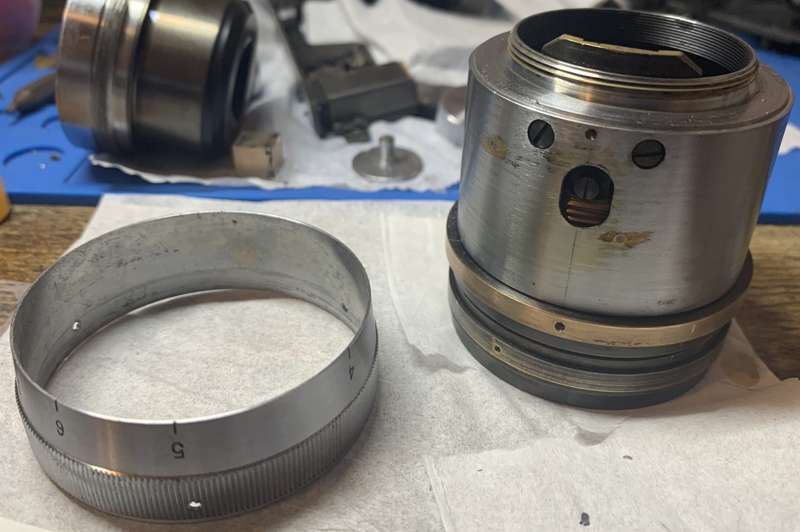
The focusing ring can then be removed now that the sleeves are out of the way. It’s obvious that you should remove the screws first before you’re able to remove the focusing ring.
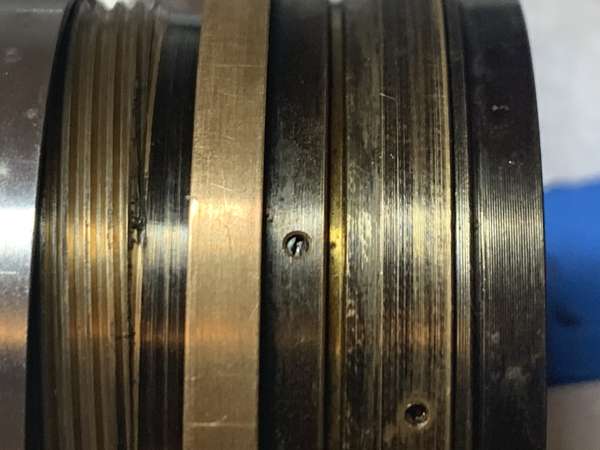
You now have fill access to these little grub screws which you should loosen/extract in order to get the objective off. While you’re able to loosen these while the focusing ring is still installed it’s better to wait until this point so you won’t strip the screws because you’re engaging them at an abnormal angle!
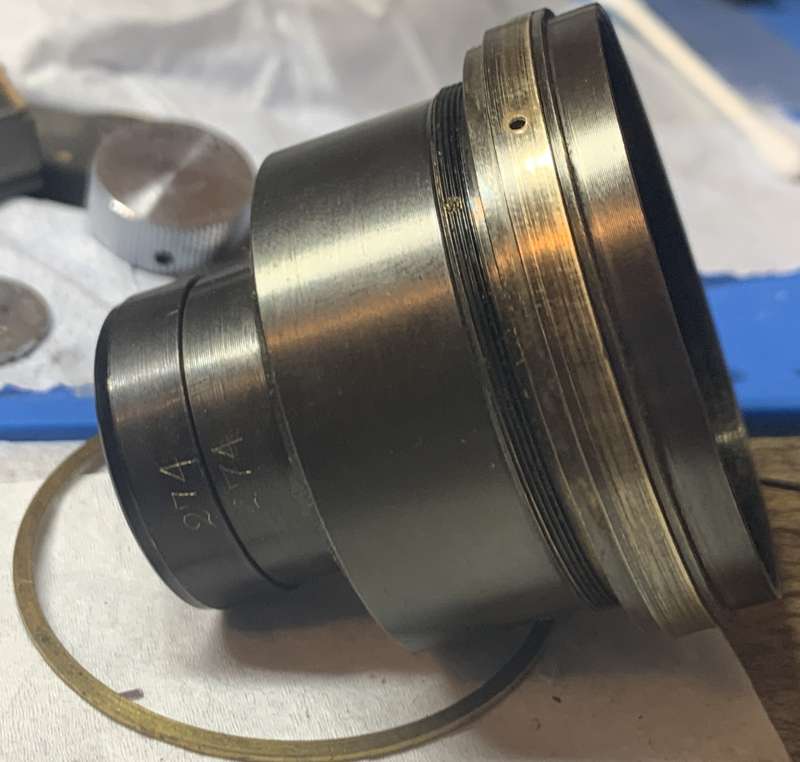
You’re now finally able to unscrew the housing of the objective off! Do not lose that shim underneath it as it’s the only thing that’s used for adjusting the focus of this lens.
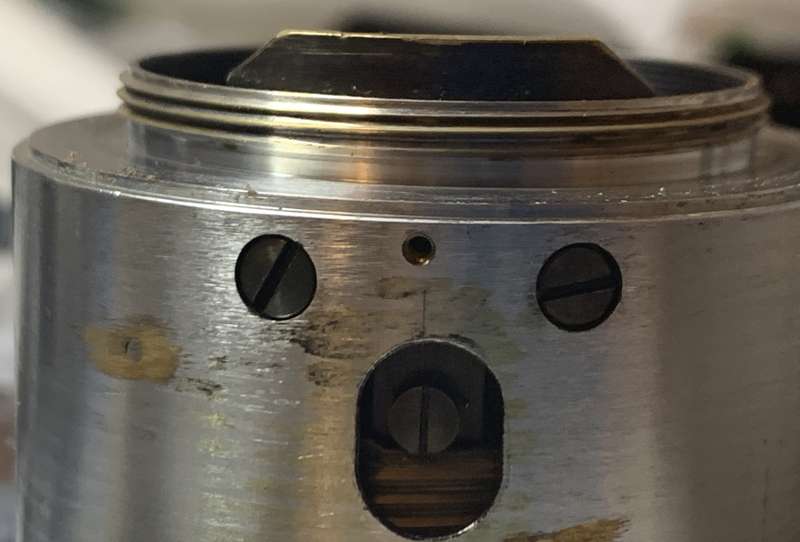
Here are 3 screws, the smaller ones secure the focusing cam mechanism while the largest one engages the helicoid and is possibly an eccentric one which means it’s used for fine adjustment! Remember the original orientation of the large one before you extract it.
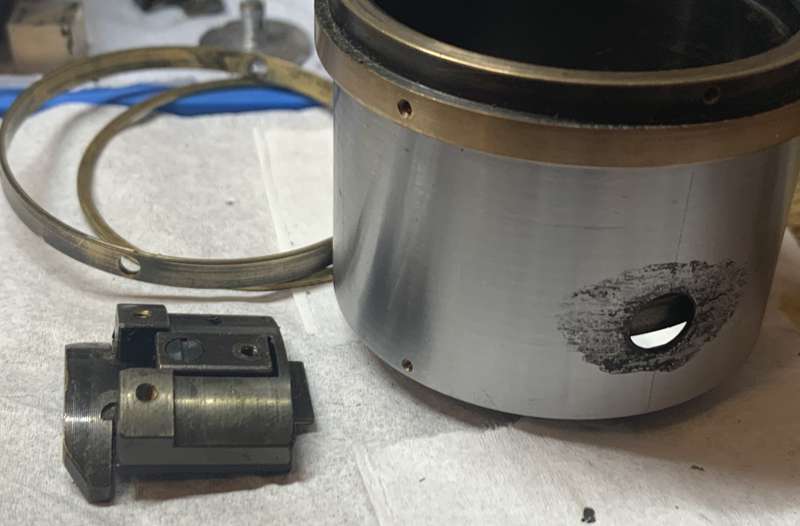
The cam assembly comes off as a single unit, but be careful because it’s spring-loaded. You’re able to dismantle it down further but it will be difficult to put it back thanks to the spring, so only do that if you know how to put it back! It took me many tries before I was able to put it all back together and I also ended up with a bent pair of premium tweezers.
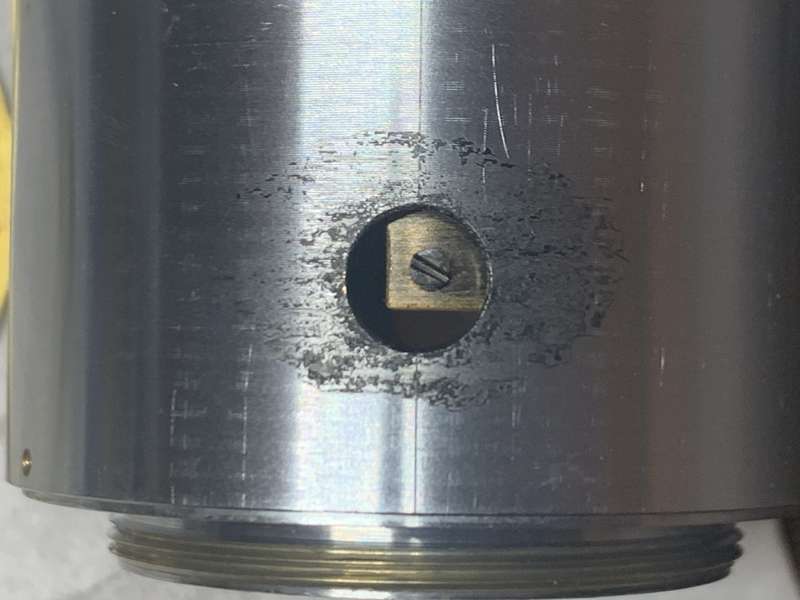
Turn the helicoid until you’re able to access this. Extract this screw so you’re able to separate the helicoids.
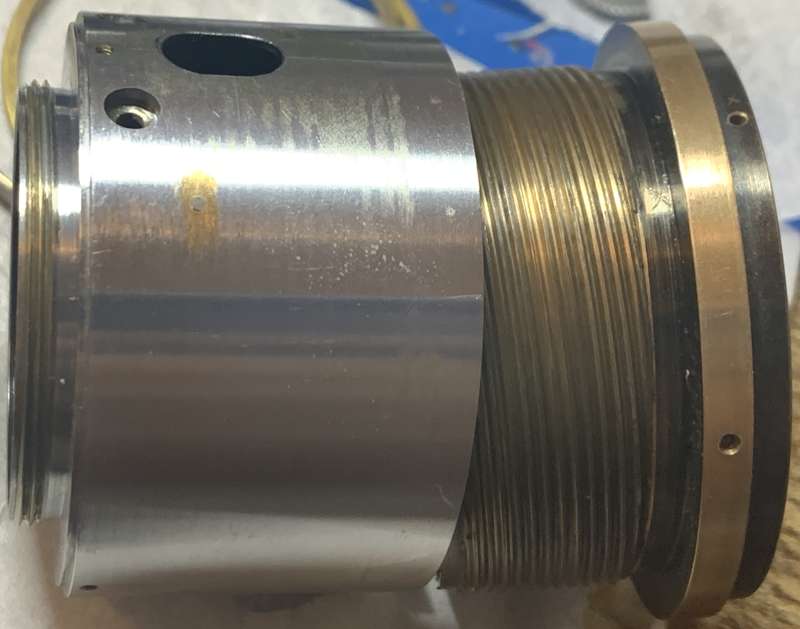
Unscrew the helicoid until it separates. Don’t forget to note where they’ve parted, it’s also the same place where they should mesh. Many people forget about it so they get stuck guessing where it is. To prevent it from happening, read servicing helicoids, follow my guide to the best of your ability.
I cleaned all of the big parts with a strong toilet cleanser – the grainier, the better. I scrubbed everything using a brush then rinsed them all very well with hot water before making a final rinse with pure alcohol to remove any remaining residue.
When lubricating it be sure not to apply too much, all you will need is a thin film of fresh grease. Mate the helicoids then exercise them by turning several times, this will ensure that the grease is evenly distributed. Wipe away any excess. If you have applied too much grease it will settle in the iris mechanism eventually, necessitating the need to open it again, just to give everything another overhaul.
Disassembly (Objective):
The objective is generally identical with the Nikkor-P•C 8.5cm f/2 (Nikon S-Mount) in every way in terms of construction. It’s not a difficult assembly to take apart nor will it take time to put things back together again.
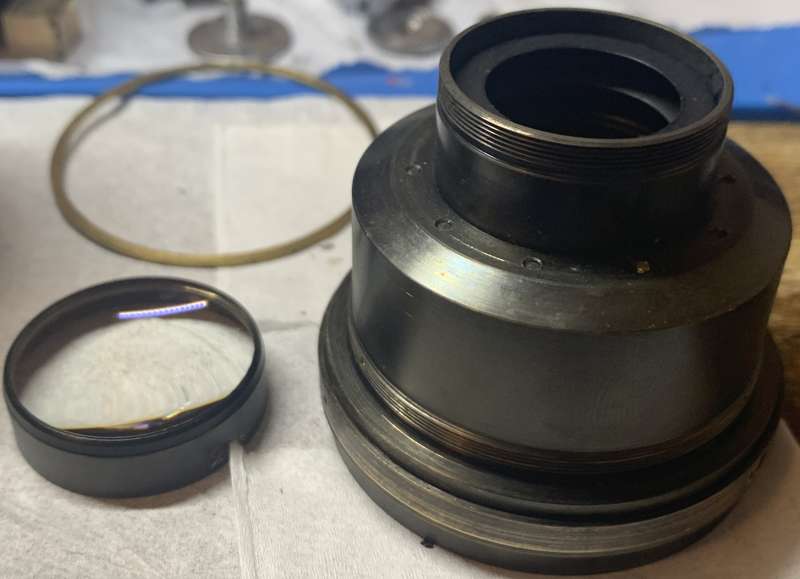
Unscrew the last element and its housing with your hands or with a rubber tool. Keep it safe while you work on the lens.
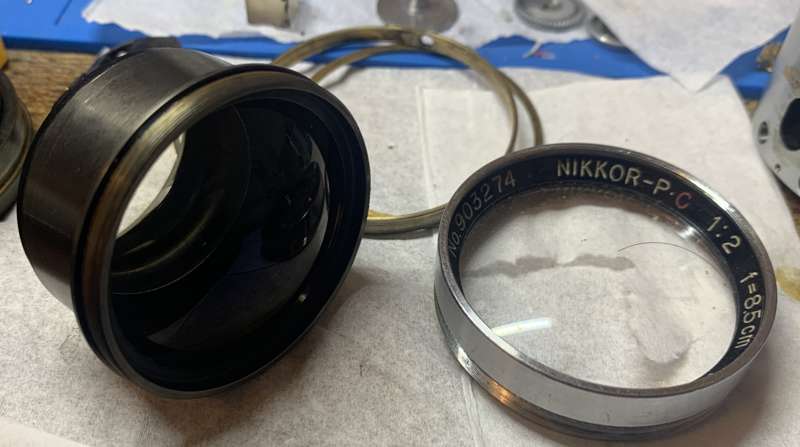
The front ring can be unscrewed just like this. Mine isn’t secured by anything so you might want to check yours first if it does not come off easily.
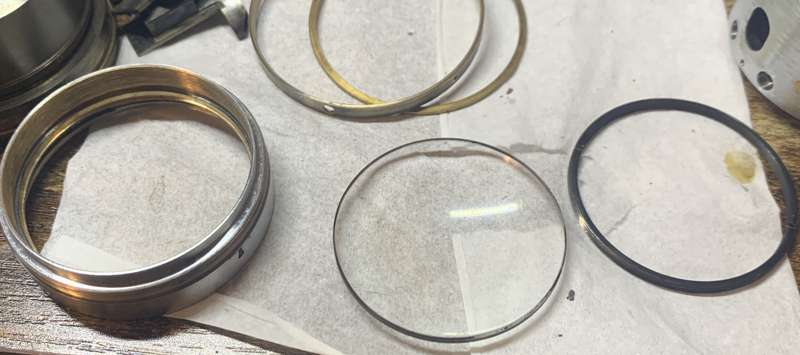
The front element can be removed by unscrewing the retainer ring with a lens spanner. Be careful not to scratch anything.
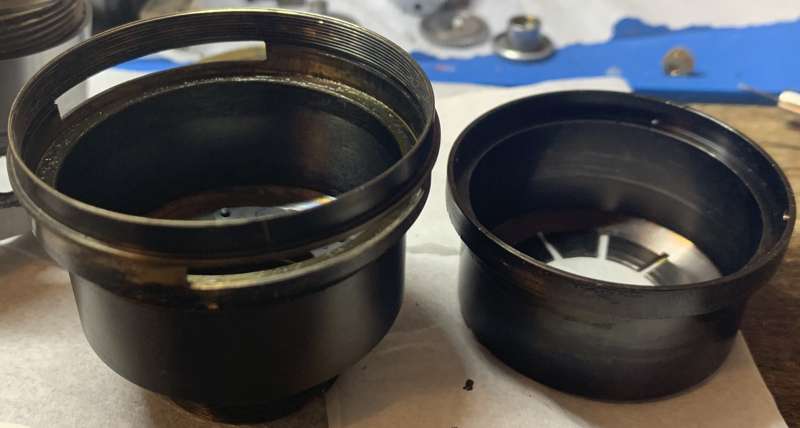
If you have extracted the 2 screws before it’s trivial to dismantle the iris mechanism, all you need to do is pull out the diaphragm cup and you’re all set. It’s similar to the Nikkor-P•C 8.5cm f/2 (Nikon S-Mount) in this regard.
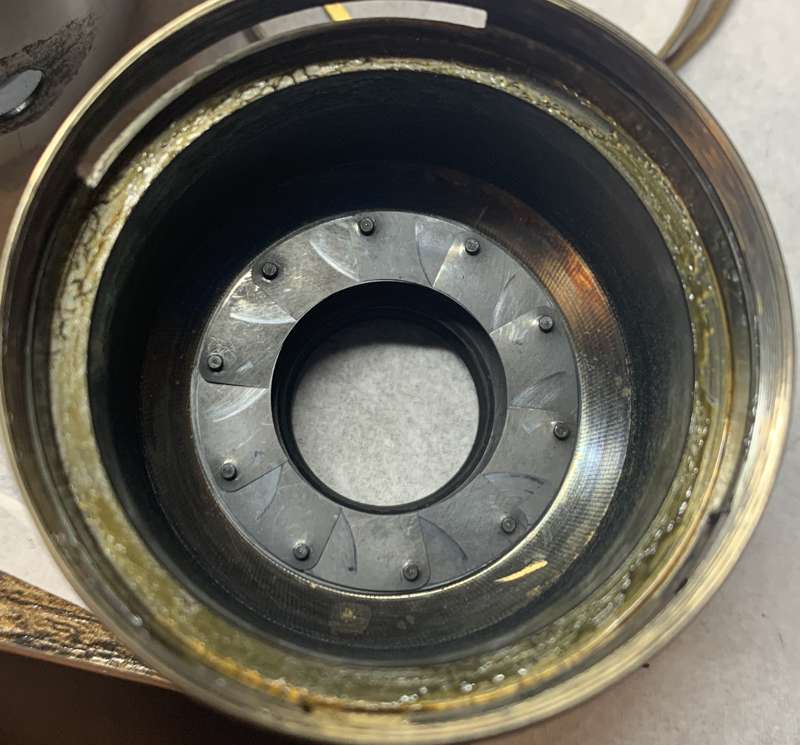
Take a look at the blades and remove them all by tapping the rear of the lens so they’ll drop on top of a soft towel to prevent doing any damage to them.
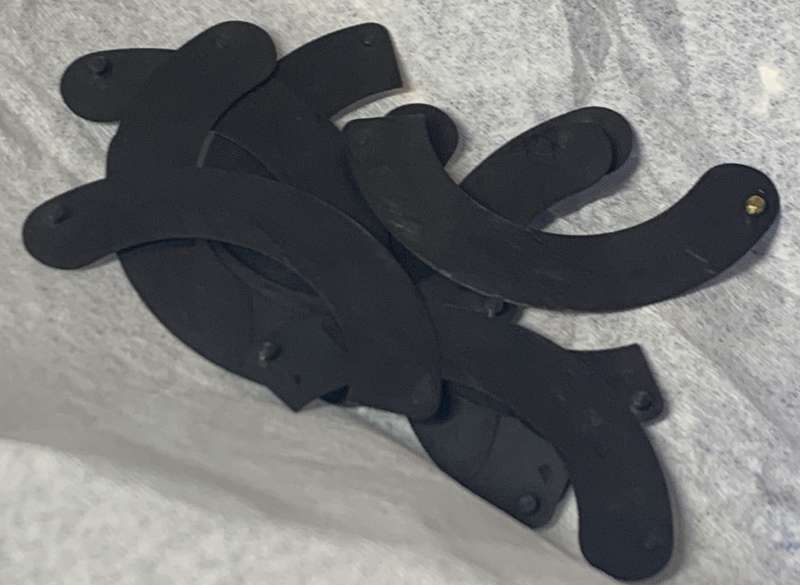
I cleaned them all up individually before putting them back together again which took me some time but I am used to it by now. It is not the most difficult design to work with.
Clean the glass as needed, if your lens has fungus just read my article on how to remove lens fungus. Follow it well and thin it out with water so you won’t damage the coating. You won’t need to lubricate the iris at all as it’s designed to operated dry. If ever you need to lubricate it, just dust it with graphite powder and that should do the trick. Just make sure to blow off the excess.
Conclusion:
Wow, I thought I knew everything about this lens but I was wrong! I learned that earlier batches were made a little differently with a little surprise where the front part is secured by grub screws when I am used to not seeing any of them at all. Being familiar with this lens allowed me to service everything in a night, but I had to spend some time to allow the paint to dry. You see, the markings were so old and the paint chipped off while I brushed the front ring with soap and water, leaving me with an alphabet soup! This is disappointing because I skipped the ultrasonic cleaning in order to be gentle but I ended up with having to repaint everything! This is just the way things are. If you are curious, read my article on painting lettering so you’ll know how I did it. I am just happy that I am able to present to you a very early example of this legendary lens and in Leica mount, too! This will give you more insight of how things were made back then compared to the later ones that are easier (and cheaper) to find.
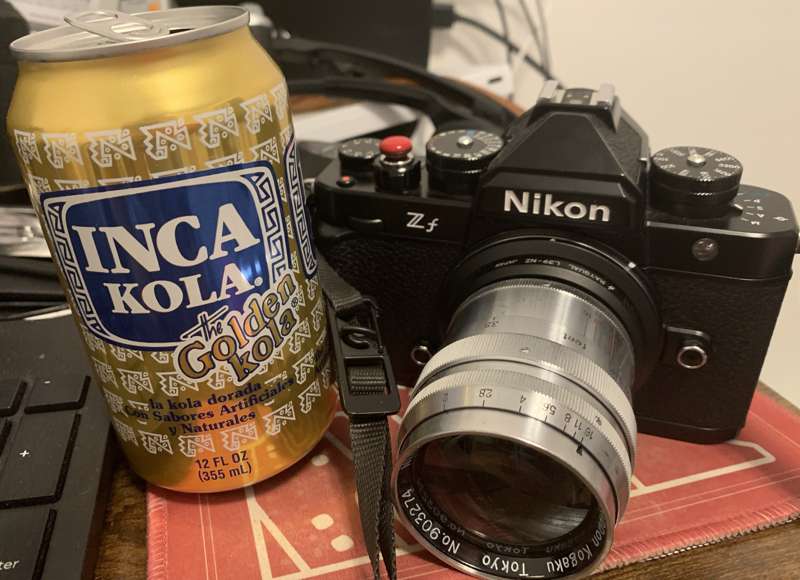
What a magnificent lens! There’s only a few lenses that I’d bring to a shoot today that’s made in the 1950’s and this is one of them! It’s exquisite and deserves to be used more by serious photographers.
That’s it, I think this is the last of the 8.5/2 Nikkors that I will ever cover, that’s all there is to it and there’s nothing else more to see about this lens family apart from minor variations of the same theme. I am happy to present to you all there is to know about it. If you like what you see, please consider leaving me a tip. It’s not much, but it helps a lot because it keeps this site running. Not only that but you’re helping me offset the cost of purchasing, processing, and scanning film which isn’t the cheapest now. Just yesterday I spent around $130.00 dollars to get 2 rolls done and buy 3 of the new Kodak films that were repackages from the old formulas. It is not what I would consider cheap because that amount is what I pay for 2 week’s worth of groceries for my family! Shooting with film isn’t cheap anymore and I do not like where it’s heading. People who say that shooting film is cheaper than digital needs to get an appointment with a doctor. Anyway, al I am trying to say is your support is really helping this site a great deal. I would not have been able to keep this going on for more than a decade if not for your help. That is my motivation, to keep enthusiasts excited and to help keep the craft alive. Where else can you see reviews, commentaries, and a repair article all in a single page? Nowhere! See you all next time again and keep healthy! Stay away from drugs except from homegrown organic weed! Happy shooting!
Help Support this Blog:
Maintaining this site requires resources and a lot of time. If you think that it has helped you or you want to show your support by helping with the site’s upkeep, you can make a small donation to my paypal.com at richardHaw888@gmail.com. Money isn’t my prime motivation for this blog, I believe I have enough to run this myself but you can help me make this site grow.
Leave me some tip?
Thank you very much for your continued support!
$2.00
Helping support this site will ensure that it will be kept going as long as I have the time and energy for this. I’d appreciate it if you just leave out your name or details like your country’s name or other info so that the donations will totally be anonymous. This is a labor of love and I intend to keep it that way for as long as I can. Ric.

