Hello, everybody! I had dinner and the star was the stew we had last night. Many people don’t know it but I’m quite the cook, too. I sometimes leave a stew to ferment overnight and serve it to people. The result is better since you give the gravy enough time to marinate the meat, tenderizing it. You’ll also notice some enhanced flavors depending on the spice you used. There are times when something gets better when you reheat it. Nikon knew that as well so they updated some of their classic lenses and sold them as new.
Introduction:
The New-Nikkor 105mm f/2.5 was made from 1974 to 1977 as an upgrade to the Nikkor-P•C. 105mm f/2.5 Auto. The optics remained the same but a new barrel was designed for it. Nikon updated the majority of their lenses so the brand’s image look modern, most of the updates are merely redesigning of the barrels but some came with totally-new optical formulas. This new line of lenses are called “New-Nikkors” or simply “K” versions which stands for “kai” (改), it means “modified” or “improved”. The New-Nikkors all have the now-standard rubber grip, fewer bare-metal surfaces and a modern look. I love these lenses as they’re quite tough, certainly a lot tougher compared to the later Ai-S ones.
It still feels quite dense despite losing the all-metal construction of the older version. The rubberized grip makes it easier to use in colder climates, your fingers won’t feel uncomfortable touching it. The one shown here does not have an Ai-ring so you shouldn’t mount it on a Nikon that has a rigid Ai-tab, doing it will damage the camera and it will cost you a lot of money to fix it.
Adjusting a lens’ focus is important. If it couldn’t focus properly to infinity it won’t be useful at all and the distance and depth-of-field scales do not mean anything. I will show you how to do this properly using simple tools under a DIY setting. This article is mostly relevant to manual lenses, autofocus ones are calibrated in the same manner but the guidelines differ a bit.
What’s Happening:
A lens’ ability to focus at infinity accurately is important. The depth-of-field and distance scales rely on that. You couldn’t do hyper-focus without it. You should be able to get it to focus on something distant such as the moon and the results should be sharp and the infinity symbol should be centered. It’s crucial for a lens to do this accurately specially if it’s longer than 35mm. It’s pointless to use a telephoto lens that couldn’t do this properly. Some lenses were designed to focus-past infinity so you could turn it beyond the infinity symbol. I usually see this for longer telephoto lenses, it is for compensating the resulting difference when certain lens elements expand when they are hot. Some optical glass expand when used under-the-sun for a long time so this was done in order to make the scales relevant when this happens. This does not apply to autofocus lenses, they focus-past infinity since the camera and its autofocus module will focus it accurately for you. The slack is only to give it more room to work with.
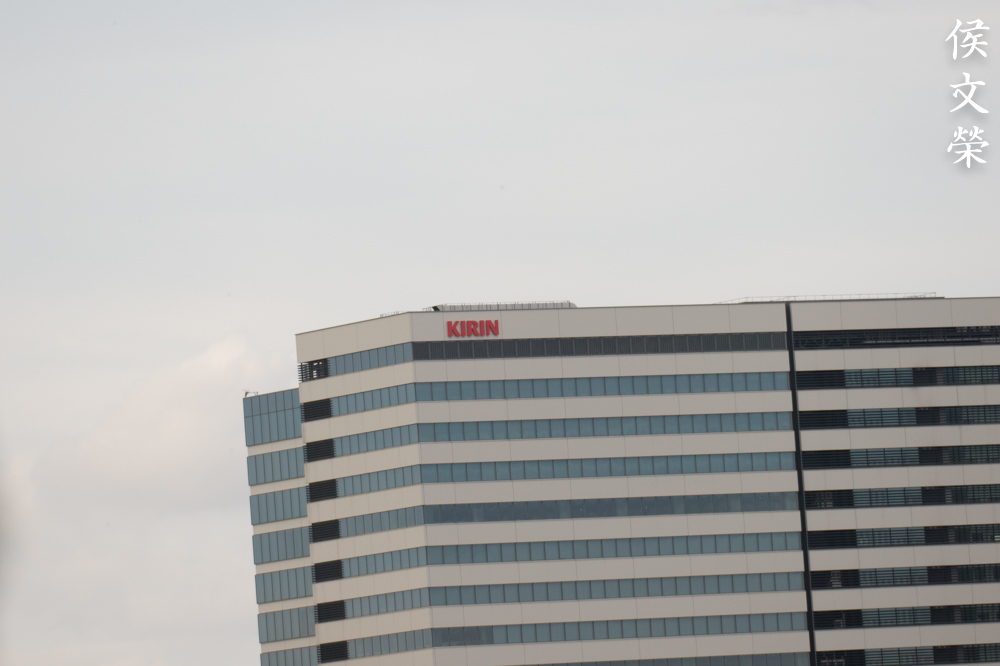
Manual lenses need to be able to focus at infinity accurately. This building is about 1.2km from where I was. This is not enough, look for test subjects that are distant such as communication towers that are close to the horizon. The moon is also fine but it’s not always possible to see it clearly. A wider lens is going to be a lot more forgiving since the wider depth-of-field will be able to compensate for any inaccuracy.
How important is this? If the lens actually focuses at 5m then it should show the same information on the scales, too. The scales should accurately reflect it since there’s no way for you to view things through the film aperture. The advent of mirrorless cameras and live-view helped somewhat but those are not solutions to the problem at all.
Hello, everybody! It’s starting to get cold here in Tokyo as we get closer to December. The temperature is beginning to get too cold for me to develop at home so I use this chance to digitize my film instead. Today, I am going to show you my film digitization workflow. I’ll also be sharing with you any settings that I use in post and I hope that you’ll like this one.
Equipment:
I’ve been getting questions on how I digitize my negatives using Nikon’s Picture Control. Hardware-wise, the technique that I use seems to be pretty popular and it was pioneered by somebody else nearly a decade ago but what makes what I do a little different is the use of Nikon Picture Control to invert the previewed images on the LCD. This makes this tedious task a little easier because you can gauge how much light you need to illuminate your negatives. I am not saying that this is the best way to do this task but I just want to show you guys a slightly different way of doing things that may appeal to some of you.
In order to digitize your slide using the technique I use you will need these:
Nikon DSLR (ideal) but any digital camera with a TTL view will do.
Flash that you can trigger remotely.
Macro lens that can reach 1:1 magnification.
Sturdy tripod.
A setup to hold/secure your film strip or slide.
This is how everything works together. The macro lens has to be capable of achieving 1:1 magnification so you can fill the frame. The Nikon ES-1 is handy for digitizing mounted slides but I use a modified one for my strip film or else the spring on the stock Nikon ES-1 will ruin my strip film. Finally, a Nikon SB-700 flash is used to provide the high-powered illumination required for this kind of job. You can swap the tripod with a copying stand if you prefer to do it that way. Check out my article on the Micro-Nikkor-P 55mm f/3.5 to know more about the lens in the picture. I love this lens for this kind of work.
Hello, guys! A few weeks ago, I made a short post showing how the Nikon D850’s negative digitizer mode work. My iPhone’s video wasn’t working properly at that time that is why my accompanying video didn’t have any audio so people have to read my commentaries to get what’s happening. I would like to make it up to you so I went to Nikon’s office this afternoon and borrowed a Nikon D850 so I can show you how this feature works and this time I brought along with me a frame of C41 negative to use as a sample to help you guys see what’s really going on. There are many quirks on how this thing works and I really hope that this video will help shed some light on this feature.
Please forgive my speech, I have sore throat today that’s why I pause from time to time. More
Hello, everybody! I’m busy lately so I am writing a short blog post this time. Today, we’re going to talk about making a special tool to remove the lock/retainer for the A/R ring. It’s the ring or collar around the shutter button of the Nikon F, Nikon F2, Nikon SP, Nikon S3 and the Nikon S4. This ring is notorious for being difficult to remove as you will require a special tool to remove it and many beginners (and even “professionals”) botch this job by using the wrong set of tools to remove this. I will admit that I also botched my first try by using poorly-made tool that I DIY’ed but thankfully the damage wasn’t severe I ended up with some scratches instead of terrible scars on the surface of the A/R ring. I do not wish for that to happen to you and that is why I started this blog.
The A/R Ring has a retainer that has 2 slots milled on it. Many people botch this by using brute force to remove this with inappropriate tools such as a pair of screwdrivers,etc. It’s used for switching between “advance” and “rewind” that’s why it’s called the A/R ring. On the Nikon F2, this part is used to switch between T or L (locked). More
Hello, everybody! My stomach wasn’t feeling very good this afternoon, I ate some cheese risotto with some very spicy chorizo slices. While this may seem to be an odd combo, it tasted very well because the spiciness compliment the sweetness of the cheese very well. In our lives we will encounter many such odd-combnations that work so well and today, we will talk about an odd combination that worked really well – Bronica and Nikon!
Introduction:
Today, we wil be covering a rare topic, the overhauling of the Bronica’s special helicoid! I didn’t find any good references online so I hope that this will help you fix yours. This is a rare topic and this should show you how this thing really works. There are people who’ll claim that there are no provisions for adjusting the focus on this thing but this article is going to show you how to do it and dispel this myth. Let’s go on a Bronica ride!
My Bronica S2a looks really compact because the Nikkor-P 75mm f/2.8 lens is small. If you think that the lens comes with its own focusing unit then you are wrong. Earlier Bronica-fit lenses don’t have any focusing units so you will need a separate helicoid to do that for you. The grease on the helicoid will sometimes get gummed-up and this is going to be our subject for this article. I don’t see any good references for this so I decide to make one. More
Hello, everybody! The days went by really quick as we approach the end of the year and I was looking at my photo archives from a few years back and found some pictures of the Nikon Df launch done in November 2013 and thought that you might be interested to see these. I am not sure where the other pictures are but I will update this blog post as soon as I find them so please come back to my blog to see if something new was published.
This is what the reception looked like. Of course, the pretty receptionists are a must in a product launch. Maybe they can hire me next time for the ladies? What do you think? More
Hello, everybody! I’m looking forward to a nice bowl of Vietnamese noodles today. I like it a lot, the soup is clear, light and tasty thanks to herbs. This is a great treat for somebody who works to hard. It gives the nourishment that I need in order to keep my brain working. Today, we’re going to talk about an interesting lens that is also light, clear and satisfying. Come with me and let us know more about this amazing lens.
Introduction:
The W-Nikkor 3.5cm f/1.8 debuted in 1956, it was the fastest 35mm lens ever made. Most things that were introduced as the “world’s first” usually have a few issues with regards to design and operation but this one is an exception because Nikon got everything right. Its performance, style and handling are all excellent and it paved the way for future Nikkors in many ways.
This is one of the first black Nikkors, it’s a sexy-looking lens. The style of the barrel looked really modern so it got carried-over to the F-mount Nikkors. It has a rather large filter size of 43mm since it has a large front element. It’s a bit of an oddity for Nikkors at that point.
Hello, everybody! Here in this blog post, I will show you how to access the Nikon D850’s unique “Negative Digitizer Mode”. Now, I would apologize for the lack of sound on my video because for some reason my iPhone picked up nothing. So I was talking loudly making sure that you will hear what I was saying but once I got to see the video I was disappointed to find that no sound was recorded! This is probably good news for people who dislike my bastardized “Commonwealth English” accent. Again, my sincerest apology! I will make up for this!
I have been digitizing my negatives using DSLRs for some time now. I have been using the Nikon Picture Control so I will get a positive image when I preview my capture on the camera’s LCD. While this works well with monochrome pictures, I wasn’t very happy with this workflow when it comes to C41 process films due to the heavy amber tint and this requires more time and effort to fix in post but I have gotten used to it somehow (unfortunately) by now and Nikon rocked the boat so to speak when they implemented the new Negative Digitizer Mode. More
Hello, everybody! Today, I am going to show you how I fix dented front rings with a lens vise! Dings on the front ring can be caused by dropping a lens or having the front of the lens hit something really hard when you are not mindful of your gear. I usually will not bother with lenses with these kinds of damage because there is a big chance that other things are damaged by the shock. Imagine, the force is strong enough to dent metal so it’s common sense that other more fragile things inside the lens or camera might have been knocked-out of tolerance. Glass elements can be knocked-out of alignment and sensitive assemblies can be thrown out of sync. If you know how to fix these or you don’t mind at all then this is how you can fix the ding on the front ring and enjoy your dropped lens.
Here is a terrible example of a dented filter ring. The threads were ugly and mangled. Its lip are irregular because the previous owner attempted to correct it by using brute force. There are scratches on the outer surface of the ring and that is probably where the pliers or whatever he used sunk its teeth on it. The serrated nature of the scar is a telltale sign. More
Help support this site by donating to richardHaw888@gmail.com over at Paypal! If you want to buy me a beer or a roll of film then that would be great,too!


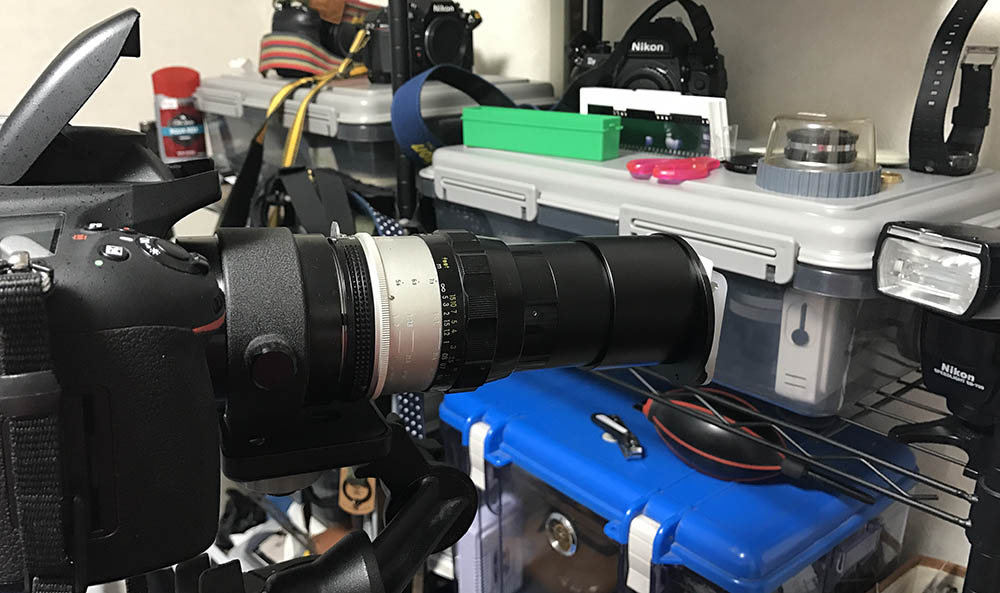 This is how everything works together. The macro lens has to be capable of achieving 1:1 magnification so you can fill the frame. The Nikon ES-1 is handy for digitizing mounted slides but I use a modified one for my strip film or else the spring on the stock Nikon ES-1 will ruin my strip film. Finally, a Nikon SB-700 flash is used to provide the high-powered illumination required for this kind of job. You can swap the tripod with a copying stand if you prefer to do it that way. Check out my article on the
 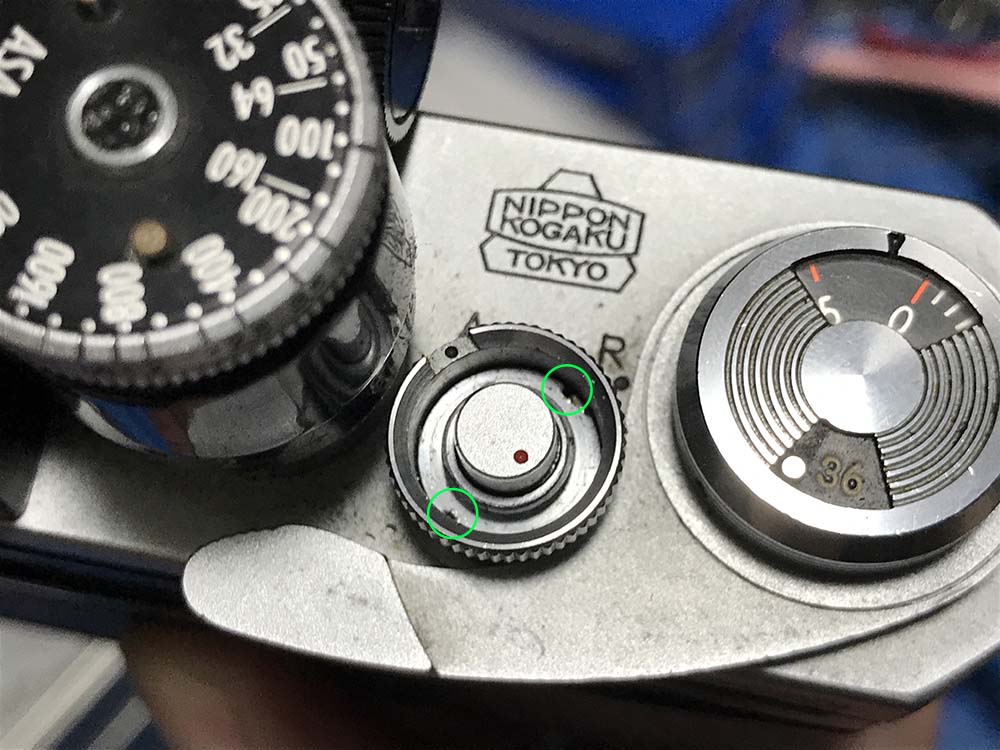 The A/R Ring has a retainer that has 2 slots milled on it. Many people botch this by using brute force to remove this with inappropriate tools such as a pair of screwdrivers,etc. It’s used for switching between “advance” and “rewind” that’s why it’s called the A/R ring. On the Nikon F2, this part is used to switch between T or L (locked).
  My Bronica S2a looks really compact because the Nikkor-P 75mm f/2.8 lens is small. If you think that the lens comes with its own focusing unit then you are wrong. Earlier Bronica-fit lenses don’t have any focusing units so you will need a separate helicoid to do that for you. The grease on the helicoid will sometimes get gummed-up and this is going to be our subject for this article. I don’t see any good references for this so I decide to make one.
  This is what the reception looked like. Of course, the pretty receptionists are a must in a product launch. Maybe they can hire me next time for the ladies? What do you think?
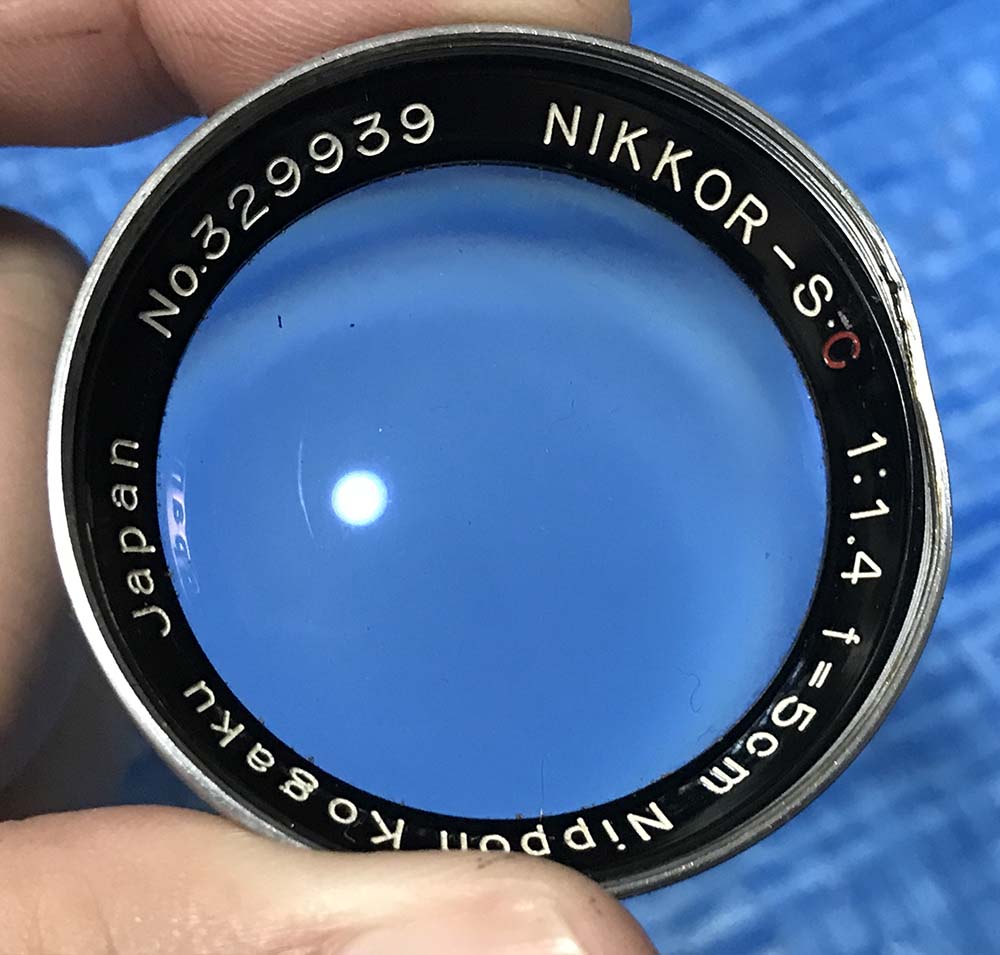 Here is a terrible example of a dented filter ring. The threads were ugly and mangled. Its lip are irregular because the previous owner attempted to correct it by using brute force. There are scratches on the outer surface of the ring and that is probably where the pliers or whatever he used sunk its teeth on it. The serrated nature of the scar is a telltale sign.
