
Hello, everybody! I got back into smoking again after quitting it for 5 years. It has always been on-and-off for me but this time, I’m using the “heat-not-burned” type where tobacco is heated instead of burned. The most popular one sold here is the IQOS. It’s by far the most popular model because of the cost and availability, it is not the best option so mine is now up for sale. In the long run, you end up spending more on tobacco because of bad design decisions made by Philip Morris. This is what I would call “false economy”, you are given an impression that you save plenty of money but at the end you actually spend lots more. That’s the reason why GLO, is slowly kicking the IQOS out of the market. It’s much better designed and is the best option in the “heat-not-burned” market. I’m not endorsing you to start smoking but instead I want you to quit! While we’re on the topic of economy, I will show you a good lens that’s hyped-up as being inexpensive but is really going to cost you more in the long run, a good example of false economy.
Introduction:
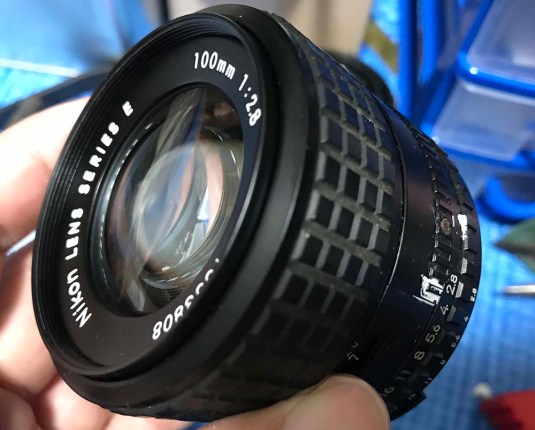
Today, we’re going to look at the Nikon 100mm f/2.8E lens! This lens belongs to the cheap Series E line of lenses. Series E lenses were made by Nikon for the budget conscious. They really had great value way back when they were introduced with the cheap Nikon EM. If you guessed that the “E” in Series E means “economy” then you got it right. The Series E line and the Nikon EM were made for ease of use, light weight and economy. This family of Nikon products were aimed at women who are fussy at the size or weight of their gear and ease of operation is important. Now, before branding me as sexist remember that this was the late ’70s. Maybe society is indeed sexist because cameras are still designed to satisfy these parameters today and much of the mirrorless segment shows this (ie: Fuji X-A line).
 Series E lenses are generally compact and lite, the Nikon 100mm f/2.8E is no exception. Its weight is almost half of the equivalent Nikkor, is just as small as some small primes and was decently made to satisfy Nikon’s marketing and accountants. They’re pretty good but not Nikkor-good.
Cost-cutting can be felt everywhere in this lens, from the feel in your hands to the internal components which we’l be seeing soon in this article. Nikon’s marketing saw that people were buying the plastic products made by other brands and thought it’s a great idea to make some themselves. The public’s perception of Nikons back then was rugged, reliable but heavy. While these may appeal to professionals which Nikon has always gave more importance to, this alienated the larger portion of the market that comprise of children, amateurs and again “women” or customers who just want to have a reliable but easy to operate system. Nikon prides in the reliable and rugged part so the Series E was born to differentiate it from the main line. It went as far as not using the valuable trade name “Nikkor” on the Series E. It’s a very wise decision because these aren’t up to snuff when you compare them to a lens that was built to the Nikkor standard. This isn’t saying that these lenses are bad, in fact they’re just as good but simply “not there”.
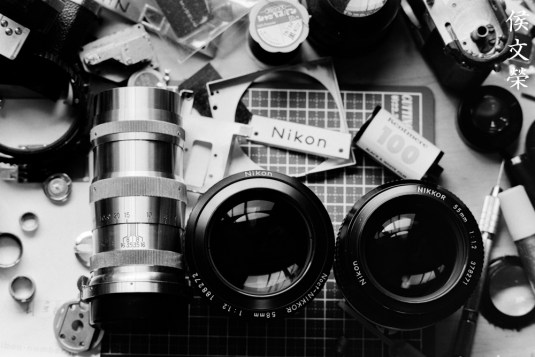
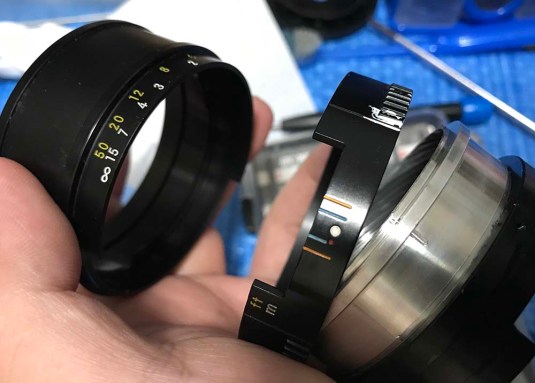
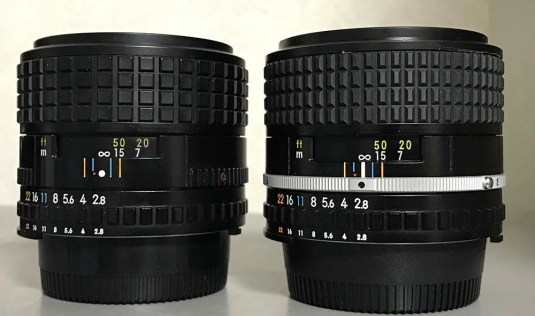 Here are the two known versions of this lens. The later one has a metal grip and the styling was made to look more like the top-shelf Nikkor lenses. This change was done because a lot of people complained that the Series-E lenses look like toys! The lens to the right was donated to me by one of our readers and site patrons. Thank you very much, sir!
They’re good enough that many professionals use them because they were small and lite, had reasonably good optics and were cheaper (back then). In fact, the legendary landscape photographer Galen Rowell used some and he advocated the hiking photographer lifestyle that he pioneered. If you hike, you will know that weight means a lot! I hiked a little bit and I can tell you that you will feel that extra 100g after a day in the trail.
 Here it is on my Nikon Df. Notice that it is no larger than an 85/2. It balances well on most cameras without a grip. Never handle this lens by the throat of your camera as the lens is mostly made up of plastic and doing it will wear it down. Check the name on the ring, the name “Nikkor” is not there! If you ever see one, show it to me!
 All that plastic and cheap rubber on the grip angered many Nikon users and so the later ones were made with a metal grip and the rubber was made to the same spec as the ones used on the Nikkors. Accountants only sees things in numbers, unfortunately. Handling is pretty good despite the cheap feel of the barrel and what I like the most is the longer focus throw of the lens. The Series-E lenses generally have shorter focus throws but this one will allow it to be precisely focused due to its longer focus throw.
The lens’ optical design is fairly simple, it’s just 4-elements-in-4-groups. This help the lens’ optical performance because less glass means richer colors in most cases. It is amazing how the Nikon engineers calculated this lens to use as few elements as possible to cut cost yet still designed a lens that performs quite well.
In modern context, this is still a great lens despite its age but saying that this is the more economical option is like saying that eating fast food often saves you money (you’ll later spend that money on medicine). “Experts” gave this lens rave reviews and used prices now reflect that. In fact, these are usually priced higher than the Nikkor equivalent! I hope this article will save many people money by showing that you are actually being suckered into buying into a lens that is probably worth $40 less than what its ebay price is. This is a “buyer’s market”. There’s nothing wrong with that but let’s find out what’s the real deal in this article.
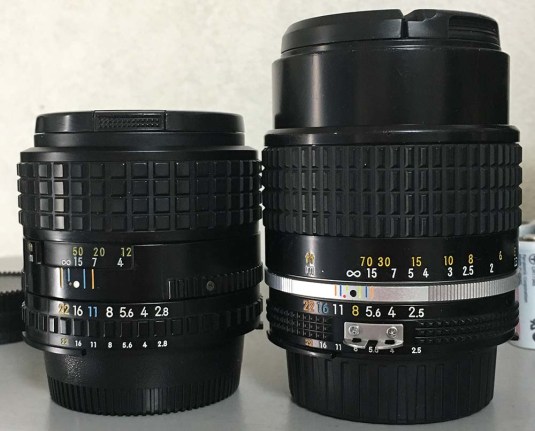 The Nikon 100mm f/2.8E is smaller and lighter when compared to a Nikkor 105mm f/2.5 Ai-S. It’s apparent in this picture that the lens to the left is made from inferior materials. If you point the Series E lenses to the sun and look at the viewfinder, you will notice that the contrast is poor and it flares very bad. This is due to the inferior coating used and I guess that not all surfaces were coated. The coatings are also less resilient to fungi. Don’t ask me how I knew this but I found this out for myself painfully, my wallet was crying.
Ok, so if you’re telling us that the Nikkor is much better then what is exactly different, you ask. Well, the closest Nikkor equivalent to this is the 105/2.5 line of lenses. You get better build in the form of an all-metal chassis, better coatings, slightly better performance that you’ll notice when you pixel-peep, smoother bokeh and of course, prestige. I don’t have a side-by-side test with me now but trust me on this. Maybe I’ll do one when I’m not busy. Again, I am not saying that this lens is bad. Just want to make myself very clear. If you have been reading my blog or have shot with many Nikkors then you’ll know what I mean if you see the sample pictures.
Let’s now see some pictures that were taken with this lens. It’s important to know how a lens performs in order to maximize its use. You will know how to avoid its weaknesses or use them to your creative advantage. You’ll also know how to exploit its strengths which is key to using this effectively.


(Click to enlarge)
Here are some pictures with this shot wide-open and stopped-down. These pictures were shot from f/2.8, f4, f/5.6, f/8 respectively. Wide-open, what’s in focus is sharp and stopping it down won’t improve much apart from giving you more resolution, the bokeh quality looks pleasing. By f/4, your subjects sharpen up a bit and you can say that it’s pointless to stop the iris down any further if all you want is sharpness. The depth-of-field gets deeper as you’d expect it so the reason for shooting it at f/4 is to get more things in focus. If you want both eyes of your model in-focus then this is what you should do. Her eye (assuming her gender) on the short side of the face should be sharp and reasonably in focus at this point. You get this while still maintaining the smooth look of the bokeh. Though the background is starting to lose its blur at this point, it is still enough to blur it somewhat. At f/5.6, it is already at its peak at the cost of the background’s blurriness because they’re now more in focus. Shooting the lens at f/8 is a waste of effort because it now looks plain and unexciting. Why bother, just use an iPhone!
If you’ll recall my article on the RF-Nikkor-P.C 8.5cm f/2 RF or others I wrote on this blog I mentioned that a lens that changes character as you stop the iris down is an asset because you can have a single lens that renders with different characteristics. This is nearly always true with faster lenses in my experience and we don’t see much of that here because of its moderate f/2.8 maximum aperture. This will also depend on the lens’ focal length because the Nikkor-P 180mm f/2.8 Auto can also exhibit that desirable ability thanks to it’s longer focal length.


(click to enlarge)
Here are some photos with this focused on things that are closer at less that 2m. I can see that the harsh transition is now gone and it is so much better in this regard. The bokeh is smooth and nice but can be a bit “unrefined” on some parts. Now, f/2.8 cannot be considered fast for a prime like this but it’s enough to give nice subject isolation. Knowing how to use a lens and when is the key to maximizing your lens and these sample shots should help you decide which scenarios you would like to use this for.


(click to enlarge)
Here are some sample with using the Nikon Df. These photos were shot in mid-range of around 10m or so. Notice the “wall of focus” where everything is soft and unfocused but it is very abrupt when it reached the focus plane? This is my main complaint for this lens. Some people may like this but not me. Although pleasing, I find this too harsh and most Nikkors do not do this and the transition is very smooth. I am not sure what’s the cause of this but on the bright side, the lens gives a nice 3-dimensinal feel to its pictures. To really appreciate this, zoom in to the last photo of the girl with the bleached hair and note how high the contrast is on her head/hair. As for what is bad, check the white embroidered design on the kimonos. Notice that it is being flooded with chromatic aberration. While not really ugly, I would want it to be less than this. Again, notice the beautiful 3-dimensional feeling on those pictures. The pictures were all shot wide-open at f/2.8 by the way, just want to make this clear to you.
Let’s now see some pictures that were taken using film. Film has a different look compared to digital and it looks unique because of grain. This makes it impossible to simulate the unique look with digital and that’s the reason it’s good for us to see these pictures as they will give us a more holistic view on how this lens performs. This lens was also made for film and it’s going to be nice to see how it performs using its intended medium. I took these using a Nikon F6 loaded with Fujifilm Industrial 100.
 Very nice when it comes to sharpness wide-open but the bokeh quality isn’t as smooth as I want it to be. It looks “clumpy” to me. Foliage and twigs will easily show if a lens has good or bad bokeh quality and I use this as a kind of simple test when learning to use a lens.
 Really sharp wide-open. At closer distances, the character of the bokeh is smoother because you’re closer to your subject. You’ll notice that this will not look as smooth when the subject is a bit further from you. This is how you can avoid the clumpy-looking bokeh if you have foliage in your scene.
 Spherical aberration can be observed in this picture because the brighter parts of the scene are contrasted with dark elements beside them. Stop the iris down a bit if you’re bothered by it.
 The 100mm focal length is great for taking candid shots like this. This photo was taken wide-open and it’s amazing how sharp this lens is. It also appears that the field curvature of this lens is rather flat or am I just imagining it.
 Shooting this lens at f/4 will enable you to have more things in-focus. You’ll also notice that sharpness doesn’t improve much from here as you stop the lens down further. The rendering of the skin feels so-so to me, I have seen a lot of better samples from Nikkors when it comes to how a lens renders the skin of my subjects. It’s not bad, but it’s not what I would call excellent.
 It is a great portrait lens if you ask me despite the less-than-average quality of the bokeh compared to the likes of the New-Nikkor 105mm f/2.5 and other lenses from that line. Sharpness is of course, excellent but resolving power is somewhat lacking a bit, specially wide-open like in this picture. Despite it looking nice, I would say that there’s a certain “cheapness” to the feel of this picture when it comes to rendering. Do you feel that, too?


(Click to enlarge)
Flaring will be a problem for this lens when shot wide-open. It’s something I don’t see much of with the Nikkor 105mm f/2.5 Ai-S. Contrast is poor so you end up with a washed-out picture. The good news is you can use this flaw to your creative advantage and give your pictures a more “natural look”. Many people are attracted to this and try to emulate this using filters.


(Click to enlarge)
Here are more pictures showing how this lens renders using film. All of the pictures look sharp apart from the one with the purple-haired lady because of the smoke. I imagine that beginners and people on the lower-end of the market value sharpness over how a lens renders so this is probably why the lens was calculated this way. These look great but lacking a bit of “finesse”. I will say that it’s a subtle quality but it certainly adds something to a photo.
Here’s a bonus! Let’s see some black-and-white pictures to make things a bit more interesting. This lens is perfect for black-and-white film because of its hight contrast which I like for taking black-and-white photos.


(click to enlarge)
Here are some sample pictures that were shot with Fujifilm Acros 100 and developed with Rodinal. The 100mm focal length is considered to be a short tele lens and isn’t really used a lot for street photography. In fact, many will tell you that it’s useless for this but this will refute that. Using a long lens for this type of photography is tricky. You do not use this lens to go near but you use this lens to get the compression needed to help you compose your frame and tell a story. The last photo with the dancing lady shows how nice this is when used for portraiture, it still gives great subject isolation despite being moderately fast wide-open. The picture of the old lady should give you an idea on how his lens performs when shooting portraits. The focal length is great for portraiture or candid photography, the flatness you get from the compression helps you frame your subject so that the background doesn’t lose its prominence and becomes too small.


(click to enlarge)
Here are some more samples. The bokeh can be a bit busy at times but it is still generally pleasant. The lens is sharp wide-open but it just doesn’t match the 105/2.5 family of lenses in many ways. The transition areas from what’s focused to what isn’t is also not as smooth as an example. You have to know when to use this lens to get your money’s worth. Bjørn Rørslett has plenty of experience with IR photography and he praises this lens for it, this is really good for the IR photography community and maybe I should try it with my infrared-modified Nikon D70s.
 Here is the lens when shot in its closest focusing distance. If I recall, it does not focus close at all. Many people actually use a short extension ring to fix that, I know some people who love using this lens as a macro lens of some sort. I really love the look of Fujifilm Across 100 with Rodinal. This is a sharp and fine-grained film and Rodinal is a high-accutance developer that’s good for enhancing contrast – a great combo!
That’s a lot of sample pictures and I hope that they’re useful in giving you a good idea on how this lens performs. Having said that, will I recommend it to you? Yes, if only you know what you want with it. For the same amount of money you can buy the Nikkor-P 105mm f/2.5 Auto which in my opinion is a superior lens despite having a very old optical design along with older coating technology. The results are much smoother, the colors richer. If you can spend a little bit more, buy the New-Nikkor 105mm f/2.5 and if you have the money to pay even more then get the Nikkor 105mm f/2.5 Ai-S which has the same optics as the New-Nikkor 105mm f/2.5 but housed in a better barrel with a built-in hood. These are considered to be legendary and they usually cost a bit more than the Nikon 100mm f/2.8 Series-E except for the legendary Nikkor 105mm f/2.5 Ai-S which costs about 2x. I hope that I didn’t offend any hardcore fans of this lens but it is what it is and the photos on my site is the best proof for that. I hope that you do not get me wrong about my opinions on this lens, I like it a lot myself but I just feel that you can get more for the same amount of money that’s why I am clearing the hype surrounding this lens. That’s all for the introduction, let’s now begin with the repair article.
Before We Begin:
If this is your first attempt at repairing a lens then I suggest that you check my previous posts regarding screws & drivers, grease and other things. Also read what I wrote about the tools that you’ll need to fix your Nikkors.
I suggest that you read these primers before you begin (for beginners):
- Essential tools
- Best practices 1
- Best practices 2
- Best practices 3
- Ai conversion
- Working with Helicoids
Reading these primers should lessen the chance of ruining your lens if you are a novice. Before opening up any lens, always look for other people who have done so in Youtube or the internet. Information is scarce, vague and scattered (that is why I started this) but you can still find some information if you search carefully.
I highly recommend that you read my working with helicoids post because this is very important and getting it wrong can ruin your day. If I can force you to read this, I would. It is that important!
For more advanced topics, you can read my fungus removal post as a start. This post has a lot of useful information and it will be beneficial for you to read this.
Disassembly (Lens Barrel):
Just like most lenses that we repaired, we want to remove the objective first so we can safely work on the barrel without worrying about damaging the glass. This lens uses some gimmicks for cost-cutting and we cannot work on this lens the way we do with the usual Nikkors. Do not worry because I will guide you through everything. I’ll caution you against using strong solvents because the lens is made up mostly of plastic or nylon-like material. Never use MEK or acetone with this lens!
One really important thing to mention is you should only use silicone-based lubricants. Don’t use anything petrol-based because of the plastic parts used on this lens. Only use silicone grease for metal-to-plastic surfaces. Lithium grease may be fine but I do not have any information on this so try this at your own risk.
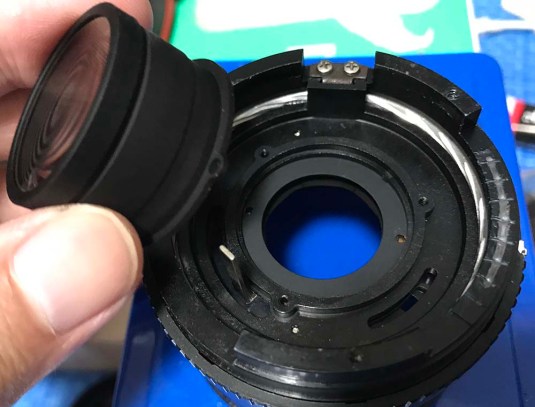
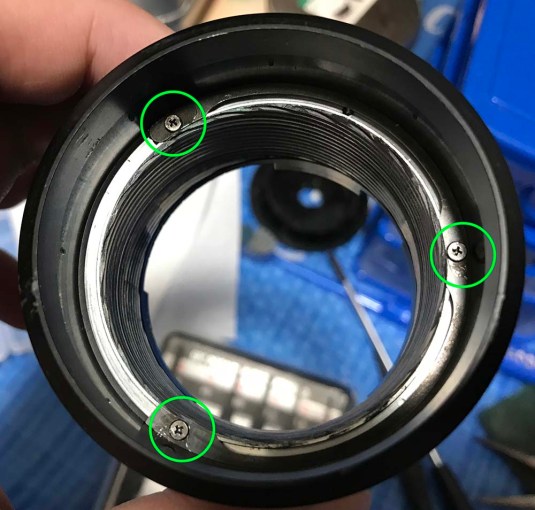
 Remove these 3 screws to remove the bayonet mount. If you are new to lens repair please read my article on removing bayonet screws. Many people get stuck because they stripped the screws. Only use a JIS screwdriver for this and read my article to know the proper technique.
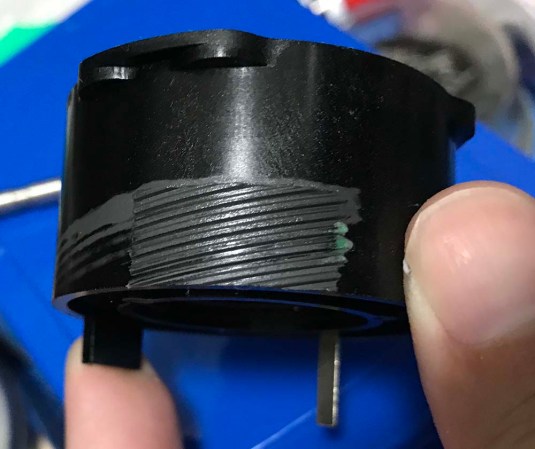
 The bayonet mount pulls-away easily. That long post is the stop-down lever. You do not need to disassemble the stop-down lever mechanism. If it’s dirty, simply clean it with tissues saturated with solvents. If it really is gritty, then you will have to open this.
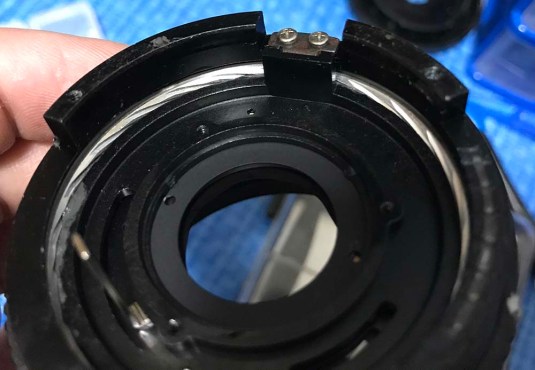
 The stop-down lever should slip into this small slit. Do not forget this when you are going to put the bayonet back. It can take some time and be careful not to damage the iris.
 The aperture ring can be removed easily. Note that the prong’s connected to that long pillar coming out of the iris assembly. At this point, you’ll have the impression that this lens is mostly made with plastic. Like somebody said, Series E lenses are like the toys you get from the bottom of the cereal box. I had the impression that they are the ones you get with a “Happy Meal”. A bit of an exaggeration but you get the idea.
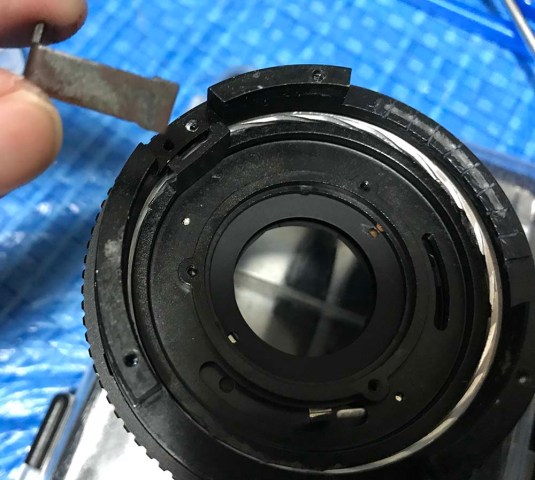
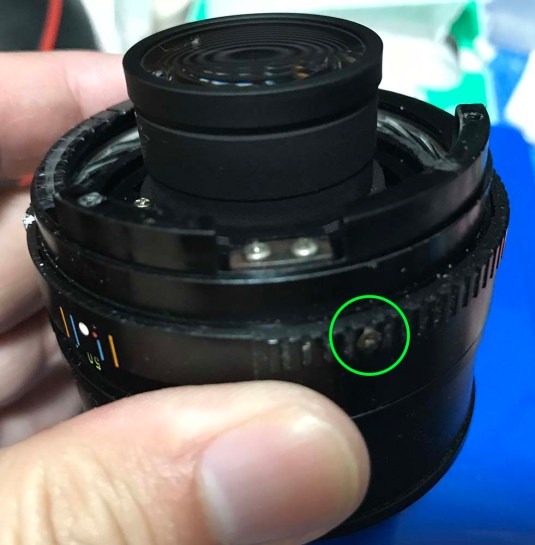 You can remove this screw now or you can remove it later, it’s all up to you. The versions made later have metal grips as opposed to the plastic one you see here.
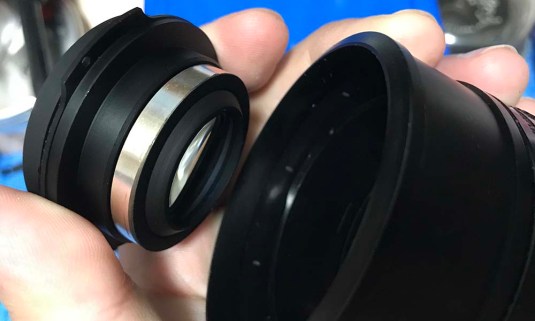
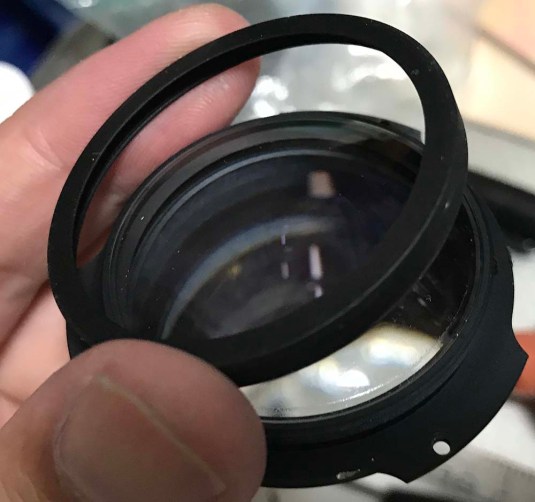
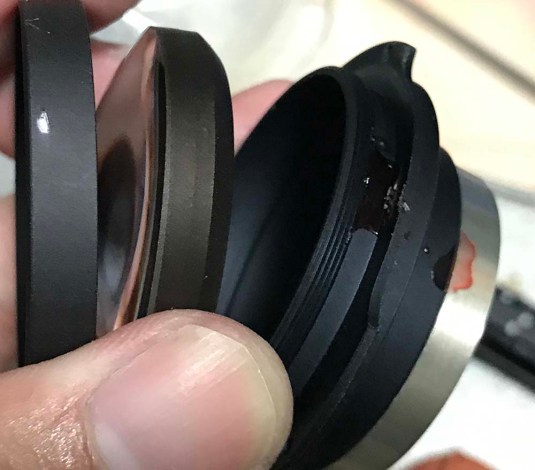
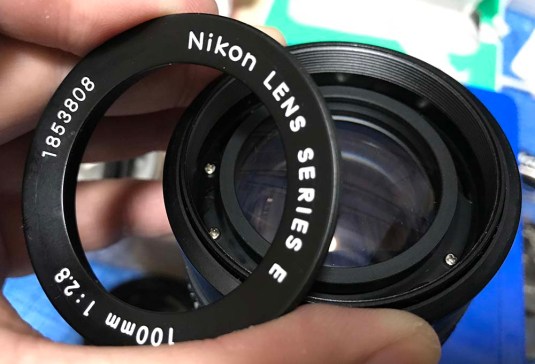 Let us now go to the other end of the lens. The beauty ring can be removed with a rubber stopper. If yours is stuck, try placing a drop of alcohol along the thread and let it soften up the glue there. I doubt that Nikon glued this thing at the factory but repair technicians who had worked on it might do that. This is very easily cross-threaded so be careful with removing this or when it’s time to put it back. Plastic flexes, that is the reason.
 Next, to remove the front barrel, you simply have to remove these 3 screws. Everything’s connected by these screws and 3 thin tabs to a plastic base. The plastic threads drilled on the screw hole will wear very easily and if you get a loose front barrel then that problem came from this part.
 Once the screws are gone, the front barrel can now be safely removed.
 Removing the front lens assembly is easy, just unscrew these but be careful to have this thing facing up or it will drop to the floor.
 The front lens assembly can now be extracted using your fingertips. Keep it in a safe place where it won’t get dirty or damaged. Covering this with clean lens tissue is also a nice idea. The glass is neither big or heavy so you should not have any problems with storing it.
 The rear lens assembly can be easily extracted by removing its screws, 3 to be exact. Again, be careful not to ruin the plastic threads in the hole.
 The rear elements assembly can now be safely removed just like this.
 The helicoids have only a single key to keep it in-sync. Removing it is easy, just remove the screws you see here. Before doing that, it is very important that you take notes and lots of pictures of the helicoids. The Series E lenses have helicoids that are a pain to put back together because the thread is so thin on one of them that it’s easy to make mistakes.
 Again, more pictures and notes just in case.
 Once I was satisfied with my note-taking, I then removed the helicoids’ key. Nikon was really trying to save money here. The helicoid key was not even plated and an inferior alloy was used so it got rusty.
 As of writing, all Series E prime lenses that I have worked on have helicoids that needs to be removed in a specific order with the inner helicoid being the first one that you should remove. This is because the innermost helicoid has tabs that cover a brass ring underneath for securing the focusing ring.
The picture above shows where the inner helicoid separated. I made some marks so that I will remember where they separated because this is also the same position that they’ll mate later. Many get stuck because they didn’t do what I did so they don’t know how to put back the helicoids back. Read my article on how to work with helicoids to know how to properly do this.
 The inner helicoid is completely made up of engineering plastic. The plastic is hard and it is resistant to most chemicals used for cleaning lenses but it is not as resistant to wear as the metal alloys used on true-blue Nikkors. I was not happy seeing thing but whatever.
Its thread doesn’t even cover the whole circumference of the inner helicoid. This is not a good thing and putting the helicoid back can be a little bit of a challenge. I do not know why this was done but I suspect that this has a lot to do with the injection molding technology of the day. The engineers were probably thinking that this will prevent this from being stuck in the metal die because of the undercuts of the threads.
The Inner helicoid also functions as the housing for the objective. If you’re a loyal reader then you will know what I will say next: “If the housing of the objective also functions as a helicoid, grease from the thread will eventually migrate to the iris or to the glass elements surrounding.” Having said this, it is best to not over-lubricate this, apply just enough grease to the threads.
 Now that the inner helicoid is out of the way, you can now remove this ring. Take a lot of notes before you remove it because you would want to put this ring back the same way you removed it. While it may look that the ring can be mounted in any orientation, I will tell you now that this isn’t the case so don’t even try. The brass ring can be removed by removing these screws. Be careful not to damage it because it’s easily bent.
 The focusing ring can now be removed. If you still haven’t noticed, I got rid of the rubber grip earlier but I didn’t mention anything about it. Removing the rubber will not do anything to make disassembly easier, I just got rid of it because I wanted to clean the dirt underneath it.
Remember the screws that I told you to remove early in this article? There are 3 of them and they hold the focusing scale/grip. You cannot remove the focusing scale when the focusing ring is still there unless you separate the helicoids.
 The focusing ring’s bezel is removable. Removing this will make it easier for you to reach the three screws securing the focusing ring. This was glued at the factory with a dollop of contact cement so removing this can be difficult unless you soak this in alcohol for some time.
 It’s finally time to remove the central/main helicoid from the outer helicoid. Again, always note where they separated. Notice how fine the threads look when you compare it to the ones found on that disgusting plastic helicoid? This can be problematic for you later when it’s time to re-assemble because missing a turn will make the helicoids line up incorrectly. Taking plenty of notes along the way will help you later
That’s it for the barrel. It can be confusing but just follow my steps and you should be fine. Things had to be removed in sequence to make it easier for me to follow or take some notes and measurements. Again, this lens can be a pain to put back if you forgot to take notes. Even experienced repairmen can get frustrated with this when they forgot to take notes.
Disassembly (Iris Mechanism):
The iris mechanism is probably the weakest part of this lens and you’ll soon see why. Working with this is easy and you can find your way around it, just use the usual precautions and take a lot of notes.
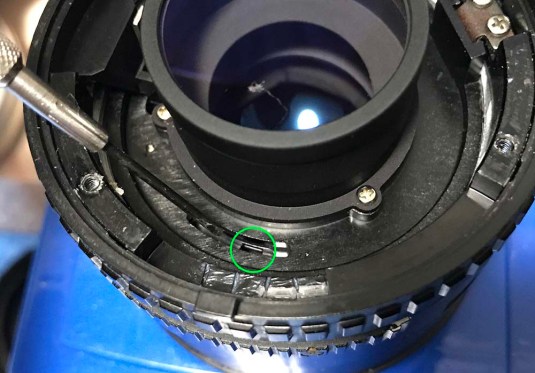
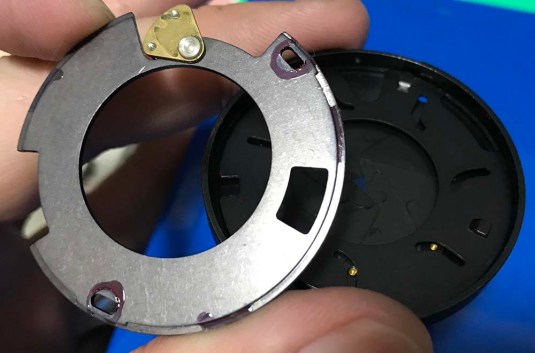
 The iris mechanism can be removed by unscrewing these screws. Notice the purple lacquer that Nikon used to secure it? Break the seal with alcohol and make sure to mark the alignment of the iris mechanism first before doing it. The iris mechanism is adjustable and you want to put it back the same way or your lens won’t meter properly.
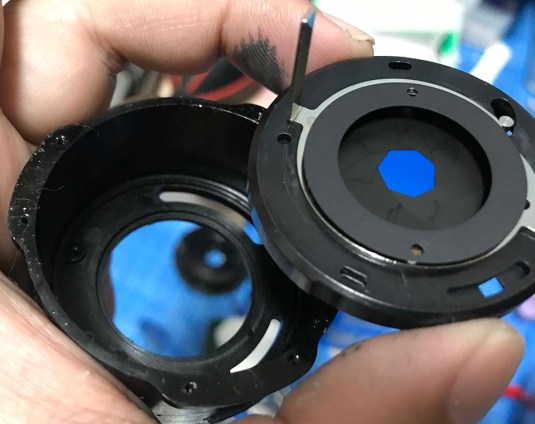 The iris assembly is a self-contained unit and it can easily be extracted with your fingers once the screws are gone. At this point, the iris is vulnerable so be careful with it.
 The plates are only secured with lacquer. This is adequate but it is not ideal, the bar was set really low for the Series E lenses. I took this for reference.
 This plate can be removed by softening the lacquer with some alcohol and using your fingernails to pick it off from the iris assembly once the lacquer has softened. Notice that the hole for the screws are a bit long. They were made like this so you can do your own adjustments to offset the size of the iris. The screw sat dead-center as you can tell from the shape of the screw’s imprint on the lacquer, If I’m not mistaken, what I did was I offset it so that my iris has a wider aperture. My iris isn’t to factory spec anymore but now I have a bigger aperture instead of f/2.8. I am just making these numbers up because I don’t have anything to measure this but you do get what I wanted to say. All of the f-numbers down the line have also been affected and they are not accurate now but this is what I wanted. If you want to put it back to factory spec then put it back the way it was. I should offset my metering by a bit by 0.3-stops in order to get accurate metering with this lens. Maybe this is a bad idea but whatever.
 The rotator plate acts like a pressure plate. It constrains the iris blades to a single plane. If this isn’t seated properly, the blades can move out-of-plane and your iris blades will be mangled as one or more of them jump off-track. Remember how it was oriented before you remove it, it is asymmetrical and orienting it properly later is very important.
 The iris blades are very delicate, you can pick them up one-by-one using a pair of tweezers and only handle them with their brass pegs. Handle them with utmost care.
The iris assembly is not difficult to understand and reassemble but you will want to use lacquer or other non-fogging adhesives to seal it like what they did at the factory. If you want to use “super glue” (cyanoacrylate), forget it. I can’t recommend this at all.
Disassembly (Objective):
Disassembly of the objective is pretty straight-forward. It’s a simple design and you don’t need to worry about hidden surprises. Alway handle the lens elements with care and don’t forget to put them back facing the right way.
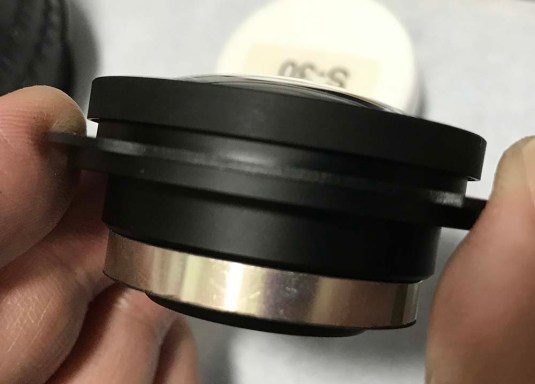 You may want to place a drop of alcohol onto the seams of the front retainer ring and on the shiny metal collar. These were sealed with lacquer from the factory or by the repair guy who had fixed this lens prior to you. Remember not to flood these with alcohol.
 The front retainer ring can now be removed, the lacquer is now soft enough for you to easily unscrew this off. The front element is now loose.
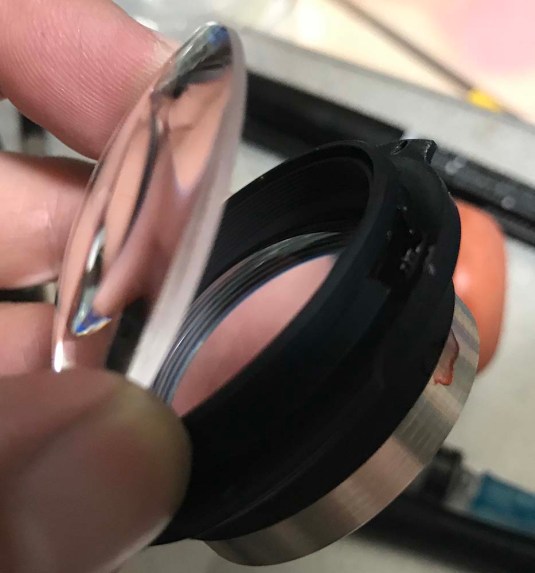 The front element can easily be removed using a lens sucker. Never let this thing face the floor at this point on because everything is now loose and can drop straight to the floor.
 Its spacer and the second element can now be easily removed. Make a small mark or do a snapshot of it to remember which way the spacer should face. In this picture, you will see that the spacer has a mark made at the factory during anodization and it’s enough to remind me of its orientation. For the glass elements, a simple dot on the side wall using a permanent marker is more than enough to remind you which is the front side and you can even place 2 dots to remind you that it’s the 2nd element.
 The collar easily comes off now that the seal has been dissolved. This collar on mine is stuck to the 3rd element. This may not be the case with your lens so be careful when you handle it. Some lenses may have these as 2 separate parts unlike this one. The lens elements don’t look ambiguous at all and you won’t get confused as to which one should face where.
 The rear element is secured by its retention ring. It can easily be unscrewed using your fingers.
 The rear element can now be extracted but don’t forget to use a marker to make a dot on the side wall of this lens element since the curvature of this thing is not very obvious because it’s shallow. I recall that the convex part should be facing forward on this thing but don’t trust my word and always take plenty of notes.
If all you need to do is clean some specs of dust then you can watch a video that our friend Kenneth made. He has many interesting videos so subscribe to his channel and watch all of his videos.
That’s all for the objective! You really don’t need to open this up unless your lens is filthy or infected with fungus. This is not difficult to overhaul but be careful with using solvents or any solution to remove fungi. My method for removing fungus will be OK for this but don’t soak the lens elements of this lens in the solution for a long time because the coating for this lens is easily damaged by my method. The coating used isn’t the tough Nikon Integrated Coating (NIC) used on true-blue Nikkors so it’s not as durable and resistant to chemicals. Again, do not soak it for a long time or thin the solution with distilled water to prevent mineral deposits to form in case you have “hard” tap water.
Conclusion:
We’re almost done with this. This was not a very nice experience because of all the plastic parts. While working with this, I’ll caution you against over-tightening any of the screws because of the the plastic threads. If you strip the threads then your lens has been compromised and things may wobble or fall. This is no exaggeration at all, just look at the front barrel of the lens and where it is secured. While this is just fine for amateur use wherein the lens doesn’t have to endure the abuse of professional use, it is still at risk of damage from bumps and other things. Even if the lens is not being used, it can be damaged while stored inside the camera bag. Pressure coming from the weight of the bag or the up and down motion from walking or cycling may be enough to damage this thing where it is weak. Having said that, the only saving grace for this lens is that it has a good and proper metal mount. Most modern low-end Nikon lenses use plastic mounts. They’re flimsy and crack occasionally. Parts are cheap but you still have to pay the repairman.
While the lens did not provide any challenges and it may be possible for a novice to work on this, I will caution you that taking notes on the helicoids for this lens is important. It’s uneven helicoid design can be tricky at times and confusing at best, even to me.
 Reassemble the lens completely but leave out the front barrel and focus to infinity. Get a modern Nikon camera or an older film camera with a digital rangefinder in the finder to help you calibrate the lens’ focus. It is essential that you use a Nikon camera because the mirrorless cameras with adapters aren’t made to Nikon’s factory spec. Worse, the cheap adapters and even the more expensive ones are usually a bit off and is either too tall or too short so getting it right can be tricky. It may focus perfectly with that setup but it will not focus accurately when you mate the lens to a Nikon camera body. Don’t believe what the mirrorless fanboys say or any hack repair guy who’s only out for profit.
 Now, focus the lens on something distant like a building that is 7km away or more. As soon as your focus indicator dot turned solid, take a picture and check the preview to see if the picture is sharp. Do this several times until you get a really sharp picture of the distant object with the lens wide-open. Next, loosen these to relax the focusing ring. The focusing ring can now be adjusted. Turn the focusing ring until the infinity sign sits right on the white focusing dot in the focusing scale. While doing this, be careful not to knock the lens out of alignment. Once you are done adjusting, tighten the screws and then take a picture of that distant object again. If it is still just as sharp then you did a good job! If it’s off then repeat the steps above until you are satisfied. This is how you adjust the focus of this lens. If the difference is too far to be adjusted this way then you’re in trouble because the helicoids are not in their correct alignment. To know more about focus adjustments, go and read my article on focus calibration.
 Finally, reinstall the front barrel and the beauty ring. I don’t usually do this but I used contact cement to rebind the rubber back to the focusing ring. I love using double-sided tape for this because it is not as messy but I got lazy that day. There are times when I would even skip the adhesives because the rubber grips the focusing ring in a very tight manner. Do whatever you like so long as you use an adhesive that will never corrode the rubber. These are irreplaceable and you want to keep it clean as much as you can. The rubber parts can be substituted but they look different.
Thanks again for supporting my blog. I have been getting plenty of requests to write one for this lens. Frankly put, I do not have any intention of writing an article for this lens. I just cannot justify the cost of buying these because they’re inferior to the Nikkors in almost every way and they even cost more due to the hype that the internet has given it. Many reviewers will say that this is cheap and just as good, but we can easily do a test to refute that. I am not sure what they are talking about when they mention that this is cheap. Maybe they are just ignorant of the market value for used Nikkors? I’m not going to go too far into this but it is what it is. If you can pay a bit more, buy one of those excellent 105/2.5 Nikkors. If you are lucky or patient, you can even buy a Nikkor for less than what these Series E lenses go for. Again, do not trust everything you read on the internet including my blog. Thank you again, Ric.
Help Support this Blog:
Maintaining this blog requires money to operate. If you think that this site has helped you or you want to show your support by helping with the site’s upkeep, you can simply make a small donation to my paypal.com account (richardHaw888@gmail.com). Money is not my prime motivation for this blog and I believe that I have enough to run this but you can help me make this site (and the companion facebook page) grow.
Leave me some tip?
Thank you very much for your continued support!
$2.00
Helping support this site will ensure that this will be kept going as long as I have the time and energy for this. I would appreciate it if you just leave out your name or details like your countrym name or other information so that the donations will totally be anonymous. This is a labor of love and I intend to keep it that way for as long as I can. Ric.

Aug 06, 2017 @ 08:22:03
Your comment on plastic mounts reminded me of an experience Ionce had with a plastic mount cheap AF Nikkor on an F5. After a while of use, the F5’s powerful AF motor damaged the plastic mount of the AF lens. That was still screwdriver type AF, so it wouldn’t happen with manual lenses or AF-S type lenses, but it shows how much of a compromise using cheap plastics in lens construction really is
Aug 06, 2017 @ 08:27:44
Wow! That’s crazy!
Aug 10, 2017 @ 19:41:15
Thank you for writing this! I’ve owned two E Series lenses: the 75-150 and the 35. The 75-150 was very nice on a 12 megapixel body, the main flaw being creep. I was never really into the push-pull design. But the barrel was metal and it held together well. The 35 on the other hand was never quite satisfactory; image quality required stopping, lacked bite and the construction was flimsy. Your teardown brings a lot of flashbacks. At the time these lenses were cheap, definitely under 50 euros per lens. I would never pay over 100 euros for a Series E lens, the AI lenses are so much better.
Aug 11, 2017 @ 00:11:48
Hello, Oskar!
Yes! I do not know why people are paying so much for the E lenses! Never makes senses!
Aug 07, 2018 @ 08:00:06
Great article!
Is it possible to get to the rear element without completely dismantling the lens? I have one with fungus on the rear element which I’d like to clean up. . I got the lens from the junk bin at the local photo shop!
Aug 13, 2018 @ 01:57:41
Hello, Steve.
Sorry for the late reply. Yes, you can do that. Just read and analyze what’s going on in my blog and you can see that you can do that after removing the rear. Do note that you have to have the right JIS drivers. Ric.
Aug 14, 2018 @ 19:14:38
Hi Richard,
Thanks. I thought I would be able to from your blog – just wanted to make sure!
I have the JIS drivers. They cost more than the lens! 🙂
Steve
Oct 09, 2018 @ 18:24:39
You can get one of these for $100-$150 on eBay. I really don’t find that expensive, but a right price for the build quality (or lack thereof). The size is also a plus, I’m thinking of getting one of these to sneak my camera into concerts with it looking inconspicuous and not like the tele it is. Four-element design and the ‘pop’ and character that comes with is also a nice benefit!
Nov 03, 2018 @ 00:14:04
Hello.
That’s expensive. For that price you can get a 105/2.5 Nikkor which is much better in most regards. Ric.
Nov 03, 2018 @ 00:16:31
That IS true, but it’s also not as compact as the 100mm and looks like the ‘serious’ lens it is.
Dec 05, 2018 @ 11:33:46
Hi. Awesome material! Im willing to repair one of these and it came already almost disassembled and missing the helicoids key (replaced), but sadly without any of the marks for the helicoids :(. Question: is there a more specific way to reassemble it and find the correct position in this particular model? Thanks a lot man, your work is brilliant.
Dec 29, 2018 @ 02:52:07
Hello, Marcelo.
If you watch my video on helicoids you will see how I try and guess the correct position of the helicoids. Ric.