
Hello, everybody! Tokyo’s heat wave was declared a national disaster by the government and the typhoon that we have now makes everthing a lot cooler. This makes me crave for some nice sushi! I just had a nice bowl of sushi yesterday but I just can’t have enough! It’s a nice and nourishing meal but it can get boring at times so I had a different style and it’s called “chirashizushi” where all the bits and seafood are all scattered on top of vinegared rice. You can think of it as deconstructed sushi if you want. This allows me to enjoy sushi in a different way, think of it as repackaging a classic in order to make it appeal to other people who wanted something new. Speaking of changing the presentation of a classic to make it appear “new” again I would like to show you something similar today.
Introduction:
Today’s featured lens is the awesome Nikkor 35mm f/2 Ai lens! I love this lens so much, it is part of my regular kit when I want something practical to bring with me. The 35/2 line of lenses had a long production run which spanned from the 1960s up until about 2005. I can only imagine how much money Nikon made from these because I don’t think that the optical formula changed much throughout the decades. This is just a testament to how it was designed back then for something like this to stand the test of time.
The Nikkor 35mm f/2 Ai is the successor of the amazing Nikkor-O 35mm f/2 Auto lens. The optical design wasn’t revised as far as I can tell but I am guessing that Nikon made a few small corrections to the design such as curvature and spacing. Nikon does this sometimes in the middle of production without telling anybody.
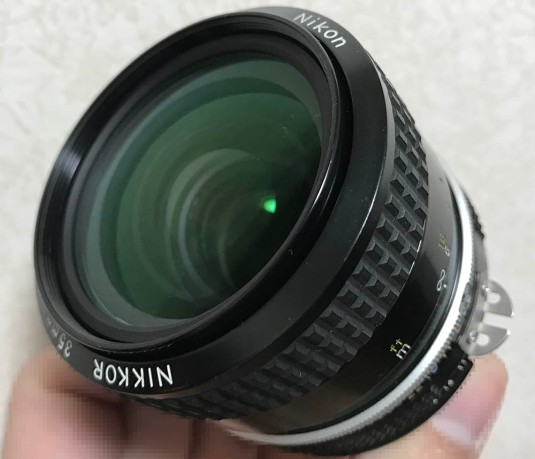 This is a very beautiful lens. Its simple lines are elegant and the rubber grip is useful for people who wear gloves or when shooting in cold weather. An all-metal focusing ring is going be uncomfortable to hold when it gets cold. Take it from me, I used to shoot in the winter a lot. The size is just right and it makes it easy to hold, the lens also feels dense so it reeks of quality. It’s true what they say, they don’t make lenses like this these days.
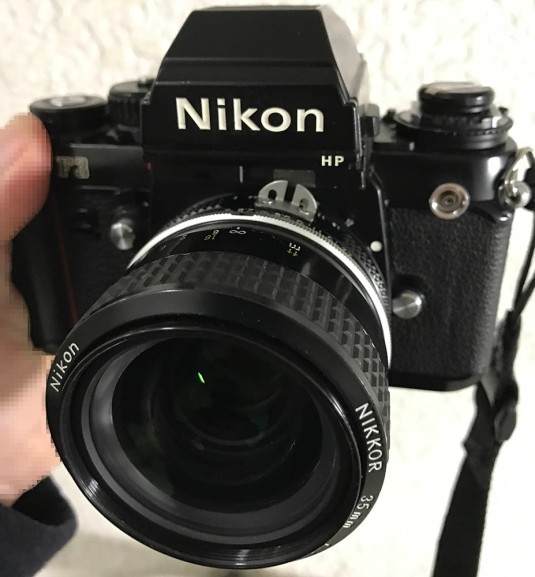 It works brilliantly with all cameras with an F-mount like the Nikon F3. It’s a pratical lens to use and will be a nice companion when travelling. Its tough barrel makes this lens the choice for many professionals, you are assured that this will survive a nuclear holocaust.
 The front element is kind of large for a lens this class and size. This will allow the lens to gather more light than an f/2.8 lens. This is handy for low-light photography and you can appreciate the view from the finder because it’s brighter. The moderately-shallow DOF is also helpful for focusing because it’s not too shallow.
 One of the most useful features of this lens is that it can focus down to 0.3m or about a ft. You can use this for detail shots if you’re a wedding or food photographer. It’s also sharp at this distance as you can see from the picture above which was shot wide-open. You’ll also see that this picture has terrible distortion and the straight panel line is bowed. This is going to be a problem when you’re shooting architecture or art.


(Click to enlarge)
This set was shot at about 0.5m away from the subject. These pictures were shot from f/2, f/2.8 and f/4 respectively from left-to-right. This lens is sharp wide-open and the contrast is more than good enough. The vignetting is kind of heavy and it makes the picture dark at the corners up to somewhere close to the middle of the frame. It’s about 0.7 stops and it can impact your image somewhat. At f/2.8, the vignetting improves considerably and I can sure see the corners brighten-up. Sharpness and contrast improves as expected, this is probably what you would want to use when you want shallow DOF and a clear frame. You will also notice that the bokeh is still nice at this aperture and didn’t change much at all from f/2. At f/4, this lens is already reaching its peak sharpness. The bokeh is also a bit subdued as expected but is still nice. The vigentting is all but gone by this aperture and it looks really clean at this point. The series of images above should give you an idea of the performance of this lens when shooting up-close, it’s great but the vignetting problem is going to be a persistent issue throughout the whole range.


(Click to enlarge)
Let’s now see how this lens performs when focused on something fat (infinity). This is a great lens for shooting at this distance because sharpness and everything is excellent. It mirrors the previous set of pictures because vignetting will be your only concern here. I have a pet theory that this lens was really meant to be an f/2.8 but it somehow ended up as being an f/2 after some clever calculation. Don’t quote me on this because It’s just me pulling up conspiracy theories out of my pants. The good news is that you can easily fix the vignetting problem at post and you end up with a nice and sharp picture. I shot these pictures to emhasize vignetting and flare so we’ll talk about how resistant to flare it is. It is pretty good judging from my samples and we don’t see the funky flaring from the likes of the Nikon 35mm f/2.5 Series E lens. The coatings work great and there’s no fogginess to the pictures even when shot directly at the sun or at an angle from it. Ghosting will show as a green or magenta blob and we’ll check that out in the next picture.
 This is probably the worst that I can get this lens to exhibit this issue. You’re not going to get this unless you’re shooting a scene like this. Most lenses will do this even the modern ones with the best coatings available. We must also remember that this lens was made to perform best with film and shooting it with digital can make this look worse as with this case. Sensors are much more reflective than film so we get this sort of this happening. It’s the reason why many manufacturers release newer versions of their existing lenses with coatings that were formulated for digital.


(Click to enlarge)
These pictures were shot from f/2, f/2.8 and f/4 respectively from left-to-right. Overall, this lens is great despite the vignetting issue. You can even say that vignetting gives it a bit of a unique look. The pictures all look great and the only reason to stop this lens down is to control the vignetting if you absolutely need bright picture. I love how the 2nd set looks, it shows just how beautiful this lens renders the scene and how natural the pictures look. The pictures sure have that “vintage-look” that many people want these days.
 This lens renders very natural-looking pictures. The transition from what’s in-focus and what’s not is smooth. Check out the distortion on this picture, pay attention to the I-beam at the top-edge of the picture and see how curved it is. You’ll want to use a lens which has nearly no distortion when shooting straight lines and the Nikkor 35mm f/2.8 Ai is going to be the lens for that kind of job.
The following pictures were made in order to give you an idea of how this lens performs in real-world scenarios. I was shooting mostly from-the-hips and both my subjects and I were moving so please forgive me if some of my pictures aren’t perfectly focused or if it’s a bit blurred. Things happen so fast in these scenarios and it can also get hostile because some people won’t want their picture taken so please understand. Yes, I’m risking myself and my safety in order to do art and at the same time show you a lens review.
 I think this was shot at about f/2.8 or f/2. Once you get your focus right you’re sure to get a nice and sharp photo. Cinestill 800T is a nice film with nice resolution and it shows that in this picture excellently. The resolving power of this lens at wider apertures offsets this lens’ weaknesses (distortion and vignetting).


(Click to enlarge)
These were both shot with Cinestill 800T film. Notice how the horizontal lines are bent in the 1st picture near the top of the frame. The 2nd picture should give you an idea on how the distortion looks like with vertical lines. It’s not so bad in the 2nd picture because the lines are somewhat “organic” unlike the awning in the 1st picture.


(Click to enlarge)
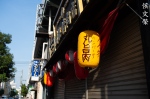
The 35mm focal length is a classic for street photography and environmental portraits. It is wide-enough to show some of the background while still just a bit long enough so you can frame your subject nicely. It’s also not too wide as to alter your picture’s perspective if I may use that term and your picture still mirrors reality somewhat. You’ll have to get closer to your subjects with a 35mm lens versus a 50mm lens in order to showcase them better (as in bigger) in your composition. This is a very good focal length to help give you the confidence to get closer to your subject.


(Click to enlarge)
The maximum aperture of f/2 is bright enough for low light photography. You’ll want to use a faster lens in theory but a faster lens will make it difficult to focus due to the thin DOF so f/2 is a nice compromise. Having an f/2.8 lens will be too slow if you shoot scenes like the ones above wherein you want to have a shutter speed of at least 1/125s in order for your subjects not appear too blurred as they move. I was also walking in most of the pictures so people won’t notice me much as I take a snapshot of them.


(Click to enlarge)
You are treated with great pictures when you can nail your focus. It’s not difficult to get it focused properly because of the bright maximum aperture but you’ll need to be great at it in order to capture fleeting moments in time. It’s easy if your subjects don’t move much or when you can anticipate what’s going on but that’s not always the case. The picture of the sushi chef should give you a good example as to how this lens performs. This lens is a capable tool in the hands of an experienced photographer.


(Click to enlarge)
These were shot with Cinestill 800T film rated at about ASA 640 or so. It would have been nice to have a faster aperture but f/2 is adequate for shots like these. I took these so I can show you how this lens performs with film. I love how this lens renders so much because the pictures feel so natural in the sense that the contrast isn’t too harsh but it’s enough to make the pictures have some kind of a “punch” to them. These were all shot at f/2 or so.
I hope that you got a good idea on how this performs in both film and digital. If you want a nice 35mm that’s versatile then I would highly recommend this lens. If you want a lens that’s distortion-free or vignettes less then you would want to buy something else. A good lens for that is the cheap Nikkor 35mm f/2.8 Ai at the cost of a slower maximum aperture. If you can live with that then it can be a better investment. Hunting for a good sample is not that difficult since the Nikkor 35mm f/2 Ai was popular in its day but make sure that you get one that’s not been abused by professionals because many of them used this lens because it’s such a practical lens to have in the bag. The Nikkor 35mm f/2 Ai-S will be a lot more expensive compared to this because they were made up until recent times so if you want a 35/2 with great value then this is the lens for you. Let’s now begin with the repair article!
Before We Begin:
If this is the first attempt at opening a lens then I suggest that you read my previous posts regarding screws & drivers, grease and other things. Also read regarding the tools that you will need in order to fix your Nikkors.
I highly suggest that you read these primers before you begin (for beginners):
- Essential tools
- Best practices 1
- Best practices 2
- Best practices 3
- Ai conversion
- Working with Helicoids
Reading these primers should lessen the chance of ruining your lens if you are a beginner. Also before opening up any lens, always look for other people who have done so in Youtube and the internet. Information is scarce, vague and scattered (that is why I started this) but you can still find some information if you search carefully.
I highly recommend that you also read my working with helicoids post because this is very important and getting it wrong can ruin your day. If I can force you to read this, I would. It is that important!
For more advanced topics, you can read my fungus removal post as a start. This post has a lot of useful information here and there and it will be beneficial for you to read this.
Disassembly (Lens Barrel):
Just like every prime lens, I prefer to separate the objective first before I work on the lens barrel so the glass stays safe. Removing the objective from the lens barrel can be a bit of a job for this lens because it requires a few more steps to do. Other than that, this lens isn’t too different from your average small Nikkor prime. The construction of this lens is kind of similar to its predecessor (Nikkor-O 35mm f/2) so you can also read the article for that in case you want some reference.
 The safe way to begin working on this is to remove the front part of the focusing ring and work your way from there.
 You can remove the focusing ring by first removing the rubber grip. Run a toothpick or a small screwdriver underneath the circumference of the rubber grip. Make sure that you don’t tear the rubber because it can be brittle due to age.
 Once the rubber is gone you can carefully unscrew the front part of the focusing ring. It’s usually cemented to the focusing ring so it’s a good idea to saturate the seams with a little bit of alcohol. Don’t use any naphtha or MEK here because that will affect the plastic. If I remember it right, this part isn’t made of metal and the plastic is also quite flimsy.
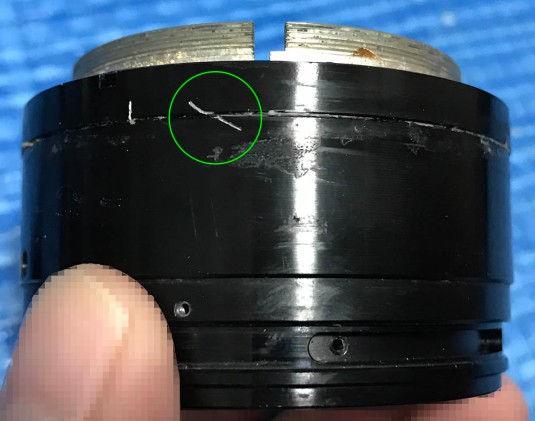
 Yuck! look at all those fungi! This is what happens when you use grease that’s not meant to last such as organic grease made from animal fat! To remove the front barrel, look for this small set screw and carefully remove it. If it’s stuck then do that alcohol trick again. I think you will have to focus the lens out as far as you can in order for you to access this.
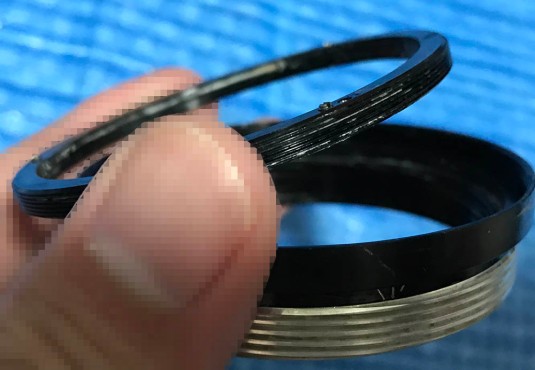
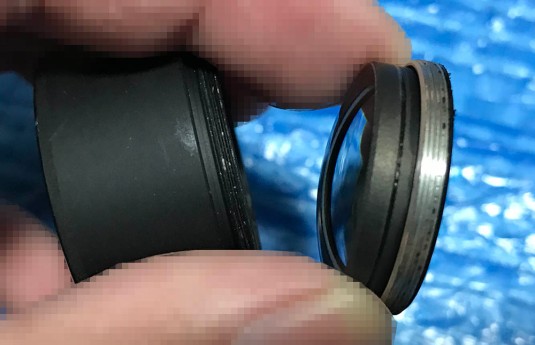
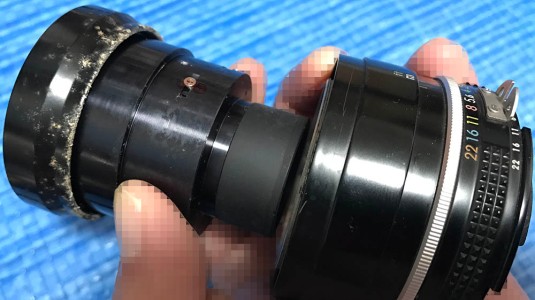 Unlike most lenses, the front barrel of this lens is part of the objective’s casing. Unscrew it to remove the whole objective from the lens barrel. Store the objective in a safe place and make sure that it doesn’t roll-off from the edge of the table.
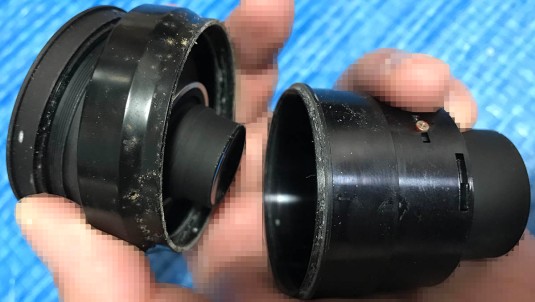
We can now work on the lens barrel without ever worrying about damaging the glass. It is important that we separate the objective first before working on anything. This is what I do as my standard operating procedure.
 Let’s now work on the rear of the lens. Carefully remove these screws so we can remove the bayonet mount. If you’re new to lens repair, please read my article on how to remove bayonet screws so you won’t strip the heads of the screws and get stuck. Removing these screws sounds easy but it’s not if you don’t have the right tools and know-how! These are not your usual phillips screws, these are JIS screws and they require the proper tools so you can safely unscrew them without stripping the head.
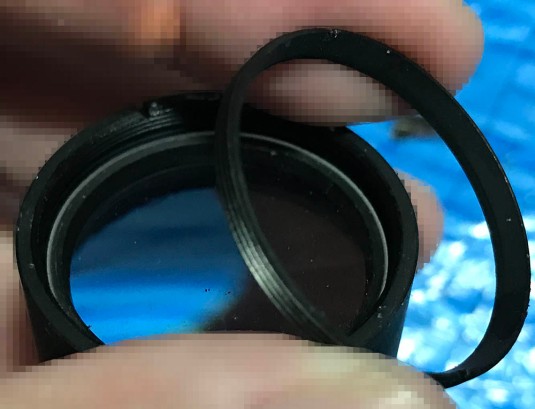
 The bayonet mount comes-off just like this. It should be easy to remove this since nothing is attached to it at this point. You can further dismantle it by removing the retainer ring. I had to do this because I wanted to disinfect this lens as much as possible.
 The aperture rings can be easily pulled from the lens barrel like so and surprise, you get to see more fungi! I call this type the Nescafé fungus because it’s grainy. This type is going to ruin your glass when it gets to it so I was happy to find this thing and clean it before it grew all over the lens. This lens has more fungus than my foot!
 You’ll want to remove this screw pin in order to proceed. This one couples the aperture ring to the aperture fork inside and that’s how you change the aperture of the iris.
 It’s also important that we remove the detent spring but we have to mark its position and take pictures for reference first so our lens will click properly later after reassembly. The screw circled here secures the grip, there are 3 of these and you should carefully remove them in order to remove the grip and the sleeve.
 Once the the screws are gone you can pull the grip and the sleeve off. It may be secured by glue or dried gunk and if that’s the case then you should just do that alcohol trick with this and wait for it to soften-up. The sleeve and grip cover the access points for the inner parts of the helicoids specifically the helicoid key.
 You can separate the grip from the sleeve to further clean it up and make sure that all of the germs are dead, you don’t want any to survive and migrate to the glass later!
 Before we proceed it’s a good idea to remove the focusing ring first. The focusing ring is being secured by these 3 screws. Notice that the holes on the focusing ring’s inner lip has elongated slots for holes. This is how you adjust your focusing ring so its scale is going to align properly with the scale at the sleeve. You can mark it or take some pictures like this so you will have an easier time putting the focusing ring back together.
 Once you are satisfied with your notes, you can go ahead and remove the screws so you can remove the focusing ring just like what I did in the picture. Clean the inner surface of the focusing ring because germs love to stay there where the sun don’t shine.
 Once the focusing ring is gone you now have better access to these things. Before you go ahead and remove anything, focus your lens to infinity and mark how the helicoids with a straight line like what I did. It doesn’t have to be as deep as what I did, just a shallow or thin scratch is all you need. This should help you determine if you got the helicoids right after reassembly. The 2 holes you see here are access holes so you can remove the screws of the helicoid key. You may need to extend the lens barrel a bit in order for the screws to be positioned right under the holes for better access.
 Carefully remove the screws and the helicoid key is now free. The helicoid key syncs the turn rate of all 3 helicoids to enable the lens barrel to extend or collapse. Once the key is unscrewed you can turn the helicoids past their range and separate them but don’t do it yet because you will have to take more notes just in case.
 Collapse the lens as far as it will allow and make a diagonal mark so you’ll know how far the central helicoid should go when you reassemble it later. I almost never do this to the inner helicoid but I have ways to determine its range which I’ll show later.
 Once you are satisfied with your note-taking, separate the central helicoid from the outer helicoid and lens barrel and never forget to mark where they separated. This is crucial in order for you to put it back properly again because the helicoids should mate at this very point. Failure to do this will mean that you will have a lens that’s near-impossible to put back together and it will take you plenty of time to guess its insertion point. To avoid this, read my article on how to work with helicoids. Never assume that you know what’s going on and regret it later so please follow what I said and read my article.
 It’s time to separate the inner helicoid. The inner helicoid’s range is being constrained by this metal stop. Note how far the stop is while it’s at the end of its rotation range. This is going to help you determine if you got it right or not after putting it back together again. The stop is being secured by these 2 screws so remove them and you can separate these.
 The stop can now be removed. It’s usually glued like what you see here and you can pick it off using the edge of a flat driver. Notice that this isn’t symmetrical so don’t put it back the wrong way. Some people don’t remove these but I always make it a point to clean the inner surface of these things since germs and gunk always accumulate under these.
 You can now remove the inner helicoid. Notice that I unscrewed it towards the bottom to separate it because you can’t remove it through the other end since there’s something in the way which you’ll see shortly. Again, it’s important to mark where they separated just like what we did with the previous helicoids. See that disgusting stuff? It looks like it was lubricated with Marmite by the previous guy and the fungi and germs had a great feast.
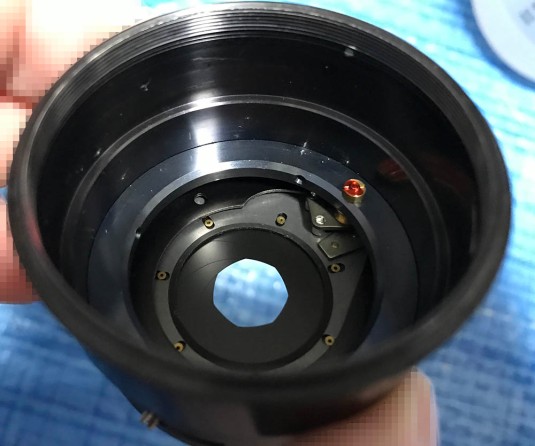
 We have now separated all of the helicoids at this point and we’re now left with the task of dismantling the lens down to its bare components. What you see here is ring that will constrain the turn range of your helicoids. This will allow the lens to stop turning once it reaches infinity so your lens will never focus-past that. This is an adjustment point and it was set properly at the factory so make a few marks so you’ll know how to put it back. It is the part that hits the metal stop attached to the inner helicoid in case you are curious and it is also the thing that prevents you from extracting the inner helicoid through the front. These are almost always glued with generous amounts of cement or epoxy and it’s tough to unscrew them. What I do is I soak these overnight in alcohol or solvent and that will soften whatever was used to bind it. After pickling it, you can go ahead and remove these 3 set screws. They’re easily damaged so be careful. You don’t have to unscrew them until they’re off, just loosen them so that the tips of these screws aren’t touching the part underneath them.
 Once the set screws have been loosened half-way, you can proceed with unscrewing this ring. Do this very carefully and use a pair of rubber gloves to help you grip it. The thread on both sides are very fine and it’s easy to cross-thread this and ruin them forever. These are impossible to fix once they’re damaged so please be careful. Putting these parts back is actually more risky than removing them and the best way to do it is to mate these two by turning them the other way and feel for a slight “click”, this will indicate that they’ve engaged and you can slowly screw them back together. Remember, these should mesh in an effortless manner so if it felt stiff then you’re doing it the wrong way so quickly turn it the other way again to separate them before the threads are ruined. If you’re frightened at the thought of ruining your lens then don’t bother separating these. I’m very particular with my lenses’ hygeine specially in cases like this where it obviously needs a thorough cleaning. I make it a point to do this all the time because it’s always filthy in these parts.
 The aperture fork and its rail is being secured by a big brass C-clip. Carefully pick on the clip with a sharp pair of tweezers to remove it.
 Once the C-clip is gone you can now remove the aperture fork and its rail. I have circled the hole where the pin screw used to be, you’ll never remove it if the screw is still stuck to the rail but you shouldn’t worry if you have been following my guide all this time.
Clean the helicoids very well and make sure that all of the old grease is gone. I even use a pig-bristle brush on a Dremel to clean mine just to be sure. You can use a toothbrush too but make sure that it’s stiff enough to clean the threads properly. Use a toothpick to pick at the hardened gunk. Dry them up very well and try mating them dry, you should have a nice and smooth set of helicoids by this point and if that’s not the case then you can do it all again until you’re satisfied. Be aware that any minor grittiness that you feel should go away once you applied some grease. Cleaning the helicoids take time to do it right, some people don’t clean it as thorough as I do but that’s their thing.
Disassembly (Objective):
Working on the optics of this lens isn’t terribly difficult but it’s not easy as well because it has more lens elements than the usual small Nikkor prime made in this era. Some of the parts may also be sealed with lacquer and it takes a little bit of waiting to soften them up with some alcohol. You don’t want to use to much alcohol or solvents near the elements, I will even assume that the fumes alone can affect the cement used to bind the groups but that’s just me speculating. Be sure that you have the proper tools for the job or else don’t even bother working on this. You will require a couple of spanners of different types just to open or access certain parts of the objective.
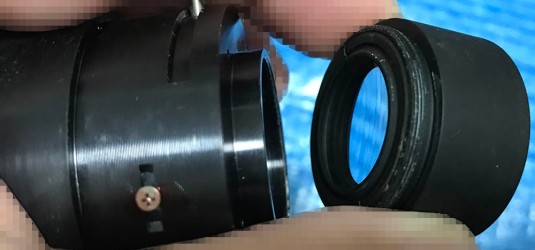
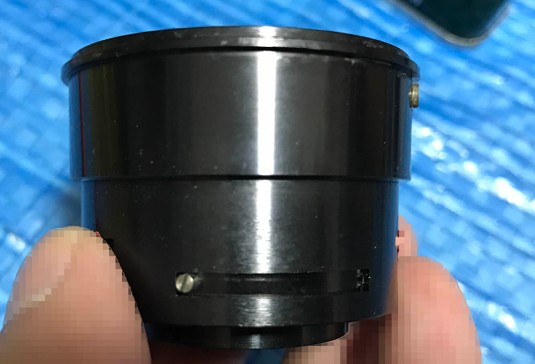
 The front barrel can be removed by by unscrewing the front elements assembly off. This can be easily damaged so please be careful doing this step. The lens has a big front glass so Nikon had to think of a way to achieve this while retaining the small size of the barrel.
 This is how it looks like without the front barrel. There’s not a lot of space left at the front of the objective’s casing as you can see from the picture.
 When removing the front elements assembly, make sure that you don’t chip the edges of this lens element. It can easily be damaged if you’re not careful. Set the lowe-half of the objective aside and let’s work with the front elements asseembly.
 This collar secures the rear part of the front elements assembly and you can remove this by simply unscrewing it with your hands. If it’s stuck then place a small drop of alcohol at the hole in the collar. Let the alcohol coat the thread by means of capillary action and wait for it to soften what was used to bind it. Repeat this process until you can remove it easily. Never put too much alcohol because if that reaches the cemented groups in this area it can damage them and cause an even bigger problem. Needless to say, you do not want to use any other solvent that’s stronger than alcohol for this purpose.
 It will depend on your sample but the collar on mine wasn’t glued to the cemented group it’s securing. Mine may have been separated long ago and that’s why it came off like this, otherwise this cemented group would have been extracted along with the collar.
 You can remove the rear cap by unscrewing it. There are actually 2 dimples at the face of this thing so you can use a lens spanner to help you remove it. I saturated the threads on my sample with alcohol because mine was hard to remove. Again, when something won’t come-off easily, always use the alcohol routine to help you remove it.
 This part can be tricky to remove because one slip and you can damage this element. It’s not essential to remove this part in order to clean the other side by the way but if it had to be done then just use a lens spanner to remove it through the slots in the ring.
 This is how it came off. Notice the big bulbous element that’s glued to this ring, you need to be careful when handling this thing because it’s very delicate.
 The front element is being secured by the front ring and you can remove it just like this. The front element has a shallow curvature on both sides so mark the leading edge using a permanent marker to help you in identifying which side should be facing the front. The mark doesn’t have to be big, a small dot is more than enough for this so long as it stays.
 The rear elements group’s housing can be unscrewed from the objective’s housing. If this won’t come-off easily then you just have to do that alcohol trick again.
 You can remove the inner elements group by using a lens spanner. Again, be careful not to scratch this part. Also take note that the threads are coated with black enamel so doing the alcohol trick won’t do anything to soften this. Get a sharp knife or needle and scrape the seam until you see the thread. Once that happens, you can just apply some alcohol as usual. Even after doing this, it’s still stiffer than usual to remove so be careful.
 This is how it should come off. Notice that the glass is a cemented group so don’t overdo the alcohol bit so you won’t accidentally damage the cement.
 The rear element is being secured by this retainer ring. Use a spanner to remove it but be careful because this thing may also be sealed with enamel.
 The rear element can be safely extracted using a lens sucker. Notice that I have drawn a few dots and a line at the wall of the rear element. The dots will help me identify which order this element should be and the line is for determining which edge should be facing forward. This is a simple trick that I use to prevent mistakes and irrepairable damage.
 There is a spacer underneath the rear element and just like with all of the glass elements, it is important that you mark which side should be facing where. The inner-most glass is easy to extract with a lens sucker. My marks here are too big but don’t worry, I cleaned them off with alcohol before I reinstalled it.
I cleaned the glass elements using my method and I went easy on the cemented groups. It is important that you treat the cemented groups with utmost care so you won’t harm it or it’s going to be an expensive learning experience. If any of the lens elements has lost the black ink at the walls then you can repaint them using some very good quality India ink. In case you don’t know, India ink is actually Chinese ink that was imported by the British through India centuries ago. The Indians sell them to the British without disclosing how or where they got it and so the name stuck, I am sure that made a few people rich.
Disassembly (Iris Assembly):
You don’t usually need to work on the iris assembly since they don’t get dirty usually but if yours got oil in it then you will have to dismantle it in order to clean it properly. Merely flushing it with solvent isn’t a good idea because it will just mask the problem for now. It is only acceptable to do it when you’re working with an iris that’s never going to be easy to dismantle without causing permanent damage but that’s a rare case.
 Before removing anything, study how the mechanisms work and take as many reference pictures as possible because they will be handy later.
 The iris mechanism is being secured by these 3 screws. They are sealed with lacquer and that is an indication that it is adjustable. Take some notes so you’ll know how this should be positioned later on. These 3 screws secure the ring inside with the actuator and that’s how the iris is closed when you actuate it. You can adjust the size of the iris by adjusting the said ring. Don’t assume that you know better than the guys at the factory who made these so make sure that you put it back as close to how it was or else the lens is not going to give you accurate F-stops values.
 You can remove the actuator and its ring once you removed all of the 3 screws. This can be hard to pull-out because of the fine tolerances they were milled. The easiest way that you can do to remove this is to pull it out while keeping it level with the walls of the iris mechanism’s housing and not while this thing is at an angle. If you did that then this ring may get stuck and that will cause an even bigger problem.
 Next, remove the this pin screw so you can remove the regulator ring. Make sure that it’s safe because the threaded tip of this screw can easily be bent and snap.
 This is the regulator ring. This will control how big or small the aperture is when the iris is actuated. It’s also the only thing that’s pressing-down on the iris blades. Never bend it, if you manage to warp it then your iris will not work smoothly. All of the parts involved with the iris mechanism are milled to exact tolerances so a small variation will affect its performance.
 This is the rotator plate. This is the one that keeps the blades together so removing it will allow you to remove the blades. The safest way to remove the blades is to drop them to a vat of alcohol so the surface tension will act like a cushion of some kind and give the iris blades a nice and soft landing. Be very careful with the blades because warping them is a sure way to turn your lens to an absolute junk because you can only use it wide-open.
That’s it for the iris mechanism. It’s not terribly hard but I would not want to do this if it can be helped. Some people use alcohol to clean the blades but I use naphtha because it’s better for removing oil. Acohol isn’t so bad but I just prefer naphtha over it. Just make it a point that you use a nice and clean lens tissue to wipe it and only hold it by its pegs using a nice pair of tweezers so you won’t damage them.
Conclusion:
This lens probably took me 2 nights to overhaul due to all that dirt but it ended up being clean and I use it regularly. The amount of glass elements also took some time to clean so factoring that into your repair time is also going add some more time. This is a complete overhaul and everything was dismantled in order to disinfect the lens. I cannot allow the germs and fungi to zombie-back and harm this lens again. I reassembled everything by back-tracking all of my steps and made adjustments accordingly.
Before we wrap up this article I would like to discuss a couple of things just so that there is nothing that’s left unclear. When choosing what type of grease to use I will advise that you choose a stiff grease for this. A thin grease won’t give you the proper resistance and that will make the focusing ring feel too light. A little bit of resistance is desirable when it comes to wider lenses so you can focus in a more precise manner.
 The iris blades were all carefully cleaned by wiping each one of them with naphtha. Use a soft lens tissue to wipe them and never air-dry them because that cause drying marks to for. If that happens, you will have to clean it again to remove the residue. Putting them back together can be challenging for a beginner but you can do it with patience. The key to working on these effortlessly is to use a pair of high-grade tweezers. I use ones that are made from carbon fiber, it doesn’t matter what material they were made from so long as they’re not magnetized. Never use magnetized tools with the iris blades because they are designed to work with minimum resistance.
 Here’s how it looks like after putting the rotator plate back. I forgot to mention it but the last 2 iris blades are the most annoying to put-back because they should overlap with the other blades. You can use a sharp toothpick to help you push on the peg so it won’t lift up and upset the whole thing. It’s also important that you only handle the blades with their pegs and never squeeze them with too much force. These are only riveted to the blades and they can be undone if you’re not careful.
Before you completely reassemble everything back, reassemble the lens up to the point where you only have the front part of the focusing ring unattached. Don’t reinstall it yet until you have adjusted your focusing ring. Adjusting the focusing ring on this lens needs to be done in 2 parts and will require that you attach the lens to camera to calibrate and remove it to adjust. This will have to be done in several tries and may take time. To know more about how to adjust the focusing of a lens (if it allows), read the article that I made on how to adjust a lens’ focusing before you proceed.
First, to get the lens to stop at infinity you will want to adjust the ring under the focusing ring where it’s attached to. As soon as you got it right, tighten the 3 set screws so that it’s secured and drop a small amount of lacquer or nail polish on top of each screw using the tip of a needle. This should secure it from shock and prevent it from loosening if you are lucky that the lens didn’t get dropped or suffer some serious vibration while travelling.
Once that’s done, it’s time to adjust the scales of the focusing ring. Just make sure that the infinity symbol is centered to the broad white line at the sleeve and and tighten all of the screws for the focusing ring and you’re set. Do a series of tests until you are satisfied and do it really quick before the lacquer sets on both the inner ring and the focusing ring.
 All that hard work paid-off and the lens is now being used to create pictures that it won’t have the chance to do so if it hadn’t been saved by me. I am proud of the job that I did, it is this feeling of satisfaction that I get from saving a dirty lens that’s keeping me going. It gives the lens more sentimental value knowing that I have spent so much love and time to restore it. Apart from a few fungus scars on the coating, nobody could’ve guessed how this lens looked like before it was restored. This is the joy of Nikon Junk Rescue!
That’s all for this article. This one took longer to prepare because it’s a complete overhaul and I also took some pictures with this lens. I realize that people also wanted reviews so I am going to make my articles in this format from now on. This takes more time and I can no longer publish a complete repair article on a weekly basis. I also need to work harder because I am now sending the little one to day care and I need the extra income to help me pay the fees. She will be going to school not long after that so I may take an extra job. I will publish short articles regularly if my time permits, articles such as the shopping or impressions series do seem popular since they appeal to people who shoot other brands, too. Thank you for following this blog and see you again next time. Ric.
Help Support this Blog:
Maintaining this blog requires money to operate. If you think that this site has helped you or you want to show your support by helping with the upkeep of this site, you can simple make a small donation to my paypal.com account (richardHaw888@gmail.com). Money is not my prime motivation for this blog and I believe that I have enough to run this but you can help me make this site (and the companion facebook page) grow.
Leave me some tip?
Thank you very much for your continued support!
$2.00
Helping support this site will ensure that this will be kept going as long as I have the time and energy for this. I would appreciate it if you just leave out your name or details like your country and other information so that the donations will totally be anonymous it is at all possible. This is a labor of love and I intend to keep it that way for as long as I can. Ric.

Jul 28, 2018 @ 04:27:07
Great post Richard.
Jul 29, 2018 @ 14:27:19
Thanks! Glad you liked it sir!
Jul 28, 2018 @ 20:10:27
Another great article, very interesting! Do you use any adhesive on the rubber grip when you reinstall it? What keeps it from spinning on the focus ring? Thanks!
Jan 22, 2019 @ 15:09:18
Thanks for the write up Richard. I’ve been using a permanent marker to identify the lens elements as they are removed but find that they always wash off during cleaning. How do you prevent the marks from being removed?
Feb 02, 2019 @ 10:40:57
Hello, Dave.
I just avoid wiping the area that I marked. You have to be really careful about it. A pencil is also nice as graphite doesn’t get dissolved with solvents. Ric.
Jan 11, 2021 @ 13:04:03
Thanks a lot for the instruction, but unfortunately not all steps of the instruction were described in detail, for example I did not understand how to remove the front barrel in one of the steps. It took me several hours to figure it out. As it turned out, a special rubber “thing” was needed (I ended up using a bushing of duct tape). This is my first experience with lens repair and it wasn’t obvious to me. I found a post in Japanese and used google translator to understand the steps. The information from there helped me to get the missing knowledge. Maybe someone will also find this information useful when repairing their Nikkor:
https://note.com /keitakeuchi0429/n/n604aad048be7
Mar 04, 2021 @ 11:15:22
Hi Richard
Thanks for this great tear down. I was just wondering how you adjust infinity on this lens. Is it the three small screws inside the slots on the focus ring or the three larger screws that need to be loosened?
Many thanks,
Jonathan Kelly
Jun 17, 2021 @ 01:15:46
Thanks for this. I was able to clean the haze out of the aperture adjacent lens surfaces. My 35mm is clear again!
The 3 grip screws were impossible though. Nikon locktite strikes again. I had to let the old grease remain.