
Hello, everybody! Unknown to many, I used to be a fan of the NBA. A player that I idolized as a youth was Larry Bird. His moves were ahead of his time, and I love how he gives his teammates the chance to score. This influences me to this day because I don’t want to take all the credits as a team leader. I make sure that my mates also get their share of glory. I am no super-man so I needed their help to finish big, daunting tasks at work. Larry is a legend, it is fair to say that he brought the sport to greater heights and he will always be remembered for this. Today, I’ll show you a lens that was such a big deal back then, it’s a big game-changer and it was considered as one of the best lenses by news magazine some years ago. Like Larry, this lens will remain a legend despite being replaced by a new-comer and it will still give you lots of enjoyment when you shoot with it.
Introduction:
The Nikkor 35mm f/1.4 Ai-S is a legendary lens from the film days. It started out as the Nikkor-N 35mm f/1.4 Auto of 1970 but that lens is a bit different, it uses radioactive glass which turns yellowish after a couple of decades. That was replaced after a couple of iterations and the optical design was revised a bit to reflect this change. That lens was the fastest wide-angle lens during its time and it’s one of the most important lenses made in recent decades. It has CRC (Close-Range Correction) employed which helps a lot when you use it at closer distances. What that does is it moves an optical block as you turn the focusing ring, varying the spacing of the optical blocks to give you better performance at closer distances compared to conventional rack-focus ones. The optical design was considered a masterpiece and it endures to this day in the form of this lens. This lens debuted in 1981 and is still made today. It’s now nearing its 40th year of production and it seems like this will stay for a long time in Nikon’s inventory.

This is Nikon’s smallest 35/1.4 lens, it has a 9-elements-in-7 groups design. It is a real classic lens in terms of build and rendering. For a long time, Nikon users only had this as the fastest 35mm F-mount lens. It was only succeeded recently in 2011 by the monster AF-S NIKKOR 35mm f/1.4G which has AF. It took Nikon more than 30 years to replace this one because it’s a hard act to follow. The newer lens is an optical masterpiece, it is not as sharp or fast as the off-brand alternatives but it certainly renders better, and by that I mean it captures pictures that look more refined. It’s a worthy successor to such a legendary optic and it honors it by keeping what made it special intact.

This is a picture of its predecessor that went to space with NASA. This lens is a main-stay with NASA, from this lens up to the version we have here in this article. Nikon had to modify these Nikkors to make these suitable for use in space. If you want to read more about Space-Nikkors, read this article.
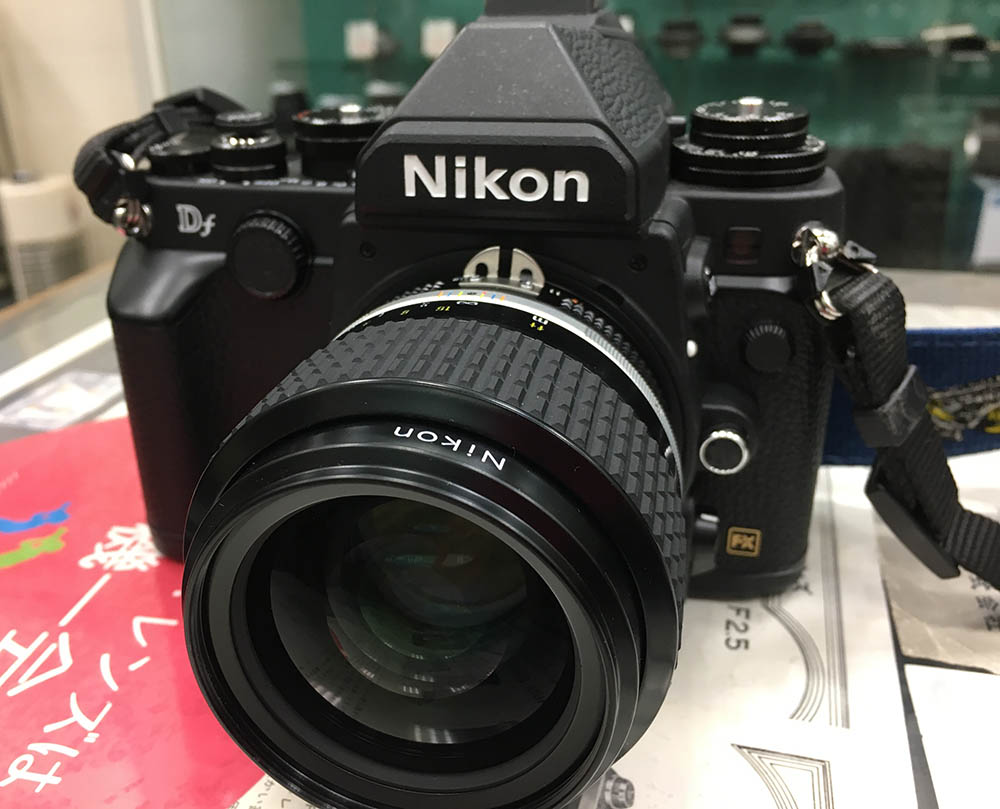
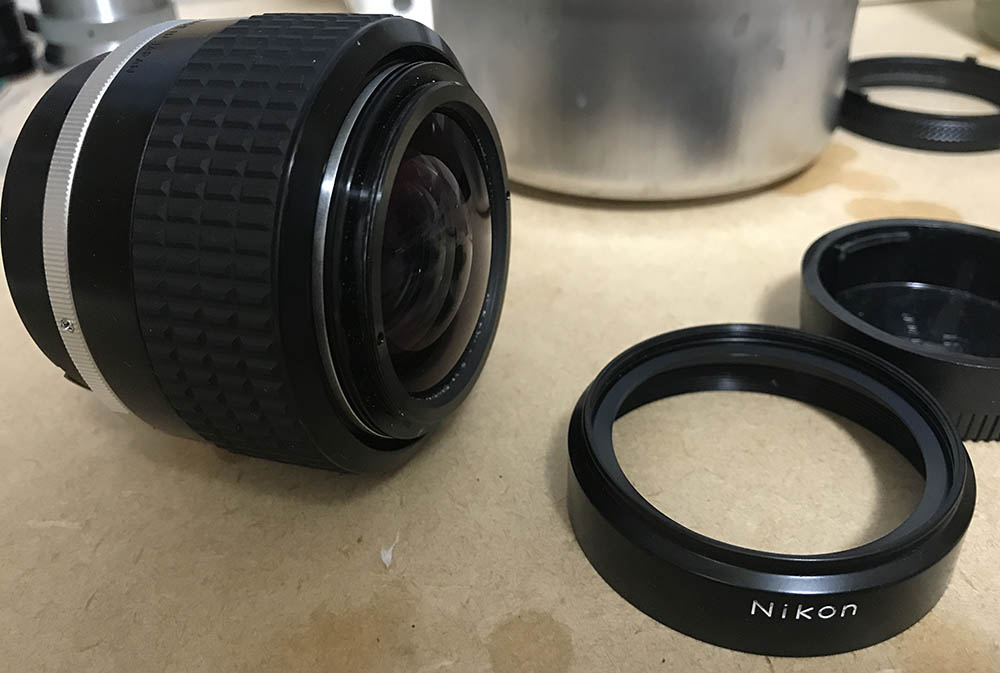
The bulbous front element is exposed, it’s best to use its dedicated hood all the time to prevent stray light from reaching it and to protect it from harm. It uses 52mm filters which is an amazing engineering feat. Nikon made a lot of effort just to keep the filter size down. It’ said that the original design had a bigger filter size but the designers pushed their limits in order to give us a standard 52mm filter size. Thank you, Nikon!
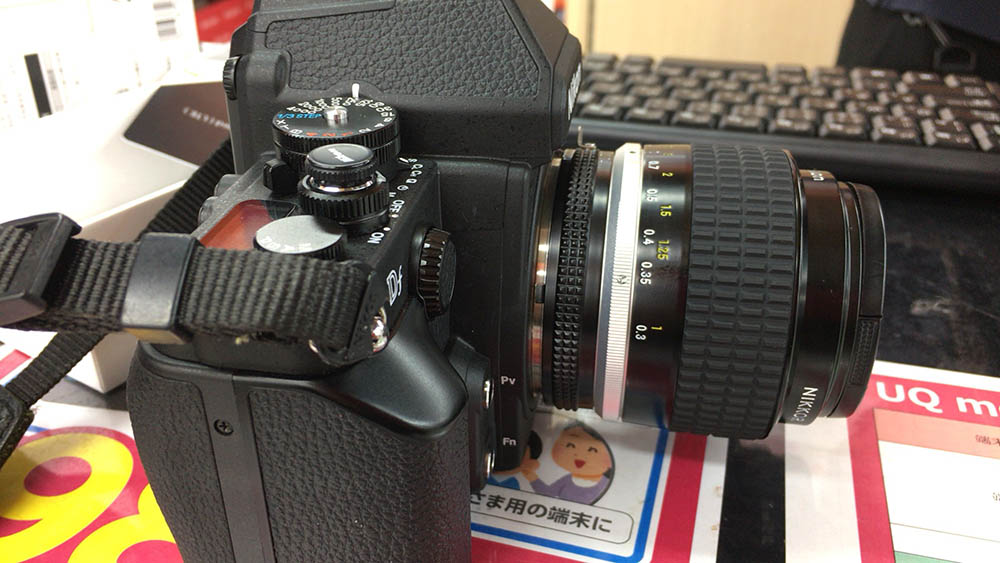
This lens handles perfectly with most Nikons but it can be a bit front-heavy, a smaller camera will tilt-over towards the front due to its weight. The wide grip is easy to grab, focusing feels great despite the pathetically short focus throw. I would want a slightly-longer focus throw to help me turn the ring a bit more precisely. The minimum aperture is f/16 which is less than the old models which have f/22 as the minimum aperture.
Knowing how a lens works is key to maximizing its use. You will learn how to exploit its strengths and work-around its weaknesses or use them to your creative advantage. I took several sets of photos from f/1.4, f/2, f/2.8, f/4 and f/5.6 (from left-to-right) so we can study how this lens performs under these apertures where we see the most changes happen in terms of rendering or image quality. These are usually the apertures that most people will want to use this lens with, anything beyond these look “generic” or predictable.


(Click to enlarge)
Vignetting can be prominent wide-open when shooting at things like the sky or something with an even color. It improves by f/2 but it only goes away by f/4. You will still see traces of it at f/2.8 but it’s not obvious anymore because it’s dispersed by now. What I meant by that last statement was the fall-off is evened-out across the corners so you won’t notice it as much. Distortion will be very obvious in scenes with lots of parallel lines. This is kind of high but I expected this since this is an older design and nearly-all of Nikon’s lenses in the 35mm focal length seem to have higher-than-average barrel distortion. I based my observations on the lenses that I have used so far.


(Click to enlarge)
Coma is kind of high wide-open as expected since this is a fast lens. The big front element isn’t aspherical so point lights at the corners of the frame will look like the “bat-symbol”. It improves considerably by f/2 and you’re going to get gorgeous-looking sunstars from f/4 on thanks to the 9-bladed iris. This is kind of sad since this lens was made for people who wanted to take night skies and scenes according to Nikon’s 1001 Nights site. I am thinking that its designers were suggesting that you shoot with it from f/2 since coma looks a lot less from this aperture on. While I find it impressive that coma is fixed to an acceptable degree by f/2 it could have been better to be honest but this is not a Noct-Nikkor 58mm f/1.2 Ai-S so I guess that it’s ok. Keep this in mind if you wish to take night-scapes or stars and you should be fine. This is not a problem these days because modern digital sensors have amazing dynamic range but people who shoot with film will find this annoying because if you stop this lens down to f/2 then you’re just losing 1-stop’s worth of light.


(Click to enlarge)
The quality of the bokeh is generally pleasant but it can look sub-par when shot wide-open with backgrounds that have high-frequency details such as foliage or lines near your focus plane. This can be alleviated when you stop the iris down to f/2.8 and it looks smooth up to f/5.6 or so. You’ll have to be a bit careful as to what you have as your background and avoid variables that can trigger this undesirable look. It does have a bit of a “soap-bubble bokeh” look which some people either love or hate. This lens changes character as you stop the iris down, it’s a valuable trait from an artistic point because it’s capable of giving you more artistic freedom. If you want a dreamy look, just use this lens wide-open. If you want a sharp photo, just stop this lens down.


(Click to enlarge)
The edges of the bokeh balls have an outline when shot wide-open, this can make things look harsh if you’re not careful. You’ll also see some smudging on long details like twigs and grass when you shoot with this wide-open. It’s important that you stop this lens down a bit to avoid this or just be careful with your subjects’ positioning when you have to shoot with this at f/1.4.


(Click to enlarge)
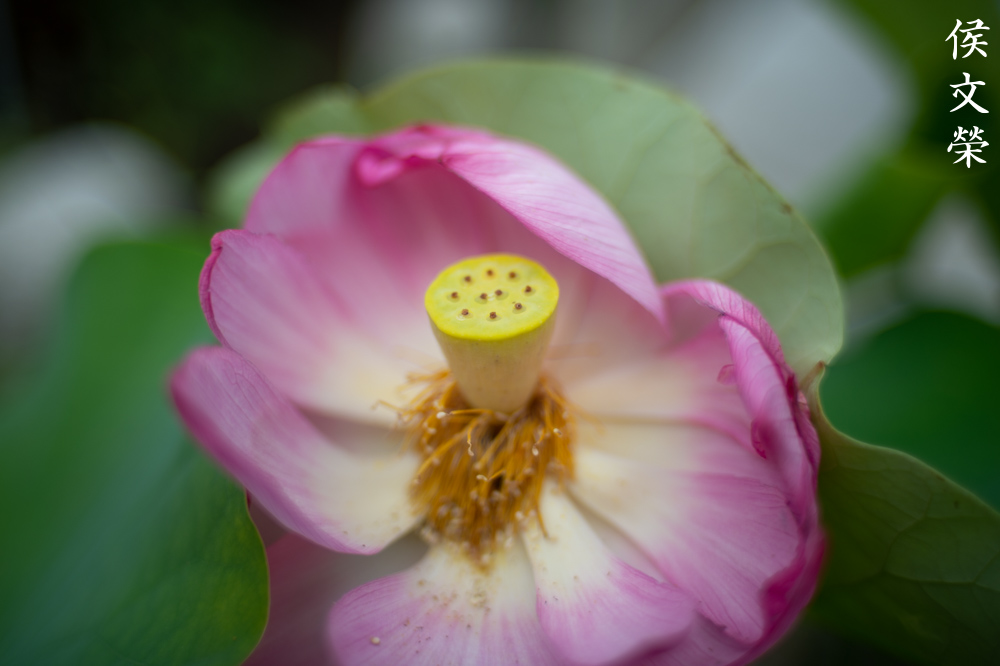
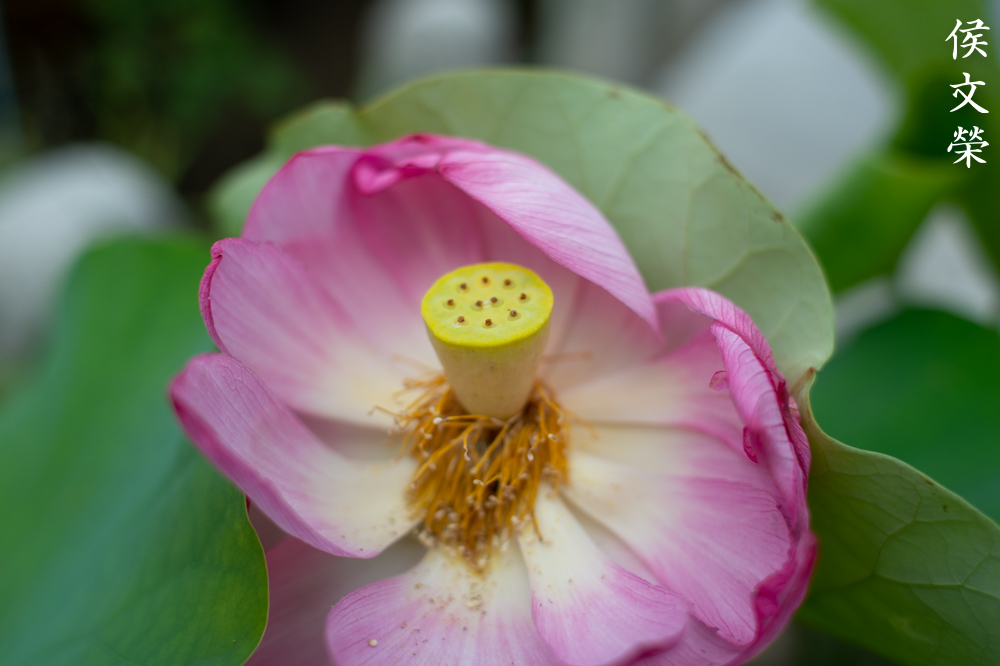
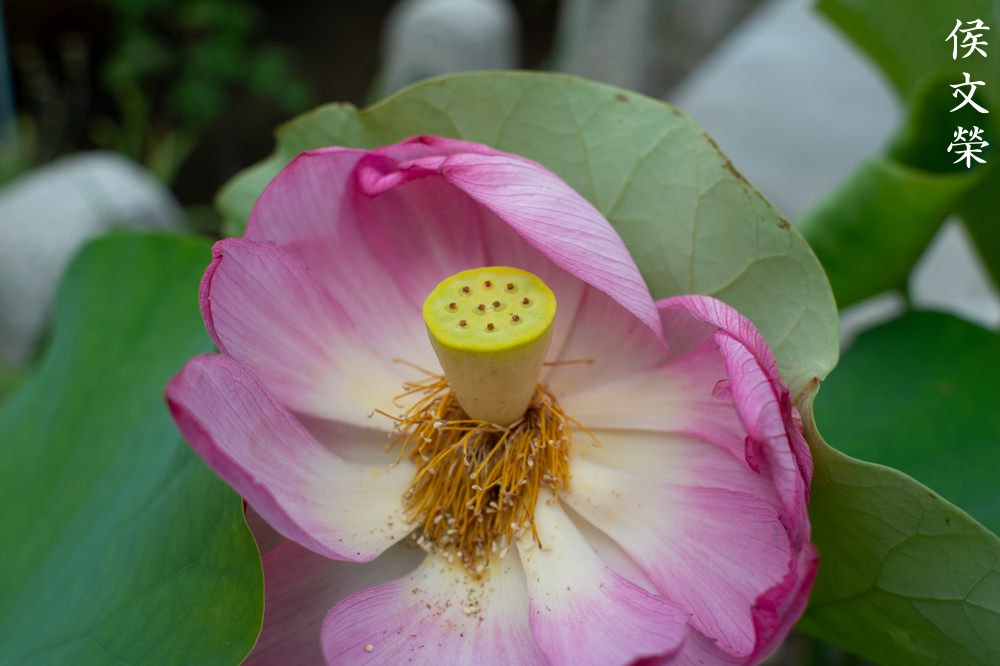
The pictures have a very delicate look when shot wide-open at its minimum focusing distance. It’s sharp but resolution is lacking, you will also notice its tendency to produce strong sphero-chromatic aberration at f/1.4. This helps give the pictures a delicate, soft-focus look that’s pleasing for taking photos of delicate things like flowers. Stopping this down to f/2 will give you more resolution to resolve fine details while still retaining a delicate look thanks to the veiling effects of spherical aberration. Things start to look a bit more “normal” when you stop it down from f/2.8 as you lose that delicate look. It’s the best aperture to use if you want good resolving power combined with a cleaner look due to the correction of the said aberrations. You will get peak performance by f/4 and f/5.6 where the resolution is excellent. Things look a bit better when you’re shooting a bit further with the focus around 1.5m or so. You still get a nice veiling-effect wide-open but it’s less-prominent. You’re going to be pleased by this lens’ sharpness at this distance provided you are under-exposing your shots a bit. For most cases, I will shoot with this lens at f/2 to get that nice, delicate look while benefitting from better its resolution. If it’s bright enough I will even go as far as use this from f/2.8 instead. This is an amazing lens when you’re familiar with its quirks.
It’s also worth mentioning that CRC helps with the close-focus performance of this lens specially at the corners of the frame as evident in the third set’s photos at wider apertures. A lens without CRC will have inferior corners, it will be blurrier than what we have here. This is an amazing feature of this lens and it’s one of the things that gave this lens a legendary status.


(Click to enlarge)
The performance isn’t terrible at further distances like 4-6m but you’ll have to be mindful with your subjects when shooting wide-open in bright places because over-blown details will result in chromatic aberration around them and the only way to avoid this is to stop it down. Shooting a scene with both dark and bright areas can be challenging because the lens works fine under darker conditions but the brighter areas will show chromatic aberration. If you are shooting a scene like the 3rd set of photos then be mindful of how it will look and stop the lens down to compensate for this so you will still have nice-looking bright areas that don’t exhibit any chromatic aberration.

This lens sure produces unique-looking photos when shot wide-open. This is a good example of what it can do if you under-expose your shot a bit, it’s my trick to avoid the effects of sphero-chromatic aberration in my photos. Look closely and you’ll see that this is a sharp photo, this is all thanks to CRC.

This is how it looks like when I didn’t under-expose the shot. This is useless if you ask me. If this is a serious photo then I would have taken this with an aperture between f/2 and f/2.8 at the least.

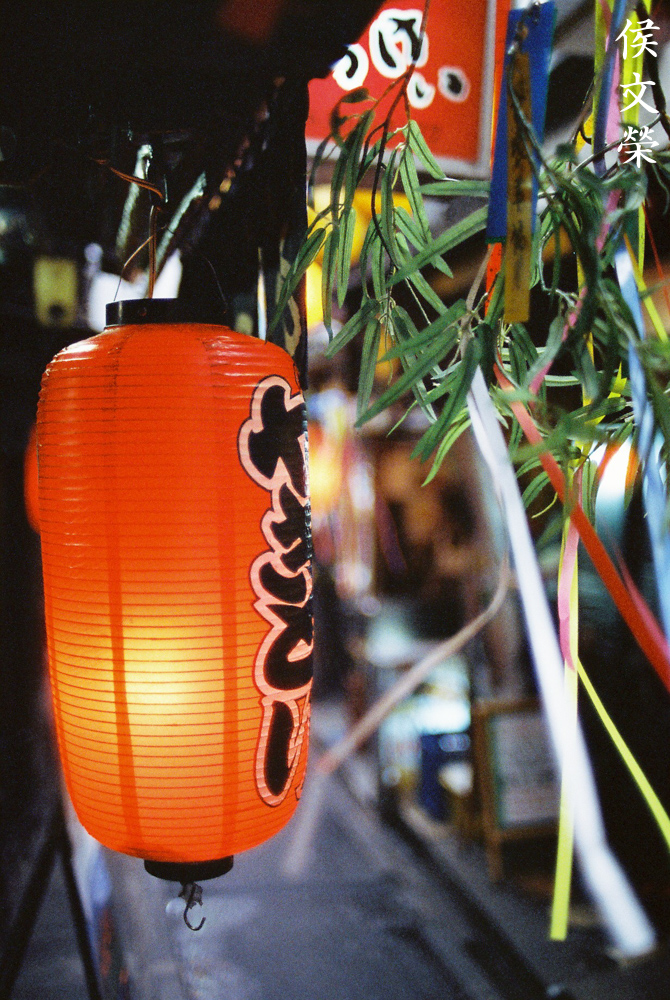
This lens excels when taking pictures at darker environments where you’ll get less things that can over-exposed or get blown-out. This was taken wide-open and I love how this lens rendered the lantern. Also note the smudging effect of the bokeh, the telephone lines look terrible and the details near the right-edge of the frame look horrible. This is not to say that this lens is bad, you will just have to figure out how to use it effectively.

The ability to shoot at f/1.4 is the reason to get this lens over the slower ones such as the Nikkor 35mm f/2 Ai. The latter is cheaper and more practical but it won’t give you the speed required for some scenarios specially if you are shooting with film where every f-stop matters in low-light photography.

This is an excellent lens for night-time photography and I can’t recommend it any further for this application. If you like taking photos like this then you already know that this lens is for you. The rendering looks exquisite, it’s the best lens in this price range if you ask me. It doesn’t have AF but that is not an issue for me since I prefer to focus my lens manually in the dark.


(Click to enlarge)
Here are more pictures for you to study. The photos have a natural, unique and subtle signature to them. They’re not “technically-perfect” because you can see some aberrations in them but it’s the main reason why they look so interesting. A little imperfection is sometimes good, it’s the reason why a bit of freckles or acne at the cheeks can make some girls look more attractive, a certain kind of appeal is usually better than a perfect-looking face.
The following photos were taken with Cinestill 800T using a Nikon F3 and a Nikon F6. Film has a unique look that’s difficult to simulate with digital, this is the reason why we’re interested in seeing photos that were taken with it. This lens was designed for use with film and it’s only fitting that we study it using its intended medium. This will help us assess this lens better and it is only fair that we judge something for its intended use.

Spherical aberration will be your biggest problem when shooting with this wide-open. Under-exposing your photo helps somewhat but it can be hard to avoid it at times specially if you have people wearing white in the scene. Under-exposing this will make the photo look “muddy”.

The lens certainly produces pictures that look unique when shot wide-open. You can use this look to give your photos something special. That thin slice of focus can be useful for blurring-out unnecessary details in your scene.

Despite the funky colors that you get with Cinestill 800T, this lens gives you a natural-looking color palette because it’s not over-corrected. The tones in your scene look natural and not “forced” like what some modern lenses will give you where the tones look “clamped”.


Here are some more pictures. This lens is perfect for low-light photography and I can’t think of a better 35mm lens for these kinds of pictures. Sure, the newer AF-S NIKKOR 35mm f/1.4G is technically better and it can autofocus but it’s several times more expensive. This lens is the best deal today when it comes to Nikkors in this class.
Let’s now see some photos taken with Cinestill 800T on brighter scenes. This will help us see the other side of this lens’ use with this film and it will give us a better appreciation of this lens as we understand how to use it better.

Amazing rendering! just look at how beautiful everything looks like. This is a boring scene but the shallow depth-of-field made it look more interesting. It made the scene look like a miniature set shot with a macro lens. This isn’t something that you should abuse just because the lens allow you to. You will get tired of this look soon and a blurry background isn’t something that you will want all the time. If you were shooting for a travel magazine then this will probably get skipped by your editor despite it looking interesting since you blurred too much of the background that people can’t recognize what’s there. It may work for this picture but not in every occasion.

(Click to enlarge)
It’s addicting to shoot with this lens wide-open because of it’s sharpness and shallow depth-of-field at that aperture. While not perfect, it’s enough to give you a sharp photo that’s certainly more than usable in most cases.

The shallow depth-of-field wide-open can be tricky to use at times and you’ll miss your focus a lot despite this lens being wide. There will be times when the camera will give you a false confirmation because of this. The focusing-aid will turn solid despite the subject being slightly out-of-focus. The easiest way to avoid this is to just “use the force” like what Luke Skywalker did. Just use a focusing screen with a ground-matte prism at the center and that can help you acquire a more accurate focus than what the digital rangefinder is capable of giving you. This is the joy of using manual lenses, if you screwed your focus then you only have yourself to blame for it.


(Click to enlarge)
This lens never ceases to amaze me. I love how it renders and it maximizes the fine-grained nature of Cinestill 800T. Details were resolved beautifully, I also don’t see much of the flaws that we saw with the photos that were shot with a digital camera. This is the reason why it’s best to test a lens using its intended medium. This is what the lens designers were looking at when this lens was being calculated.
Let’s now see some photos that were taken with Fujifilm Industrial 100. This is a more “generic” film compared to Cinestill 800T so the pictures will look more “normal” and without the signature halation of Cinestill 800T.

This picture looks exquisite thanks to how sharp this lens is wide-open. The background is blurred nicely and the subject isolation is beautiful. You will get a nice three-dimensional effect in your photos and you can use that for helping you tell a story by leading your viewers’ eyes to your subject.

The thin depth-of-field can be abused easily and you end up with a picture that looks trippy. I would normally avoid this kind of look but it sometimes adds something special to your pictures despite making your viewers dizzy.

You can avoid that trippy look by positioning your subject a bit further from you and you will retain that nice subject isolation without making the photo look like it was taken with an “art lens”. This is probably the best way to use this lens when using it wide-open for people pictures. It’s sharp wide-open, I love this picture a lot because of it and how beautiful the out-of-focus areas look. It gives you a very natural-looking photo that’s pleasing to the eyes.

Here’s another picture to demonstrate that effect. See how lovely the details are rendered and the quality of the bokeh looks exquisite. There’ll be times when this lens can give you inferior-looking bokeh and I will show you one example in the next picture.

The character of the bokeh can be quite harsh at times, this is an exception and it’s generally quite pleasing. When it’s bad you’ll observe outlines at the edge of the discs which contributes to this. The optical design is quite old, it hasn’t been updated since the first model of this lens apart from a little bit of adjustments from the radioactive glass to more conventional ones. It can have too-much contrast at times and that’s also another reason for the bad-looking bokeh quality in certain situations.

The good thing is it looks great when shot up-close and the background can be turn into a super-smooth blur of colors. Sphero-chromatic aberration is evident in this picture as this was shot wide-open. The field curvature is not as flat as I expected it to have so you must place important subjects within the same place as the main subjects in order to get them in-focus when you shoot with this lens at wider apertures.

Sphero-chromatic aberration can be avoided by stopping down the iris a bit and you will be treated with a very sharp photo with great resolution. You’ll get really nice colors out of this lens with a natural rendering. Vignetting is also controlled nicely after stopping the lens down by an f-stop. CRC helps a lot when it comes to performance at closer distances.

If you must shoot with this wide-open, make sure to under-expose a bit and that will help you avoid the effects of chromatic aberration. You can still see a bit of it in this photo but it’s not too obvious.


(Click to enlarge)
Beautiful rendering as far as I am concerned, this is as good as it gets when it comes to classic 35mm lenses. It’s hard to find another classic Nikkor that will render like this at this focal length. I rate this to be at the same tier with the legendary Noct-Nikkor 58mm f/1.2 Ai-S when it comes to rendering. This is something that many people don’t look for these days and you’ll even get ridiculed for this by people who have a different opinion.
I hope my pictures gave you an idea of how this lens performs. This is nice and I love shooting with mine. The focus throw is on the short-side, though. It can cause you to miss your focus at times which is a shame. People who shoot videos will want to use a follow-focus with a larger ring for this just to compensate for this. I find the focus-throw pathetic and I wish that it’s just a bit longer so I can make fine adjustments with it. It’s probably good for fast-moving subjects and newsmen and sports photographers will appreciate it but it’s not for me.
This lens is a special lens for people with special requirements. If you don’t need the fast maximum aperture then you’re better-off buying the cheaper f/2 lenses instead. They’re more practical in most cases and f/2 will be more than fast-enough for most applications, even night photography. If you are mostly shooting in darker scenarios like me then this lens is for you. People who shoot with film will also appreciate the extra speed this lens offers, it’s handy for situations when the lighting changes abruptly like moving from a bright outdoor scene to a candle-lit cathedral. This lens offers you plenty of options when it comes to creativity, you can use its minimum focus distance of just 0.3m to your advantage and take close-up photos with a special look. People who shoot the night sky will also find this useful since coma won’t be much of a problem from f/2 on but I suggest that you shoot at f/2.8 if you are really fussy with coma. When buying this lens, make sure that everything is working properly, specially the CRC mechanism. It’s hard to know if there is something wrong with it without opening it but you’ll know once you focus it and something doesn’t feel right. The iris can also be prone to the oily iris syndrome. If that happened, expect a major repair. This lens isn’t cheap but it’s still within the reach of many photographers. Just wait for a good one to appear online and scrutinize it first before you buy it. Ric.
Before We Begin:
If this is your first attempt at repairing a lens then I suggest that you check my previous posts regarding screws & drivers, grease and other things. Also read what I wrote about the tools that you’ll need to fix your Nikkors.
I suggest that you read these primers before you begin (for beginners):
Reading these primers should lessen the chance of ruining your lens if you are a novice. Before opening up any lens, always look for other people who have done so in Youtube or the internet. Information is scarce, vague and scattered (that is why I started this) but you can still find some information if you search carefully.
I highly recommend that you read my working with helicoids post because this is very important and getting it wrong can ruin your day. If I can force you to read this, I would. It is that important!
For more advanced topics, you can read my fungus removal post as a start. This post has a lot of useful information and it will be beneficial for you to read this.
Disassembly (Main Barrel):
The main barrel is not conventional in terms of design and it’s complicated in some areas because Nikon tried to fit so many things inside a small barrel so a lot of clever tricks were employed. You will have to take plenty of notes and measurements when you repair these and you will have to pay a lot of attention as to how the helicoids separates since there’s so many parts here that will get in their way so you can’t just turn them freely unlike the other simpler lenses that you’re used to seeing here in the blog. You’ll need to use the right type of drivers for this and a lot of patience when removing some of the parts that were sealed at the factory.
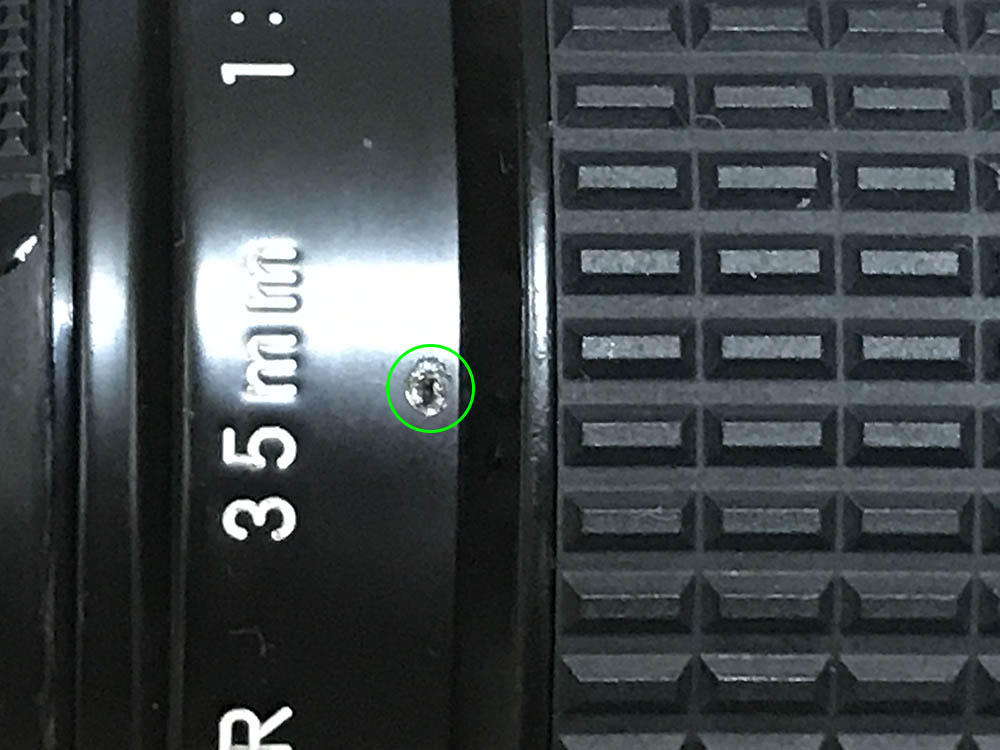
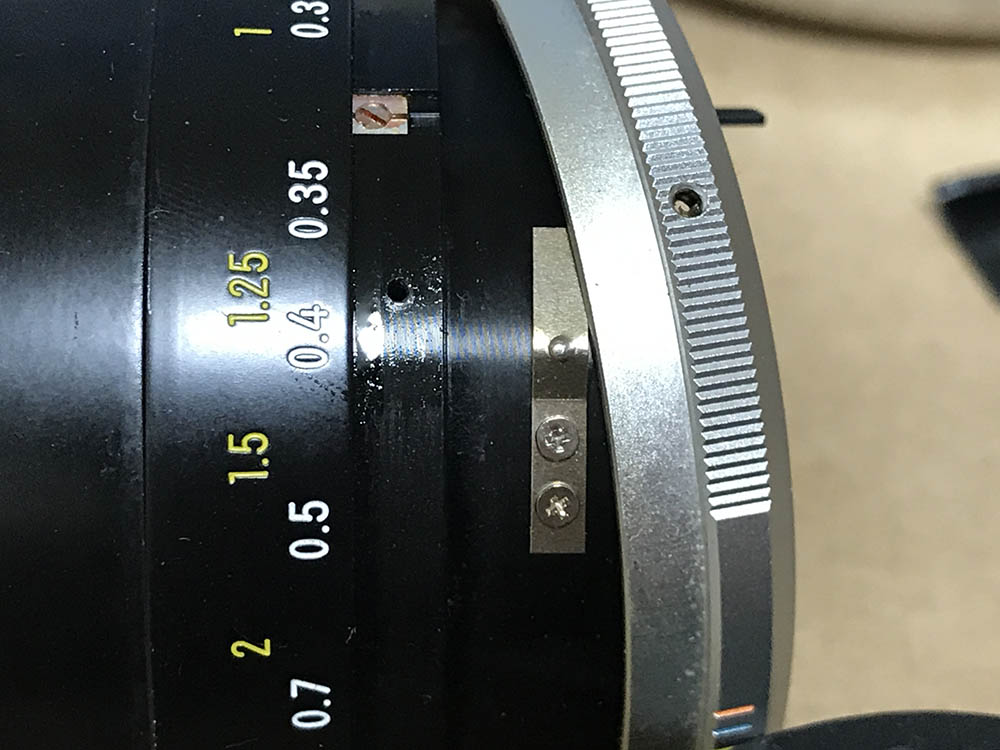
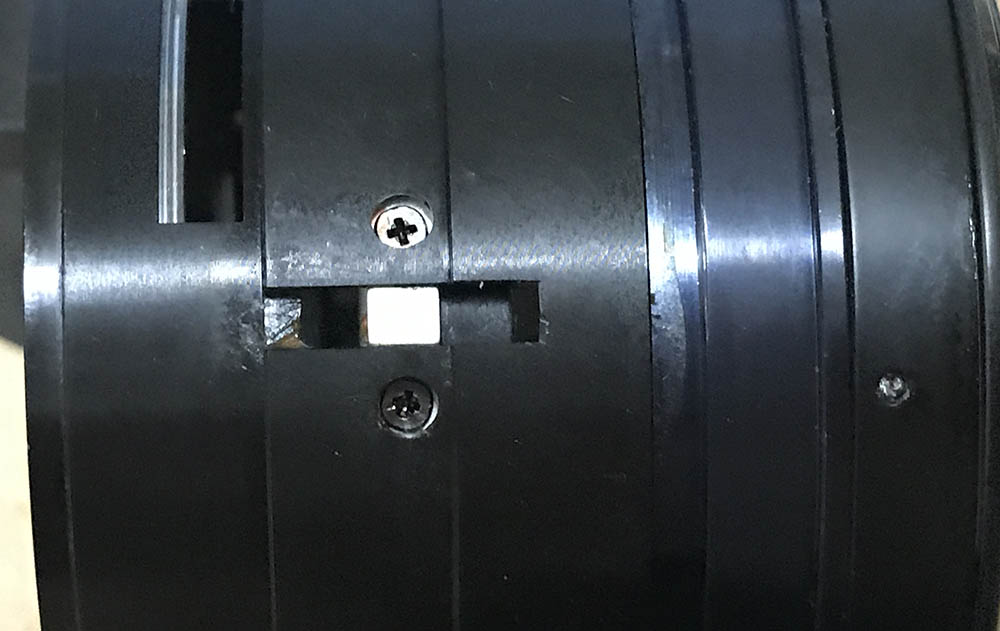
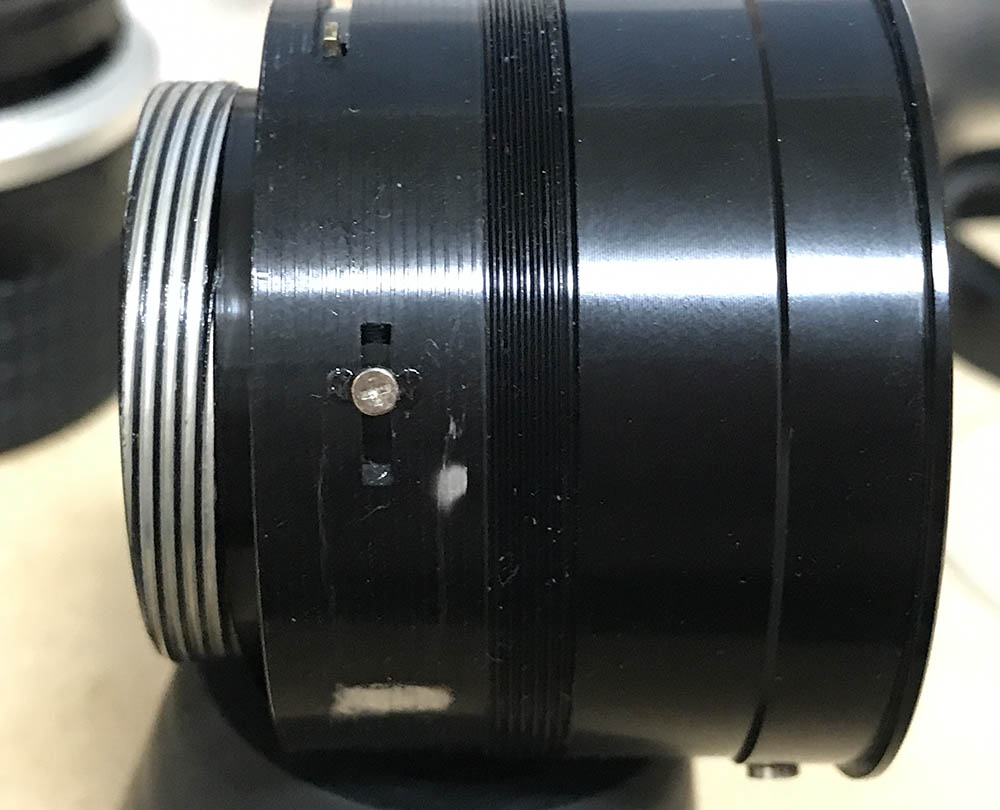
Locate this little screw and carefully remove it. It’s usually sealed with paint so you may have to remove the paint first. This one is severely damaged, it’s stripped and I should have replaced it but I didn’t see it until I stripped the head further during re-assembly. It’s so small and I didn’t notice it.
The set screw secures the front barrel and extracting that will allow you to remove the front barrel. It may be stiff so place a drop of alcohol on its hole to help soften the seal before you try another attempt.
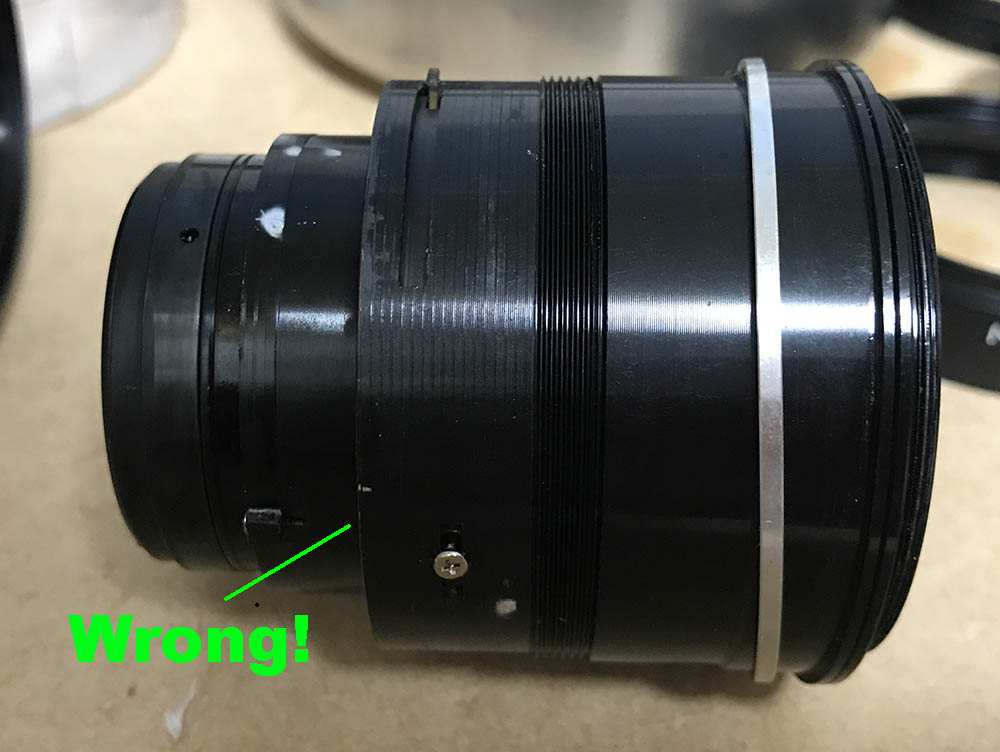
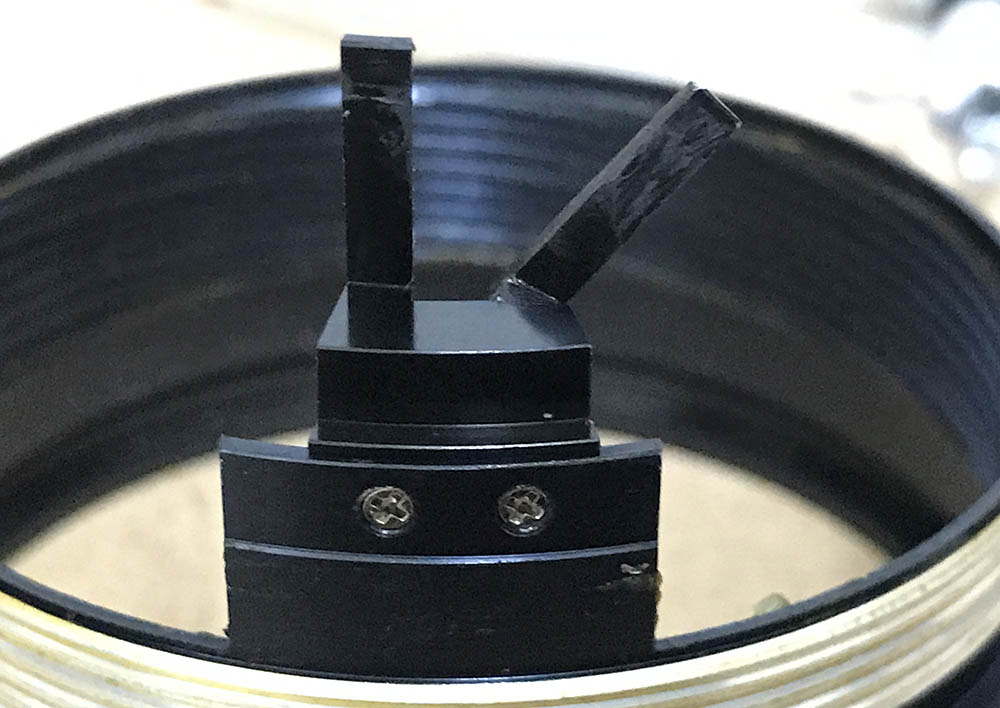
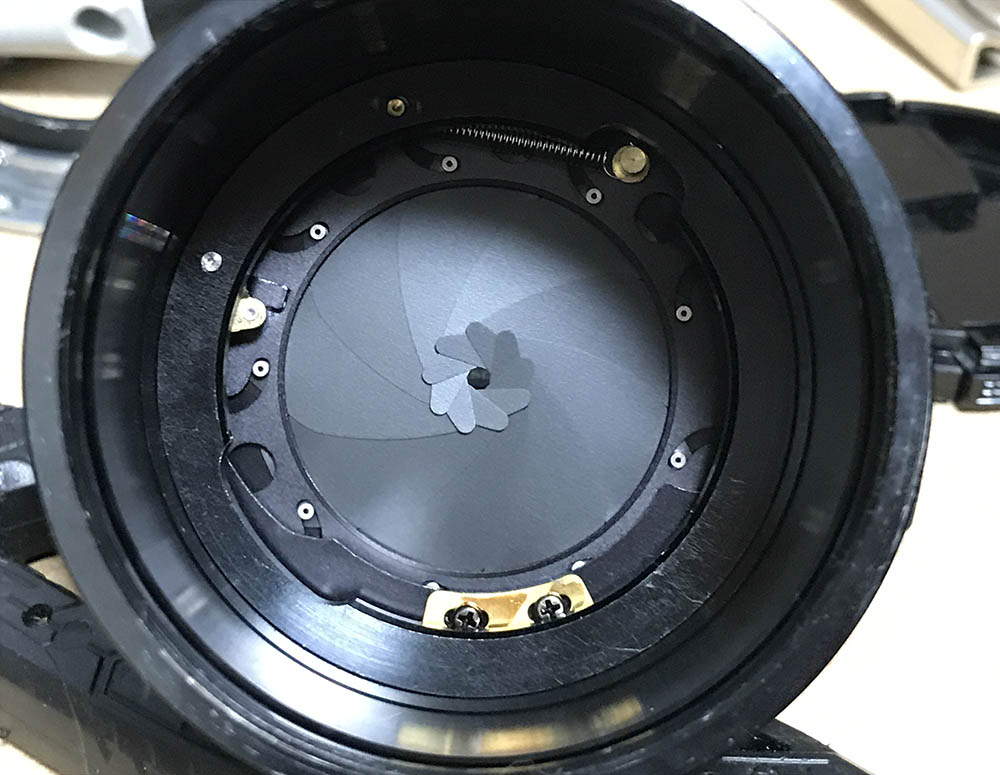
Carefully extract the objective and be sure not to disturb the position of the CRC element at the rear because you will want to note its position. This lens arrived in this state, the CRC housing was incorrectly installed so it contacts the housing of the objective. This is wrong, you will have to leave a gap here so there is enough room for the CRC casing to move up or down. This is very hard to assess and it took me the whole afternoon figuring out how the CRC housing should be installed. This isn’t easy so you will want to take notes on how much gap there is between these things.
Keep the objective inside a container so it’s safe and make sure that it won’t move or you can knock the position of the CRC housing off. There is a shim here that’s made from aluminum alloy and you don’t want to misplace this.
We can now work on the rest of the barrel now that the objective is gone. In this picture and the following ones, you’ll see that the objective is still in the photos. Please disregard it, I just wanted to see what’s wrong that’s why it’s still there. I don’t want to extract the objective with the CRC housing jammed as it may catch on anything and damage it even further.
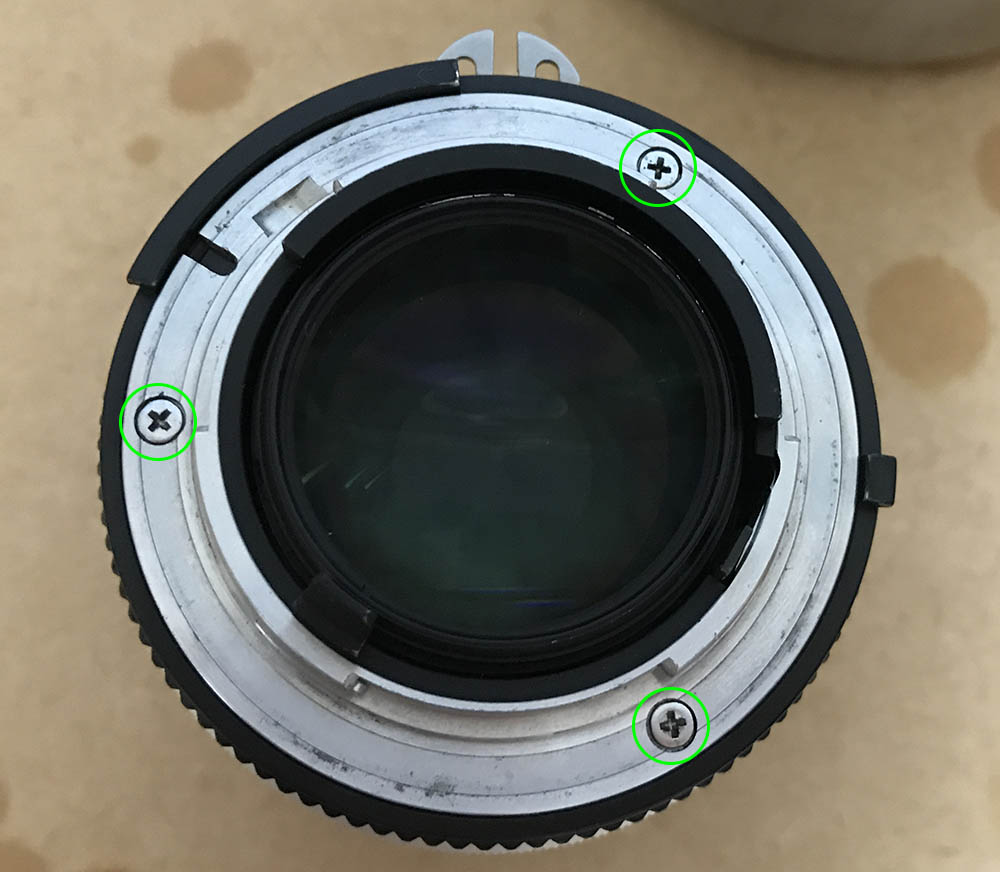
Remove the screws in the bayonet plate using a JIS driver. Many people get stuck here because they stripped the screws by using the wrong drivers or not having the right technique. To prevent this from happening to you, read my article on how to remove bayonet screws. These are not Philips screws, it is foolish to use the wrong type of driver for this and do not follow what the internet says about these and how to extract these when things go wrong. It is one of the reasons why I started this blog as I am tired of seeing stripped screws due to incompetence or ignorance.
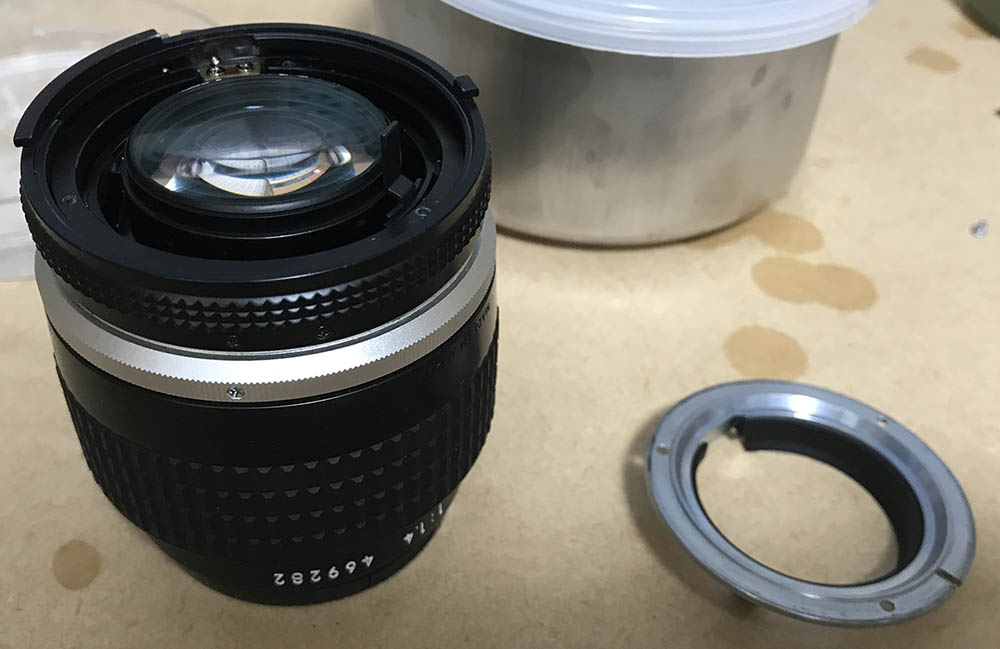
The bayonet mount can safely be removed once the screws are gone. One of the screws or some of them are glued at the factory using a strong adhesive. This is to prevent the bayonet mount from coming-off and the only way you can remove them is with heat or acetone.
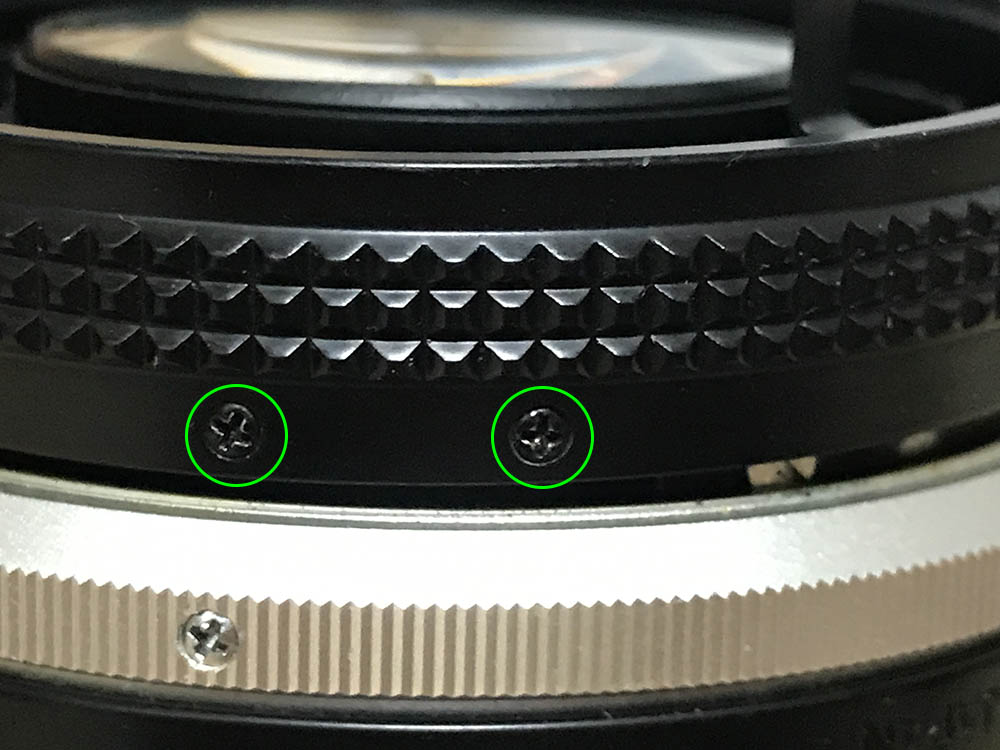
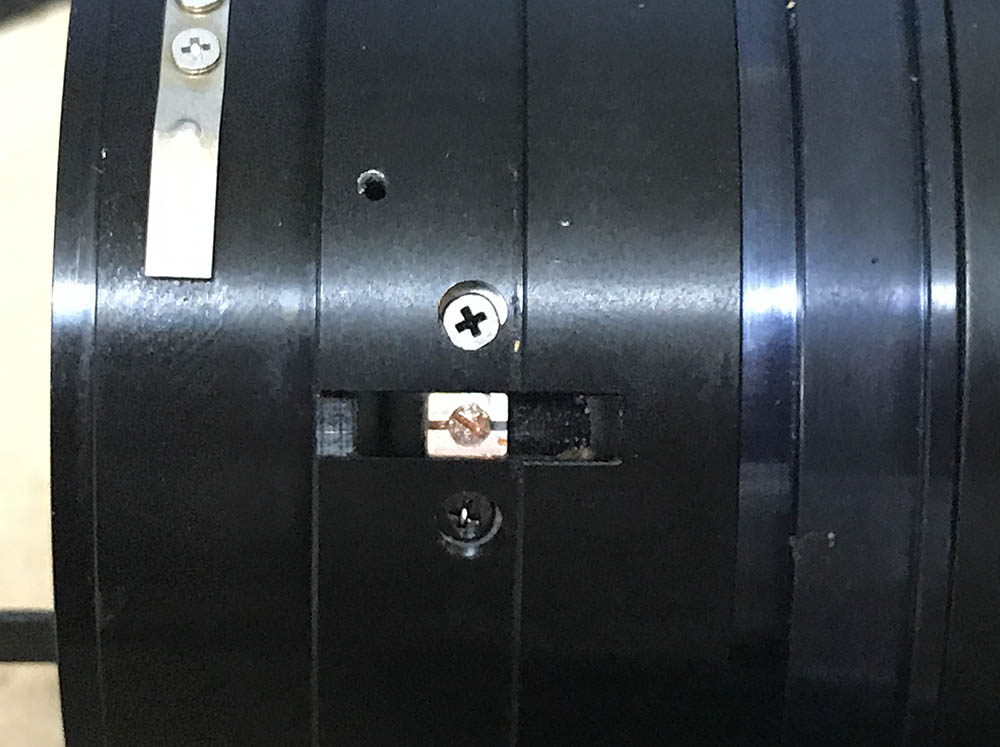
Before removing the aperture ring, extract these screws first. These couple the aperture ring to its fork underneath it so turning this will adjust the iris. These screws are usually sealed and heating them will make help you a lot. The heads can snap if you used brute-force to remove these. These are thin and using a screw extractor on these can be tricky.

You can now safely remove the aperture ring. The fork is still inside the lens barrel and you can only remove it once the objective is gone. It should be if you followed my recommended disassembly sequence.
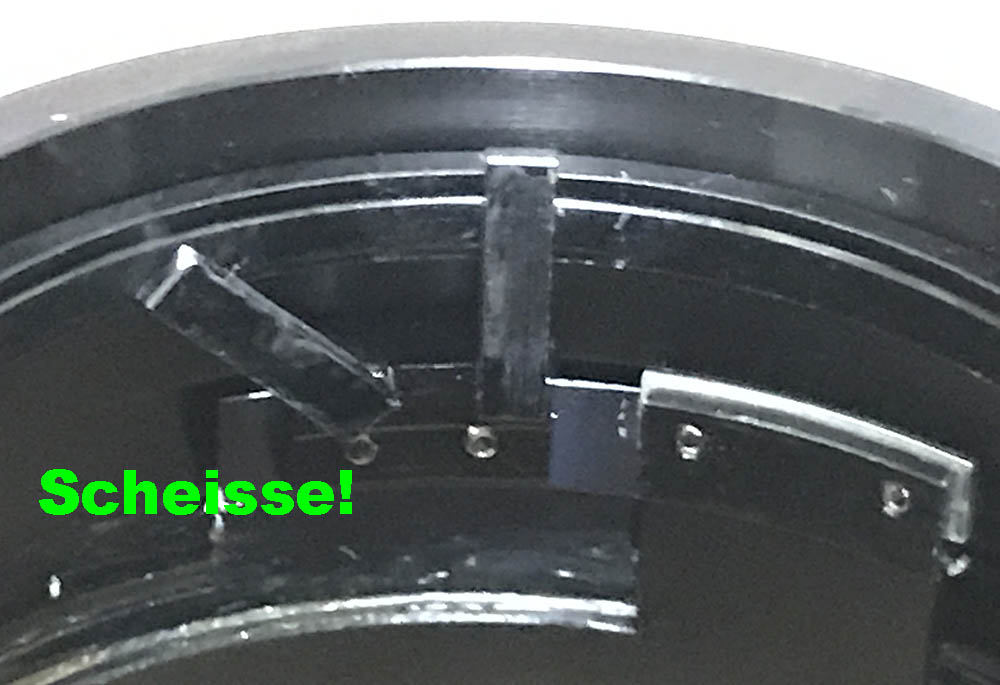
This is one of the cause of this lens’ problem! Since the CRC housing is not in the right position, turning the focusing barrel using brute fork bent this to a state that requires some serious repairs! This is why you should only send a lens to trusted repairman, a specialist if you can. A repairman who does not have intimate knowledge on manual Nikkors won’t be able to know how the CRC mechanism works and this is the result.
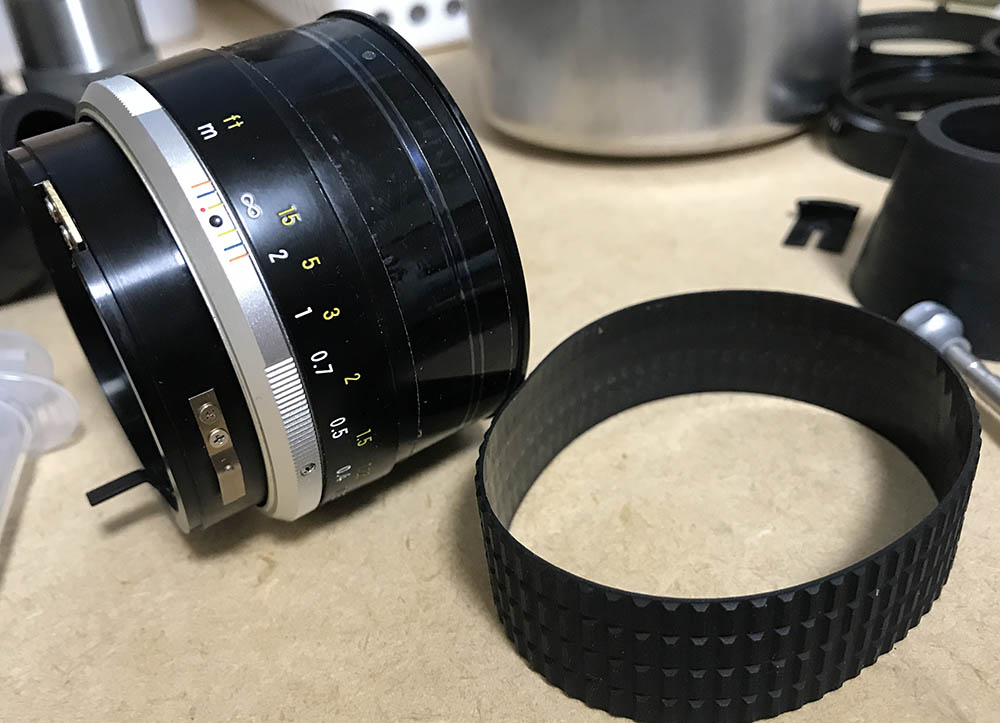
Carefully remove the rubber grip using a thin toothpick or a blunt rod. Slip it underneath the rubber and run it across the whole circumference of the rubber grip to lift it from the glue. Carefully remove it and make sure not to tear the rubber grip, you won’t be able to get replacement parts.

It’s now time to take as many notes as possible on the alignment of the rings and helicoids when the barrel is turned to infinity. You will want to work on the barrel while it’s at infinity so you will have a good point-of-reference.

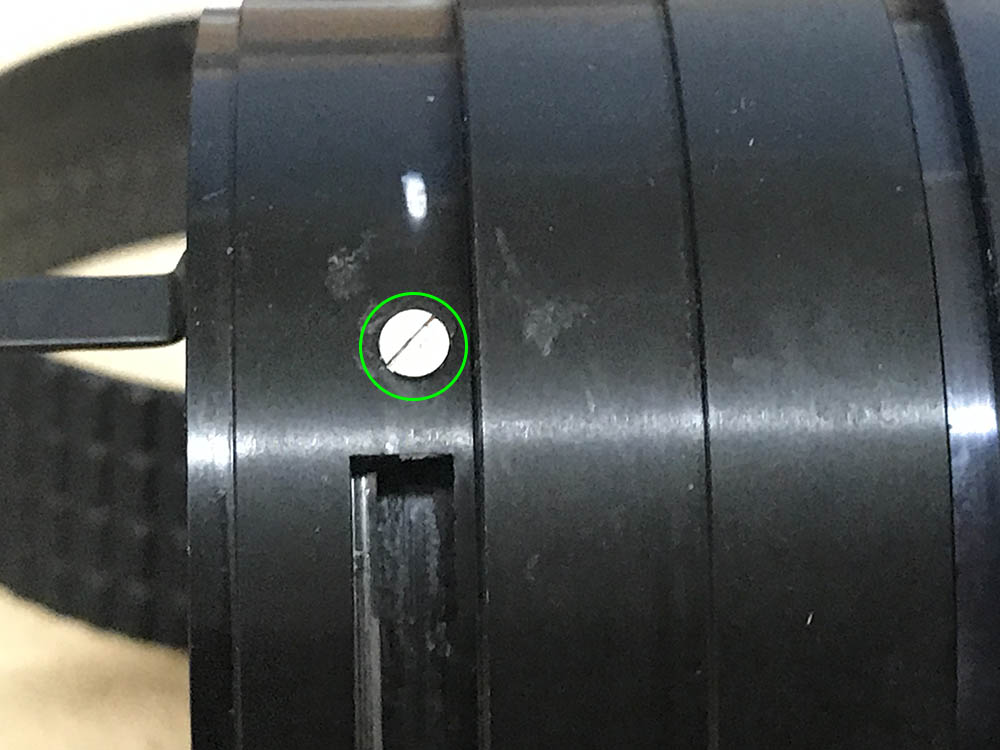
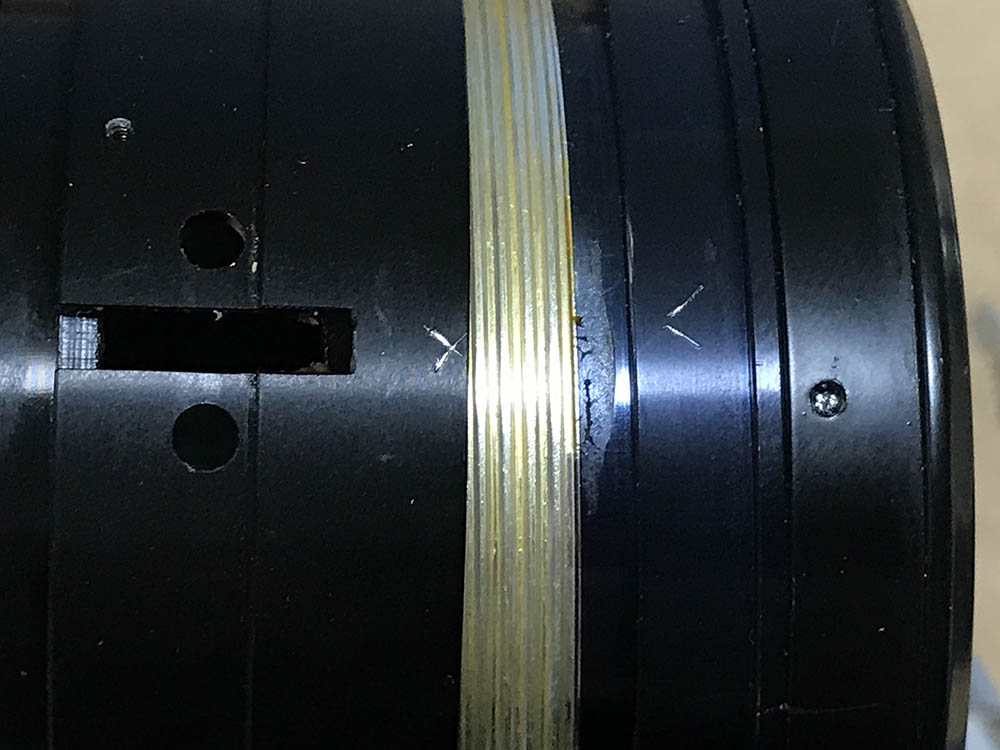
Extracting these screws will allow you to remove the grip. Use a driver that will fit the heads perfectly. A bigger one will scar the fluted details, smaller ones will strip the heads of the screws.
You may want to remove the detent spring to help you clear some space for the grip to pass-through, I simply pushed it down.

With the grip now gone, you can now remove the distance scale. Notice that the aperture fork is in the background.
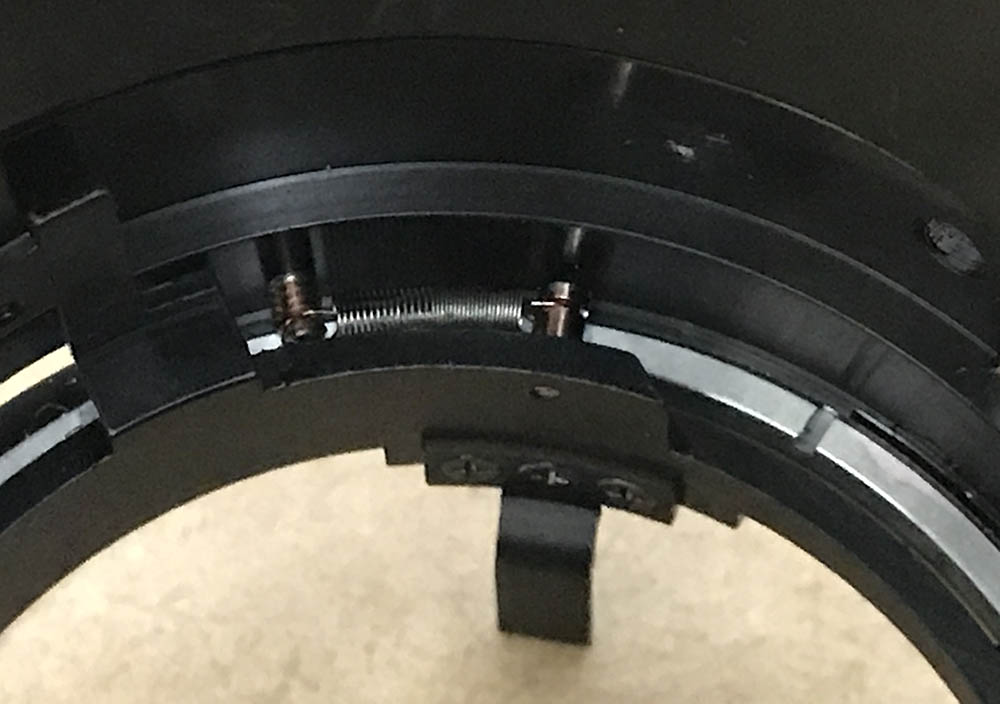
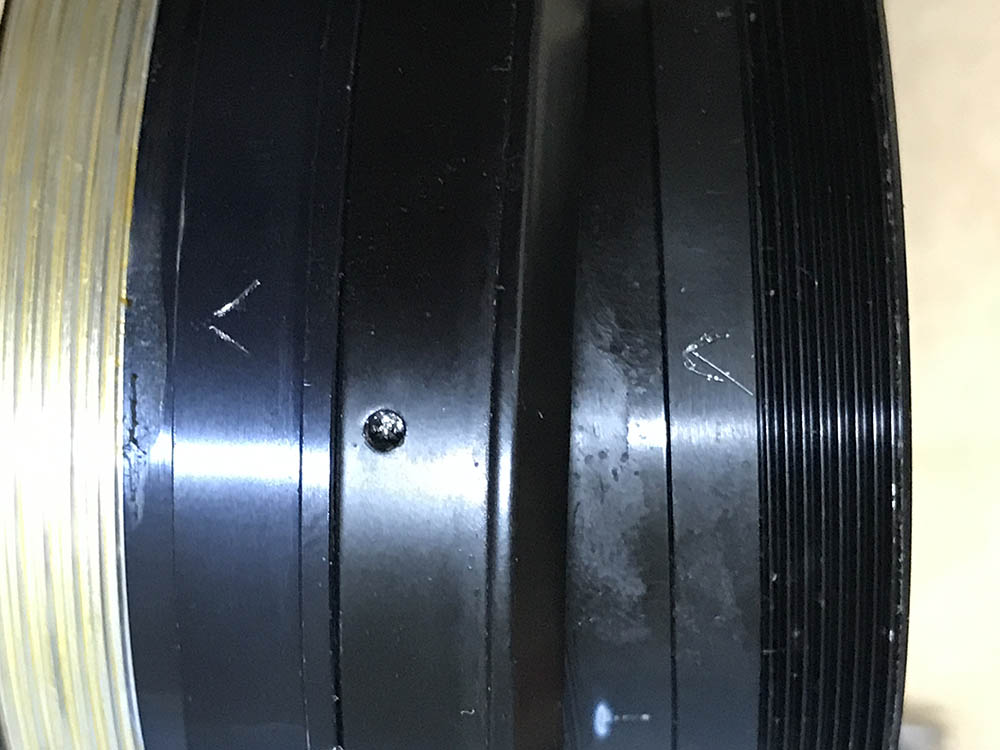
The following steps are optional. This spring is the way and this will stretch and lose its tension when you don’t uncouple it. There is a way to separate the helicoids without doing this but it will require you plan your steps more than you would ever wanted to. I don’t like solving pointless puzzles so I did this.
Uncoupling the spring will allow the stop-down lever’s ring to turn freely, it won’t stretch the spring and you can turn it as you wish without worrying if you may damage the spring or not. It can be challenging to put back but you will have a simpler re-assembly sequence to think about later.
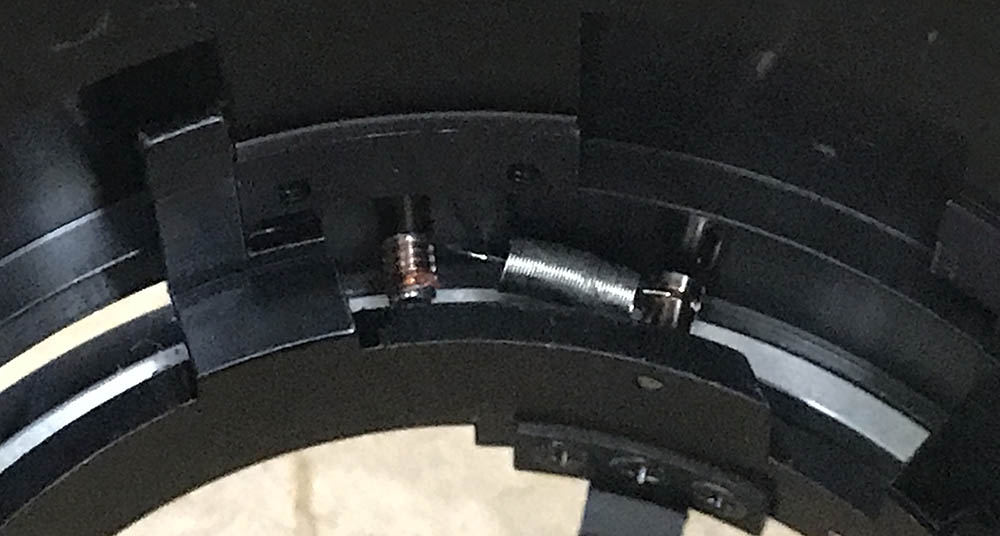
This is the head of the screw where one end of the spring was connected. It is in the way and you should carefully remove it. This is usually sealed and heating this with a torch will make it easier to extract this.
(Click to enlarge)
To separate the helicoids you must first remove the helicoid keys. This lens has a pair of keys, don’t forget to note which key should go to which slot and which part of the helicoid it’s attached to. There’s a screw in one of the keys, you can adjust the key’s width with that screw but never bother with it.

You can remove the CRC’s coupling fork through these openings. I didn’t do it because the fork on this particular lens was damaged so I wanted it to be connected to the helicoid when I remove it so I can see the whole extent of the damage before I remove it.
Once the helicoid keys and that pesky fork is gone you can now separate the helicoids. Start with the outer one and never forget to note how and where it separated because this is also the same spot where these should mate. Use a small scriber and place a mark to help you find this spot later. There’s lots of people who didn’t do this and they end up spending many hours guessing how these should mate. To prevent this from happening to you, read what I wrote about working with helicoids. Follow my guide and you should be fine so long as you turn these carefully.
Remove the inner helicoid and never forget to note where it separated, too.

(Click to enlarge)
The fork was bent terribly and I have never seen anything like this. I bent it back to shape by heating it and bending it carefully in small increments. It’s a very tedious process, it took me about an hour to get this right. I could’ve done this much faster but I wanted to do it the right way. This is dangerous because I am using a real mini-torch to heat this so I had to use glove so my skin won’t be burnt. I don’t think I got it to as parallel as it used to be but it’s much better than how it looked like before the repair.
That fork took more time to finish than I anticipated but at least it’s working now. The helicoids weren’t cleaned and re-lubricated since I don’t have time for that. The grease still looks fine and is the original one used by Nikon. It’s important to clean the helicoids properly and apply a fresh film of grease if you have the time. Don’t use a thick grease for this because there is another set of helicoids for the CRC mechanism. The combined resistance from these should give you the adequate resistance.
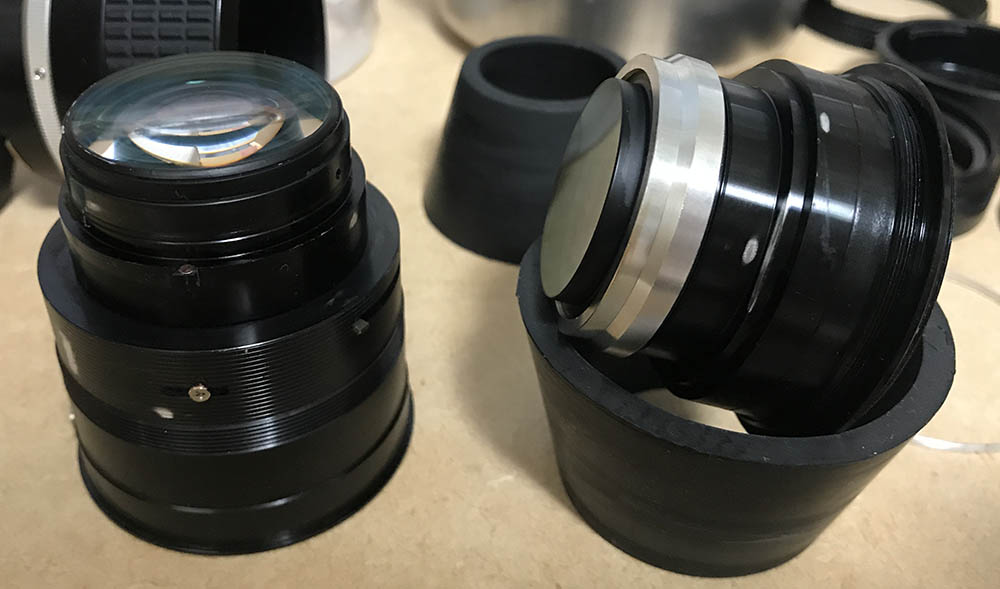
Disassembly (Objective):
The objective is simple apart from the CRC and iris mechanisms which were cleverly designed to fit inside a tight space. It’s amazing how this lens has a 9-bladed iris and how that thing fits inside the housing. The objective itself is clean but there’s fungus in some areas and oil in the inner glass.
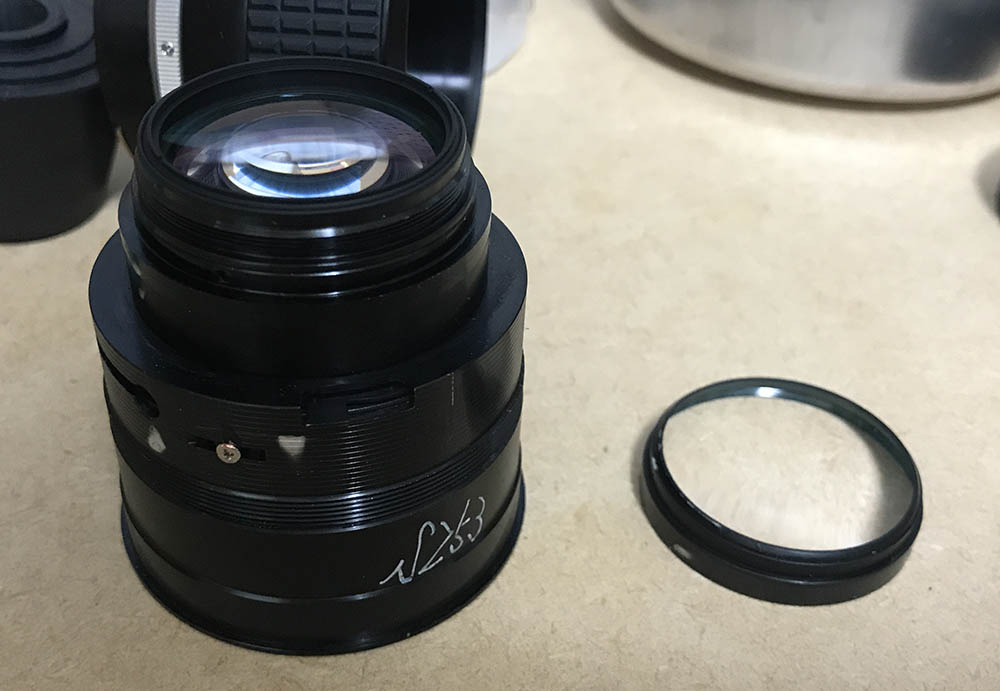
The front elements assembly can be separated just like this. There was oil in the elements, it probably got there through condensation so I had to clean it carefully. There’s also some signs of fungus which is a sign that this used to be a badly-infected lens and somebody cleaned it before me.
The rear element’s casing can be unscrewed from the CRC housing. It can be tight since this is usually sealed with lacquer. Alcohol will dissolve the seal.
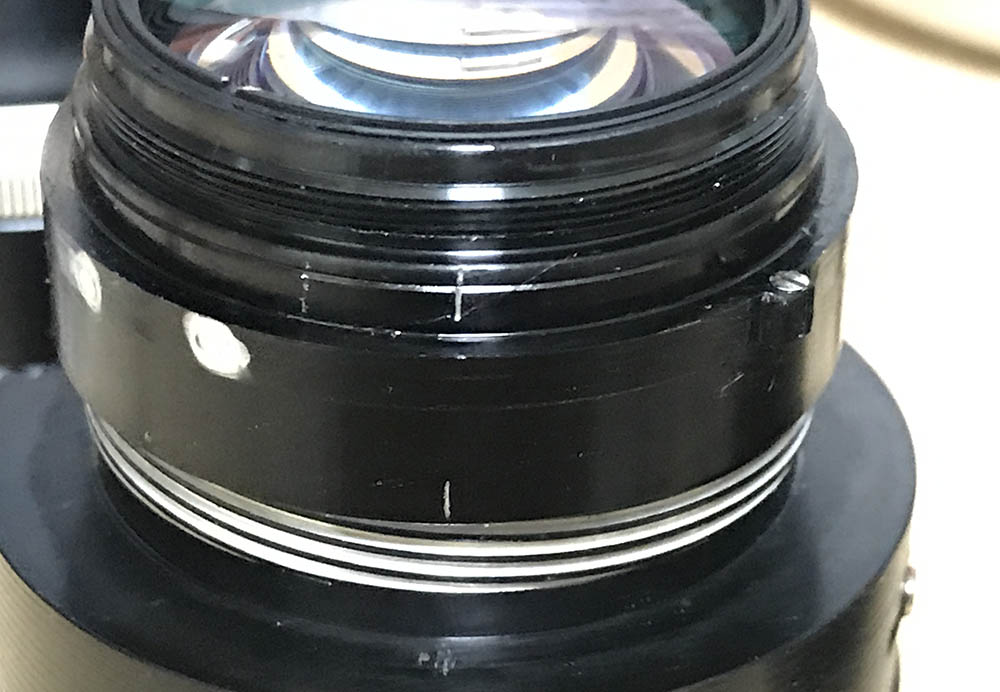
The CRC housing can be unscrewed like any helicoid, you should mark the spot where it separated. I didn’t mark this one because it’s pointless since it was installed improperly and I will have to guess where it should mate.

The rear elements assembly can be extracted from the CRC’s helicoid, clean it properly if it’s dirty.
The iris mechanism on this one seems clean so it’s best to just leave it alone.
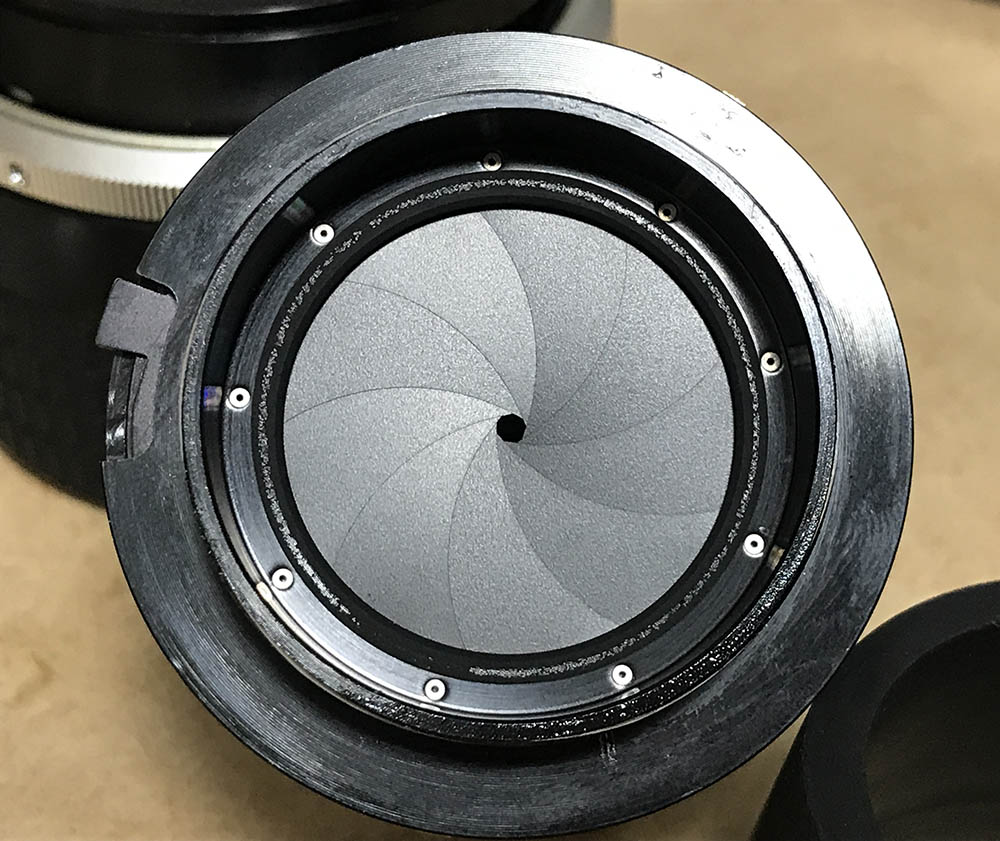
Here’s how the rear looks like.
Removing these screws will allow you to remove the iris mechanism. This is an adjustable mechanism as evident with the seal on the screws. If yours is dirty and you have to dismantle the iris mechanism to clean it, don’t forget to note its original position so you will know how to put it back.

After an hour of guessing how the CRC mechanism should be positioned, it’s now time to put this back to the lens barrel. This is how it should look like. I had to mount and dismount this several times and check with a camera just to see if I got it correctly. There’s be a gap between the CRC housing and the objective’s casing like you see here in the photo. This will allow it to move in or out as you focus. The previous guy didn’t know about this and the result is a broken lens sold for several times cheaper than a working one. This is a good example of why you should only send your lenses to a legit repairer.
The helicoids for the CRC should be cleaned thoroughly and a lighter type of grease should be used to coat it. Never apply too much grease or it will end up in the iris and cause an even bigger problem. A thin film is enough and it will go along way. I didn’t clean this one since the grease seems OK and I did not have the time when I was repairing this lens. I was supposed to do it but I already wasted so much time repairing the CRC mechanism. If time wasn’t a problem that I would’ve done the right thing. I only have an afternoon to repair this since it was a national holiday.
Conclusion:
This took me around 6-7 hours to repair with most of that time spent doing a lot of guessing as to how things should align since I don’t have a reference as to how things should be despite having a repair manual for this lens. The good thing is I have a perfect copy and I had to measure that lens at several points and then adjust this one so that it matches the good one’s tolerances. It sounds simple but it’s very tedious since it required a lot of dismantling if I got it wrong and I had to re-assemble it again just to test it. I spent a whole afternoon just doing that. If it takes an experienced repairer that long then it will probably take somebody else much longer.

Assemble the lens to this point and adjust your lens’ focus. Read my article on how to adjust your lens’ focus and follow my steps there. Since this lens is fast it’s essential that we calibrate its focus perfectly. Once you’re happy, use tape to finish your adjustments and re-install the rubber grip.
Such a magnificent lens. It’s a shame that this was badly damaged, lucky for the lens that I managed to repair this. It took me longer than it should since I had to adjust the CRC mechanism’s position and repair that bent fork.
Thank goodness this is now done. I don’t want to repair anything like this in the near future because it takes a lot of mental energy to do this. I hope that you enjoyed this article and may this serve as a lesson to you all. If you liked this article, please share this with your friends at social media. You can also help me by supporting this blog, that will help me pay the bills and this site can continue to educate, entertain and inspire more people. See you again in the next article, Ric.
Help Support this Blog:
Maintaining this blog requires money to operate. If you think that this site has helped you or you want to show your support by helping with the site’s upkeep, you can make a small donation to my paypal.com (richardHaw888@gmail.com). Money is not my prime motivation for this blog and I believe that I have enough to run this but you can help me make this site (and the companion facebook page) grow.
Leave me some tip?
Thank you very much for your continued support!
$2.00
Helping support this site will ensure that this will be kept going as long as I have the time and energy for this. I would appreciate it if you just leave out your name or details like your country’s name or other information so that the donations will totally be anonymous. This is a labor of love and I intend to keep it that way for as long as I can. Ric.

Jul 01, 2020 @ 18:19:54
I am a bit confused in regards to correcting infinity focus on this lens. Removing the tape and adjusting the focus scale will allow you to have the correct distance shown on the barrel, but the hard stop on infinity might not align properly with the infinity mark on the barrel. Is this correct? I have a copy of this lens that focuses pretty far past infinity. My desire is to have the hard stop at the infinity end of the range correspond with the infinity mark on the lens as well as being adjusted for the lens to reach infinity at that point. The silver ring which sets the hard stops is non-adjustable so is there a way to make this happen? or is it only possible to have the focus scale adjusted properly and not the hard stops as well?
Oct 17, 2020 @ 20:14:14
Thank you for your detailed article. The image of the correct orientation of the CRC piece saved a lot of grief. Getting that rear helicoid thread to start back in was a big vexation. The lens I have just defungussed has also been previously repaired or serviced. There was a stripped screwhead which fortunately I have not had to tackle as the fungus was in the front element of the CRC group not in the front group. The lens is a little flarey so maybe the coatings are gone on that rear group. The fungus cleared straight off the glass without any etchings.
Oct 18, 2020 @ 15:03:16
Further to my earlier reply, since following your guide, the lens focus action sees better. It used to go a faction past infinity before it hit its stop. Thanks again.
Dec 20, 2020 @ 19:49:52
Richard, have problem with my lens.. can I send it to you repairs…?
Jan 07, 2021 @ 17:26:22
Richard, u saved my life! Was declicking my nikkor ais 35mm f1.4 and when I tried to unscrew the rear element, I accidentally bent the fork without me even noticing until I read your article. After 5 hr, I managed to put fix the fork, declick and put the lens back in order again, the stress was real though. Btw, I didn’t remove the helicoid while fixing the fork, I simply heated the parts with a soldering iron and bent it back in shape with a plier. It works! Thanks again for this article =)
Jan 29, 2021 @ 06:57:08
Furthur to my previous reply, I since discovered that the lens was not achieving infinity focus. It seems that there had been previous repairs as there were several matchmarks, some which which did not match at the time I dismantled. After reassembly following your instruction, the lens was sharper than it had been. Now that the rear helicoid is set correctly it may be that the front helicoid is one thread wrong. The front metal shim ring is 1.5mm thick. The distance to achieve infinity focus as now assembled, requires the shim to be just a hair over 1.0mm thick. There are no shims under the rear mount tail that can be removed. I can cut a new shim for the front but there may be a simpler solution I have missed. Any advice is appreciated.
Jan 31, 2021 @ 19:46:14
Further to my previous reply – again, I finally got to the bottom of a monkey-puzzle which was why I was getting inconsisent results when cutting and adding shims in the front of the lens. The key on the back of the CRC group was not engaging with the CRC fork so focus was by the front element’s movement only. The range of movement was not matching the focus numbers. I eventually hacked an arrangement by putting a tiny dop of higher viscosity grease on the threads of the CRC group on the back and a pinhead of light oil in another spot on the threads. I then could tell if the fork had engaged by the greater friction when trying the focus movement. After final assembly I worked the focus movement full range to blend the lubricants into a thinner viscousity. Very.very small spots or it will migrate to unwanted places. It is far from a recommended method but it became a bit of a desperate measures thing as my close-up eyesight is not what it once was. The original shim was fine and the focus numbers now read true. Thank you again for your guidance on the CRC group’s correct position.
Jun 23, 2025 @ 05:41:52
Richard, thank you for being so generous and open with your knowledge. This information is invaluable and immensely helpful!
I am at the final stage of disassembly but am having difficulty disconnecting the final components of the CRC – the rear element and the CRC helicoid.
CRC – REAR ELEMENT
Despite applying alcohol along the split line and putting some drops through the side hole (to reach the threads), it simply will not budge.
CRC – HELICOID
Apologies for my beginner questions, as this is my first lens I have worked on and I’m trying my very best not to make any mistakes or do any damage to the lens!