
Hello, everybody! It’s the middle of summer here in Tokyo and it’s getting too hot for me to go out or even sit at my workshop! On the other end of the spectrum, it can be too cold during winter and I don’t want to do anything but just sleep. The perfect weather for me is a happy balance between winter and summer. While we’re on the topic of balance, I’ll be talking about something that’s considered to be one of the best lenses made by Nikon during the early days due to how good it was balanced in terms of performance and the price point it was sold under. Sometimes, the best option doesn’t really have to be the top product in the catalog. The key to success is following the middle path!
Introduction:
The W-Nikkor•C 3.5cm f/2.5 is one of Nikon’s best-sellers during the rangefinder days, it was a huge hit and there are still many samples of this lens that survive to this day but it is worth noting that these lenses should be treated with the utmost respect because we’ll not going to have enough of these in the decades to come due to the demand. It was also sold in Leica-fit (looking for one myself) for the screw-mounted cameras and it became a classic combination for many people up to this day. The reasonably-fast f/2.5 aperture is more than adequate for most tasks and this was considered to be a fast lens when it was sold new. Most wide lenses were sold with a maximum aperture of f/3.5 to f/5.6 so the fast f/2.5 (back then) maximum aperture made more things possible and made it practical for everyday use in almost every lighting condition. One very useful feature of this lens is it’s minimum aperture size is f/22 so you can stop it down to get maximum depth-of-field.
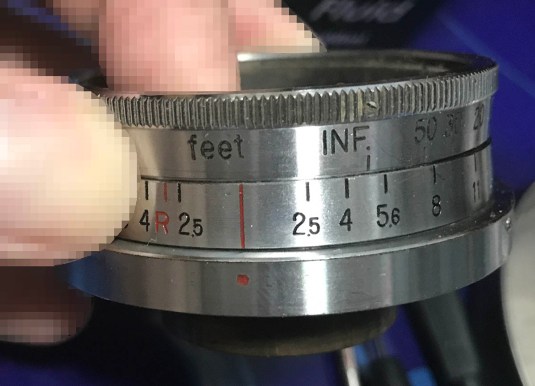
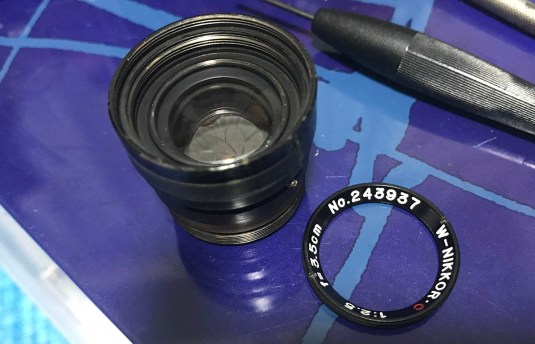
 The W-Nikkor•C 3.5cm f/2.5 is a nice and compact lens. It’s made from heavy brass and I love how it feels in my hands. The chrome and nickel plating helps protect the substrate and it also gives the lens barrel a nice finish. This was made during a time when chrome was liberally used for an equipment’s aesthetics. The drawback to this is it’s hard to look at the engravings and understand what’s going on during a sunny day. The barrel had a make-over near the mid-1950s and was painted black and the aperture numbers are now engraved on the outer rim of the aperture ring which made it handle a lot better. A hood is shown in this picture but I rarely use this with one because it can get in the way when I want to change the aperture so I never use this lens with a hood at all (just a lens cap).
 All the W-Nikkors of this series share the same basic schematics except for the ones that’s going to cost you more such as the amazing W-Nikkor 3.5cm f/1.8 or the exotic wider ones that costs more than your monthly rent. It can be hard to distinguish them from afar so I always have to look closer to know which one I am grabbing.
It has a 6 elements in 4 groups design and the geometry is almost symmetrical so it won’t distort the images much. Nikon likes to use this symmetrical design for most if their wide lenses during this era for some reason, maybe they have just mastered this design at the beginning of their consumer photography business? It also has a red “C” to denote that it was coated. Nikon got this marketing idea from Zeiss and it was dropped as soon as most lenses that came out of the factory were coated in one form or the other and it became a bit redundant to add this small detail to their lenses.
 When using this lens on cameras with no 35mm frame-lines such as the Nikon S you will need a separate finder to frame this properly. Nikon made many types of finders for their rangefinder cameras and you can also use the ones that were made by the other brands.
This is an amazing lens and I will even say that this one is the best option for somebody who wants a 35mm for their Nikon rangefinder setup. While the W-Nikkor 3.5cm f/1.8 is a great lens and it reigned as the best 35mm lens for some time before the competition had an answer, it’s an expensive lens that costs 2x as much at the least. The cheaper option is the W-Nikkor.C 3.5cm f/3.5 but its slower speed is going to make it near-useless for using it at darker environments which limits this lens to shooting on a sunny day. It’s also not much cheaper than the W-Nikkor・C 3.5cm f/2.5 so all you need to do is add a little more and you can get the next best option. Keep this advice in mind and you will know what’s going to be the best option for your budget and needs.
The following samples were shot with a Sony α7 using an adapter. I made lots of pictures with this lens on film but it’s going to be almost impossible for me to scour my library to look for the pictures that I took with this lens because film has no EXIF data! Maybe I will update this in the future when I will shoot a dedicated roll using this lens and post what I can get out of that roll here but we will have to make-do with these for now.
Knowing how a lens performs is very important because you will know how to use it and when not to use it. I hope that my samples will help make things clear for you so you can make a better decision when considering if this lens is for you or not. Having said that, I want to warn you that I shot all of the people pictures in this article from-the-hips. This is a technique that I use a lot and I wasn’t focusing on my subjects so the focus will be off in some of the pictures. I was also walking fast so even when shooting at 1/800s, I sstill get a bit of motion blur as the subjects are mostly walking towards me. I know that this sounds like I am just making excuses but it is what it is.


(Click to enlarge)
The vignetting can be terrible for this lens (at least in my sample), the annoying thing is it’s not even and biased towards one side much like a graduated ND filter. The left-most picture was shot at f/2.5 and as you can see, there’s a dark bar at one edge of the frame! It improves a bit when you stop it down to f/2.8 and the vignetting is almost gone by f/4. It’s very important to know this “feature” so that you’ll know what to expect when you use it for real-world shooting specially with film cameras where there’s no preview.
 Here’s an example shot oriented horizontally. The ugly vignetting isn’t so obvious here, it is not clear if this was caused mechanically or optically but I’m not seeing this with all of my pictures from this lens with film but whatever. As you can see, the center is so sharp even wide-open that it is not characteristic of a lens calculated in the late 1940s. You can also notice that the edges are a bit lacking if you look at the shorter building to the left. It is not as sharp as later lenses but it’s more than good enough especially with film.


(Click to enlarge)
The lens renders nice sun stars but you can see some flaring and ghosting. This can’t be helped since the coatings applied are old-tech. The blobs solidify when you stop the lens down which you can use creatively as part of your composition. This isn’t so bad if you’re going to ask me, I have seen lenses that perform worse.


(Click to enlarge)
These were shot from f/2.5, f/4 and f/5.6 in that order from left-to-right. I skipped f/2.8, it’s too close to f/2.5 so it won’t make any sense to include it here. The lens is sharp at f/2.5, it only looks otherwise due to flaring and other artefacts. By f/4, the contrast improves and you can now see how sharp it is clearly. It’s showing near-peak performance by f/5.6 and it is really not going to improve the sharpness and contrast by much if you stop it down further but the peak performance of this lens is at f/8 if you’re just curious. Stopping the lens down even further will only make more of the scene in-focus but diffraction and its effects will begin to show around f/11. I don’t really mind to be honest because I always shoot this lens for things where sharpness is only 2nd to DOF.


(Click to enlarge)
Well, probably not very good examples for studying how the distortion looks like but this lens does have a little bit of the usual barrel distortion as ecpected from a lens this old. It is not distracting or obvious in most shots so it’s rarely a problem for me. The design was inspired by the pre-war symmetrical designs which has the characteristics of giving a flat or low distortion pictures.


(Click to enlarge)
Here as some samples shot in color. The lens renders in a very natural and organic way, I love how my pictures look and there’s definitely something intangible with these images that make them look special. The colors look a bit muted or flat but that’s what we want in an old lens sometimes if you will agree with me on this statement.


(Click to enlarge)
Here are some pictures that were converted to monochrome using Lightroom’s presets. I just wanted to convert these to monochrome because I didn’t have the time to process a roll of film shot with this lens. I really love using this lens and it just works!
Now for some pictures that were shot with film! Film has a unique look that digital can’t reproduce and that’s why we’re doing this so we can see how a lens performs in these 2 media. Seeing the pictures that were shot with film will help give you a better idea of this lens’ performance. Digital will never do justice to a lens that was designed for film.


(Click to enlarge)
This part mirrors the results that we shot with digital when it comes to flaring. I also got a weird clipped flare on the first picture, I have never seen anything like this and this is very odd because the cause of this seems to be mechanical rather than optical. I doubt it has to do with the shutter because I should be getting the same thing on the whole roll if that’s the case and the effects of shutter bounce should manifest itself at the other end of the frame. This is very odd and I will find the cause of this.


(Click to enlarge)
These pictures were shot at about f/8 or so. Contrast and saturation seems good for a lens that was made in the 1950s. I love how it rendered the reds in the scene and how rich the bright colors looked. These pictures are great examples for the effects of distortion at the far edges of the frame. The distortion isn’t too much but it’s enough for you to notice.


(Click to enlarge)
Depending on the situation this lens can give you really ugly bokeh characteristics if shot near its minimum focus distance of about 1m. The good news is this lens performs great when you shoot with it really close whether wide-open or stopped-down. Wide lenses are judged by how good their performance are at closer distances and at infinity by some. It does make sense since wider lenses are valued for their ability to exaggerate things. You can make your subjects look bigger or dimunitive depending on your composition and it is the key to using these lenses.


(Click to enlarge)
This lens is nice for travel photos since it’s both wide-enough and fast-enough for most of your typical travel pictures. I really like how this lens renders so long as I’m not shooting directly at the Sun or at least have it facing the lens.
 This lens’ simple optical formula can give you really nice pictures that show depth and it can help separate your subjects from their background. This was shot at around f/5.6 and still managed to get a decent level of subject separation. The monk looks sharp and every detail of his garb and drum are rendered beautifully yet the background is blurred a bit, making him pop-out from the frame.
 Skin is rendered beautifully in this picure as evident on the cop that photo-bombed this picture. Everything is sharp at f/5.6 and beyond and the DOF is wide-enough so you have more things in-focus. I love this picture a lot because of the timing, a happy accident.


(Click to enlarge)
Here are some more pictures that I took with film. If you like shooting film then this lens is going to be very useful for you. It’s going to be a little bit odd to handle but it will give you nice pictures when you know how to use it properly. True, modern lenses are better in almost every way but this lens will give you something that they can’t which is the feel and nostalgia that you can get when shooting with something this old.
So, do you think this lens is worth buying? If you’re shooting with Nikon rangefinders or the Contax rangefinder system (and its clones) then this is a nice lens to own. It is decent in almost every aspect and you can still take nice photos with it despite it being out-dated when it comes to some aspects of its performace such as vignetting. Manipulating the iris can be a bit awkward with this lens because you will have to look at the front in order to see which f-stop you’re in. If this bothers you then the later versions of this lens is what’s going to please you beacuse the f-numbers are all engraved at the outer rim of the lens. It makes things a lot easier and I recommend that you get that version if you want to use it on a regular basis. For people who shoot with Leica thread-mount cameras, this lens will be a nice addition to your collection. The LTM version of this lens costs just a bit more or about 20% the going rate of this lens in its native mount. It can be a good alternative to a Leica lens and it certainly won’t cost as much. That’s it for the introduction and I hope it’s enough to give you a good impression of this lens’ performance. It’s still a good choice in the age of auto-everything and once adapted, these lenses can still bring you joy and lots of nice pictures with today’s amazing digital cameras.
Before We Begin:
If this is the first attempt at opening a lens then I suggest that you read my previous posts regarding screws & drivers, grease and other things. Please also read what I wrote about the tools that you will need in order to fix your Nikkors.
I highly suggest that you read these primers before you begin (for beginners):
- Essential tools
- Best practices 1
- Best practices 2
- Best practices 3
- Ai conversion
- Working with Helicoids
Reading these primers should lessen the chance of ruining your lens if you are a novice. Before opening up any lens, always look for other people who have done so in Youtube or the internet. Information is scarce, vague and scattered (that is why I started this) but you can still find some information if you search carefully.
I highly recommend that you also read my working with helicoids post because this is very important and getting it wrong can ruin your day. If I can force you to read this, I would. It is that important!
For more advanced topics, you can read my fungus removal post as a start. This post has a lot of useful information here and there and it will be beneficial for you to read this.
Disassembly (Lens Barrel):
The lens barrel is easy to take-apart for people who are experienced with lens repair. It’s very simple and the construction is almost identical to that of the other W-Nikkors. Read my articles on the W-Nikkor•C 3.5cm f/3.5 and the W-Nikkor•C 2.8cm f/3.5 to see how they are similar so you won’t have any surprises waiting for you.
I will rate this lens on the easy-side but I will not recommend this to a beginner because these lenses are getting more and more valuable each day and it’s not a good idea to use these for practice. Get a used and cheap Soviet lens and use that for practice instead.
 Remove the rear collar by using a lens spanner. Notice that somebody had been working on this lens before it got to me as evident by the scratches, the idiot slipped and the tool’s tips scratched the metal. Personally, I always use my fingers for these things since they’re usually loose-enough for me to remove them without the use of tools.
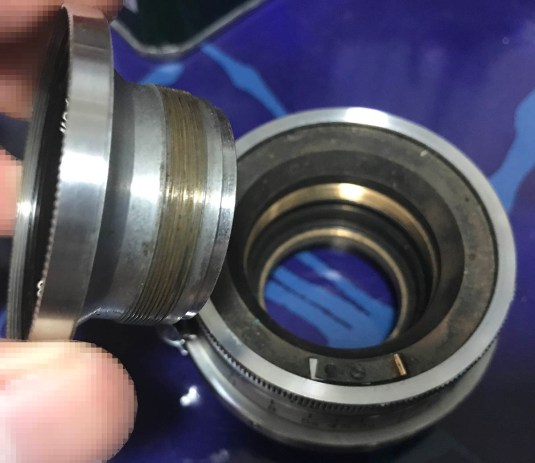
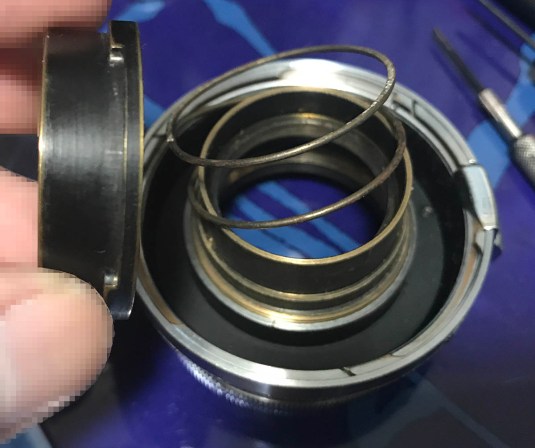
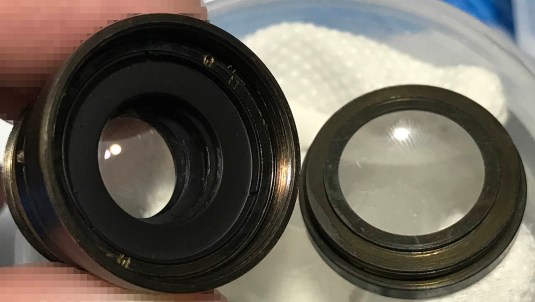
 Removing the collar will separate the whole thing into its bare components. Seeing this, I will strongly suggest that you remove the collar while the whole thing is in your palm so that the objective won’t fall straight to the floor. The picture above shows the basic parts of the lens:
- A is the objective.
- B is the lens barrel assembly.
- C is the collar that we just removed.
As you can see, the whole thing is being held together by the collar. This is very typical of all early W-Nikkor lenses as far as I know (Nikon-fit only).
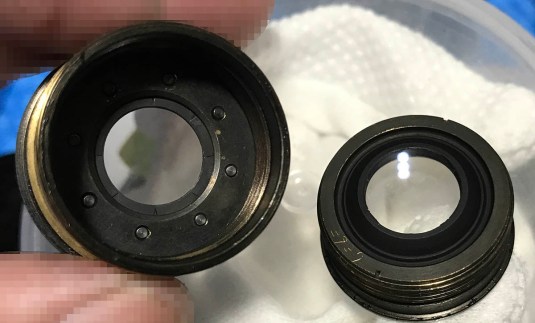
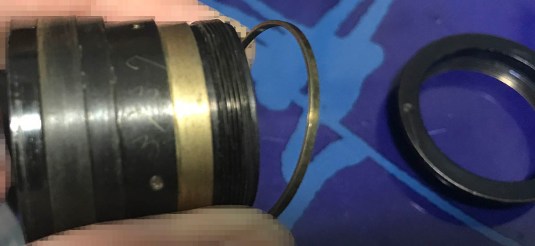 Whatever happens, never lose this brass shim! These shims added at the factory to adjust the lens’ infinity focusing so don’t lose or damage these things because they are unique to each lens and were all filed-to-fit. Store the objective in a safe place and make sure that it doesn’t get damaged or roll-off the edge of your table. Test it on its side so the glass won’t come into contact with any surface. I use a small plastic box just for this purpose.
 Now that the lens barrel is on its own, you can begin dismantling it. Remove the collar or the front ring by unscrewing it but don’t forget to take notes on how far this thing should go so you won’t turn it too much when you reassemble it. This collar also serves as your lens’ aperture ring so be very careful with it. Clean the threads very well so it will rotate smoothly and only apply a very thin film of grease to lubricate the thread. Notice that the detent spring can be seen in the picture. These are adjusted so your lens will click nicely and accurately as you change your aperture so leave it alone. If you must remove it then take plenty of notes so you’ll know how to put this thing back. If you got it wrong, you’ll end up with a lens with mis-aligned click stops and your iris’ opening won’t be accurate.
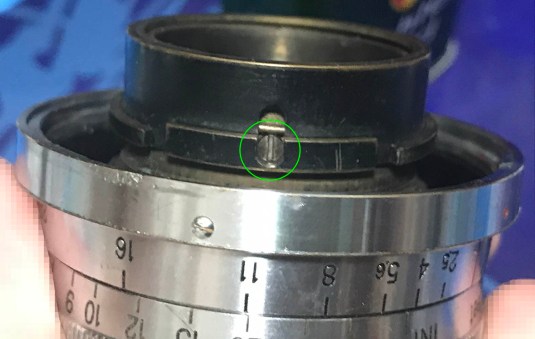 To remove the rangefinder coupling collar, remove this screw. Notice how the spring sits atop the screw, this is how it should look like when you reassemble it if not then you will not be able to make this slide properly. This collar or cam engages the rangefinder’s lever so that the rangefinder’s prism and arm will move as you focus your lens.
 The whole assembly can be taken-apart just like this. Clean this very well and remove all the rust with a chemical bath or by brushing it. Don’t lose that screw from the last step, it is a crucial part of this assembly and it holds this whole assembly together. You can use a small amount of grease on this thing but make sure that you only apply a very thin film where there’s metal-to-metal contact. Don’t apply too much, the grease will coat the parts in due time as it spreads. Applying too much grease will end up being problematic later, I will err on the side of applying too little than the other way because of this.
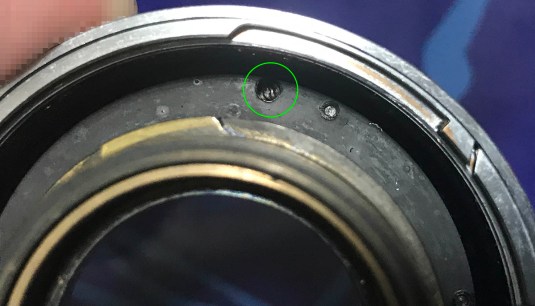 To separate the helicoids, remove this screw and be careful not to damage it. It’s delicate and you can’t find a replacement for this unless you make your own or got lucky because you have a similar part in your spares box. This long-headed screw acts like a pin so that the helicoids will only rotate within its focusing range and not undo itself.
 Now that the helicoids can turn outside of its range, try turning it as far as you can. This is how far mine goes. Doing this will help you determine if you assembled the helicoid in the right manner. If it’s off by a lot then you got it wrong, if it’s off by a little but then you probably can ignore it and assume that you got it right.
 When separating the helicoids, make sure to know where the separate! Mine separated at this point, this is also where you should mate them together when you reassemble it. If you are new to repairing lenses, please read my article on how to work with helicoids. It’s one of those things that get beginners stuck with a lens that they can’t put back again so please read it and watch the video I made to help you avoid this fate.
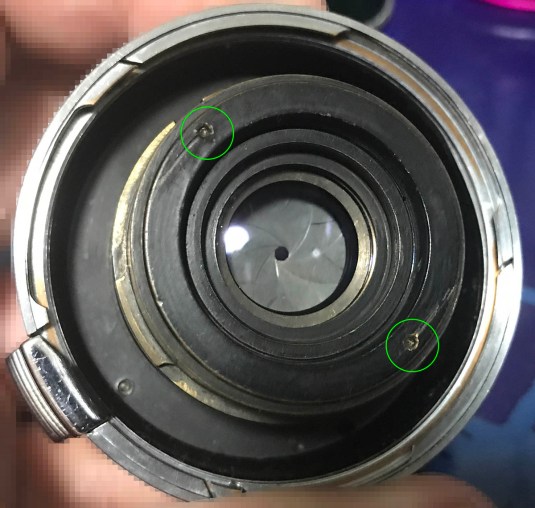
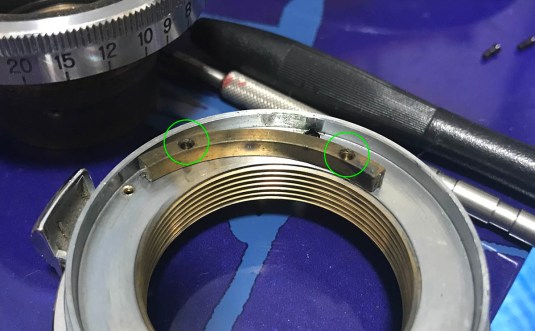 Once the helicoids are separated, you can remove this brass stop if you wish but there is not benefit in doing this unless you wanted to clean this part thoroughly. You can remove it by unscrewing 2 screws encircled here (they’re gone, these are the holes).
This is as far as you would want to go for the lens barrel. There’s no need to disassemble the bayonet mount as there’s no benefit in doing so. In fact, you risk damaging the lens if you did that because it’s usually a very tight fit. Clean the helicoids very well and remove as much old grease as you can with a toothbrush. Use a plastic kitchen wool and scrub it very well to remoev the stubborn ones and use a toothpick to pick on the ones that won’t go away. I usually polish these with a pig-bristle brush on my Dremel but that’s just me. It takes a steady hand to use this tool properly and a slip will result in a scarred helicoid so I will only recommend this for people who know what they’re doing. For really damaged helicoids, I will lap them carefully but I almost never get to this point.
Disassembly (Objective):
The objective is pretty simple. There’s not much going on but you’ll still have to be careful with your tools so you won’t scar the lens. The assembly is similar to the other W-Nikkors such as the W-Nikkor•C 2.8cm f/3.5 and the W-Nikkor•C 3.5cm f/3.5 so you can also check these articles for more information. I swear I cleaned the iris mechanism of this lens but I can’t find my notes for it so please check the above articles for that as they’re similar. It is very important that you clean the iris very well but if you are afraid of working on the iris then it’s OK to just flush it with lighter fluid repeatedly until no more oil is present. It is a preset-type iris so it’s not going to impede its operation when you got a small amount of oil on the blades unlike the automatic irises for SLR cameras where even a small trace of oil can make it inoperable. Read my article on how to work with the preset-type iris so you will know what you’re getting into. Even experienced repairers lose their patience so don’t take it apart unless you’re prepared to spend plenty of time putting it back.
 Begin by removing the front bezel. You can use a lens spanner on these slots to help you remove it or you can use a rubber friction tool instead. Whatever you do, don’t force it, it is a small part and you can easily damage it. If it’s stuck, just place a drop of alcohol and let it spread around the thread with capillary action. Wait for 20 minutes and see if it’s a bit easier for you to remove if not then repeat the process until you can remove it. Don’t use too much alcohol or else it may end up in one of the cemented elements and dissolve the cement holding the elements together. If this happened then you can just donate the lens to me because fixing the cement separation isn’t easy and is beyond most DIY work.
 Once the bezel is gone, you can remove the front element assembly by unscrewing it off using a rubber cup.
 This is how the front element assembly comes-off. It’s glued to its housing in my lens, the glue can lose its bind so there will be times when the element can pop-out of its housing. If this is the case then you can just pick the front element out after the bezel is gone. Use a lens sucker to safely remove the glass from its housing if this happened to your lens.
What you’re seeing inside the objective’s housing is the 2nd elements assembly. You can remove it with a lens spanner. Notice that the slots were scarred by the previous guy.
 Removing it will reveal the iris mechanism. Again, if yours got stuck, simply apply a tiny amount of alcohol to soften what’s binding it before you go for another attempt.
 The rear elements assembly can be unscrewed from the housing just like this. The inner element’s lips are delicate and prone to chipping if you’re not careful, make sure that the lips are safe so you won’t end up with a junk lens.
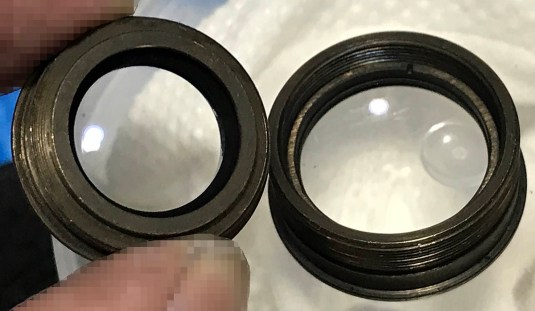 The rear elements assembly can be further disassembled like this. You now have access to all of the optical surfaces of the objective and you can clean them all at this point.
 Removing this screw will allow you to dismantle the iris assembly. I’m sorry but I do not have the notes for working on the iris. Please read this article to get some hints for that.
That’s all for the objective. It’s a very simple design and it didn’t take me a lot of effort to overhaul it completely. you have to assemble it back carefully and don’t apply any grease or oil because it will find its way to the iris.
Conclusion:
This feels like a long article but it’s really short one but we’re finally at the end of it! The lens is simple enough for me spend just under 3 hours working on it. You can reassemble it by following your notes in reverse but before doing so, please read what I have to say.
You should use a thinner grease for the helicoids, using a thicker grease will make it hard to turn using the focusing wheel of your camera. Don’t forget that all S-mount lenses with their own helicoids couple with another helicoid within the camera and these two sets of helicoids working together will make everything turn harder. This is the reason why the thinner grease is favored over the thicker type.
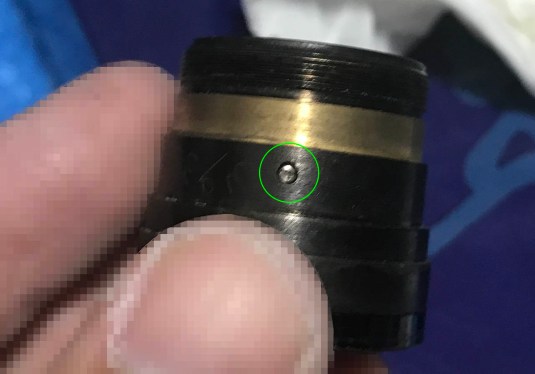
When putting the objective back to the lens barrel, make sure you you check if the clicks are placed exactly where they should be. There is a small white dot at the front lips of the objective and you align that to the aperture scale in the front ring to give you the correct aperture. If this is off you can just adjust the spring that I showed you near the beginning of this article when we removed the aperture ring/cup. This is the reason why I told you not to remove it or make some marks so you’ll know how to put it back properly.
 Time to enjoy a nice Japanese curry meal after all the work that I did! I love this lens, it is the lens that I always get when I need a 35mm. You should buy a cheap plastic lens cap, it will help protect your shutter curtains from burn holes but be sure to remove it when it’s time to snap a picture or you’ll end up with a black frame and spanking your own head.
We’re here at the end of another article. While I felt that this article doesn’t have much to offer when it came to repairs because it’s too similar to the other articles that I made for the W-Nikkor series I felt that my repair blog won’t be complete without it so here it is. It is the last 35mm W-Nikkor that I’ll make an article of because we have covered all of the lenses in this focal length so far. Thank you very much for following the blog and I hope that you like this article. Please share this with your friends so our community will grow and more people can be helped through this blog. See you guys again next time, Ric.
Help Support this Blog:
Maintaining this blog requires money to operate. If you think that this site has helped you or you want to show your support by helping with the upkeep of this site, you can simple make a small donation to my paypal.com account (richardHaw888@gmail.com). Money is not my prime motivation for this blog and I believe that I have enough to run this but you can help me make this site (and the companion facebook page) grow.
Leave me some tip?
Thank you very much for your continued support!
$2.00
Helping support this site will ensure that this will be kept going as long as I have the time and energy for this. I would appreciate it if you just leave out your name or details like your country and other information so that the donations will totally be anonymous it is at all possible. This is a labor of love and I intend to keep it that way for as long as I can. Ric.

7 Comments (+add yours?)