
Hello, everybody! I was listening to the song “Mama Told Me Not to Come” by Three Dog Night. I love Tome Jones‘ version but the original one sounds better to me. It’s grittier and more down-to-earth, it’s not over-produced so it sounds more “authentic”. While younger people usually remember songs that were covered by the last artist, they don’t know the original version of the songs they love. The originals are worth observing, you’ll hear the base states of the songs before they were altered to suit modern audiences. I like to dig-into the roots of things and that’s true for lenses, too. I will introduce to you a lens that’s the root of all medium-telephoto Nikkors for 35mm but it is also a clone of an even earlier lens, much like Three Dog Night’s version is a cover of an earlier version, so send in the clones!
Introduction:
The Nikkor-Q•C 13.5cm f/4 is one of the “original six” lenses that Nikon made for their first 35mm system, the original Nikon. The “original six” consists of the W-Nikkor•C 3.5cm f/3.5, the Nikkor-H•C 5cm f/2, the Nikkor-Q•C 5cm f/3.5, the Nikkor-P•C 8.5cm f/2 the Nikkor-S•C 5cm f/1.5 and the Nikkor-Q•C 13.5cm f/4 which is the topic of this article. These debuted separately from 1946 (or earlier) up until 1949 to form the core of the original system. This lens has a short production life, it was only produced for 3 years. It was soon replaced by the common Nikkor-Q•C 13.5cm f/3.5 which lasted far-longer in terms of production, its optical design transitioned fairly-well into what will become the Nikkor-Q 13.5cm f/3.5 Auto. While this is quite rare it is certainly not the rarest variant of the “original six”, that honor goes to the first version of the Nikkor-H•C 5cm f/2 or the Nikkor-S•C 5cm f/1.5, both are quite rare and very valuable in the Nikon collectors’ circle.

Shooting with this lens takes me back in time. The build is solid and heavy, I think it’s nearly as heavy as my old Nikon D700. This is due to the huge glass chunks used in the 2nd group and the brass construction. This lens will last for many decades more after we’re all gone from this planet.
This lens is a collectors’ item and it belongs in any serious collector’s box. It certainly isn’t cheap but it’s not the most expensive either. The price ranges from $350 up to $800 depending on condition and serial number. This isn’t a lens for everybody to appreciate, it is like rare cheese that only an expert will appreciate its true value.

This is a nice family portrait. The Nikkor-Q•C 13.5cm f/3.5 family of lenses is a popular one and it all started with the Nikkor-Q•C 13.5cm f/4. It’s a copy of the venerable Carl Zeiss Sonnar 13.5cm f/4 but with minor changes. It is one of Nikon’s original lenses for the 35mm system and should be held in really high regard for its historical value.
The optical formula is a simple 4-elements-in-3-groups design, a classic Tele-Sonnar for the 135/4 class of lenses. The 2nd and 3rd elements are two huge chunks of glass that were cemented together to form a single group, this is a classic trait of this lens type. The original German design is of course, really similar but this I am sure that this one differs a bit but it can be considered nearly-identical to the Carl Zeiss Sonnar 13.5cm f/4 in most respects. I’m not an expert on this matter but this is what I have observed from illustrations, everybody had to start somewhere, even Nikon.
Knowing how a lens works is key to maximizing its use. You will learn how to utilize its strengths and workaround its weaknesses. This is important, it will help you decide if you will take this lens with you or leave it at home. I took these photos from f/4, f/5.6 and f8 from left-to-right. You’ll see the most changes happen in these apertures, this lens is considered to be slow so you won’t see drastic changes in terms of character as you would with brighter lenses but it’s still worth studying it.


(Click to enlarge)
Wide-open, vignetting is prominent but confined to the far-corners. It’s not terrible at all but you will easily notice it when shooting at an even-colored background such as the sky. Stopping it down to f/5.6 helps a lot but you will still traces of it at the far-corners. It won’t totally go away by f/8 but it’s only visible at the extreme corners.


(Click to enlarge)
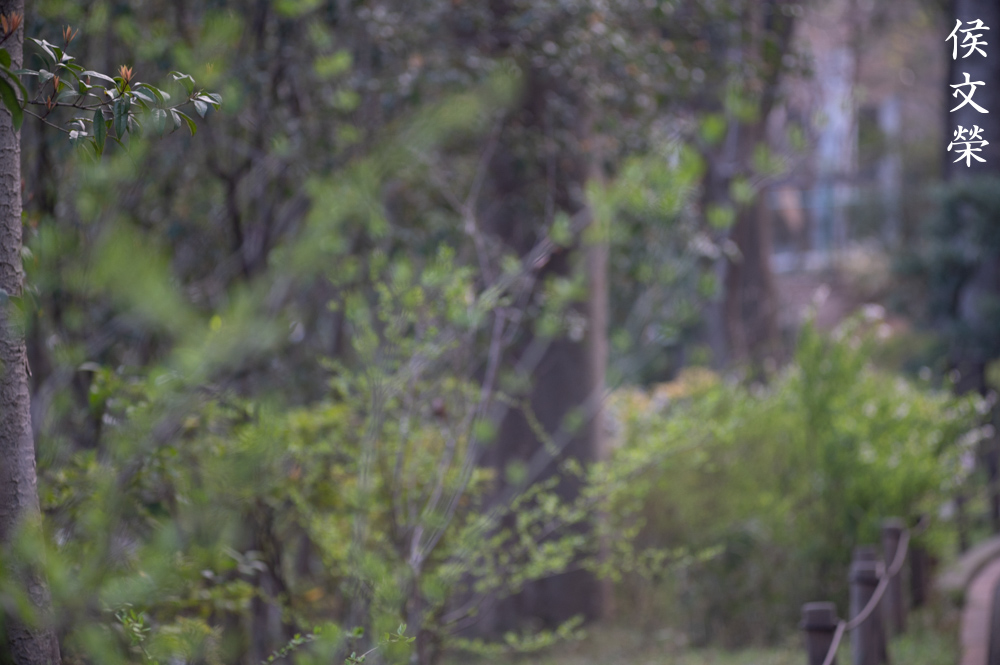
The discs look clean so far with only slight outlining that’s observable with some of the discs that are more-defined. This can be caused by condition of of the cement holding the 2nd and 3rd elements together, they deteriorate from the edges and that will show in the bokeh discs. The bokeh quality can vary from very good to mediocre depending on what’s blurred and at what distance your lens is shooting at. The last sets with the twigs shows that but it’s quite good in general. Foliage and twigs are difficult subjects if you want to test a lens’ bokeh characteristics since foliage is multi-faceted, twigs are a pain to render and lenses with poor bokeh quality will falter and render the twigs with a “smudgy”, dirty look.


(Click to enlarge)
Flare and ghosting can be observed when shooting the sun within the frame or just outside of it. This is as expected from lenses of this vintage. Stopping the iris down won’t help much but you will see some improvement, though. I don’t see any point in stopping the iris down to counter the effects of flare, you will want to use the hood but that’s only useful for stray light hitting the front of the lens at an angle.


(Click to enlarge)
This lens is really sharp wide-open, the resolution is high, its contrast is nice and the corners don’t look so bad, too. What’s not good is you will see some chromatic aberration at this aperture when shooting at over-blown objects such shiny metal things. Spherical aberration is also observable but that is what I expected from a lens of this vintage, it’s not terrible at all and this is a nice touch which adds some character to your photos. Stopping-down the iris will give you a slight boost in sharpness and resolution, you won’t see a big change here but you will notice that chromatic aberration is now better controlled and it’s nearly-gone. Spherical aberration is still there but it’s not something that takes away from the image. Stopping the iris down to f/8 will make this lens perform at its peak, you won’t see a big change at the center but you will notice that the corners are now a lot better. The corners aren’t bad at all, even wide open but stopping this down to f/8 really makes them a lot better. This is surprisingly good, I think this lens is the best one of all the vintage Nikkors, it’s great wide-open and you won’t gain much by stopping the iris down. It was designed to be excellent from its maximum aperture. I also noticed that it’s excellent at every distance, from close-ups to infinity. It is an impressive lens considering its age and the circumstances it was made in, it really is excellent despite being a mere copy of a German optic.
Let’s now see some real-world examples. I am not interested in tests, charts and data gathered under a controlled space so I judge a lens by it performs in practical use. Real-world photos speak more than anything and that’s the reason why I do all the effort to take pictures with my lenses and study how it handles and other things that won’t reflect in any chart. I took the photos with my Nikon Z6 so we will see how it performs with a 24MP sensor.

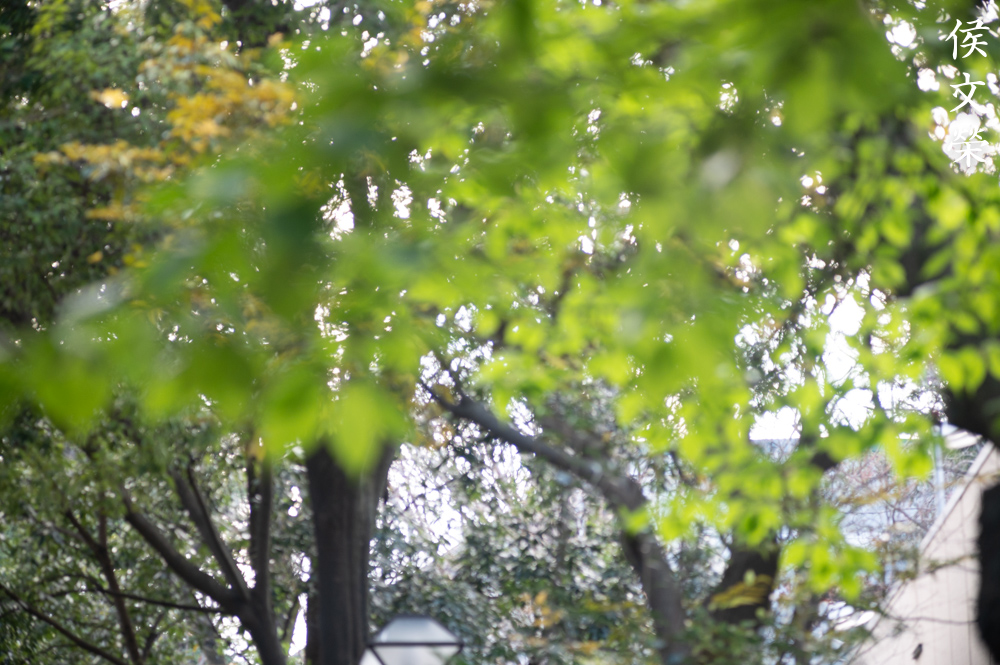
Despite its age this lens is capable of resolving fine details wide-open. I find that this lens has a tendency to produce washed-out photos with digital but my photos that were shot with film looks fine. Pay attention to the foliage at the back, I can say that this lens has pleasing bokeh quality that will be good for taking portraits.

Here’s another photo. This is surprisingly good for such an old lens. This is a real antique made during Nikon’s post-war recovery years where materials were scarce and precision machinery was damaged, I am impressed at how Nikon made something like despite the odds.

The background of this photo is complicated but this lens rendered it really well or should I say, better than expected. The details of the wig looks nice, I love the tones and how delicate the wig was rendered.

While this is sharp wide-open it’s not as sharp as what many modern lenses can easily do these days. It does give you a unique, vintage look which your clients will either want or hate.

There are hints of chromatic and spherical aberration in this picture, all of which makes this photo even more interesting. Without them, this photo is boring.

Having a lens that’s sharp-enough is good at times since they make for good portrait lenses because they won’t render every pore and pimple well. Your subject will appreciate that as it makes their skin looks nice and healthy.


(Click to enlarge)
Here’s the rest of the set. This lens is decent for modern-day use specially if you’re using them on a 24MP sensor but that’s probably the limit of this lens because I don’t think it will out-resolve a higher MP count sensor. I will not use this lens for digital cameras since this wasn’t made for that so let’s now compare it with some photos that were taken with film.
This lens was designed to be shot with film so it’s only right that we judge it using its intended medium. Film is more forgiving in this respect because it can mask certain flaws or amplify them depending on what you are looking for. It has a unique look thanks to film grain, this is different to noise and it gives the photos a nice, unique look. I personally like this a lot and that’s the reason why I love to shoot film. Since this lens was made for use with film, I suggest that we judge its performance with it. The following set of pictures were shot with a Nikon SP loaded with Fujifilm Industrial 100.

It’s difficult to nail your focus with this lens specially if you consider that it can only be accurately-focused with a tiny patch in your Nikon S. If you are shooting moving subjects then multiply that difficulty by a several times. It requires a lot of anticipation and guessing as to where your subject will end up being in the next few milliseconds but you’re in for a treat once you get one shot in-focus.

This is a superb lens for taking pictures of festivals. I can now see why this was such a huge hit back then. Most photographers back then in the 1950s were constrained since they’re stuck with normal-standard lenses and this one really adds a new dimension to their craft, that is if they were shooting Nikons exclusively. Expensive German-made glass wasn’t something that a local newsman would afford unless they were issued with one.

This lens is perfect for candid shots. The subject-isolation qualities is good, I can isolate my main subject from the rest of the crowd effectively even if it was shot with a smaller aperture.

This is a nice portrait lens. The compression provided by a long lens is good for framing your subjects so they’ll have the same height with the rest of the crowd. A shorter lens will make your subject appear taller due to the effects of foreshortening.

It has ample resolution when shot with film. See how the strands of her hair were rendered nicely in this photo.

The character of the bokeh is quite pleasing to say the least. My pictures are more vibrant with film, this may be because film is less-reflective compared to digital sensors so I get less light bouncing from behind the lens. I am not sure about this but I definitely see a difference.

This lens renders beautifully. The pictures look so natural and it certainly is a lens that’s capable of giving you the “vintage-look”. It should since this is a real vintage lens.


(Click to enlarge)
It seems like I prefer these film photos over the ones that I took with digital. There’s something about them that makes them look more appealing. I also liked how well it handled with the Nikon SP despite it not having click-stops for the aperture ring. Its weight helped stabilize my hand so I can take shots with confidence and not having to worry about my shaky hands.
I cannot recommend this lens for everybody since there’s not enough lenses out there to satisfy the demand. This lens is best left to the collector and the best option you have is the Nikkor-Q•C 13.5cm f/3.5 which in my opinion is a superior lens specially considering how cheap they are these days. They are similar in many ways so won’t be missing anything by choosing the latter. If you still wanted to shoot with one then just forget it, these lenses are really valuable and you should consider them as historical relics. Damaging one is not something that will make anybody happy, for that the very inexpensive Nikkor-Q•C 13.5cm f/3.5 will be more than happy to take the punishment. It’s not your usual lens and you should treat it like one. I hope my pictures gave you a good idea as to how this lens performs, I am sure many are curious as to how this lens performs and wanted to see some pictures that were taken with it so here they are. Let’s now see something that nobody else will show you, this is exclusive only to this site and it’s time for use to see the inside of this lens.
Before We Begin:
If this is your first attempt at repairing a lens then I suggest that you check my previous posts regarding screws & drivers, grease and other things. Also read what I wrote about the tools that you’ll need to fix your Nikkors.
I suggest that you read these primers before you begin (for beginners):
Reading these primers should lessen the chance of ruining your lens if you are a novice. Before opening up any lens, always look for other people who have done so in Youtube or the internet. Information is scarce, vague and scattered (that is why I started this) but you can still find some information if you search carefully.
I highly recommend that you read my working with helicoids post because this is very important and getting it wrong can ruin your day. If I can force you to read this, I would. It is that important!
For more advanced topics, you can read my fungus removal post as a start. This post has a lot of useful information and it will be beneficial for you to read this.
Disassembly (Lens Barrel):
The lens barrel is typical of many long Nikkors from this era. It shares a lot of similarities with the Nikkor-Q•C 13.5cm f/3.5 but they’re not-quite similar in every way. If you’re familiar with the Nikkor-Q•C 13.5cm f/3.5 then this is something that should look familiar to you. If you’re a beginner, skip this. It is best left to the professional because this lens is valuable. It’s a relic from a short period in Japanese history.
Just like most long Nikkors from the rangefinder era you’re able to separate the front optics assembly by unscrewing it from the main barrel.

Remove the aperture ring by extracting its screws. Be careful not to damage the surrounding metal by using a driver that fits the heads perfectly.
Do the same for the focusing ring.

I made a small mark so I’ll know which part of the inner helicoid will align with the infinity mark.

You should extract this screw in order to remove the inner barrel. Unscrew the inner barrel and it should be easy to separate.
Once the inner barrel is out, loosen the screw on the cover.
Unscrew the cover of the inner barrel and set it aside.

Extract this screw to remove the rotator collar but be sure to note how high it is so you will know how many turns it takes to turn the collar back into its proper position.
Unscrew the collar off. This couples the aperture ring to the iris mechanism inside.

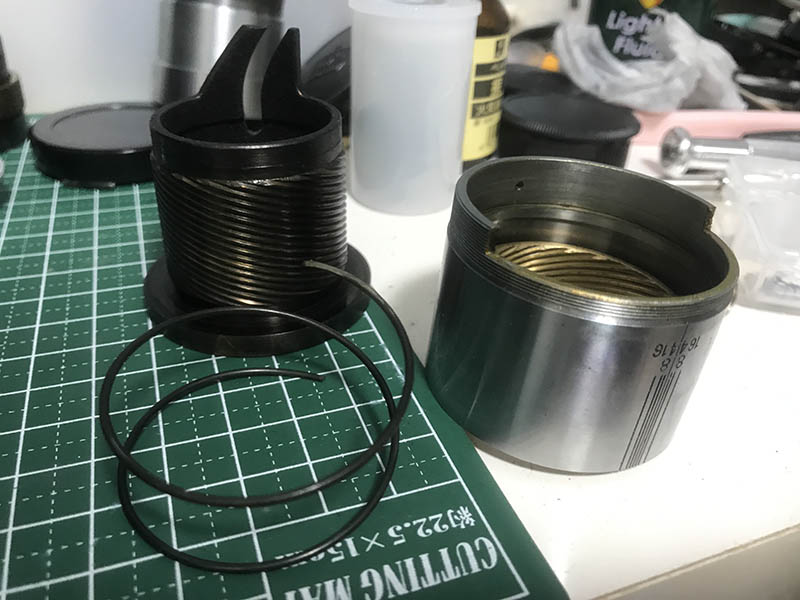
Extract this large screw so you can unscrew the main barrel from the base.

It may take some effort to unscrew it, you may want to use a pair of rubber gloves to help you do the job.

Carefully remove the rangefinder-coupling cam mechanism from the lower part of the main barrel.
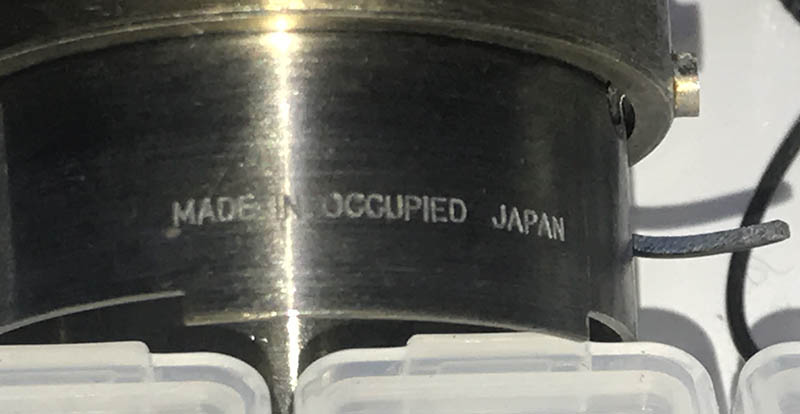
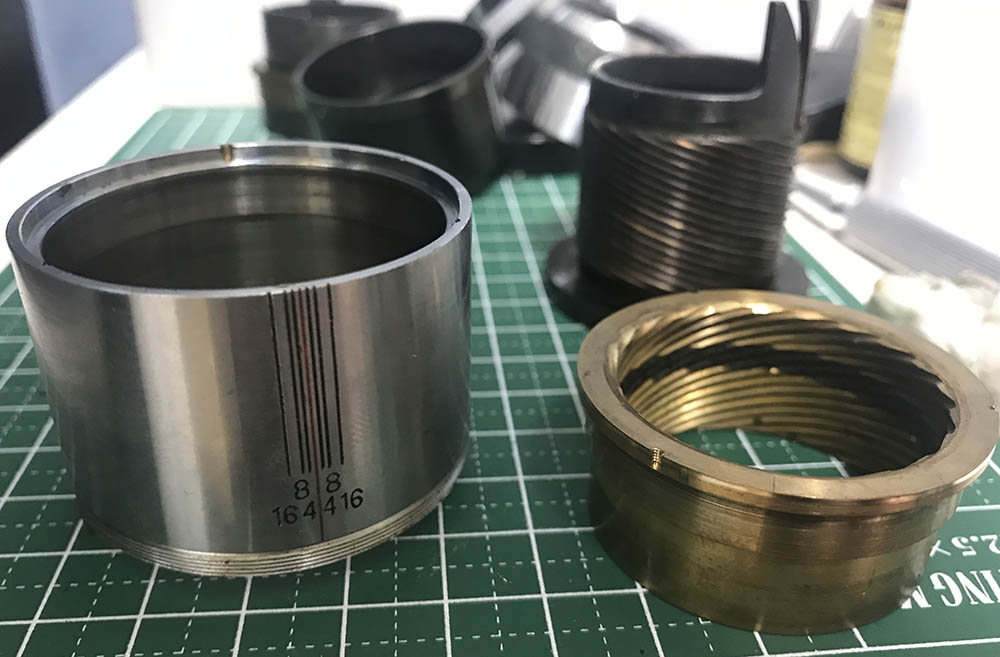
One side of the cam has the words “Made in Occupied Japan” engraved on it and those 4 words alone make this lens much more valuable.

Separate the inner helicoid from the main barrel. Note the spot where they separated as this is also the same spot where they should mate. If you have not read my article on how to work with helicoids then I suggest that you do that know. Many people forget to do this and they get stuck in the process. It is a waste of time trying to figure how and where these should mesh.
You can now remove the spring of the rangefinder-coupling cam. Clean this very well as these tend to be rusty after all these decades.

Extract these 3 tiny grub screws. These are delicate so make sure that your tools won’t strip their heads.
You can now pull the outer helicoid away from the main barrel. This piece was forced-fit into the main barrel so it can be tight.
You don’t have to dismantle the bayonet mount unless you want to clean the parts individually. It can be difficult to put back and you may damage this. It’s being secured by several little screws and they can get damaged rather easily.

The lock is being held by a pin. I usually don’t bother with it.

It’s difficult to remove the pin and even more difficult to put it back. This is a delicate part and you can damage this part beyond-repair. I remove it by using a special tool I made from an old driver.
I cleaned everything and I replaced all the felt and wool in the lens barrel. It should be as clean as possible and you don’t want germs to breed in the lens only to make you sick each time you use it. The helicoids do not require oil, it only requires a thin film of fresh, good grease. You may be tempted to put a huge dollop of grease but that grease will migrate somewhere, usually to the optics and iris as the grease evaporates and settle. Never leave residual oil on the helicoids so your fresh coat of grease won’t be contaminated.
Disassembly (Objective):
The objective is similar to the early Nikkor-Q•C 13.5cm f/3.5‘s in almost every way but there are small differences such as the way the blades were made. I notice that the iris leaves were made in a crude manner unlike later ones. It was flimsier and the metal that was used is of a lower-grade material. These lenses usually have oily irises due to their age and the oil has migrated from elsewhere and settled in the iris. The only way to clean it is to do it the right way which is to overhaul the iris mechanism down-to-the-last-screw.

This particular lens has a damaged iris. One of the pins have dislodged itself and there’s no easy way to fix this except to fabricate another one.

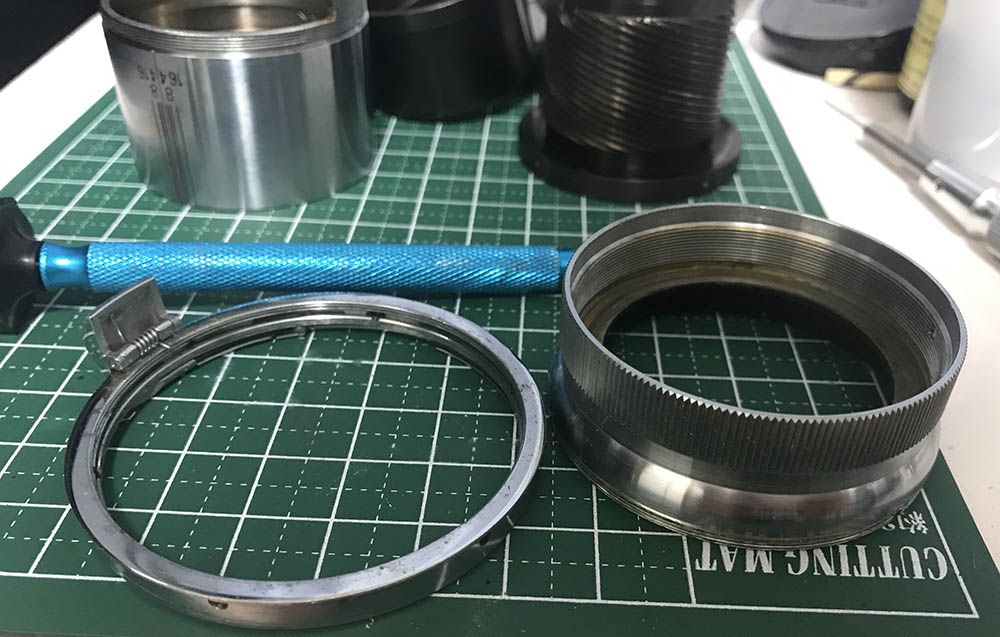
Carefully remove the retainer ring and you can remove the rotator plate. It keeps the iris mechanism in place.

You can then remove the base of the iris mechanism if you want to. This is a precise adjustment so only remove it if you know how to put this back. This is being secured by a little set screw on the other side of the barrel.
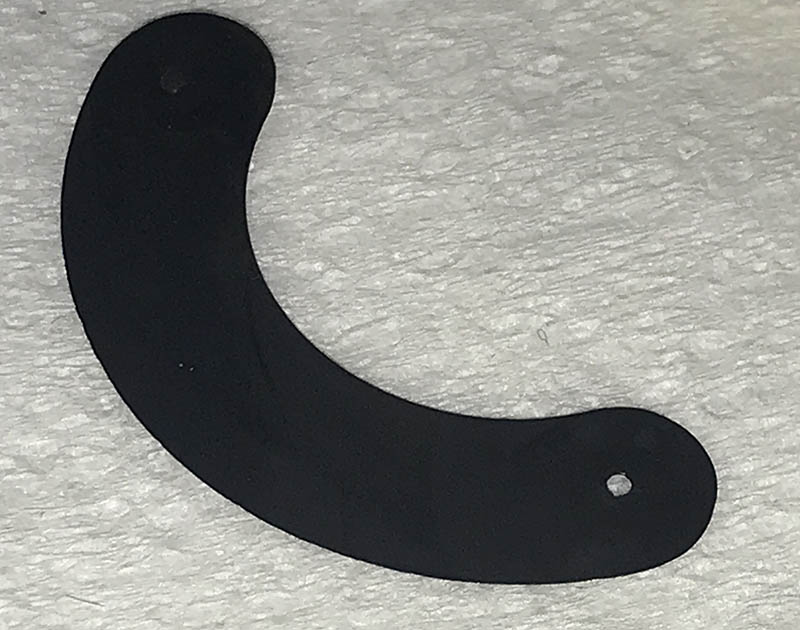
This is the damaged leaf. If you want to know how I repaired this, read my article on how to fabricate iris blades. This is not a simple repair, you’ll need a lot of patience and the right skill to do this properly.

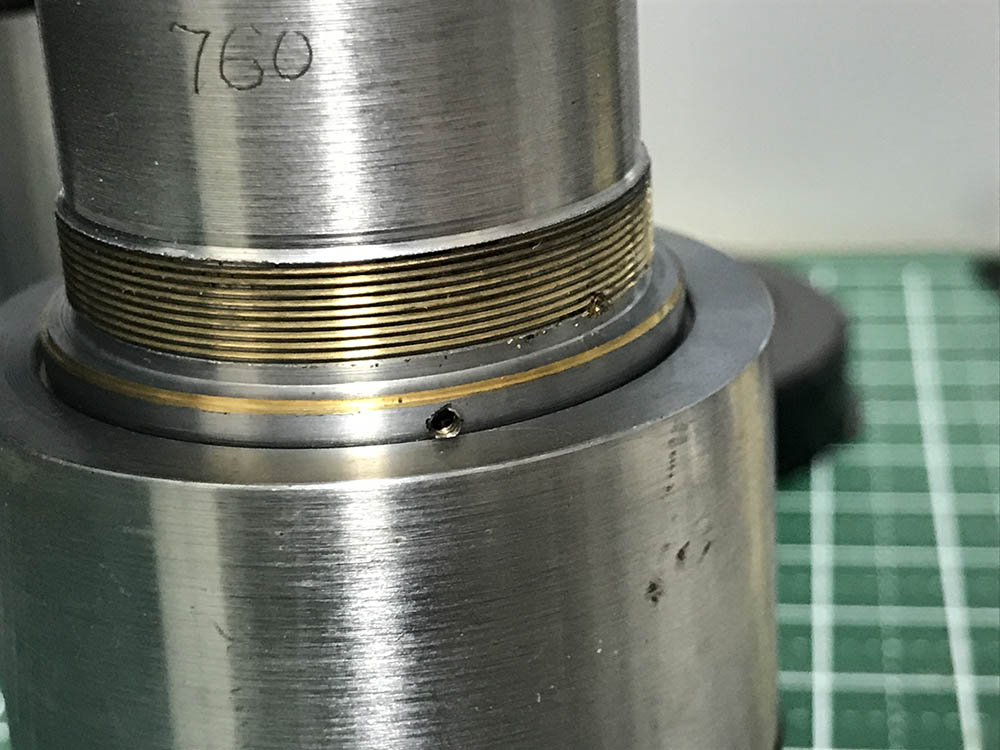
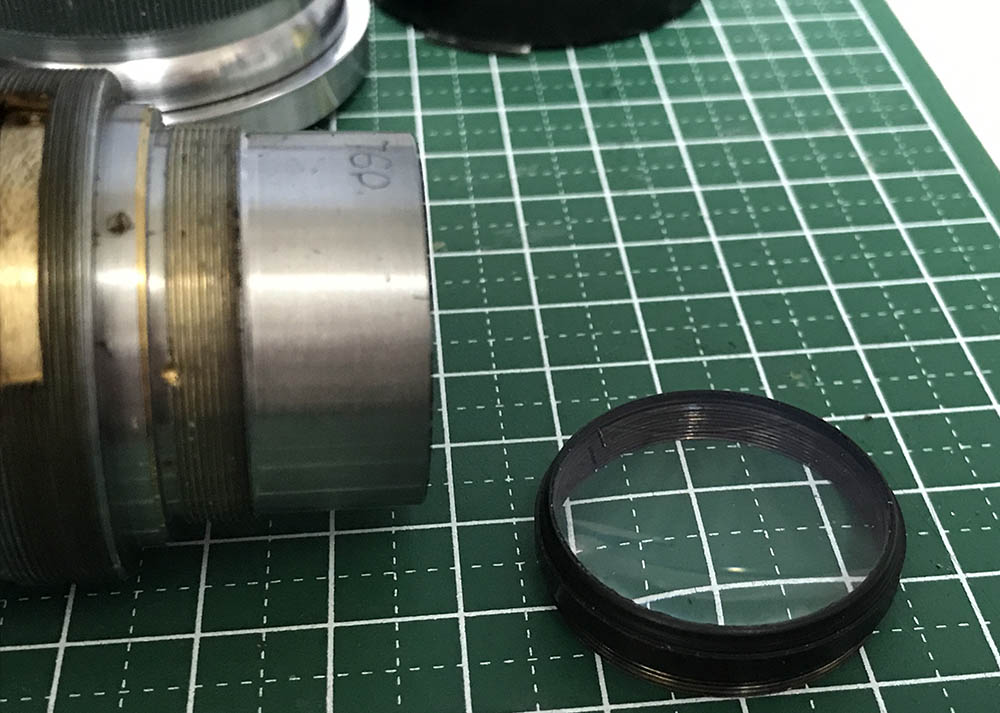
The front element assembly is easy to remove, simply unscrew it.

The front element is being held by this retainer. Remove it carefully using a lens spanner. As you can already see, somebody was here prior to me.

It can be tricky to remove and you can’t afford to screw this one up because this is a very valuable lens.
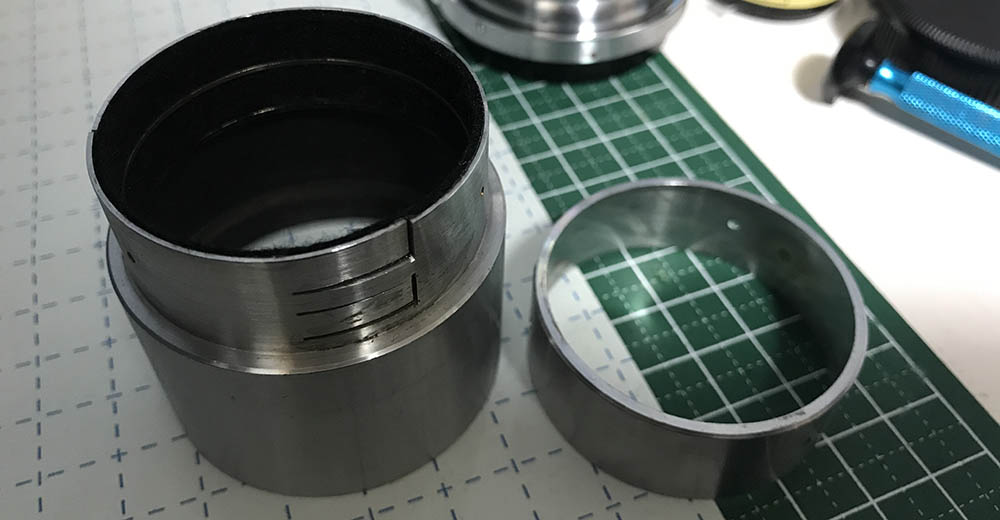
The rear element can be unscrewed just like this. Don’t bother removing the glass from its housing, it’s pointless.
There are some parts here which should be left alone such as the cemented group, that big chunk of cemented glass is forced-fit to its housing. The rear element is also another one. Treat this lens with utmost care and respect.
Conclusion:
This was a problematic lens to work with because of the damaged iris. This gave me the chance to do something hardcore and I was pleased with it. It’s a very valuable lens and I took pride in repairing a minor historical relic. It should be in a museum one day as Indiana Jones says.

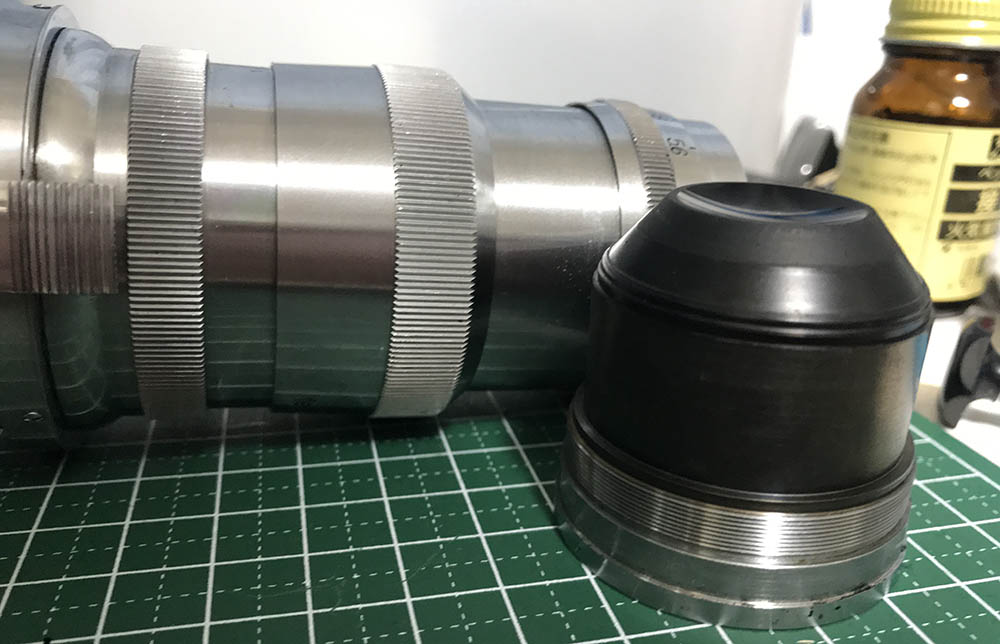
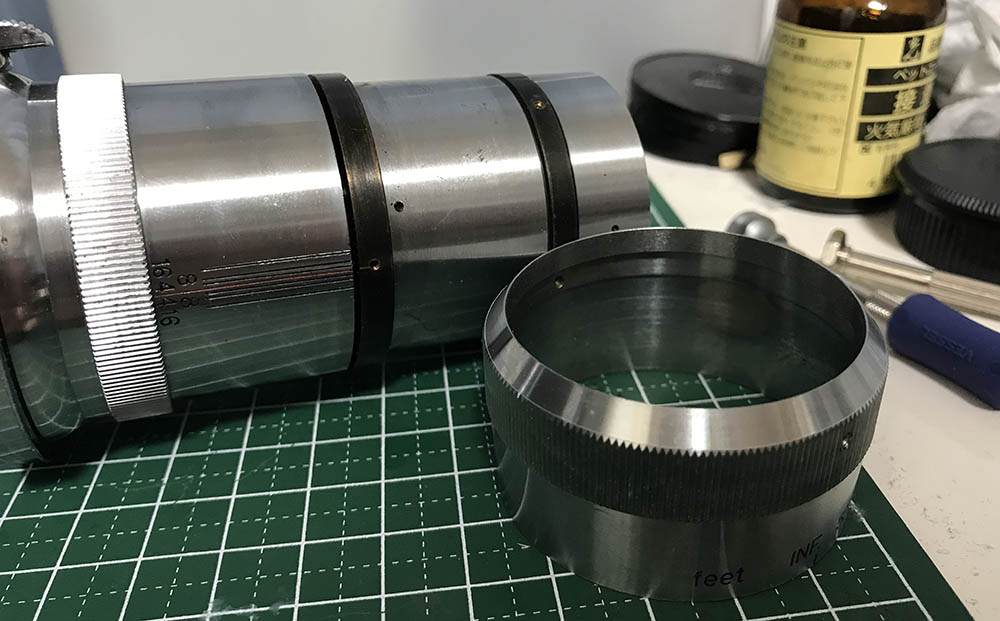
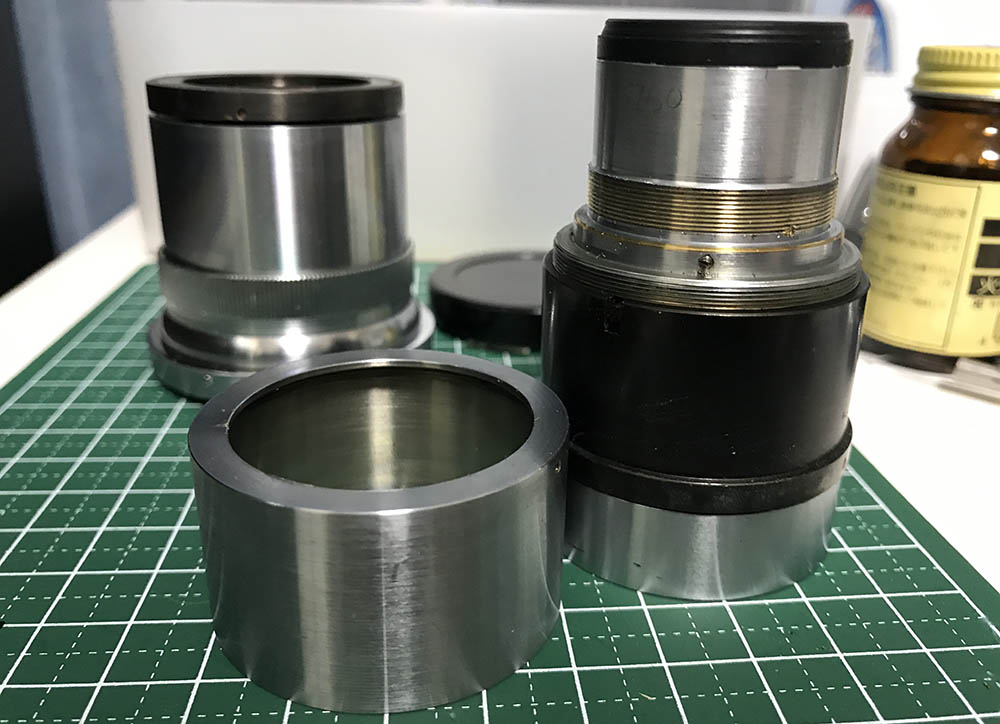
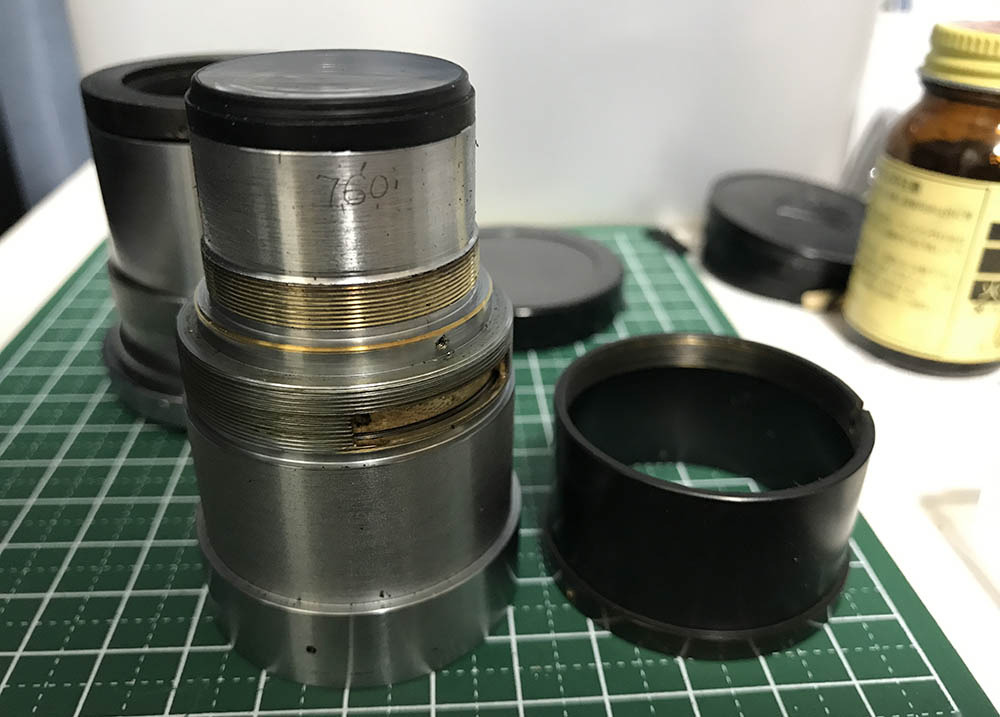
I am almost done with this lens, all I need is to put things back together. The lens to right is the Nikkor-Q•C 13.5cm f/3.5. I was expecting that these would be identical in terms of construction but I was wrong since there are many small details that differ.
The snap-on hood has been given a treatment, too. The lining was replaced with fresh material and the black paint was given a fresh coat.

This is how the iris looks like now after I rebuilt it. It’s not perfect but this is much better than how it looked like before.
That’s all for this article. Did you enjoy this? I hope that this article showed you something that you can’t find elsewhere. This lens is rare and you can’t easily find photos that were taken with it, much less a repair article. This is what I am proud of, helping fill the information gap for everyone. If you’re a fan of my work, please share it with your friends. You can also support the site and that will help me maintain it. Your help goes to paying hosting and also helping me buy, develop and scan films. Your help goes a long way and it ensures that the future of this blog is secure. Thank you for your help, see you again in the next article. Ric.
In memory of the late Toyosumi-san of Sankyo Camera.
Help Support this Blog:
Maintaining this blog requires money to operate. If you think that this site has helped you or you want to show your support by helping with the site’s upkeep, you can make a small donation to my paypal.com (richardHaw888@gmail.com). Money is not my prime motivation for this blog and I believe that I have enough to run this but you can help me make this site (and the companion facebook page) grow.
Leave me some tip?
Thank you very much for your continued support!
$2.00
Helping support this site will ensure that this will be kept going as long as I have the time and energy for this. I would appreciate it if you just leave out your name or details like your country’s name or other information so that the donations will totally be anonymous. This is a labor of love and I intend to keep it that way for as long as I can. Ric.

2 Comments (+add yours?)