
Hello, everybody! I was looking at some watches a while back. They’re the fancy ones that could rival what a smart-watch could do. It’s amazing how far technology has brought us. What we saw as kids in the movies or television is now a reality. It’s unthinkable back then how much technology you could pack in small things. It makes science fiction authors a few decades back feel like they’re uninspired. Today, I’ll show you something that’s small but it’s also a wonderful tool. Unlike the super-watches that I mentioned, this one was made at a time when people still made things the old way.
Introduction:
The Nikkor-H•C 5cm f/2 was conceived during the war but it was only sold from 1946 until 1962. It was made in several minor versions and a few different mounts throughout its production. It was Nikon’s standard lens for its rangefinder-coupled cameras and it was sold along with cameras as a kit.
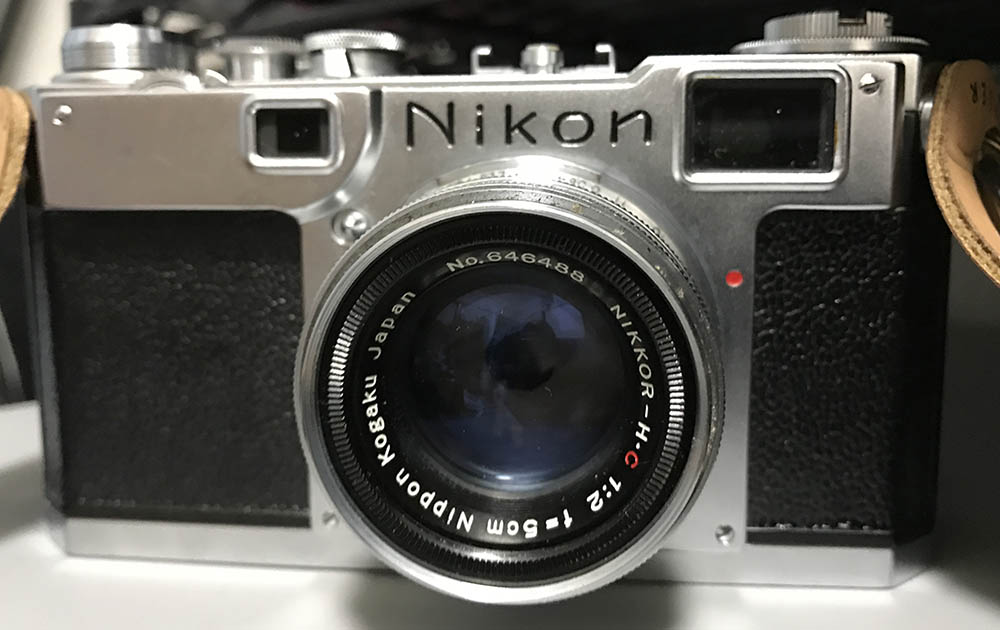
It’s usually sold with Nikon-brand cameras such as this Nikon S2. It’s a great walkaround lens, you’re neck will not hurt after a whole day shooting with it. It’s heavy despite its tiny size since the barrel is made from brass. I love how “luxurious” it feels when held. It’s a very well-made Japanese lens for its time. The later models have black barrels and the internals were made from aluminum, making them a bit lighter.
It actually began development around 1935 as a Sonnar-copy and was completed during the middle of the war in 1942. This was perfected in 1948 when the supply of rare raw materials for optical glass manufacturing was stabilized. One of the reasons why it took so long to get it going was it had to undergo several recalculations as every disturbance in the supply of raw materials meant recalculating the optics to adjust for differences in the optical properties of the available glass. Index-of-refraction is one such property.
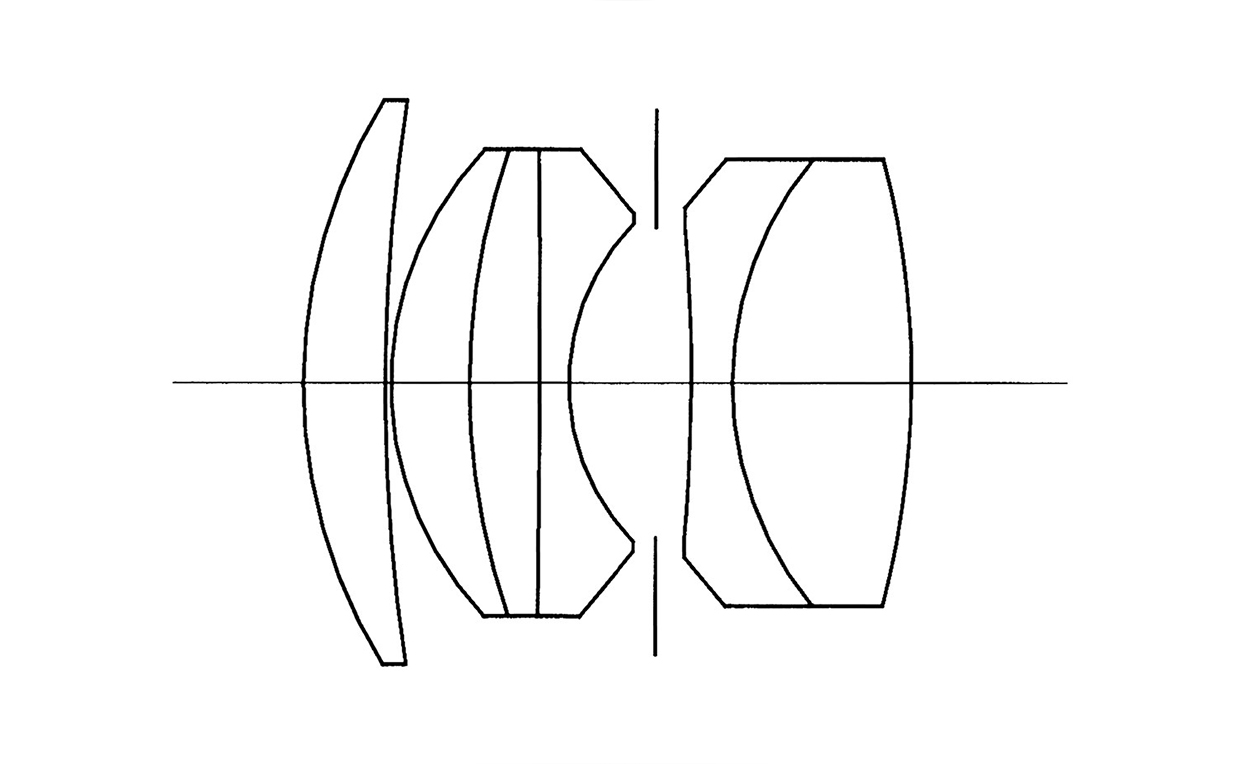
The optical formula is 6-elements-in-3-groups, it’s one-of-many copycats of the famous Sonnar. The old Sonnar was the best lens design for smaller cameras at a time when coatings for consumer lenses were unheard of or were too-primitive to be effective. This is because it has fewer air-to-glass surfaces. The compering design has a lot more, the Double-Gauss design. It was protected with a patent but when Germany lost the war all patents (German) were made void by the Allies so nearly-everyone who had the capability to manufacture this made their own copy. The Japanese and the Russians copied the Sonnar and made their own improvements to it.
The Sonnar isn’t perfect despite being the best for its time. It has the tendency to shift its focus as you stop the iris down. It’s expensive to manufacture since it consists of many cemented elements. Its asymmetric nature is going to give you more geometric distortion and it has a few other quirks, too.

It’s not unusual to find these with oily irises but this is not acceptable at all as it could evaporate and ruin the glass. A lens that exhibits this should be overhauled, no exceptions at all.

It doesn’t have any focusing ring since it gets focused via a helicoid at the camera’s body. This made it compact and light but there’s a tradeoff, its focus is tied to the camera it’s mounted to, That means it couldn’t focus any close that what the camera would allow it to. It also made the camera complicated and expensive to produce.
This isn’t a problem for the later Nikkor-H•C 5cm f/2 (LTM) as it has its own helicoid. It could focus-down much closer but at the cost of losing any connection to the camera’s rangefinder. Apart from this, it also comes with a collapsible version, too. The Nikkor-H•C 5cm f/2 (collapsible) are the earliest versions and they come in both Nikon S-mount and Leica Thread Mount versions. They’re rare and expensive. This is the most common one so they’re not as expensive compared to the other versions that I just mentioned.

Here’s the later version that comes with a black barrel. It’s a bit lighter because its internals were made from aluminum and its construction is a bit simpler. Notice that the red C is now gone, at that point in the industry most, if not all lenses were coated so it made no more sense to advertise it. It was sold with later cameras like this Nikon S4.

The later black version was sold to complement the later black-trimmed version of the Nikon S2 if I am right. I love this combo a lot, it looks very handsome.

The black paint of the later version made it look elegant. Heavily-worn ones look the best since you’ll see a bit of brass at the worn areas, creating a nice patina. The coatings still look great on this lens. Nikon’s coatings are tough, it’s rare to find one with bad coatings. This is because they’ve developed it for use for submarines. It’s a known fact that Nikon’s earlier coatings were the toughest, specially compared to the German ones.
Knowing how your lens performs will help you maximize it. You’ll get to know its strengths and weaknesses, this knowledge will help you decide if a lens is the right tool for the job. I shot these from f/2, f/2.8 and f/4, we’ll see the most changes happen within these apertures.


(Click to enlarge)
Vignetting is quite high wide-open. It improves considerably by f/2.8 but you’ll still see traces of it at f/5.6. Stop the iris down further if this bothers you. The character of the bokeh appears to be smooth wide-open but it has the tendency to produce outlines in the discs which could trigger smudgy-looking artifacts. The discs look a lot more even at f/2.8 and they look clean by f/4. The round iris is helpful in keeping the discs round. If you want to see more samples, read my Nikkor-H•C 5cm f/2 (LTM) article. They share the same optics so what you’ll see there is still relevant to this.

Geometric distortion isn’t terrible at all but you can see it if you have straight lines in your frame.


(Click to enlarge)
These were shot wide-open at around 1m. It’s sharp at the center and the resolution is quite decent. Stopping it down to f/2.8 will improve the center considerably thanks to the improved resolution. The bokeh character looks natural. Contrast and saturation looks quite nice, too.


(Click to enlarge)
It renders exquisitely, the pictures have a natural-look. This is impressive considering that it’s an old lens. It’s a great lens if you prefer the “vintage-look”.

It appears that the image quality deteriorates a bit when focused farther. You’ll also see chromatic aberration at overblown areas, too.

Coma is quite bad wide-open as evident in the lamps. Stop the iris down and that should help alleviate it.
Let’s now check some film photos. Film has a unique look that’s hard to simulate with a digital camera thanks to grain. It reacts differently to light, this means that it could mask a lens’ flaws or amplify them. Since it was designed to be used with it it’s best that we judge this with its intended medium.


(click to enlarge)
It’s great wide-open with film as with a digital camera. It looks great from f/4 and it’s awesome by f/8. This is a great lens for doing street photography. It’s small, unassuming nature helps keep you “invisible”.


(click to enlarge)
Here are more samples, this time with Ilford HP4+. Most of these were taken at f/4 to f/8. Avoid shooting this with the Sun in your frame to avoid flare and ghosts. It’s not bad as I’ve seen worse.


(Click to enlarge)
These were shot with Fujifilm Industrial 100. Chromatic aberration is kept controlled as far as I could tell. This is an amazing lens with film, color or monochrome.


(Click to enlarge)
These were shot at f/2.8 and f/4. The corners don’t look so good, they’re mediocre at best. You should stop the iris down further to get the corners looking decent.


(Click to enlarge)
The character of the bokeh is quite pleasing, a typical Sonnar trait. This is a nice lens for taking people photos since it gives a slight glow to the highlights of your subjects’ skin. It’s sharp but not so much as to render your subjects in great detail. This makes it a nice lens for portraiture.
Let’s now see some photos taken with Fujifilm Provia 100. It’s an unforgiving film, chromogenic films have less dynamic range compared to C41 films and this film’s fine-grained nature will make it easier to see any flaws.

Focusing it at closer distances can be challenging due to the focus-shift that Sonnar-type lenses are know for.

Chromatic aberration can be seen at the edges of the tombstone. It’s pretty bad here since I would consider it an extreme case. Flaring can also be observed which results in subdued contrast at affected areas.

It’s hard to visualize the focus-shift since you’re not focusing through-the-lens. It’s not hard to compensate for it but it will require you to do some experiments.


(Click to enlarge)
Here are more photos for you to enjoy. I like this lens a lot and I think it’s best-enjoyed by shooting film with it. Many people try to simulate film’s look with a digital camera and some work in post, why not just shoot film? You’ll get the results in an authentic way, too.
I highly recommend this lens, everybody shooting with a Nikon rangefinder camera should own one. If you’re shooting with a Leica, just get an adapter and you could enjoy shooting with it or just get the LTM version. It’s a lens with high price-to-performance ratio, these are selling for $150.00 on average and I usually get mine for a lot cheaper since I only buy junks. When looking for these, be sure that the glass is clean, the coatings need to be nice, too. Some scratches in the front element is unavoidable for a lens of this vintage. It is also common to find these with the oily iris problem, too. Expect a complete overhaul to fix it properly. If you see any signs of balsam separation, skip that lens. The design has a lot of cemented elements and some of it will deteriorate over the decades, it’s not worth it to have them repaired unless it’s a very rare, important version. You can’t go wrong with these, just buy one and enjoy shooting with it. Happy hunting.
Before We Begin:
If this is your first attempt at repairing a lens then I suggest that you check my previous posts regarding screws & drivers, grease and other things. Also read what I wrote about the tools that you’ll need to fix your Nikkors.
I suggest that you read these primers before you begin (for beginners):
Reading these primers should lessen the chance of ruining your lens if you are a novice. Before opening up any lens, always look for other people who have done so in YouTube or the internet. Information is scarce, vague and scattered (that is why I started this) but you can still find some information if you search carefully.
I highly recommend that you read my working with helicoids post because this is very important and getting it wrong can ruin your day. If I can force you to read this, I would. It is that important!
For more advanced topics, you can read my fungus removal post as a start. This post has a lot of useful information and it will be beneficial for you to read this.
Disassembly (Lens Barrel):
It’s an easy lens to overhaul for an experienced repairer. It doesn’t have a focusing unit at all so I spend a lot less time cleaning things. You’ll need special openers to completely dismantle this so I won’t recommend this to a complete beginner.
Since it’s a simple lens I will include the section for the optics here. This will make the article shorter.

The front optics assembly can be removed by unscrewing it with a rubber tool.

Carefully separate the front optics assembly and be sure not to damage the rear.

You could further dismantle the front optics assembly by unscrewing it. Never remove any group if it is glued to its housing.

Ignore this screw, just leave that alone.

Carefully hold the barrel while you unscrew the rear baffle. It keeps the whole lens together, extracting it will allow you to separate the lens to its basic components. It’s usually easy to unscrew these but if yours is stuck a few drops of alcohol to its threads will dissolve the seal.

Pull the barrel off from the objective. Notice that there’s a slot at the throat of the objective, the screw that I told you not to remove should align with it.

Never lose or damage this shim, it’s used for adjusting its focus and is mostly unique to the lens it’s made for.

Extract the screws to remove the detent spring. Don’t forget to mark its position so you’ll know how to put it back.

Extract these to remove the aperture ring.

Here’s another one. Don’t forget to note the alignment of the aperture ring so you’ll know how to put it back correctly later.

Removing the aperture ring is trivial once its screws are gone. Note that I made a small mark so I’ll know that it corresponds to the number 2 in the aperture ring.

Carefully extract this to remove the front ring. Notice that it has been filed at the factory since this part should be flush or it will impede the movement of the aperture ring.

Unscrew the front ring. It can sometimes be difficult to remove and only heating it helps. Some people apply cement or lacquer to the threads which is overkill. When reinstalling the screw be sure that it sinks into this depression.

The rear optical assembly can be removed with a pipe-key, you could make an alternative tool to remove it. It is a delicate part so only remove it if you have to.
Clean everything very well and never lubricate anything here apart from the detent spring which only needs a thin film of grease. The threads of the aperture ring can be lubricated with powdered graphite. Grease isn’t the best thing for it since it will migrate to the iris once it has deteriorated.
Clean the glass carefully. If your lens has fungus, read my article on how to clean lens fungus. Don’t use the solution at full-strength, thin it with distilled water. Don’t soak the elements in the solution for too long or it will dissolve the coatings. The cemented group is fragile so handle it with a lot of care.
Disassembly (Iris Mechanism):
The iris mechanism has to be overhauled if it’s oily. Never flush it and hope that it will fix this, you are only pushing the dirt and oil deeper which will resurface eventually.
This is the most difficult part of repairing this lens so only an experienced repairer should attempt this. It’s not some a beginner will be comfortable with since putting the iris back together takes skill.
Note that the specimen shown here is from a different lens. The construction may be a little bit different but it is mostly the same.

Start by removing this retainer with a lens spanner.

Extract this to unscrew the collar. It acts as a pin that couples to the iris mechanism inside of the casing.

Carefully remove the collar but don’t forget to note its original alignment first.

Remove this brass ring to take the iris mechanism apart. Be careful not to damage the exposed iris.

It can be tricky to remove without the right tools. Older versions won’t have this but they have a retainer ring instead. You simply apply a drop of alcohol to their threads and unscrew them with a lens spanner.

Remove the diaphragm cup with your fingers but don’t forget to note its alignment first. Its holes should align with the pins of the iris blades.

Take a few pictures so you’ll know how the blades should be seated. Remove them carefully, they are delicate.

Wipe the blades clean with naphtha and lens tissue. Only handle them with their pins.

If you couldn’t remove the rear optics assembly this is your chance to clean it since the iris is now gone.

Putting the blades back is tedious. Read my article on how to work with a preset-type iris to get some tips.

The last few blades are the most difficult to put back. My favorite technique is to slowly, carefully slip a blade under another then carefully push it into place with its pin at the other end.

After several attempts the iris is now working perfectly.
This is the most challenging part of repairing this lens. It usually takes me 30 minutes to get this done. If I am lucky I could do it with my first try. Be careful when working with the blades, they are old and they could fall-apart. Read my article on fabricating preset-iris blades to see how difficult it is to make one from scratch.
Bonus (Late Version):
Since I’m feeling generous, I’ll add this section on the late version in this article. While it is mostly similar to the early one there are minor differences in both versions that’s going to be interesting to avid Nikon fans.

The detent mechanism is more-refined on the later ones. It now consists of a long brass spring and a bearing ball. This makes it operate smoother and you could now adjust the detent spring’s position. Ne sure to note its position before you remove it.

Extract this to unscrew the collar of the aperture ring.

If this is sealed a drop of acetone to its threads will help you dissolve it. Be sure that it aligns perfectly when it is time to put it back or else you wouldn’t be able to put its screw back.

Carefully remove the aperture ring.

Unscrewing the front ring off is easy but there are times when these are cemented and the only way to get it off is to heat the ring from the sides, being careful not to subject the glass to any heat as that will surely affect the optical cement in any way.

Carefully unscrew the front optics assembly off, be careful not to damage its rear.

The rear optics assembly can be removed with a pipe-key or something similar. This is a delicate part so only remove it if you have to.

The iris mechanism is being secured by a brass ring. Pick it out using a dental pick, it keeps the whole thing together.

Extract this to so you can remove the diaphragm cup.

Carefully pick the cup out with your fingers but don’t forget to note its alignment first.

Carefully remove the blades.

Wipe them well with naphtha and lens tissue.
The later version has more clever construction, it’s certainly an improvement over the older one. You’ll notice that the overall quality has improved somewhat, too.
Conclusion:
I usually take an hour to overhaul this with most of that time spent on rebuilding the iris. Do not work on it if you are a beginner, practice with a cheap Russian lens first to get some experience. If your lens needs repair, send it to a reputable repairer.

The lettering has faded, it’s difficult to see on a sunny day, I had to repaint them. Read my lettering restoration article to know how I do this.

It’s so much cleaner now. If you don’t have any lens caps for these, some Nikon binoculars have caps that will fit these perfectly.

The rear cap is a lot trickier, you’ll have to source these expensive but well-made ones. You can make one for yourself from plastic tubes if you wish.
Thanks for following my work, if you liked this article please share this with your friends so it will get more views. This site earns around $0.30 a day, it’s totally reliant on views. You can also support this site, it helps me offset the cost of maintenance and hosting. You are also helping me purchase, process and scan film. This site promotes the use of film so we’re all in this together. See you again in the next article, Ric.
Help Support this Blog:
Maintaining this blog requires money to operate. If you think that this site has helped you or you want to show your support by helping with the site’s upkeep, you can make a small donation to my paypal.com (richardHaw888@gmail.com). Money is not my prime motivation for this blog and I believe that I have enough to run this but you can help me make this site (and the companion facebook page) grow.
Buy me a roll of film or a burger?
Thank you very much for your continued support!
$2.00
Helping support this site will ensure that this will be kept going as long as I have the time and energy for this. I would appreciate it if you just leave out your name or details like your country’s name or other information so that the donations will totally be anonymous. This is a labor of love and I intend to keep it that way for as long as I can. Ric.

Jan 13, 2019 @ 19:14:31
Real nice history and repair guide
Feb 02, 2019 @ 10:36:57
Thanks, Donald! Glad you liked it! There’s another one in the works. Ric.
Apr 12, 2019 @ 16:46:41
Really excellent instructions and images. Thank you very much! I just cleaned my 5cm f2 lens I recently purchased and it looks like new! Regards