
Hello, everybody! It’s a very cold evening now and it’s forecasted to snow in the coming hours. I hope that you keep yourselves warm this weekend and drink plenty of fluids and vitamin C. I used to be resistant to minor illnesses but age has caught on to me and I easily get sick. Some old people are tough despite living for more than 7 decades so age clearly is not a problem here. Speaking of tough oldies, I’ll show you one tough lens that can still deliver despite being around 70 years old. Sit back and enjoy, this is the Mick Jagger of telephoto Nikkors (who will outlive us all and never seem to die)!
Introduction:
The topic of this post is the amazing Nikkor-Q.C 13.5cm f/3.5! This was really popular back in the days because it’s Nikon’s longest for their rangefinder cameras. 135mm is the upper-limit for many rangefinder cameras because focusing a longer lens is not only an exercise in futility but it’s also going to be too big for the smallish lens mounts of most 35mm camera systems back in the day. Its predecessor is the Nikkor-Q.C 13.5cm f/4 and that is one of the original Nikkors made for consumer photography right after the war. It was heavily-based on the Zeiss original but it was short-lived, that was replaced shortly by this after only a few years. The Nikkor-Q.C 13.5cm f/3.5 improved upon its predecessor’s design by giving it a slightly faster maximum speed. It came in different versions and mounts and it can be very difficult to near-impossible to acquire every one of them. I’ll show you some of them in this post and on a succeeding post showcasing a different, earlier version of this lens. This lens is the first in a long line of 135/3.5 lenses that was made until recently with the Nikkor 135mm f/3.5 Ai-S being the last model.

These are lovely lenses. and they are very well-made from solid brass. The chrome one came in the Leica L39 mount. Many people preferred Nikkors over their Leicas because they had better contrast, harder coatings and the Nikkors were cheaper. The people at TIME magazine brought Nikon to the limelight by using them to cover the Korean War. It gave Nikon a very good reputation because their gear didn’t freeze in the bad winters of the Korean peninsula and this gave Nikon her reputation for reliability and toughness.

The Nikon S3 doesn’t have frame lines for 135mm so you’ll need an external viewfinder for accurate framing. This big bright-line finder isn’t cheap but I got it for a nice price because it had fungus.
The Nikkor-Q.C 13.5cm f/3.5 is a big lens. It’s front-heavy when mounted to a tiny camera like the Nikon S3. If you think it’s big without the hood then just look at it with the hood on. The hood is an important accessory as you will soon see why. The hood alone can sometimes cost more than the lens itself. This is the rarer “all-black” version and this set can cost 1.5x to more than 2x the usual price of the normal chrome one depending on condition. Mine is not mint but just nice enough to be presentable.
The Nikkor-Q.C 13.5cm f/3.5 only has four lens elements so it’s not a difficult or expensive lens to produce. Despite that, it has great optical performance and is a favorite of many photographers. Its F-mount successor, the Nikkor-Q 13.5cm f/3.5 Auto has a slightly different optical formula but largely based on this lens. This is the father of telephoto Nikkors in this focal length to say the least and is a historically-important lens.

Here it is mounted on a Sony a7. Despite its age, this is still a decent lens by today’s standards if your main interest is how a lens renders or its use for general photography where autofocus and other modern features aren’t as important as a lens’ other intangible qualities.


(Click to enlarge)
The lens flares terribly. The flare resistance (or lack of it) reminds me of the cheaper lens that we recently reviewed, the Nikkor-T 10.5 cm f/4 but at least this lens isn’t that bad and also consider that this lens was made in the early 1950s so that puts things into perspective so I would say that it’s typical for lenses from this era. The good thing is the lens seems to be pretty resistant to flaring somewhat with the sun in the frame, it’s only terrible when the sun is outside of the frame. A hood should be used at all times to prevent it from flaring. Stopping the lens down helps a lot as you can see on the right-most picture but it also “solidifies” the flare into slivers of light. You can use this to your creative advantage.
The lens doesn’t vignette much except for the far corners and It’s also sharp at infinity. It’s not bad at all but I think that this was calculated to be better at closer ranges.


(Click to enlarge)
The set of photos above were shot from f/3.5, f/4 and f/5.6 from left-to-right. Wide-open, the lens is pretty sharp at the center of the frame. The bokeh is pleasing despite the slow f/3.5 maximum aperture. It’s not the lens to use if you want a washed-out background but it does the job decently to say the least. Stopping the lens slightly to f/4 helps a lot, sharpness is nice by f/4 and the contrast improves a lot. Stopping the lens down to f/5.6 doesn’t really do much except for improving sharpness even more or getting more things in-focus. Even when you stop the lens down, the character of the bokeh is still nice because of the round iris. A preset-type iris with plenty of blades will always have a round iris and this will give you that nice, pleasing character for the bokeh, just imagine shooting this lens at night.


(Click to enlarge)
The rendering of this lens looks natural due to the low element count of just four lens elements. The transition between what’s in-focus and what’s not is smooth and not abrupt. This can be hard to focus despite using a mirrorless camera with focus peaking set to ON but you’ll get used to it. Its focus throw is on the long side which is typical of rangefinder Nikkors.
Let’s now see some pictures that were taken with film. Film has this unique look that’s nearly-impossible to replicate with digital because of film grain, I personally love how photos taken with film looks because of this. This lens was made for use with film and it’s best that we see photos taken with film to help us assess this lens better since we’re seeing this lens perform under its intended medium.


(Click to enlarge)
The results with film looks also pretty good. Sharpness and rendering are both excellent! Using this lens with a Nikon SP is convenient because it has frame lines for 135mm and it is also very easy to focus because of the Nikon SP’s accurate viewfinder. I love how my pictures look to be honest. They’re not technically perfect and they won’t top any modern chart for lens testing but they are definitely not mediocre specially considering that this is from the 1950s. This lens is a real bargain if you find one in decent condition.
Let’s now see some color photos. I took these using Fujifilm Industrial 100, I then had the roll developed and scanned at the lab using the best scanner I have access to (Fujifilm Frontier SP3000). Since it was a really sunny day, it’s pointless to shoot wide-open so most, if not all of my pictures were taken at smaller apertures starting from f/5.6 to f/8.

Such a lovely lens, it’s sharp where it needs to be. You won’t think that this was taken with a lens from the 1950s in a blind test. The smooth character of the bokeh is pleasing even at smaller apertures thanks to the round iris.

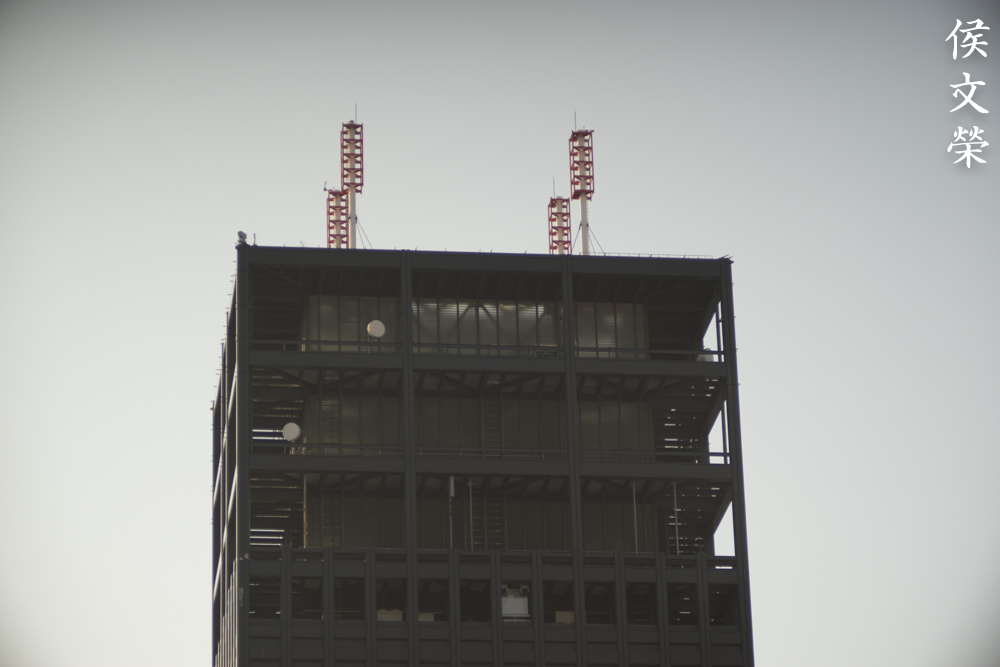
I think this was taken at f/5.6 with a shutter speed of 1/500s. Notice how nice the subject separation is. The quality of the bokeh can at times look ugly like what you see here. It’s just a bad mix of variables that can trigger this but it is safe to say that it’s easy to avoid. The metal structure at the center has lots of shiny tubes and were at just the right place to trigger this harsh, nervous look of the bokeh.

Here’s how it looks like with the pipes covered. Despite my ancient setup it was possible for me to take action photos. It’s just unfortunate that the man didn’t face my way when he did his jump.

I used to be a lion dancer in my younger years so I find this Okinawan lion to be quite interesting. Focusing is very challenging on subjects that move a lot and the erratic motion of the lions made it even tougher but you will be rewarded with a nice photo if you nailed it. Despite using a shutter speed of 1/500s, the lion is a bit blurred thanks to motion blur.


(Click to enlarge)
Here’s the rest of the roll. You get a nice “vintage-look” from this lens, some people either love or hate it but I personally love it. It gives the photos this unique look that’s not too-clean. A little grit and imperfection make things a lot more interesting, just think of it like a little bit of freckles on the cheeks of a pretty girl or stubble on a handsome guy’s face. That’s why I rarely do a clean shave for years.
I hope that this introduction gave you a good idea on how this performs and I’m really hoping that you’ll appreciate this lens a bit more in the historical context since I consider this lens to be one of Nikon’s most important lenses ever. If you’re a collector, I am sure that you already own one of these and I hope that you bring that lens out and shoot it just to give that some exercise and prepare to be amazed by the results. It makes for a great travel lens due its size and practicality but the weight (feels like 800g) is something that you should be prepared for.
Before We Begin:
If this is your first attempt at repairing a lens then I suggest that you check my previous posts regarding screws & drivers, grease and other things. Also read what I wrote about the tools that you’ll need to fix your Nikkors.
I suggest that you read these primers before you begin (for beginners):
Reading these primers should lessen the chance of ruining your lens if you are a novice. Before opening up any lens, always look for other people who have done so in Youtube or the internet. Information is scarce, vague and scattered (that is why I started this) but you can still find some information if you search carefully.
I highly recommend that you read my working with helicoids post because this is very important and getting it wrong can ruin your day. If I can force you to read this, I would. It is that important!
For more advanced topics, you can read my fungus removal post as a start. This post has a lot of useful information and it will be beneficial for you to read this.
Lens Barrel:
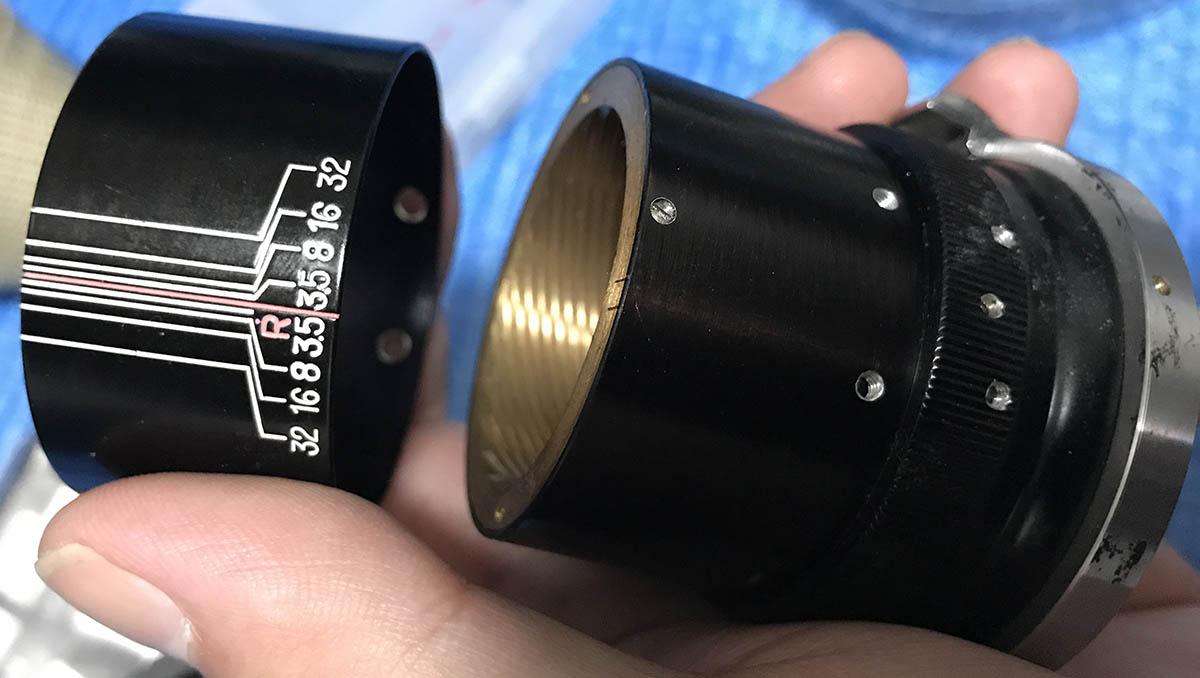
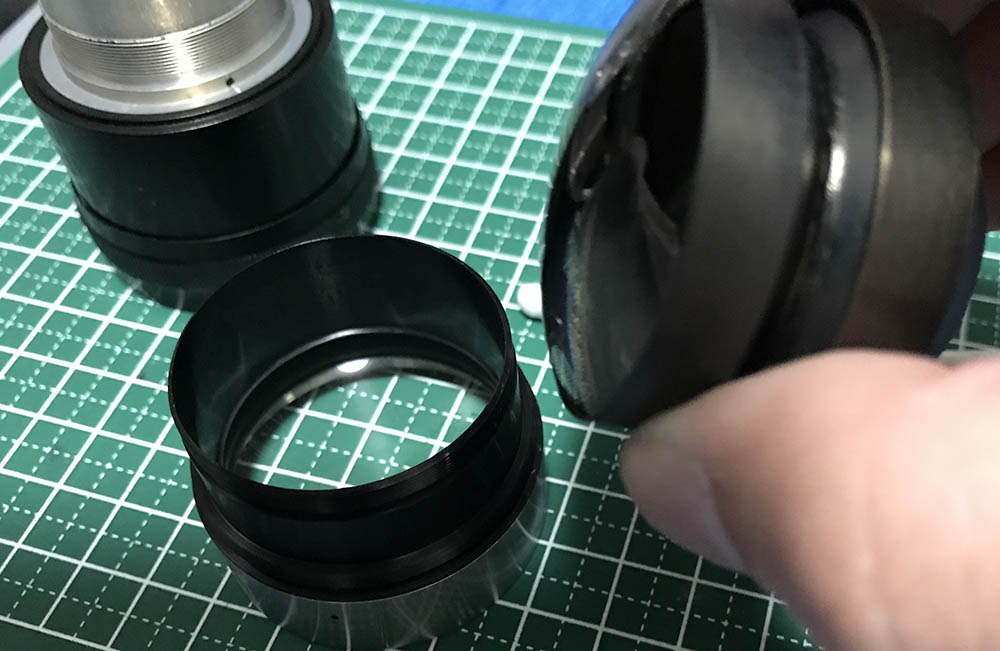
This lens conveniently separates into two parts. I always remove the optical part of any lens and store it somewhere safe before I work on the rest of the lens so this makes repairing this lens a lot easier. One of the reasons for this is that Nikon can manufacture the front part of the lens and then make the main barrel in several versions for Leica, Contax, Arri or other mounts. This simplifies production and I recall seeing an ad where you can buy the lens barrel separately so you can swap the lens barrel of your lens to a mount of your choice. I don’t know if this was ever a standard practice in those days because I never see these lens barrels being sold now. Maybe they were but the volume is probably very low so we don’t see it trickle-down to the used camera gear market at the present.
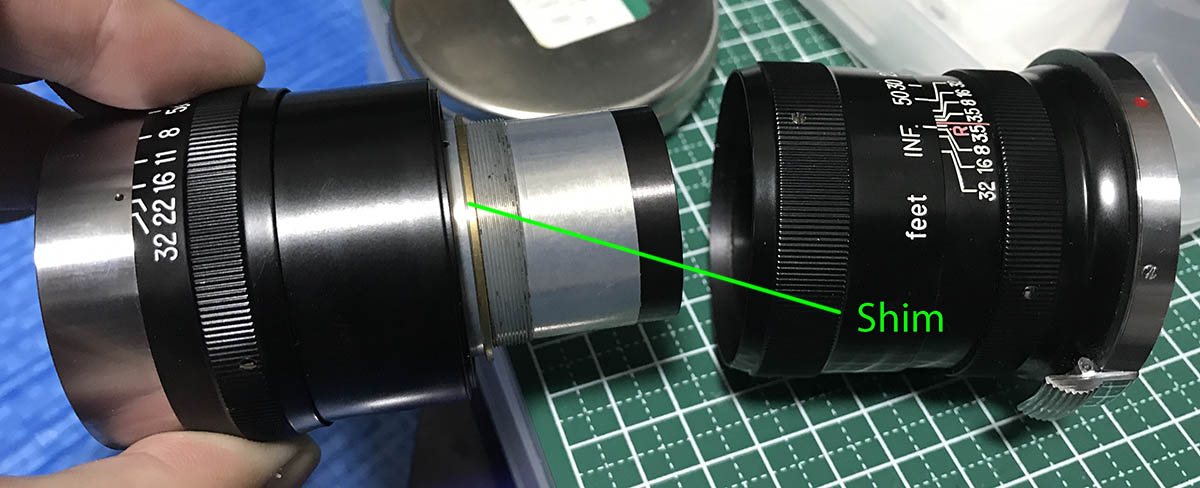
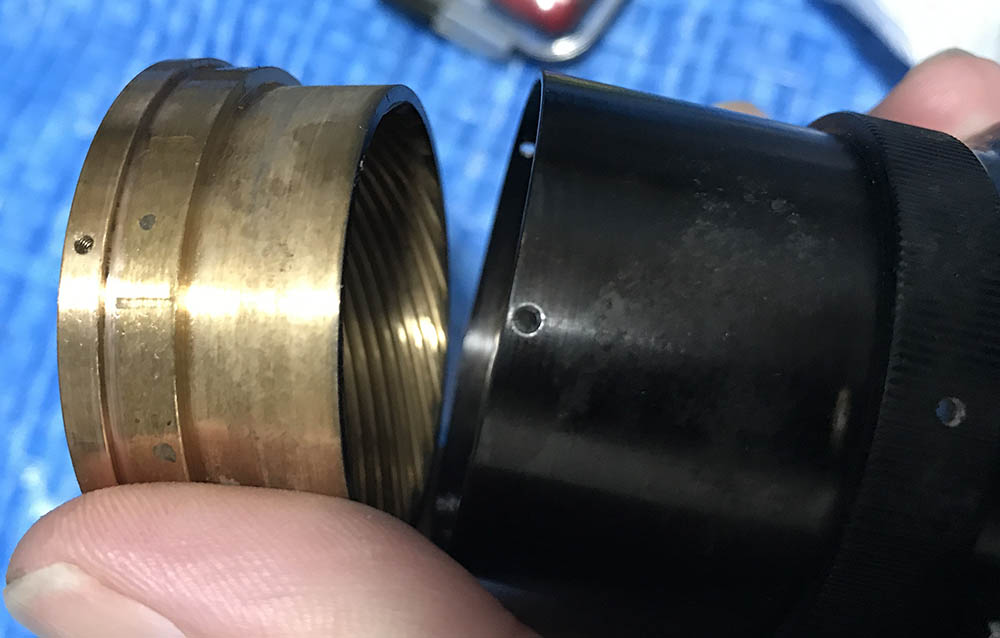
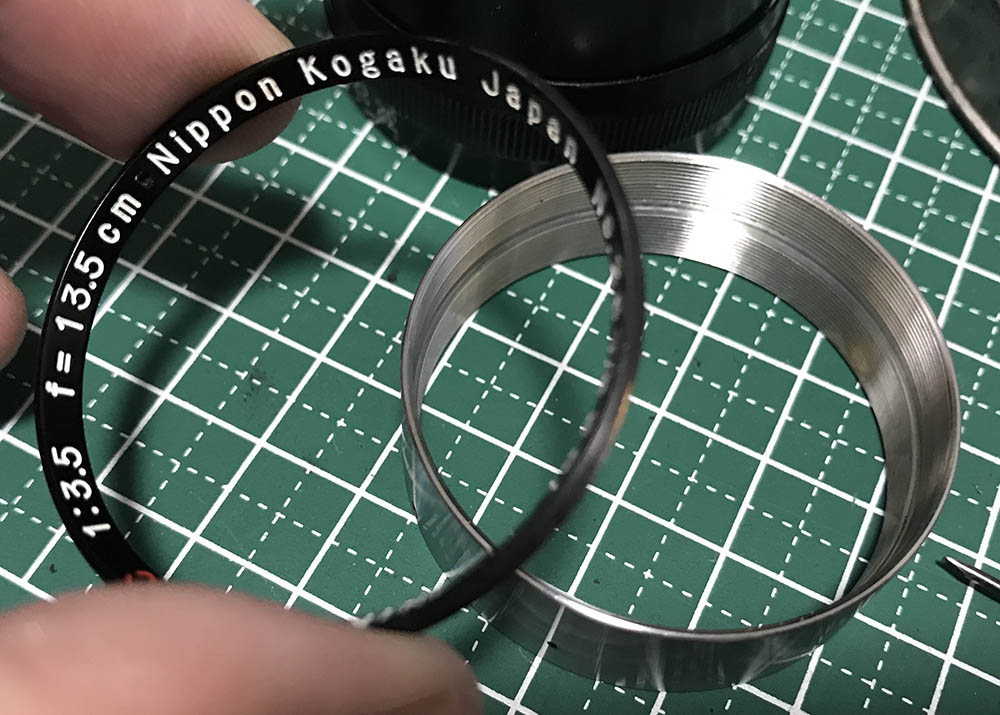
The front assembly can be easily removed by unscrewing it away from the focusing unit. There is a brass shim there that you should be careful with. It is unique to this lens as it’s used to adjust this lens’ focus. Store that in a safe place so you won’t misplace it.
Keep the front assembly safe because that is where all of the elements are. Put it in a safe place to prevent it from rolling-off the edge of the table. Be careful not to scar it or damage the iris.

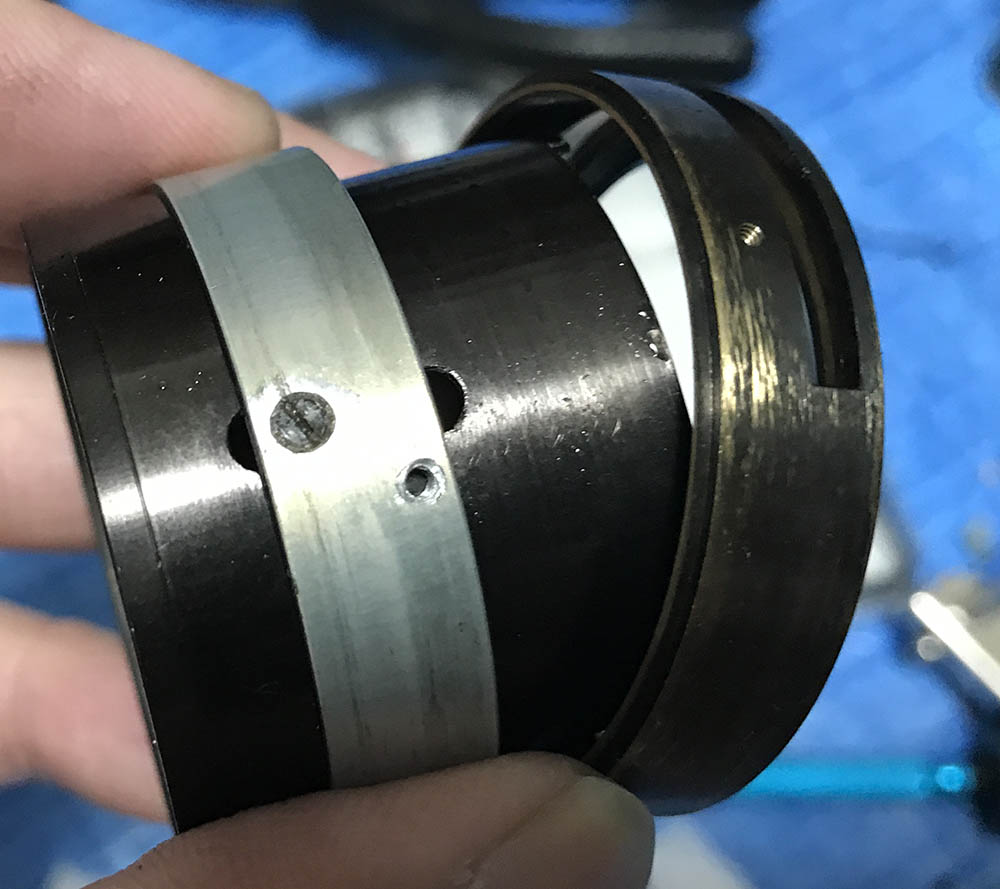
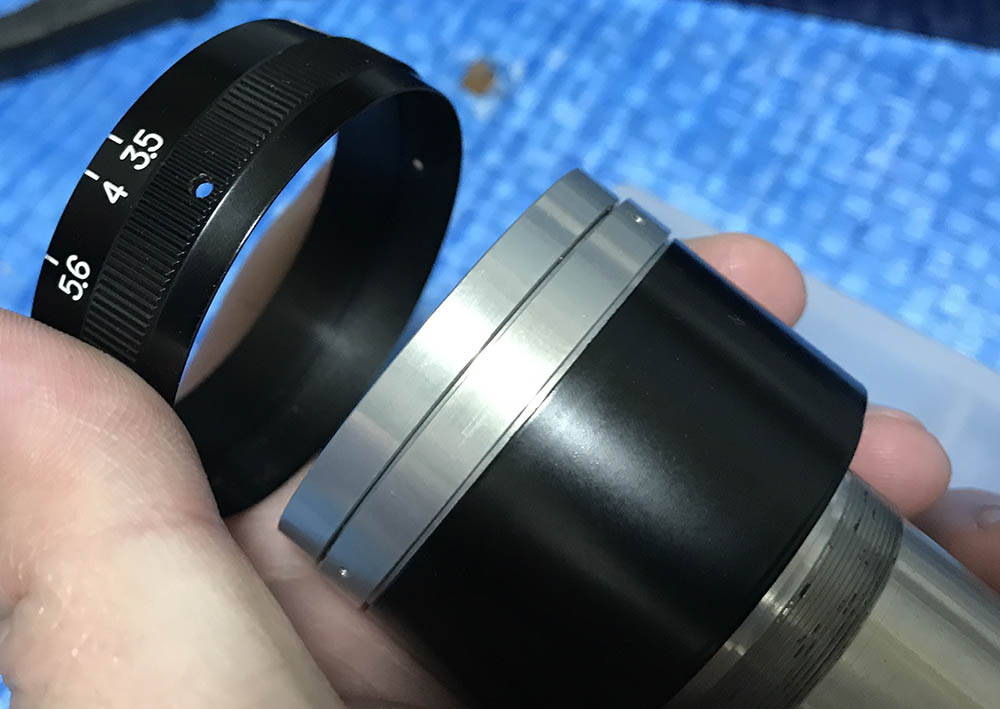
The focusing ring can be removed by extracting three of these screws. Make sure that your driver is of the correct size or else it can strip the screws or scar the surrounding metal. It should fit the slot snugly and you may need to grind a driver to fit.
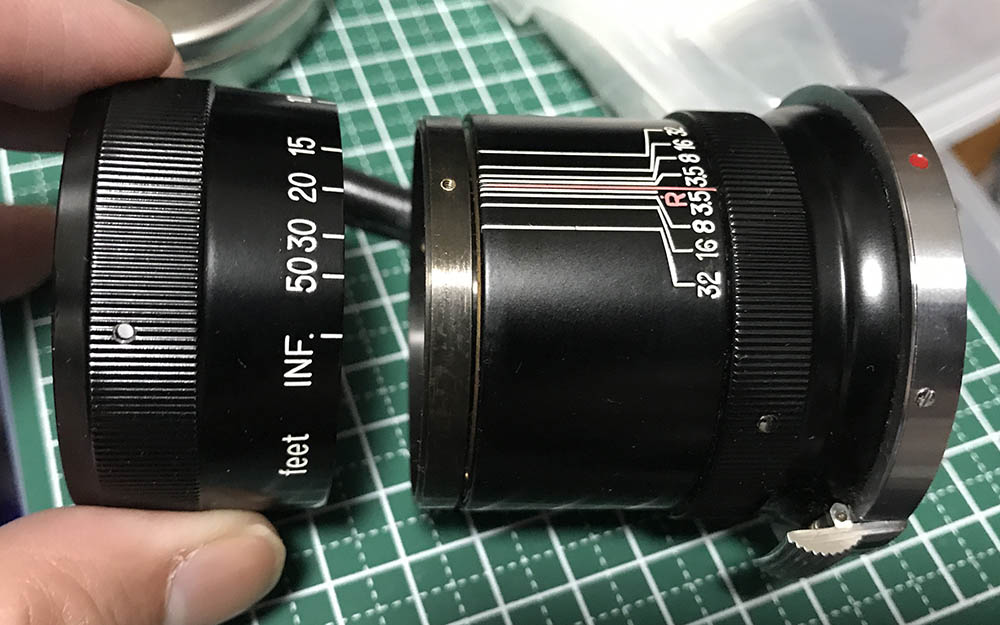
The focusing ring comes-off just like this. I always work with the barrel set to infinity to give me a nice reference point. This is a good habit that you’ll need to get used to.

To remove the sleeve with the grip, you will have to remove these screws. There are two that you can easily access but one of them is hidden and I’ll show you how to access it.

The tripod foot can be removed by unscrewing these 4 screws.
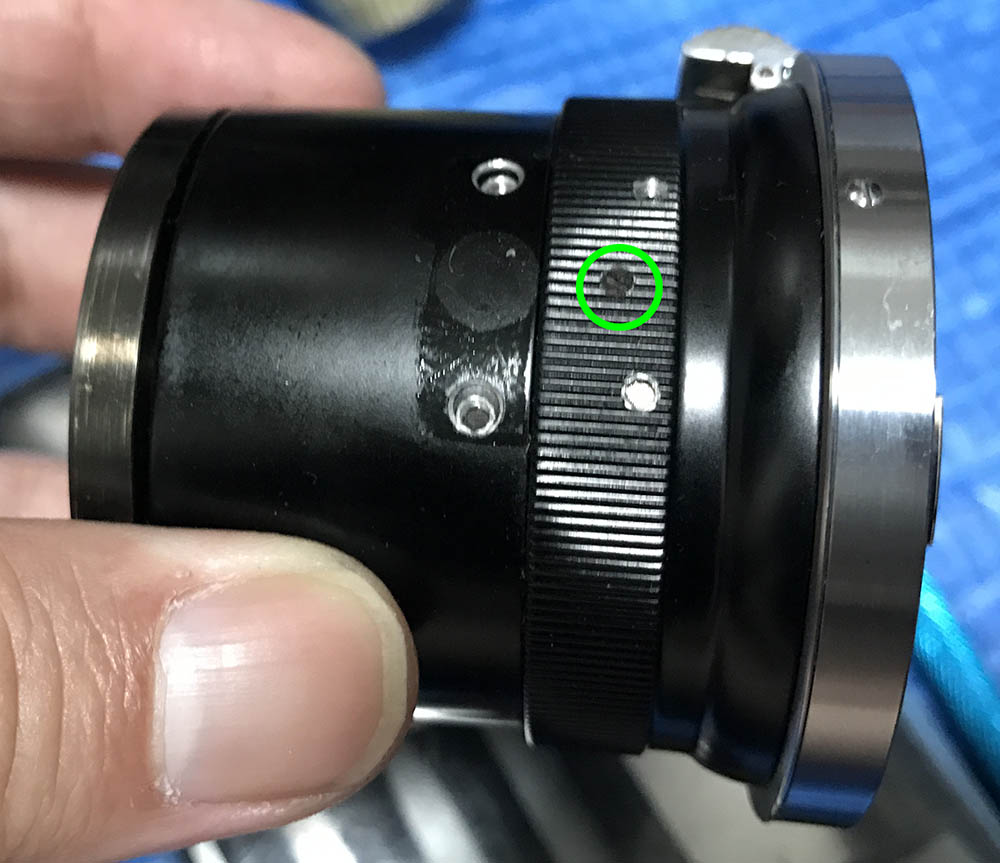
Once the foot is gone, you can now access that hidden screw.

Before you can remove the sleeve, you should first remove the helicoid. As usual, always mark where the helicoids separated or you’ll have a terrible time guessing where they should mesh properly. Read my article on how to work with helicoids to know how to do this properly. Many people get stuck here so read my article just to be safe.
You can now remove the sleeve. You can access the 3 screws that secure one of the helicoids now.
Extract the screws and you can remove the helicoid. Be sure that you mark how it should be oriented before you remove it because you can easily put this back incorrectly.

The rangefinder-coupling cam mechanism can be removed after removing a few screws. Just like with the helicoid, remember its orientation before it’s removed. This couples to the rangefinder arm in the camera and the spring makes sure that contact between these 2 parts are always maintained.

To separate the collar, remove this screw.
The collar can be removed just like this. Don’t apply too much grease on this part. A very thin film of grease is enough so long as it doesn’t squeak. There is another screw, it’s for the cam and extracting it will allow you to separate the cam.

The cam can now be separated. Clean this part properly and grease the hole a bit when it is time to put this back. Make sure that the assembly does not squeak and it should be operating smoothly. The spring may be rusty so you should remove all of the rust with oil or WD-40. Clean the spring properly before re-installing it. That black felt lining on the inner surface of the cam had to be replaced. It has been there for more than half a century breeding germs. Unless you’re a collector, this has to be done.
The main barrel of this lens is simple enough to understand and you don’t need plenty of explanations for this. If you’re familiar with old-school Zeiss lenses then this shouldn’t be a problem for you. The key to all this is using the correct-sized drivers for the screws.
Use a lighter-type of grease for this. I used a heavier grease on this and it’s a bit too stiff. Remember that this will couple with another set of helicoids on the camera and the resistance of that helicoid will contribute to the overall resistance that you will feel when you turn the focusing ring. Always keep this is mind when working with Contax and S-mount lenses. I do not know what I was thinking when I oiled this but I forgot this fundamental thing! I was probably concerned with making precise turns so I tried using a heavy grease initially. It’s not all that bad but I wish that it’s just a bit lighter.
Front Assembly:
It’s time to take the front assembly apart. This separates into 2 convenient parts and this is where most of the action happen since it contains several mechanisms. I personally like working with this because of its simplicity. Do note that some parts of this lens may be glued such as the front barrel so be patient. Use some solvent and place a small drop to the seams and let that soften the glue before you proceed. Acetone and alcohol (isopropyl 99.9%) is very good for this. MEK will also do but I find that it’s a little bit too strong and may dissolve some of the paint. Be careful with solvents because they’ll do a quick job on cemented elements if you aren’t careful! The fumes alone may be enough to soften Canada Balsam. It’s a bit of an exaggeration though but you get the idea.

The front elements assembly can be extracted from the front assembly just like this. Be careful not to damage the glass when you’re handling this part.
The aperture ring can be removed after you extract the 3 set screws that are securing it. Make sure not to damage the screws because they can be brittle with age.
The doublet is glued to its collar so unscrewing the collar will also remove it. The 2nd and 3rd elements were glued together so handle this with care. Be careful when using any solvents, they can dissolve the cement.

The front barrel is secured by a small set screw.

You can unscrew the front barrel once the screw is gone. The bezel secures the front element so removing the front barrel with it attached will give you access to it. You can remove the bezel first before removing the front barrel by using a rubber cup but I prefer to do it this way. Make sure that you don’t drop the front element to the ground.

The front element can now be extracted with a lens sucker. You can push it from behind using a finger and catch it with your other hand but this is the safest way to do this. Note which side should be facing forward by drawing a small dot with a Sharpie on the wall of the glass. Putting an element back facing the wrong way is dangerous.
The bezel can be safely removed just like this. I always clean what’s behind this because this thing usually accumulates dust or germs underneath it.

The rear element is secured to its housing. Extract the housing to remove it.

The rear element is secured to its housing by a retainer. Use a lens spanner if you want to remove it but there’s no point in doing so since you can clean the rear element while it’s still attached. Make sure not to damage this part while removing the retention ring.

Mine was really filthy so I had to disassemble everything.

The rear element can now be removed. Again, be sure not to put this back facing the wrong way.
There’s not a lot of surprises here since it was made during the early years and production shortcuts weren’t implemented yet. So long as you have the proper tools you should be fine working with this.
Iris Mechanism:
The iris mechanism is similar to the one on the Nikkor-P.C 10.5cm f/2.5. Mine was just a little bit oily so I decided to just wipe it with a Q-tip and naphtha. I rarely do this as I advocate cleaning this thoroughly, there are times when I get lazy and shortcuts like this are acceptable to me. If the iris mechanism needs a complete overhaul then just wait for the next article in this series where I will take-apart the iris mechanism of an earlier version of this lens. There are little differences but they’re basically the same mechanically.
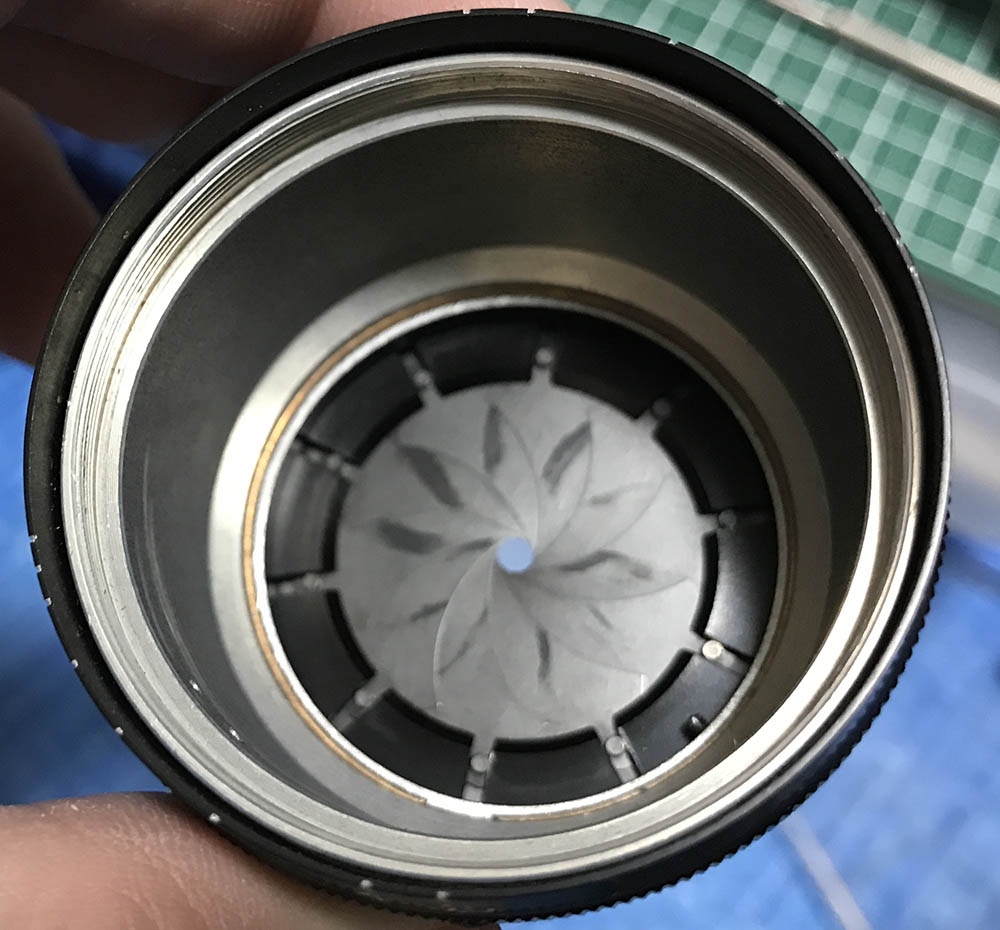
There is a thin film of oil. I carefully wiped it with Q-tip and naphtha until it is as clean as I could make it. Always wipe along the curvature if the iris to prevent it from catching any of the iris blades. You can also flush this with naphtha if you like but that will take more effort.
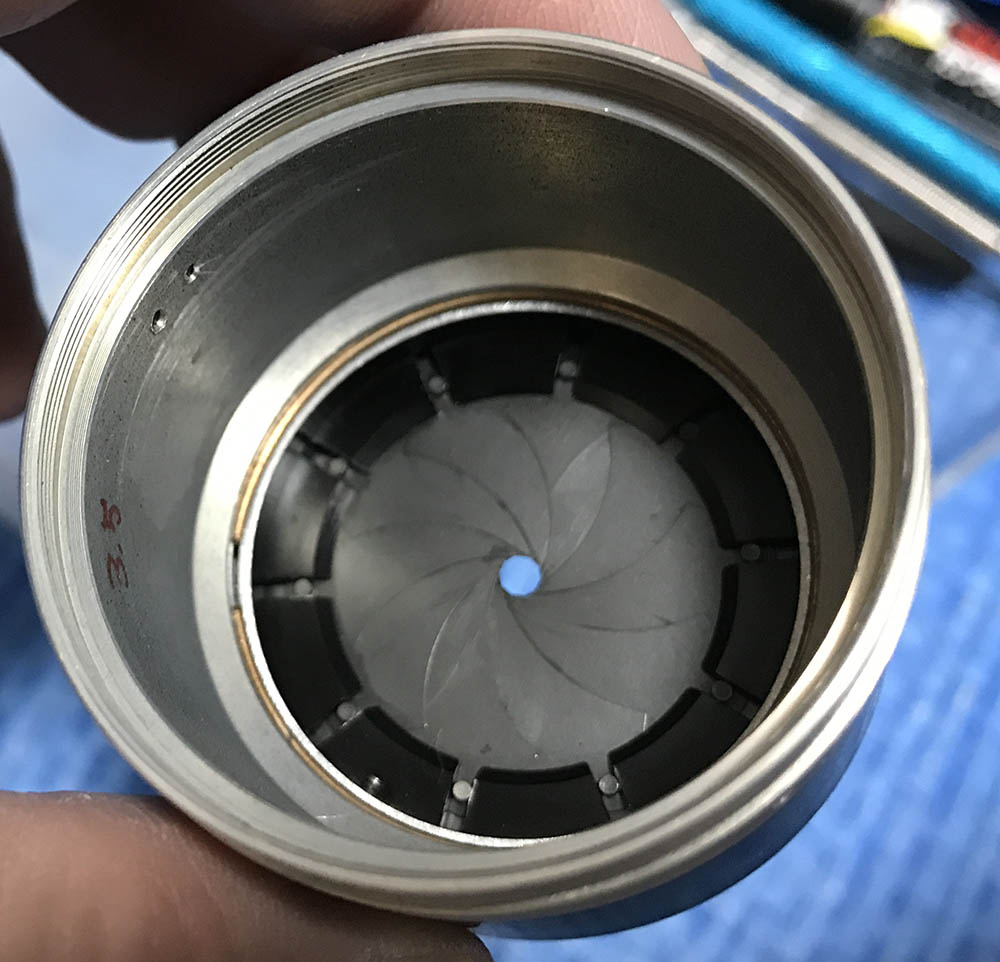
Just a little bit more to go! A sharp artist’s brush will finish the job.
That’s the quick-and-dirty way to clean a preset-type iris. To do a proper job, read my post on how to work with preset-type irises. These work differently from the usual automatic irises that we are more familiar with and requires more patience. It can be frustrating so even experienced repairmen are not always happy to work with one.
Conclusion:
I had plenty of fun working with this, it’s a nice project for a relaxed Sunday afternoon. This will probably take you 2-4 hours at most depending on the condition of the lens. I wanted to replace all of the liners so it took me more time because I had to pickle the lens in an alcohol bath to soften the glue on the felt so I can completely remove them and replace all of them using new material such as black matte velvet paper or felt. It will all depend on which surface needs it.

The felt lining for the hood was replaced with fresh material. The old one’s dirty so this had to be done. I used a thicker material so that the fit is snug.

Coupled with the bright-line finder, it makes for an enjoyable setup to use for general photography. All that hard work paid off and this will be good to use for another 50 years. They don’t make things like they used to.
Did you enjoy this repair and review article? If you did, please do not forget to share this with your friends at social media. Share this with your camera group so people will have a better appreciation of this lens. This is probably the only article online which deals with this lens when it comes to repairs so I hope that this will help somebody repair their old lens and bring it back to working condition. If you’re new to this, send this to a repairer and have him see this article as a guide. Thank you very much for the support. This blog has been continuously publishing exclusive and original content for a couple of years so it has been gaining plenty of respect in the Nikon repair community. Without your help, this blog will not succeed and your support is the key to my motivation to keep this running. I am busy these days but I always make time for this blog because I know that people will be waiting for my next post every weekend. See you guys again next time and thank you for the burgers you’re sending me. Keep warm this winter, Ric.
Help Support this Blog:
Maintaining this blog requires money to operate. If you think that this site has helped you or you want to show your support by helping with the site’s upkeep, you can make a small donation to my paypal.com (richardHaw888@gmail.com). Money is not my prime motivation for this blog and I believe that I have enough to run this but you can help me make this site (and the companion facebook page) grow.
Leave me some tip?
Thank you very much for your continued support!
$2.00
Helping support this site will ensure that this will be kept going as long as I have the time and energy for this. I would appreciate it if you just leave out your name or details like your country’s name or other information so that the donations will totally be anonymous. This is a labor of love and I intend to keep it that way for as long as I can. Ric.

Jan 30, 2020 @ 23:23:38
Richard,
Great blog, so much good information! Do you have an article showing how to adjust the infinity focus on the Nikkor-Q.C 13.5cm f3.5?
Gavin
Sep 01, 2023 @ 12:02:47
Dear Richard
Thank you so much for the detailed instructions! I just acquired this lens with some fungus issues with the rear element. In the lens barrel section you mentioned “The front assembly can be easily removed by unscrewing it away from the focusing unit…” could you elaborate on how to unscrew the front assembly? I gave it a try by holding the back part below focus ring and turn the front assembly counter clockwise, nothing moved.
Best wishes, John
Sep 01, 2023 @ 15:09:10
No worries Richard, I was able to take it apart. For anyone else trying to do this as well – I removed the aperture ring and the focus ring first (secured by three set screws each), then I had a better visual of the silver lens barrel which is the front assembly vs. the brass back assembly, with a little brutal force and without worrying about damaging the rings, I was able to break apart the assemblies by turning upper part counter clockwise.