
Hello, everybody! Spring is officially here and the weather is starting to get warmer. The sakura trees are blooming more than a week earlier than usual and this is a sign that we are going to have a very warm summer this year. I hate summers because it’s hot but the only consolation I get is to enjoy the sight of beautiful girls in their summer attire. This is just one small thing that makes life worth living. I am always infatuated by pretty girls so I got into photography. There are times when I wish I have a lens for portraiture with me all the time but it’s going to be awkward to ask random beautiful women for a snap. The way things work here in Tokyo is very different and I will be viewed as a creep. Maybe if I have an impressive lens with me then that would probably be enough to announce my intention that I am a gentleman with a Nikon and a Nikkor. Maybe the sight of the lens is all it needs to change their opinions. Speaking of lenses that make an impression, I’ll be showing you guys one lens that doesn’t need a calling card and its nick name is bokeh.
Introduction:
Today, we are going to look into the Nikkor 85mm f/1.4 Ai-S lens! This lens’ reputation is the stuff of legends. It’s the first 85/1.4 ever made for 35mm SLR photography. Nikon also made the first 85/1.5 lens for the Nikon rangefinder line in the 1950s and it took decades before we see a lens in this class made for the SLR. During this period when Nikon didn’t have a 85/1.5 for the F-mount, people only have the Nikkor 85mm f/2 Ai-S and its earlier sibling – the New-Nikkor 85mm f/1.8. While both lenses are great, they lack the extra 0.5% that an 85/1.4 can offer. Since Nikon’s 85mm lenses at the time were so good, it was hard to make an 85/1.4 to top these but Nikon made it happen in 1981 and it didn’t disappoint. There were stories of people shifting over to Nikon just to use this lens and I know a guy who did just that in the ’80s, I think he was shooting with a Pentax back then.
 Just look at that glass! The Nikkor 85mm f/1.4 Ai-S is an impressive to look at. It is sure to make people notice it. This lens shook the photography industry when it came out since it’s the fastest 85mm lens in its class for 35mm SLR photography. There were stories that I heard about people switching over to Nikon just so that they can shoot with this lens. It was a very good lens then and it’s certainly still a very good lens now.
This lens was so good that it was still being made until 2005 parallel to it’s successor, the equally-amazing Nikkor 85mm f/1.4 AF-D. While the newer lens has autofocus and other new features, some people still swear by their old Nikkor 85mm f/1.4 Ai-S. Some even feel that the older lens is better wide-open. I never did any tests between the newer variants of the 85/1.4 and this lens but I can tell you that this lens has less CA wide-open. Maybe it can all be blamed to sample variation but who knows? Maybe I can do a test one day.
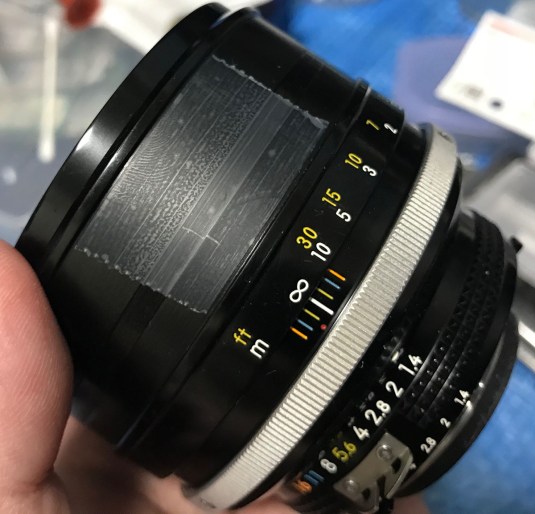
 This is by no means a tiny lens and it even makes the big Nikon F4 look small. It balances very well on bigger camera bodies because this lens is heavy. The hood is also a required accessory for this lens and it makes the setup even bigger.
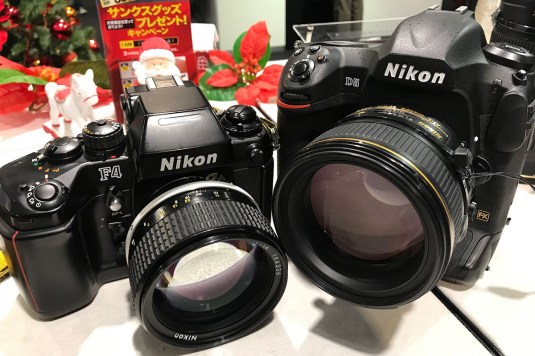 Then and now. I would imagine that these 2 setups were the choice of pros for portraits during their respective eras. The 85/1.4 line of lenses is very important for many camera manufacturers and is considered to be on of their top-tier lenses for prestige. It’s rare to find a bad 85/1.4 lens from any manufacturer because of this. I have shot both lenses in a quick test and I find that the older lens has a more natural rendering.


(Click to enlarge)
Let’s see how the coating on this lens performs. I shot this lens against the sun in purpose to see how resistant it is. Unsurprisingly, the more modern coatings of this lens is great at suppressing ghosts and flares. The pics above were shot wide-open and stopped-down. It can produce a feint blob wide-open and the blobs solidify as you stop it down further. It’s important that you use this lens with a lens hood not only for protection but also to stop stray light from hitting the front element and causing unwanted optical artifacts.


(Click to enlarge)
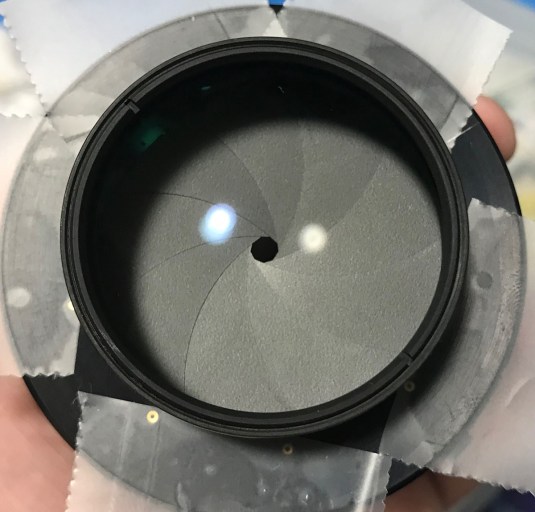
You shoot this lens for the bokeh. For those who are curious about this, check my sample images above to see just how smooth the bokeh is and how evenly-lit the bokeh balls are. This lens is an engineering masterpiece if you’re going to judge it by its bokeh alone.


(Click to enlarge)
Now that you have seen how the bokeh looks like, this is how thin the DOF is on this lens. It can be difficult to use this lens wide-open with subjects that won’t stay-still for you. If you need to use this lens for uncooperative subjects then it’s best to use it stopped-down to f/4 or more. This is a great studio lens and its resolution and sharpness peaks at about f/4 or f/5.6. I don’t own a Nikon D850 but I am sure that this lens will still out-resolve any new high-MP cameras available when you shoot it from f/2.8 to f/8.
 Since this is a manual lens, you are rewarded when the subject would stay still for even a second or two for you to focus your lens and take your shot. Just look at how beautiful its rendering is. It’s very sharp wide-open where in-focus while not super sharp as to make your subject’s flaws obvious. This lens is a portrait photographer’s dream-come-true. For people who are fine with manual focusing, this lens will reward you with stunning and memorable pictures. Using this lens for natural light photography is the reason to buy it.
 Shooting with this lens wide-open on a sunny day without using ND filters is not a great idea because it’s too fast. Just look for a shady area and take your picture. The contrast is great wide-open and gets even better by f/2 onwards. The saturation is also nice and the colors look neutral without any hint of yellowish or bluish cast. Chromatic aberration is also nicely-controlled in this lens but this doesn’t mean that it’s absent. There is just the right amount of it to make the image not look flat. Look at how natural the picture looks and how nice the subject separation is. Again, all I needed was for my subjects to stand-still for a second or two. Autofocusing lenses are convenient but not necessary.


(Click to enlarge)
The implementation of CRC means that this lens will perform very well regardless of the distance you focus it at. A lens without CRC may be calculated for optimal sharpness at distances that it was designed for. A lens with CRC will alter the spacing of the elements so it will try to give you the best results as you focus it in or out. Just look at these photos that I shot with the lens at its minimum focusing distance and judge it for yourself. All of these were taken wide-open at f/1.4.


(Click to enlarge)
Here are some samples taken at infinity. Again, CRC helps ensure that the picture is sharp at almost all distances. I would like to not that I shot the 1st and 2nd picture at about f/5.6 and f/4 because I don’t need shallow DOF for these. I think the 3rd photo was shot at f/1.4 but don’t take my word for it. The resolution is so good at f/4 that you can see the details of the buildings clearly in the 2nd picture.
The following sets of pictures were shot at f/1.4, f/2, f/2.8 and f4 respectively. The feel and rendering of this lens changes a lot as you stop it down. This makes this lens versatile for many tasks and is not only used for portraiture.


(Click to enlarge)
The set of pictures above show how the ghost looks like throughout the faster apertures. It’s very prominent in the scene when you have a very strong light source in the frame. It only gets more obvious as you stop the lens down. It can’t be helped so just avoid taking photos with the sun in the frame if you’re bothered by this. To be honest, I took this with the intent of showing the blob to you so in real-world conditions you will tend to angle it so that the ghost appears off-frame. The good thing is that contrast isn’t affected much at all when shot in contra-light like we have here in this set.


(Click to enlarge)
The pictures above are should illustrate how good this lens is. At f/1.4, it’s sharp but there is a little bit of veiling flare muting the contrast down a bit and some CA is can be seen. It isn’t that bad to be honest and it’s certainly a it better than the Nikkor 85mm f/1.4 AF-D as far as I can remember. By f/2, it’s already getting pretty sharp and contrast has improved considerably. Most of the optical artifacts are now almost gone and the wider DOF helps in giving you better detail. Resolution everything else improves by f/2.8 and you can now notice that the background blur is beginning lose its washed-out look but its still smooth and lovely. Resolution is beginning to peak at f/4 and now the background is beginning to get more defined but it’s still smooth. I will say that f/4 is probably very good for portraits because you can get both eyes (your model) in-focus while still retaining a soft and nice background. It’s not easy to make this lens generate bad bokeh even at f/5.6 so you don’t have to worry about it so much. This is one of the best lenses that I have used so far.


(Click to enlarge)
Here are some real-world examples that were shot with this lens. Nailing focus is really the biggest challenge while shooting wide-open. You will have to be very careful with it and confirm your focus properly before pressing the shutter button. It’s a versatile lens with a useful focal length for general photography and will make a nice partner to your 35mm lens. If not for its size and weight, this lens will be a very good travel lens. I shoot it for lowlight photography as well because it’s sharp wide-open so it’s nice for shooting stage or concert photography. This lens is very highly-regarded and I can tell you that it’s all true and it certainly lives up to the hype. If you are thinking of buying that Samyang, don’t buy it and just save your money for this lens. Look for a nice used copy and you are going to be thankful that you chose the Nikkor.
Let’s now see some samples that were taken using film. Film has a unique look that’s difficult to simulate with film because of grain. The colors also look different because it uses dies that are a unique to each formula and how light reacts with silver. This is what makes film so special and since this lens was calculated to work with film it is best that we see pictures that were taken using it. This will help give us a better idea of how a lens performs and that will help us better assess how a lens performs. The pictures were taken with the help of my Nikon F100 and Fujifilm Industrial 100, I then had the roll developed and scanned using Fujifilm Frontier SP3000, it’s the best scanner that’s available to me because the colors look amazing.
 This was taken at near-minimum focusing distance. Chromatic aberration will show easily in this kind of scene but I didn’t see any here or at least it’s not obvious in the results. The quality of the bokeh is stunning and the center looks sharp. I think this was taken with the lens stopped-down a bit if I am not mistaken.
 This lens was designed to be the ultimate portrait lens and this picture should demonstrate why it was the best at one point in the 1980s. The rendering looks painterly, almost like it was drawn by an artist. There are small amounts of spherical aberration in this picture but it just helped make this picture look great.
 Focusing with a lens this fast can be difficult when taking pictures of moving subjects as you can see in this picture. This can be helped by using the correct type of focusing screen for your camera, the electronic rangefinder isn’t going to be helpful for acquiring focus quickly despite being more accurate.
 You can be lucky at times because your focus won’t be off by much. An easy way to focus with a manual lens is to focus from the far-end and stop when your focus is acquired, you then adjust your focus a bit to get critical sharpness. This is easier said than done and it takes a lot of practice to perfect this skill. It will also depend the focus throw of your lens, a longer one will be harder to focus but it will be more precise because the turn rate is much smaller. A shorter one is easier to focus but it’s easier to focus pass your subject when you turn the ring too much. This lens is a little bit on the long side but you’ll get used to it.
 People these days shoot for the blur instead of the picture. This can be a problem if the eyes of your subject aren’t flat on the same plane and you’ll get one of the eyes focused and the other one blurred. The ability to shoot at f/1.4 is a bonus but it does not mean that you should shoot at that aperture all-the-time. I would shoot pictures like this at f/2.8 or smaller and this picture was only taken to illustrate my point.


(Click to enlarge)
Some more sample portraits with this lens and film combination. The 85mm focal length is great for this kind of framing since it’s neither too-long or too-short for this. A wider lens will make your subjects bigger while a longer lens will make them look a bit flat. This is just the way foreshortening works and you should choose your focal lengths wisely depending on the job.


(Click to enlarge)
Here’s the rest of the set. Please click on them to see the pictures better, I hope that these will help give you a better idea of how this lens performs and how special this lens is when used with film.
So, are you now excited to buy your copy of this lens? Just make sure that everything’s all clean and that the iris is snappy. This lens was made the old way and it will outlive you’re grandchildren as long as you take care of it. This is one of those lenses that you buy and keep forever. This lens is a real modern classic that’s why the price of this lens doesn’t go down. If you’re looking to spend some $450 for a manual 85/1.4 then skip the Samyang and just put your money to better use and buy this lens, it’s built better and it’s a Nikkor! That’s all for the introduction, it’s now time for the repair portion.
Before We Begin:
If this is the first attempt at opening a lens then I suggest that you read my previous posts regarding screws & drivers, grease and other things. Also read regarding the tools that you will need in order to fix your Nikkors.
I highly suggest that you read these primers before you begin (for beginners):
- Essential tools
- Best practices 1
- Best practices 2
- Best practices 3
- Ai conversion
- Working with Helicoids
Reading these primers should lessen the chance of ruining your lens if you are a beginner. Also before opening up any lens, always look for other people who have done so in Youtube and the internet. Information is scarce, vague and scattered (that is why I started this) but you can still find some information if you search carefully.
I highly recommend that you also read my working with helicoids post because this is very important and getting it wrong can ruin your day. If I can force you to read this, I would. It is that important!
For more advanced topics, you can read my fungus removal post as a start. This post has a lot of useful information here and there and it will be beneficial for you to read this.
Disassembly (Lens Barrel):
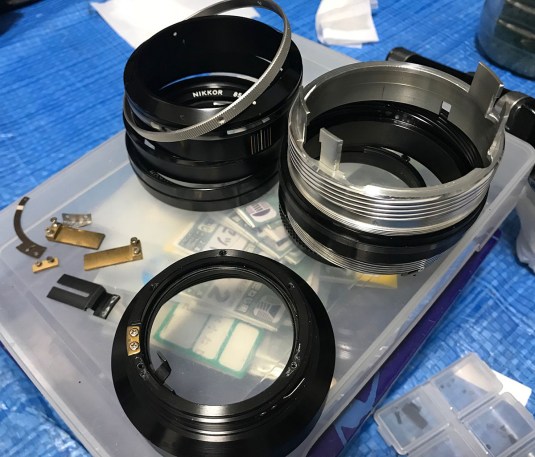
As usual, we want to separate the optics of this lens before we work on the lens barrel. It is much more important with this lens because its glass is so big and vulnerable. It’s also a complicated lens to work with as far as manual-focus primes are concerned due to the implementation of CRC and the size of the optics. I wouldn’t recommend this lens to any beginner no matter how much literature he has read or whether he has the right tools or not. You need lots of experience to work on this because of its delicate nature. This is the type of lens that is best left for the pros to tackle. It’s not worth experimenting with since the price of this lens is almost always on the high-side.
 I began by removing the rubber grip. You can do this later but I opted to do it first for no reason at all. Run a thin toothpick or something similar underneath the rubber to lift it from its bond and then you can carefully pick it off. Be careful not to tear the rubber.
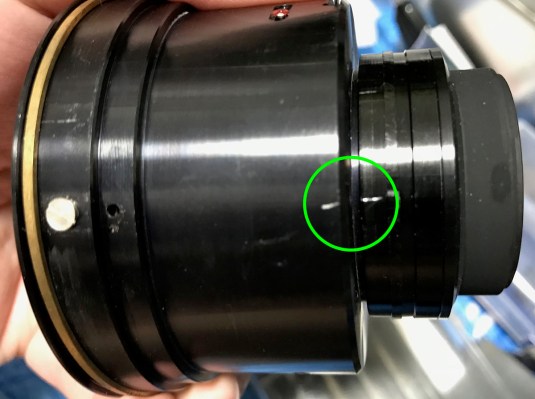
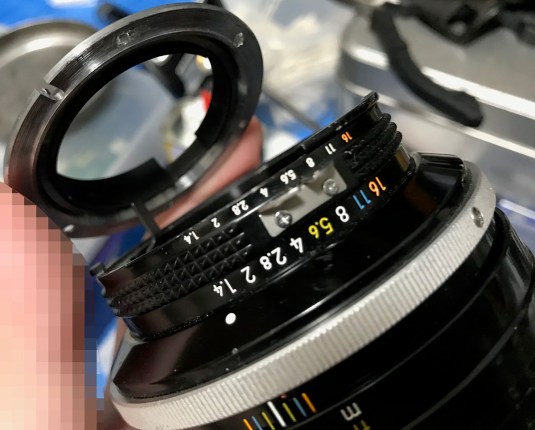
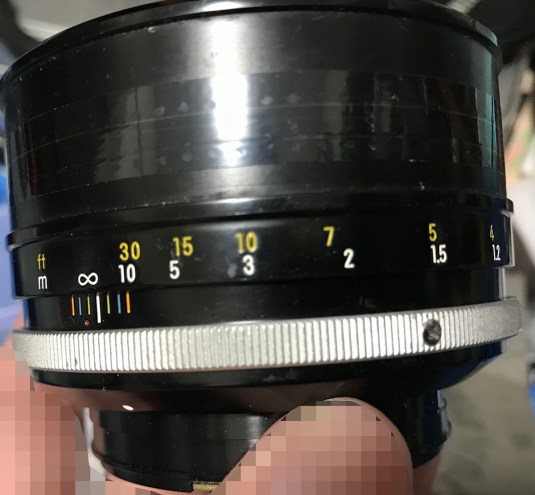
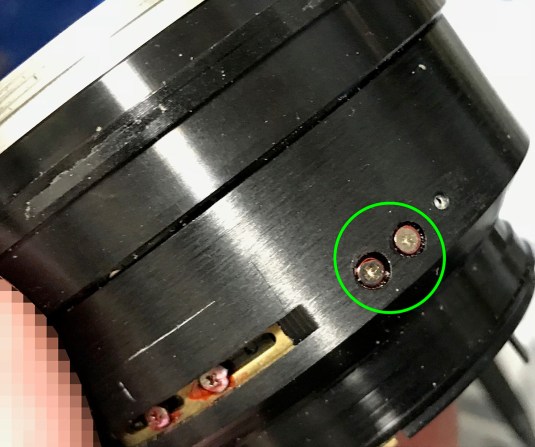
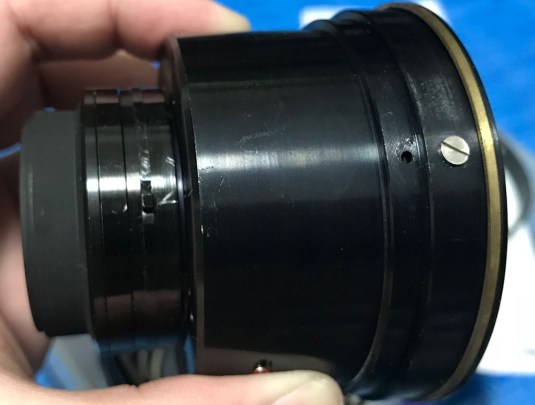
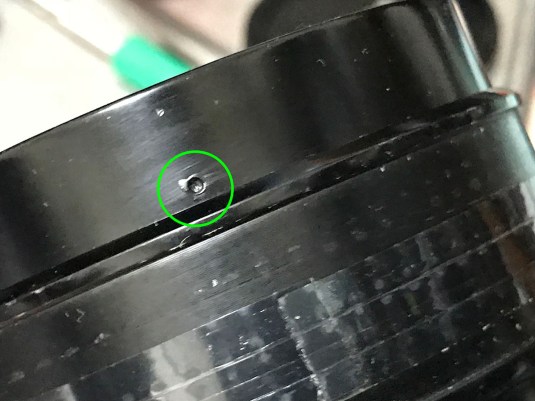 To remove the front barrel, remove this tiny set screw. This secures the front ring to help prevent it from getting loose accidentally. It’s usually secured by paint or lacquer so drop a small amount of alcohol or Zippo fluid (in the case of enamel paint) to soften it up then remove it once it’s soft enough. You don’t want to strip the head of this screw.
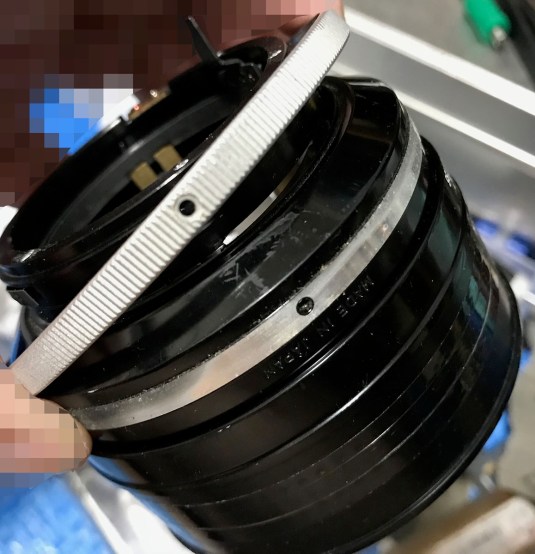
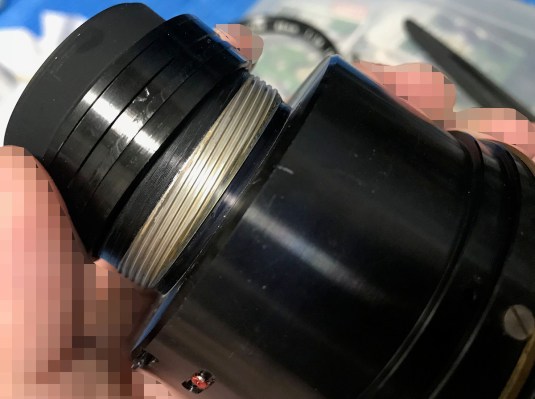
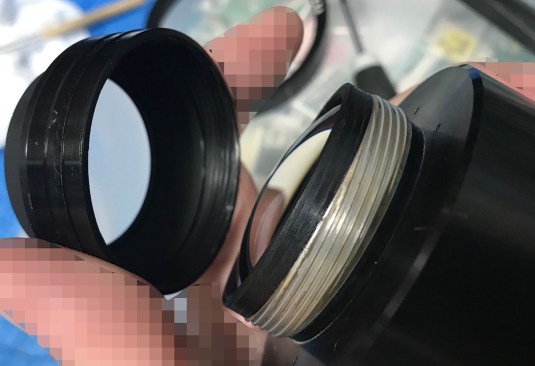
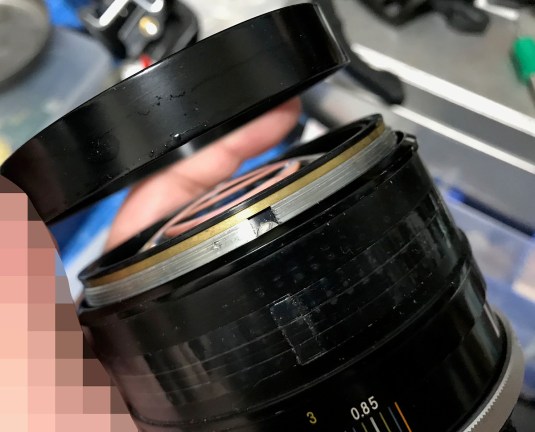 Carefully unscrew the front barrel off while the lens is facing up. The front barrel holds the objective’s casing in-place so once it’s gone, the objective can free-fall to the floor. See the droplets of alcohol? Mine was held in-place with lacquer so I had to soften it first. As you can see, the focusing ring is merely held by a strip of scotch tape.
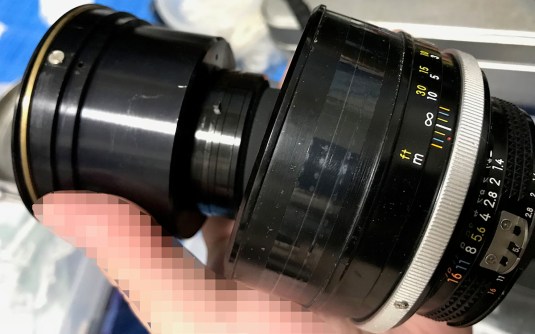 Before extracting the objective, make sure that the lens is focused all-the-way to infinity. I did this because this lens has CRC and it’s crucial that the alignment of the CRC unit when the lens is set to infinity is known to me. Always work on a lens while it’s at infinity if it’s possible. This way you will have a point of reference when it’s time for reassembly.
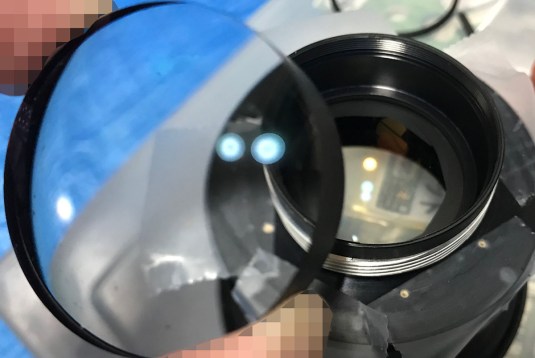
While pulling the objective out of the lens barrel, make sure that you don’t move or touch the CRC unit accidentally before taking notes! This requires a very steady hand.
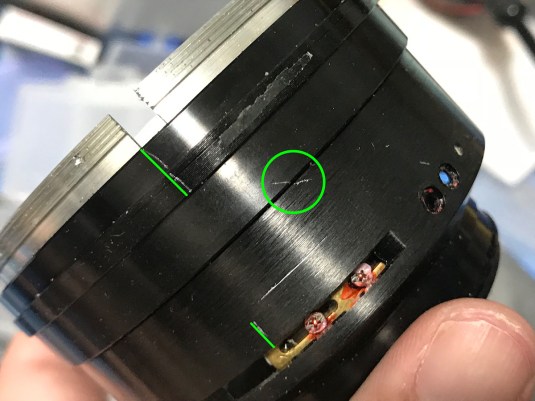
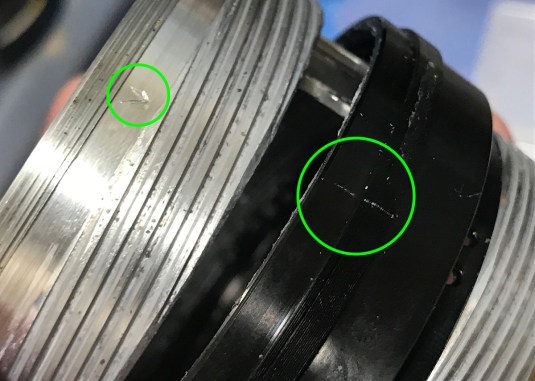
 Make a few small marks so you will know how things should be aligned. Measure the gap between the CRC unit’s housing and the objective’s housing. This is very important and if you forgot to do this then you will spend plenty of time guessing how things should align later during reassembly. Once you are satisfied, store the objective in a safe place.
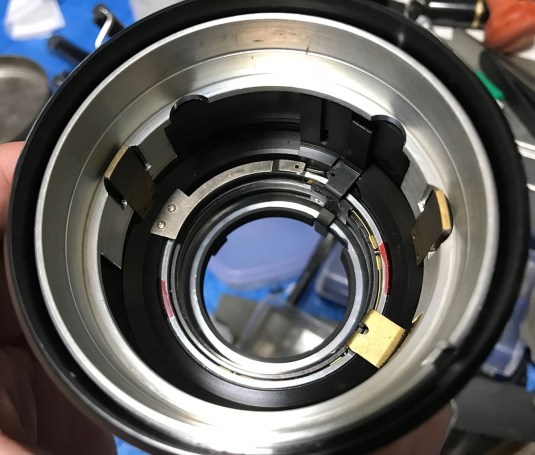
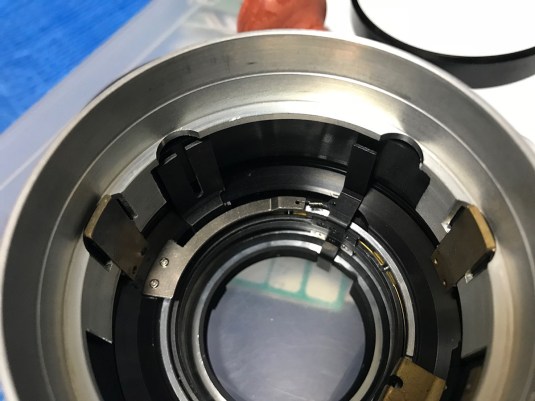 Inspect and study how the inside of the lens barrel looks like and take as many pictures as you can here for reference. Taking notes is half of the job when it comes to repairing old lenses. Focus the lens in or out and study how the mechanisms work.
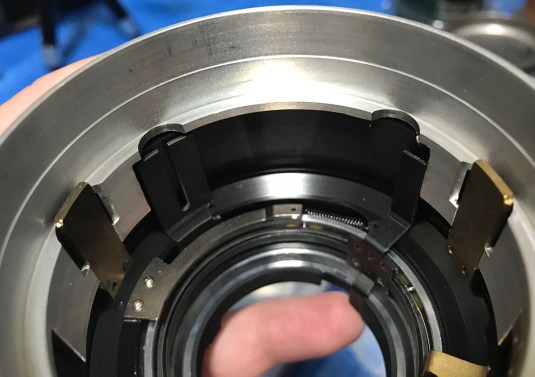 This picture show me flicking the stop-down lever and seeing the extent of how it moves and how far the range of movement should be. It’s fun studying how things work.
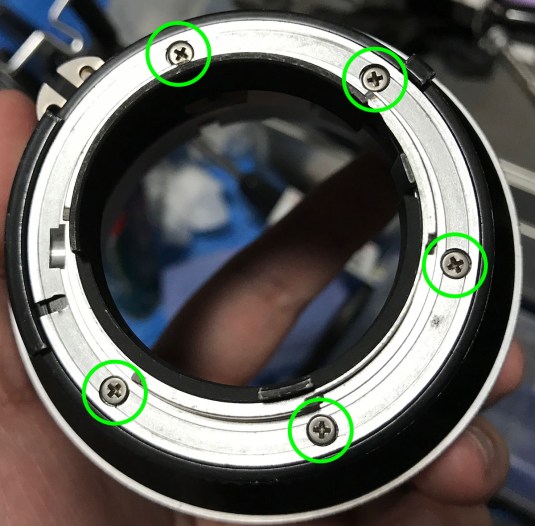 Now that we got the objective out of the way, we can now work on the rest of the lens and not think about accidentally damaging the delicate glass. To disassemble the lens barrel, begin by removing these screws from the bayonet mount. To prevent any damage to the screws, read my guide on how to work with screws. Many people get stuck because they stripped the head of their screws, you don’t want to be one of them!
 Once the screws are gone, you can now safely pull the bayonet off.
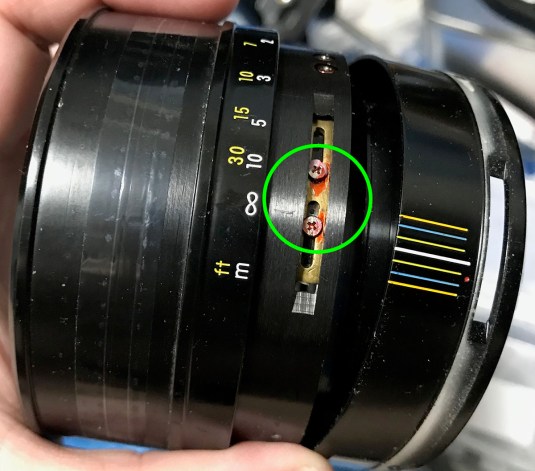
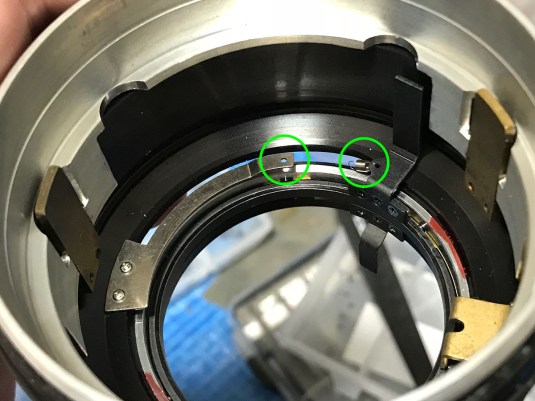
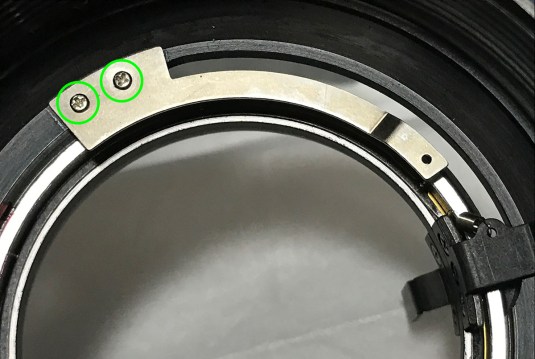
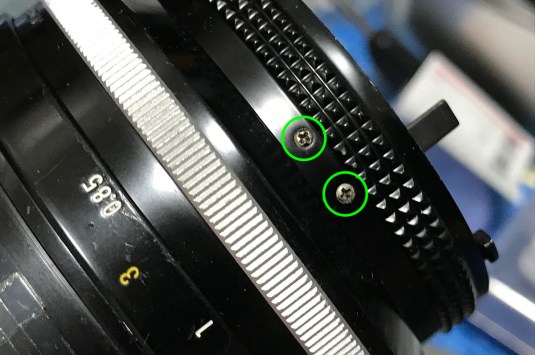 Before removing the aperture ring, carefully remove these 2 screws. These connect the aperture ring to its coupling fork underneath it.
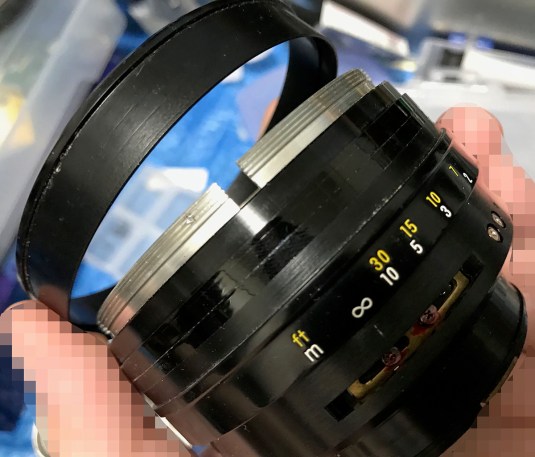
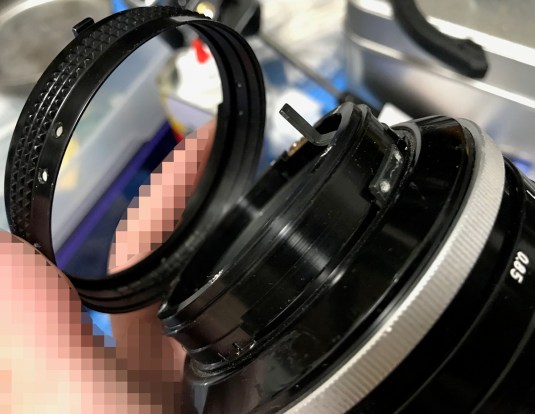 Once the screws are gone, the aperture ring comes off just like this.
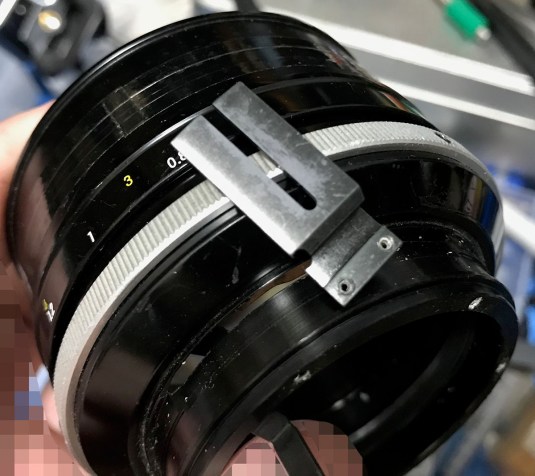 The aperture coupling fork can now be safely removed. Note that there is a thin layer of grease at the center of the fork. You will need to apply a very thin film of clean grease in this same spot later after cleaning away the old grime. This is important because if you didn’t do this the lens will squeak when you focus it in or out. Remember that you only need to apply the minimal amount of grease here. If you applied too much then you will end up with an oily iris in the future as the grease migrates to the iris mechanism.
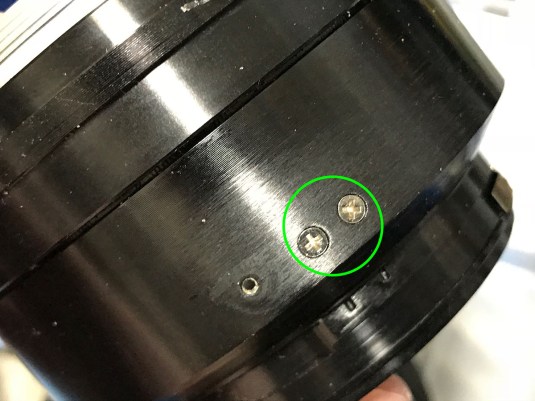
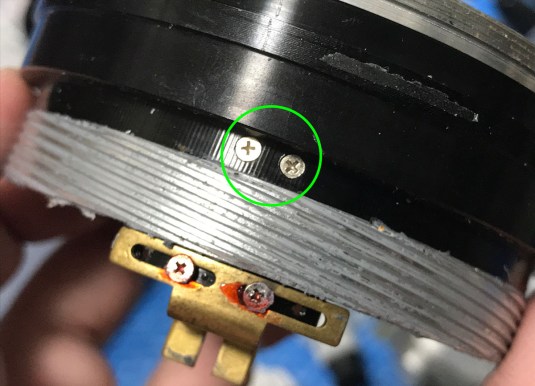
 To remove the metal grip, carefully remove the 3 screws around it. Use the correct driver for these so you won’t strip it or damage the surrounding metal.
 The grip can now be safely removed. If yours is stuck due to some dried grease or glue, it is essential that you soften it first with some solvent and try again later when the solvent has done its job softening whatever is binding this.
 Once the grip is gone, the sleeve can now be removed. Again, this part can get stuck and I sometimes have to apply some solvents and use a rubber glove to remove it. Mine was ok and I don’t recall having a hard time with this. See the part that I highlighted? Do not do anything with this thing just yet and leave it alone. If you see something that has lacquer on it, chances are Nikon doesn’t want you to touch it as it’s a precise adjustment point. It’s also one way for Nikon to determine whether something had been tampered with.
 You can now remove the tape securing the front part of the focusing ring to remove it. It is also very important to take notes at this point, notice that I made a small scratch under the infinity symbol. This will help me determine how things should be and it’s will save me a lot of time later during reassembly. You will also want to make a small scratch near the central part of the focusing ring where it’s covered by the rubber grip to help you see its alignment during reassembly.
 The lower-half of the focusing ring can now be removed. Notice that I made more marks here. The marks don’t need to be big or deep so long as it’s easy to see and it will not get wiped-away during cleaning.
 The lens is built similarly to the Noct-Nikkor 58mm f/1.2 Ai-S and I’ll suggest that you read on it to see how similar or different both lenses are. The lens has a pair of helicoid keys and the rails are milled into one of the helicoids. This is not easy to machine and I never see this in cheaper Nikkors, a true sign of quality! The helicoid keys keep the helicoids in-sync so that it extends or retracts as you turn the central helicoid.
 Before you go any further, uncouple the spring for the stop-down lever first so that you’ll not have to worry about ruining it. This spring can get fatigued and cause a sluggish iris. It’s not very likely to happen with a lens this “young” but it’s one of those things that can go wrong in lenses that are many decades old.
 To remove the helicoid keys, you will need to remove their screws. Here’s one set and the other set is on the other side. These are sometimes glued with epoxy or similar-strength adhesives for a very good reason. If yours is hard to remove, just follow the trick that I’m showing you in this article to remove these. Remember, never force it when you’re stuck!
 Here’s another set. I remember that the screws for the left and right keys aren’t identical so screw them back again to their respective keys to help remind you which set of screws should be attached to which keys. The keys should also be reinstalled back to their holes respectively, I make a small mark on one of them to remind me which one should be on the right or left slot. Do not damage the helicoid keys or you will end up with a rough or gritty feeling focusing action. It’s also good not to over-tighten these screws at first when you put them back, focus the lens first and see if it’s smooth first. Once you are happy, it’s now time to tighten these screws because you are sure that the keys have been set in the right way. Some people don’t know this and this is one of the trade secrets of repairmen.
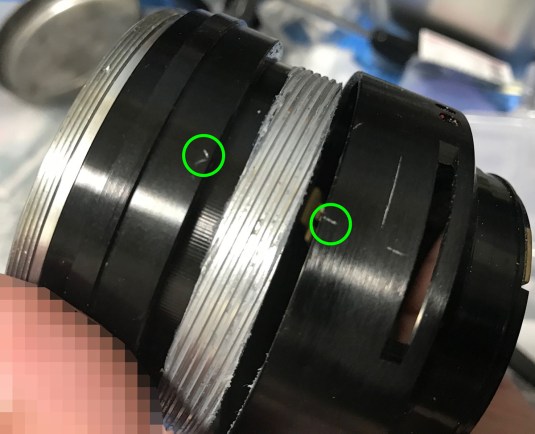
 Once the helicoid keys are gone, you can now turn the helicoids beyond their range since they aren’t constrained by the keys anymore. Collapse the lens as far as you can and then make a small diagonal scratch. When you put put your helicoids back, you should get the same result or something close to it. If you got it wrong then you’ll have to figure out how the helicoids should mate. Also observe the marks that you made and how they align this time around. Observation is a very important skill in this trade.
 To separate the helicoids, you will need to remove several things first. Before the anchor for the spring was removed, I made marks on its surrounding metal to note it’s position. You can remove it by unscrewing 2 screws.
 Here are the marks that I made. I will have to align it to these lines later, it’s very simple but very effective.
 Next, you will have to remove the helicoid stop. This prevents the helicoids from turning past their range and undoing themselves. Make sure to mark on end so you’ll know what edge should be facing where during reassembly. These are usually asymmetrical and are filed-to-fit in many cases.
 The screws for the helicoid stop are here. The brass prong you see below it is for the CRC unit. It couples to a small tab in the CRC unit’s housing. You don’t want to remove any of the screws here and just leave this thing alone. It’s a very precise adjustment point and if you messed this thing up you will end up with a lens that’s not optimally sharp because the CRC unit is not collimated and synced properly to the rest of the optics. Leave this be!
 Now that there’s nothing holding you back from separating the helicoids you can now go ahead with separating them. Make sure to mark where they separated because this is the same spot that they should mate. Many people get stuck in this process because they did not make a mark and end up with a lens that won’t focus properly. To avoid this mistake, read my article on working with helicoids. If you got stuck, it’s your fault and not mine.
 It’s now time to separate the inner helicoid from the central one. Again, make a mark to remind you where they separated.
That’s all for the lens barrel. All-in-all, it doesn’t have a lot of parts but it’s how they were all put-together than makes this lens complicated. Appreciate the high-quality and art of the beautifully-machined components because it’s as high as it gets as far as lenses made in this era is concerned.
Disassembly (Objective):
I am always nervous when working with glass this big! Thankfully, my lens is clean apart from some dust and evaporated oil on the rear part of the lens. The iris is also relatively clean so I don’t have to worry about it. I don’t want to unnecessarily open things and risk damaging anything accidentally. If your lens has oily iris or dirty front elements then I’m afraid that I won’t have the relevant information for you here in this article. You’ll want to check my other articles and find a similar lens and pray that the iris design is similar to this and then use that as a guide. This lens has CRC and it’s common for lenses of this type to acquire the dreaded oily iris problem or anything related to focusing due to the grease in the CRC unit going bad. It’s rare for this lens to come with a misaligned optics unless it has been tampered with or if the lens has suffered some form of damage. As far as working on the objective goes, just follow common sense and you should be fine. I will reiterate this again, this lens is not for the beginner to work with. Leave this to the pros!
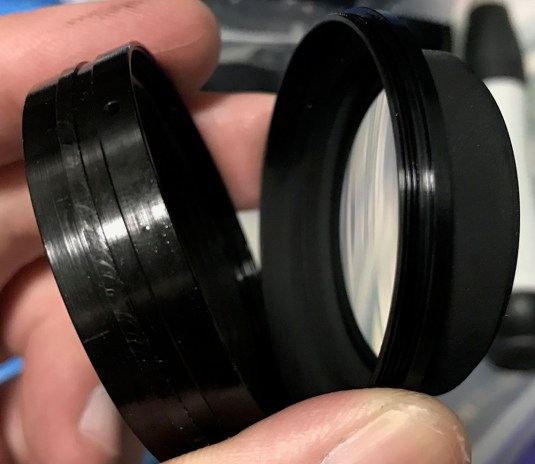
 The objective is made up of 2 parts, the front part which is the housing and the main part and the rear part which is the CRC unit. The CRC unit is synced to the helicoids and it will move in or out as you turn the focusing ring. It has a helicoid of its own and is a delicate and precise part of the lens. The objective itself is a very part of the lens because the glass is big and chunky. You must be extremely careful when handling this.
 I have no plans to work on the iris mechanism so to prevent me from contaminating it, I used some 3M Magic Tape to cover the pins of the iris blades that are exposed at the rear of the objective’s housing. This is required because I will flush the helicoid of the CRC unit and this will prevent anything from getting to these pins. Prevention is the key to this.
 The CRC unit has a set of helicoids and this usually goes bad as grease gets hard or dry-up and will result in a dry or seized lens. Bad grease will also migrate to the optics or the iris because of its proximity to these. I always clean this part as much as I can when I open a lens with CRC just to make sure this won’t happen to me in the near-future. Just like your usual helicoids, you will need to mark where the separate. Also make sure to take plenty of notes and measurements as soon as you take the objective out of the lens barrel. In the opening part of this article, I showed you how to do this and I’m just repeating it now to stress how important it is to take notes on this part of the lens.
 The CRC unit is now off. Clean both exposed glass surfaces very well because the grease has evaporated and settled on the surface of the glass. Even the best of grease will go bad eventually so it’s very important to clean anything that’s close to it. If you left it there it is one of the causes of haze on a lens and there are times when the damage is permanent.
 The CRC unit can be further disassembled just like this. Clean the threads of its helicoid very well to make sure that all of the old grease is gone before you apply fresh grease.
 Cleaning this element very well is important so I will have to remove it by unscrewing its retention ring away. It’s held by black paint and you will need to soften the paint first by using a little bit of solvent and reapplying it until the paint is soft enough. This may take several hours at most, trust me on this.
 The retention ring is now free. By the way, you will want to clean the helicoid here very well before you remove this ring. This is to make sure that you will not contaminate the glass accidentally with old grease when you handle it. Clean it with plenty of Q-tips and a lot of naphtha or lighter fluid. Clean it until it’s not oily and dirty. It’s normal to use about a dozen Q-tips on this part alone. Finish it off with some lens tissue until it’s very clean.
 Now that the retention ring is gone, you can now extract the glass with a lens sucker. Do not forget to put this back in the correct direction. Putting it back the wrong way will risk damaging the glass because the curvature is all wrong and the retention ring will stress it too much. You will also need to open the iris and get a Q-tip that’s saturated with some naphtha and clean the glass behind the iris. Mine was kind of dusty here, the dust may have come from the iris itself or from its openings. To be sure that you won’t scratch it accidentally, blow some air into it using a bulb blower. Never use compressed air on this because it’s too strong. The pressure alone is enough to warp or dislodge the iris blades!
That’s all for the objective. Apart from the CRC unit, everything seems to be conventional. If you need to work on the rest of the elements, make sure that you take not of how many turns you need to seat an element if it’s housed in a casing and also note its orientation. I will even go as far as measuring an element’s position before I remove it. I am saying all this because this lens needs to be collimated properly due to the very thin DOF and if it’s off by a bit then you may not get the desired result without a lens collimator. This lens is very sharp wide-open and you may not get critical sharpness if it’s put-back incorrectly.
Conclusion:
I really enjoyed working with this lens a lot. I learned many new things and I’m proud to say that I now own one of the legendary Nikkors that I have been hearing so much about in the past. The personal touch that I put into this lens just made it even more special for me. Before we call it quits, I will have to write about some other things that you should pay attention to. Read these carefully to save you some time if this is the first time that you have worked on this lens.
 See how beautifully-milled the parts of this lens is? It’s a masterpiece! I cleaned all of the parts very well until I am convinced that all of the old grime is gone. I then greased the helicoids with some light grease and make sure not to apply too much or too thin. If you have a big gloop near the helicoids after reassembly then this just means that you used too much grease and you will need to clean the excess up with a Q-tip. If your lens feels too light or dry then you will have to apply a little bit more. The helicoid on the CRC unit only needs a very thin film of grease to work. If you applied too much then the grease is going to migrate to your optics and iris in the future. I would err on the side of applying too little grease on the CRC unit’s helicoid than making the mistake of applying too much. This is very important so don’t get this wrong. It requires experience to determine how much grease you need to apply. Another reason for using a thinner type of grease is this lens has 2 sets of helicoids, the main ones and the one in the CRC unit. These all equal to 5 helicoids and the resistance of all these 5 helicoids working together as you turn your focusing ring matters. Applying a thick type of grease will just result in a very stiff lens to focus. This is a very important consideration when working with a lens with CRC. I will suggest that you read my other articles on lenses with CRC unit implemented such as the Nikkor-N 24mm f/2.8 Auto and the Micro-Nikkor 55mm f/2.8 Ai-S to make yourself familiar with this and not make the mistake of applying the wrong type of grease.
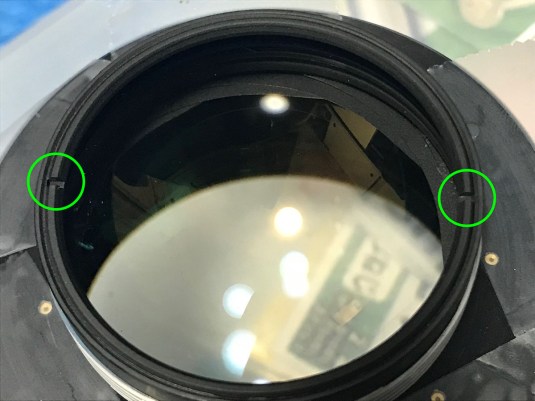
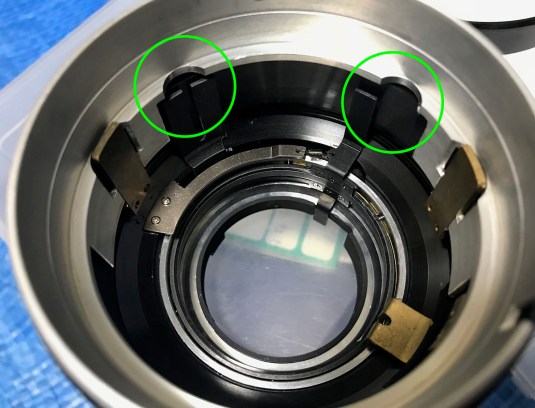 An important note when reassembling the lens. Before putting the objective back to the lens barrel, make sure that the aperture-coupling fork and the stop-down lever are both positioned properly. See the notches milled into the walls of the inner helicoid? They are there because the objective is so big and there’s not a lot of room inside the barrel so the engineers need to do this. The part that connects to these parts have to clear these holes in order for you to put objective back properly. It’s not impossible but it may take several attempts before you get the objective to sit inside properly.
 Adjust the lens’ infinity focusing by aligning the focusing ring to the focusing scale. Make sure that the front barrel is installed properly before you do this so you will not drop the objective to the floor! To read more about calibrating a lens’ focus, read my article in this link. This lens needs to be calibrated properly because the depth-of-field is very shallow so it’s crucial that you get this right. There’s no way around this but to do it the right way.
Did you enjoy this article? I hope that you have learned a thing or two because this lens is special and you don’t get to read a lot about the inner workings of this lens a lot on the internet. This lens has been requested to me for a long time by several people but I only got the time and chance to write about this now so I hope that this article will be a very welcome addition to our lens repair knowledge base. I am not sure if anybody else made a repair article on the internet for this lens but I am sure that this article will be useful to many. Again, for the 4th or 5th time. Never work on this lens if you don’t have the proper experience. Hire a pro to work on your lens and just use this article to judge his work. If he made a bad job then you will at least have some knowledge to call him out. Thanks to you, this blog is now beginning to become popular. It’s now becoming a legit venue for people who seek information on Nikkors when it comes to repair and reviews. Because of that, I am now expanding this site to include things that were not made by Nikon but is somewhat related to Nikon and her products or history. See you guys next time, please do not forget to share this blog to your friends and camera club members. Please do not get tired of supporting the blog and its community. Stay warm and healthy, Ric.
Help Support this Blog:
Maintaining this blog requires money to operate. If you think that this site has helped you or you want to show your support by helping with the upkeep of this site to help pay for hosting, etc then you can make a small contribution to my paypal.com account (richardHaw888@gmail.com). Money is not my prime motivation for this blog and I believe that I have enough to run this but you can help me make this site (and the companion facebook page) grow.
Leave me some tip?
Thank you very much for your continued support!
$2.00
Helping support this site will ensure that this will be kept going as long as I have the time and energy for this. I would appreciate it if you just leave out your name or details like your country and other information so that the donations will totally be anonymous it is at all possible. This is a labor of love and I intend to keep it that way for as long as I can. Ric.

Sep 24, 2018 @ 18:20:23
Hey Richard,
Just wanted to thank you for the detailed guidance. The only recommendation of yours I totally disregarded was this of not attempting the repair as a beginner: this is my first lens fixing ever and thank to this page (and the youtube timelapse of mikeno62) I somehow managed to be successful! So as long as one is a half-decent handyman and takes his/her time, it is feasible.
It took me about 6 hours to complete in two nights, I went very slow and meticulously marked and observed as recommended. Cleaning was done with liquid dish soap, an electric toothbrush and some 85% denatured alcohol, thorough rinsing and drying. Man, realigning these helicoids, even with separation spots marked was one tricky part and almost got me doubting!
For greasing I used Mobilith 100, a kind of aviation grade red grease (which I had around for my electric bike drive) with a viscosity of NLGI 2, probably too resistant for some, but I don’t mind. It still is a world of difference compared to how stiff it was before the repair….and if I get tired of that, now I know how to change it.
When I first took the objective block out I wasn’t really careful about the CRC unit alignment so I got worried re-reading your advice on that, but at the end I got the impression that because it needs to fit in the little brass fork tied to the aperture ring there wasn’t much room for mistake there, or did I miss something??
Anyhow, I was lucky enough to purchase that lens for only about 350$ because of the stiff focus ring and with this fun little project I now have a perfect copy of this piece of art worth twice as much (though I will never sell it anyway!). The little donation I just made to you as a token of appreciation is well deserved. I’m just worried you passed on the virus of looking for old glass fixing to me now.
Cheers!
Sep 25, 2018 @ 00:57:26
Thank you Romain!
You gave the same name as my ex-housemate from France!
You are lucky! Just use the correct drivers, that is probably one of the most important piece of advice.
Don’t put too much grease or it will end up in the iris one day.
Glad that the article helped but I still think you should practice with a cheaper one next time 😀
Thanks for helping keeping this blog alive! your contribution will be spent paying for developing the film and scanning them for the reviews!
Thank you again, Ric.
Mar 27, 2020 @ 11:49:48
Hi Richard. I found your instructions to be invaluable for cleaning and restoring my old lens. Thanks to your work, it now operates like new, and I was able to work out exactly how it works, which makes it an even greater tool. An awesome lens. Thanks again. Corey
May 24, 2021 @ 23:48:41
Thank you so much for this article as well as your working with helicoids video it helped greatly as I put this lens back together. This lens as you mentioned has much less ca than the newer 85 1.4 AFd. Thanks again Regards Gerry
Jan 21, 2023 @ 19:27:58
Thanks for much for the guide! I’m comparing this to your guide on setting focus at infinity and trying to determine the easiest way to adjust for this lens. Does it require removing the rubber grip and tape to adjust, or is there an easier method? My lens is slightly off and only focuses out to ~100 meters or so.
Nov 20, 2024 @ 22:26:45
Looking old lenses I realize that the optical design is very similar to the Dallmeyer Septac 50mm f1.5, basically they scaled it up and added the CRC (and the Dallmeyer is famous for his pictorial bokeh)