
Hello, everybody. It has been awhile since I last updated the blog. I have been really busy balancing my time between work, family, leisure and learning. This post is important so I will try my best to illustrate and explain how to manually convert pre-Ai Nikkor lenses so that you can use them with Ai capable bodies and how to make it look like it was done by a professional despite the fact that you are going to do this mostly with common house hold tools and materials.
Introduction:
One of the reasons why I shot Nikon is because they stuck with the F-mount while other companies abandoned their respective original mounts each time there is a major change in lens technology. While this is good from the engineering point of view, it severed the compatibility between their older lens lineup and what they currently have and making the said legacy lenses useless for modern digital bodies (until the advent of mirrorless cameras). I once owned a Canon T60 and sold that camera in 2004 for small change for the simple reason that Canon’s older FD mount at that time was considered unsellable in my homecity. Having this in mind, my next camera purchase was a Nikon D60 and I never looked back. Choosing Nikon gave me the ability to use a roster of lenses from the late 1950’s up to the ones that are currently in production.
While it is true that Nikon did not change the lens mount since it’s debut, it did underwent some changes through the years that will inhibit the use of some lenses on some bodies. One such change is the mount got a bit wider (by 1mm-1.5) in the 1960’s and the change to Ai technology. Dpreview has made a great article on the Nikon F-mount and the different iterations made to it and I suggest that you read it to understand the issues surrounding it. Our main concern in this blog post is how to trim away material from the aperture ring of a pre-Ai lens so that it will not interfere or damage the Ai indexing tab of some of the higher end Nikon bodies (image from D600.org).

There are lots of great pre-Ai/non-Ai lenses that can be had for cheap and most of them produce a characteristic look to them that has become so desirable in recent years because the advancement (20-40 years worth) in lens and coating technology made most recent lens releases to be so well corrected that they all seem to produce similar-looking output. While this is all good and well it does take away the “art” and “soul” of an image. Older lenses are less corrected but all of the flaws come together to produce an image with lots of “character” and you can even debate that it also has a certain unique quality that makes them look more pleasing and “natural”. Nikon tried to bring back the “look” of the older lenses by manufacturing the overpriced 58mm f/1.4G. I am a practical person and for the price of the previously mentioned lens you could buy around 5-10 vintage lenses so the choice was obvious. I do not mind manual focusing anyway and I prefer to do so in most case so this was not an issue to me.
ATTENTION:
Some Nikkor lenses, especially the older ones have a thin aperture ring and the aperture coupling tab of the camera runs over it and doesn’t even come into contact with the ring at all. Removing material from the aperture ring of these lenses doesn’t make any sense and I would consider it wasteful and it will ruin the resale of the lens.

Here is an example of that mod and for those kind of lenses that can be modified this way, please read this guide instead to help you determine wether you can get away with this or not. Remember, the steps outlined in this article is non-reversible so you will have to be very careful with your decision wether to make this lens kosher or not.
Before We Begin:
If this is the first attempt at opening a lens then I suggest that you read my previous posts regarding screws & drivers, grease and other things. Also read regarding the tools that you will need in order to fix your Nikkors.
I highly suggest that you read these primers before you begin (for beginners):
- Essential tools
- Best practices 1
- Best practices 2
- Best practices 3
- Ai conversion
- Working with Helicoids
Reading these primers should lessen the chance of ruining your lens if you are a beginner. Also before opening up any lens, always look for other people who have done so in Youtube and the internet. Information is scarce, vague and scattered (that is why I started this) but you can still find some information if you search carefully.
I highly recommend that you also read my working with helicoids post because this is very important and getting it wrong can ruin your day. If I can force you to read this, I would. It is that important!
For more advanced topics, you can read my fungus removal post as a start. This post has a lot of useful information here and there and it will be beneficial for you to read this.
Tools:
Before we begin, I would like to outline the tools needed for this project.
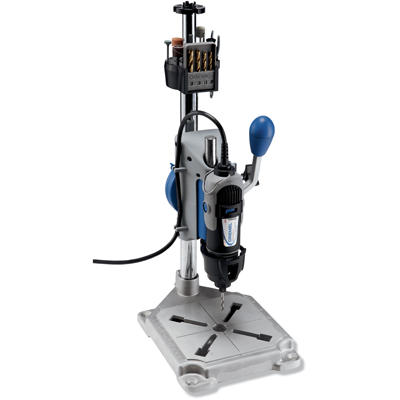
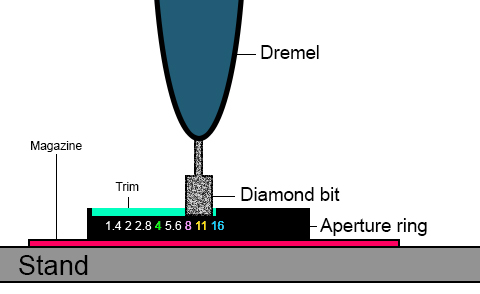
- Dremel with Workstation or any rotary tool in a stable stand.
- Cylindrical diamond bit (image from CNC Home).

- A magazine with glossy pages, newspaper or a book would do as well…need not be pornographic in nature.

- Black lacquer spray paint (bottled ones would do fine,too).

- Fine and coarse grit sandpaper or emery board. (image from Wikipedia)
 6. Flat metal file, ideally medium grit. (image from Google)
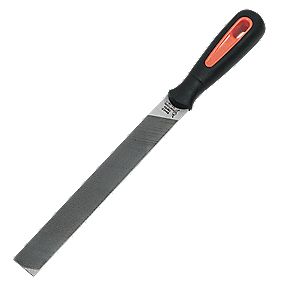 While the Dremel or rotary tool in a stand is preferred, a metal file will work just as well provided you have the time, patience and skill for working with one.
Overview:
There are two key points to carefully consider before we start trimming away material from the aperture ring.
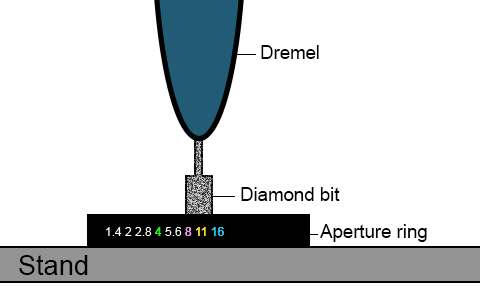
Point #1 is how deep the trim should be so that the aperture ring will not damage the Ai indexing tab of your Nikon body.

As shown in the illustration above that I made, all we want to do is trim away the part of the aperture ring so that it is level with the chrome bayonet mount. Trimming away too much will make it look unprofessional and shabby as well as potentially disabling the use of the aperture prongs (image from nicovandijk.net) if you also trimmed away the 2 screw holes for them to attach to the aperture ring.
Point #2 is how much material should we remove from the circumference of the aperture ring. This is actually more important than Point#1 because trimming away too much or too little will prevent your Nikon camera from reading the correct aperture set by the lens!
 How much you should grind away depends on which lens and what maximum aperture the lens has. From the picture above, A should correspond to your lens’ maximum aperture and B is just how much clearance you should have so that the Ai indexing tab will not get bent when you mount your lens when it is set at any given aperture. Pay attention to where A should be because trimming away too much will make your camera interpret your lens with a bigger aperture than it actually has so just trim a little at a time.
To determine where A should be, check online for an Ai, Ai-S or AF-D compatible lens and see where the slot starts in relation to the aperture numbers engraved in the aperture ring.
 As an example, an f/2.8 lens should have point A start at around the f/16 mark. You should trim 1mm before that point so that you carefully trim away the metal until you get to the correct point for A.
Important!
Got this important message from Roland Vink and he has this to say for the positioning of the hook:
- For any lens with max aperture f/2 or slower, the AI tab starts 4 2/3 stops down from the max aperture setting.
- For any lens f/1.8 or faster, the AI tab starts 5 stops down from the max aperture setting.
This means f/2 and f/1.8 lenses have the AI tab in the same location, even though there is a 1/3 stop difference between the two.
Fast lenses (for f/2 and faster) are probably indexed a little differently due to the way they interact with the camera meter so some compensation is required to provide consistent metering compared to slower lenses.
Below is a table with the lens max aperture (Left) and the position of the AI tab (Right):
4 2/3 stops down (Slower lenses):
- f5.6 (f22 +2/3)
- f4.5 (f22)
- f4.0 (f16 +2/3)
- f3.5 (f16 +1/3)
- f2.8 (f11 +2/3)
- f2.5 (f11 +1/3)
- f2.0 (f8 +2/3)
5 stops down (Fast lenses):
- f1.8 (f8 +2/3)
- f1.4 (f8)
- f1.2 (f5.6 +1/2)
Thanks to Roland for this very informative table that he shared to us over at nikongear.com. Use this table as a guide as to where you should position your tab/hook and trim away any excess plastic and test it to see if you are getting what you want. It will affect metering so you would want to be very careful.
Rotate your aperture ring until it reaches it’s smallest aperture (largest number) and try to place the lens into your camera without actually mounting it. This should give you an idea as to where B should be. You can trim further for B since it is just a clearance for the Ai tab, just make sure that you make it look neat and professional.
 (Test first to see where the aperture tab will touch your aperture ring when the lens is set to the minimum and maximum aperture. Remember where they contact each other and put that into consideration.)
Technique:
Fully understanding all the points discussed above, we can now commence with modifying the aperture ring. Before removing the aperture ring from the lens, first use a sharp tool to scribe lines on the side of the aperture ring that will less likely be seen. Scribe lines for A,B & how deep you want to remove (3 lines in all). Remove the aperture ring and get ready for the next step.
 First, place your aperture ring on top of your drill press, Dremel Workstation stand. Next, lower your Dremel tool with a diamond bit attached until it touches the aperture ring. Make sure that the tool and stand are secure and all screws are tight so that the whole setup will not wiggle.
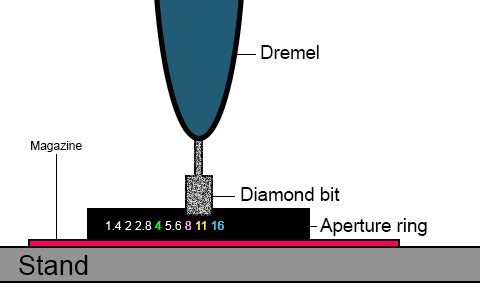 Second, place your magazine or cardboard under the aperture ring. The thickness of the pages should be the same as how deep you want to grind away from the aperture ring. If you want to remove 2mm from the aperture ring then the height of the pages should also be around 2mm.
 Third, start grinding a little bit at a time from the inside diameter of the aperture ring up until you get your desired result. Be sure to hold the aperture ring down because it may fly across the room if it slipped. Start by using a slow speed and settle to a speed where you are comfortable with.
As an addition to the 3 steps mentioned above, if you need to grind off material that is just too thick then you would want to divide the thickness of the magazine pages into two. For example, if you need to grind away a 2.5mm thick wall with a height of 2mm then you would want to grind it first with a 1mm thickness worth of magazine pages. Doing this will make your grinding easier and there will be less chance of mistakes or accidents that would dent or destroy your precious aperture ring. You may have to do this twice but at least you are sure that you are going to get it right.
After you are satisfied with the grinding, get some sandpaper or emery sticks and start sanding away any harsh edges or ugly grind marks left by the diamond bit. These will usually leave swirl marks if you are grinding at a low speed. The metal file can come in handy as well if you need to do some minor adjustments.
Before fitting it back to your lens, clean it up properly so that you do not leave any dirt or metal filing in the aperture ring. Next, place it back on the lens then attach the lens to your camera. Select the appropriate aperture number and focal length number under the “Non-CPU Lenses” in your camera’s setup menu and see if your lens is displaying the correct aperture in the LCD.
To find out if the aperture read out is correct, set the lens’ aperture to it’s widest, like f/1.4 for the 50mm f/1.4 lens. If you ground your aperture properly and set the camera’s Non-CPU Lens options properly, you should get “f/1.4” in your LCD. If it is showing f/2 then you will need to grind away around 1mm more from the aperture ring (point A) or until you get f/1.4 showing in the LCD.
When everything is all good and fine, remove the aperture ring again and mask it with scotch tape. Paint on the exposed alloy with a spray can or hand paint it with a brush. Let it dry for an hour or so and remove the tape before the paint completely dries out. Removing the tape too early and the paint will creep into places where you do not want it to be but removing the tape when it is already dry will leave harsh edges on the area that you have masked.
If you are concerned about leaving adhesive marks on your aperture ring, stick the tape to your jeans first before applying it to the aperture ring. This will cause the adhesive to weaken as the lint from your jeans will stick to it as well.

With the steps mentioned above, I got a result like the one in this picture. As I get familiar with the method I can consistently get cleaner and more precise results than this.
Practice makes perfect!
Conclusion:
The techniques that I just shared to you is by far the best one that I have tried that only requires minimal equipment. You can omit the Dremel if you do not have one or do not intend to purchase one in the near future as using the flat metal file will suffice.
Using the metal file can be difficult because it requires time and skill to grind an even looking slot in your aperture ring but it can be done (I have done it myself). You can start by using a coarse grit file and finally finish it off with a finer grit file.
Finally, please do not forget to use any protection for your eye because metal filings in your eyes is never fun! I would also like to emphasize that I do no hold responsibility for the results of following this guide as I assume that you have sufficient knowledge, common sense and experience with practical DIY skills.
Have fun and show me your results!
Help Support this Blog:
Maintaining this blog requires money to operate. If you think that this site has helped you or you want to show your support by helping with the upkeep of this site, you can simple make a small donation to my paypal.com account (richardHaw888@gmail.com). Money is not my prime motivation for this blog and I believe that I have enough to run this but you can help me make this site (and the companion facebook page) grow.
Helping support this site will ensure that this will be kept going as long as I have the time and energy for this. I would appreciate it if you just leave out your name or details like your country and other information so that the donations will totally be anonymous it is at all possible. This is a labor of love and I intend to keep it that way for as long as I can. Ric.

Jan 27, 2016 @ 03:07:46
That is a nice looking dremel with workstation. I hope i can get one for varying applications.
Jan 27, 2016 @ 03:12:09
Thanks! they are not perfect but it is better than not having anything
Aug 17, 2017 @ 01:54:26
I’m amazed, I must say. Seldom do I encounter a
blog that’s both educative and amusing, and let me tell you, you have hit the nail on the head.
The problem is something not enough people are speaking intelligently about.
I’m very happy I found this in my hunt for something concerning this.
Jan 15, 2018 @ 00:08:10
Thank you for being the only one I’ve found, in a whole day of looking, to give an intelligible explanation of how and why a non-AI lens can damage my D610 and D700 camera body. The pictures really helped.
Dec 01, 2021 @ 13:53:13
Hello,
Very informative, BUT. . . somewhat confusing diagrams showing the aperture ring and Dremel tool. Form the diagram, it appears that one would be grinding away the edge of the ring that is farthest from the camera body. Am I confused? Shouldn’t the numbers be shown upside down?
Dec 30, 2023 @ 18:56:40
Saturday Afternoon
December 30, 2023
Dear Mr. Haw;
It’s only in the past few months that I’ve become interested in the Nikon product line … having started with a Canon Ftb back in 1973 while overseas in the Air Force.
For the past few weeks I’ve been trying to understand the mechanical handshaking that goes on between a Nikon AI lens and the camera body that it’s connected to.
The thought has occurred to me that a non AI lens presents the same relative positional information (via the external prong) to the camera as the AI lens does via one of the cuts in its ‘skirt’ but the AI lens also discloses to the camera its maximum aperture via the second cut (step-transition) in its skirt. As best I can tell that is the limitation of a non AI lens … it can only present its relative f-stop to the camera but not its absolute f-stop capability.
If there was a way to tell an AI-equipped camera body a lens’s absolute f-stop limit then would not a non AI lens’s external prong provide the additional aperture information to allow the camera to work in full aperture (non stop-down) metering mode ?
Sincerely;
Paul N.
Garland, Texas